
As mentioned in the Requirements section, make sure you have a proper SMTP relay server (such as Postfix) setup so that the usual mail/mailx commands can work. Verify this by sending yourself a test e-mail with the following command on the server (make sure you replace [email protected] with your own e-mail address):
$ echo "This is a test email" | /bin/mail –s "Test email" [email protected]
Proceed further if it works and you receive an e-mail. Troubleshoot your SMTP server if the preceding command gives an error, or you don't receive an e-mail. Open /etc/icinga/objects/contacts.cfg, and replace icinga@localhost with your own e-mail address in following line:
email [email protected]
By default, notifications are disabled, so we need to enable them first. Open /etc/icinga/objects/localhost.cfg, and comment all occurrences of the following line:
notifications_enabled 0
The configuration files can be commented with a hash (#) or a semicolon (;):
# notification_enabled 0
After the installation step, we now have Icinga Core, the web UI, and the Nagios plugins in place. The configuration to monitor your localhost for common services such as ping check, system load, and disk space is already in place. Now, start the icinga service, and (re)start the apache web server to begin the monitoring and see what's happening in the web interface. This can be done using the following commands.
- For RedHat/CentOS/Fedora:
$ service icinga start
$ service httpd start
- For Ubuntu/Debian:
$ /etc/init.d/icinga start
$ /etc/init.d/apache2 start
Make sure that there were no errors reported for the preceding commands. You can now access the web interface at http://localhost/icinga. The default authentication credentials are username: icingaadmin and password: icingaadmin.
Tip
If you get a connection refused error, make sure that Apache was started properly. Also check if you have proper firewall settings in place to allow connections to the web server. This should not be a problem if you are already using the Apache server for other purposes.
The web server may give constant "Internal Server Errors", due to some distributions shipping with SELinux which is enabled by default. We need to disable it to have the web functioning properly.
$ setenforce 0
You can change the default password for the icingaadmin user to something of your choice with following command:
$ htpasswd /etc/icinga/passwd icingaadmin
This command will prompt for a new password to be set, type in the password and press Enter, this will save your password. Simply reload the web page, and it will ask for the new password.
You should have an interface similar to the following screenshot:
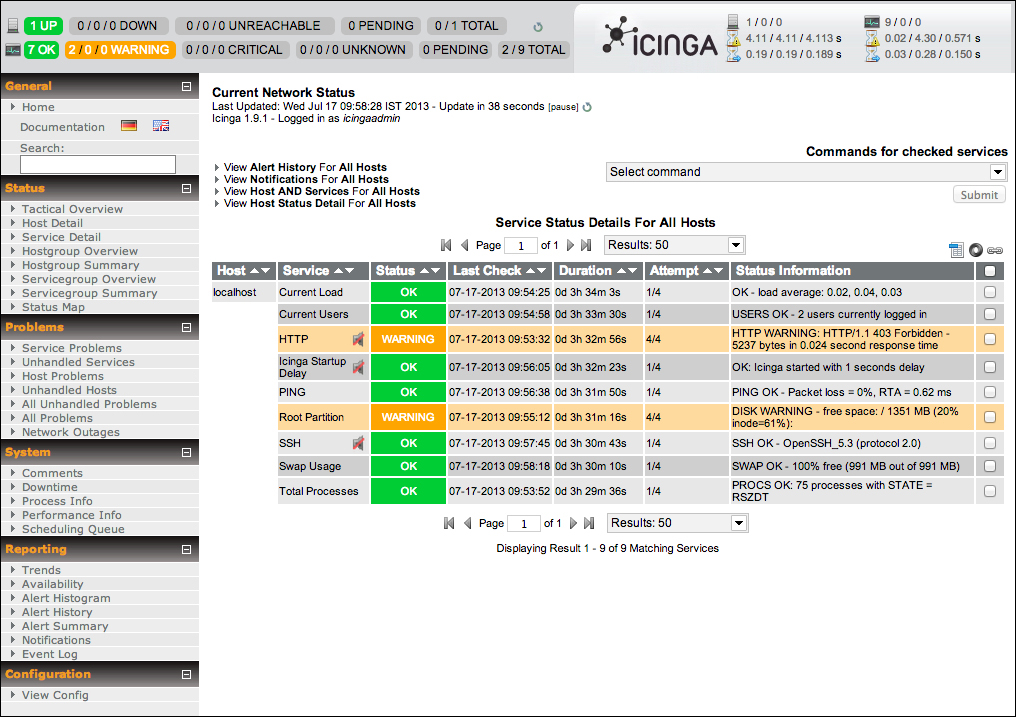
Icinga Web
Go to the Service Detail link on the left sidebar to see all the hosts (localhost only for now) and the services being monitored. It may take a few minutes for Icinga to schedule and complete the checking of all the services; after which, all of them will go green (given that they all pass, of course).
The next critical part is alerting. Note that we have a HTTP check for localhost (visible on the web interface). You can try to stop the web server and see if you get an e-mail notification. Note that it may take five to ten minutes before you get an e-mail alert. Icinga makes sure that the service is really down, by checking multiple times, before it sends out alerts. Also note that when we stop the web server, the web interface will remain inaccessible for that duration.
At this point, we're done with setting up a very basic monitoring server. The last section before we summarize the chapter provides some insight into the basic configuration options of Icinga, which typically applies to how Icinga operates rather than to what it monitors.