
To perceive in a better way how a Play application is built, we first need to understand a few of its architectural aspects.
Before we start exploring the code behind a typical sample Play application, let's visualize the architecture of the framework using a couple of diagrams. First, the overall diagram of the technology stack composed of Play is shown as follows:
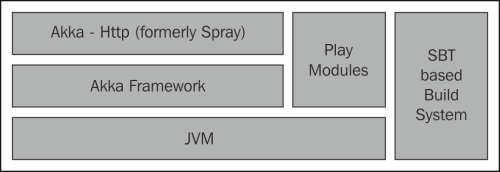
On top of the JVM resides the Akka Framework, a framework to manage concurrent operations based on the actor model, which we will cover later in Chapter 8, Essential Properties of Modern Applications – Asynchrony and Concurrency. While most web frameworks today still rely on servlet containers such as Tomcat or JBoss, the novelty of Play is to avoid following this model by focusing on making applications stateless when code can be hot swapped, that is, replaced at runtime. Although widely used and deployed in commercial environments, servlet containers suffer from additional overheads, such as the one thread per request problem, which can limit the scalability when handling large loads. For a developer, the time gained by avoiding the redeployment of a partial or full .ear or .war archive every time a change in the code is made can be significant.
On top of Akka resides a REST/HTTP integration layer, based on Spray (an open source toolkit to build REST/HTTP-based integration layers, now called Akka-Http), which produces and consumes embeddable REST services. This makes Play pertinent to the modern ways of writing web applications, where the backend and frontend communicate through HTTP REST services, exchanging mostly JSON/XML messages that can be rendered as HTML5 and, therefore, embrace the full power of frontend JavaScript frameworks.
Finally, to be able to integrate with many other technologies of all kinds, such as relational or NoSQL-based databases, security frameworks, social networks, cloud-based or Big Data solutions, a large list of Play plugins and modules are listed at http://www.playmodules.net.
Play follows the well-known MVC pattern, and the lifecycle of the web request can be seen as follows:
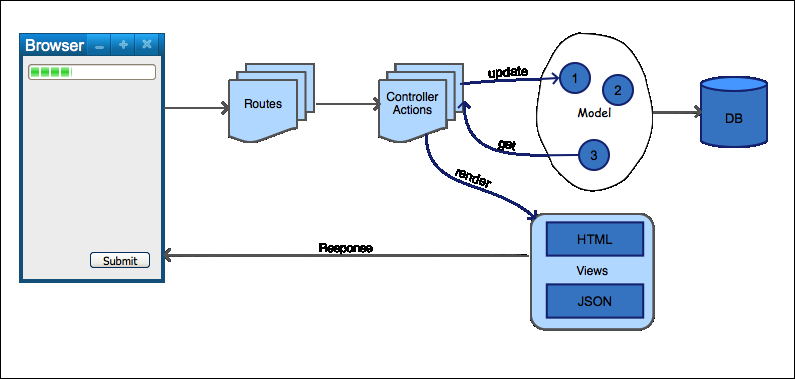
To go through the various steps of this workflow, we are going to explore a sample helloworld application that is part of the Play distribution. This helloworld application is a little more sophisticated and, therefore, more interesting than the pure getting started examples that we launched previously either via the Typesafe Activator or the plain > play new <project> command to create a project from scratch.
The helloworld application that we consider here can be found under the <play installation root>/samples/scala/helloworld directory (we have used the Play 2.2.1 distribution at the time of this writing).
As for any Play project within the distribution that already contains the sbteclipse plugin, we can directly generate Eclipse-related files by entering the following command in a command prompt (at the level of the project root directory):
> play eclipse
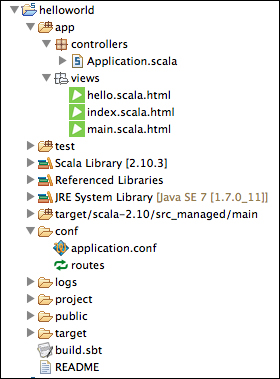
Note that as Play commands are just a thin layer on the top of SBT, we can reuse the same syntax, that is, > play eclipse rather than > sbt eclipse. Once these are imported into the IDE, you can see the general source layout of a Play application in the Package Explorer panel on the left-hand side, as shown in the following screenshot:
Let's first run the application to see what it looks like using the following command:
> play run
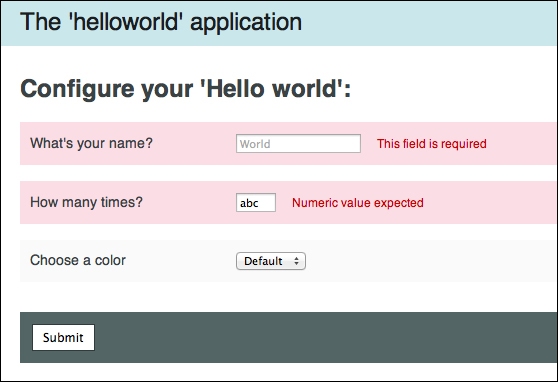
Open a browser at http://localhost:9000/ and you should see a small web form similar to the following screenshot:
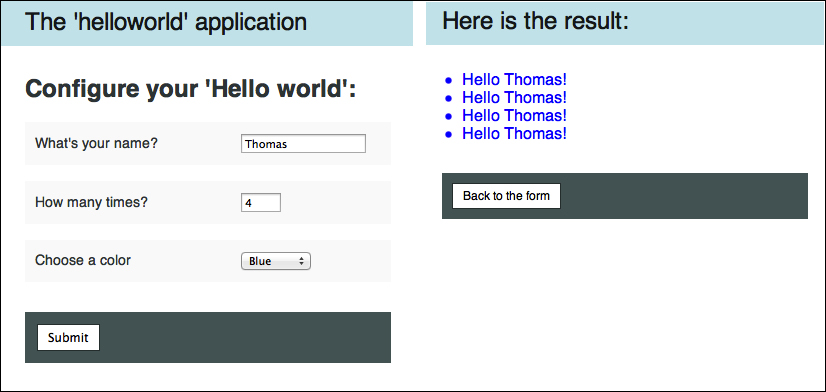
Enter the required information and click on Submit to verify that you get your name displayed a specified number of times.
The first step in the request flow appears in the conf/routes file, which is shown as follows:
# Routes
# This file defines all application routes (Higher priority routes first)
# ~~~~

# Home page
GET    /              controllers.Application.index

# Hello action
GET    /hello         controllers.Application.sayHello

# Map static resources from the /public folder to the /assets URL path
GET    /assets/*file  controllers.Assets.at(path="/public", file)
This is the place where we can define a mapping between HTTP request URLs and the controller code that needs to handle the request on the Play server, shown in the following format:
<REQUEST_TYPE(GET, POST...)> <URL_RELATIVE_PATH> <CONTROLLER_METHOD>
For instance, accessing the http://localhost:9000/hello URL in the browser matches the following route:
GET / controllers.Application.index
The index method, taking no arguments, will be called on the controller.Application.scala class.
This way of presenting the routing of the URLs to the controllers is different from the standard Java way found, for instance, in JAX-RS or Spring MVC, where each controller is annotated instead. In our opinion, the routing file approach gives us a clear overview of what the API supports, that is, the documentation, and it makes a Play application RESTful by default.
Even if it seems that the routes file is a configuration file, it is indeed compiled and any typo or reference to a nonexistent controller method will be quickly identified. Replace controllers.Application.index with controllers.Application.wrongmethod, save the file, and just click on the reload button in the browser (Ctrl + R). You should get the error nicely displayed in the browser, as seen in the following screenshot:
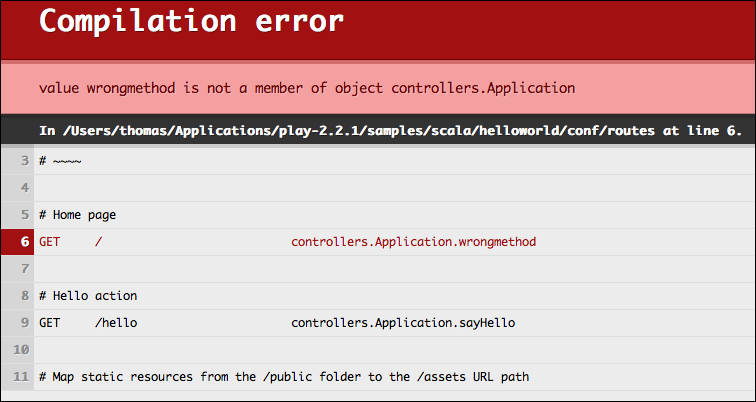
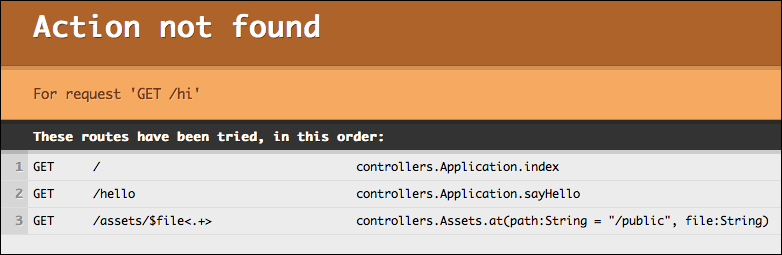
Notice how precise the error message is and how the exact failing line in the file is pointed out. This great way to display error messages on reloading the browser is one of the many features that makes programmers more productive. Similarly, even if there is no mapping error in the routes file, accessing a nonmapped URL that is under development (such as http://localhost:9000/hi) will display an error as well as the content of the routes file to show us which URLs are possible to invoke. This can be seen in the following screenshot:
Moving on, let's take a look at the Application class that receives and processes the GET request:
object Application extends Controller {
  /**
   * Describes the hello form.
   */
  val helloForm = Form(
    tuple(
      "name" -> nonEmptyText,
      "repeat" -> number(min = 1, max = 100),
      "color" -> optional(text)
    )
  )

  // -- Actions
  /**
   * Home page
   */
  def index = Action {
    Ok(html.index(helloForm))
  }

  /**
   * Handles the form submission.
   */
  def sayHello = Action { implicit request =>
    helloForm.bindFromRequest.fold(
      formWithErrors => BadRequest(html.index(formWithErrors)),
      {case (name, repeat, color) => Ok(html.hello(name, repeat.toInt, color))}
    )
  }
}
The index method performs the Action block, which is a function (Request[AnyContent] => Result), that takes the request and returns a Result object. The input parameter of the Request type is not shown here in the index method as it is implicitly passed and we are not using it in the body of the function; we could have written def index = Action { implicit request => instead, if we wanted to. The one liner Ok(html.index(helloForm)) means that the returned result should have an HTTP status equal to 200, that is, Ok, and consist of binding the html.index view to the helloForm model.
The model in this tiny example consists of a Form object defined in val earlier in the file. This can be seen as follows:
val helloForm = Form(
  tuple(
    "name" -> nonEmptyText,
    "repeat" -> number(min = 1, max = 100),
    "color" -> optional(text)
  )
)
Each parameter is described as a key -> value pair, where key is the name of the parameter and value is the result of a function applied to the parameter that will produce a play.api.data.Mapping object. Such mapping functions are very useful to be able to perform a validation on the form parameters. Here, the Form parameters are expressed as a tuple object, but we could create more complex objects such as case classes. The sample project named forms in the Play distribution contains examples of this more advanced way of handling validation. The fold method encountered in the sayHello method of the controller is a way to accumulate validation errors to be able to report all of these errors at once. Let's enter a few mistakes (such as leaving the name field blank or entering characters when numbers are required) when filling out the form to verify how errors are displayed. This can be seen in the following screenshot:
The template used to render the view is found under the views/index.scala.html file. This template is shown as follows:
@(helloForm: Form[(String,Int,Option[String])])
@import helper._

@main(title = "The 'helloworld' application") {

    <h1>Configure your 'Hello world':</h1>

    @form(action = routes.Application.sayHello, args = 'id -> "helloform") {
        @inputText(
            field = helloForm("name"),
            args = '_label -> "What's your name?", 'placeholder -> "World"
        )

        @inputText(
            field = helloForm("repeat"),
            args = '_label -> "How many times?", 'size -> 3, 'placeholder -> 10
        )

        @select(
            field = helloForm("color"),
            options = options(
                "" -> "Default",
                "red" -> "Red",
                "green" -> "Green",
                "blue" -> "Blue"
            ),
            args = '_label -> "Choose a color"
        )

        <p class="buttons">
            <input type="submit" id="submit">
        <p>
    }
}
One of the strengths of the Play template engine is that it is based on the Scala language itself. This is good news because we do not need to learn any new templating syntax; we can reuse the Scala constructs, without any additional integration. Moreover, the templates are compiled so that we get compile-time errors whenever we make a mistake; the errors will show up in the browser in the same way that they showed up for routes or the plain controller Scala code. This fast feedback can save us a lot of time compared to the more traditional techniques of using JSPs (JavaServer Pages) in Java web development.
The declarations at the top of the template contain the bound variables that will be populated throughout the template. The template markup can produce an output of any kind, such as HTML5, XML, or plain text. Templates can also include other templates.
In the previous example, the @main(title = "The 'helloworld' application"){ <block> ...} statement refers to the main.scala.html view file itself, displayed as follows:
@(title: String)(content: Html)

<!DOCTYPE html>
<html>
    <head>
        <title>@title</title>
        <link rel="stylesheet" media="screen" href="@routes.Assets.at("stylesheets/main.css")">
        <link rel="shortcut icon" type="image/png" href="@routes.Assets.at("images/favicon.png")">
        <script src="@routes.Assets.at("javascripts/jquery-1.6.4.min.js")" type="text/javascript"></script>
    </head>
    <body>
        <header>
            <a href="@routes.Application.index">@title</a>
        </header>

        <section>
            @content
        </section>
    </body>
</html>
As you can see, @(title: String)(content: Html) at the top of this file matches (title = "The 'helloworld' application"){ <block of template with code> ...} from the previous template. This is how templates call each other.
The @ sign indicates that the Scala code follows either directly with the name of a variable or a method to be invoked, or with a full block of code given between brackets, that is, @{ …code … }.
The response (views/hello.scala.html) template, once the web form has been submitted, contains a for loop to display the name field a number of times. This is shown as follows:
@(name: String, repeat: Int, color: Option[String])
@main("Here is the result:") {
    <ul style="color: @color.getOrElse("inherited")">
        @for(_ <- 1 to repeat) {
            <li>Hello @name!</li>
        }
    </ul>
    <p class="buttons">
        <a href="@routes.Application.index">Back to the form</a>
    </p>
}