
In this section, we are going to further experiment with Slick and Play by automatically creating a full Play application with basic CRUD functionality out of a relational database, including Models, Views, Controllers, as well as test data and configuration files such as Play routes.
Any web application that needs to connect to a database generally requires most of the CRUD functionality at least in the backend. Furthermore, being able to generate a default frontend can avoid you having to make one from scratch. In particular, a Play frontend consisting of HTML5 views is highly reusable since most of the display of columns, fields, buttons, and forms can be re-arranged with limited copy/paste in an HTML editor.
Let's apply this reverse engineering on the sample customer database from the NetBeans distribution that we have already covered in Chapter 2, Code Integration.
The generation of the Play app is done in two steps:
- Creation of a regular Play project.
- Usage of an external tool named
playcrudthat is itself a Play app and will generate all the required MVC and configuration files on top of the new Play project structure.
Having this approach in two steps has a better guarantee that the generated application will follow the latest changes in the Play distribution, in particular with regards to the evolution of the look and feel in Play that comes with every new release.
To get started with the playcrud utility, clone the project from GitHub by entering in a command terminal in a directory of your choice (assuming GIT is installed, visit http://git-scm.com/ if you don't have it already):
> git clone https://github.com/ThomasAlexandre/playcrud
This should create a directory, playcrud, with the content of the project being a regular Play application, including the plugin to generate an Eclipse project. We can therefore run the following commands:
> cd playcrud
> play eclipse
Then, import the project into Eclipse to better visualize what it consists of. The application is made of just one controller found in the Application.scala file located at samplecrudappcontrollers, and its corresponding view found in index.scala.html under samplecrudappviews. Only two routes are defined in the routes file under samplecrudconf:
# Home page
GET    /    controllers.Application.index

# CRUD action
GET    /crud    controllers.Application.generateAll
The first route will display a form in the browser where we can enter information about the database from which we want to create a Play app. The form is fairly straightforward to understand by looking at its template:
@(dbForm: Form[(String,String,String,String)])
@import helper._
@main(title = "The 'CRUD generator' application") {
    <h1>Enter Info about your existing database:</h1>
    @form(action = routes.Application.generateAll, args = 'id -> "dbform") {

        @select(
            field = dbForm("driver"),
            options = options(
                "com.mysql.jdbc.Driver" -> "MySQL",
                "org.postgresql.Driver" -> "PostgreSQL",
                "org.h2.Driver" -> "H2",
                "org.apache.derby.jdbc.ClientDriver" -> "Derby"
            ),
            args = '_label -> "Choose a DB"
        )

        @inputText(
            field = dbForm("dburl"),
            args = '_label -> "Database url", 'placeholder -> "jdbc:mysql://localhost:3306/slick"
        )

        @inputText(
            field = dbForm("username"),
            args = '_label -> "DB username", 'size -> 10, 'placeholder -> "root"
        )

        @inputText(
            field = dbForm("password"),
            args = '_label -> "DB password", 'size -> 10, 'placeholder -> "root"
        )
        <p class="buttons">
            <input type="submit" id="submit">
        <p>
    }
}
The second is the generateAll action performed once we submit the form that will create all files needed to execute the newly created Play app.
To be able to generate all files in the right place, we just need to edit one configuration property called baseDirectory, currently found in the Config.scala file in the utilities/ folder. This property specifies the root directory of the Play application we want to generate. Before we edit it, we can generate a blank Play project that the baseDirectory variable will refer to:
> cd ~/projects/internal (or any location of your choice)
> play new samplecrud
…
What is the application name? [samplecrud]
> [ENTER]
Which template do you want to use for this new application?
  1             - Create a simple Scala application
  2             - Create a simple Java application
> [Press 1]
Just to verify we have our blank Play application correctly created we can launch it with:
> cd samplecrud
> play run
Now, open the http://localhost:9000 URL in a web browser.
Now that we have our baseDirectory (~/projects/internal/samplecrud), we can add it to the Config.scala file. The other properties concerning the database are just default values; we do not need to edit them here since we will instead specify them when we fill out the HTML form while running the playcrud app.
In a new terminal window, let's execute the playcrud app by entering the following commands:
> cd <LOCATION_OF_PLAYCRUD_PROJECT_ROOT>
> play "run 9020" (or any other port than 9000)
Here, we need to choose a different port than 9000 as it is already taken by the blank application.
Now, point your web browser to the playcrud URL, http://localhost:9020/. You should get an HTML form where you can edit the properties of the source database to access for CRUD generation, as shown in the following screenshot (this database will only be read from):
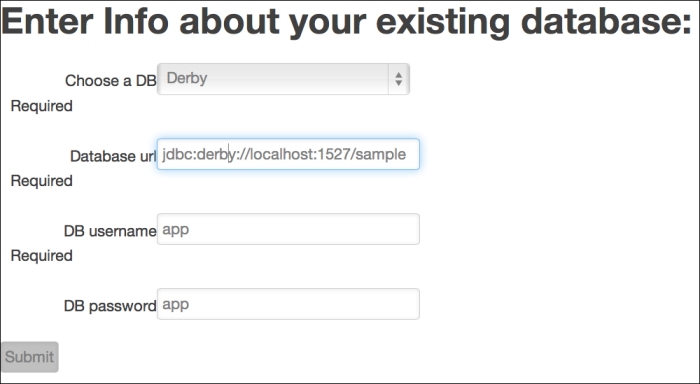
Submitting the form will most likely generate some logging output in the terminal console, and once it is done with the generation, the browser will be redirected to port 9000 to display the newly generated CRUD app. Since this is the first time we generate the app, it will fail because the build.sbt file of the generated app was updated and needs to be reloaded with some new dependencies.
To fix that, interrupt the currently running Play app by pressing Ctrl + D. Once it has stopped, simply re-launch it:
> play run
If everything goes well, you should be able to access http://localhost:9000 and see a list of clickable controllers corresponding to the entities that were generated from the database, including Product, Manufacturer, and Purchase Order.
Let's open one of them, for instance, the Manufacturer view, as shown in the following screenshot:
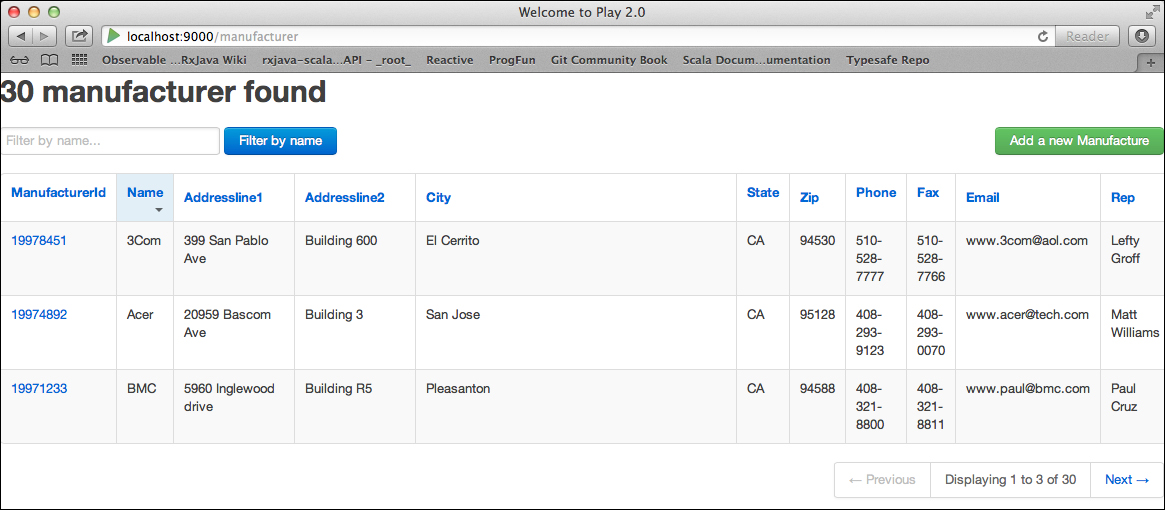
The resulting screen shows the READ part of the CRUD functionality by displaying a list of all the manufacturer rows from the database. The paging functionality is set to 3 by default, that is why only three out of the 30 available manufacturers are seen at once, but one can navigate to the other pages by clicking on the Previous and Next buttons. This default page size is editable in each individual controller (look for a pageSize val declaration), or can be modified in the controller template before code generation to update all controllers at once. Moreover, the headers of the HTML table are clickable to sort elements according to each specific column.
Clicking on the Add New Manufacturer button will invoke a new screen containing a form used to create a new entry in the database.
The generated app is running with an H2 in-memory database, by default, which is populated at startup with some test data. During generation, we have exported content from the source database into an XML file using the functionality of DBUnit, a JUnit-based framework in Java. DBUnit is useful when there is enough database data involved in your tests that you want to avoid mocking everything by producing XML sample files containing some data extracted from a real database instead. The exported test data is stored in testdata.xml under samplecrud est. When running the generated application, this file will be loaded by DBUnit in the onStart method of the Global.scala after the DB schema has been created.
To be able to persist the data to a real database and therefore avoid importing the XML file on every restart, we can replace the in-memory data by a real database on disk. For example, we can replace the database driver properties in the application.conf file under samplecrudconf with the following lines:
db.default.driver=org.h2.Driver
db.default.url="jdbc:h2:tcp://localhost/~/customerdb"
db.default.user=sa
db.default.password=""
The new database is built once we have restarted the play app:
> play run
Accessing the http://localhost:9000 URL in the browser will this time create the database schema on disk and populate test data as well. Since the database is persisted between restarts, from now on we have to comment out the ddl.create statement in Global.scala as well as the lines referring to the DBUnit import of testdata.xml.
A convenient feature of Play is that you can access the h2-browser to visualize the database content in your browser directly from SBT. This is true even if you are using most databases other than H2. Open a terminal window and navigate to the root of the generated project:
> play
> h2-browser
Connect to the database by filling out the connection properties as shown in the following screenshot:
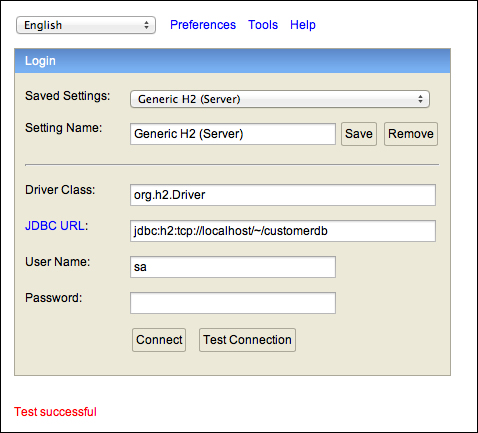
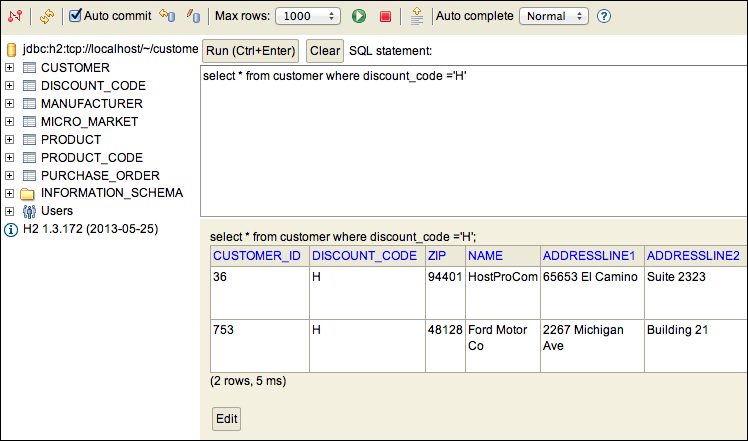
Assuming that clicking on the Test Connection button displayed Test successful as shown in the previous screenshot, we can visualize and send SQL queries to the customerdb database as shown in the following screenshot:
Every table from the source database leads to the generation of a number of artifacts:
- One
model, onecontroller, and severalviewclasses - A set of
routeentries inserted in theconf.routesfile, as shown in the following code for thePURCHASE_ORDERtable:# PurchaseOrder # # PurchaseOrder list (look at the default values for pagination parameters) GET /purchaseorder controllers.PurchaseOrderController.list(p:Int ?= 0, s:Int ?= 2, f ?= "") # Add purchaseorder GET /purchaseorder/new controllers.PurchaseOrderController.create POST /purchaseorder controllers.PurchaseOrderController.save # Edit existing purchaseorder GET /purchaseorder/:pk controllers.PurchaseOrderController.edit(pk:Int) POST /purchaseorder/:pk controllers.PurchaseOrderController.update(pk:Int) # Delete purchaseorder POST /purchaseorder/:pk/delete controllers.PurchaseOrderController.delete(pk:Int)
Models consist of the domain entities, each being defined in Slick by a combination of a case class representing a row together with a driver specific slick.driver.H2Driver.simple.Table of rows. We could have avoided the usage of the case class and directly written tuples of the involved columns as we have seen in the earlier Test12 example from the test-patterns-scala activator template, but encapsulating the columns in a case class is convenient for later use of pattern matching and usage in the views. The model class representing a PurchaseOrder entity is generated as follows:
package models

case class PurchaseOrderRow(orderNum : Option[Int], customerId : Int, productId : Int, quantity : Option[Int], shippingCost : Option[Int], salesDate : Option[Date], shippingDate : Option[Date], freightCompany : Option[String])

// Definition of the PurchaseOrder table
object PurchaseOrder extends Table[PurchaseOrderRow]("PURCHASE_ORDER") {

  def orderNum = column[Int]("ORDER_NUM", O.PrimaryKey)
  def customerId = column[Int]("CUSTOMER_ID")
  def productId = column[Int]("PRODUCT_ID")
  def quantity = column[Option[Int]]("QUANTITY")
  def shippingCost = column[Option[Int]]("SHIPPING_COST")
  def salesDate = column[Option[Date]]("SALES_DATE")
  def shippingDate = column[Option[Date]]("SHIPPING_DATE")
  def freightCompany = column[Option[String]]("FREIGHT_COMPANY")

  def * = orderNum.? ~ customerId ~ productId ~ quantity ~ shippingCost ~ salesDate ~ shippingDate ~ freightCompany <> (PurchaseOrderRow.apply _, PurchaseOrderRow.unapply _)

  def findAll(filter: String = "%") = {
    for {
      entity <- PurchaseOrder
      // if (entity.name like ("%" + filter))
    } yield entity
  }

  def findByPK(pk: Int) =
     for (
       entity <- PurchaseOrder if entity.orderNum === pk
     ) yield entity
     ...
The complete code for the PurchaseOrder entity as well as the definition of the CRUD methods of the corresponding PurchaseOrderController class is available for download on the Packt Publishing website and can also be reproduced by executing the scaffolding playcrud GitHub project on the CustomerDB sample database as we have explained in this section.
Finally, templates to generate views for a specific entity are gathered under the same directory named views.<entity_name>/ and consist of three files, list.scala.html, createForm.scala.html, and editForm.scala.html for the READ, CREATE, and UPDATE operations, respectively. They embed a mix of plain HTML5 markup together with minimal Scala code to loop over and display elements from the controller queries. Notice in the view the addition of a specific play.api.mvc.Flash implicit object: this useful feature of Play makes it possible to display some information in the resulting views to inform the user on the outcome of the performed actions. You can see in the controller that we referred to it via the statement Home.flashing {... }, where we display various information depending on pattern matching on the success or failure of an action.
In the current release of the experimental playcrud utility, a few limitations have been found, which are explained as follows:
- The
playcrudproject does not always work out of the box with all JDBC databases, especially since the mappings of some databases are customized. However, with only few changes, it is flexible enough to adapt to new mappings. Furthermore, it allows the generation of only a partial database by specifying the tables that need to be generated in an external file. To enable this functionality, we only need to add a file in ourplaycrudproject underconf/, name ittables, and write the table names of tables we want to include (one table name per row in the file, case insensitive). For instance, consider atablesfile that includes the following code:product purchaseorder manufacturer
This code will create MVC classes and HTML views for these three tables only.
- In case the mapping of a specific database datatype is not handled by
playcrud, you will get a compiler error in the browser window that will most likely refer to the missing datatype. The place in theplaycrudcode where mappings are handled is theutilities/DBUtil.scalaclass. A later release ofplaycrudshould make these configurations more flexible per database type and put them in external files, but for now they are embedded in the code. - The available code generation is inspired and built upon two already existing samples, one being the sample named
computer-databasepart of the Play Framework distribution (which exhibits a CRUD app but with Anorm as persistence, a SQL-based persistence framework, which is the default in Play), the other being a sample of usage of Slick done by Typesafe's Slick Team (theCoffeedatabase with itsSuppliersshowing one-to-many relationships). If you wish to generate the code differently, all the templates are found underviews/. Some of them mostly contain static data, such as the generation ofbuild.sbtbased on thebuild.scala.txttemplate. - In commercial applications, it is not unusual to encounter database tables that have more than 22 columns. Since we encapsulate these columns into case classes and Scala 2.10 has a restriction that limits the creation of a case class of more than 22 elements, it is not possible at the moment to generate Slick mappings exceeding that size. Hopefully, starting with Scala 2.11, this limitation should be lifted.