Now that you have a mobile robot, you want to coordinate all of its different abilities. Let's start with the simplest approach: using a single control program that can call other programs and enable all the capabilities.
You've already done this once. In Chapter 3, Providing Speech Input and Output, you edited the continuous.c code to allow it to call other programs to execute functionality. Here is the code that we used, found in the /home/ubuntu/pocketsphinx-0.8/programs/src/ directory.
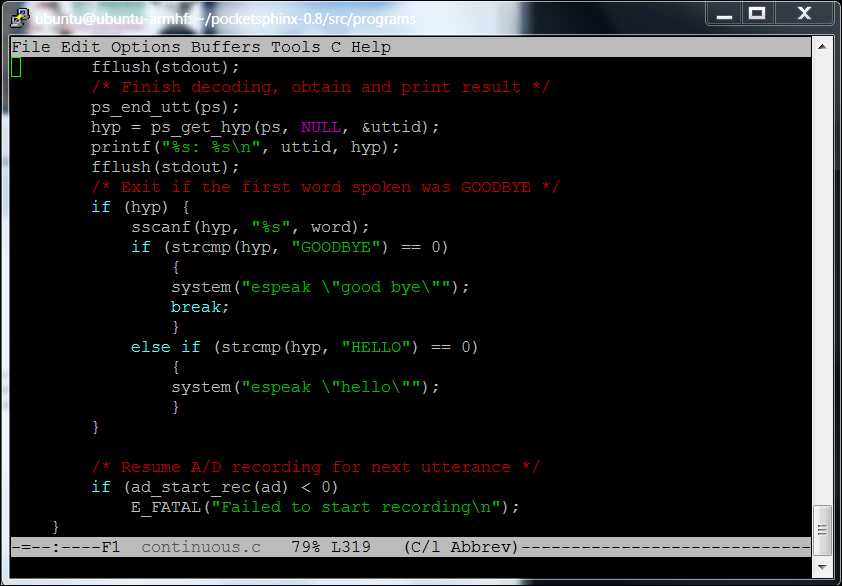
The functionality that is important to us is the system("espeak "good bye""");"""); line of code. When you use the system function call, the program actually calls a different program, in this case the espeak program, and passes it to the good bye parameter so that the words good and bye come out of the speaker.
Here is another example, this time from Chapter 5, Making the Unit Mobile – Controlling Wheeled Movement, when we wanted to command our robot to move:
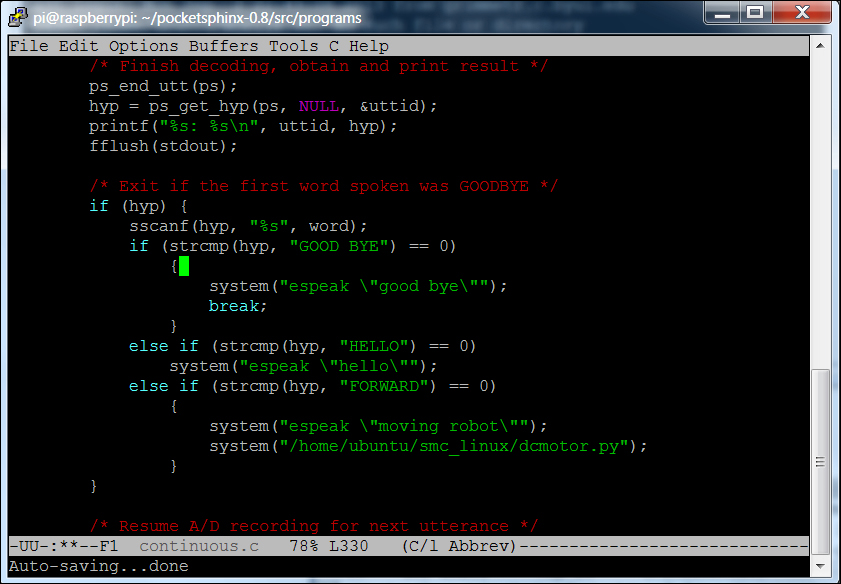
In this case, if you say forward to your robot, it will execute two programs. The first program you call is the espeak program with the parameter moving robot, and these words should then come out of the speaker on the robot. The second program is the dcmotor.py program, which should include the commands to move the robot forward.
I am now going to include an example in Python; it is my preferred language. I am going to use my wheeled robot:
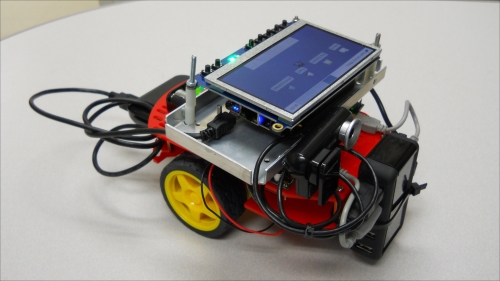
It has a camera and is also able to communicate via a speaker. I control it via my wireless keyboard. I want to add the functionality to follow a colored ball, turn as the ball goes right or left, and tell me when it is turning.
You also need to make sure all of your devices are available to your programs. To do this, you'll need to make sure your USB camera as well as the two DC motor controllers are connected. To connect the camera, follow the steps given in Chapter 4, Allowing the BeagleBone Black to See, in the section Connecting the USB Camera to the BeagleBone Black and viewing the Images. It works best to connect the USB camera first before connecting any other USB devices.
After the camera is up and running, check that both motor controllers are available to the system. To do this, type cd /home/ubuntu/scm_linux and then type .SmcCmd –list. You should see something like this:
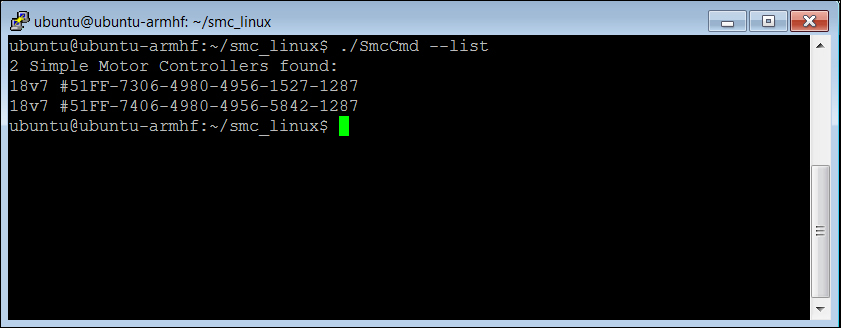
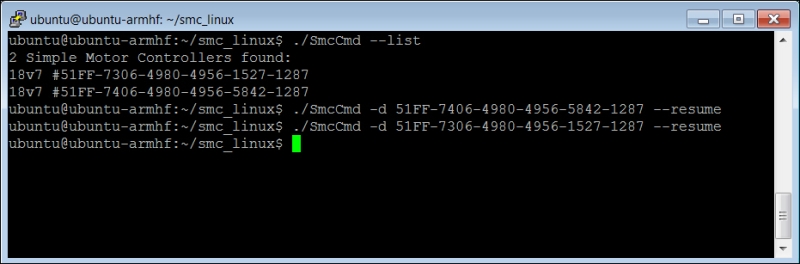
Both DC motor controllers are available. The numbers are the serial numbers of each individual motor; you can use them to send commands to just one motor controller. For example, you may need to send the resume command to the motors. To do this type as shown in the following screenshot:
I am going to involve three different programs. First, I am going to create a program that will find out if the ball is to the right or left. This is going to be my main control program. I am also going to create a program that moves my robot approximately 45 degrees to the right-hand side and another that moves my robot 45 degrees to the left-hand side. I am going to keep these very simple, and you might be tempted to just put them all in the same source file. But as the complexity of each of this program grows, it will make more sense for them to be separate, so this is a good starting point for your robotic code. Also, if you want to use the code in another project, or want to share the code, this sort of separation helps.
You are going to create three programs for this project. In order to keep this organized, I created a new directory in my home directory by typing mkdir robot in my home directory. I will now put all my files in this directory.
The next step is to create two files that can move your robot: one to the left-hand side, the other to the right-hand side. To do this, you will create two copies of the dcmotor.py code you created in Chapter 5, Making the Unit Mobile – Controlling Wheeled Movement, in your robot directory. If you have created that file in your home directory, type cp dcmotor.py ./robot/move_left.py cp dcmotor.py ./robot/move_right.py. Now you'll edit those, changing two numbers in the if __name__=="____=="__main__":__": command. Here is the edit to the move_left.py file:
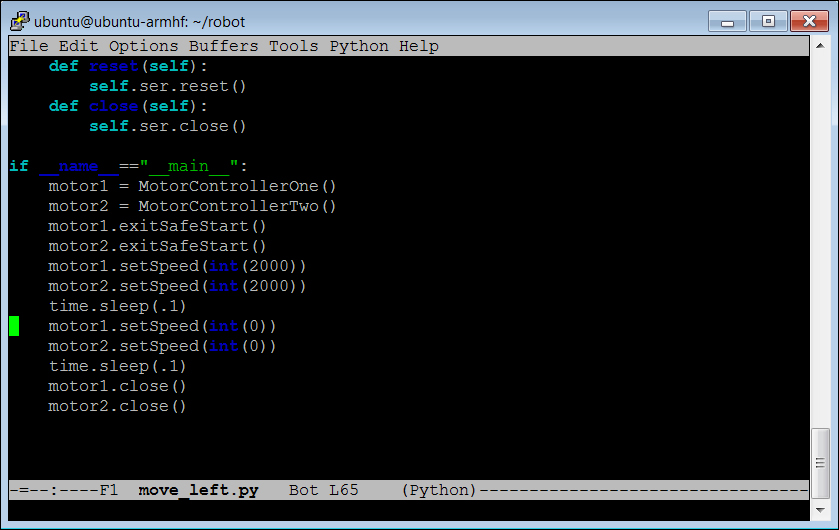
I'm not going to explain the details of the code; it is already detailed in Chapter 5, Making the Unit Mobile – Controlling Wheeled Movement. The numbers that I changed were the motorx.setSpeed numbers; using 2000 for both motors turns my robot to the left-hand side. Additionally, I changed the time.sleep numbers to .1, so the robot will respond more quickly. The .1 will delay the execution of the program by one-tenth of a second. You will also need to edit moveright.py similarly:
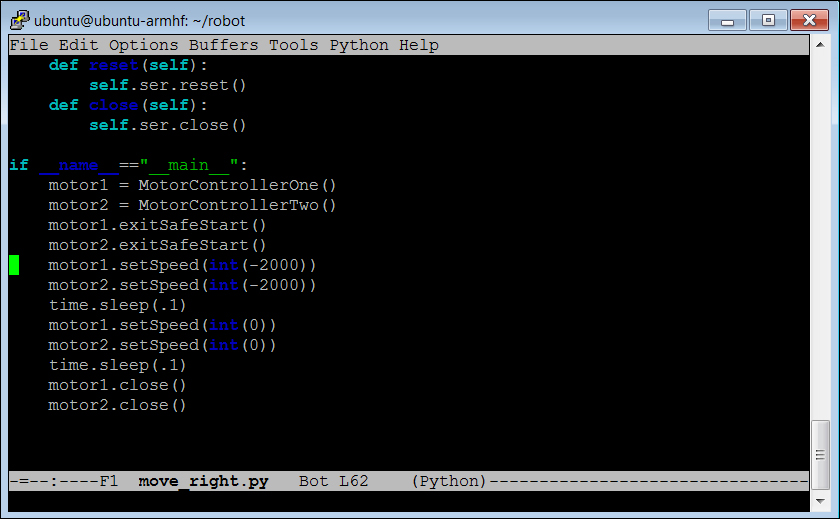
This time the setSpeed numbers are both -2000, turning my robot to the right-hand side.
The final step is to create our main control program. Let's call it follow.py. Open this file with your editor; if using Emacs type emacs follow.py:
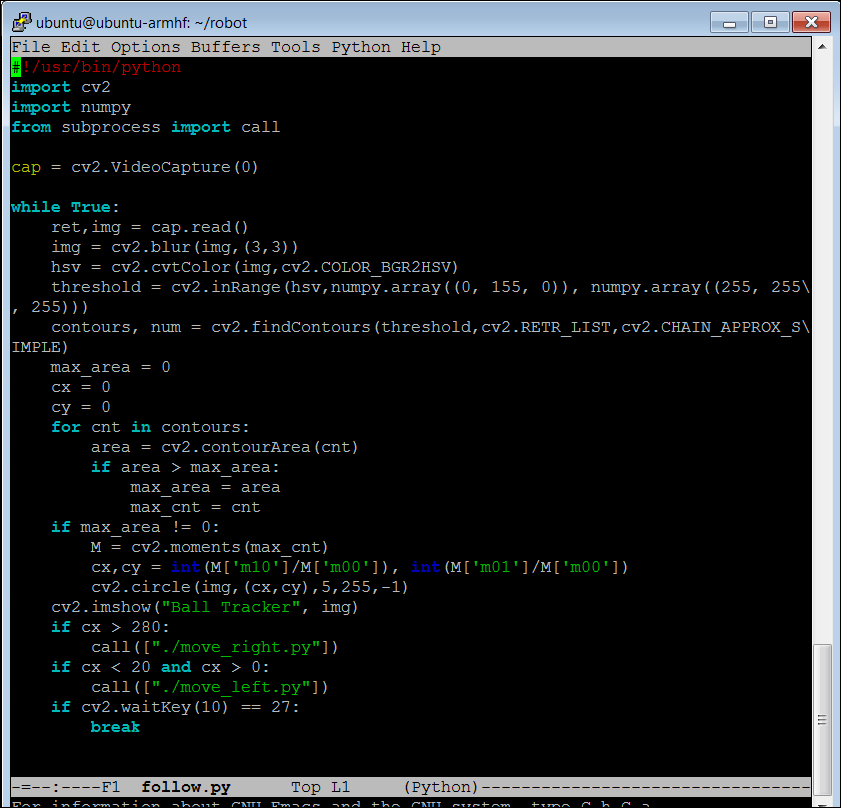
#!/usr/bin/python: The first line allows your program to be run outside the Python environment. You'll use that later when you want to execute your code usingautostartor using voice commands.import cv2: The next line imports the OpenCV library. You need this to process the images.import numpy: The next line imports the numpy library. This allows Python to work with the special arrays associated with OpenCV.from subprocess import call: This library will allow you to call other programs from within your program.cap = cv2.VideoCapture(0): This line associates our program with the webcam.while True:: Keep doing the loop; you'll only break if you press the Esc key in the image window.ret,img = cap.read(): This line captures an image and moves it into theimgarray.img = cv2.blur(img,(3,3)): This line smooths the images, getting rid of some of the random noise normally associated with images.hsv = cv2.cvtColor(img,cv2.COLOR_BGR2HSV): This OpenCV function converts the image file to the type you need to process it in a different color space.threshold = cv2.inRange(hsv,numpy.array((0, 155, 0)), numpy.array((255, 255,255))): This creates a new image matrix, only allowing colors in a specific range. The(0,155,0)to(255,255,255)values let only green objects (the middle value has to be greater than155) through to the threshold image.contours, num = cv2.findContours(threshold,cv2.RETR_LIST,cv2.CHAIN_APPROX_SIMPLE): This finds the contours in the black and white image. These are places where there is a set of the same colors.max_area = 0, cx = 0, cy = 0: These are all simple initializers.for cnt in contours:: This section finds the biggest blob of colors; hopefully this will be the ball.if max_area != 0:: If no set is found, we don't want to try to move to the propercx, andcypairs.M = cv2.moments(max_cnt): Find the moment (shape) associated with the biggest set of color.-
cx,cy = int(M['m10']/M['m00']), int(M['m01']/M['m00']): Find the center of the biggest set of color. cv2.circle(img,(cx,cy),5,255,-1): Draw a small blue circle on the image at the center of the biggest set of color.cv2.imshow("("Ball Tracker",", img): Show the image on the screen.if cx > 280:call(["./(["./move_right.py"])"]): If thexvalue of the biggest set of color is greater than280, then call themove_right.pyprogram in this directory. This will move the robot to the right-hand side.if cx < 20 and cx > 0:call(["./(["./move_left.py"])"]): If thexvalue of the biggest set of color is less than20, but greater than0, then call themove_left.pyprogram in this directory. This will move the robot to the left-hand side.if cv2.waitKey(10) == 27:: Stop the entire program if the Esc key is pressed while in the display window.
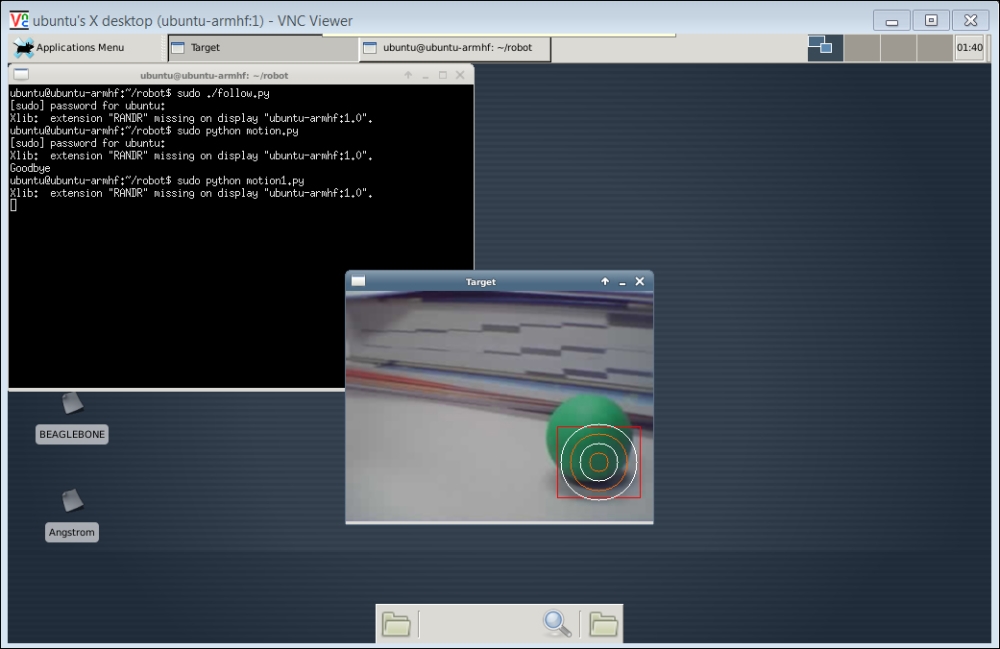
Now you can run the program by typing sudo ./follow.py. The following window should be displayed:
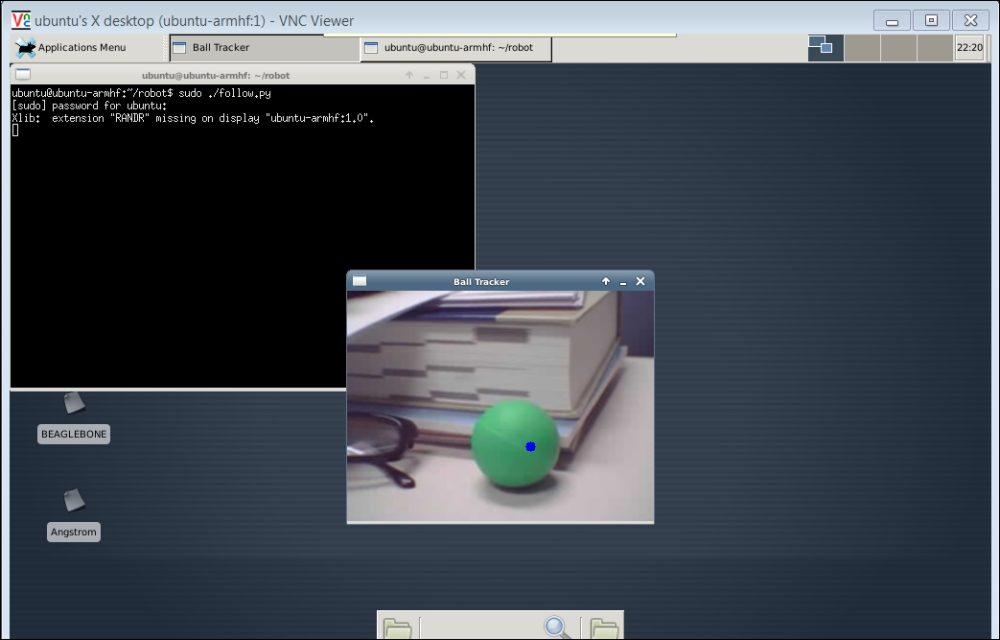
The blue dot indicates that the program is following the green ball. As the green ball is moved towards the left edge, the robot should also rotate slightly left. As the green ball is moved toward the right edge, the robot should also rotate slightly right.
You can change the color that you are looking for by changing the line threshold = cv2.inRange(hsv,numpy.array((0, 155, 0)), numpy.array((255, 255,255))).
Two other color possibilities are:
- Yellow:
threshold = cv2.inRange(hsv,numpy.array((20, 100, 100)), numpy.array((30, 255,255))) - Blue:
threshold = cv2.inRange(hsv,numpy.array((100, 100, 100)), numpy.array((120, 255,255)))
With OpenCV it is also possible to do motion detection. There are a couple of good tutorials on how to do this with OpenCV. One simple example is at http://www.steinm.com/blog/motion-detection-webcam-python-opencv-differential-images/. Another example, a bit more complex but more elegant, is at http://stackoverflow.com/questions/3374828/how-do-i-track-motion-using-opencv-in-python.
When using motion detection, if you roll the ball across the screen, you should see the following output on the webcam (using the code from the second tutorial):