
With the help of the level editor, we are able to create any number of levels with minimal effort. All we need to do is let the level designer visually create the levels and export the data in an usable format. Our game plays out in a single level specifically tailored to have the maximum space to move about with two color-coded bases at two distant places. I have shared the source for a demo in the Chapter 4 folder, which has the game scene basics implemented.
In this chapter, we will cover the following topics:
- Implementing our isometric level
- Placing soldiers, drawing paths for them, and making them follow the paths
- Learning about the path findings
- Using the
pathfinderclass to find a path and making the enemy soldiers to follow it - Implementing the game UI
- Implementing the whole turn-based game logic based on the game states
- Implementing very basic AI (Artificial Intelligence)
- Learning to create an alternative class for
MovieClipfor better control
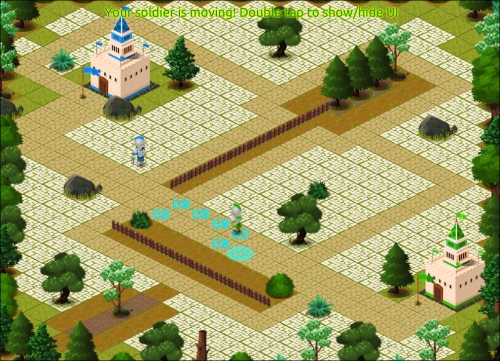
Using the level editor, I have exported the level data in the form of two arrays for ground and overlay tiles, and a dictionary for storing altered registration points.
The following screenshot shows the game level:
We won't be going through the whole code line by line as that would be a lot of code and much of it will be self-explanatory for AS3 developers. I will explain the concepts and the tricky parts of the code, and would expect all of you to go through the whole project as well as all the associated classes to understand the complete implementation.
Our game is named as Flag Defense. We will start with the implementation of the Web version of the game first and later on we will re-use the code to create a cross-platform version based on the Adobe AIR technology for iOS and Android.
Every game involves a bit of homework and planning before we even start the project. For our game, we need to decide on the resolution, size of the tile, size of the array, and the corresponding art. As you may have already seen the game art, you may have deduced our approach, but the process is always the other way around. We have decided to set a 1024 x 768 resolution for our web game. Deciding on a 2D top-down tile size of 40 in turn means an 80 x 40 tile in an isometric space.
Tip
Note that the isometric tile is two times wide and of the same height as the top-down tile. This can be tested by applying the isometric matrix transformation to a top-down tile as detailed in the Chapter 2, Going Isometric.
The preceding numbers mean that in order to create a level which fills the entire screen, we will need a very specific number of tiles.
Number of columns = 1024 / 80 = 12.8 ~= 13
Number of rows = 768 / 40 = 19.2 ~= 20
This means that we will need level data with arrays of 13 x 20.
We have also used an FPS of 30, which should be fine for a cross-platform project. The background color is chosen as #004400 for matching with the predominant grass color used for the ground tiles. This helps to fill up any minor gaps that may pop up due to the pixel variations in the tile sizes.
If you have not yet explored the project files that were provided, please do it now. The following is the list of the major classes used and their basic purposes:
IsoHelper: This is a helper class for easy isometric and Cartesian conversionResourceManager: This class loads assets using the defaultAssetManagerclassGameEvent: This is a custom event which helps in passing a custom parameterCustomAnimatedItem: This class is an alternative to theMovieClipclassCustomIsometricCharacter: This is a base class for isometric characters based on theCustomAnimatedItemclassGameStates: This class includes reference of all game statesEmbeddedAssets: This class embeds the texture sheet, Atlas XML, and TrueType fontMainLevel: This is the Starling root class which controls the gameplayWorldLayer: This class allowsRenderTexture-based game level implementationGroundLayer: This class allowsRenderTexture-based ground implementation
Other classes are self-explanatory as it is evident from their names and they mostly deal with the graphic elements used in the game. Please make sure that you look into the source code provided while going through the chapters from here on. It is advised to have the code open in your editor while you are reading for your easy reference.
The interesting point to note is that we have two different RenderTexture classes rather than one as used in earlier examples. The reason is a matter of efficiency and optimization. The ground layer seldom changes and won't need redrawing most of the time. The overlay layer will require a redraw each time some soldier moves. If we only had a single RenderTexture class, then we would need to redraw everything. Now with two RenderTexture classes, we can keep the whole ground layer on one and draw it onto the world layer while updating the scene. This saves us a lot of time as we don't need to draw the ground tile by tile again.
Drawing tiles onto a RenderTexture class is a heavy process and we would want to speed it up as much as possible as this may need to be done on every frame. The RenderTexture class has a convenience function named drawBundled(), which can speed things up, as explained in the following code, from the GroundLayer class's drawing function:
public function drawGround():void {
  this.drawBundled(function():void{
    for(var i:int = 0; i<rows; i++) {
      for(var j:int = 0; j<cols; j++) {
        img = new Image(assetsManager.getTexture(String(groundArray[i][j]).split(".")[0]));
        pt.x = j*tileWidth;
        pt.y = i*tileWidth;
        pt = IsoHelper.cartToIso(pt);
        img.x = pt.x + screenOffset.x;
        img.y = pt.y + screenOffset.y;
        this.draw(img);
      }
    }
  });
}
The variable pt is a global point instance. The same is applied in the WorldLayer class's render function which draws the ground layer, the soldiers, and the overlying tiles.