
For the usual purpose of displaying an animated item, we all can use the default Starling MovieClip class. For creating an animated character, we will need to make sure that we have a method to control the different animations it can perform. For example, our character needs the animations such as idle, walk, attack, die, idle with blue flag, idle with green flag, walk with blue flag, walk with green flag, attack with blue flag, and attack with green flag. All these animations are needed for four directions as our game is isometric. Considering that we have two types of characters, green and blue, this amounts to handling a lot of movie clips per character. So, I have created a new class which skips the use of MovieClip and uses the Image class instead.
CustomAnimatedItem is a core class which extends Starling's Image class and changes its texture according to the frame rate of the animation. It will dispatch an event when a particular animation is complete. We can call its update function per frame to advance the animation. It also has a provision to have multiple animations, which can be swapped at ease as we did with the CustomIsometricCharacter class. The following code explains the creation of a CustomAnimatedItem class:
var character:CustomAnimatedItem = new CustomAnimatedItem("char",70,50,4,0.05,true);The parameters are respectively image name, image width, image height, image name padding, frame delay, and whether to dispatch an event or not.
The images for each frame will follow a particular naming convention for this to work correctly; in the previous case it will be char0001.png or char0006.png as we have 4 as the zero padding value.
The CustomIsometricCharacter class extends the CustomAnimatedItem class to add much more functionality required for our isometric character. We will be following the given naming convention for our character's animation frame images:
newFrameName = baseImageName+"_"+state+"_"+facing+"_"+paddedString;
For example, for a character named Mario with a frame for walking down with a zero padding of 4, the naming will be mario_walk_down_0001.png. This enables us to easily switch the animations by changing the state property of the class and also change the facing direction by changing the facing property.
It has a 2D tile coordinate named paintPoint, which indicates the tile coordinates that it occupies in the 2D array. The corresponding Cartesian coordinate is paintPoint2D and the respective isometric coordinate is paintPointIso. The update method calculates paintPointIso as per the current paintPoint2D value. For moving the character, we just increment/decrement the paintPoint2D value and the rest will be calculated automatically via update. The following code shows how CustomIsometricCharacter is created and animated:
character = new CustomAnimatedCharacter("soldier",imageWidth,imageHeight,tileWidth,paintPoint,offsetPoint,padding,framedelay,dispatchEvent);
character.setLabels(new Array(["walk",6],["jump",4],["attack",8]));
character.state = "walk";
character.facing = "right";
character.gotoAndPlay(character.state+"_"+character.facing);
An interesting parameter is offsetPoint, which actually deals with the altering of a registration point as with the case of our overlay tiles. As noted earlier, you can also use the pivot property of a Starling image for the same implementation. These character images are usually bigger than our isometric tile dimensions and hence, drawing them at their default top-left corner registration point will make their legs fall out of the tile on which they are standing. So, we will need to offset the drawing point to make sure that the characters look right and feel that they are standing on their intended paintPoint tile.
Frame-based animations depend entirely on the frame rate of the Shockwave Flash document. For example, the following code is a frame-based animation of simple sidewise movement:
this.paintPoint2D.x += speed;
Each frame in the paintPoint2D value is incremented in x by the speed value. This has a severe flaw as the animation will slow down on a low-end machine where the frame rates are low. It may also speed up on a super fast machine as well. Such a feature is undesirable and sometimes may even break our game logic. Hence, it is always advisable to have time-based animations instead of frame-based ones. A time-based variant of the previous code can be found in the Soldier class, shown as follows:
this.paintPoint2D.x += speed*delta;
Here, delta is the time elapsed after the last frame. This value can either be manually found out by finding the difference of time between the frames or can be found from the passedTime property of EnterFrameEvent. Such time-based animations are not affected by the frame rates and will always run at the same speed.
Depth sorting is a very tricky thing to do with huge isometric worlds with multiple moving items. For all nonmoveable tiles, which include the ground tiles and overlay tiles, all we need to do is to sequentially draw them while parsing the respective level data arrays. Ground tiles can be omitted from depth considerations as they are always below the characters and overlay tiles. For overlay tiles, the ones with higher X or Y values are drawn on top of those with lower values. Drawing happens in increasing order of the rows and in each row it happens in increasing order of columns—a loop within a loop. This effectively handles the depth sorting automatically as we do not have any moving tiles.
But things get complicated when we consider the characters moving across the ground. Each character, being a CustomIsometricCharacter instance, will have a corresponding paintPoint, which is the tile coordinate it occupies. So, we can easily compare this value while going through the previous loop and draw them at the right instance. For example, a character on row 2 and column 4 can be drawn at exactly that position within the loop. After each move, the update method of the CustomIsometricCharacter class finds out the current paintPoint value, which essentially points to the row and the column it occupies. In our game, we have made sure that any tile with an overlay item is nonwalkable and hence, we do not have to think about two items occupying same row and column.
The only issue that you will face is with the larger tiles which occupy multiple rows. A tile occupying multiple columns but a single row will always render correctly. But the one which occupies multiple rows will break our automatic depth sorting when a moveable item occupies a tile next to it. This happens when the moveable item occupies the lower row than the big tile but the next column. The right end of the bigger tile which also occupies the same row as the moveable tile will be drawn on top of it. The reason being that the big tile exists at a higher row than the moveable tile and hence drawn later, thereby overlapping the moveable tile. This is wrong, as although the moveable tile is on a lower row, it still is in the next column which in real-world space means that it should be drawn on top of the big tile in that particular row. This can only be explained via a visual representation. See how the castle and the soldier are neighbors while the soldier is in a lower row than the castle. The castle gets drawn after the soldier and hence its right part overlaps the soldier.
Check the following figure to understand this issue:
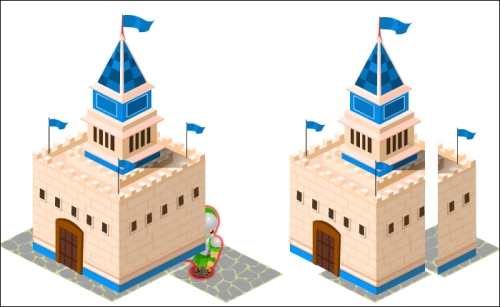
The solution is to split such tiles per row as displayed in the previous figure to the right. This essentially makes sure that each piece is rendered per row, and hence an item in a higher column is always drawn later and won't get masked.