
Our cross-platform game is now complete and is ready to be published. So, we will need a cross-platform framework which can track its penetration, log custom events, have a global leaderboard, and so on. There is no other technology which does all this and much more than Flox, which is specifically tailored to be cross-platform with a straightforward AS3 API. Flox comes from Gamua , the exceptional team behind Sparrow and Starling, who need no introduction to the audience of this book. In this chapter, we will go through all the features offered by Flox, such as:
- Global leaderboard
- User tracking
- Game analytics and custom event tracking
- Persistent game data
- Social integration
We will not be adding these features directly to the Flag Defense game, as many of these features are game-specific and will change for each game. I will demonstrate the code snippets for each so that you can easily integrate it into your game.
Flox is the one-stop server side for your games. It is a highly scalable backend that offers game-focused features such as analytics; logs and error introspections; leaderboards and high scores; comprehensive support for players; and a nifty entity system to store, load, and query your custom game data. It's a bit too much but that's not all, head over to http://gamua.com/flox/features/ to check all of the features.
There are no upfront costs, no monthly commitments, and no minimum fees. Sign up at http://gamua.com/flox/ and get 1000000 operations for free, as of the time of writing. The backend is designed to be highly flexible and scalable, and it lets you focus on what matters the most—your game!
Once you have signed up with Flox, you get access to your dashboard and the Flox documentation. You will need to download the Flox SWC and link it with your game project. You can explore the documentation provided at www.flox.cc/docs/getting-started, which is more than enough for all basic integration. Let me explain the integration in the following simple steps:
- Add your game using the Games menu at the top of the Flox site dashboard
- Initialize Flox using the following code:
Flox.init("INSERT_GAME_ID_HERE", "INSERT_GAME_KEY_HERE", gameVersion);
That's it! Flox is all set to do all the heavy lifting now. You will get your unique ID and an unique KEY while you register your game, as it is an unique game per user. This initialization already tracks the gameplay and creates a default guest user on each device that is used for playing your game.
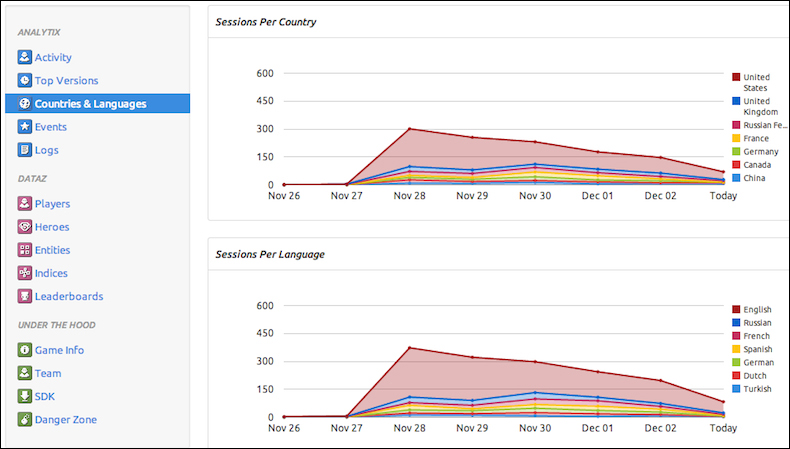
The basic analytics get logged when you initialize Flox, and it can be accessed via the Flox web interface.
For tracking further, we can let our game submit more data to Flox. The main issues faced while developing a cross-platform game is that there will be at least one device which may have a problem with our code. Such exceptions can be tracked and logged so that we can swiftly come up with a fix and update our game. The following code, which adds an event to the loaderInfo property of the Document class, does just that:
loaderInfo.uncaughtErrorEvents.addEventListener(UncaughtErrorEvent.UNCAUGHT_ERROR, function(event:UncaughtErrorEvent):void
  {
    Flox.logError(event.error, "Uncaught Error: " +event.error.message);
  }
);
The interesting part of the code is Flox.logError, which does the actual logging. This kind of logging should only be done for the most critical cases, as these get a special treatment apart from the other logging methods. There are other logging methods, as mentioned, which you can use for alternate purposes:
Flox.logInfo("Player lost a life.", player);
Flox.logWarning("Something fishy is going on!");
The Flox.logInfo method is your best friend for simple tracking, as it can replace the trace() method with the added benefit of being remote. Flox suggests you to keep logging within necessary limits and also keep an eye on the number of operations. Also, keeping the minimum number of messages saves the data charges for users using a mobile device.
Any event can be tracked using Flox; even the custom events can be tracked. Consider the following code:
Flox.logEvent("MyCustomEvent");This code will create a new event named MyCustomEvent and will start collecting statistical data about it. Flox will prepare this data in numbers and charts for you. You can even do more with the events by using the event properties. You'll encounter the event properties as a key/value mapping that you can submit to each event.
Flox.logEvent("LevelStarted", { TimeRemaining: 12.0, GameMode: "DeathMatch" });The Flox web interface will list all these activity logs for your perusal.
The following are the few things that you should keep in mind:
- If you submit a
Stringas an event value, Flox will show you the total number of times this string has been submitted to an event. - If you submit a
Numberas an event value, Flox will be able to do some math work with it and calculate several statistical values. You will be able to see the minimum, maximum, average, and sum of the values that have been submitted.
Using Flox, it is easy to add top-score leaderboards. You will need to first create a leaderboard for your game in the Leaderboards section in the Flox web interface. You will need to provide a name, ID, and the natural sort order for the leaderboard. The sort order indicates whether the highest value comes at the top or the lowest value. Usually, the scores need to have the highest value at the top, but the level time should have the lowest value at the top of the list. The leaderboard ID will be used to submit and retrieve the scores. The following are the scores that are submitted:
Flox.postScore(leaderboardid, score, "Johnny");
Similarly, it is easier to retrieve the submitted scores, as follows:
Flox.loadScores(leaderboardid, TimeScope.THIS_WEEK,
  function onComplete(scores:Array):void {
    trace("retrieved " + scores.length + " scores", scores);
  },
  function onError(error:String, cachedScores:Array):void {
    trace("error loading scores: " + error);
  }
);
We can use a FeathersUI-based interface to display the list of scores. The OnError function also returns the locally stored scores. Flox handles syncing of scores if your device is offline, and it uses applicationStorageDirectory for storing some temporary data. You are advised not to change anything there unless absolutely necessary.
It is always better to use a try-catch safety envelope when dealing with Internet interfaces, as is the case with the leaderboards. Things may go wrong due to various unpredictable reasons, and you do not want your game to crash due to the same.
A way in which the leaderboards can be made more interesting is to show the scores of the user's Facebook friends.
It becomes more important to track the user when you can play the game on any number of different devices. Every player who plays a Flox-enabled game has a player ID that is automatically assigned to him/her. This ID is unique to every player and even on every device, unless the user logs in using alternate credentials. You can access the player as follows:
var currentPlayer:Player = Player.current;
The player's ID is stored close to the player and in a way fitting for your game's medium (for example, a cookie or an AS3-shared object). This approach allows Flox to bind each request to a specific player, thus creating the basis for all possible player-related requests. The different user authentication methods are listed as follows:
- Guest authentication: The guests are the players who are bound to a single installation of your game.
- Key authentication: The players are identified by a single foreign
keystring that you are able to submit. Use this key to integrate your Flox players with a foreign authentication system, such as the iOS GameCenter or Facebook. These players can be recovered and they will have access to their game data from different devices, as long as thekeystring is the same. - E-mail authentication: The players who authenticated themselves using their e-mail address are recoverable as well. Also, this is the only form of authentication that allows the Flox backend to ensure that the player is the one he/she pretends to be.
The methods that we can use are as follows:
Player.login(...);
Player.loginWithKey(...);
Player.loginWithEmail(...);
Among these, it is easier to use the e-mail authentication method. In reality, people are not ready to trust you with any personal data unless you prove yourselves worthy of it. So, even asking for an e-mail in a modal window when the game launches, may not be a good idea. It is advised to do a thorough market study before you decide to add a player authentication.
By using the e-mail authentication, Flox can make sure that your players are who they pretend to be, by sending them confirmation e-mails. This basically works as follows:
- Your game offers an e-mail authentication and prompts for the player's e-mail address
- The player enters his/her e-mail address
- The Flox server sends a confirmation e-mail to this address
- The player clicks on the confirmation link present within the e-mail
- Flox confirms the game installation, and tells the player that they are now ready to play on
- The player switches back to your game and is now able to access his/her game data
The Flox e-mail authentication system automatically authenticates the first game installation that a player logs in to. This means that for each player, the first Flox.loginWithEmail(...) call will succeed without prompting a player to check his/her e-mail account. Subsequent logins on different devices/installations will send confirmation e-mails. You can use the following code to build your authentication system:
Player.loginWithEmail(email, function onLoginComplete(player:Player)
  {
    //Yay! The player is logged in.
  }, function onLoginFailed(error:String, confirmationEmailSent:Boolean)
  {
    if(confirmationEmailSent)
      {
        /*The player is playing on this device for the first time.
        He has been sent a confirmation email and needs to clickon the contained confirmation link.
        You should now tell the player that he needs to check hisemails, click the confirmation link and return to the game. When the player returns to your game, you should proceed by calling loginWithEmail() again. This time the device your player is playing on will be authorized and the login attempt will succeed. */
      } else {
        /*Darn! Something unexpected went wrong during the authentication attempt. You should probably log the error and tell your player about it. */
      }
  } );
Social integration with Facebook or other platforms can also help us to authenticate the player. We can use a social network's API to get the user's unique ID and use it to log in. We can later use the same to get his/her friends list and other social attributes. The basic sample code can be as follows:
var facebookID:String = ...;
var floxPlayerKey:String = createUID(16, facebookID);
Player.loginWithKey, floxPlayerKey,
    function onComplete(player:Player):void { ... },
    function onError(error:String):void { ... }
);Once you have your player authenticated, you can store data for later retrieval. This data is persistent and can be used as saved games, level progression, score, preferences, and so on. Such data is represented as an entity. You can think of entities as simple objects within your game code. Flox allows you to save those entities to the Cloud and retrieve them from there at anytime. You can have your own custom items which extends the Entity class as follows:
public class Savegame extends Entity {
  ...
}
var savegame:Savegame = new Savegame();
savegame.progress = 0.5;
savegame.saveQueued();
In order to allow Flox to save/load your custom objects, they need to be prepared to work with the Flox SDK. As you'll see, only minor changes will be necessary, such as:
- Your custom objects need to extend the
com.gamua.flox.Entityclass - Your custom objects need to have a default/no-argument constructor
- The properties of your custom objects need to be readable and writable, or have getters and setters
Behind the scenes, Flox will be engaged in saving the entity immediately, but you may decide to save it later, if necessary. The SDK adds the savegame object to its internal save-queue and processes the entities in the queue as soon as possible. This means that your savegame is usually saved in an instant, but may be saved at a later point in time if, for example, your player's device is offline at that very moment. If you need much more precise control over the saving mechanism, then you may use the following code:
var savegame:Savegame = new Savegame();
savegame.id = "my-savegame";
savegame.inGameProgress = 0.1;
  //save it to Flox
savegame.save( function onComplete(savegame:Savegame): void {
  //The savegame has been saved successfully.
}, function onError(error:String):void {
  //An error occurred while saving the entity: The device may be offline.
} );
It is advised to stick to the saveQueued() method, as it will handle the offline failure situation.
The saved entities can be retrieved by using the IDs assigned to them, as follows:
var savegameId:String = "my-savegame";
//load the associated entity of type Savegame Entity.load(Savegame, savegameId, function onComplete(savegame:Savegame):void {
  /*Everything worked just fine and an entity has been retrieved from the server. This savegame is never null. */
}, function onError(error:String, httpStatus:HttpStatus):void {
  if(httpStatus == HttpStatus.NOT_FOUND) {
  /*There's no entity on the server that matches the given type and ID. */
  } else {
  /*Something went wrong during the load operation: The player's device may be offline. */
  }
} );
Destroying an entity is similar to saving it, as it provides different approaches based on whether you have an entity instance or not. Consider the following code:
entity.destroyQueued();
//or
entity.destroy( function onComplete(entity:Entity):void {
  //Yay! Deleting the entity did succeed.
}, function onError(error:String):void {
  //Oops! Deleting the entity did fail.
} );
//or
Entity.destroyQueued(Savegame, "my-savegame");
//or
Entity.destroy(Savegame, "my-savegame", function onComplete():void {
  //Yay! Deleting the entity did succeed.
}, function onError(error:String):void {
  //Oops! Deleting the entity did fail.
} );Entities can be accessed using their IDs, but we can also use the query system to access them. Queries are used when it becomes necessary to find groups of entities that match a certain set of conditions without knowing their exact IDs. The following code gets all the stored entities of the type Human:
var query:Query = new Query(Human);
query.find( function onComplete(humans:Array):void {
  //The humans array contains all humans
}, function onError(error:String):void {
  //Something went wrong. The player's device may be offline.
} );
For limiting the amount of data fetched, it is advised to set limits to your query. Also, effective pagination can be done by using the offset value, as follows:
//set a reasonable limit to this query
query.limit = 20;
//set the offset for the paging
query.offset = 20;
Queries can do a lot more than this, and you can explore the documentation at www.flox.cc/docs/queries, to know more about them.
Flox uses a terminology called operations to track the use of service. Let us see how Flox operations work, and how you can calculate and estimate the number of operations that your games will require. The following paradigms apply:
- Buy server operations only when you need them: You do not have to commit to any form of monthly payments.
- Pay only for the amount of server operations you actually use: There are no minimum fees and no obligations.
- Operations never expire: Once you've bought operations, they'll reside at your account until they are put to use. If the need arises, they'll remain in your account forever.
Different server actions cost different amounts of operations. The following table visualizes the basic operations that you can execute on the Flox servers:
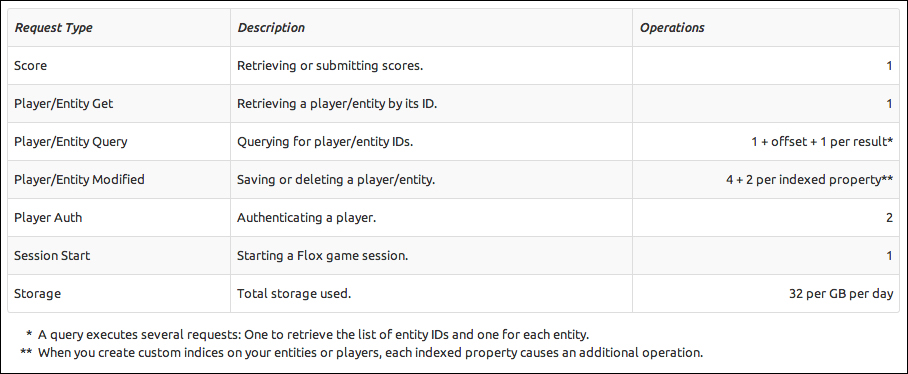
Using the web interface for browsing your game data (for example, analytics and log files) is free. The cost of operations and their count may vary in the near future. You can get the current status from this link: https://www.flox.cc/docs/operations