
Tile-based game design involves breaking the level art into pieces known as tiles, which will then be arranged in a two - dimensional grid to create complicated levels. These tiles will be of equal dimensions, which means that the height and width will be the same for all of the tiles. Care should be taken while designing such tiles, as they need to be joined with other tiles on all four sides without creating a discontinuity in the overall level graphic created by all of the tiles arranged in the grid. Hence, a tile will need to be seamless, and we should be able to stack an infinite number of them adjacent to each other in order to create complicated-level designs.
The major advantages of using such an approach are as follows:
- We can get rid of huge level sheets
- Only a limited number of tiles are capable of creating complicated levels
- Tile-based level and logic can be implemented using standard data structures
- Collision detection and path finding becomes comparatively easier
- Scrolling levels are much easier to implement
- Multiple views can be supported: top-down, side, and isometric
- Easy serializing and deserializing of level data
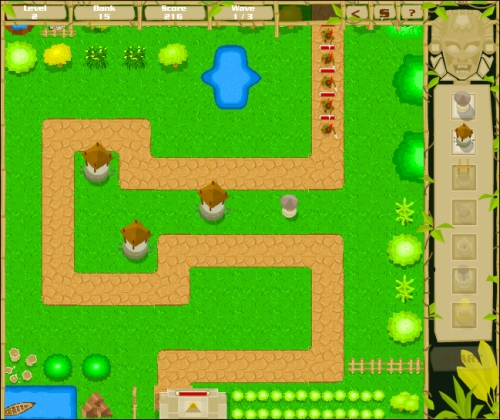
The following screenshot shows an example of a top-down tile-based game level:
Now let us see how a simple two-dimensional array can be used to facilitate the implementation of the tile-based design.
We have understood that a tile-based level is actually a two-dimensional grid of tiles. This can be logically represented using a 2D array, where the value stored at any index can be the ID of the corresponding tile. For example, say we have 20 different tiles making up a level of 50 x 50 tiles. This means that if an individual tile has dimensions A x B, then our level will be 50 x A wide and 50 x B high. Here, A is called tileWidth whereas B is called tileHeight. In many cases, both of these values will be the same resulting in square tiles. For representing these 20 different tiles, we can give them sequential IDs starting from 1 to 20. So, tile number 12 will have an ID as 12. This means that our 50 x 50 level data can be stored as a two-dimensional array with tile IDs as values.
The following example shows the level data for an 8 x 5 tile grid:
[[5,1,1,1,1,1,1,6],
[4,0,0,0,0,9,0,2],
[4,0,9,0,0,0,0,2],
[4,0,0,0,0,0,0,2],
[8,3,3,3,3,3,3,7]]
This level data can be explained as follows:
- ID 0: Sand tile, walkable
- ID 1, 2, 3, and 4: Wall tiles on top, right, bottom, and left respectively
- ID 5, 6, 7, and 8: Wall corner tile on top - left, top - right, bottom - right, and bottom - left respectively
- ID 9: Sand tile with a rock formation
Now that we have represented our level data using a 2D array, let us explore how we can formulate a relationship between the graphic in screen space and their corresponding value in the array. Let us consider a case where we have square tiles with the dimension tileWidth x tileWidth. Also, our level array is M x N, that is, M columns and N rows. We can place the first tile at [0][0] on screen at (0,0) as:
var tile:Image = Image.fromBitmap("tile"+levelData[0][0]+".png");
addChild(tile);
LevelData[0][0] will return the stored tile ID value and it is appended to the string to form the correct name of the tile. For example, if levelData[0][0] is 5, then the tile image name will be tile5.png. We create an image from this particular bitmap and add it to the scene. As this tile is situated at the top-left extreme, there is no need to explicitly set the x and y values because by default they will be 0, 0. For any other tile, we will need to set the x and y values for rightly positioning it on the screen.
Let us take the example of levelData[5][4], which means the tile is in the sixth column and fifth row. For placing this tile, we will need to offset the tile by relevant multiples of tileWidth.
var tile:Image = Image.fromBitmap("tile"+levelData[5][4]+".png");
addChild(tile);
tile.x=5*tileWidth;
tile.y=4*tileWidth;
So for any tile at an arbitrary position i, j in the array, the screen position will be x = i * tileWidth and y = j * tileWidth. This is the forward relationship from level array to screen space, but what about the reverse? How will we find the corresponding level array value from any particular point in screen space?
For this, we will need to reverse the preceding formula, that is, i = x / tileWidth and j = y / tileWidth. Care is to be taken to make sure that we only consider the integer value of the calculated values, as the original result will be a float with decimal values. This is because AS3 array indices are always integer values starting at a value of 0.
So let us write down our formulas for any level array at the position [i][j]:
x = offsetX + (i * tileWidth);
y = offsetY + (j * tileWidth);
Here, offsetX and offsetY are the space we need to leave out in the left and top respectively, because in normal cases our level art won't start at (0, 0) screen position, but at an arbitrary (offsetX, offsetY). Reversing the preceding formula, we calculate the level array indices as follows:
i = int ((x - offsetX) / tileWidth);
j = int ((y - offsetY) / tileWidth);
There can be times at which the calculated values may fall out of valid array dimensions and may need to be ignored. Now let us try implementing a simple top-down view array-based level using Starling, based on the knowledge we have acquired so far.