
The Application Descriptor XML file is of great importance when we go cross platform. We need to provide a unique ID, which is usually the package name of your game, which is com.csharks.flagdefense. We need to set the following:
<autoOrients>false</autoOrients>
<aspectRatio>landscape</aspectRatio>
<renderMode>direct</renderMode>
<fullScreen>true</fullScreen>
<visible>true</visible>
We need to point to all the needed icon files, which are different for Android, desktop, and iOS, a safer way being to populate them all. There are some scripts out there which can help us create all the icons needed. We will also need to add the ANE file details if we are using any.
A major change in the code is the replacement of RenderTextures with QuadBatch. When creating a game for all devices, we need to compromise a bit to handle the lack of resources in many of those devices. Some may lack enough memory, some may not have the graphics capabilities, and some may not be fast enough. Although our render texture-based approach works on most of the current generation devices, it has the tendency to fail with older generation devices, especially the iPad1. Most experts would advise you to quit supporting these old generation devices, but knowing how to support them will be key information. RenderTexture needs a lot of memory, and when it is marked as persistent, it uses up double the memory. We will run out of texture memory and will face a blank screen when running on a low-memory device.
QuadBatch
helps us add quads or images to a scene and render them really fast with exceptional performance. The catch is to have all the images read from the same texture that we already have. Thankfully, our game is architectured to make sure that this swap needs minimal work. All we need to do is:
- Add the
QuadBatchinstance to the stage, not image-based onRenderTexture - Instead of drawing to
RenderTexture, just add them to theQuadBatchof every frame
The following code demonstrates a slight change for groundlayer:
for(i=0; i<rows; i++){
for(j=0; j<cols; j++){
  str = groundArray[i][j];
  img.texture = assetsManager.getTexture(str.split(".")[0]);
  pt.x = j * tileWidth;
  pt.y = i * tileWidth;
  pt = IsoHelper.cartToIso(pt);
  img.x = pt.x + screenOffset.x;
  img.y = pt.y + screenOffset.y;
  glQb.addImage(img);
}
}In the web version, it is much easier to select any soldier and draw a path precisely using the mouse. But on a touch-based device, it becomes very hard to precisely do the same, especially with small-screen devices like phones. We need to alter our control mechanism a bit to handle this limitation. An alternate approach is to tap to select any soldier, and then tap on the screen to add a path depending on the screen position. For example, if we tap on the top of the screen, we will add a path upwards. We need to be liberal in finding the soldier when we tap as the touch point, which is a finger, is pretty inaccurate and big. So, we need to find if we have a soldier on the tapped tile and also on any tile around it.
For targeting iOS, we need to provide all the default launch images in the root folder. Currently they are:
Default-Landscape~ipad.png[email protected]Default.png[email protected][email protected]
For targeting all iOS devices, that is, to build a universal game, we need to have the following code in the infoAdditions section:
<key>UIDeviceFamily</key>
  <array>
    <string>1</string>
    <string>2</string>
  </array>
Also, the following code line is needed to enable retina display access:
<requestedDisplayResolution>high</requestedDisplayResolution>
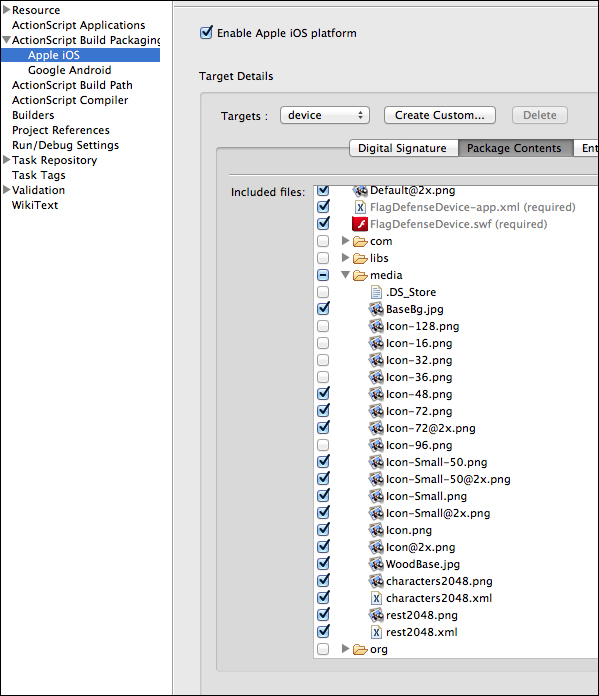
Also, it becomes essential to pack only those files that are needed for a particular platform in the project properties. The following screenshot shows the needed files for iOS, which can be identified from the tick marks to their left:
There are some different settings that you need to be aware of for targeting Android devices. We need to set the right permissions as follows:
<uses-permission android:name="android.permission.WRITE_EXTERNAL_STORAGE"/>
<uses-permission android:name="android.permission.DISABLE_KEYGUARD"/>
<uses-permission android:name="android.permission.WAKE_LOCK"/>
Without the write permission, our dynamic texture atlas won't be able to save the created atlas. Also, it is always good to enable storage in the SD card feature when available.
<manifest android:installLocation="preferExternal">
Another important addition to Android builds is handling the back button.
This is specific to Android devices only as iOS devices do not have a back button. The FlagDefenseDevice document class has a key listener added for this purpose. The following code is for the listener:
private function handleKeyDown(ev:flash.events.KeyboardEvent):void{
  switch(ev.keyCode){
  case Keyboard.ESCAPE://for testing on PC :)
  case Keyboard.BACK:
  ev.preventDefault();
  var gameRef:SceneManager=Starling.current.root as SceneManager;
  gameRef.tryBackPress();
  break;
  case Keyboard.MENU:
  ev.preventDefault();
  break;
  case Keyboard.SEARCH:
  ev.preventDefault();
  break;
  }
}
This calls the tryBackPress method in the SceneManager class, which in turn calls the backButtonPressed method in the running scene. All running scenes have this method as they all now extend the SkeletonScene class, which has this public method. Please notice that we are also capturing the menu and search keys found in some Android devices too as we do not have any use for those in a typical game.
All of these devices are primarily phones and there is a possibility of an incoming call at any time. So, we need to listen to any such event and pause our game at that time. This can also happen when another app comes to the foreground or when the user presses the home button. For this purpose, the FlagDefenseDevice class has listeners added.
NativeApplication.nativeApplication.addEventListener(flash.events.Event.ACTIVATE,
  function (e:flash.events.Event):void { starling.start(); ResourceManager.startMusic();});

NativeApplication.nativeApplication.addEventListener(flash.events.Event.DEACTIVATE,
  function (e:flash.events.Event):void { starling.stop();ResourceManager.stopMusic();});

NativeApplication.nativeApplication.systemIdleMode=SystemIdleMode.KEEP_AWAKE;
The DEACTIVATE event is triggered when the app goes to the background and the ACTIVATE event is triggered when it comes to the foreground. The final line of code is to keep the screen from turning off.