
Amazon S3 is a data storage service. It underpins many of today's high-profile web services. Despite offering enterprise-grade resilience, performance and features, it's pretty easy to start with. It is affordable, and it provides a simple API for automated access. It's one of many cloud services in the growing Amazon Web Services (AWS) portfolio.
APIs change every now and then, and they are usually given a version number so that we can track them. We'll be working with the current version of the S3 REST API, "2006-03-01".
You'll notice that in the S3 documentation and elsewhere, the S3 web API is referred to as a REST API. REST stands for Representational State Transfer, and it is a fairly academic conception of how HTTP should be used for APIs, originally presented by Roy Fielding in his PhD dissertation. Although the properties that an API should possess so as to be considered RESTful are quite specific, in practice pretty much any API that is based on HTTP is now slapped with the RESTful label. The S3 API is actually among the most RESTful high-profile APIs, because it appropriately uses a good range of the HTTP methods.
Note
If you want to read more about this topic, Roy Fielding's dissertation is available here http://ics.uci.edu/~fielding/pubs/dissertation, and one of the original books that promoted the concept, and is a great read, RESTful Web Services by Leonard Richardson and Sam Ruby, is now available for free download from this page http://restfulwebapis.org/rws.html.
Before we can access S3, we need to register with AWS. It is the norm for APIs to require registration before allowing access to their features. You can use either an existing Amazon account or create a new one at http://www.amazonaws.com. Although S3 is ultimately a paid-for service, if you are using AWS for the first time, then you will get a year's free trial for low-volume use. A year is plenty of time for finishing this chapter! The trial provides 5GB of free S3 storage.
Next, we need to discuss authentication, which is an important topic of discussion when using many web APIs. Most web APIs we use will specify a way for supplying authentication credentials that allow requests to be made to them, and typically every HTTP request we make must include authentication information.
APIs require this information for the following reasons:
- To ensure that others can't abuse your application's access permissions
- To apply per-application rate limiting
- To manage delegation of access rights, so that an application can act on the behalf of other users of a service or other services
- Collection of usage statistics
All of the AWS services use an HTTP request signing mechanism for authentication. To sign a request, we hash and sign unique data in an HTTP request using a cryptographic key, then add the signature to the request as a header. By recreating the signature on the server, AWS can ensure that the request has been sent by us, and that it doesn't get altered in transit.
The AWS signature generation process is currently on its 4th version, and an involved discussion would be needed to cover it, so we're going to employ a third-party library, that is, requests-aws4auth. This is a companion library for the Requests module that automatically handles signature generation for us. It's available at PyPi. So, install it on a command line with the help of pip:
$ pip install requests-aws4auth
Downloading/unpacking requests-aws4auth
...
To use authentication, we need to acquire some credentials.
We will set this up through the AWS Console. Once you've registered with AWS, log into the Console at https://console.aws.amazon.com.
Once you are logged in, you need to perform the steps shown here:
- Click on your name at the top-right, and then choose Security Credentials.
- Click on Users, which is on the list in the left-hand side of the screen, and then click on the Create New Users button at the top.
- Type in the username, and make sure that Generate an access key for each user has been checked, and then click on the Create button in the bottom right-hand corner.
You'll see a new page saying that the user has been created successfully. Click on the Download credentials button at the bottom right corner to download a CSV file, which contains the Access ID and Access Secret for this user. These are important because they will help in authenticating ourselves to the S3 API. Make sure that you store them securely, as they will allow full access to your S3 files.
Then, click on Close at the bottom of the screen, and click on the new user in the list that will appear, and then click on the Attach Policy button. A list of policy templates will appear. Scroll down this list and select the AmazonS3FullAccess policy, as shown in the following screenshot:
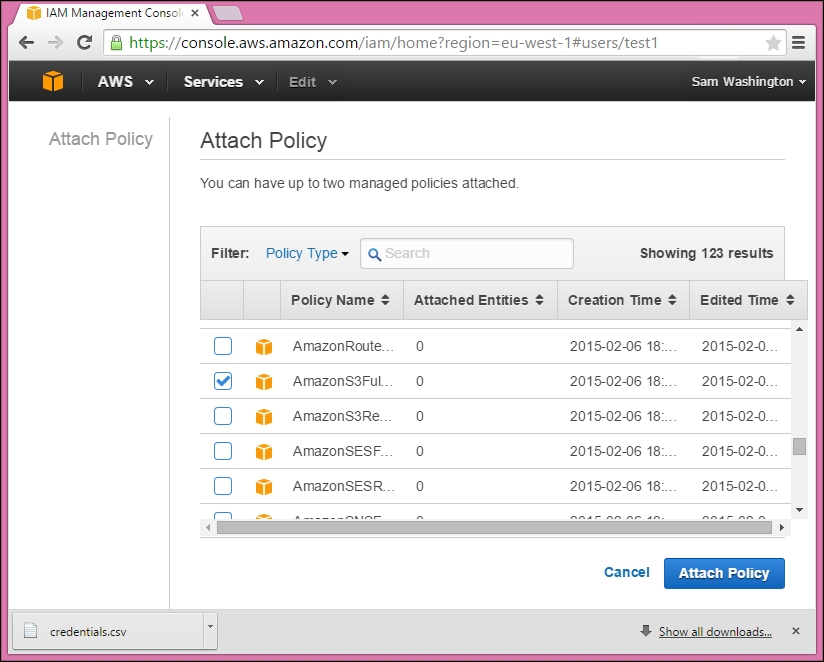
Finally, click on the Attach Policy button at the bottom right-hand side when it appears. Now, our user has full access to the S3 service.
AWS has datacenters around the world, so when we activate a service in AWS we pick the region we want it to live in. There is a list of regions for S3 at http://docs.aws.amazon.com/general/latest/gr/rande.html#s3_region.
It's best to choose a region that is closest to the users who will be using the service. For now, you'll be the only user, so just decide on the region that is closest to you for our first S3 tests.
S3 organizes the data that we store in it using two concepts: buckets and objects. An object is the equivalent of a file, that is, a blob of data with a name, and a bucket is equivalent to a directory. The only difference between buckets and directories is that buckets cannot contain other buckets.
Every bucket has its own URL of the form:
http://<bucketname>.s3-<region>.amazonaws.com.
In the URL, <bucketname> is the name of the bucket and <region> is the AWS region where the bucket is present, for example eu-west-1. The bucket name and region are set when we create the bucket.
Bucket names are shared globally among all S3 users, and so they must be unique. If you own a domain, then a subdomain of that will make an appropriate bucket name. You could also use your email address by replacing the @ symbol with a hyphen or underscore.
Objects are named when we first upload them. We access objects by adding the object name to the end of the bucket's URL as a path. For example, if we have a bucket called mybucket.example.com in the eu-west-1 region containing the object cheeseshop.txt, then we can access it by using the URL http://mybucket.example.com.s3-eu-west-1.amazonaws.com/cheeseshop.txt.
Let's create our first bucket through the AWS Console. We can perform most of the operations that the API exposes manually through this web interface, and it's a good way of checking that our API client is performing the desired tasks:
- Log into the Console at https://console.aws.amazon.com.
- Go to the S3 service. You will see a page, which will prompt you to create a bucket.
- Click on the Create Bucket button.
- Enter a bucket name, pick a region, and then click on Create.
- You will be taken to the bucket list, and you will be able to see your bucket.
Okay, enough preparation, let's get to coding. For the rest of this section on S3, we will be writing a small command line client that will enable us to interact with the service. We will create buckets, and then upload and download files.
First we'll set up our command line interpreter and initialize the authentication. Create a file called s3_client.py and save the following code block in it:
import sys
import requests
import requests_aws4auth as aws4auth
import xml.etree.ElementTree as ET
import xml.dom.minidom as minidom

access_id = '<ACCESS ID>'
access_key = '<ACCESS KEY>'
region = '<REGION>'
endpoint = 's3-{}.amazonaws.com'.format(region)
auth = aws4auth.AWS4Auth(access_id, access_key, region, 's3')
ns = 'http://s3.amazonaws.com/doc/2006-03-01/'

def xml_pprint(xml_string):
    print(minidom.parseString(xml_string).toprettyxml())

def create_bucket(bucket):
    print('Bucket name: {}'.format(bucket))

if __name__ == '__main__':
    cmd, *args = sys.argv[1:]
    globals()[cmd](*args)
Tip
Downloading the example code
You can download the example code files for all Packt books you have purchased from your account at http://www.packtpub.com. If you purchased this book elsewhere, you can visit http://www.packtpub.com/support and register to have the files e-mailed directly to you.
You'll need to replace <ACCESS ID> and <ACCESS KEY> with the values from the credentials CSV that we downloaded earlier, and <REGION> with the AWS region of your choice.
So, what are we doing here? Well, first we set up our endpoint. An endpoint is a general term for a URL which is used to access an API. Some web APIs have a single endpoint, some have many endpoints, it depends on how the API is designed. The endpoint we generate here is actually only a part of the full endpoint which we'll use when we work with buckets. Our actual endpoint is the endpoint prefixed by a bucket name.
Next, we create our auth object. We'll use this in conjunction with Requests to add AWS authentication to our API requests.
The ns variable is a string, which we'll need for working with XML from the S3 API. We'll discuss this when we use it.
We've included a modified version of our xml_pprint() function to help with debugging. And, for now, the create_bucket() function is just a placeholder. We'll learn more about this in the next section.
Finally, we have the command interpreter itself - it simply takes the first argument given to the script on the command line and tries to run a function with the same name, passing any remaining command-line arguments to the function. Let's give this a test run. Enter the following in a command prompt:
$ python3.4 s3_client.py create_bucket mybucket
Bucket name: mybucket
You can see that the script pulls create_bucket from the command line arguments and so calls the function create_bucket(), passing myBucket as an argument.
This framework makes adding functions to expand our client's capabilities a straightforward process. Let's start by making create_bucket() do something useful.
Whenever we write a client for an API, our main point of reference is the API documentation. The documentation tells us how to construct the HTTP requests for performing operations. The S3 documentation can be found at http://docs.aws.amazon.com/AmazonS3/latest/API/APIRest.html. The http://docs.aws.amazon.com/AmazonS3/latest/API/RESTBucketPUT.html URL will provide the details of bucket creation.
This documentation tells us that to create a bucket we need to make an HTTP request to our new bucket's endpoint by using the HTTP PUT method. It also tells us that the request body must contain some XML, which specifies the AWS region that we want the bucket to be created in.
So, now we know what we're aiming for, let's discuss our function. First, let's create the XML. Replace the content of create_bucket() with the following code block:
def create_bucket(bucket):
    XML = ET.Element('CreateBucketConfiguration')
    XML.attrib['xmlns'] = ns
    location = ET.SubElement(XML, 'LocationConstraint')
    location.text = auth.region
    data = ET.tostring(XML, encoding='utf-8')
    xml_pprint(data)
Here we create an XML tree following the format given in the S3 documentation. If we run our client now, then we will see the XML shown here:
$ python3.4 s3_client.py create_bucket mybucket.example.com
<?xml version="1.0" ?>
<CreateBucketConfiguration xmlns="http://s3.amazonaws.com/doc/2006- 03-01/">
    <LocationConstraint>eu-west-1</LocationConstraint>
</CreateBucketConfiguration>
This matches the format specified in the documentation. You can see that we've used the ns variable to fill the xmlns attribute. This attribute pops up throughout the S3 XML, having the ns variable pre-defined makes it quicker to work with it.
Now, let's add the code to make the request. Replace the xml_pprint(data) at the end of create_bucket() with the following:
    url = 'http://{}.{}'.format(bucket, endpoint)
    r = requests.put(url, data=data, auth=auth)
    if r.ok:
        print('Created bucket {} OK'.format(bucket))
    else:
        xml_pprint(r.text)
The first line shown here will generate the full URL from our bucket name and endpoint. The second line will make the request to the S3 API. Notice that we have used the requests.put() function to make this request using the HTTP PUT method, rather than by using either the requests.get()method or the requests.post() method. Also, note that we have supplied our auth object to the call. This will allow Requests to handle all the S3 authentication for us!
If all goes well , then we print out a message. In case everything does not go as expected, we print out the response body. S3 returns error messages as XML in the response body. So we use our xml_pprint() function to display it. We'll look at working with these errors in the Handling errors section, later on.
Now run the client, and if everything works as expected, then we will get a confirmation message. Make sure that you have picked a bucket that hasn't already been created:
$ python3.4 s3_client.py create_bucket mybucket.example.com
Created bucket mybucket.example.com OK
When we refresh the S3 Console in our browser, we will see that our bucket has been created.
Now that we've created a bucket, we can upload some files. Writing a function for uploading a file is similar to creating a bucket. We check the documentation to see how to construct our HTTP request, figure out what information should be collected at the command line, and then write the function.
We need to use an HTTP PUT again. We need the name of the bucket that we want to store the file in and the name that we want the file to be stored under in S3. The body of the request will contain the file data. At the command line, we'll collect the bucket name, the name we want the file to have in the S3 service and the name of the local file to upload.
Add the following function to your s3_client.py file after the create_bucket() function:
def upload_file(bucket, s3_name, local_path):
    data = open(local_path, 'rb').read()
    url = 'http://{}.{}/{}'.format(bucket, endpoint, s3_name)
    r = requests.put(url, data=data, auth=auth)
    if r.ok:
        print('Uploaded {} OK'.format(local_path))
    else:
        xml_pprint(r.text)
In creating this function, we follow a pattern similar to that for creating a bucket:
- Prepare the data that will go in the request body.
- Construct our URL.
- Make the request.
- Check the outcome.
Note that we open the local file in binary mode. The file could contain any type of data, so we don't want text transforms applied. We could pull this data from anywhere, such as a database or another web API. Here, we just use a local file for simplicity.
The URL is the same endpoint that we constructed in create_bucket() with the S3 object name appended to the URL path. Later, we can use this URL to retrieve the object.
Now, run the command shown here to upload a file:
$ python3.4 s3_client.py mybucket.example.com test.jpg ~/test.jpg
Uploaded ~/test.jpg OK
You'll need to replace mybucket.example.com with your own bucket name. Once the file gets uploaded, you will see it in the S3 Console.
I have used a JPEG image that was stored in my home directory as the source file. You can use any file, just change the last argument to an appropriate path. However, using a JPEG image will make the following sections easier for you to reproduce.
By default, S3 applies restrictive permissions for buckets and objects. The account that creates them has full read-write permissions, but access is completely denied for anyone else. This means that the file that we've just uploaded can only be downloaded if the download request includes authentication for our account. If we try the resulting URL in a browser, then we'll get an access denied error. This isn't very useful if we're trying to use S3 for sharing files with other people.
The solution for this is to use one of S3's mechanisms for changing the permissions. Let's look at the simple task of making our uploaded file public. Change upload_file() to the following:
def upload_file(bucket, s3_name, local_path, acl='private'):
    data = open(local_path, 'rb').read()
    url = 'http://{}.{}/{}'.format(bucket, endpoint, s3_name)
    headers = {'x-amz-acl': acl}
    r = requests.put(url, data=data, headers=headers, auth=auth)
    if r.ok:
        print('Uploaded {} OK'.format(local_path))
    else:
        xml_pprint(r.text)
We have now included a header in our HTTP request, x-amz-acl, which specifies a permission set to be applied to the object. We've also added a new argument to our function signature so that we can specify the permission set on the command line. We have used the so-called canned
ACLs (canned Access Control Lists), which have been provided by S3, and are documented at http://docs.aws.amazon.com/AmazonS3/latest/dev/acl-overview.html#canned-acl.
The ACL that we're interested in is called public-read. This will allow anyone to download the file without needing any kind of authentication. We can now re-run our upload, but this time it will apply this ACL to it:
$ python3.4 s3_client.py mybucket.example.com test.jpg ~/test.jpg public-read
Uploaded test.jpg OK
Now, visiting the file's S3 URL in a browser will give us the option to download the file.
If you have uploaded an image, then you may be wondering why the browser had asked us to save it instead of just displaying it. The reason is that we haven't set the file's Content-Type.
If you remember from the last chapter, the Content-Type header in an HTTP response tells the client, which in this case is our browser, the type of file that is in the body. By default, S3 applies the content type of binary/octet-stream. Because of this Content-Type, the browser can't tell that it's downloading an image, so it just presents it as a file that can be saved. We can fix this by supplying a Content-Type header in the upload request. S3 will store the type that we specify, and it will use it as the Content-Type in the subsequent download responses.
Add the code block shown here to the import at the beginning of s3_client.py:
import mimetypes
Then change upload_file() to this:
def upload_file(bucket, s3_name, local_path, acl='private'):
    data = open(local_path, 'rb').read()
    url = 'http://{}.{}/{}'.format(bucket, endpoint, s3_name)
    headers = {'x-amz-acl': acl}
    mimetype = mimetypes.guess_type(local_path)[0]
    if mimetype:
        headers['Content-Type'] = mimetype
    r = requests.put(url, data=data, headers=headers, auth=auth)
    if r.ok:
        print('Uploaded {} OK'.format(local_path))
    else:
        xml_pprint(r.text)
Here, we have used the mimetypes module to guess a suitable Content-Type by looking at the file extension of local_path. If mimetypes can't determine a Content-Type from local_path, then we don't include the Content-Type header, and let S3 apply the default binary/octet-stream type.
Unfortunately, in S3 we won't be able to overwrite the metadata for an existing object by using a simple PUT request. It's possible to do it by using a PUT copy request, but that's beyond the scope of this chapter. For now, it's better to just delete the file from S3 by using the AWS Console before uploading it again. We only need to do this once. Now, our code will automatically add the Content-Type for any new file that we upload.
Once you've deleted the file, re-run the client just as shown in the last section, that is, upload the file with the new Content-Type and try to download the file in a browser again. If all goes well, then the image will be displayed.
Downloading a file through the S3 API is similar to uploading it. We simply take the bucket name, the S3 object name and the local filename again but issue a GET request instead of a PUT request, and then write the data received to disk.
Add the following function to your program, underneath the upload_file() function:
def download_file(bucket, s3_name, local_path):
    url = 'http://{}.{}/{}'.format(bucket, endpoint, s3_name)
    r = requests.get(url, auth=auth)
    if r.ok:
        open(local_path, 'wb').write(r.content)
        print('Downloaded {} OK'.format(s3_name))
    else:
        xml_pprint(r.text)
Now, run the client and download a file, which you have uploaded previously, by using the following command:
$ python3.4 s3_client.py download_file mybucket.example.com test.jpg ~/test_downloaded.jpg
Downloaded test.jpg OK
If you ran into any errors while running the aforementioned code, then you'll notice that a clear error message will not get displayed. S3 embeds error messages in the XML returned in the response body, and until now we've just been dumping the raw XML to the screen. We can improve on this and pull the text out of the XML. First, let's generate an error message so that we can see what the XML looks like. In s3_client.py, replace your access secret with an empty string, as shown here:
access_secret = ''
Now, try and perform the following operation on the service:
$ python3.4 s3_client.py create_bucket failbucket.example.com
<?xml version="1.0" ?>
<Error>
    <Code>SignatureDoesNotMatch</Code>
    <Message>The request signature we calculated does not match the signature you provided. Check your key and signing method.</Message>
    <AWSAccessKeyId>AKIAJY5II3SZNHZ25SUA</AWSAccessKeyId>
    <StringToSign>AWS4-HMAC-SHA256...</StringToSign>
    <SignatureProvided>e43e2130...</SignatureProvided>
    <StringToSignBytes>41 57 53 34...</StringToSignBytes>
    <CanonicalRequest>PUT...</CanonicalRequest>
    <CanonicalRequestBytes>50 55 54...</CanonicalRequestBytes>
    <RequestId>86F25A39912FC628</RequestId>
    <HostId>kYIZnLclzIW6CmsGA....</HostId>
</Error>
The preceding XML is the S3 error information. I've truncated several of the fields so as to show it here. Your code block will be slightly longer than this. In this case, it's telling us that it can't authenticate our request, and this is because we have set a blank access secret.
Printing all of the XML is too much for an error message. There's a lot of extraneous information which isn't useful to us. It would be better if we could just pull out the useful parts of the error message and display them.
Well, ElementTree gives us some powerful tools for extracting such information from XML. We're going back to XML for a while to explore these tools a little.
First we need to open an interactive Python shell, and then generate the aforementioned error message again by using the following command:
>>> import requests
>>> import requests_aws4auth
>>> auth = requests_aws4auth.AWS4Auth('<ID>', '', 'eu-west-1', '')
>>> r = requests.get('http://s3.eu-west-1.amazonaws.com', auth=auth)
You'll need to replace <ID> with your AWS access ID. Print out r.text to make sure that you get an error message, which is similar to the one that we generated earlier.
Now, we can explore our XML. Convert the XML text into an ElementTree tree. A handy function for doing this is:
>>> import xml.etree.ElementTree as ET
>>> root = ET.fromstring(r.text)
We now have an ElementTree instance, with root as the root element.
The simplest way of navigating the tree is by using the elements as iterators. Try doing the following:
>>> for element in root:
...     print('Tag: ' + element.tag)
Tag: Code
Tag: Message
Tag: AWSAccessKeyId
Tag: StringToSign
Tag: SignatureProvided
...
Iterating over root returns each of its child elements, and then we print out the tag of an element by using the tag attribute.
We can apply a filter to the tags that we iterate over by using the following command:
>>> for element in root.findall('Message'):
...     print(element.tag + ': ' + element.text)
Message: The request signature we calculated does not match the signature you provided. Check your key and signing method.
Here, we have used the findall() method of the root element. This method will provide us with a list of all the direct children of the root element that match the specified tag, which in this case is <Message>.
And this will solve our problem of just extracting the text of the error message. Now, let's update our error handling.
We can go back and add this to our s3_client.py file, but let's include a little more information in the output, and structure the code to allow re-use. Add the following function to the file underneath the download_file() function:
def handle_error(response):
    output = 'Status code: {}
'.format(response.status_code)
    root = ET.fromstring(response.text)
    code =  root.find('Code').text
    output += 'Error code: {}
'.format(code)
    message = root.find('Message').text
    output += 'Message: {}
'.format(message)
    print(output)
You'll notice that we have used a new function here, namely, root.find(). This works in the same way as findall() except that it only returns the first matching element, as opposed to a list of all matching elements.
Then, replace each instance of xml_pprint(r.text) in your file with handle_error(r) and then run the client again with the incorrect access secret. Now, you will see a more informative error message:
$ python3.4 s3_client.py create_bucket failbucket.example.com
Status code: 403
Error code: SignatureDoesNotMatch
Message: The request signature we calculated does not match the signature you provided. Check your key and signing method.
That's as far as we're going to take our client. We've written a command line program that can perform essential operations, such as creating buckets and uploading and downloading objects on the Amazon S3 service. There are still plenty of operations that can be implemented, and these can be found in the S3 documentation; operations such as listing buckets' contents, deleting objects, and copying objects.
We could improve a few other things, especially if we are going to make this into a production application. The command-line parsing mechanism, although compact, is not satisfactory from a security perspective, since anybody with access to the command line can run any built-in python command. It would be better to have a whitelist of functions and to implement a proper command line parser by using one of the standard library modules like argparse.
Storing the access ID and the access secret in the source code is also a problem for security. Several serious security incidents have happened because passwords were stored in source code and then uploaded to cloud code repositories. It's much better to load the keys from an external source, such as a file or a database at run time.
We've discussed working directly with the S3 REST API, and this has given us some useful techniques that will allow us to program against similar APIs in the future. In many cases, this will be the only way in which we can interact with a web API.
However, some APIs, including AWS, have ready-to-use packages which expose the functionality of the service without having to deal with the complexities of the HTTP API. These packages generally make the code cleaner and simpler, and they should be preferred for doing production work if they're available.
The AWS package is called Boto. We will take a very quick look at the Boto package to see how it can provide some of the functionalities that we wrote earlier.
The boto package is available in PyPi, so we can install it with pip:
$ pip install boto
Downloading/unpacking boto
...
Now, fire up a Python shell and let's try it out. We need to connect to the service first:
>>> import boto
>>> conn = boto.connect_s3('<ACCESS ID>', '<ACCESS SECRET>')
You'll need to replace <ACCESS ID> and <ACCESS SECRET> with your access ID and access secret. Now, let's create a bucket:
>>> conn.create_bucket('mybucket.example.com')
This creates the bucket in the default standard US region. We can supply a different region, as shown here:
>>> from boto.s3.connection import Location
>>> conn.create_bucket('mybucket.example.com', location=Location.EU)
The region names we need to use for this function are different to the ones we used when creating buckets earlier. To see a list of acceptable region names do this:
>>> [x for x in dir(Location) if x.isalnum()]
['APNortheast', 'APSoutheast', 'APSoutheast2', 'CNNorth1', 'DEFAULT', 'EU', 'SAEast', 'USWest', 'USWest2']
Do the following to display a list of the buckets we own:
>>> buckets = conn.get_all_buckets()
>>> [b.name for b in buckets]
['mybucket.example.com', 'mybucket2.example.com']
We can also list the contents of a bucket. To do so, first, we need to get a reference to it:
>>> bucket = conn.get_bucket('mybucket.example.com')
And then to list the contents:
>>> [k.name for k in bucket.list()]
['cheesehop.txt', 'parrot.txt']
Uploading a file is a straightforward process. First, we need to get a reference to the bucket that we want to put it in, and then we need to create a Key object, which will represent our object in the bucket:
>>> bucket = conn.get_bucket('mybucket.example.com')
>>> from boto.s3.key import Key
>>> key = Key(bucket)
Next, we have to set the Key name and then upload our file data:
>>> key.key = 'lumberjack_song.txt'
>>> key.set_contents_from_filename('~/lumberjack_song.txt')
The boto package will automatically set the Content-Type when it uploads a file like this, and it uses the same mimetypes module that we used earlier for determining a type.
Downloading also follows a similar pattern. Try the following commands:
>>> bucket = conn.get_bucket('mybucket.example.com')
>>> key = bucket.get_key('parrot.txt')
>>> key.get_contents_to_filename('~/parrot.txt')
This downloads the parrot.txt S3 object in the mybucket.example.com bucket and then stores it in the ~/parrot.txt local file.
Once we have a reference to the key, just use the following to set the ACL:
>>> key.set_acl('public-read')
I'll leave you to further explore the boto package's functionality with the help of the tutorial, which can be found at https://boto.readthedocs.org/en/latest/s3_tut.html.
It should be evident that for everyday S3 work in Python, boto should be your go to package.
So, we've discussed some of the uses of the Amazon S3 API, and learned some things about working with XML in Python. These skills should give you a good start in working with any XML based REST API, whether or not it has a pre-built library like boto.
However, XML isn't the only data format that is used by web APIs, and the S3 way of working with HTTP isn't the only model used by web APIs. So, we're going to move on and take a look at the other major data format in use today, JSON and another API: Twitter.