
The Twitter API provides access to all the functions that we may want a Twitter client to perform. With the Twitter API, we can create clients that search for recent tweets, find out what's trending, look up user details, follow users' timelines, and even act on the behalf of users by posting tweets and direct messages for them.
We'll be looking at Twitter API version 1.1, the version current at time of writing this chapter.
Note
Twitter maintains comprehensive documentation for its API, which can be found at https://dev.twitter.com/overview/documentation.
To illustrate some of the functionalities of the Twitter API, we're going to write the code for a simple Twitter world clock. Our application will periodically poll its Twitter account for mentions which contain a recognizable city name, and if it finds one, then it will reply to the Tweet with the current local time of that city. In Twitter speak, a mention is any Tweet which includes our account name prefixed by an @, for example, @myaccount.
Similar to S3, we need to determine how authentication will be managed before we get started. We need to register, and then we need to find out how Twitter expects us to authenticate our requests.
We need to create a Twitter account, register our application against the account, and then we will receive the authentication credentials for our app. It's also a good idea to set up a second account, which we can use for sending test tweets to the application account. This provides for a cleaner way of checking whether the app is working properly, rather than having the app account send tweets to itself. There's no limit on the number of Twitter accounts that you can create.
To create an account, go to http://www.twitter.com and complete the signup process. Do the following for registering your application once you have a Twitter account:
- Log into http://apps.twitter.com with your main Twitter account, and then create a new app.
- Fill out the new app form, note that Twitter application names need to be unique globally.
- Go to the app's settings and then change the app permissions to have read and write access. You may need to register your mobile number for enabling this. Even if you're unhappy about supplying this, we can create the full app; however the final function that sends a tweet in reply won't be active.
Now we need to get our access credentials, as shown here:
- Go to the Keys and Access Tokens section and then note the Consumer Key and the Access Secret.
- Generate an Access Token.
- Note down the Access Token and the Access Secret.
We now have enough information for authenticating requests. Twitter uses an authentication standard called oAuth, version 1.0a. It's described in detail at http://oauth.net/core/1.0a/.
The oAuth authentication standard is a little tricky, but fortunately the Requests module has a companion library called requests-oauthlib, which can handle most of the complexity for us. This is available on PyPi, so we can download and install it with pip.
$ pip install requests-oauthlib
Downloading/unpacking requests-oauthlib
...
Now, we can add authentication to our requests, and then write our application.
Save the code mentioned here to a file, and save it as twitter_worldclock.py. You'll need to replace <CONSUMER_KEY>, <CONSUMER_SECRET>, <ACCESS_TOKEN>, and <ACCESS_SECRET> with the values that you have taken down from the aforementioned Twitter app configuration:
import requests, requests_oauthlib, sys

consumer_key = '<CONSUMER_KEY>'
consumer_secret = '<CONSUMER_SECRET>'
access_token = '<ACCESS_TOKEN>'
access_secret = '<ACCESS_KEY>'

def init_auth():
    auth_obj = requests_oauthlib.OAuth1(
                    consumer_key, consumer_secret,
                    access_token, access_secret)

    if verify_credentials(auth_obj):
        print('Validated credentials OK')
        return auth_obj
    else:
        print('Credentials validation failed')
        sys.exit(1)

def verify_credentials(auth_obj):
    url = 'https://api.twitter.com/1.1/'
          'account/verify_credentials.json'
    response = requests.get(url, auth=auth_obj)
    return response.status_code == 200

if __name__ == '__main__':
    auth_obj = init_auth()
Remember that consumer_secret and access_secret act as the password to your Twitter account, so in a production app they should be loaded from a secure external location instead of being hard-coded into the source code.
In the aforementioned code, we create the OAuth1 authentication instance, auth_obj, in the init_auth() function by using our access credentials. We pass this to Requests whenever we need to make an HTTP request, and through it Requests handles the authentication. You can see an example of this in the verify_credentials() function.
In the verify_credentials() function, we test whether Twitter recognizes our credentials. The URL that we're using here is an endpoint that Twitter provides purely for testing whether our credentials are valid. It returns an HTTP 200 status code if they are valid or a 401 status code if not.
Now, let's run twitter_worldclock.py and if we've registered our application and filled out the tokens and secrets properly, then we should see Validated credentials OK. Now that the authentication is working, the basic flow of our program will be, as shown in the following diagram:
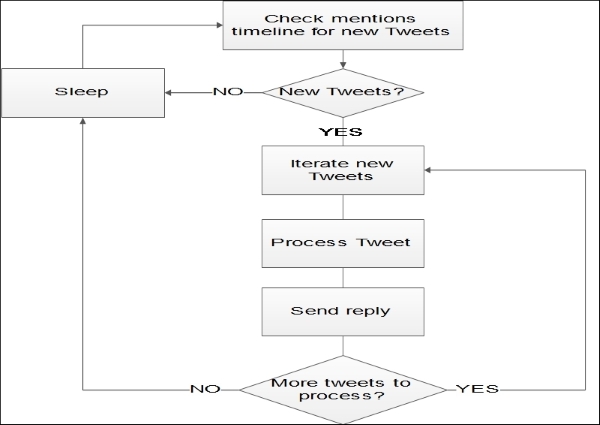
Our program will be running as a daemon, polling Twitter periodically to see whether there are any new tweets for us to process and reply to. When we poll the mentions timeline, we will download any new tweets that were received in a single batch since our last poll, so that we can process all of them without having to poll again.
Let's add a function for checking and retrieving new tweets from our mentions timeline. We'll get this to work before we add the loop. Add the new function underneath verify_credentials(), and then add a call this function to the main section, as shown here; also, add json to the list of the imports at the beginning of the file:
def get_mentions(since_id, auth_obj):
    params = {'count': 200, 'since_id': since_id,
              'include_rts':  0, 'include_entities': 'false'}
    url = 'https://api.twitter.com/1.1/'
          'statuses/mentions_timeline.json'
    response = requests.get(url, params=params, auth=auth_obj)
    response.raise_for_status()
    return json.loads(response.text)

if __name__ == '__main__':
    auth_obj = init_auth()
    since_id = 1
    for tweet in get_mentions(since_id, auth_obj):
        print(tweet['text'])
Using get_mentions(), we check for and download any tweets that mention our app account by connecting to the statuses/mentions_timeline.json endpoint. We supply a number of parameters, which Requests passes on as a query string. These parameters are specified by Twitter and they control how the tweets will be returned to us. They are as follows:
'count': This specifies the maximum number of tweets that will be returned. Twitter will allow 200 tweets to be received by a single request made to this endpoint.'include_entities': This is used for trimming down some extraneous information from the tweets retrieved.'include_rts': This tells Twitter not to include any retweets. We don't want the user to receive another time update if someone retweets our reply.'since_id': This tells Twitter to only return the tweets with IDs above this value. Every tweet has a unique 64-bit integer ID, and later tweets have higher value IDs than earlier tweets. By remembering the ID of the last tweet we process and then passing it as this parameter, Twitter will filter out the tweets that we've already seen.
Before running the aforementioned, we want to generate some mentions for our account so that we have something to download. Log into your Twitter test account and then create a couple of tweets that contain @username, where you replace username with your app account's username. After this, when you go into the Mentions section of the Notifications tab of your app account, you will see these tweets.
Now, if we run the aforementioned code, then we will get the text of our mentions printed to screen.
The next step is to parse our mentions and then generate the times that we want to include in our replies. Parsing is a straightforward process. In this, we just check the 'text' value of the tweets, but it takes a little more work to generate the times. In fact, for this, we'll need a database of cities and their time zones. This is available in the pytz package, which can be found at PyPi. For doing this, install the following package:
$ pip install pytz
Downloading/unpacking pytz
...
And then, we can write our tweet processing function. Add this function underneath get_mentions(), and then add datetime and pytz to the list of the imports at the beginning of the file:
def process_tweet(tweet):
    username = tweet['user']['screen_name']
    text = tweet['text']
    words = [x for x in text.split() if
                        x[0] not in ['@', '#']]
    place = ' '.join(words)
    check = place.replace(' ', '_').lower()
    found = False
    for tz in pytz.common_timezones:
        tz_low = tz.lower()
        if check in tz_low.split('/'):
            found = True
            break
    if found:
        timezone = pytz.timezone(tz)
        time = datetime.datetime.now(timezone).strftime('%H:%M')
        reply = '@{} The time in {} is currently {}'.format(username, place, time)
    else:
        reply = "@{} Sorry, I didn't recognize "
                        "'{}' as a city".format(username, place)
    print(reply)

if __name__ == '__main__':
    auth_obj = init_auth()
    since_id = 1
    for tweet in get_mentions(since_id, auth_obj):
        process_tweet(tweet)
The bulk of process_tweet() is used for formatting the tweet's text and processing the time zone data. First we will remove any @username mentions and #hashtags from the tweet. Then, we prepare the remaining tweet text to be compared with the time zone names database. The time zone names database is held in pytz.common_timezones, but the names also contain regions, which are separated from the names with slashes (/). Also, in these names underscores are used in place of spaces.
We scan through the database checking against the formatted tweet text. If a match is found, then we construct a reply, which contains the local time of the matched time zone. For this, we use the datetime module along with a time zone object generated by pytz. If we don't find a match in the time zone database, then we compose a reply to let the user know the same. Then, we print our reply to screen to check if it's working as expected.
Again, before running this, we may want to create a few tweets that contain just a city name and mention our world clock app account, so that the function has something to process. Some cities that appear in the time zone database are Dublin, New York, and Tokyo.
Give it a try! When you run it, you will get some tweet reply texts on the screen, which contain the cities and the current local times for those cities.
If we run the aforementioned several times, then we'll find that it will stop working after a while. Either the credentials will temporarily fail to validate, or the HTTP request in get_mentions() will fail.
This is because Twitter applies rate limits to its API, which means that our application is only allowed to make a certain number of requests to an endpoint in a given amount of time. The limits are listed in the Twitter documentation and they vary according to the authentication route (as discussed later) and endpoint. We are using statuses/mentions_timeline.json, so our limit is 15 requests for every 15 minutes. If we exceed this, then Twitter will respond with a 429 Too many requests status code. This will force us to wait till the next 15 minute window starts before it lets us get any useful data back.
Rate limits are a common feature of web APIs, so it's useful to have ways of testing efficiently when using them. One approach to testing with data from rate-limited APIs is to download some data once and then store it locally. After this, load it from the file instead of pulling it from the API. Download some test data by using the Python interpreter, as shown here:
>>> from twitter_worldclock import *
>>> auth_obj = init_auth()
Credentials validated OK
>>> mentions = get_mentions(1, auth_obj)
>>> json.dump(mentions, open('test_mentions.json', 'w'))
You'll need to be in the same folder as twitter_worldclock.py when you run this. This creates a file called test_mentions.json, which contains our JSONized mentions. Here, the json.dump() function writes the supplied data into a file rather than returning it as a string.
Instead of calling the API, we can use this data by modifying our program's main section to look like the following:
if __name__ == '__main__':
    mentions = json.load(open('test_mentions.json'))
    for tweet in mentions:
process_tweet(tweet)The final function that we need to perform is sending a tweet in response to a mention. For this, we use the statuses/update.json endpoint. If you've not registered your mobile number with your app account, then this won't work. So, just leave your program as it is. If you have registered your mobile number, then add this function under process_tweets():
def post_reply(reply_to_id, text, auth_obj):
    params = {
        'status': text,
        'in_reply_to_status_id': reply_to_id}
    url = 'https://api.twitter.com/1.1./statuses/update.json'
    response = requests.post(url, params=params, auth=auth_obj)
    response.raise_for_status()
And add this below the print() call at the end of process_tweet(), at the same indentation level:
post_reply(tweet['id'], reply, auth_obj)
Now, if you run this and then check your test account's Twitter notifications, you will see some replies.
The post_reply() function just calls the endpoint by using the following parameters to inform Twitter on what to post:
When testing this, we might get some 403 status code responses. This is okay, it's just that Twitter refuses to let us post two tweets with identical text in a row, which we may find happens with this set up, depending on what test tweets we send.
The building blocks are in place, and we can add our main loop to make the program a daemon. Add the time module to the imports at the top, and then change the main section to what is shown here:
if __name__ == '__main__':
    auth_obj = init_auth()
    since_id = 1
    error_count = 0
    while error_count < 15:
        try:
            for tweet in get_mentions(since_id, auth_obj):
                process_tweet(tweet)
                since_id = max(since_id, tweet['id'])
            error_count =  0
        except requests.exceptions.HTTPError as e:
            print('Error: {}'.format(str(e)))
            error_count += 1
        time.sleep(60)
This will call get_mentions() every 60 seconds and then process any new tweets that have been downloaded. If we hit any HTTP errors, then it will retry the process 15 times before exiting the program.
Now if we run our program, then it will run continuously, replying to tweets that mention the world clock app account. Give it a try, run the program, and then send some tweets from your test account. After a minute, you will see some replies to your notifications.
Now that we've written a basic functional Twitter API client, there are certainly some things that we could improve upon. Although we don't have space in this chapter to explore enhancements in detail, it's worth mentioning a few to inform future projects you may want to undertake.
You may have already spotted a problem that our client will only pull a maximum of 200 tweets per poll. In each poll, Twitter provides the most recent tweets first. This means that if we get more than 200 tweets in 60 seconds, then we will permanently lose the tweets that come in first. In fact, there is no complete solution for this using the statuses/mentions_timeline.json endpoint.
Twitter's solution for this problem is to provide an alternative type of API, which is called a streaming API. When connecting to these APIs, the HTTP response connection is actually left open and the incoming tweets are continuously streamed through it. The Requests package provides neat functionality for handling this. The Requests response objects have an iter_lines() method, which runs indefinitely. It is capable of outputting a line of data whenever the server sends one, which can then be processed by us. If you do find that you need this, then there's an example that will help you in getting started in the Requests documentation, and it can be found at http://docs.python-requests.org/en/latest/user/advanced/#streaming-requests.
Our setup for having our app operate against our main account and having a second account for sending the test tweets is a little clunky, especially so if you use your app account for regular tweeting. Wouldn't it be better to have a separate account dedicated to handling the world clock tweets?
Well, yes it would. The ideal set up is to have a main account on which you register the app, and which you can also use it as a regular Twitter account, and have the app process tweets for a second dedicated world clock account.
oAuth makes this possible, but there are some extra steps that are needed to get it to work. We would need the world clock account to authorize our app to act on its behalf. You'll notice that the oAuth credentials mentioned earlier are comprised of two main elements, consumer and access. The consumer element identifies our application, and the access element proves that the account the access credentials came from authorized our app to act on its behalf. In our app we shortcut the full account authorization process by having the app act on behalf of the account through which it was registered, that is, our app account. When we do this, Twitter lets us acquire the access credentials directly from the dev.twitter.com interface. To use a different user account, we would have needed to have inserted a step where the user is taken to Twitter, which would be opened in a web browser, where the user would have to log in and then explicitly authorize our application.
Note
This process is demonstrated in the requests-oauthlib documentation, which can be found at https://requests-oauthlib.readthedocs.org/en/latest/oauth1_workflow.html.