
If your computer is connected to the Internet or a local area network (LAN), then it's time to talk to the other computers on the network. In a typical home, office, or campus LAN, you will find that many different types of computers are connected to the network. Some computers act as the servers for specific services, such as a file server, a print server, a user authentication management server, and so on. In this chapter, we will explore how the computers in a network can interact with each other and how they can access a few services through the Python scripts. The following task list will give you an overview of the topics that will be covered in this chapter:
- Accessing SSH terminals with
paramiko - Transferring files through SFTP
- Transferring files with the help of FTP
- Reading the SNMP packets
- Reading the LDAP packets
- Sharing the files with the help of SAMBA
This chapter requires quite a few third-party packages, such as paramiko, pysnmp, and so on. You can use your operating system's package management tool for installing them. Here's a quick how-to on installing the paramiko module in Ubuntu 14, python3, and the other modules that are required for understanding the topics covered in this chapter:
sudo apt-get install python3
sudo apt-get install python3-setuptools
sudo easy_install3 paramiko
sudo easy_install3 python3-ldap
sudo easy_install3 pysnmp
sudo easy_install3 pysmb
SSH has become a very popular network protocol for performing secure data communication between two computers. It provides an excellent cryptographic support, so that unrelated third-parties cannot see the content of the data during the transmission process. Details of the SSH protocol can be found in these RFC documents: RFC4251-RFC4254, available at http://www.rfc-editor.org/rfc/rfc4251.txt.
Python's paramiko library provides a very good support for the SSH-based network communication. You can use Python scripts to benefit from the advantages of SSH-based remote administration, such as the remote command-line login, command execution, and the other secure network services between two networked computers. You may also be interested in using the pysftp module, which is based on paramiko. More details regarding this package can be found at PyPI: https://pypi.python.org/pypi/pysftp/.
The SSH is a client/server protocol. Both of the parties use the SSH key pairs to encrypt the communication. Each key pair has one private and one public key. The public key can be published to anyone who may be interested in that. The private key is always kept private and secure from everyone except the owner of the key.
The SSH public and private keys can be generated and digitally signed by an external or an internal certificate authority. But that brings a lot of overhead to a small organization. So, alternatively, the keys can be generated randomly by utility tools, such as ssh-keygen. The public key needs to be available to all participating parties. When the SSH client connects to the server for the first time, it registers the public key of the server on a special file called ~/.ssh/known_hosts file. So, the subsequent connection to the server ensures that the client is talking to the same server as it spoke to before. On the server side, if you would like to restrict access to certain clients who have certain IP addresses, then the public keys of the permitted hosts can be stored to another special file called ssh_known_hosts file. Of course, if you re-build the machines, such as the server machine, then the old public key of the server won't match with that of the one stored in the ~/.ssh/known_hosts file. So, the SSH client will raise an exception and prevent you from connecting to it. You can delete the old key from that file and then try to re-connect, as if for the first time.
We can use the paramiko module to create an SSH client and then connect it to the SSH server. This module will supply the SSHClient() class.
ssh_client = paramiko.SSHClient()
By default, the instance of this client class will reject the unknown host keys. So, you can set up a policy for accepting the unknown host keys. The built-in AutoAddPolicy() class will add the host keys as and when they are discovered. Now, you need to run the set_missing_host_key_policy() method along with the following argument on the ssh_client object.
ssh_client.set_missing_host_key_policy(paramiko.AutoAddPolicy())
If, you want to restrict connecting only to certain hosts, then you can define your own policy and replace it with the AutoAddPolicy() class.
You may also be interested in adding the system host keys by using the load_system_host_keys() method.
ssh_client.load_system_host_keys()
So far, we have discussed how to encrypt the connection. However, SSH needs your authentication credentials. This means that the client needs to prove to the server that a specific user is talking, not someone else. This can be done in a few ways. The simplest way is by using the username and the password combination. Another popular way is by using the key-based authentication method. This means that the user's public key can be copied to the server. There's a specific tool for doing that. This comes with the later versions of the SSH. Here's an example of how to use ssh-copy-id.
ssh-copy-id -i ~/.ssh/id_rsa.pub [email protected]
This command will copy the SSH public key of the faruq user to a machine, debian6box.localdomain.loc:
Here, we can simply call the connect() method along with the target hostname and the SSH login credentials. To run any command on the target host, we need to invoke the exec_command() method by passing the command as its argument.
ssh_client.connect(hostname, port, username, password)
stdin, stdout, stderr = ssh_client.exec_command(cmd)
The following code listing shows how to do SSH login to a target host and then run a simple ls command:
#!/usr/bin/env python3
import getpass
import paramiko
HOSTNAME = 'localhost'
PORT = 22
def run_ssh_cmd(username, password, cmd, hostname=HOSTNAME, port=PORT):
ssh_client = paramiko.SSHClient()
ssh_client.set_missing_host_key_policy(
paramiko.AutoAddPolicy())
ssh_client.load_system_host_keys()
ssh_client.connect(hostname, port, username, password)
stdin, stdout, stderr = ssh_client.exec_command(cmd)
print(stdout.read())
if __name__ == '__main__':
username = input("Enter username: ")
password = getpass.getpass(prompt="Enter password: ")
cmd = 'ls -l /dev'
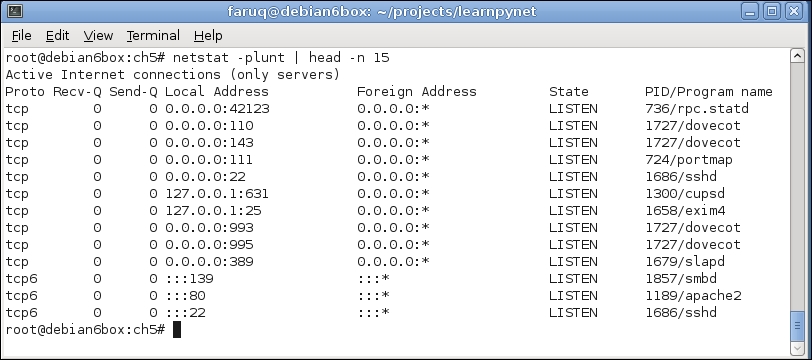
run_ssh_cmd(username, password, cmd)Before running it, we need to ensure that the SSH server daemon is running on the target host (which in this case is the localhost). As shown in the following screenshot, we can use the netstat command for doing that. This command will show all the running services that are listening to a particular port:
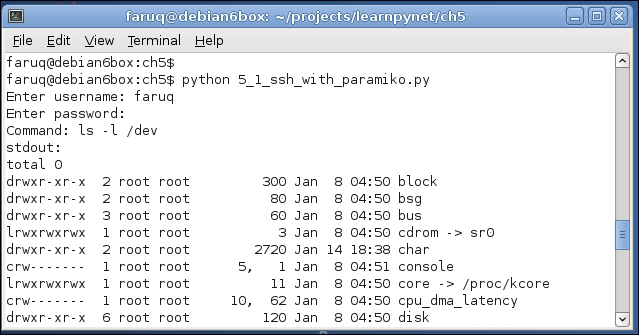
The preceding script will make an SSH connection to the localhost and the run the ls -l /dev/ command. The output of this script will be similar to the following screenshot:
It would be very interesting to see the network packet exchange between the client and the server. We can use either the native tcpdump command or the third-party Wireshark tool to capture network packets. With tcpdump, you can specify the target network interface ( -i lo) and the port number (port 22) options. In the following packet capture session, five packet exchanges have been shown during an SSH client/server communication session:
root@debian6box:~# tcpdump -i lo port 22
tcpdump: verbose output suppressed, use -v or -vv for full protocol decode
listening on lo, link-type EN10MB (Ethernet), capture size 65535 bytes
12:18:19.761292 IP localhost.50768 > localhost.ssh: Flags [S], seq 3958510356, win 32792, options [mss 16396,sackOK,TS val 57162360 ecr 0,nop,wscale 6], length 0
12:18:19.761335 IP localhost.ssh > localhost.50768: Flags [S.], seq 1834733028, ack 3958510357, win 32768, options [mss 16396,sackOK,TS val 57162360 ecr 57162360,nop,wscale 6], length 0
12:18:19.761376 IP localhost.50768 > localhost.ssh: Flags [.], ack 1, win 513, options [nop,nop,TS val 57162360 ecr 57162360], length 0
12:18:19.769430 IP localhost.50768 > localhost.ssh: Flags [P.], seq 1:25, ack 1, win 513, options [nop,nop,TS val 57162362 ecr 57162360], length 24
12:18:19.769467 IP localhost.ssh > localhost.50768: Flags [.], ack 25, win 512, options [nop,nop,TS val 57162362 ecr 57162362], length 0
Although, it's very quick and easy to run tcpdump, the command does not interpret it in the same way as the other GUI tools, such as Wireshark, interpret it. The preceding session can be captured in Wireshark, as shown in the following screenshot:
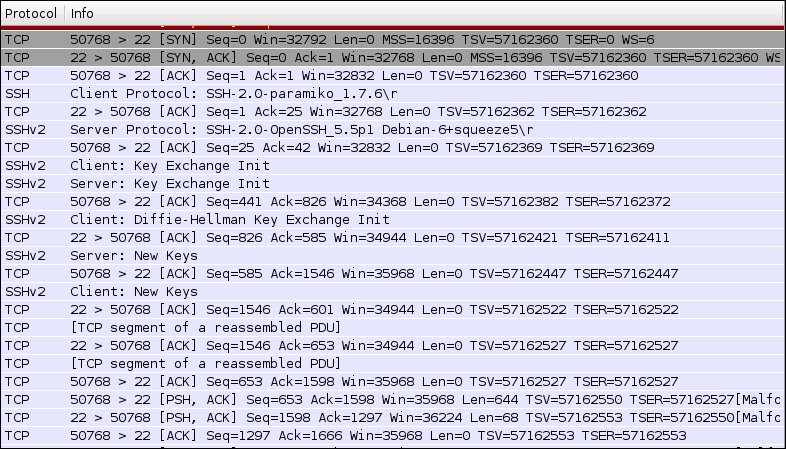
This clearly shows how the first three packets complete the TCP handshake process. Then, the subsequent SSH packets negotiate the connection between the client and the server. It's interesting to see how the client and the server negotiate the encryption protocols. In this example, the client port is 50768 and the server port is 22. The client first initiates the SSH packet exchange and then indicates that it would like to talk over the SSHv2 protocol. Then, the server agrees on that and continues the packet exchange.