
Creating a socket object in Python is very straightforward. You just need to import the socket module and call the socket() class:
from socket import*
import socket

#create a TCP socket (SOCK_STREAM)
s = socket.socket(family=AF_INET, type=SOCK_STREAM, proto=0)
print('Socket created')
Traditionally, the class takes plenty of parameters. Some of them are listed in the following:
- Socket family: This is the domain of socket, such as
AF_INET(about 90 percent of the sockets of the Internet fall under this category) orAF_UNIX,which is sometimes used as well. In Python 3, you can create a Bluetooth socket usingAF_BLUETOOTH. - Socket type: Depending on your need, you need to specify the type of socket. For example, TCP and UDP-based sockets are created by specifying
SOCK_STREAMandSOCK_DGRAM,respectively. - Protocol: This specifies the variation of protocol within a socket family and type. Usually, it is left as zero.
For many reasons, socket operations may not be successful. For example, if you don't have permission to access a particular port as a normal user, you may not be able to bind to a socket. This is why it is a good idea to do proper error handling when creating a socket or doing some network-bound communication.
Let's try to connect a client socket to a server process. The following code is an example of TCP client socket that makes a connection to server socket:
import socket
import sys

if __name__ == '__main__':

    try:
        sock = socket.socket(socket.AF_INET, socket.SOCK_STREAM)
    except socket.error as err:
        print("Failed to crate a socket")
        print("Reason: %s" %str(err))
        sys.exit();

    print('Socket created')

    target_host = input("Enter the target host name to connect: ")
    target_port = input("Enter the target port: ")

    try:
        sock.connect((target_host, int(target_port)))
        print("Socket Connected to %s on port: %s" %(target_host, target_port))
    sock.shutdown(2)
    except socket.error as err:
        print("Failed to connect to %s on port %s" %(target_host, target_port))
        print("Reason: %s" %str(err))
        sys.exit();
If you run the preceding TCP client, an output similar to the following will be shown:
# python 7_1_tcp_client_socket.py
Socket created
Enter the target host name to connect: 'www.python.org'
Enter the target port: 80
Socket Connected to www.python.org on port: 80
However, if socket creation has failed for some reason, such as invalid DNS, an output similar to the following will be shown:
# python 7_1_tcp_client_socket.py
Socket created
Enter the target host name to connect: www.asgdfdfdkflakslalalasdsdsds.invalid
Enter the target port: 80
Failed to connect to www.asgdfdfdkflakslalalasdsdsds.invalid on port 80
Reason: [Errno -2] Name or service not known
Now, let's exchange some data with the server. The following code is an example of a simple TCP client:
import socket

HOST = 'www.linux.org' # or 'localhost'
PORT = 80
BUFSIZ = 4096
ADDR = (HOST, PORT)

if __name__ == '__main__':
    client_sock = socket.socket(socket.AF_INET, socket.SOCK_STREAM)
    client_sock.connect(ADDR)

    while True:
        data = 'GET / HTTP/1.0

'
        if not data:
            break
        client_sock.send(data.encode('utf-8'))
        data = client_sock.recv(BUFSIZ)
        if not data:
            break
        print(data.decode('utf-8'))

    client_sock.close()
If you look carefully, you can see that the preceding code actually created a raw HTTP client that fetches a web page from a web server. It sends an HTTP GET request to pull the home page:
# python 7_2_simple_tcp_client.py
HTTP/1.1 200 OK
Date: Sat, 07 Mar 2015 16:23:02 GMT
Server: Apache
Last-Modified: Mon, 17 Feb 2014 03:19:34 GMT
Accept-Ranges: bytes
Content-Length: 111
Connection: close
Content-Type: text/html

<html><head><META HTTP-EQUIV="refresh" CONTENT="0;URL=/cgi- sys/defaultwebpage.cgi"></head><body></body></html>
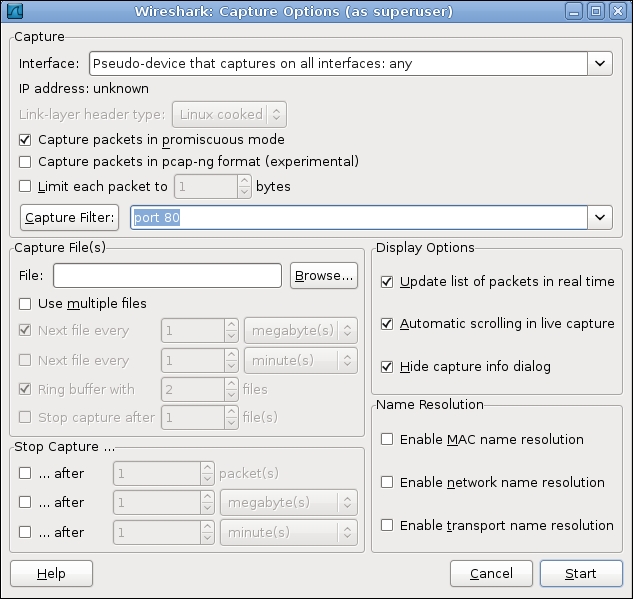
The interaction between the client and server through the exchange of network packets can be analyzed using any network packet capturing tool, such as Wireshark. You can configure Wireshark to filter packets by port or host. In this case, we can filter by port 80. You can get the options under the Capture | Options menu and type port 80 in the input box next to the Capture Filter option, as shown in the following screenshot:
In the Interface option, we choose to capture packets passing through any interface. Now, if you run the preceding TCP client to connect to www.linux.org, you can see the sequence of packets exchanged in Wireshark, as shown in the following screenshot:
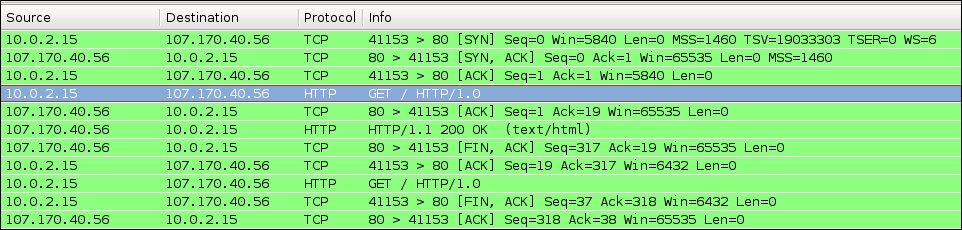
As you can see, the first three packets establish the TCP connection by a three-way handshake process between the client and server. We are more interested in the fourth packet that makes an HTTP GET request to the server. If you double-click the selected row, you can see the details of the HTTP request, as shown in the following screenshot:
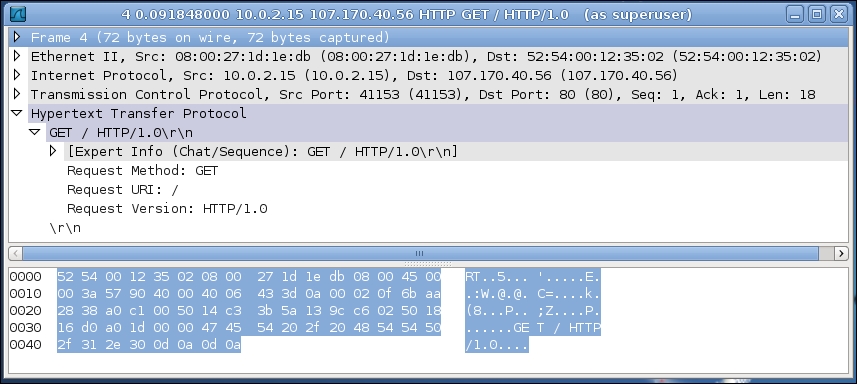
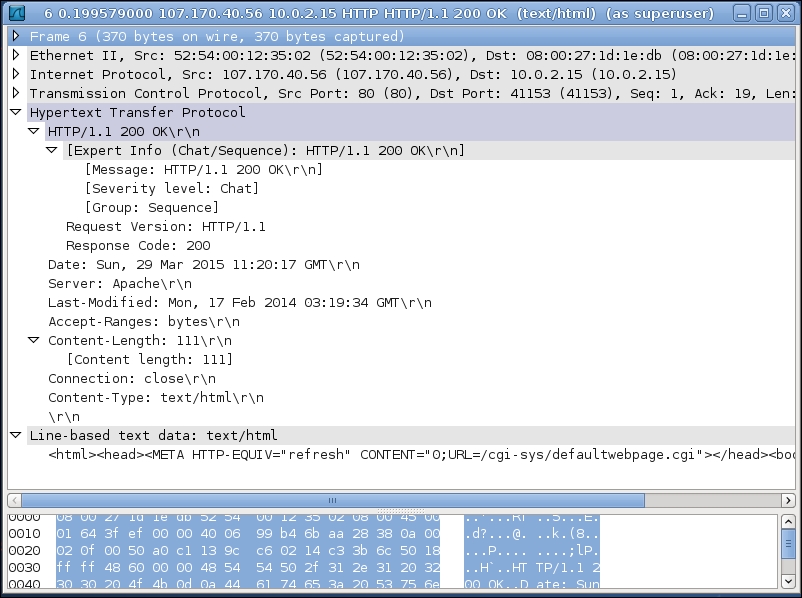
As you can see, the HTTP GET request has other components such as Request URI, version, and so on. Now you can check the HTTP response from the web server to your client. It has come after the TCP acknowledgment packet, that is, the sixth packet. Here, the server typically sends an HTTP response code (in this case 200), content length, and the data or web page content. The structure of this packet is shown in the following screenshot:
From the preceding analysis of the interaction between the client and server, you can now understand, at a basic level, what happens behind the scenes when you visit a web page using your web browser. In the next section, you will be shown how to create your own TCP server and examine the interactions between your personal TCP client and server.
As you understood from the very first client/server interaction diagram, the server process needs to carry out a bit of extra work. It needs to bind to a socket address and listen for incoming connections. The following code snippet shows how to create a TCP server:
import socket
from time import ctime

HOST = 'localhost'
PORT = 12345
BUFSIZ = 1024
ADDR = (HOST, PORT)

if __name__ == '__main__':
    server_socket = socket.socket(socket.AF_INET, socket.SOCK_STREAM)
    server_socket.bind(ADDR)
    server_socket.listen(5)
    server_socket.setsockopt( socket.SOL_SOCKET, socket.SO_REUSEADDR, 1 )

    while True:
        print('Server waiting for connection...')
        client_sock, addr = server_socket.accept()
        print('Client connected from: ', addr)

        while True:
            data = client_sock.recv(BUFSIZ)
            if not data or data.decode('utf-8') == 'END':
                break
            print("Received from client: %s" % data.decode('utf- 8'))
            print("Sending the server time to client: %s"  %ctime())
            try:
                client_sock.send(bytes(ctime(), 'utf-8'))
            except KeyboardInterrupt:
                print("Exited by user")
        client_sock.close()
    server_socket.close()
Let's modify our previous TCP client to send arbitrary data to any server. The following is an example of an enhanced TCP client:
import socket

HOST = 'localhost'
PORT = 12345
BUFSIZ = 256

if __name__ == '__main__':
    client_sock = socket.socket(socket.AF_INET, socket.SOCK_STREAM)
    host = input("Enter hostname [%s]: " %HOST) or HOST
    port = input("Enter port [%s]: " %PORT) or PORT

    sock_addr = (host, int(port))
    client_sock.connect(sock_addr)

    payload = 'GET TIME'
    try:
        while True:
            client_sock.send(payload.encode('utf-8'))
            data = client_sock.recv(BUFSIZ)
            print(repr(data))
            more = input("Want to send more data to server[y/n] :")
            if more.lower() == 'y':
               payload = input("Enter payload: ")
            else:
                break
    except KeyboardInterrupt:
        print("Exited by user")

    client_sock.close()
If you run the preceding TCP server in one console and the TCP client in another console, you can see the following interaction between the client and server. After running the TCP server script you will get the following output:
# python 7_3_tcp_server.py
Server waiting for connection...
Client connected from:  ('127.0.0.1', 59961)
Received from client: GET TIME

Sending the server time to client: Sun Mar 15 12:09:16 2015
Server waiting for connection...
When you will run the TCP client script on another terminal then you will get the following output:
# python 7_4_tcp_client_socket_send_data.py
Enter hostname [www.linux.org]: localhost
Enter port [80]: 12345
b'Sun Mar 15 12:09:16 2015'
Want to send more data to server[y/n] :n
Now, once again, you can configure Wireshark to capture packets, as discussed in the last section. But, in this case, you need to specify the port that your server is listening on (in the preceding example it's 12345), as shown in the following screenshot:

As we are capturing packets on a non-standard port, Wireshark doesn't decode it in the Data section (as shown in the middle pane of the preceding screenshot). However, you can see the decoded text on the bottom pane where the server's timestamp is shown on the right side.