
In this example, we will look at the 'sum of grades' aggregation type. The course has five assignments for the students to complete, each with a different final grade.
With the following screenshot, you can see how this example course has been set up:
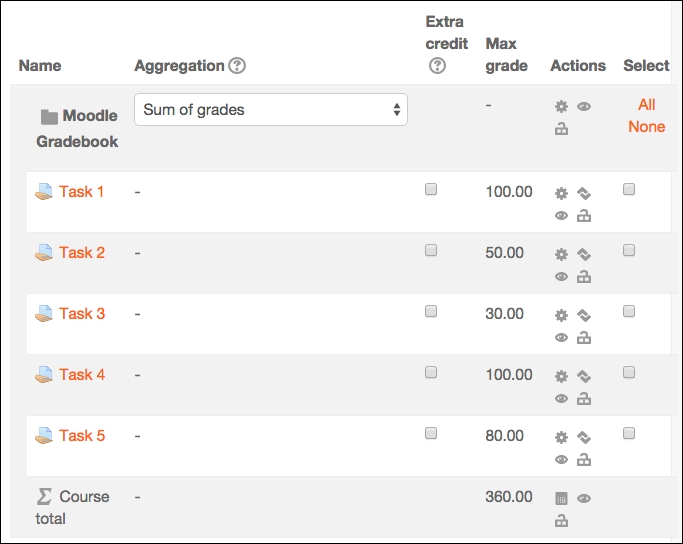
Note the maximum grades for each assessed activity. The maximum grade for the course is the total of each assessed item within the course.
To change the aggregation type, you will use the same process as the one used previously:
- Go to Categories and items.
- Change the aggregation type to Sum of grades and click on Save changes at the bottom of the screen.
- Now, switch back to View (Grader report in the drop-down list) in the Gradebook.
The calculation for this aggregation is simple. Each graded item is added together and presented as the course total grade. Normalization does not occur, and it is not possible to exclude empty grades (ungraded items). This aggregation simply adds each item to the total as it is graded.
However, it is possible to apply some extra credit within this grade type.
Go back to the Categories and items page from within the grades area and notice the Extra credit column. For each graded item within the course, there is an option for it to be chosen for extra credit. So, what does this do?
Any item that has extra credit applied to it is considered an additional assessment and therefore, the maximum grade is not used in the course total.
For example, the course can have four required tasks. A student might not submit Task 2 on time or not get a sufficient grade, but they are not allowed to resubmit. Task 5 could be an additional or alternative task that can be used to increase the final course score. Another use of extra credit could be where the student has completed all work but has the option to improve their final grade by completing additional work.
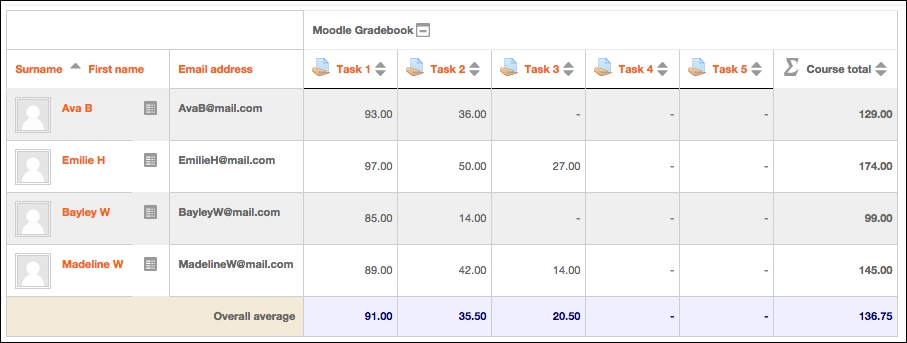
In the example we are using, the course total is currently 360, which is calculated by adding all the maximum grades of each assessed item together. We are going to set Task 5 as the extra credit. This will mean that the maximum grade of 80 is not included in the calculation of the course total. Let's apply this; go to the Categories and items screen and check the Extra credit column for Task 5 and click on Save changes at the bottom of the screen.

Note that the course total grade is now 280 instead of 360.
The maximum grade that a student can receive will always be 280. For example, if a student receives a grade of 100 in Task 1, 50 in Task 2, 30 in Task 3, 100 in Task 4, and also completes Task 5 and receives a grade of 80, their course total will still say 280. This is because it is not possible to get a grade that is higher than the course maximum. However, the extra credit will mean that students have an additional chance to receive the highest grade possible.
Until now, we have been viewing the results in the Gradebook as numbers.
In Chapter 2, Customizing Grades, we created letter grades to show numbers as a corresponding word of our choice rather than the numbers that we used to grade (for example, Distinction instead of 100). We used the following percentages for the grade letters:
|
Letter grade |
Highest percentage |
Lowest percentage |
|---|---|---|
|
Distinction |
100% |
100% |
|
Merit |
99.99% |
75% |
|
Pass |
74.99% |
50% |
|
Not yet complete |
49.99% |
0% |
If you are following these instructions within your own course, then make sure that you have the letter grades set up, as shown in the preceding table. If you cannot remember how to do this, refer to Chapter 2, Customizing Grades.
We can apply these to our Gradebook so that instead of seeing a final number grade, we will see a word based on the percentage that the learner has received.
This takes some setting up! Take a look:
- Go to the Grades area (navigate to Administration | Grades)
- Go to Categories and items (either by clicking on the drop-down list and clicking on Simple view under the categories and items heading, or by clicking on Categories and items on the tabs bar).
- Click on the edit icon at the top of the Actions column (this is usually a cog icon, and it will be next to the category aggregation drop-down list).
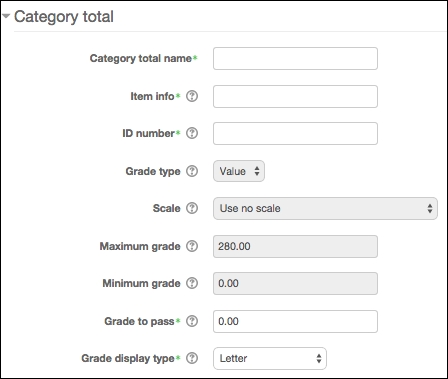
- You need to view the Category total options and click on Show more to see the settings we need.
- Look for the Grade display type option. It probably says Default (Real) in the current setting. Click on the drop-down list and you will see a range of options. There are three main options:
- Letter: This shows you the relevant letter grade in relation to the percentage setup in the letter grades options.
- Percentage: This will show you the grade as a percentage. Moodle will calculate the percentage grade based on the grade awarded and the maximum grade possible.
- Real: This will show you the actual grade awarded in the grading process. This is what is currently displayed as the default.
You might notice that there are actually more than three options available in the drop-down list. You will see that more options are there apart from the ones described in the preceding points. This allows you to choose two grades to be shown within the Gradebook. For example, if Letter (percentage) is chosen, the letter will be shown as the main grade in the Gradebook, and the corresponding percentage will be shown in brackets next to it.
- From the drop-down list, choose Letter and click on Save changes at the bottom of the screen.
- Switch back to View (Grader report in the drop-down list) in the Gradebook.
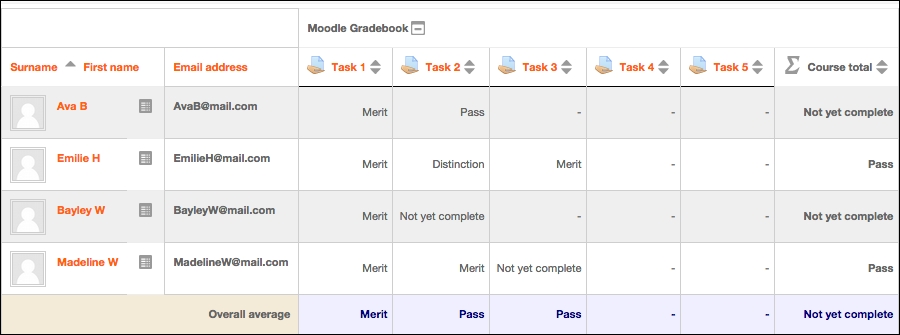
Take a look at the course total and note that the Course total column now has the words that have been set up as the letter grades. These are shown based on a calculated percentage grade, which is based on the work graded so far.

You can see that Ava B and Bayley W have not yet received sufficient grades to gain an actual grade yet (which means that they have received less than a 50 percent grade according to how our letter grades have been set up). As more work is completed and graded, the course total will increase and therefore the final grade will change.
Note that the tasks are still displayed as real number grades. It is possible to change the settings for individual assignments in order to display alternative grade display types as well. Let's go in and change these:
- Go back to Categories and items.
- This time, click on the edit (cog) icon next to the first graded item on the list (in the example we have been using, this will be Task 1).
- Find the Grade display type option (you will need to click on Show more) and change it to Letter.
- Click on Save changes at the bottom of the screen.
Repeat this process for all the assessed activities in the course (or as many as you want in order to show a letter grade instead of a number grade). Take a look at the grader report again to see the letter grades instead of numbers shown in the Gradebook.
The process to change the way in which the grades are displayed is the same for all types of aggregation and any graded activity. However, it always needs to be completed through the Gradebook for each individual item, so it could be quite time-consuming for courses with lots of graded items.
If the course is going to use the same grade display types, you can set the course default to an alternative (other than Real, which is the current default).
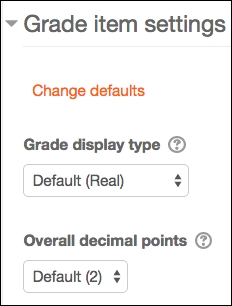
The course default can be set up as follows:
- Within the Grades screen, we need to go to the Settings area (if using the drop-down list, find the Settings heading and click on Course; if using the tabs view, click on Settings).
- Find the Grade item settings section and click on the drop-down list to change the Default (Real) option to the option you would like for the course. Save the changes on this screen.
You will still be able to change each assignment type or total to an alternative grade display type, but all future graded activities will be presented as this chosen grade display type within the course.