
In the previous chapter, we added a total of five assignments using scales, number grades, outcomes, a marking guide, and a rubric. We also added a graded item directly into the Gradebook.
Once graded activities are added to a Moodle course, we need to award grades to students. Some of the activities are graded by Moodle, such as quizzes and some elements of lessons, but activities with a lot of written content need to be reviewed and graded by the teacher.
In this chapter, we will look at different ways of grading work using a range of grade types. We will see how to:
- Grade assignments with number grades, scales, outcomes, marking guides, and rubrics
- Add written feedback, including inline comments with online text submitted by students
- Download and upload grades using the offline grading options
- Use quick grading directly within the Gradebook
Let's first find our way to assignments and the grading screen. Within a course, we need to click on the name of the assignment that we want to grade. If you created the assignments based on the instructions within Chapter 3, Adding Graded Activities, click on Task 1 to view it.
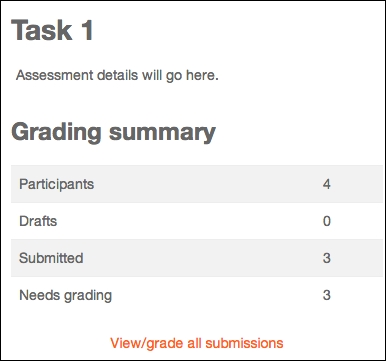
At the top of the assignment screen, we can see the name of the assignment—in this case, Task 1—as well as the assignment details. Beneath the assignment details, we are provided with a Grading summary section. The grading summary tells us about the following options:
- How many students under the Participants option are in the course for which we are expecting assignments to be submitted.
- Beneath this, we can see whether any drafts of work have been submitted in the Drafts section.
- The Submitted option tells us how many students have submitted their assignment. This is only relevant when students are required to submit their work electronically either through file or an online submission.
- The Needs grading option tells us how many of the submitted pieces of assignments need to be graded. This is particularly useful for teachers so that they can quickly see whether they are required to grade any assignment without checking each student submission individually.
Underneath the grading summary, there is the View/grade all submissions text. This is a hyperlink that will take us to the assignment grading screen. Click on this link to go into the assignment grading area.
You can see how the grading screen will look in the following screenshot:
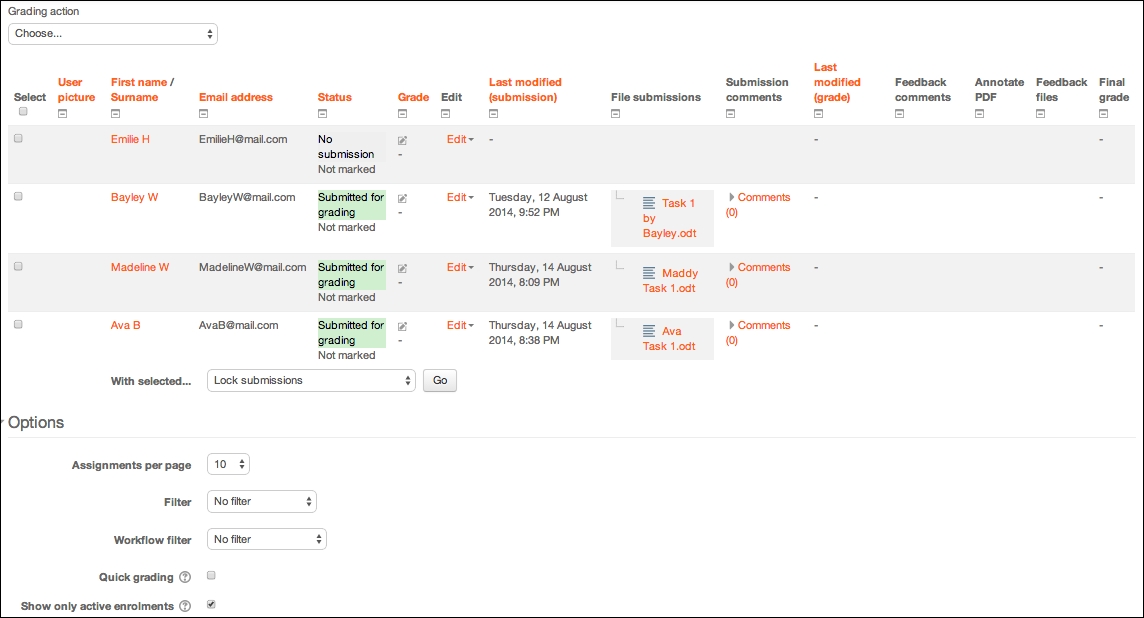
There are three main sections on this page:
- The Grading action option is shown at the top of the page. This is a drop-down list through which you can choose to download assignments or select alternative ways of grading.
- The main grading table provides information related to the assessments of each student.
- At the bottom of the assignment grading screen is the Options section that enables us to change how we view the assignment grading screen.
There are a lot of options as well as a lot of information on this screen, so we will look at one section at a time. The first area we are going to use is in the central table, as this contains the core information about the assessments for each student. The table starts with the name of each student on the left-hand side, and each column provides different details of student submissions and grades. Each column is explained in the upcoming section.
In the following screenshot, the User picture and Email address columns have been minimized in order to show more information:
These columns are explained as follows:
- The first column is a Select column where we can choose to select student rows in order to apply actions to them. The options for the selected rows appear beneath the grading table in a drop-down list, as shown in the following screenshot:
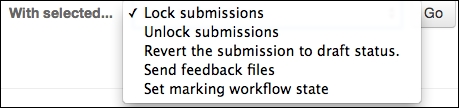
- There are five options to choose from within the list. All the actions within this list can also be undertaken when grading individual assignments, but using the Select column and choosing an option from the list allows the action to be applied to multiple students at the same time. After selecting an option, we will click on the Go button to complete the action. The five options are explained as follows:
- Lock submissions: This allows a teacher to lock the assignment submissions of selected students in order to prevent them from amending or changing their work while the grading process is taking place.
- Unlock submissions: This allows a teacher to unlock assignments in order to enable students to amend or re-upload their work.
- Revert the submission back to draft status: This option allows students to resubmit their work.
- Send feedback files: This option is only available when file submissions are enabled. The option here allows a teacher to upload feedback files for students. We will be looking at this when grading individual assignments, but this option can be used for a quick upload of feedback files for multiple students.
- Set marking workflow state: This option is only relevant when the marking workflow has been turned on when creating the assignment. This enables the teacher to amend the current workflow status of the assignment for multiple students at the same time.
- The next column is the User picture column, which is shown in the screenshot as a + symbol as this has been minimized. This column, as suggested, shows you the image a student has uploaded as their profile picture. If blind marking has been turned on for the assignment, no column for the user's picture will be shown.
- The First name/surname column shows you the student's name at the beginning of each row. If blind marking is turned on for an assignment, a participant number will be shown here instead.
- The Email address column shows you the student's email address. In the screenshot, this is shown with a + symbol, as this has been minimized.
- The Status column shows you the submission and grading status of the assignment of the student. It will indicate whether a student has submitted their assignment (either No submission or Submitted for grading). It will also show you the grading status (Not marked or Graded).
- The Grade column shows you an icon that is used to access the grading page for a specific student. After the work has been graded, the currently awarded grade will be shown in this column.
- The Edit column also enables us to access the assignment grading page as well as perform some quick actions for the assignment. The options will vary depending on the options chosen when creating the assignment and the current status of the assignment. However, the options we are most likely to see are:
- The Grade or Update grade option: This takes us to the assignment grading page.
- The Prevent submission changes option: This enables us to lock a student's submission so that it can no longer be changed.
- The Grant extension option: This allows the student to submit their assignment after the due date but before the cut-off date. This option is only available if a cut-off date was added when the assignment was created.
- The Edit submission option: This allows the teacher to upload a file or add online text on behalf of a student. This option is only shown prior to students submitting their own assignment.
- The Revert submission to draft option: This is shown if students have submitted their assignment but it hasn't been graded yet. Choosing this option will allow the student to submit their assignment again.
- The Allow another attempt option: This enables the student to have another go at submitting their work. It will enable regrading by the teacher following the submission.
- The next column on the assignment grading table is the Last modified (submission) column. This will show you the date and time when the student submitted their work for grading.
- File submissions and/or Online text will show a link to the file/files that students have uploaded for grading or written into the online text area for submission. Teachers can click to view the files from here, or can view them from the individual grading screen. For assignments with both online and file submissions enabled, there will be two columns.
- Submission comments will allow the teacher to view any comments added by students while they were submitting their assignment if this option was turned on within the assignment.
- The Last modified (grade) column will show you the date and time when the assignment was graded by a teacher.
- Feedback comments will show you the start of any comments given by the teacher after the assignment has been graded.
- If an assignment is submitted as a
.pdffile, the teacher is given an option to grade it using an integrated editor that allows the teacher to review and annotate the work directly within Moodle. If this option is used for grading, a View annotated PDF button will appear within the Annotate PDF column. - Feedback files will show you a hyperlink to any files uploaded by the teacher to provide feedback to students. This will only be shown if the Feedback files option was selected when creating the assignment.
- The Final grade column shows you the grade that was awarded to the student.
- When Outcomes are added to an assignment, a column will show you which outcomes are being met by the assignment. Following the grading, this column will show you the grade for each of the outcomes.
There is a lot of information in this table and it provides a good overview of the current status of the assignment for each student.
Some grading can take place from this screen, which we will look at in more detail later, but we will now go to an individual student's grading screen. Click on the Grade icon in the Status column next to the student you want to grade (make sure that you choose a student who has submitted some work). There are three main sections on the individual grading screen. We will look at each one in turn.
The Submission status section provides a summary of the assignment for this student, including which attempt this piece of work is, the current submission and grading status of the piece of work, the date the work was submitted, and access to any submitted work. The submitted work can be in the form of a hyperlink to a file or the content of the online submission. For the Task 1 assignment, students were required to submit a file for their work, and we can see from the following screenshot that Bayley W has submitted his assignment:

When files are uploaded, the teacher can click on them in order to open them to view the content.
The Grade section will enable us to assign a grade and provide feedback to students, as shown in the following screenshot:
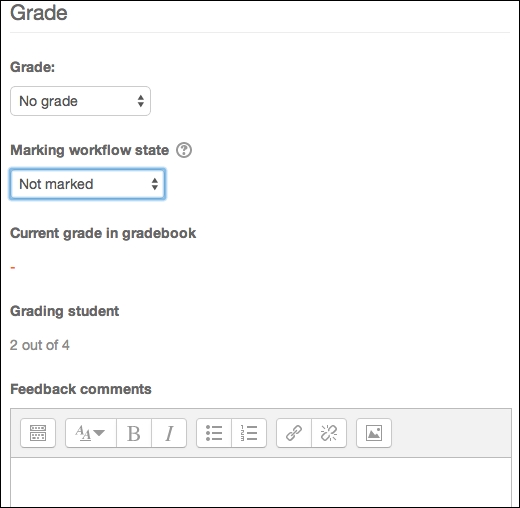
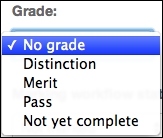
The first option is to select the grade for the piece of work. The grade will depend on the type of grade we selected when creating the assignment. For Task 1, we selected scale grade, so we are provided with a drop-down list from which we can choose our grade. When grading this assignment for the first time, the Grade drop-down list will say No grade. If this work is being regraded, then the currently assigned grade will be shown in this list.
The next option within the Grade section is Marking workflow state. This will only appear if the marking workflow is turned on when initially setting up the assignment.
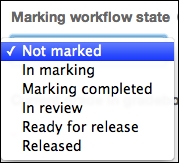
There are six options that the teacher can choose when they are grading the work:
- Not marked: This is the state that will be shown prior to grading.
- In marking: This will be chosen if the teacher has started grading the assignment but hasn't completed it yet. This option will show other teachers that the grading is still in progress. Students won't be able to view their grade when this option is chosen.
- Marking completed: This option will be chosen when the grading is complete, but it should be kept hidden from students. It can be used if a teacher has marked this piece of work but is still grading the work of others.
- In review: This option will be used if the initial teacher or assessor has graded the assignment but it needs to undergo a second grading process or needs to be moderated inline along with other work.
- Ready for release: This option will be chosen if the work has been graded and reviewed, where appropriate, and is ready for students to view, but we still want to prevent the student from seeing it. This can be used when teachers want to release the assignment to all students at the same time but they are still in the process of grading other work.
- Released: This releases the grades and feedback to students and the grade appears within their Gradebook.
The final options within the Grade section provide feedback. There were two options that were selected when we created this assignment: Feedback comments and Feedback files. Within the Feedback comments section, we can write feedback for students based on their work. This section has a text editor so that text can be formatted. Within the Feedback files section, we can upload files through the + icon or drag-and-drop them in order to give more information to students. This could be an annotated copy of the student's original uploaded work, a completed feedback form, or even a sound file that provides audio feedback.
The final section of the assignment grading screen outlines the current status and some further options for the assignment. The details within this section will vary depending on how the initial assignment was set up. In this example, we opted for attempts to be reopened automatically, so we are only provided with the details of this rather than the option that can change it.

Once each of these sections has been completed, we need to save our work. There are five options at the bottom of the individual grading screen:
- Save changes: This enables you to save the grade and feedback and go back to the assignment grading table.
- Save and show next: This will save the grade and feedback and move onto the next individual grading page in order to grade another assignment.
- Cancel: This will cancel any work completed on the current individual grading screen and show you the assignment grading area.
- Previous: This will go to the assignment grading screen of the previous student in the grading list but will not save any work completed on the current grading screen.
- Next: This will move on to the next individual grading page but will not save any work completed on the current grading screen.
Once the grading has been completed, you will see that the assignment grading table has been updated. Take a look at Bayley W in the following screenshot:

All the information regarding the work of Bayley W is explained as follows:
- The Status column shows you the text, Submitted for grading and Released which means that not only the work is submitted but has also been released after grading.
- A grade is now shown in the Grade column as well as in the Final grade column.
- The Last modified (grade) column shows you the date and time when the grade was last updated.
- You can see the beginning of the written feedback provided in the Feedback comments column. A magnifying glass icon shown in this column enables users to view all the feedback.
When creating the assignment, we enabled offline grading, so let's take a look at how we access this and some of the other grading options available from the grading table page.
At the top of the assignment grading table page, there is a drop-down list that provides you with a range of grading options. There are up to five options available in this list but the options will depend on which options were turned on when the assignment was created.
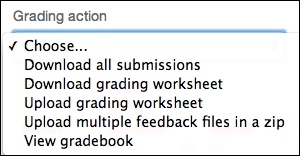
These options are explained as follows:
- Download all submissions: This enables a teacher to download all the files uploaded to this assignment. This will create a
.zipfile that can be used to view all the work when offline. - Download grading worksheet: This option is only available if offline grading has been enabled when creating the assignment. It downloads a
.csvfile that contains the assignment information.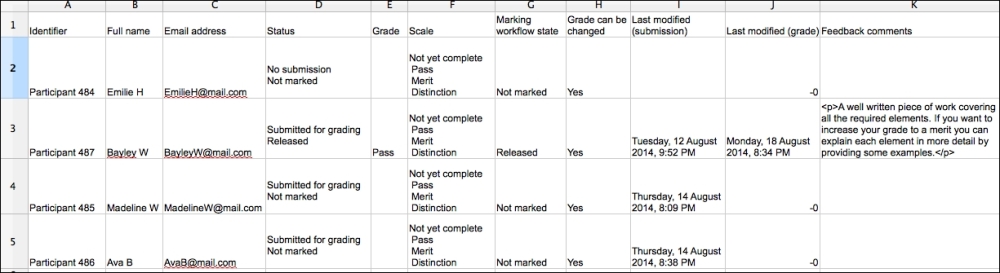
The file contains current information for assignments that are already graded. Take a look at Bayley W and note that a grade is already available in column E and feedback is shown in column K. A teacher can add grades and feedback into this
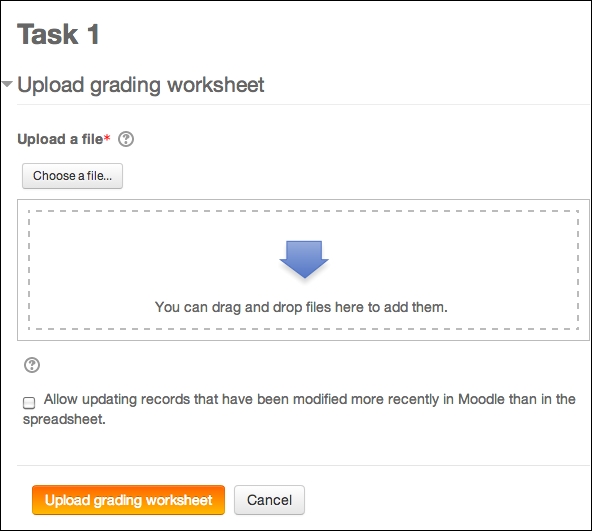
.csvfile while they are offline, and this can be uploaded to populate the grading table with the relevant grades and feedback. - Upload grading worksheet: We will choose this option if we want to upload the amended grading worksheet.
- Upload multiple feedback files in a zip: This option allows students' work to be annotated and re-uploaded as feedback. This works with the Download all submissions option. After downloading the files, the folder needs to be unzipped and all files need to be moved to a new folder. The teacher can then review and edit or annotate the files and save them. The file names must not be changed. The new folder can then be zipped and uploaded through this option. This will assign the relevant feedback files to the relevant students.
- View gradebook: This option will take us straight to the Gradebook area in order to view all grades for all students.
The Options section enables us to customize how the grading table is viewed as well as provide some quick grading options. Individual teachers can customize how they view the assignment grading area. Three main options are shown at the bottom of the assignment grading screen.
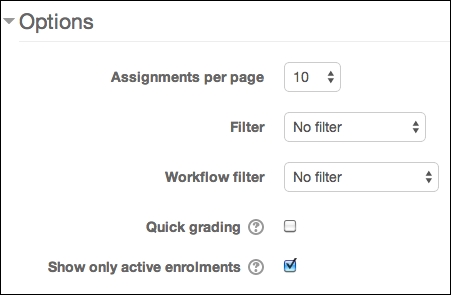
These options are explained as follows:
- Assignments per page: This option allows us to choose how many rows of students are shown per page. For example, if we have 12 students in the course, we can choose to view all 12 on one screen rather than move to another screen to review the final two students. Alternatively, if students are submitting many files per assignment, we might only want to view one or two students per page so that we can see all the information easily on the screen.
- Filter: This is a very useful drop-down list on the grading table that only shows you the assignments that we need to consider:
- Not submitted: This only shows you students who have not submitted any work
- Submitted: This only shows you students who have submitted an assignment
- Requires grading: This option will only show you any assignment that is currently ungraded
- Workflow filter: This option allows a teacher to choose to view only students within a specific part of the workflow. This can be useful to move multiple students through the workflow process.
- Quick grading: A tick in this box will give you an alternative way to grade a student's work. Let's look at this in more detail.
Turning on the Quick grading option turns the assignment grading area into an editable table that will enable us to add a grade and some written feedback directly onto the screen without needing to enter individual student pages. Quick grading is very useful for offline activities or assignments that have already been viewed offline. When a tick is added to the Quick grading box, three columns are changed.
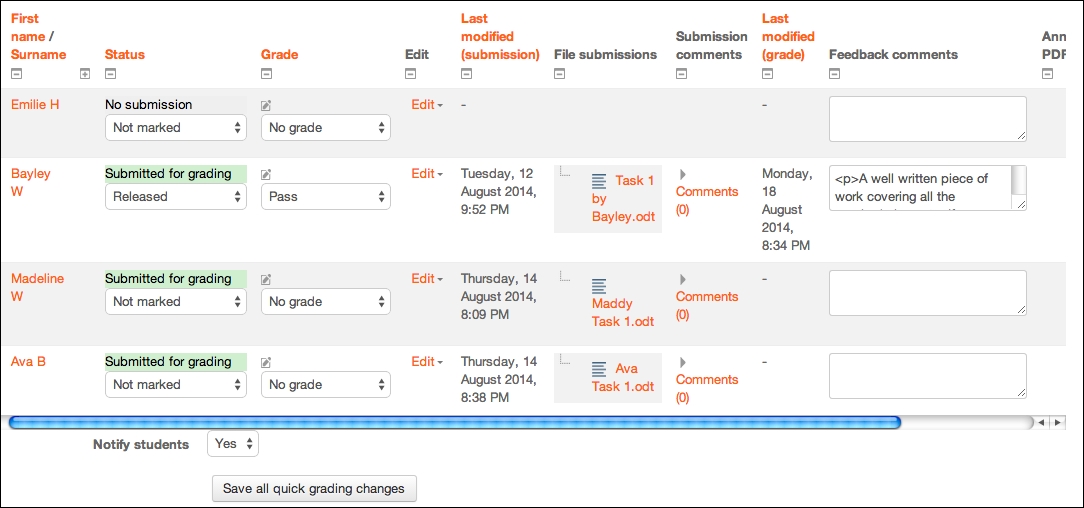
- The Status column includes a drop-down list that changes the workflow phase for the student (if the marking workflow is turned on for the assignment).
- The Grade column also has a drop-down list next to each student in order to enable us to choose the grade that we would like to award. This is the same drop-down list as the one on the individual grading screen and will show you all the options within the scale. If this assignment were to be graded with a number, an empty text box would appear here in order to enable us to type in the grade to be awarded.
- The Feedback comments column also has a text entry box that enables us to type in some feedback for the assignment. The feedback box can be made larger with the resizing area in the bottom-right section of the box, but there is no editor to change how the information looks.
Once all the grades and written feedback have been added, it is important that you click on Save all quick grading changes at the bottom of the grading table in order to save the completed feedback. We have now seen most of the main features and functions of the assignment grading table. However, we created a range of different type of assignments, so let's take a look at how we can grade other grade types.
When creating assignments in Chapter 3, Adding Graded Activities, we created Task 2 in order to enable students to submit text online, and the maximum grade possible was set to 20. View Task 2 to follow the instructions for the grading process.
As with the previous assignment, we are initially provided with Grading summary, and we need to click on View/grade all assignments. This will open up the assignment grading table.
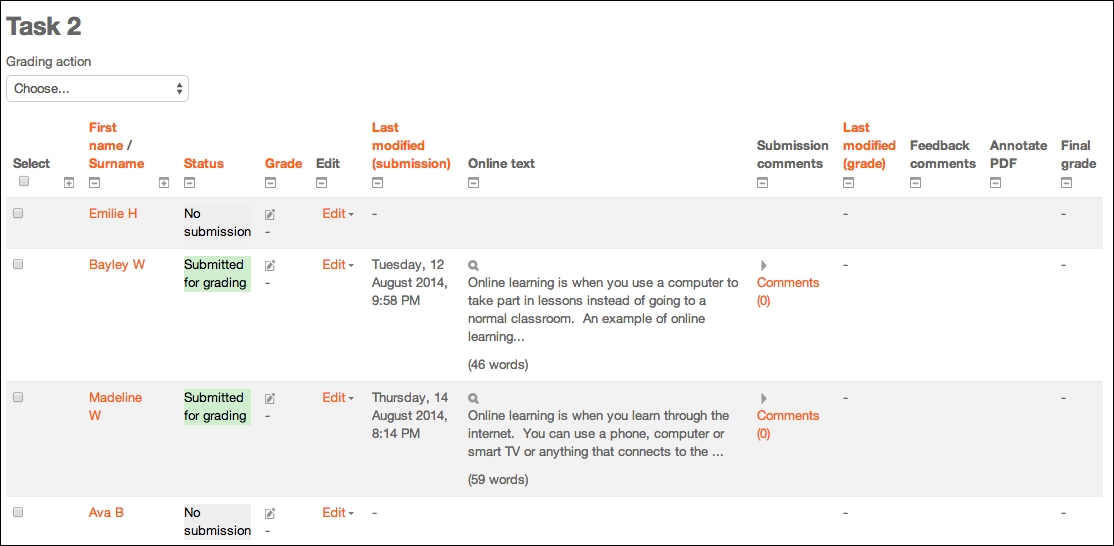
The grading table is similar to the one we have already used, but on this table, we have an Online text column instead of a File submissions column. Take a look at your grading table and choose a student who has the Submitted for grading text in the Status column. Click on the grading icon within the Grade column next to the student's name.
As shown previously, the page begins with some information about the Submission status section. Much of this information is the same as what was used previously, but take note of the Online text information shown on this page. This will allow you to read the assignment submitted by the student. In most cases, there will be more text than can be seen on this screen, so a + symbol is shown for us to expand the information in order to read the full submission.
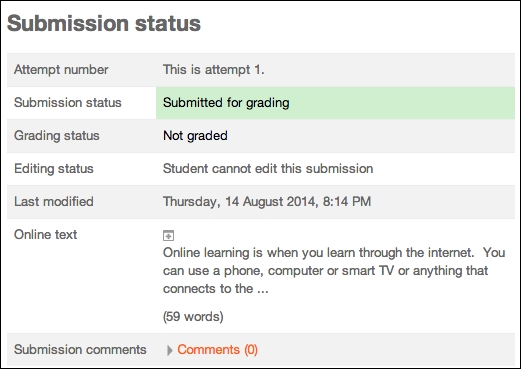
In the
Submission status section, we have the Grade section, which begins with the option to assign a grade. For the previous assignment, we graded assignments with a scale that provided a drop-down list for us to choose the grade. As this assignment is a number grade, we are provided with a text entry box instead and are informed to assign a grade in the Grade out of 20 option. We are not likely to complete this until we have reviewed the work but when we are ready, we simply need to type in a number between 0 and 20 in order to assign a grade to the assignment.

Toward the bottom of this section, we can see that the Feedback comments box already has some text in it. This text is the assignment submitted by the student. This information appears in the box, as we selected Comment inline when we initially created the assignment. We can edit this text and add further information in order to provide feedback to the students. We will need to make our feedback stand out from the student's original text, so we will need to make use of the text editor that is available at the top of the Feedback comments box.
Click on Save changes to submit the feedback and grade to the Gradebook and inform the student.
So far, we have graded assignments with a scale and number and have viewed assignments submitted as a file and online text. When creating assignments, we also set up a third task, which is Task 3, that makes use of all of these and utilizes the Outcomes feature. Let's take a look now at how to grade outcomes.
After viewing the assignment and clicking on View/grade all assignments, we will see the assignment grading table. As this assignment has enabled File submissions and Online text submissions, both of these columns appear in the table. As we have added outcomes to this assignment, there is an additional column at the end of the grading table, which shows you the outcomes that are used.
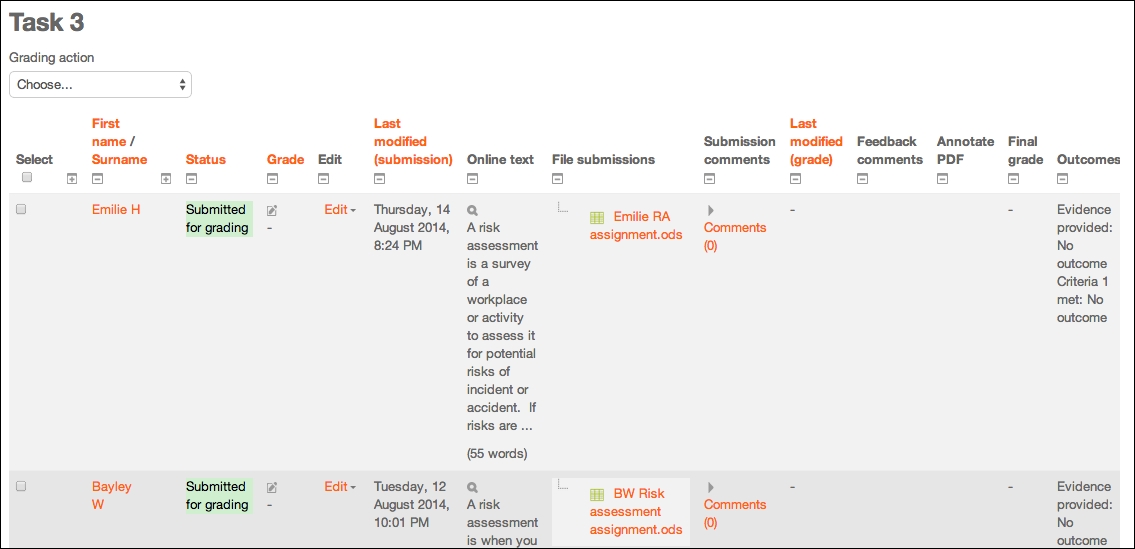
Note that currently, the text No outcome appears with each outcome. This shows you that the assignments haven't been graded yet.
We will use the individual grading screen to grade the outcomes, so we need to click on the grade icon in the Grade column next to the student whose work we want to mark.
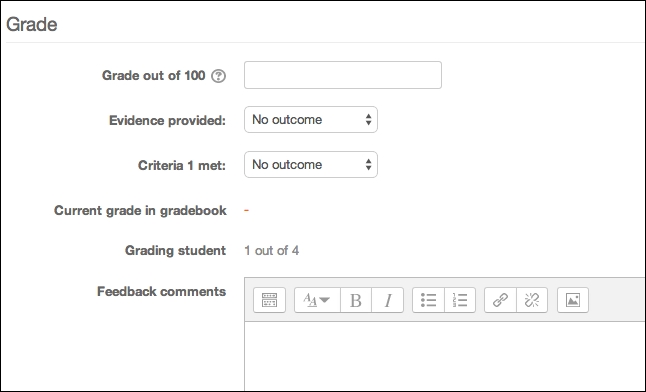
Once we're on the individual grading screen, the Submission status area enables us to access the file and online text submitted by the student. The Grade section is very similar to the one used previously. A final grade will be awarded and we can enter a numerical value in the Grade out of 100 option in the Grade box.
However, there are additional items to grade now: Evidence provided and Criteria 1 met. Next to the name of each outcome is a drop-down list that provides us with the scale chosen when setting up the outcomes. To grade each outcome, we need to click on the drop-down list in order to choose the grade we want to provide.
The other option we turned on for this assignment, which we haven't seen in practice yet, is the option to manually reopen an assignment in order to enable resubmission. This option is within the Attempt settings section.
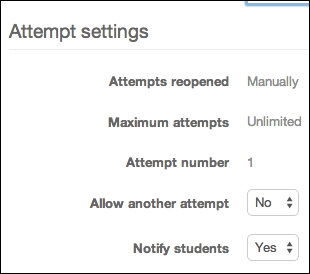
If we want to enable the student to resubmit their work again, we need to change the Allow another attempt option to Yes using the drop-down list.
When grading all assignments, we need to ensure that we click on Save changes when we have added the grades and feedback.
We have now looked at all the key options when grading assignments with the simple direct grading method, and we have also created assignments using the advanced grading methods that utilize the marking guide and rubric grading tools. Let's take a look at how to grade these assignments.