
The Gradebook can be difficult to use due to the amount of information shown within the table, especially in a course that uses a lot of graded activities. Often, the main course screen is arranged by topics in order to organize the content, and we can apply a similar process to the Gradebook through the use of categories to group grades by topic, assessment type, or any other preferred arrangement.
We have seen how we can carry out course calculations based on how we want all the assignments to be added together. However, what if you want one set of assessments to be calculated as a mean of grades and another group of tasks to show the highest grade? What if you don't want some of the grades to be used in the calculations? We can use categories in a range of ways in order to group assessments together, such as by topic or assessment type. We can also use categories to enable some assessments to have a higher weighting than others. In this chapter, we will:
- Create categories and learn how to add graded activities to them
- See how categories can provide a range of aggregation types within one course
- See ways in which we can exclude grades from the final course total
Categories enable you to group graded activities within the Gradebook so that they can be viewed together and provide additional options to calculate final course grades. We will look at how they can be used throughout this chapter but first, we need to add some categories. We need to create the categories using the Grades area of the course:
- Go to the Grades area and then go to the Categories and items screen (if using the drop-down list, you will need to choose Simple view).
- At the bottom of the Categories and items screen, there is a button that says Add category. Click on this and a new screen will appear.
- Give the category a name (such as
Unit 1). Note that the options you get when setting up the category are the same as the options we used in Chapter 5, Using Calculations to set up how the course should be aggregated. This includes the grade display type as well as the aggregation method. You can choose the same type of aggregation as the course or use one specific aggregation type for this unit. - In the Category total section, you can set a Maximum grade option for the category. Category totals will work in exactly the same way as the course total in order to set a maximum grade available. For example, if
Unit 1has three assessments each worth 100 but the maximum forUnit 1is 100, the maximum grade can be set and the aggregation will take this into account when presenting a final category total. See the upcoming information box for how this affects the course totals. - Make any further changes you would like to make to the category.
- When you have added at least one category, you get an additional option at the bottom of the screen in order to choose a Parent category option. This allows you to choose whether the category will be a main or a subcategory (a subcategory is a category nested within another category). We will look at the use of subcategories later in the chapter.
- Scroll to the bottom of the screen and click on Save changes.
Note
When using categories, the course total is calculated using the category totals instead of the individual assessment grades. The category will complete the selected aggregation when it is created and present a category total. The course total will then use each category total in the aggregation that has been selected for the course total.
If graded activities have already been added to the course, you can use the Categories and items screen to move graded activities to the relevant categories. Once categories have been set up, you can choose the relevant category when initially adding the graded activity to the course.
To move the graded activities into categories, check the small Select box next to each activity that you want to move (the Select column is on the right-hand side of the screen) and at the bottom of the screen, click on Move selected items to and choose the category you would like them to be moved to. You can also use the standard move icon in the Actions column to move individual items as required, as shown:

You can also move the order of the categories after they have been created using the moving icon:
- Click on the move icon next the category you want to move (in the Actions column). This will temporarily remove the category from the screen.
- White boxes will appear on the screen in all the places where can move the category to.
- Click on the space where you would like the category to be.
In the following screenshot, you can see that there are three categories within the course and there are two aggregation types used in the course:
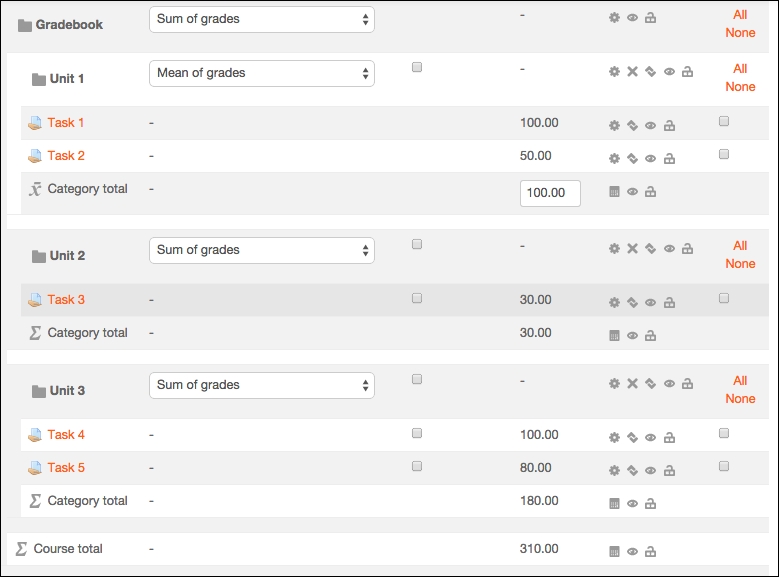
For this example, the total of Unit 1 will be calculated using the 'mean of grades' aggregation type, which means that the graded items will be divided by 2 (the total number of graded items in the category).
Unit 2 will present the sum of grades (in this case, the total of one assignment) as the category total.
Unit 3 will also show a sum of grades of the two assignments as the category total.
The course total will be Sum of grades (as shown at the top of the preceding screenshot), which will add together all the grades awarded and shown in the unit category totals. This calculation will be Unit 1 + Unit 2 + Unit 3. Individual assessment grades will only be included in the final grade if they are not in a category.