
The model that forms the basis for this app is a typical many-to-many relationship between the two entry concepts: project and employee. A project has many employees, and an employee works on many projects. The many-to-many relationship between project and employee is normalized into two one-to-many relationships by introducing the intermediary task concept; a project consists of many tasks and an employee has many tasks: project (1-n) task and employee (1-n) task.
A project has a name (its ID), a description, and a tasks collection. An employee has an email (its ID), a lastName, and a firstName (both required) attributes, and a tasks collection. A task has a project, an employee, and a description: its ID is composed of the IDs of the project and employee, so an employee can only have, at the most, one task in a project. The code for this model is based on the Dartlero framework and can be found in the libmodel folder. Let's say that we want to look up a project first, and then display its tasks. In this case, the relationship between project (1-n) and task is internal. This means that you will have two hierarchical structures: projects with their tasks and employees only (employees without tasks). In each task, you will have a reference to its employee. The data could be saved as two JSON documents in two different files or in the local storage under two different keys. You will be able to see the difference in code by looking at the toJson methods for project in the projects.dart file:
Map<String, Object> toJson() {
    Map<String, Object> entityMap = new Map<String, Object>();
    entityMap['code'] = code;
    entityMap['name'] = name;
    entityMap['description'] = description;
    entityMap['tasks'] = tasks.toJson(); // saving tasks
    return entityMap;
  }
Compare this with the same method for employee in the employee.dart file (the same is true for the fromJson methods):
Map<String, Object> toJson() {
    Map<String, Object> entityMap = new Map<String, Object>();
    entityMap['code'] = code;
    entityMap['lastName'] = lastName;
    entityMap['firstName'] = firstName;
    entityMap['email'] = email;
    return entityMap;
  }
When you load the data, you will need to recreate the relationship between employee (1-n) and task in both directions by using the employee's email in each task. After the load, all the relationships become internal and there are no reference IDs in the model (no employee email in every task, only the employee and project properties), which means that the model in the main memory is an object model. On the startup, our app instantiates the <polymer-app> component in the polymer_project_tasks.html file, which fires the PolymerApp.created() constructor. Here, the model objects are created and the data is either loaded from the local storage or, if the data was not saved yet, it is initialized by calling the tasksModel.init() method:
static const String EMPLOYEE_TASKS = 'polymer-employee-tasks';
static const String PROJECT_TASKS = 'polymer-project-tasks';
PolymerApp.created() : super.created() {
  tasksModel = TasksModel.one();
  employees = tasksModel.employees;
  projects = tasksModel.projects;
  // tasksModel.init()  // comment load to reinit
  load();
  employees.internalList= toObservable(employees.internalList);(1)
  projects.internalList = toObservable(projects.internalList); (2)
}

load() {
  loadEmployees();
  loadProjects();
}

loadEmployees() {
  String json = window.localStorage[EMPLOYEE_TASKS];
  if (json == null) {
    tasksModel.init();
  } else {
    employees.fromJson(JSON.decode(json));
  }
  employees.order();
}

loadProjects() {
  String json = window.localStorage[PROJECT_TASKS];
  if (json != null) {
    projects.fromJson(JSON.decode(json));
  }
  projects.order();
}
Lines (1) and (2) are there so that the web components show employee or project updates when a new employee or project is added or removed: this is done by annotating the List with toObservable. The web component defined in the polymer_app.html file shows a Save button:
<button on-click="{{save}}">Save</button> The save() method is also contained in the polymer_app.dart file and saves the data in the local storage:
save(Event e, var detail, Node target) {
  saveEmployees();
  saveProjects();
}
saveEmployees() {
  window.localStorage[EMPLOYEE_TASKS] = JSON.encode(employees.toJson());
}
saveProjects() {
  window.localStorage[PROJECT_TASKS] = JSON.encode(projects.toJson());
}
The initial screen shows all Projects and all Employees, as shown in the following screenshot:
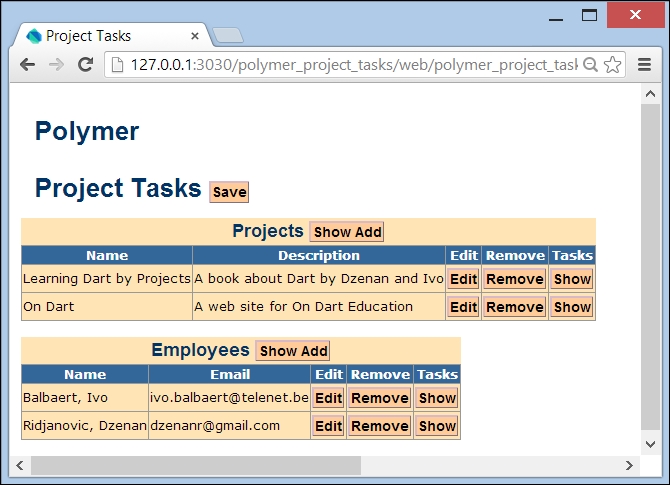
Startup of app Project Tasks
Here, we use two <project-table> and <employee-table> web components:
  <project-table id="project-table"
      projects="{{ projects }}">
  </project-table>
  <employee-table id="employee-table"
      employees="{{ employees }}">
</employee-table><link rel="import" href="component/employee/employee_table.html"> <link rel="import" href="component/project/project_table.html">
As usual, the code of the components resides in libviewcomponent. We see that both the entities have an Add functionality together with Edit, Remove, and Show tasks. The <employee-table> component defined in the employee_table.html file is indeed composed of three other components: <employee-add>, <employee-edit>, and <task-table>, again shown in the conditional templates controlled by the showAdd, showEdit, and showTasks Boolean variables; these are all marked as @observable in the EmployeeTable class:
    <template if="{{showAdd}}">
      <employee-add employees="{{employees}}"></employee-add>
    </template>
    <template if="{{showEdit}}">
      <employee-edit employees="{{employees}}"
        employee="{{employee}}"></employee-edit>
    </template>
    <template if="{{showTasks}}">
      <task-table id="task-table" employee="{{employee}}">
      </task-table>
 </template>
The employees are shown through a repeating template in an HTML table:
   <tbody template repeat="employee in employees.internalList">
     <tr>
       <td>{{ employee.name }}</td>
       <td>{{ employee.email }}</td>
       <td><button on-click="{{edit}}" code="{{employee.code}}>(2)
              Edit</button></td>
       <td><button on-click="{{delete}}" code="{{employee.code}}>   Remove</button></td>
       <td><button on-click="{{showEmployeeTasks}}"  code="{{employee.code}}>Show</button></td>
     </tr>
   </tbody>
The behavior of the <employee-table> component is defined in the employee_table.dart file:
@CustomTag('employee-table')
class EmployeeTable extends PolymerElement {
  @published Employees employees;
  Employee employee;
  @observable bool showAdd = false;
  @observable bool showEdit = false;
  @observable bool showTasks = false;
  show(Event e, var detail, Node target) {
    ButtonElement showAddButton = $['show-add'];           (3)
    if (showAddButton.text == 'Show Add') {
      showAdd = true;
      showAddButton.text = 'Hide Add';
    } else {
      showAdd = false;
      showAddButton.text = 'Show Add';
    }
  }
  edit(Event e, var detail, Element target) {
    String code = target.attributes['code'];               (4)
    employee = employees.find(code);
    showEdit = true;
  }
  delete(Event e, var detail, Element target) {
    String code = target.attributes['code'];
    employee = employees.find(code);
    for (var task in employee.tasks) {
      task.project.tasks.remove(task);
    }
    employees.remove(employee);
    showTasks = false;
  }
  showEmployeeTasks(Event e, var detail, Element target) {
    String code = target.attributes['code'];
    ButtonElement tasksButton = target;
    if (!showTasks && tasksButton.text == 'Show') {
      showTasks = true;
      employee = employees.find(code);
      employee.tasks.internalList =     toObservable(employee.tasks.internalList);
      employee.tasks.order();
      tasksButton.text = 'Hide';
    } else if (showTasks && tasksButton.text == 'Hide') {
      showTasks = false;
      tasksButton.text = 'Show';
    }
  }
}
In line (3), we have used $['show-add'] as an alternative way of writing querySelector('#show-add'). It will probably remind you of jQuery and is included in Polymer. Note how the edit event handler (as well as delete and showEmployeeTasks) gets passed the employee code through line (4), because it is an attribute of the button (see line (2)). If we expand the three subcomponents of the <employee-table> component, we will get the following screen:
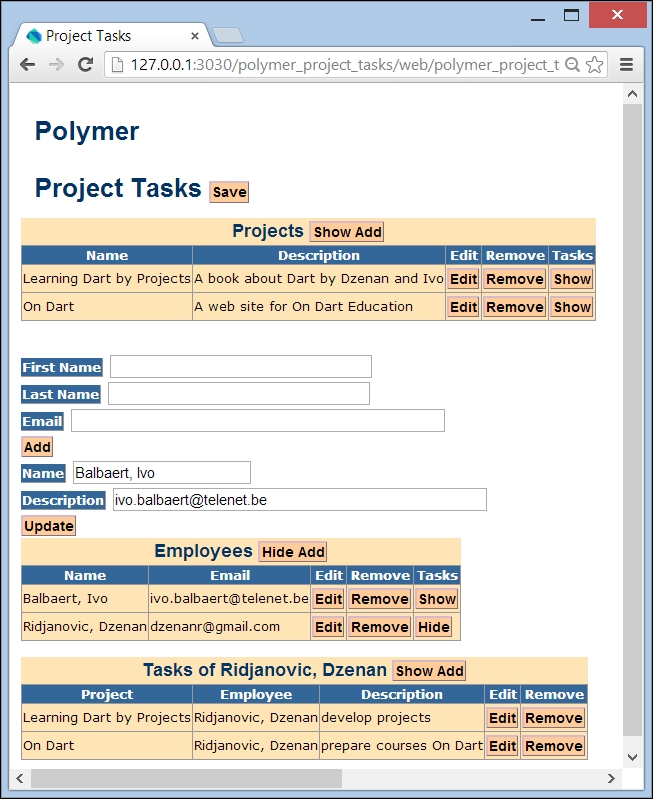
All components of employee activated
The <employee-add> component is defined in the employee_add.html file:
<polymer-element name="employee-add">
  <template>
    <style> // left out </style>
    <br/>
    <label for="first-name">First Name</label>
    <input id="first-name" type="text" size="32"/>
    <br/>
    <label for="last-name">Last Name</label>
    <input id="last-name" type="text" size="32"/>
    <br/>
    <label for="email">Email</label>
    <input id="email" type="text" size="48"/>
    <br/>
    <button on-click="{{add}}">Add</button>
    <span id="message"></span>
  </template>
  <script type="application/dart"   src="employee_add.dart"></script>
   </polymer-element>
The add method in the employee_add.dart file verifies that all the fields are filled in. If so, a new Employee object is made and added (only when the employee was new) to the employees collection:
class EmployeeAdd extends PolymerElement {
  @published Employees employees;
  add(Event e, var detail, Node target) {
    InputElement firstName = $['first-name'];
    InputElement lastName = $['last-name'];
    InputElement email = $['email'];
    Element message = $['message'];
    var error = false;
    message.text = '';
    if (firstName.value.trim() == '') {
      message.text = 'employee first name is required;   ${message.text}';
      error = true;
    }
    if (lastName.value.trim() == '') {
      message.text = 'employee last name is required;     ${message.text}';
      error = true;
    }
    if (email.value.trim() == '') {
      message.text = 'employee email is required; ${message.text}';
      error = true;
    }
    if (!error) {
      var employee = new Employee();
      employee.firstName = firstName.value;
      employee.lastName = lastName.value;
      employee.email = email.value;
      if (employees.add(employee)) {
        message.text = 'added';
        employees.order();                                    (1)
      } else {
        message.text = 'employee email already in use';
      }
    }
}
The <employee-table> component shows the newly added employee because of line (1). The UI of the <employee-edit> component is defined in the employee_edit.html file; the update is called in the employee_edit.dart file:
class EmployeeEdit extends PolymerElement {
  @published Employees employees;
  @published Employee employee;
  EmployeeEdit.created() : super.created();


update(Event e, var detail, Node target) {
    var polymerApp = querySelector('#polymer-app'),
    EmployeeTable employeeTable = polymerApp.shadowRoot.querySelector('#employee-table'),
    employeeTable.showEdit = false;
    polymerApp.saveData();
    window.location.reload();
  }}
Deleting an employee is covered in the delete method of the employee_table.dart file. The Show Tasks button activates the <task-table> component. Its <template> definition in the task_table.html file repeats over all the tasks:
     <tbody template repeat="{{task in tasks.internalList}}">
        <tr>
          <td>{{task.project.name}}</td>
          <td>{{task.employee.name}}</td>
          <td>{{task.description}}</td>
          <td><button on-click="{{edit}}" code="{{task.code}}">Edit</button></td>
          <td><button on-click="{{delete}}" code="{{task.code}}">Remove</button></td>
        </tr>
     </tbody>
The browser now shows the name of the employee or project. This component also envelops two other components: tasks can be added through the <task-add> component, edited through the <task-edit> component, and also be removed.
A new task must be related to one project and one employee. This means that a new task, as one and only one object, must be added to two different collections of tasks: one for the project and the other for the employee. In this application, the internal project-task relationship is used to add a task to its project. The external task-employee relationship is used to lookup an employee for the new task of the project. In this application, a task cannot be added to an employee.
When a task is removed from the project's tasks, it must also be removed from the employee's tasks and vice versa. When a project is removed, its tasks cannot be accessed anymore. These tasks must be removed from the collections of tasks related to the employees found in the project's tasks. Similarly, when an employee is removed, its tasks cannot be accessed anymore. These tasks must be removed from the collections of tasks related to the projects found in the employee's tasks.
The Add and Remove propagations of the tasks in the model must be reflected in the display of the web components. When a task is updated (description only in this application), there is no need to update the propagations in the model because there is only one task with the same project and the same employee. However, the same task (with the same project and the same employee) may be displayed in two different web components. When this task is updated, the new description must show up in the display of both the web components.
As it is built in exactly the same way, you should now be able to understand the other web components: <project-table>, and its <project-add> and <project-edit> subcomponents, together with <task-table>. Used in the project context, the task table also shows a <task-add> component and a remove functionality. Now, here is the lookup of an employee while adding a task in the task_add.html file:
<select id="employee-lookup">
      <option template repeat="{{employee in employees.internalList}}"> {{employee.code}} </option>
</select>
In the add event handler, its value is retrieved with the following code:
SelectElement employeeLookup = $['employee-lookup'];
String code = employeeLookup.value;