In the previous Lessons, you learned how to build and test your real-time MEAN application. You learned how to connect all the MEAN components and how to use test frameworks to test your application. While you can continue developing your application using the same methods used in the previous Lessons, you can also speed up development cycles by using supportive tools and frameworks. These tools will provide you with a solid development environment through automation and abstraction. In this Lesson, you'll learn how to use different community tools to expedite your MEAN application's development. We'll cover the following topics:
- Introduction to Grunt
- Using Grunt tasks and community tasks
- Debugging your Express application using node-inspector
- Debugging your AngularJS application's internals using Batarang
MEAN application development, and any other software development in general, often involves redundant repetition. Daily operations such as running, testing, debugging, and preparing your application for the production environment becomes monotonous and should be abstracted by some sort of an automation layer. You may be familiar with Ant or Rake, but in JavaScript projects, the automation of repetitive tasks can be easily done using the Grunt task runner. Grunt is a Node.js command-line tool that uses custom and third-party tasks to automate a project's build process. This means you can either write your own automated tasks, or better yet, take advantage of the growing Grunt eco-system and automate common operations using third-party Grunt tasks. In this section, you'll learn how to install, configure, and use Grunt. The examples in this Lesson will continue directly from those in previous Lessons, so copy the final example from Lesson 9, Testing MEAN Applications, and let's take it from there.
The easiest way to get started with Grunt is by using the Grunt command-line utility. To do so, you will need to globally install the grunt-cli package by issuing the following command in your command-line tool:
$ npm install -g grunt-cli
This will install the latest version of Grunt CLI in your global node_modules folder. When the installation process is successfully finished, you'll be able to use the Grunt utility from your command line.
To use Grunt in your project, you will need to install a local Grunt module using npm. Furthermore, third-party tasks are also installed as packages using npm. For instance, a common third-party task is the grunt-env task, which lets developers set Node's environment variables. This task is installed as a node module, which Grunt can later use as a task. Let's locally install the grunt and grunt-env modules. To do so, change your project's package.json file as follows:
{
  "name": "MEAN",
  "version": "0.0.11",
  "dependencies": {
    "express": "~4.8.8",
    "morgan": "~1.3.0",
    "compression": "~1.0.11",
    "body-parser": "~1.8.0",
    "method-override": "~2.2.0",
    "express-session": "~1.7.6",
    "ejs": "~1.0.0",
    "connect-flash": "~0.1.1",
    "mongoose": "~3.8.15",
    "passport": "~0.2.1",
    "passport-local": "~1.0.0",
    "passport-facebook": "~1.0.3",
    "passport-twitter": "~1.0.2",
    "passport-google-oauth": "~0.1.5",
    "socket.io": "~1.1.0",
    "connect-mongo": "~0.4.1",
    "cookie-parser": "~1.3.3"
  },
  "devDependencies": {
    "should": "~4.0.4",
    "supertest": "~0.13.0",
    "karma": "~0.12.23",
    "karma-jasmine": "~0.2.2",
    "karma-phantomjs-launcher": "~0.1.4",
    "grunt": "~0.4.5",
    "grunt-env": "~0.4.1"
  }
}
To install your new dependencies, go to your application's root folder and issue the following command in your command-line tool:
$ npm install
This will install the specified versions of the grunt and grunt-env modules in your project's node_modules folder. When the installation process is successfully finished, you'll be able to use Grunt in your project. However, first you'll need to configure Grunt using the Gruntfile.js configuration file.
In order to configure Grunt's operation, you will need to create a special configuration file placed at the root folder of your application. When Grunt is executed, it will automatically look for the default configuration file named Gruntfile.js in the application's root folder. You can also indicate your configuration filename using a command-line flag, but we'll use the default filename for simplicity.
To configure Grunt and use the grunt-env task, create a new file in your application's root folder and name it Gruntfile.js. In your new file, paste the following code snippet:
module.exports = function(grunt) {
  grunt.initConfig({
    env: {
      dev: {
        NODE_ENV: 'development'
      },
      test: {
        NODE_ENV: 'test'
      }
    }
  });

  grunt.loadNpmTasks('grunt-env');

  grunt.registerTask('default', ['env:dev']);
};
As you can see, the grunt configuration file uses a single module function to inject the grunt object. Then, you used the grunt.initConfig() method to configure your third-party tasks. Notice how you configured the grunt-env task in the configuration object, where you basically created two environment variables sets: one for testing and the other for development. Next, you used the grunt.loadNpmTasks() method to load the grunt-env module. Be aware that you will need to call this method for any new third-party task you add to the project. Finally, you created a default grunt task using the grunt.registerTask() method. Notice how the grunt.registerTask() method accepts two arguments: the first one sets the task name and the second argument is a collection of other grunt tasks that will be executed when the parent task is used. This is a common pattern of grouping different tasks together to easily automate several operations. In this case, the default task will only run the grunt-env tasks to set the NODE_ENV variable for your development environment.
To use the default task, navigate to your application's root folder and issue the following command in your command-line tool:
$ grunt
This will run the grunt-env task and set the NODE_ENV variable for your development environment. This is just a simple example, so let's see how we can use grunt to automate more complex operations.
Note
You can learn more about Grunt's configuration by visiting the official documentation page at http://gruntjs.com/configuring-tasks.
Running your application using the node command-line tool may not seem like a redundant task. However, when continuously developing your application, you will soon notice that you stop and start your application server quite often. To help with this task, there is unique tool called Nodemon. Nodemon is a Node.js command-line tool that functions as a wrapper to the simple node command-line tool, but watches for changes in your application files. When Nodemon detects file changes, it automatically restarts the node server to update the application. Although Nodemon can be used directly, it is also possible to use it as a Grunt task. To do so, you will need to install the third-party grunt-nodemon task and then configure it in your Grunt configuration file. Let's begin by installing the grunt-nodemon module. Start by changing your project's package.json file as follows:
{
  "name": "MEAN",
  "version": "0.0.11",
  "dependencies": {
    "express": "~4.8.8",
    "morgan": "~1.3.0",
    "compression": "~1.0.11",
    "body-parser": "~1.8.0",
    "method-override": "~2.2.0",
    "express-session": "~1.7.6",
    "ejs": "~1.0.0",
    "connect-flash": "~0.1.1",
    "mongoose": "~3.8.15",
    "passport": "~0.2.1",
    "passport-local": "~1.0.0",
    "passport-facebook": "~1.0.3",
    "passport-twitter": "~1.0.2",
    "passport-google-oauth": "~0.1.5",
    "socket.io": "~1.1.0",
    "connect-mongo": "~0.4.1",
    "cookie-parser": "~1.3.3"
  },
  "devDependencies": {
    "should": "~4.0.4",
    "supertest": "~0.13.0",
    "karma": "~0.12.23",
    "karma-jasmine": "~0.2.2",
    "karma-phantomjs-launcher": "~0.1.4",
    "grunt": "~0.4.5",
    "grunt-env": "~0.4.1",
    "grunt-nodemon": "~0.3.0"
  }
}
To install your new dependencies, go to your application's root folder and issue the following command in your command-line tool:
$ npm install
This will install the specified version of the grunt-nodemon module in your project's node_modules folder. When the installation process is successfully finished, you will need to configure the Nodemon Grunt task. To do so, change your project's Gruntfile.js file as follows:
module.exports = function(grunt) {
  grunt.initConfig({
    env: {
      test: {
        NODE_ENV: 'test'
      },
      dev: {
        NODE_ENV: 'development'
      }
    },
    nodemon: {
      dev: {
        script: 'server.js',
        options: {
          ext: 'js,html',
          watch: ['server.js', 'config/**/*.js', 'app/**/*.js']
        }
      }
    }
  });

  grunt.loadNpmTasks('grunt-env');
  grunt.loadNpmTasks('grunt-nodemon');

  grunt.registerTask('default', ['env:dev', 'nodemon']);
};
Let's go over these changes. First, you changed the configuration object passed to the grunt.initConfig() method. You added a new nodemon property and created a development environment configuration. The script property is used to define the main script file, in this case, the server.js file. The options property configures Nodemon's operation and tells it to watch both the HTML and JavaScript files that are placed in your config and app folders. The last changes you've made load the grunt-nodemon module and add the nodemon task as a subtask of the default task.
To use your modified default task, go to your application's root folder and issue the following command in your command-line tool:
$ grunt
This will run both the grunt-env and grunt-nodemon tasks and start your application server.
Note
You can learn more about Nodemon's configuration by visiting the official documentation page at https://github.com/remy/nodemon.
Since you have to run three different test tools, running your tests can also be a tedious task. However, Grunt can assist you by running Mocha, Karma, and Protractor for you. To do so, you will need to install the grunt-karma, grunt-mocha-test, and grunt-protractor-runner modules and then configure them in your Grunt's configuration file. Start by changing your project's package.json file as follows:
{
  "name": "MEAN",
  "version": "0.0.11",
  "dependencies": {
    "express": "~4.8.8",
    "morgan": "~1.3.0",
    "compression": "~1.0.11",
    "body-parser": "~1.8.0",
    "method-override": "~2.2.0",
    "express-session": "~1.7.6",
    "ejs": "~1.0.0",
    "connect-flash": "~0.1.1",
    "mongoose": "~3.8.15",
    "passport": "~0.2.1",
    "passport-local": "~1.0.0",
    "passport-facebook": "~1.0.3",
    "passport-twitter": "~1.0.2",
    "passport-google-oauth": "~0.1.5",
    "socket.io": "~1.1.0",
    "connect-mongo": "~0.4.1",
    "cookie-parser": "~1.3.3"
  },
  "devDependencies": {
    "should": "~4.0.4",
    "supertest": "~0.13.0",
    "karma": "~0.12.23",
    "karma-jasmine": "~0.2.2",
    "karma-phantomjs-launcher": "~0.1.4",
    "grunt": "~0.4.5",
    "grunt-env": "~0.4.1",
    "grunt-nodemon": "~0.3.0",
    "grunt-mocha-test": "~0.11.0",
    "grunt-karma": "~0.9.0",
    "grunt-protractor-runner": "~1.1.4"
  }
}
To install your new dependencies, go to your application's root folder and issue the following command in your command-line tool:
$ npm install
This will install the specified versions of the grunt-karma, grunt-mocha-test, and grunt-protractor-runner modules in your project's node_modules folder. However, you'll also need to download and install Protractor's standalone WebDriver server by issuing the following command in your command-line tool:
$ node_modules/grunt-protractor-runner/node_modules/protractor/bin/webdriver-manager update
When the installation process is successfully finished, your will need to configure your new Grunt tasks. To do so, change your project's Gruntfile.js file as follows:
module.exports = function(grunt) {
  grunt.initConfig({
    env: {
      test: {
        NODE_ENV: 'test'
      },
      dev: {
        NODE_ENV: 'development'
      }
    },
    nodemon: {
      dev: {
        script: 'server.js',
        options: {
          ext: 'js,html',
          watch: ['server.js', 'config/**/*.js', 'app/**/*.js']
        }
      }
    },
    mochaTest: {
      src: 'app/tests/**/*.js',
      options: {
        reporter: 'spec'
      }
    },
    karma: {
      unit: {
        configFile: 'karma.conf.js'
      }
    },
    protractor: {
      e2e: {
        options: {
          configFile: 'protractor.conf.js'
        }
      }
    }
  });

  grunt.loadNpmTasks('grunt-env');
  grunt.loadNpmTasks('grunt-nodemon');
  grunt.loadNpmTasks('grunt-mocha-test');
  grunt.loadNpmTasks('grunt-karma');
  grunt.loadNpmTasks('grunt-protractor-runner');

  grunt.registerTask('default', ['env:dev', 'nodemon']);
  grunt.registerTask('test', ['env:test', 'mochaTest', 'karma', 'protractor']);
};
Let's go over these changes. First, you changed the configuration object passed to the grunt.initConfig() method. You added a new mochaTest configuration property with a src property that tells the Mocha task where to look for the test files and an options property that sets Mocha's reporter. You also added a new karma configuration property that uses the configFile property to set Karma's configuration filename and a new protractor configuration property that uses the configFile property to set Protractor's configuration file name. You finished by loading the grunt-karma, grunt-mocha-test, and grunt-protractor-runner modules and creating a new test task containing mochaTest, karma, and protractor as subtasks.
To use your new test task, go to your application's root folder and issue the following command in your command-line tool:
$ grunt test
This will run the grunt-env, mochaTest, karma, and protractor tasks and will run your application tests.
In software development, linting is the identification of suspicious code usage using dedicated tools. In a MEAN application, linting can help you avoid common mistakes and coding errors in your daily development cycles. Let's see how you can use Grunt to lint your project's CSS and JavaScript files. To do so, you will need to install and configure the grunt-contrib-csslint module, which lints CSS files, and the grunt-contrib-jshint modules, which lints JavaScript files. Start by changing your project's package.json file as follows:
{
  "name": "MEAN",
  "version": "0.0.11",
  "dependencies": {
    "express": "~4.8.8",
    "morgan": "~1.3.0",
    "compression": "~1.0.11",
    "body-parser": "~1.8.0",
    "method-override": "~2.2.0",
    "express-session": "~1.7.6",
    "ejs": "~1.0.0",
    "connect-flash": "~0.1.1",
    "mongoose": "~3.8.15",
    "passport": "~0.2.1",
    "passport-local": "~1.0.0",
    "passport-facebook": "~1.0.3",
    "passport-twitter": "~1.0.2",
    "passport-google-oauth": "~0.1.5",
    "socket.io": "~1.1.0",
    "connect-mongo": "~0.4.1",
    "cookie-parser": "~1.3.3"
  },
  "devDependencies": {
    "should": "~4.0.4",
    "supertest": "~0.13.0",
    "karma": "~0.12.23",
    "karma-jasmine": "~0.2.2",
    "karma-phantomjs-launcher": "~0.1.4",
    "grunt": "~0.4.5",
    "grunt-env": "~0.4.1",
    "grunt-nodemon": "~0.3.0",
    "grunt-mocha-test": "~0.11.0",
    "grunt-karma": "~0.9.0",
    "grunt-protractor-runner": "~1.1.4",
    "grunt-contrib-jshint": "~0.10.0",
    "grunt-contrib-csslint": "~0.2.0"
  }
}
To install your new dependencies, go to your application's root folder and issue the following command in your command-line tool:
$ npm install
This will install the specified versions of the grunt-contrib-csslint and grunt-contrib-jshint modules in your project's node_modules folder. When the installation process is successfully finished, your will need to configure your new Grunt tasks. To do so, change your project's Gruntfile.js file as follows:
module.exports = function(grunt) {
  grunt.initConfig({
    env: {
      test: {
        NODE_ENV: 'test'
      },
      dev: {
        NODE_ENV: 'development'
      }
    },
    nodemon: {
      dev: {
        script: 'server.js',
        options: {
          ext: 'js,html',
          watch: ['server.js', 'config/**/*.js', 'app/**/*.js']
        }
      }
    },
    mochaTest: {
      src: 'app/tests/**/*.js',
      options: {
        reporter: 'spec'
      }
    },
    karma: {
      unit: {
        configFile: 'karma.conf.js'
      }
    },
    jshint: {
      all: {
        src: ['server.js', 'config/**/*.js', 'app/**/*.js', 'public/js/*.js', 'public/modules/**/*.js']
      }
    },
    csslint: {
      all: {
        src: 'public/modules/**/*.css'
      }
    }
  });

  grunt.loadNpmTasks('grunt-env');
  grunt.loadNpmTasks('grunt-nodemon');
  grunt.loadNpmTasks('grunt-mocha-test');
  grunt.loadNpmTasks('grunt-karma');
  grunt.loadNpmTasks('grunt-contrib-jshint');
  grunt.loadNpmTasks('grunt-contrib-csslint');

  grunt.registerTask('default', ['env:dev', 'nodemon']);
  grunt.registerTask('test', ['env:test', 'mochaTest', 'karma']);
  grunt.registerTask('lint', ['jshint', 'csslint']);
};
Let's go over these changes. First, you changed the configuration object passed to the grunt.initConfig() method. You added a new jshint configuration with an src property that tells the linter task which JavaScript files to test. You also added a new csslint configuration with an src property that tells the linter task which CSS files to test. You finished by loading the grunt-contrib-jshint and grunt-contrib-csslint modules, and creating a new lint task containing jshint and csslint as subtasks.
To use your new lint task, go to your application's root folder and issue the following command in your command-line tool:
$ grunt lint
This will run the jshint and csslint tasks and will report the results in your command-line tool. Linters are great tools to validate your code; however, in this form, you would need to run the lint task manually. A better approach would be to automatically run the lint task whenever you modify a file.
Using the current Grunt configuration, Nodemon will restart your application whenever certain files change. However, what if you want to run other tasks when files change? For this, you will need to install the grunt-contrib-watch module, which will be used to watch for file changes, and the grunt-concurrent module that is used to run multiple Grunt tasks concurrently. Start by changing your project's package.json file as follows:
{
  "name": "MEAN",
  "version": "0.0.11",
  "dependencies": {
    "express": "~4.8.8",
    "morgan": "~1.3.0",
    "compression": "~1.0.11",
    "body-parser": "~1.8.0",
    "method-override": "~2.2.0",
    "express-session": "~1.7.6",
    "ejs": "~1.0.0",
    "connect-flash": "~0.1.1",
    "mongoose": "~3.8.15",
    "passport": "~0.2.1",
    "passport-local": "~1.0.0",
    "passport-facebook": "~1.0.3",
    "passport-twitter": "~1.0.2",
    "passport-google-oauth": "~0.1.5",
    "socket.io": "~1.1.0",
    "connect-mongo": "~0.4.1",
    "cookie-parser": "~1.3.3"
  },
  "devDependencies": {
    "should": "~4.0.4",
    "supertest": "~0.13.0",
    "karma": "~0.12.23",
    "karma-jasmine": "~0.2.2",
    "karma-phantomjs-launcher": "~0.1.4",
    "grunt": "~0.4.5",
    "grunt-env": "~0.4.1",
    "grunt-nodemon": "~0.3.0",
    "grunt-mocha-test": "~0.11.0",
    "grunt-karma": "~0.9.0",
    "grunt-protractor-runner": "~1.1.4",
    "grunt-contrib-jshint": "~0.10.0",
    "grunt-contrib-csslint": "~0.2.0",
    "grunt-contrib-watch": "~0.6.1",
    "grunt-concurrent": "~1.0.0"
  }
}
To install your new dependencies, go to your application's root folder and issue the following command in your command-line tool:
$ npm install
This will install the specified versions of the grunt-contrib-watch and grunt-concurrent modules in your project's node_modules folder. When the installation process is successfully finished, your will need to configure your new grunt tasks. To do so, change your project's Gruntfile.js file as follows:
module.exports = function(grunt) {
  grunt.initConfig({
    env: {
      test: {
        NODE_ENV: 'test'
      },
      dev: {
        NODE_ENV: 'development'
      }
    },
    nodemon: {
      dev: {
        script: 'server.js',
        options: {
          ext: 'js,html',
          watch: ['server.js', 'config/**/*.js', 'app/**/*.js']
        }
      }
    },
    mochaTest: {
      src: 'app/tests/**/*.js',
      options: {
        reporter: 'spec'
      }
    },
    karma: {
      unit: {
        configFile: 'karma.conf.js'
      }
    },
    protractor: {
      e2e: {
        options: {
          configFile: 'protractor.conf.js'
        }
      }
    },
    jshint: {
      all: {
        src: ['server.js', 'config/**/*.js', 'app/**/*.js', 'public/js/*.js', 'public/modules/**/*.js']
      }
    },
    csslint: {
      all: {
        src: 'public/modules/**/*.css'
      }
    },
    watch: {
      js: {
        files: ['server.js', 'config/**/*.js', 'app/**/*.js', 'public/js/*.js', 'public/modules/**/*.js'],
        tasks: ['jshint']
      },
      css: {
        files: 'public/modules/**/*.css',
        tasks: ['csslint']
      }
    },
    concurrent: {
      dev: {
        tasks: ['nodemon', 'watch'],
        options: {
          logConcurrentOutput: true
        }
      }
    }
  });

  grunt.loadNpmTasks('grunt-env');
  grunt.loadNpmTasks('grunt-nodemon');
  grunt.loadNpmTasks('grunt-mocha-test');
  grunt.loadNpmTasks('grunt-karma');
  grunt.loadNpmTasks('grunt-protractor-runner');
  grunt.loadNpmTasks('grunt-contrib-jshint');
  grunt.loadNpmTasks('grunt-contrib-csslint');
  grunt.loadNpmTasks('grunt-contrib-watch');
  grunt.loadNpmTasks('grunt-concurrent');


  grunt.registerTask('default', ['env:dev', 'lint', 'concurrent']);
  grunt.registerTask('test', ['env:test', 'mochaTest', 'karma', 'protractor']);
  grunt.registerTask('lint', ['jshint', 'csslint']);
};
First, you changed the configuration object passed to the grunt.initConfig() method. You added a new watch configuration property with two subconfigurations. The first one is to watch the JavaScript files and the second is to watch the CSS files. These watch configurations will automatically run the jshint and csslint tasks whenever file changes are detected. Then, you created a new configuration for the concurrent task that will run both the nodemon and watch tasks concurrently. Notice that the concurrent task will log the console output of these tasks since you set the logConcurrentOutput option to true. You finished by loading the grunt-contrib-watch and grunt-concurrent modules and modifying your default task to use the concurrent task.
To use your modified default task, navigate to your application's root folder and issue the following command in your command-line tool:
$ grunt
This will run the lint and concurrent tasks that will start your application and report the results in your command-line tool.
Grunt is a powerful tool with a growing ecosystem of third-party tasks to perform any task from minimizing files to project deployment. Grunt also encouraged the community to create new types of task runners, which are also gaining popularity such as Gulp. So, it is highly recommended that you visit Grunt's home page at http://gruntjs.com/ to find the best automation tools suitable for your needs.
Debugging the Express part of your MEAN application can be a complicated task. Fortunately, there is a great tool that solves this issue called node-inspector. Node-inspector is a debugging tool for Node.js applications that use the Blink (a WebKit Fork) Developer Tools. In fact, developers using Google's Chrome browser will notice that node-inspector's interface is very similar to the Chrome Developer Tools' interface. Node-inspector supports some pretty powerful debugging features:
- Source code files navigation
- Breakpoints manipulation
- Stepping over, stepping in, stepping out, and resuming execution
- Variable and properties inspection
- Live code editing
When running node-inspector, it will create a new web server and attach to your running MEAN application source code. To debug your application, you will need to access the node-inspector interface using a compatible web browser. You will then be able to use node-inspector to debug your application code using node-inspector's interface. Before you begin, you'll need to install and configure node-inspector and make a few small changes in the way you run your application. You can use node-inspector independently or by using the node-inspector Grunt task. Since your application is already configured to use Grunt, we'll go with the Grunt task solution.
To use node-inspector, you will need to install the grunt-node-inspector module. To do so, change your project's package.json file as follows:
{
  "name": "MEAN",
  "version": "0.0.11",
  "dependencies": {
    "express": "~4.8.8",
    "morgan": "~1.3.0",
    "compression": "~1.0.11",
    "body-parser": "~1.8.0",
    "method-override": "~2.2.0",
    "express-session": "~1.7.6",
    "ejs": "~1.0.0",
    "connect-flash": "~0.1.1",
    "mongoose": "~3.8.15",
    "passport": "~0.2.1",
    "passport-local": "~1.0.0",
    "passport-facebook": "~1.0.3",
    "passport-twitter": "~1.0.2",
    "passport-google-oauth": "~0.1.5",
    "socket.io": "~1.1.0",
    "connect-mongo": "~0.4.1",
    "cookie-parser": "~1.3.3"
  },
  "devDependencies": {
    "should": "~4.0.4",
    "supertest": "~0.13.0",
    "karma": "~0.12.23",
    "karma-jasmine": "~0.2.2",
    "karma-phantomjs-launcher": "~0.1.4",
    "grunt": "~0.4.5",
    "grunt-env": "~0.4.1",
    "grunt-nodemon": "~0.3.0",
    "grunt-mocha-test": "~0.11.0",
    "grunt-karma": "~0.9.0",
    "grunt-protractor-runner": "~1.1.4",
    "grunt-contrib-jshint": "~0.10.0",
    "grunt-contrib-csslint": "~0.2.0",
    "grunt-contrib-watch": "~0.6.1",
    "grunt-concurrent": "~1.0.0",
    "grunt-node-inspector": "~0.1.5"
  }
}
To install your new dependencies, go to your application's root folder and issue the following command in your command-line tool:
$ npm install
This will install the specified version of the grunt-node-inspector module in your project's node_modules folder. When the installation process is successfully finished, your will need to configure your new grunt task.
The node-inspector's grunt task configuration is very similar to other tasks' configuration. However, it will also force you to make a few changes in other tasks as well. To configure the node-inspector task, change your project's Gruntfile.js file as follows:
module.exports = function(grunt) {
  grunt.initConfig({
    env: {
      test: {
        NODE_ENV: 'test'
      },
      dev: {
        NODE_ENV: 'development'
      }
    },
    nodemon: {
      dev: {
        script: 'server.js',
        options: {
          ext: 'js,html',
          watch: ['server.js', 'config/**/*.js', 'app/**/*.js']
        }
      },
      debug: {
        script: 'server.js',
        options: {
          nodeArgs: ['--debug'],
          ext: 'js,html',
          watch: ['server.js', 'config/**/*.js', 'app/**/*.js']
        }
      }
    },
    mochaTest: {
      src: 'app/tests/**/*.js',
      options: {
        reporter: 'spec'
      }
    },
    karma: {
      unit: {
        configFile: 'karma.conf.js'
      }
    },
    protractor: {
      e2e: {
        options: {
          configFile: 'protractor.conf.js'
        }
      }
    },
    jshint: {
      all: {
        src: ['server.js', 'config/**/*.js', 'app/**/*.js', 'public/js/*.js', 'public/modules/**/*.js']
      }
    },
    csslint: {
      all: {
        src: 'public/modules/**/*.css'
      }
    },
    watch: {
      js: {
        files: ['server.js', 'config/**/*.js', 'app/**/*.js', 'public/js/*.js', 'public/modules/**/*.js'],
        tasks: ['jshint']
      },
      css: {
        files: 'public/modules/**/*.css',
        tasks: ['csslint']
      }
    },
    concurrent: {
      dev: {
        tasks: ['nodemon', 'watch'],
        options: {
          logConcurrentOutput: true
        }
      },
      debug: {
        tasks: ['nodemon:debug', 'watch', 'node-inspector'],
        options: {
          logConcurrentOutput: true
        }
      }
    },
    'node-inspector': {
      debug: {}
    }
  });

  grunt.loadNpmTasks('grunt-env');
  grunt.loadNpmTasks('grunt-nodemon');
  grunt.loadNpmTasks('grunt-mocha-test');
  grunt.loadNpmTasks('grunt-karma');
  grunt.loadNpmTasks('grunt-protractor-runner');
  grunt.loadNpmTasks('grunt-contrib-jshint');
  grunt.loadNpmTasks('grunt-contrib-csslint');
  grunt.loadNpmTasks('grunt-contrib-watch');
  grunt.loadNpmTasks('grunt-concurrent');
  grunt.loadNpmTasks('grunt-node-inspector');

  grunt.registerTask('default', ['env:dev', 'lint', 'concurrent:dev']);
  grunt.registerTask('debug', ['env:dev', 'lint', 'concurrent:debug']);
  grunt.registerTask('test', ['env:test', 'mochaTest', 'karma', 'protractor']);
  grunt.registerTask('lint', ['jshint', 'csslint']);
};
Let's go over these changes. First, you changed the configuration object passed to the grunt.initConfig() method. You began by modifying the nodemon task by adding a new debug subtask. The debug subtask will use the nodeArgs property to start your application in debug mode. Then, you modified the concurrent task by adding a new debug subtask as well. This time, the debug subtask is simply using the nodemon:debug task and the new node-inspector task. Near the end of the configuration object, you minimally configured the new node-inspector task and then loaded the grunt-node-inspector module. You finished by creating a debug task and modifying your default task.
Note
You can learn more about node-inspector's configuration by visiting the official project at https://github.com/node-inspector/node-inspector.
To use your new debug task, navigate to your application's root folder and issue the following command in your command-line tool:
$ grunt debug
This will run your application in a debug mode and start the node-inspector server. The output in your command-line tool should be similar to the following screenshot:
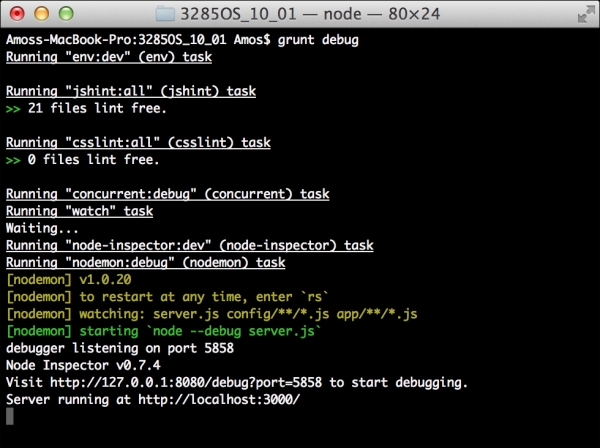
As you can see, the node-inspector task invites you to start debugging the application by visiting http://127.0.0.1:8080/debug?port=5858 using a compatible browser. Open this URL in Google Chrome and you should see an interface similar to the following screenshot:
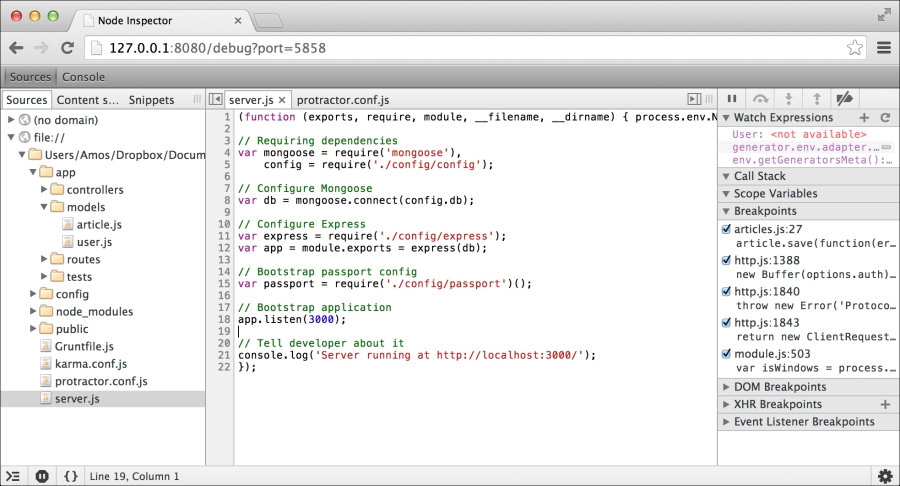
Debugging with node-inspector
As you can see, you'll get a list of your project files on the left-hand side panel, a file content viewer in the middle panel, and a debug panel on the right-hand side panel. This means your node-inspector task is running properly and identifies your Express project. You can start debugging your project by setting some breakpoints and testing your components' behavior.
Debugging most of the AngularJS part of your MEAN application is usually done in the browser. However, debugging the internal operations of AngularJS can be a bit trickier. For this purpose, the AngularJS team created a Chrome extension called Batarang. Batarang extends the Chrome Developer Tools with a new tab where you can debug different aspects of your AngularJS application. Installing Batarang is quite straightforward; all you have to is to visit the Chrome web store at https://chrome.google.com/webstore/detail/angularjs-batarang/ighdmehidhipcmcojjgiloacoafjmpfk and install the Chrome extension.
Once you're done installing Batarang, use Chrome to navigate to your application URL. Then, open the Chrome Developer Tools panel and you should see an AngularJS tab. Click on it and a panel similar to the following screenshot should open:
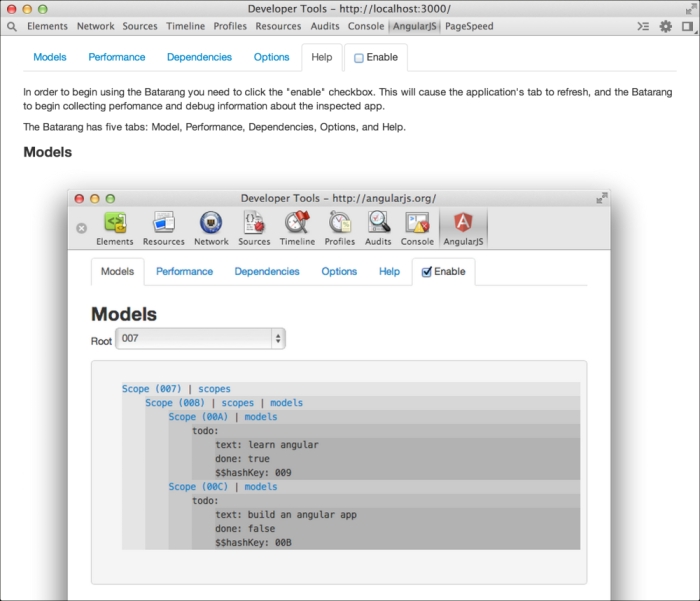
Batarang Tool
Note that you need to enable Batarang using the Enable checkbox at the top of the panel. Batarang has four tabs you can use: Models, Performance, Dependencies, and Options. The last tab is the Help section where you can learn more about Batarang.
To explore your AngularJS application models, make sure you've enabled Batarang and click on the Models tab. You should see a panel similar to the following screenshot:
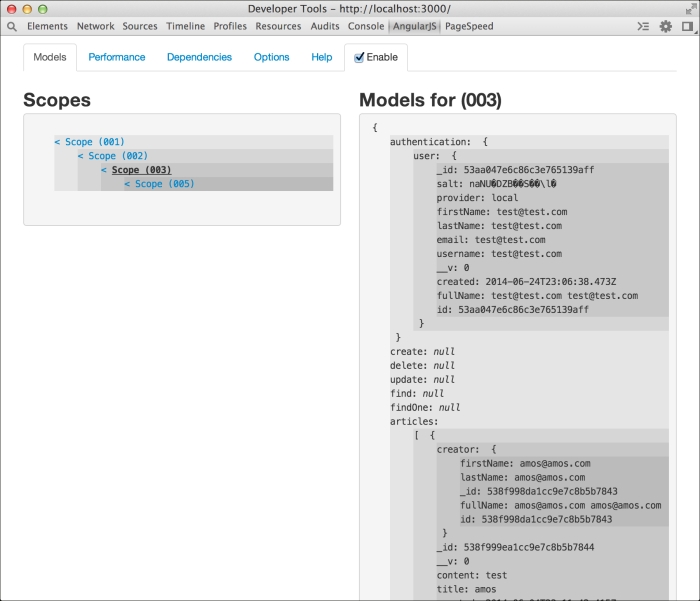
Batarang models
On the left side of the panel, you'll be able to see the page scopes hierarchy. When selecting a scope, you'll be able to see the scope model on the right. In the preceding screenshot, you can see the scope model for the articles example from the previous Lessons.
To explore your AngularJS application performance, make sure you enabled Batarang and click on the Performance tab. You should see a panel similar to the following screenshot:
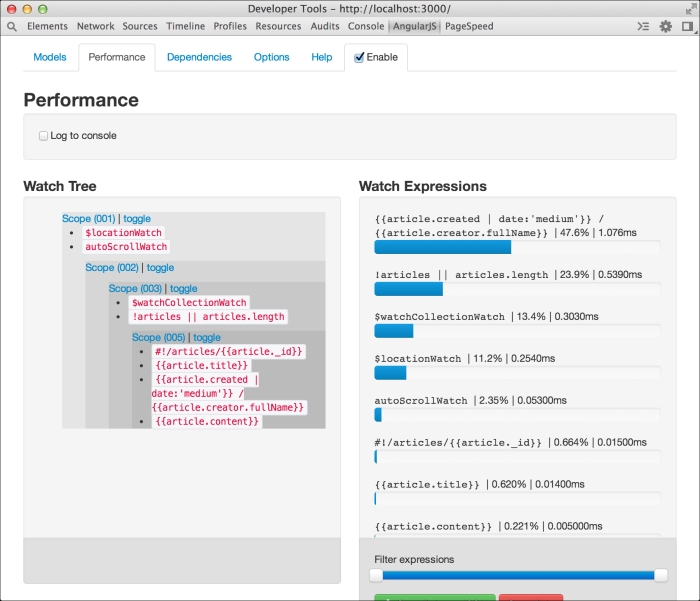
Batarang performance
On the left side of the panel, you'll be able to see a tree of your application's watched expressions. On the right-hand side of the panel, you'll be able to see the relative and absolute performance status of all of your application's watched expressions. In the preceding screenshot, you'll be able to see the performance report for the articles example from the previous Lessons.
To explore your AngularJS services' dependencies, make sure you enabled Batarang and then click on the Dependencies tab. You should see a panel similar to the following screenshot:
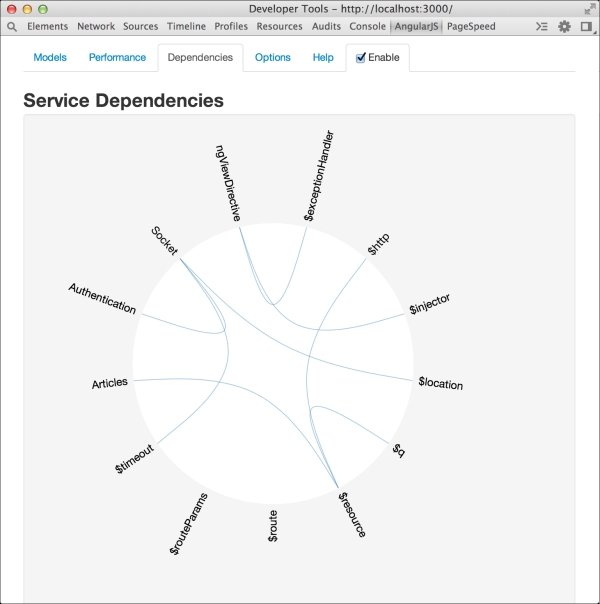
Batarang dependencies
In the Dependencies tab, you'll be able to see a visualization of the application's services dependencies. When hovering with your mouse over one of the services, the selected service will be colored green and the selected service dependencies will turn red.
To highlight your AngularJS components' elements, make sure you've enabled Batarang and then click on the Options tab. You should see a panel similar to the following screenshot:
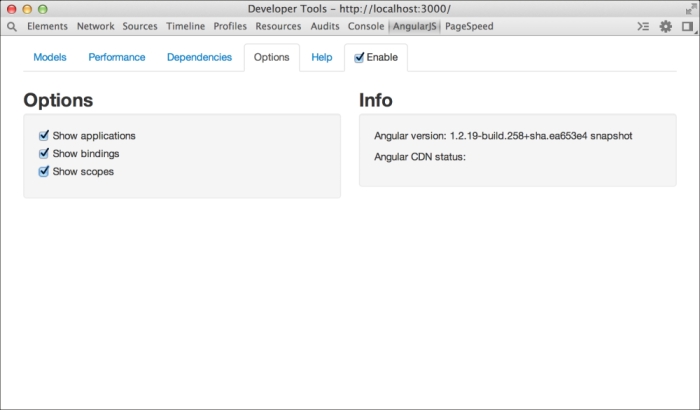
Batarang options
When you enable one of the options, Batarang will highlight the respective feature of the application. Scopes will have a red outline, bindings will have a blue outline, and applications will have a green outline.
Batarang is a simple yet powerful tool. Used right, it can save you a lot of time of endlessly looking around and using console logging. Make sure you understand each tab and try to explore your application yourself.