Chapter 1: Creating Your First Web Application in Angular
Angular is a popular and modern JavaScript framework that can run on different platforms additional to the web, such as desktop and mobile. Angular applications are written in TypeScript, a superset of JavaScript that provides syntactic sugar such as strong typing and object-oriented techniques.
Angular applications are created and developed using a command-line tool made by the Angular team called the Angular CLI. It automates many development tasks, such as scaffolding, testing, and deploying an Angular application, which would take a lot of time to configure manually.
The popularity of the Angular framework is considerably reflected in its broad support of tooling. The Visual Studio Code (VSCode) editor contains various extensions that enhance the development experience when working with Angular.
In this chapter, we will cover the following topics:
- Introduction to Angular
- Introduction to the Angular CLI
- Exploring the rich ecosystem of Angular tooling in VSCode
- How to create our first Angular application
- How to use Nx Console for automating Angular CLI commands
Essential background theory and context
The Angular framework is a cross-platform JavaScript framework that can run on a wide range of environments, including the web, servers, mobile, and desktop. It consists of a collection of JavaScript libraries that we can use for building highly performant and scalable web applications. The architecture of an Angular application is based on a hierarchical representation of components. Components are the fundamental building blocks of an Angular application. They represent and control a particular portion of a web page called the view. Some examples of components are as follows:
- A list of blog posts
- An issue reporting form
- A weather display widget
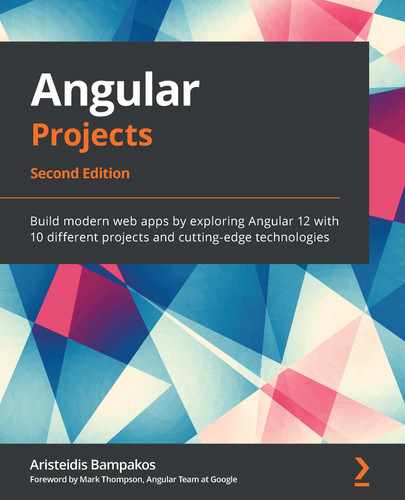
Components of an Angular application can be logically organized as a tree:

Figure 1.1 – Component tree
An Angular application typically has one main component, called AppComponent, by convention. Each component in the tree can communicate and interact with its siblings using an application programming interface defined by each one.
An Angular application can have many features that are called modules. Each module serves a block of single functionality that corresponds to a particular application domain or workflow. Angular modules are used to group Angular components that share similar functionality:
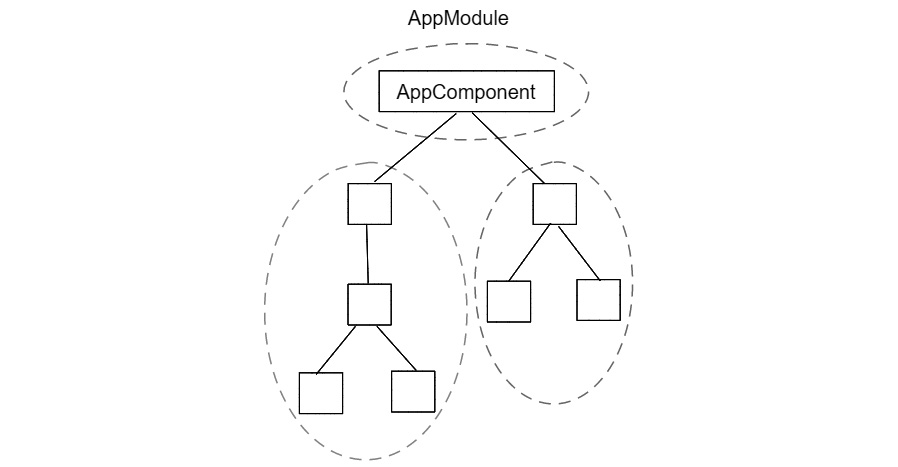
Figure 1.2 – Module hierarchy
In the previous diagram, the dashed line circles represent Angular modules. An Angular application typically has one main module, called AppModule, by convention. Each module can import other modules in an Angular application if they wish to use part of their functionality.
The functionality of a module can be further analyzed in the presentational and business logic of a feature. Angular components should only be responsible for handling the presentational logic and delegating business logic tasks to services. The Angular framework provides Angular services to components using a built-in dependency injection (DI) mechanism.
The Angular DI framework uses special-purpose objects, called injectors, to hide much of the complexity of providing dependencies to an Angular application. Components are not required to know any of the actual implementation of an Angular service. They only need to ask for it from an injector.
An Angular service should follow the single responsibility principle, and it should not cross boundaries between different Angular modules. Some examples of services are as follows:
- Access data from a backend API using the HTTP protocol.
- Interact with the local storage of the browser.
- Error logging.
- Data transformations.
An Angular developer does not need to remember how to create components, modules, and services off by heart while building an Angular application. Luckily, the Angular CLI can assist us by providing a command-line interface to accomplish these tasks.
Introduction to the Angular CLI
The Angular CLI is a tool created by the Angular team that improves the developer experience while building Angular applications. It hides much of the complexity of scaffolding and configuring an Angular application while allowing the developer to concentrate on what they do best – coding! Before we can start using the Angular CLI, we need to set up the following prerequisites in our system:
- Node.js: A JavaScript runtime that is built on the v8 engine of Chrome. You can download any Long-Term Support (LTS) version from https://nodejs.org/en.
- npm: A package manager for the Node.js runtime.
We can then install the Angular CLI using npm from the command line:
npm install -g @angular/cli
We can use the -g option to install the Angular CLI globally since we want to create Angular applications from any path of our operating system.
Important note
Installing the Angular CLI may require administrative privileges in some operating systems.
To verify that the Angular CLI has been installed correctly, we can run the following from the command line:
ng version
The previous command will report the version of the Angular CLI that has been installed in our system. The Angular CLI provides a command-line interface through the ng command, which is the binary executable of the Angular CLI. It can accept various options, including the following:
- serve: Build and serve an Angular application.
- build: Build an Angular application.
- test: Run the unit tests of an Angular application.
- generate: Generate a new Angular artifact, such as a component or module.
- add: Install a third-party library that is compatible with the Angular framework.
- new: Create a new Angular application.
The previous options are the most common ones. If you want to view all the available commands, execute the following in the command line:
ng help
The previous command will display a list of all the supported commands from the Angular CLI.
The Angular tooling ecosystem is full of extensions and utilities that can help us when developing Angular applications. In the next section, we will overview some of them that work with VSCode.
Angular tooling in VSCode
There are many extensions available in the VSCode Marketplace that enhance the Angular tooling ecosystem. In this section, we will learn about the most popular ones that can significantly help us in Angular development:
- Nx Console
- Angular Language Service
- Angular Snippets
- Angular Evergreen
- Material Icon Theme
The preceding list is not exhaustive, and some of the extensions are already included in the Angular Essentials pack. However, you can browse more Angular extensions for VSCode at https://marketplace.visualstudio.com/search?term=angular&target=VSCode.
Nx Console
The Nx Console is a VSCode extension developed by the Nrwl team that provides a graphical user interface over the Angular CLI. It contains most of the Angular CLI commands, and it uses the Angular CLI internally to execute each one. We will learn more about this extension in the Building our application with Nx Console section.
Angular Language Service
The Angular Language Service extension provides various enhancements while editing HTML templates in an Angular application, including the following:
- Code autocompletion
- Compile error messages
- Go-to definition techniques
Code autocompletion is a feature that helps us find the right property or method to use while typing. It works by displaying a list of suggestions while we start typing in HTML content:

Figure 1.3 – Code completion
In the previous screenshot, when we start typing the word ti, the Angular Language Service suggests the title component property. Notice that code completion only works for the public properties and methods in a component.
One of the most common issues when developing web applications is detecting errors before the application reaches production. This problem can be solved partially by the Angular compiler, which is bootstrapped upon building an Angular application for production. Moreover, the Angular Language Service can take this further by displaying compilation error messages far before our application reaches the compilation process:
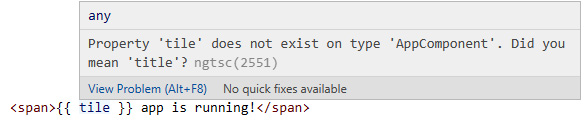
Figure 1.4 – Compile error message
For example, if we accidentally misspell the name of a property or method of the component, the Angular Language Service will display an appropriate error message.
Angular Snippets
The Angular Snippets extension contains a collection of Angular code snippets for TypeScript and HTML. In TypeScript, we can use it to create components, modules, or services in a blank TypeScript file:

Figure 1.5 – New Angular component snippet
In an HTML template, we can use the extension to create useful Angular artifacts, such as the *ngFor directive, to loop through a list in HTML:
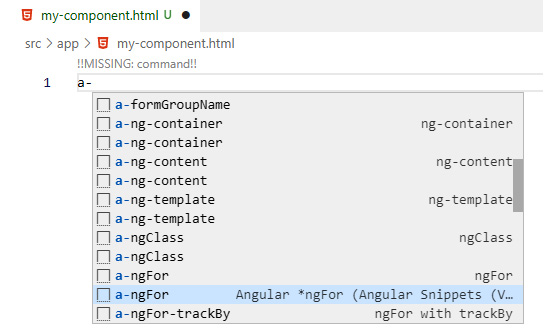
Figure 1.6 – *ngFor snippet
Due to the widespread popularity and capabilities of the Angular CLI, it looks more convenient to use it for generating Angular artifacts in TypeScript. However, Angular Snippets does a great job with the HTML part, where there are more things to remember off by heart.
Angular Evergreen
One of the primary factors that makes the Angular framework so stable is that it follows a regular release cycle based on semantic versioning. If we want our Angular applications to be packed with the latest features and fixes, we must update them regularly. But how can we stay up to date in the most efficient way? We can use the Angular Evergreen extension for that!
It compares the Angular and Angular CLI versions of an Angular CLI project with the latest ones and alerts you about whether you need to update it:
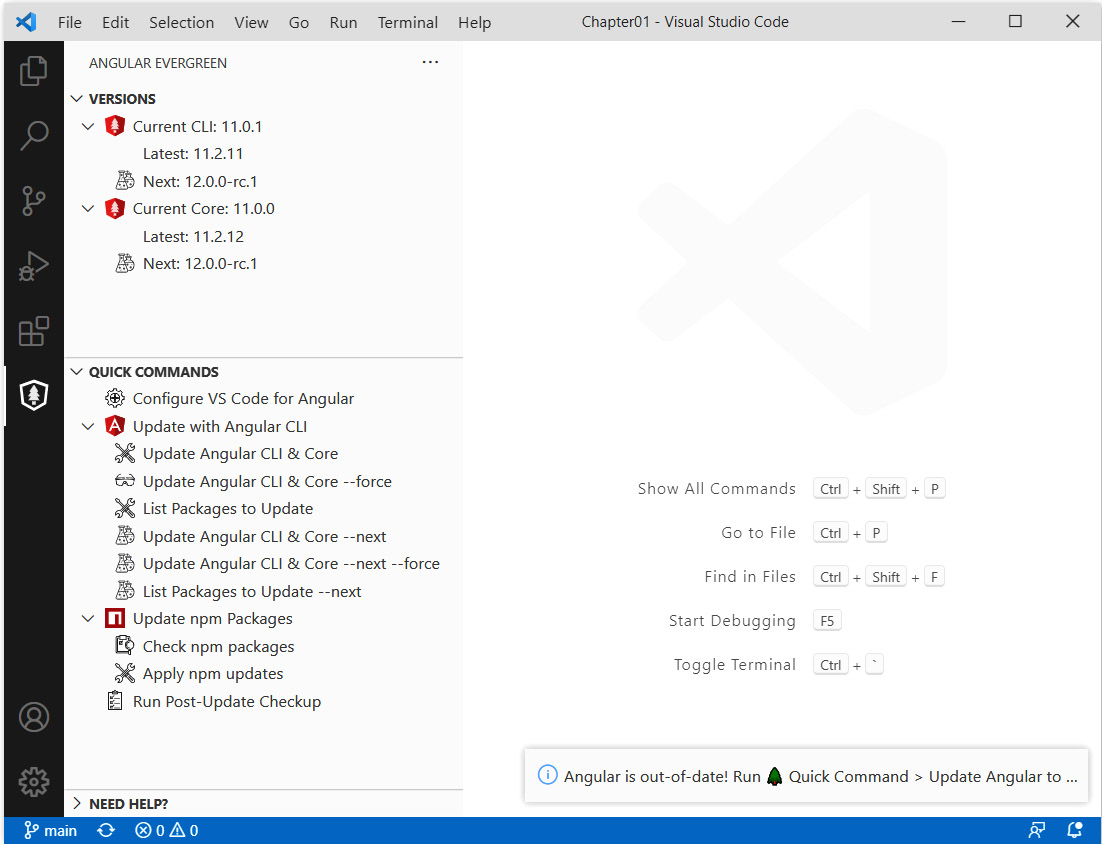
Figure 1.7 – Angular Evergreen
It provides an easy-to-use user interface for executing the following commands:
- Upgrading Angular dependencies to the latest version
- Upgrading Angular dependencies to the next version
- Upgrading all npm dependencies
Angular Evergreen is the perfect extension for never staying out of date with your Angular projects.
Material Icon Theme
The last extension in the list does not add much value regarding the productivity of the developer. Instead, it focuses on the discoverability and aesthetic point of view by modifying the icon theme of VSCode.
The Material Icon Theme contains a ton of icons that are based on Material Design. It can understand the type of each file in your project and display the related icon automatically. For example, Angular modules are displayed with a red Angular icon, whereas components are displayed with a blue Angular icon.
VSCode has a default file icon theme called Seti. Once you've installed Material Icon Theme, it will prompt you to select which one you would like to activate:

Figure 1.8 – Selecting a file icon theme
Selecting Material Icon Theme will update the icons of your current Angular project automatically.
Important note
Material Icon Theme is installed and applied globally to VSCode, so you do not need to activate it separately for each Angular CLI project.
Now, when you open your Angular project, you will understand the type of each file at a glance, even if its name is not displayed as a whole on the screen.
Project overview
In this project, we will use the Angular CLI to create a new Angular application from scratch. Then, we will interact with the core functionality of the Angular framework to make a simple change to our application. Finally, we will learn how to use the Nx Console extension to build and serve our application.
Build time: 15 minutes.
Getting started
The following software tools are required to complete this project:
- Git: A free and open source distributed version control system. You can download it from https://git-scm.com.
- VSCode: A code editor that you can download from https://code.visualstudio.com/Download.
- Angular CLI: The command-line interface for Angular that we introduced in the Essential background theory and context section.
- GitHub material: The related code for this chapter can be found in the Chapter01 folder at https://github.com/PacktPublishing/Angular-Projects-Second-Edition.
Creating our first Angular application
To create a fresh new Angular application, we must execute the ng new command of the Angular CLI, passing the name of the application as an option:
ng new my-angular
The new command is used to create a new Angular application or a new Angular workspace. An Angular workspace is an Angular CLI project that contains one or more Angular applications, where some of them can be Angular libraries. So, when we execute the ng new command, we create an Angular workspace with an Angular application by default.
In the previous command, the name of our Angular application is my-angular. Upon executing the command, the Angular CLI will ask some questions to collect as much information as possible regarding the nature of the application that we want to create. Let's take a look:
- Initially, it will ask whether we want to enable routing in our Angular application:

Figure 1.9 – Angular routing
Routing in Angular is all about navigating between the components of an Angular application using a URL. In this project, we are not concerned with routing, so press Enter to accept the default value.
- Then, the Angular CLI prompts us to select the style format that we want to use throughout the Angular application:

Figure 1.10 – Stylesheet format
- Select a format from the list of available stylesheets and press Enter.
Tip
You can use the arrow keys of your keyboard to navigate between the available stylesheet options.
The Angular CLI initiates the creation process of your Angular application, which consists of the following:
- Scaffolding the necessary folder structure of a typical Angular CLI project
- Installing the required npm dependencies and Angular packages
- Initializing Git in the Angular CLI project
This process may take some time, depending on the speed of your network. Once it has finished, you should have a new folder named my-angular in the path where you ran the ng new Angular CLI command.
Now, the time has finally come to run our Angular application and see it in action:
- Open a Terminal window and navigate to the my-angular folder.
- Run the following Angular CLI command:
ng serve
This will build the Angular application and start a built-in web server that we can use to preview it. The web server is started in watch mode; that is, it automatically rebuilds the Angular application whenever we make a change in the code. The first time an Angular application is built, it takes a considerable amount of time to complete, so we must be patient. You will know when the process has finished with no errors when you see the following message in the Terminal window:

Figure 1.11 – Angular build output
- Fire up your favorite browser and navigate to http://localhost:4200 to get a preview of your brand-new Angular application:
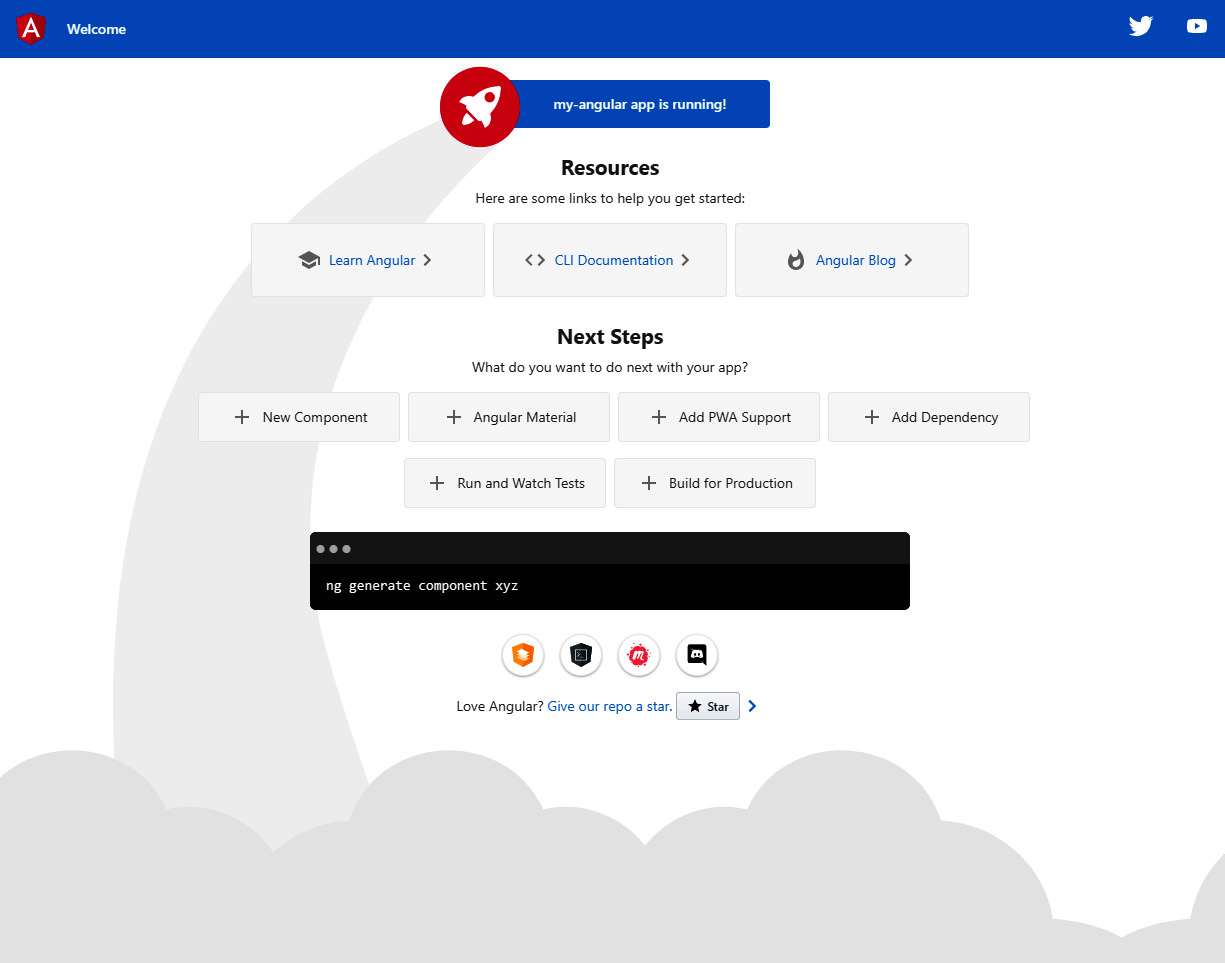
Figure 1.12 – Minimal Angular application
The Angular CLI creates a minimal Angular application by default to provide us with a starting point for our Angular project. It contains some ready-made CSS styles and HTML content, which we will learn how to change according to our specifications in the following section.
Interacting with the Angular framework
When working with Angular, the real fun starts when we get our hands dirty with the framework itself. Understanding how Angular works and writing the application code is what matters, after all.
The application source code resides inside the srcapp folder, in the root of our Angular CLI project. It contains all the files needed to build and test our Angular application, including a component and a module. The component is the main component of the Angular application:
app.component.ts
import { Component } from '@angular/core';
@Component({
selector: 'app-root',
templateUrl: './app.component.html',
styleUrls: ['./app.component.css']
})
export class AppComponent {
title = 'my-angular';
}
The following properties characterize an Angular component:
- selector: A unique name that is used to identify and declare the component inside HTML content. It is used as an HTML tag, just like any native HTML element, such as <app-root></app-root>.
Tip
The Angular CLI provides the app prefix by default in component selectors. We can use a custom one using the --prefix option when creating a new Angular CLI application from scratch. A custom prefix can be based on the name of an organization or a particular product, and it helps avoid collisions with other libraries or modules.
- templateUrl: The path pointing to an HTML file that contains the HTML content of the component, which is called the template of the component.
- styleUrls: A list of paths where each one points to a stylesheet file containing the CSS styles of the component.
The preceding properties are defined using the @Component decorator. It is a function that decorates the TypeScript class of the component and recognizes it as an Angular component. The title property of the AppComponent class is a public property that contains a string value and can be used in the template of the component.
The main module of our Angular application uses a similar decorator called @NgModule to define its properties:
app.module.ts
import { NgModule } from '@angular/core';
import { BrowserModule } from '@angular/platform-browser';
import { AppComponent } from './app.component';
@NgModule({
declarations: [
AppComponent
],
imports: [
BrowserModule
],
providers: [],
bootstrap: [AppComponent]
})
export class AppModule { }
The decorator of an Angular module defines a set of properties that can be used to configure the module. The most common ones are as follows:
- declarations: Defines Angular components that are part of the Angular module. Every component that exists in the Angular module must be added to the declarations array.
- imports: Defines other Angular modules that contain functionality the Angular module needs.
Let's get our feet wet now by modifying the code of our Angular application. We will change the following greeting message, which is displayed at application startup, to something more meaningful:

Figure 1.13 – Greeting message
First, we need to find the location where the message in the previous screenshot is declared. The main component of an Angular application is the component that is loaded at application startup by default.
Tip
The component that is displayed when an Angular application is bootstrapped is indicated by the bootstrap property of the main module of the application. We rarely need to change this property. The selector of that component is used in the index.html file by default.
So, the message should be declared inside the app.component.ts file. Let's take a look:
- Open the VSCode editor and select Open folder… from the Start section of the Welcome screen.
- Find the my-angular folder of the Angular application that we created and select it.
- Navigate to the srcapp folder from the EXPLORER pane and select the app.component.ts file.
- Locate the title property in the AppComponent class and change its value to Angular Projects:
title = 'Angular Projects';
- Run ng serve from the Terminal window, if the application is not running, and navigate to http://localhost:4200 using your browser. Our Angular application should now display the following greeting message:

Figure 1.14 – Greeting message
The title property is bound to the template of the main component. If we open the app.component.html file and go to line 346, we will see the following HTML code:
<span>{{ title }} app is running!</span>
The {{}} syntax that surrounds the title property is called interpolation. During interpolation, the Angular framework reads the enclosed component property value, converts it into text, and prints it on the screen.
The Angular CLI provides a rich collection of commands that can assist us during our daily development routine. Running these commands from a Terminal window may look simple, but it could quickly turn into a nightmare.
Building our application with Nx Console
The Angular CLI is a command-line tool with a variety of commands. Each command can accept a wide range of options and parameters according to the task that we want to accomplish. The process of remembering these commands and their options off by heart is daunting and time-consuming. In such cases, the ecosystem of Angular tooling can come in handy. VSCode Marketplace contains many useful extensions that we can install to help us during Angular development. One of these extensions is the Nx Console, which provides a user interface over the Angular CLI. To install the Nx Console in your environment, follow these steps:
- Open VSCode and click on the Extensions menu in the sidebar:

Figure 1.15 – VSCode Extensions
- In the EXTENSIONS pane that appears, type Nx Console.
- Click the Install button on the first item to install the Nx Console extension.
The Nx Console extension is now installed globally in our environment, which means we can use it in any Angular project. It is a graphical representation of the most common Angular CLI commands. Currently, it supports the following commands (the related Angular CLI command is shown in parentheses):
- Generate: Generate new Angular artifacts, such as components and modules (ng generate).
- Run: Run an architect target, as defined in the angular.json configuration file of the Angular CLI workspace (ng run).
- Build: Build an Angular application (ng build).
- Serve: Build and serve an Angular application (ng serve).
- Test: Run the unit tests of an Angular application (ng test).
- E2E: Run the end-to-end or integration tests of an Angular application (ng e2e).
- Lint: Check an Angular application according to a set of linting rules (ng lint).
- Change workspace: Load a different Angular CLI workspace in VSCode.
Whatever we can do with the Angular CLI can almost be achieved using the Nx Console. The real benefit is that the developer does not need to remember all the Angular CLI command options as they are all represented in a graphical interface. Let's see how:
- Open the my-angular folder using VSCode and click on the Nx Console menu in the sidebar:

Figure 1.16 – Nx Console
- Click on the Serve command from the NX CONSOLE pane:

Figure 1.17 – Serve command
- Select the my-angular project in the dialog that appears:

Figure 1.18 – Selecting a project
The Nx Console will open the Serve tab, where you can optionally set additional options supported by the serve command of the Angular CLI. Each option contains a title with a short description that explains what it does.
Important note
Some options may contain the word (deprecated) in their title. This indicates that the option has been deprecated in the current version of Angular CLI, and that it will finally be removed in a later version.
- Click on the Run button to start the Angular application:
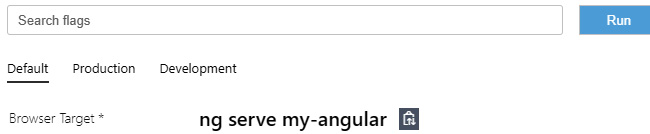
Figure 1.19 – Serve tab
VSCode opens an integrated Terminal at the bottom of the editor and executes the ng serve command:

Figure 1.20 – VSCode integrated Terminal
This is the same command that we execute when using the Angular CLI from a Terminal window.
The Nx Console uses tasks internally to run Angular CLI commands. Tasks are a built-in mechanism of VSCode that allow us to run scripts or start external processes without interacting directly with the command line.
The Nx Console extension does a fantastic job of removing the burden of remembering Angular CLI commands off by heart. The VSCode Marketplace contains many more extensions for Angular developers that supplement the job of the Nx Console.
Summary
In this chapter, we learned about the basic principles of the Angular framework and provided a brief overview of the Angular architecture. We saw some popular extensions for VSCode that we can use to enhance our development experience while working with Angular.
Then, we learned how to use the Angular CLI, a powerful tool of the Angular ecosystem, to scaffold and build a new Angular application from scratch. We also made our first interaction with Angular code by modifying the Angular component of a typical Angular CLI application. Finally, we installed the Nx Console extension and learned how to build our application with it.
In the next chapter, we will look at the Angular Router and learn how to use it to create a personal blog using the Scully static website generator.
Practice questions
Let's take a look at a few practice questions:
- What is the basic building block of an Angular application?
- How do we group components of similar functionality?
- Who is responsible for handling business logic tasks in an Angular application?
- Which Angular CLI command can we use to create a new Angular application?
- Which Angular CLI command can we use to serve an Angular application?
- How do we declare an Angular component in HTML?
- How do we declare Angular components in a module?
- What syntax do we use for text binding on HTML templates?
- What is the benefit of using the Nx Console?
- Which extension do we use to perform static analysis in our Angular code?
Further reading
Here are some links to build upon what we learned in the chapter:
- Introduction to Basic Concepts: https://angular.io/guide/architecture
- Interpolation: https://angular.io/guide/interpolation
- Nx Console: https://nx.dev/latest/angular/cli/console
- Angular Essentials: https://marketplace.visualstudio.com/items?itemName=johnpapa.angular-essentials
- Angular Evergreen: https://expertlysimple.io/get-evergreen