
Chapter 14: Securing Keycloak and Applications
In this chapter, we will look at how to secure Keycloak for production environments. Then, we will look at how to secure the database, as well as secure cluster communication between Keycloak nodes. Finally, we will touch on some topics regarding how you can protect your own applications against threats.
After reading this chapter, you will have a good understanding of how to securely deploy Keycloak, including what is required to secure the database. Since this is a book about Keycloak and not about application security, you won't become an expert on application security, but if this is a topic that's new to you, you will have a basic understanding and an idea of how to learn more.
In this chapter, we're going to cover the following main topics:
- Securing Keycloak
- Securing the database
- Securing cluster communication
- Securing applications
Securing Keycloak
In this section, we will look at some important aspects of securing the Keycloak server itself. We will start by looking at an example of a secure Keycloak deployment, as shown in the following diagram:

Figure 14.1 – An example of a secure deployment
In this example, Keycloak and its database are isolated from users and applications with a Web Application Firewall (WAF), all network requests are encrypted, and the database is also encrypted.
Let's look at this in a bit more detail, starting with why Transport Layer Security (TLS) is a requirement for any ingoing and outgoing traffic to Keycloak.
Encrypting communication to Keycloak
It is recommended to use end-to-end encryption for all communication to and from Keycloak. This means always using HTTPS, and never using HTTP. At the time of writing this book, the most recent security layer in HTTPS is TLS 1.3, so this is what you should use whenever possible. Most HTTP libraries will support at least TLS 1.2. If they do not support this, you should consider not using the library since TLS 1.2 has been around since 2008.
If you're leveraging a load balancer or reverse proxy in front of Keycloak, the most secure approach is to leverage TLS passthrough, which provides end-to-end encryption between the client and Keycloak.
In some cases, this may be infeasible, in which case you can use re-encrypt, where the communication between the proxy and Keycloak is encrypted again with an internal certificate.
Using unencrypted communication between the proxy and Keycloak should be avoided and only considered if the network between the proxy and Keycloak can be fully isolated, such as in cases where the proxy and Keycloak reside on the same machine.
In the next section, we'll look at why Keycloak needs to know the URL it will be exposed on.
Configuring the Keycloak hostname
Keycloak is required to know its hostname for several reasons, such as when you're sending an email to a user. Out of the box, for convenience, Keycloak infers the hostname from the request by looking at the Host HTTP header sent by the client. This configuration should never be used in production deployments as it could allow an attacker to send requests to Keycloak with a different value for the header.
An example of such an attack is where an attacker uses the recover password capability in Keycloak and modifies the host header, resulting in the email that's being sent to the user containing a link to a site controlled by the attacker. Unless the users realize the URL is not correct, the attacker can intercept the request to update the password. By intercepting the request, the attacker can either obtain the updated password or set a different password. In either case, the attacker gains access to the user account.
To prevent this type of attack, you can either configure a fixed hostname for Keycloak, or if Keycloak has been exposed through a reverse proxy, you can verify the host header at the reverse proxy. Configuring a fixed hostname for Keycloak is the simplest and most secure approach. To learn how to do that, read Chapter 9, Configuring Keycloak for Production.
In the next section, we will look at the importance of regular key rotation.
Rotating the signing keys used by Keycloak
Regularly rotating all your signing and encryption keys is highly recommended. You may want to consider doing so as frequently as once a month.
Luckily, Keycloak allows you to rotate keys in a way that is seamless and non-interrupting. This is because new keys can be made active, while the old keys are still permitted to verify tokens for a while.
Rotating keys have several benefits, such as the following:
- Reduces the amount of content that's signed or encrypted with a specific key.
- Reduces the time available to anyone who wants to try and crack your keys.
- Cleans up unused refresh tokens or long expiration access tokens, regardless of user session timeout settings.
- If an attacker were able to gain access to the keys or – even worse – such a leak was not discovered, the impact would be reduced.
To rotate the signing keys in Keycloak, open the administration console of Keycloak in your browser. Select the realm you want to rotate keys for, go to Realm Settings, and click on Keys.
First, you will see all the active signing keys in the realm, as shown in the following screenshot:

Figure 14.2 – Active signing keys
The screenshot shows that the realm currently has two signing keys – one for the RS256 algorithm and another for the HS256 algorithm. Keys in Keycloak can have three different states:
- Active: Active keys are used to sign new tokens, where the highest priority key is used for a specific algorithm.
- Passive: Passive keys are not used to sign new tokens but are used to verify previously signed tokens.
- Disabled: Disabled keys are keys that are not currently in use.
To rotate the keys, the first step is to create a new active key. If, after creating a new active key, the previous key is disabled, all active user sessions and tokens will be invalidated. This approach should only be taken if you suspect the keys may have been compromised. Otherwise, it is better to passivate the previous key for a period to allow all user sessions and tokens to be updated with the new signing keys, before deleting the old key.
Creating additional keys is done by configuring additional key providers. Click on the Providers tab; then, under Add keystore, select rsa-generated. Fill in the form with the values shown in the following screenshot:

Figure 14.3 – Creating a new signing key
After creating the key, go back to the Active tab. You will notice that there are now two signing keys for RS256, as shown in the following screenshot:

Figure 14.4 – Multiple signing keys for the same algorithm
Since the new key you created has the highest priority, it will be used to sign new tokens. Keycloak will automatically re-sign cookies and tokens with the new keys, which will be transparent to users and applications.
By default, Keycloak stores private keys in the database. Combined with good database security and regular key rotation, this is usually acceptable.
For additional security, Keycloak supports storing keys in an external store. At the time of writing this book, Keycloak can load keys from a Java keystore. There is also an extension mechanism that allows you to implement a custom source for keys. Understanding how to develop custom providers for Keycloak was covered in Chapter 13, Extending Keycloak.
For the highest level of security, you could also consider using an external service such as a Hardware Security Module (HSM) for signing tokens. Out of the box, Keycloak does not currently support any such integrations but does have extension points that allow you to develop custom providers yourself.
Next, we will look at the importance of regular updates.
Regularly updating Keycloak
Potentially one of the best sources of inspiration for an attacker comes from known vulnerabilities in unpatched software. If you do not regularly update Keycloak or the operating system, the list of unpatched known vulnerabilities the attacker can try out becomes longer and longer.
It is especially important that you have a process in place to be able to discover new releases and quickly upgrade.
One thing to note here is that Keycloak does not have long-term supported versions. Instead, it uses a continuous delivery model, or a rolling release. If there are any issues, then continuously upgrading Keycloak means that there are significantly fewer changes you need to make, so you are dealing with bite-sized chunks at a time.
Dealing with continuous releases does, in most cases, require automating the upgrade process, as well as being able to quickly test if an upgrade has any impact on your production systems.
If you prefer a long-term supported version, Red Hat offers Red Hat Single Sign-On, which is essentially a long-term supported version of Keycloak. At the time of writing this book, the most current version of Red Hat Single Sign-On is 7.4, which is essentially Keycloak 9, and is continuously receiving security and bug patches. You can find more information about Red Hat Single Sign-On at https://access.redhat.com/products/red-hat-single-sign-on.
In the next section, we will look at using an external vault to store secrets.
Loading secrets into Keycloak from an external vault
There are some use cases where you need to provide Keycloak with credentials to access external systems, such as connecting to an email server or federating users from a directory server. By default, Keycloak stores these credentials in the database, but it can also retrieve these from an external vault.
At the time of writing this book, Keycloak has out of the box support for an Elytron credential store, which is essentially an encrypted file, and support for leveraging secrets from Kubernetes.
As we mentioned previously, Keycloak has an extension mechanism that allows you to integrate it with any external vault. To learn more about extending Keycloak, please refer to Chapter 13, Extending Keycloak.
For more information on configuring a vault, please refer to the Keycloak server administration guide, which is available at https://www.keycloak.org/docs/latest/server_admin/index.html#_vault-administration.
Protecting Keycloak with a firewall and an intrusion prevention system
At a minimum, it is a good idea to leverage a firewall to control incoming and outgoing traffic to Keycloak. If possible, you should also consider completely separating Keycloak and its database from even internal applications.
With regards to incoming traffic, this can include limiting incoming traffic to only accepting HTTPS. You may also want to consider only allowing access to the Keycloak admin console and admin REST APIs from an internal network.
For outgoing traffic, it may be a little bit more difficult, depending on your use case. Some outgoing traffic you may need to permit includes the following:
- Backchannel requests over HTTPS to applications, such as logout requests.
- Connections to user federation providers, such as LDAP.
- Backchannel requests to external identity providers, such as an OpenID token request.
If you are only securing internal applications with Keycloak, it is most likely simpler to secure outgoing traffic, but this may be harder if you are also securing third-party applications that have been deployed outside your network.
It may also be a wise decision to utilize an intrusion prevention (or detection-only) system. An intrusion prevention system can be a great tool in detecting and preventing bad traffic, including helping you survive a denial-of-service attack.
For additional security, it can also be a good idea to leverage a web application firewall (WAF). It is relatively complex to set up a WAF properly and it may need to be updated regularly, but if this is done correctly, a WAF can provide an extra layer of protection against attacks.
Next, we will look at arguably one of the most important aspect of securing Keycloak, which is protecting the database.
Securing the database
Keycloak stores a lot of sensitive data in its database, which makes it especially important to secure it, thus preventing attackers from accessing or modifying the databases.
Some examples of the data Keycloak stores includes the following:
- Realm configuration
- Users
- Clients
If your database became compromised, we must consider some examples of what could happen if an attacker were able to read your data:
- An attacker would get access to details about your employees or customers. The impact of this would depend on how much personal information you store about your users, but even a list of email addresses is valuable to an attacker.
- An attacker would get access to user credentials. Even though passwords are stored as one-way salted hashes in the database, the attacker may be able to crack some of the less secure passwords.
- If you are not using a vault or keystore, an attacker would have access to any secrets stored in the database, such as LDAP bind credentials, SMPT passwords, and even the private signing keys used by Keycloak.
These are only a few examples, but attackers are usually highly creative and can come up with all sorts of ways to exploit your data.
An important point to stress here is that an attacker does not care if they get the data directly from the database, or if they get it from a backup of the database, which makes it just as important to secure backups of the database as securing the database itself.
It would be potentially even worse if an attacker managed to gain access to write to the database, as this could give an attacker the ability to access any application secured by Keycloak – they would be able to alter realm configuration or user credentials to impersonate users.
It is beyond the scope of this book to cover database security in detail, but we will briefly look at some best practices, starting with using a firewall.
Protecting the database with a firewall
The first and most obvious thing to do when you're securing your database is protect it with a firewall. All traffic should be denied by default, and only required access such as from the Keycloak servers should be permitted.
In addition, you should prevent outbound connections unless there is a strong reason to permit it.
The next thing you will want to do is enable authentication and access control.
Enabling authentication and access control for the database
Only the minimum amount of people possible should have access to the database, and they should have the minimum amount of access needed to do their job. As Keycloak manages the schema as well as the data in the database, ask yourself if anyone really needs permanent access to the database at all.
Keycloak, as well as any users accessing the database, should use strong passwords, and accounts should be locked after failed login attempts. Consider using stronger authentication mechanisms, such as client certificates.
After limiting access to the database, you will want to secure the data in transit as well as at rest by enabling encryption.
Encrypting the database
To protect data in transit, all connections to the database should be encrypted by leveraging TLS.
In the event someone gains access to the server where the database is running, it is also important to encrypt data at rest. This includes making sure you encrypt any backups of the database.
There are a lot more steps involved in properly securing a database, and just like you will want to regularly update Keycloak, you should also regularly update your database. If your company has its own data center, chances are you already have people that can help you with this task. If not, you could consider leveraging a relational database service in the cloud.
In the next section, we will look at how to secure communication between nodes in a cluster.
Securing cluster communication
Keycloak embeds Infinispan, which is leveraged when you create a cluster of Keycloak nodes. Unlike the database, Keycloak does not send any very critical information through the cluster, where most of the sensitive data is kept in a local cache, thus leveraging cluster communication only for invalidations. It does store information about user sessions in the cluster, which are distributed across the cluster. Sessions themselves contain some information such as the session ID, the expiration date, and associated client sessions. Even if an attacker gains access to this information, they are limited in terms of what they can do with it, since accessing any session through Keycloak requires a token or cookie to be signed by Keycloak.
It would still be a good idea to secure cluster communication, at the very least with a firewall. For additional protection, you can enable authentication and/or encryption for cluster communication.
Tip
At the time of writing this book, the Keycloak documentation does not provide instructions on how to secure cluster communication. Neither does the documentation for the underlying WildFly application server. On the other hand, the Red Hat Jboss Enterprise Application Platform documentation, which is the Red Hat supported version of WildFly, provides great documentation for securing the cluster. You can find this documentation at https://access.redhat.com/documentation/en-us/red_hat_jboss_enterprise_application_platform/7.3/html/configuration_guide/configuring_high_availability#securing_cluster.
Enabling cluster authentication
Enabling authentication prevents unauthorized nodes from joining the cluster, but it does not prevent non-members from communicating with cluster members. For this reason, there is little value in adding authentication on its own, and this should be combined with asymmetric encryption.
Encrypting cluster communication
Cluster communication can be encrypted either with symmetric encryption with a shared key or asymmetric encryption combined with authentication. The simplest approach is enabling symmetric encryption, so we will look at how you can enable that.
The first step is to create a Java keystore that holds the shared secret. To create the keystore, run the following command in a Terminal:
$ cd $KC_HOME
$ java -c modules/system/layers/base/org/jgroups/main/jgroups-*.jar org.jgroups.demos.KeyStoreGenerator --alg AES --size 256 --storeName defaultStore.keystore --storepass PASSWORD --alias mykey
This command will create a keystore in the root of your Keycloak home directory, with a key that can be used for symmetric encryption. You should copy this file to all Keycloak nodes.
The next step is to open the standalone/configuration/standalone-ha.xml file in a text editor. Search for pbcast.NAKACK2 to find the correct location to enable encryption. This text will be repeated twice in the file – once for the UDP transport and once for the TCP transport. You should configure encryption for both transports or remove the transport that you are not using. Update the file to add the SYM_ENCRYPT protocol immediately before the pbcast.NAKACK2 protocol, as shown in the following example:
<protocol type="VERIFY_SUSPECT"/>
<protocol type="SYM_ENCRYPT">
<property name="provider">SunJCE</property>
<property name="sym_algorithm">AES</property>
<property name="encrypt_entire_message">true</property>
<property name="keystore_name">defaultStore.keystore</property>
<property name="store_password">PASSWORD</property>
<property name="alias">mykey</property>
</protocol>
<protocol type="pbcast.NAKACK2"/>
You should also make sure the changes you made to the standalone-ha.xml file are made to all Keycloak nodes.
If you want to make sure encryption is enabled, you can try to start one Keycloak node with encryption enabled and one without, or you can try creating a different keystore on one node. The following example shows the output from Keycloak when one node is trying to join the cluster with a different keystore:
21:37:54,763 ERROR [org.jgroups.protocols.SYM_ENCRYPT] (thread-8,ejb,fedora) fedora: rejected decryption of unicast message from non-member node2
This message shows that the node was not permitted to join the cluster and will also not be able to read or send any messages to the cluster.
With that, you have learned how to secure cluster communication. In the next section, we will look at securing user accounts.
Securing user accounts
With regard to securing user accounts, you will want to protect against an attacker gaining access to the user account and also protect information about the user, including their password.
Preventing an attacker from accessing a user account is mostly about enabling strong authentication, and not just accepting a password as the means of authentication. If your users are relying on passwords, even in combination with a second factor, it is important that passwords are protected. Passwords are protected by leveraging a strong password hashing algorithm, having a good password policy, and enabling brute-force protection for passwords. It is also important to educate users in terms of what is a strong password and that they should not reuse passwords with other services.
To configure a password policy, open the Keycloak administration console and select the realm you want to configure. Then, click on Realm Settings, then Authentication, and select the Password Policy tab. You can create your password policy by clicking on Add policy and selecting the policies you want to use. The following screenshot shows an example policy that requires passwords to have a minimum length of 8 and contain at least one lowercase letter, one uppercase letter, one special character, and one digit:
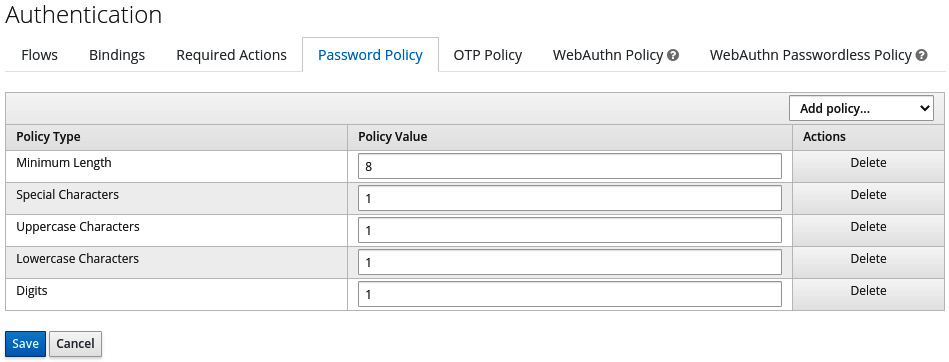
Figure 14.5 – An example password policy
It is also a good idea to enable password brute-force detection. Do this by clicking on Realm Settings, then Security Defenses, and selecting the Brute Force Detection tab, as shown in the following screenshot:
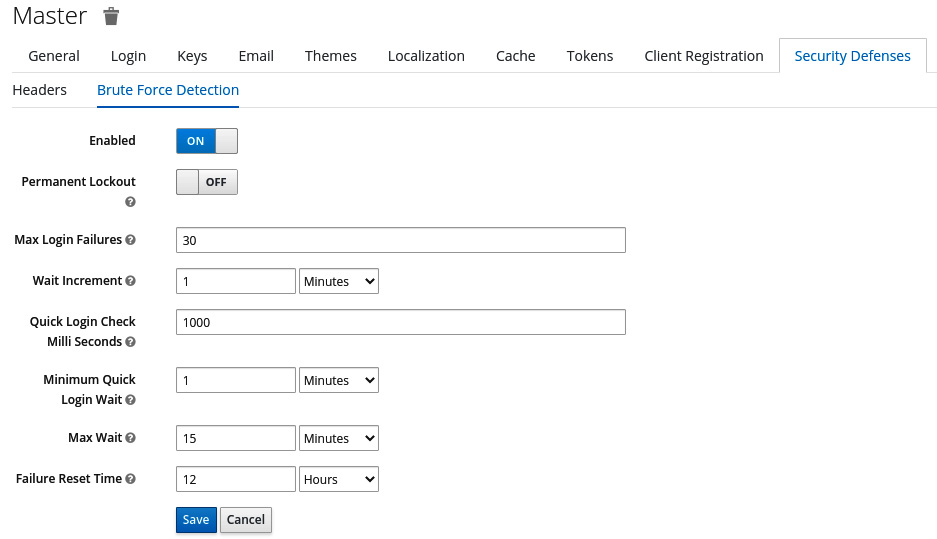
Figure 14.6 – Enabling password brute-force detection
Depending on your use case, you may be storing different levels of personal data, or personally identifiable information, about your users. There are a few steps you can take to limit your exposure to issues in this regard:
- Limit the information you store about users to only what is absolutely required.
- Limit what user information is exposed to applications.
- Secure the database.
- Understand legislation around personal information in regions where your business operates.
This topic should not be taken lightly. Personal information is invaluable to an attacker and is a commodity on its own that can be sold. Leaking such information can result in large fines and, in worst cases, cause irreparable damage to your business.
In the last section of this chapter, we will look at the steps you should take to increase the security of applications.
Securing applications
Since more applications are being exposed on the internet, the number of attacks and data breaches are growing by the day. This means it is important to secure applications properly.
Up until recently, a common practice was to leverage firewalls and VPNs as the main layer of defense against attacks. Often, this was combined with questionable security within the boundaries of the enterprise environment. This is becoming less viable with more employees working from home or using their personal laptop or phone. More and more services are also being exposed to partners or the public. This is blurring the line of the enterprise network. The whole idea of trusting what is on the inside, but not what is on the outside, was also somewhat questionable as there are often ways for attackers to get inside the enterprise network, and it also provides less protection against an internal attack.
Essentially, something better is needed than just a firewall. Keycloak is a great tool that can help increase the security of your applications, but your applications are not secure simply by using Keycloak.
It is beyond the scope of this book to provide you with all the information you need to secure your applications. Reading this section will give you some idea of this. We will start by looking at web application security.
Web application security
There are plenty of books and good resources on the internet that can help you learn how to secure web applications. Some of the steps involved in securing web applications include the following:
- Authentication: Since you are reading a book about Keycloak, chances are you are planning to use Keycloak to authenticate users to your applications. Once a user has been authenticated and a session has been established, it is important that the session is also secure.
- Authorization: Least privilege access is a great principle to follow. If you limit the access that's granted to users for them to perform their job, you are reducing the impact of a compromised account or a rogue employee.
- Understand and protect against common attacks: Make sure your applications are protected against common vulnerabilities such as injection and cross-site scripting (XSS).
- Regular updates: Web application security is a continuous effort, and you should continuously strive to improve the security of your application. You should also regularly update frameworks, libraries, and any tools you are leveraging.
- Data security: Sensitive data should be encrypted at rest, and all data should be encrypted in transit. This should also apply to any backup data. Just like the web application itself, it is important to have good authentication and authorization in place.
- Logging and monitoring: Without sufficient logging and monitoring, you will not be able to identify if you have been compromised. Logging and monitoring can also be a valuable tool to prevent larger impacts due to an ongoing attack.
- Firewall: Firewalls and WAFs add an extra layer of defense to your web applications. Relying on only a web application firewall for protection is far from ideal, though – you should build security into the application itself.
One of the best places to start learning more about web application security is the Open Web Application Security Project (OWASP) Top 10. The OWASP Top 10 is a list of some of the most critical security risks to web applications. For each risk, it provides easy to understand details of the vulnerabilities, as well as tips on how to protect your application.
Another great resource is the OWASP Cheat Sheet Series, which provides several cheat sheets with very concise information on specific areas of application security.
Next, we will look at how to securely leverage OAuth 2.0 and OpenID Connect in your application.
OAuth 2.0 and OpenID Connect best practice
There are a lot of mistakes that can be made when you're using OAuth 2.0 and OpenID Connect in your applications. The specifications themselves have a lot of flexibility in how they are used, and a lot of the mechanisms to protect against common vulnerabilities are optional.
Consider the following authorization request, for example:
/auth?response_type=code&client_id=public-client&redirect_uri=https://acme.corp/myclient
In this request, the state parameter is not included. A Proof Key for Code Exchange (PKCE) is also not being used. Unless the authorization server explicitly requires these parameters, this is a perfectly valid authorization request, but at the same time, it is open to several known vulnerabilities.
The same problem applies to the JSON Web Token (JWT) specification. It is relatively easy to make mistakes here. One example is the none algorithm, which is included in the specification. A valid token, according to the specification, can simply specify that it uses no signing algorithm, which obviously makes it easy for an attacker to create their own tokens.
Chapter 6, Securing Different Application Types, covered a fair portion of what you need to know to use OAuth 2.0 securely, but it is recommended that you learn more about this topic through other resources. The OAuth 2.0 website (https://oauth.net/2/) contains links to several invaluable resources that are all worth reading, including the following:
- OAuth 2.0 for mobile and native apps
- OAuth 2.0 for browser-based apps
- OAuth 2.0 threat model and security considerations
- OAuth 2.0 security best current practice
With all the options in OAuth 2.0 and the potential for not following the best practices, this may be a bit confusing. Luckily, some improvements in this regard are on their way with the introduction of OAuth 2.1. OAuth 2.1 incorporates several best practices into the specification itself, making it easier to follow best practices by simply being compliant with the specification.
Other important work regarding security is happening in the Financial-Grade API (FAPI) working group. This working group derives from establishing highly secure profiles of OIDC in order to leverage OIDC for open banking. However, you should not get too hung up on the name as the work they have produced applies to any use case for OIDC where additional security is required. The most important work that is coming out of this is two profiles for OIDC that are providing it with best practices:
- FAPI 1.0 – Part 1: Baseline API Security Profile
- FAPI 1.0 – Part 2: Advanced Security Profile
These profiles allow you to balance the complexity of applying the best practice with the level of security required so that it fits the use cases you have.
The Keycloak team is also making great progress in making it easier for you to enforce secure usage of OAuth 2.0 and OpenID Connect in your applications, since a feature called client policies is being created. Through client policies, it will be easy for you to enforce the use of best practices for applications, including allowing you to select different profiles for different applications, depending on the level of security needed.
We will conclude this chapter by looking at various configuration options available in Keycloak that affect the security of your applications.
Keycloak client configurations
In this section, we will look at some configuration options for an OIDC client in Keycloak that affect security.
The following screenshot show the basic settings for an OIDC client:

Figure 14.7 – Client settings
Let's review these and consider which are more related to security:
- Consent Required: If this is not enabled, the user will not see what level of access the application receives. You should enable this option for any third-party application. You should also enable this option for a native application such as a CLI.
- Access Type: Setting this to confidential is more secure when the client credentials can be kept securely on the server side.
- Standard Flow Enabled: Enables the authorization code flow for the client.
- Implicit Flow Enabled: Enables the now deprecated implicit flow. You should only enable this when it's absolutely required, and plan to update the application so that this can be disabled.
- Direct Access Grants Flow Enabled: Enables the now deprecated resource owner password flow. You should only enable this when it's absolutely required, and plan to update the application so this can be disabled.
- Valid Redirect URIs: It is recommended to use an exact match for the redirect URI. An example of a good redirect URI would be https://acme.corp/myclient/oauth-callback. Keycloak does support a wildcard in the redirect URI –any redirect URI, for that matter. You should avoid using a wildcard in the redirect URIs, but if you do, limit it to only requests that are available to the application, such as https://acme.corp/myclient/*.
Next, we will look at different signing algorithms that Keycloak supports:
- Rivest–Shamir–Adleman (RSA) signature: This is the default algorithm used by Keycloak. It is not the most secure option, but it is used as the default as it is the most widely available.
- Elliptic Curve Digital Signature Algorithm (ECDSA): Considered more secure than RSA and is also significantly faster.
- Hash-based message authentication code (HMAC): A symmetric signing algorithm that requires access to a shared secret.
When possible, you should use ECDSA in favor of RSA, even though RSA is still considered secure. If you want to enforce applications to use the token introspection endpoint to verify the token, you can use HMAC as the required secret. This is only available to Keycloak.
You can also choose between different lengths of the signature hash, where longer hashes provide greater security. With relatively short-lived tokens such as refresh tokens and access tokens, a 256-bit length is considered more than secure enough for most use cases.
Some other important options include configuring the lifespan of tokens. Keycloak allows you to override the access token lifespan for individual clients. It also allows you to override the client session lifespan, which controls the lifespan of refresh tokens. This allows you to have a long-lived SSO session (which could be days or weeks) with shorter-lived refresh tokens (which could be less than an hour). Shorter-lived refresh tokens reduce the impact if any refresh tokens are leaked and shortens the application HTTP session's lifespan.
Summary
In this chapter, you learned about several important aspects of deploying Keycloak securely into production. You learned how important it is to secure the database that's used by Keycloak, as well as communication between nodes. You also learned how important it is to protect user accounts from being compromised, as well as how important it is to keep information about your users secure. Finally, you got some insight into what it means to secure an application by focusing on web applications, as well as how to utilize OAuth 2.0 and OpenID Connect to secure your applications.
You should now have a good understanding of how to securely run Keycloak in production, as well as an idea of where you can start learning more about securing your applications.
This is the final chapter of this book. We hope you have enjoyed this book and have gained a good understanding of Keycloak and how you can utilize it to help secure your applications. While this book has not covered everything you may need to know, you should now have the knowledge to get started on your journey with Keycloak. As a next step, you may want to learn more about OAuth 2.0 and OpenID Connect, or web application security in general.
Questions
- Why is it important to regularly update Keycloak?
- Why is it especially important to protect the database that's used by Keycloak?
- Is it sufficient to use a web application firewall to protect web applications?
Further reading
Please refer to the following links for more information on the topics that were covered in this chapter:
- OWASP Top 10: https://owasp.org/www-project-top-ten/
- OWASP Cheat Sheet Series: https://cheatsheetseries.owasp.org/index.html
- OAuth 2.0 for Mobile and Native Apps: https://tools.ietf.org/html/rfc8252
- OAuth 2.0 for Browser-Based Apps: https://tools.ietf.org/html/draft-ietf-oauth-browser-based-apps
- OAuth 2.0 Threat Model and Security Considerations: https://tools.ietf.org/html/rfc6819
- OAuth 2.0 Security Best Current Practice: https://tools.ietf.org/html/draft-ietf-oauth-security-topics
- OAuth 2.1: https://tools.ietf.org/html/draft-parecki-oauth-v2-1