
Chapter 2: Securing Your First Application
In this chapter, you will learn how to secure your first application with Keycloak. To make things a bit more interesting, the sample application you will be running consists of two parts, a frontend web application and a backend REST API. This will show you how a user can authenticate to the frontend, and also how the frontend is able to securely invoke the backend.
By the end of this chapter, you will have a basic understanding of how applications can be secured by Keycloak by leveraging OpenID Connect.
In this chapter, we're going to cover the following main topics:
- Understanding the sample application
- Running the application
- Understanding how to log in to the application
- Securely invoking the backend REST API
Technical requirements
To run the sample application included in this chapter, you need to have Node.js (https://nodejs.org/) installed on your workstation.
You also need to have a local copy of the GitHub repository associated with the book. If you have Git installed, you can clone the repository by running this command in a terminal:
$ git clone https://github.com/PacktPublishing/Keycloak-Identity-and-Access-Management-for-Modern-Applications.git
Alternatively, you can download a ZIP of the repository from
Check out the following link to see the Code in Action video:
Understanding the sample application
The sample application consists of two parts – a frontend web application and a backend REST API.
The frontend web application is a single-page application written in JavaScript. As we want to focus on what Keycloak can offer, the application is very simple. Furthermore, to make it as simple as possible to run the application, it uses Node.js. The application provides the following features:
- Login with Keycloak.
- It displays the user's name.
- It displays the user's profile picture, if available.
- It shows the ID token.
- It shows the Access token.
- It refreshes the tokens.
- It invokes the secured endpoint provided by the backend.
The backend REST API is also very simple, and is implemented with Node.js. It provides a REST API with two endpoints:
- /public: A publicly available endpoint with no security
- /secured: A secured endpoint requiring an access token with the myrealm global role
Node.js is used for the example applications as we want to make the code as easy to understand and simple to run as possible, regardless of what programming language you are familiar with.
The following diagram shows the relationship between the frontend, the backend, and Keycloak. The frontend authenticates the users using Keycloak, and then invokes the backend, which uses Keycloak to verify that the request should be permitted:

Figure 2.1 – Application overview
Now that you have a basic understanding of the sample application, let's look at some more details on how it all comes together.
When the user clicks on the login button in the frontend application, the browser is redirected to the Keycloak login page. The user then authenticates with Keycloak, before the browser is redirected back to the application with a special code called an authorization code. The application then invokes Keycloak to exchange the authorization code for the following tokens:
- An ID token: This provides the application information pertaining to the authenticated user.
- An access token: The application includes this token when making a request to a service, which allows the service to verify whether the request should be permitted.
- A refresh token: Both the ID and the access token have short expirations, by default, 5 minutes. The refresh token is used by the application to obtain new tokens from Keycloak.
The flow described is what is known as the authorization code flow in OpenID Connect. If you are not already familiar with OAuth 2.0 or OpenID Connect, they can be a bit daunting at first, but once you become familiar with them, they are actually quite simple and easy to understand.
Luckily, the example application uses the Keycloak JavaScript and Node.js libraries, which means you don't actually have to understand these specifications to get started using Keycloak.
To help visualize the login process, a simplified sequence diagram is provided as follows:

Figure 2.2 – Authorization code flow in OpenID Connect simplified
The steps in this diagram are as follows:
- The user clicks on the login button.
- The application redirects to the Keycloak login page.
- The Keycloak login page is displayed to the user.
- The user fills in the username and password and submits the results to Keycloak.
- After verifying the username and password, Keycloak sends the authorization code to the application.
- The application exchanges the authorization code for an ID token and an access token. The application can now verify the identity of the user by inspecting the ID token.
Tip
By delegating authentication of the user to Keycloak, the application does not have to know how to authenticate the user. This is especially relevant when the authentication mechanisms change. For example, two-factor authentication can be enabled without having to make changes to the application. This also means the application does not have access to the user's credentials.
The next step related to Keycloak is when the frontend invokes the backend. The backend REST API has a protected endpoint that can only be invoked by a user with the global role, myrole.
To be completely accurate, the frontend is granted permissions to invoke the backend on behalf of the user. This is part of the beauty of OAuth 2.0. An application does not have access to do everything that the user is able to do, only what it should be able to do.
When the frontend makes a request to the backend, it includes the access token within the request. By default, Keycloak uses JSON Web Signature (JWS) as the token format. These types of tokens are often referred to as non-opaque tokens, meaning the contents of the token are directly visible to the application.
The token also includes a digital signature, making it possible to verify that the token was indeed issued by Keycloak. In essence, this means that the backend can both verify the token and read the contents without a request to Keycloak, resulting in less demand on the Keycloak server and lower latency when processing requests to the backend.
To help visualize what happens when the frontend sends a request to the backend, take a look at the following diagram:

Figure 2.3 – Secured request from the frontend to the backend simplified
The steps in the diagram are as follows:
- The backend retrieves Keycloak's public keys. The backend does not need to do this for all requests to the backend, but can instead cache the keys in memory.
- The frontend sends a request to the backend, including the access token.
- The backend uses the public keys it retrieved earlier to verify that the access token was issued by a trusted Keycloak instance, and then verifies that the token is valid and that the token contains the role, myrole.
- The backend returns the results to the frontend.
You now have a basic understanding of how the sample applications is secured with Keycloak. In the next section, you will learn how to run the sample application.
Running the application
In this section, you will learn how to run the sample application.
If you don't already have Node.js installed on your workstation, go to https://nodejs.org/ for instructions on how to install it.
To run the frontend on Node.js, open a terminal and run the following commands:
$ cd Keycloak-Identity-and-Access-Management-for-Modern-Applications/ch2/frontend/
$ npm install
$ npm start
Next, open a new terminal to run the backend using the following commands:
$ cd Keycloak-Identity-and-Access-Management-for-Modern-Applications/ch2/backend/
$ npm install
$ npm start
Now that you have the sample application running with Node.js, you can register it with Keycloak, which we will cover in the next section.
Understanding how to log in to the application
In the previous chapter, covering how to get started with Keycloak, you learned how to run Keycloak, as well as how to create your first realm. Prior to continuing this section, you should have Keycloak running with the realm created as covered in the previous chapter. In summary, what you require before continuing is the following:
- Keycloak up and running
- A realm named myrealm
- A global role named myrole
- A user with the preceding role
Before an application can log in with Keycloak, it has to be registered as a client with Keycloak.
Before registering the frontend, let's see what happens if an unregistered application tries to authenticate with Keycloak. Open http://localhost:8000 and then click on the Login button.
You will see an error page from Keycloak with the message Client not found. This error is telling you that the application is not registered with Keycloak.
To register the frontend with Keycloak, open the Keycloak admin console. At the top of the menu on the left-hand side, there is an option to select what realm you are working with. Make sure you have selected the realm named myrealm. In the menu on the left-hand side, click on Clients, and then click on Create.
Fill in the form with the following values:
- Client ID: myclient
- Client Protocol: openid-connect
- Root URL: http://localhost:8000
The following diagram shows the Add Client form with the values you need to fill in:
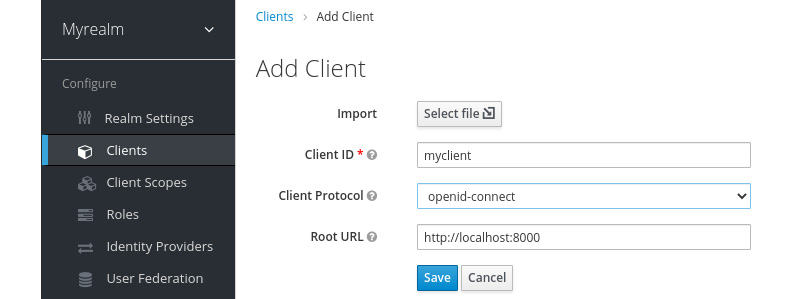
Figure 2.4 – Creating the client in the admin console
Once you have filled in the form, click on Save. After you click Save, you will see the full configuration for the client. There are two configuration options that are particularly interesting at this point:
- Valid Redirect URIs: This value is very important in an OpenID Connect authorization code flow when a client-side application is used. A client-side application is not able to have any credentials as these would be visible to end users of the application. To prevent any malicious applications from being able to masquerade as the real application, the valid redirect URIs instruct Keycloak to only redirect the user to a URL that matches a valid redirect URI. In this case, since the value is set to http://localhost:8000/*, an application hosted on http://attacker.com would not be able to authenticate.
- Web Origins: This option registers the valid web origins for the application for Cross-Origin Resource Sharing (CORS) requests. To obtain tokens from Keycloak, the frontend application has to send an AJAX request to Keycloak, and browsers do not permit an AJAX request from one web origin to another, unless CORS is used
Now you can go back to the frontend by opening http://localhost:8000. This time, when you click on the Login button, you will see the Keycloak login page. Log in with the username and password you created during the previous chapter.
Let's take a look at the ID token that Keycloak issued. Click on the Show ID Token button. The ID token that is displayed will look something like the following:
{
"exp": 1603912252,
"iat": 1603911952,
"auth_time": 1603911952,
"jti": "363b94b8-7e0c-4852-8287-d331c98153f2",
"iss": "http://localhost:8080/auth/realms/myrealm",
"aud": "myclient",
"sub": "67855660-fd6e-4416-96d1-72c99db5e525",
"typ": "ID",
"azp": "myclient",
"nonce": "b59c4dbf-d196-4af7-9451-8020b153caff",
"session_state": "32e2501f-f5ca-4d73-9fad-067d4c52835a",
"at_hash": "7p1VYLHv2T5qRAf2X9UzSw",
"acr": "1",
"email_verified": false,
"realm_access": {
"roles": [
"offline_access",
"uma_authorization",
"myrole"
]
},
"name": "Stian Thorgersen",
"preferred_username": "st",
"locale": "en",
"given_name": "Stian",
"family_name": "Thorgersen",
"email": "st@localhost"
}
Here is a list of some of the more interesting values within the ID token:
- exp: This is the date and time the token expires in seconds since 01/01/1970 00:00:00 UTC (often referred to as Unix or Epoch time).
- iss: This is the issuer of the token, which you may notice is the URL of the Keycloak realm.
- sub: This is the unique identifier of the authenticated user.
- name: This is the first name and last name of the authenticated user.
- preferred_username: This is the username of the authenticated user. You should avoid this as a key for the user as it may be changed, and even refer to a different user in the future. Instead, always use the sub field for the user key.
The ID token is used by the application to establish the identity of the authenticated user.
Next, let's take a look at the access token. Click on the Show Access Token button. Let's also take a look at some fields in this token:
- allowed-origins: This is a list of permitted web origins for the application. The backend service can use this field when deciding whether web origins should be permitted for CORS requests.
- realm_access: This contains a list of global roles. It is the intersection between the roles granted to the user, and the roles the client has access to.
- resource_access: This contains a list of client roles.
- scope: Scopes can be used both to decide what fields (or claims) to include in the token, as well as be used by backends to decide what APIs the token can access.
Currently, the information within the tokens are the default fields available in Keycloak. If you want to add additional information, Keycloak is very flexible in allowing you to customize the contents within the tokens.
Let's give this a go by adding a picture for the user. Leave the tab with the frontend open, and then open a new tab with the Keycloak admin console. In the menu on the left-hand side, click on Users, then click on View all users, and select the user you created previously. Now let's add a custom attribute to the user. Click on Attributes. In the table, there will be two empty input fields at the bottom. In the Key column. set the value to picture, and in the Value column, set the value to the URL to a profile picture (in the following screenshot, I've used my GitHub avatar). Then, click on Add:

Figure 2.5 – Adding a custom attribute to a user
Now, go back to the tab where you have the frontend open. To display the profile picture, you can click on the Refresh button. When you click on this button, the tokens will be refreshed, and the new ID token will now contain the picture attribute you just added, which allows the application to display a profile picture for the user.
Next, you will learn how to securely invoke the backend from the frontend.
Securely invoking the backend REST API
Now, open http://localhost:3000/ and click on the Public endpoint link. You will see a message saying Public message!. The public endpoint is not secured by Keycloak, and can be invoked without an access token.
Next, let's try the secured endpoint that is protected by Keycloak. Open http://localhost:3000/ again. This time, click on the Secured endpoint link. Now you will see a message saying Access denied. The Keycloak Node.js adapter is denying requests to this endpoint as it requires a valid access token to invoke the endpoint.
Let's now try to invoke the secured endpoint from the frontend. Open http://localhost:8000/ and click on Invoke Service. You will now see a message displayed saying Secret message!. If instead you get the message Access Denied, this is most likely caused by the user not having the myrole role.
When you click Invoke Service, the frontend sends an AJAX request to the backend service, including the access token in the request, which allows the backend to verify that the invocation is done on behalf of a user who has the required role to access the endpoint.
Summary
In this chapter, you learned how to secure your first application, consisting of a frontend web application and a backend REST API with Keycloak. You also gained a basic understanding of how Keycloak leverages OpenID Connect to make this all happen in a standard and secure way. Together with what you learned in the first chapter of the book, you now have a solid foundation to start learning more about Keycloak.
In the next chapter, we will dive deeper into securing applications with Keycloak, giving you a better understanding of how it all works.
Questions
- How does an application authenticate with Keycloak?
- What do you need to configure in the Keycloak admin console in order to allow an application to authenticate with Keycloak?
- How does an application securely invoke a protected backend service?