
Chapter 4: Big Data Applications and Notebooks Available in Amazon EMR
From previous chapters, you got an overview of Amazon EMR (Elastic MapReduce), its architecture, and reference architecture for a few common use cases. This chapter will help you learn more about a few of the popular big data applications and distributed processing components of the Hadoop ecosystem that are available in EMR, such as Hive, Presto, Spark, HBase, Hue, Ganglia, and so on. Apart from that, it will also provide an overview of a few machine learning frameworks available in EMR, such as TensorFlow and MXNet.
At the end of the chapter, you will learn about notebook options available in EMR for interactive development that include EMR Notebook, JupyterHub, EMR Studio, and Zeppelin notebooks.
The following topics will be covered in this chapter:
- Understanding popular big data applications in EMR
- Understanding machine learning frameworks available in EMR
- Understanding notebook options available in EMR
Technical requirements
In this chapter, we will cover different big data applications available in EMR and how you can access or configure them. Please make sure you have access to the following resources before continuing:
- An AWS account
- An IAM user, which has permission to create EMR clusters, EC2 instances, and dependent IAM roles
Now let's dive deep into each of the big data applications and machine learning frameworks available in EMR.
Understanding popular big data applications in EMR
There are several big data applications available in the Hadoop ecosystem and open source community, and EMR includes a few very popular ones that are very commonly used in big data use cases. The availability of different big data applications or components in your cluster depends on the EMR release you choose while launching the cluster. Each EMR release includes a different version of these applications and makes sure they are compatible with each other for smooth execution of the cluster and jobs.
EMR does include the most common or popular Hadoop interfaces in its recent releases and also does continuous updates to include new Hadoop interfaces as they gain popularity in the open source community. In addition to adding new big data applications or components, EMR also removes support for a few as they lack attention from the open source community or customers. For example, till EMR 3.11.x, you had the option to select Impala as an application, but after 4.x.x, support for Impala was removed.
To explain the different big data components available in EMR, we considered the latest EMR release available while writing this book, which is 6.3.0.
Now let's look at a few of the popular components available in EMR, such as Hive, Presto, Spark, HBase, Hue, and Ganglia, which are pretty commonly used in big data use cases. You will also learn about how these open source components are configured in EMR and how they are integrated with Amazon S3.
Hive
Hive is an open source query engine that runs on top of Hadoop and allows you to query data from your data lake or cloud object store with a standard SQL-like language called Hive Query Language (Hive QL).
Compared to typical relational databases, Hive follows schema on read semantics instead of schema on write. That means you can define a table schema on top of your HDFS or Amazon S3 file path, which is called as a virtual table, and when you run a Hive query on top of your metadata table, it will fetch data from your underlying storage, apply the schema on top of it, and show the output in tabular format.
Hive supports reading from different types of file formats, such as CSV, JSON, Avro, Parquet, ORC, and so on, with the inclusion of the respective file format's serializer. You can also bring in your custom serializer and specify that in your Hive table properties to let Hive know how to parse your file format.
Hive internally uses big data processing frameworks such as MapReduce, Tez, and Spark to fetch data from HDFS or S3 and process it to serve the output. It converts user-submitted Hive QL to corresponding MapReduce, Tez, or Spark jobs and you can configure Hive to use any of these frameworks.
Passing variables to Hive Step in EMR
You can use AWS's EMR Console or AWS CLI to trigger a Hive Step. It also supports passing variables to a Hive script that you can access using a $ sign and curly braces, for example, ${variable-name}.
For example, if you would like to pass an S3 path to your Hive script with a variable name of MyPath, then you can pass it as the following:
-d MyPath=s3://elasticmapreduce/lookup-input/path1
Then you can access it in your Hive script as ${MyPath}.
Additional considerations for Hive with Amazon S3 as a persistent storage layer
When Hive is configured on top of the EMR core node's HDFS, its way of working is the same as non-EMR environments, but there are slight variations when it is configured on top of Amazon S3 as its persistent storage layer.
The following are a few of the differences to consider:
- Authorization: EMR supports Hive authorization only for HDFS and not for S3 and EMRFS. Hive Authorization is disabled in an EMR cluster by default.
- File merge behavior: Apache Hive provides two configurations to control if you need to merge small files at the end of a map-only job. The first configuration is hive.merge.mapfiles, which needs to be true, and the second configuration is to trigger the merge if the average output size is less than the value set in the hive.merge.smallfiles.avgsize parameter. Hive on EMR works with both these settings if the output is set to HDFS but if the output is set to Amazon S3, then the merge task is always triggered if hive.merge.mapfiles is set to true, ignoring the value set for hive.merge.smallfiles.avgsize.
- ACID transactions: Hive ACID (Atomicity, Consistency, Isolation, Durability) transaction support is available in EMR from EMR 6.1.0 and above.
- Hive Live Long and Process (LLAP): Hive 2.0 included a new feature called Live Long and Process, which provides a hybrid execution model. It uses long-lived daemons that replace interaction with HDFS and also provides in-memory caching that improves performance. This Hive feature is only available after the EMR 6.0.0 release.
These differences or considerations are explained assuming you will be using EMR 6.x.x. If you plan to go with older EMR releases, there might be other differences that you should consider.
Integrating an external metastore for Hive
As explained, Hive defines a virtual table or schema on top of file storage to facilitate SQL-like query support on your data. To store all the table metadata, Hive needs to use a persistent metastore. By default, Hive uses a MySQL-based relational database to store metadata, which is deployed on the master node. But this brings a risk of losing the metastore if your master node's file system gets corrupted or you lose the instance itself.
To secure the Hive metastore, you can think of externalizing the metastore, which means instead of storing it in master node's MySQL instance, look for options to store it outside the cluster, so that you can persist it to support transient EMR cluster use cases too.
In AWS, you have the following options for externalizing your Hive metastore.
- An Amazon Aurora or Amazon RDS database
- The AWS Glue Data Catalog (supported by EMR 5.8.0 and later versions only)
Now let's understand how you can configure a Hive metastore with these two options.
Configuring Amazon Aurora or RDS as a Hive metastore
Hive has hive-site.xml, which has configurations to specify which metastore to use. To use Amazon RDS or Amazon Aurora, you will need to create a database there and override the default configuration of hive-site.xml to point to this newly created database.
The following steps can guide you with the setup:
- Create an Amazon Aurora or Amazon RDS database by following the steps given in the AWS documentation (https://aws.amazon.com/rds/).
- You need to allow access between your database and the EMR master node. To do that, please modify your database cluster security group.
- After your database is available with the required access for connectivity, you need to modify the hive-site.xml configuration file to specify the JDBC connection parameters of your database. To avoid modifying the original hive-site.xml file, you can create a copy of the file and have a new name such as hive-config.json with the following JSON configuration:
[{
"Classification": "hive-site",
"Properties": {
"javax.jdo.option.ConnectionURL": "jdbc:mysql://<hostname>:3306/hive?createDatabaseIfNotExist=true",
"javax.jdo.option.ConnectionDriverName": "org.mariadb.jdbc.Driver",
"javax.jdo.option.ConnectionUserName": "<username>",
"javax.jdo.option.ConnectionPassword": "<password>"
}
}]
In this configuration file, you need to replace <hostname>, which will be your database server's host, and <username> and <password>, which will be your database connection credentials. We have specified 3306 as the port number, assuming you have a MySQL database with the default port, but you can change it as needed.
- After your configuration file is ready, the next step is to specify the file path while creating your EMR cluster. The configuration file path can be a local path or an S3 path.
The following is an example of an AWS CLI command to launch an EMR cluster:
aws emr create-cluster --release-label emr-6.3.0 --instance-type m5.xlarge --instance-count 2 --applications Name=Hive --configurations file://hive-config.json --use-default-roles
As you will notice, we have hive-config.json specified as the configuration file for Hive. We have referred to a local path here, but you can upload this configuration JSON to S3 and use the S3 path.
Configuring the AWS Glue Data Catalog as a Hive metastore
As explained earlier, AWS Glue is a fully managed ETL service, which is built on top of Spark and has Glue Crawler, Glue Data Catalog, Glue Jobs, and Glue Workflows as primary components. The AWS Glue Data Catalog provides a unified metadata repository, which can be shared across multiple AWS services, such as Amazon EMR, AWS Lake Formation, Amazon Athena, Amazon Redshift, and so on.
Starting with EMR 5.8.0 and later releases, you can configure the AWS Glue Data Catalog as a Hive external metastore, which can be shared across multiple EMR clusters, Glue Spark jobs, or even can be shared with multiple AWS accounts.
When you integrate Glue Data Catalog as EMR's external metastore, you need to consider the Glue Data Catalog pricing too. The Glue Data Catalog provides storage for up to 1 million objects for free every month and beyond that, for every 100,000 objects, you will be charged USD 1 each month. An object in Glue Catalog is represented as a database, table, or partition.
Now let's understand how to configure Glue Data Catalog as Hive's external metastore in EMR:
- Through the AWS Console: If you are creating the EMR cluster through the AWS console, then create the cluster through Advanced Options, select EMR 5.8.0 or a later release, choose Hive or the HCatalog service under the release, and then under AWS Glue Data Catalog settings, choose Use for Hive table metadata. You can select the rest of the options as needed and proceed with the cluster creation. This should set you up to use AWS Glue Data Catalog as an external Hive metastore.
- Through the AWS CLI: If you are going to create the cluster through AWS CLI commands, then you can specify the hive.metastore.client.factory.class value using the hive-site classification. The following is an example of the configuration:
[{
"Classification": "hive-site",
"Properties": {
"hive.metastore.client.factory.class": "com.amazonaws.glue.catalog.metastore.AWSGlueDataCatalogHiveClientFactory"
}
}]
- Additional configuration for specific EMR releases: If you are using EMR release 5.28.0, 5.28.1, or 5.29.0, then you need to specify additional configuration in the hive-site configuration, where you need to set hive.metastore.schema.verification as false. If this is not set to false, the master instance group will be suspended.
- Configuring Glue Catalog available in other AWS accounts: If your Glue Data Catalog is in another AWS account, then you will have to specify an additional configuration where you need to specify the account ID in the hive.metastore.glue.catalogid parameter. The following is an example of the JSON configuration:
[{
"Classification": "hive-site",
"Properties": {
"hive.metastore.client.factory.class": "com.amazonaws.glue.catalog.metastore.AWSGlueDataCatalogHiveClientFactory",
"hive.metastore.schema.verification": "false"
"hive.metastore.glue.catalogid": "<account-id>"
}
}]
A few additional IAM permission configurations might be needed if you are not using the default EMR_EC2_DefaultRole role with the AmazonElasticMapReduceforEC2Role managed policy attached to it, and also if you have additional encryption or decryption procedures involved. Please refer to the AWS documentation link specified in the Further reading section of this chapter.
Presto
Similar to Hive, Presto also provides a distributed query engine to query data from different data sources such as HDFS, Amazon S3, and Kafka and databases such as MySQL, MongoDB, Cassandra, Teradata, and so on with a SQL-like query language. But compared to Hive's batch engine, Presto provides a high-performance fast SQL query engine designed specifically for interactive query use cases.
Presto is available in two separate versions, PrestoDB and PrestoSQL. Presto was originally created by a few members at Facebook and later it got forked to a separate open source release with the name PrestoSQL, which was recently renamed as Trino. In EMR, the Presto name refers to PrestoDB.
While launching your EMR cluster, you need to select either PrestoDB or PrestoSQL as selecting both is not supported. Please refer to the AWS documentation to understand the PrestoDB or PrestoSQL version attached to each release of EMR.
Both PrestoDB and PrestoSQL can access the data in Amazon S3 through the EMR File System (EMRFS). PrestoDB can access EMRFS starting with EMR release 5.12.0 and is also specified as the default configuration. PrestoSQL also uses EMRFS as the default since EMR release 6.1.0.
Making Presto work with the AWS Glue Data Catalog
As was discussed about Hive in the previous section, you can also configure Presto to use the AWS Glue Data Catalog as its external metastore. The following steps will guide you to configure it:
- Through the AWS Console: If you are creating the EMR cluster through the AWS console, then create the cluster through Advanced Options, select EMR 5.10.0 or a later release, and choose Presto as the application under the release. Then choose the Use for Presto table metadata option and select Next to proceed with the rest of the configuration as needed for your cluster creation.
- Through the AWS CLI: PrestoSQL and PrestoDB have different configurations for different EMR releases. Coming up are a few of the configuration examples.
For PrestoDB in EMR release 5.16.0 or later, you can use the following JSON configuration to specify "glue" as the default metastore:
[{
"Classification": "presto-connector-hive",
"Properties": {
"hive.metastore": "glue"
}
}]
Similar to Hive, you can also specify Glue Catalog in another AWS account with hive.metastore.glue.catalogid. The following is an example of the JSON configuration:
[{
"Classification": "presto-connector-hive",
"Properties": {
"hive.metastore": "glue",
"hive.metastore.glue.catalogid": "acct-id"
}
}]
PrestoSQL started supporting Glue as its default metastore starting with the EMR 6.1.0 release. The following JSON example shows how you can specify "glue" in the "prestosql-connector-hive" configuration classification:
[{
"Classification": "prestosql-connector-hive",
"Properties": {
"hive.metastore": "glue"
}
}]
In this section, you have learned how you can integrate Presto in EMR with a few of the configurations that make it work with the AWS Glue Data Catalog. In the next section, you will get an overview of Apache Spark and its integration with Amazon EMR.
Spark
Apache Spark is a very popular distributed processing framework that supports a wide range of big data analytics use cases, such as Batch ETL with Spark Core and Spark SQL, real-time streaming with Spark structured streaming, machine learning with MLlib, and graph processing with its GraphX library. Its programming interfaces are available in Java, Scala, Python, and R, which drives its adoption.
Spark provides an in-memory distributed processing capability on top of the data stored in HDFS, Amazon S3, databases connected through JDBC, other cloud object stores, and additional caching solutions such as Alluxio. It has a Directed Acyclic Graph (DAG) execution engine that is optimized for fast performance.
You can set up or configure Spark on an EMR cluster as you do for other applications or services. Spark on EMR natively integrates with EMRFS to read from or write data to Amazon S3. As highlighted earlier, you can configure Hive to submit queries to Spark for in-memory processing.
The latest EMR 6.3.0 release includes Spark 3.1.1 and you can refer to the AWS documentation to find which specific version of Spark is included in which EMR release.
In the following example AWS CLI command, you will learn how you can create an EMR cluster with Spark as the selected service. The command is the same as you have seen for Hive or Presto:
aws emr create-cluster --name "EMR Spark cluster" --release-label emr-6.3.0 --applications Name=Spark --ec2-attributes KeyName=<myEC2KeyPair> --instance-type m5.xlarge --instance-count 3 --use-default-roles
You will have to replace <myEC2KeyPair> with your EC2 key pair name before executing this command in the AWS CLI.
Making Spark SQL work with the AWS Glue Data Catalog
As discussed for Hive and Presto in previous sections, you can also configure Spark to use the AWS Glue Data Catalog as its external metastore. The following steps will guide you on how you can configure it:
- Through the AWS Console: If you are creating the EMR cluster through the AWS console, then create the cluster through Advanced Options, select EMR 5.8.0 or a later release, then choose Spark or Zeppelin as the applications under the release. Then, under AWS Glue Data Catalog settings, select the Use for Spark table metadata option and proceed with the rest of the configuration as needed for your cluster creation.
- Through the AWS CLI: If you are creating an EMR cluster with the AWS CLI or SDK, then you can specify the Glue Data Catalog option in the hive.metastore.client.factory.class parameter of the spark-hive-site classification.
The following is an example of the JSON configuration:
[{
"Classification": "spark-hive-site",
"Properties": {
"hive.metastore.client.factory.class": "com.amazonaws.glue.catalog.metastore.AWSGlueDataCatalogHiveClientFactory"
}
}]
As explained for Hive and Presto, if you need to specify Glue Data Catalog as available in another AWS account, then in the configuration JSON, you can specify it through the "hive.metastore.glue.catalogid": "account-id" additional parameter.
Submitting a Spark job to an EMR cluster
Similar to other Hadoop services, you can submit a Spark step while launching an EMR cluster or after the cluster is created, and you can use the AWS console, the AWS CLI, or SDKs to submit a step.
Now let's see how to submit a Spark job in EMR.
Submitting a Spark job through the AWS console
Follow these steps to submit a Spark job through the AWS console to an existing EMR cluster:
- Navigate to the Amazon EMR service console within the AWS console.
- From the cluster list, choose the EMR cluster against which you plan to submit a job.
- Navigate to the Steps section and select the Add Step action button.
- In the Add Step dialog box, select Spark Application for Step type. Then, give a name to the step and select Deploy mode as Client or Cluster. Selecting client mode will launch the driver in the cluster master node, whereas cluster mode will select any node of the cluster.
Then specify the spark-submit options, application script location, arguments to the script, and Action on failure, where you can go with the default option to Continue. Then choose the Add button, which will show the Spark job step in the steps list with the status as Pending.
- Then, as the job starts running, it will move the status to Running and then Completed.
After understanding how you can submit a Spark job step to the EMR cluster using the EMR console, next let's learn how you can do the same using the AWS CLI.
Submitting a Spark job through the AWS CLI
You can submit a Spark job while launching the cluster or to an existing EMR cluster.
The following is an example of an AWS CLI command that explains how you can add a SparkPi step while launching an EMR cluster:
aws emr create-cluster --name "EMR Spark Cluster" --release-label emr-6.3.0 --applications Name=Spark
--ec2-attributes KeyName=myKeyPairName --instance-type m5.xlarge --instance-count 3
--steps Type=Spark,Name="Spark Program", ActionOnFailure=CONTINUE,Args=[--class,org.apache.spark.examples.SparkPi,/usr/lib/spark/examples/jars/spark-examples.jar,10] --use-default-roles
Alternatively you can also add a Spark step to an existing EMR cluster, as shown in the following example:
aws emr add-steps --cluster-id <cluster-id> --steps Type=Spark, Name="Spark Pi Step", ActionOnFailure=CONTINUE,Args=[--class,org.apache.spark.examples.SparkPi,/usr/lib/spark/examples/jars/spark-examples.jar,10]
Please replace <cluster-id> with your existing EMR cluster's ID.
Improving EMR Spark performance with Amazon S3
Amazon EMR offers features and configurations using which you can improve Spark performance while reading from or writing data to Amazon S3. S3 Select and the EMRFS S3-optimized committer are a couple of methods using which you can improve the performance.
Let's understand both in a bit more detail:
- S3 Select: This is one of the features of S3, where you can fetch a subset of the data from S3 by applying filters on the data. When you are using Spark with EMR and trying to fetch data from S3, instead of transferring the complete S3 file to EMR and then applying a filter through Spark, you can push the filtering part to S3 Select so that less data is transferred to EMR for processing.
It's useful when you filter out more than 50% of your data from S3, and please note that you will need a sufficient transfer speed and available bandwidth over the internet to transfer data between EMR and S3, as the data that gets transferred is uncompressed and the size might be larger. The following is sample PySpark code if you need to integrate S3 Select with Spark:
spark
.read
.format("s3selectCSV") // "s3selectJson" for Json
.schema(...) // optional, but recommended
.options(...) // optional
.load("s3://path/to/my/datafiles")
There are several limitations when you integrate S3 Select. A few of the limitations are that the S3 Select feature is only supported with CSV and JSON files and uncompressed or gzip files and is not supported in multiline CSV files. Please refer to the AWS documentation for a detailed list.
- EMRFS S3-optimizer committer: When you are using Spark with Spark SQL DataFrames or Datasets to write output to Amazon S3, the EMRFS S3-optimizer committer improves performance. The committer is available in EMR starting with the 5.19.0 release and is available by default since the 5.20.0 release.
To enable the committer in the EMR 5.19.0 release, you need to set the spark.sql.parquet.fs.optimized.committer.optimization-enabled property value to true and you can do that by adding it to SparkConf or passing it as an argument to your spark-submit command.
The following example shows how to pass it through a Spark SQL command:
spark-sql --conf spark.sql.parquet.fs.optimized.committer.optimization-enabled=true -e "INSERT OVERWRITE TABLE new_table SELECT * FROM old_table;"
Please note this committer takes a small amount of memory for each file written by a task but that is negligible. But if you are writing a large volume of files, then the total additional memory consumed might be noticeable and in that case, you may need to tune Spark executor memory parameters to provide additional memory. In general, the guidance is if a task is to write around 100,000 files, then it might need an additional 100 MB of memory for the committer.
HBase
HBase is a popular Hadoop project of the Apache Software Foundation, which acts as a non-relational or NoSQL database in the Hadoop ecosystem. It is a columnar database, where you need to define column families and within each column family, a set of columns. In terms of architecture, HBase has master and region servers where each region server has multiple regions. In EMR, region servers will be primarily on core nodes as HDFS is configured only on core nodes.
HBase has Zookeeper built into it to provide centralized high-performance coordination between nodes or region servers. Zookeeper is an open source coordination service for distributed applications, where you can focus on your application logic and Zookeeper takes care of coordinating with hosts of the cluster by keeping metadata of all the configuration parameters.
Every time data is added, modified, or deleted, HBase keeps track of the changes as change files and then merges them periodically. This process is called compaction. HBase supports two types of compaction. One is major compaction, which you need to trigger manually as HBase does not invoke it automatically and you can define your schedule to trigger it. The other is minor compaction, which HBase does periodically without your manual intervention.
HBase also integrates with Hive where you need to define an external table on top of HBase with Hive to HBase column mapping and query the data using Hive QL.
EMR 6.3.0 has the HBase 2.2.6 version included in it. You can refer to the AWS documentation to find the HBase version included in each EMR release.
From the following example of an AWS CLI command, you can understand how you can create an EMR cluster with HBase as the selected service. The command is the same as you have seen for other Hadoop applications:
aws emr create-cluster --name "EMR HBase cluster" --release-label emr-6.3.0 --applications Name=HBase --use-default-roles --ec2-attributes KeyName=<myEC2KeyPair> --instance-type m5.xlarge --instance-count 3
You will have to replace <myEC2KeyPair> in the preceding command with your EC2 key pair.
In EMR, HBase can run on top of local HDFS or Amazon S3 and it can use Amazon S3 as its root directory or use it to store HBase snapshots. HBase integration with Amazon S3 opens up several other use cases such as cross-cluster data sharing, bringing in more reliability to data storage, disaster recovery, and so on.
Let's dive deep into a few of these additional integration benefits that you can get from HBase integration with Amazon S3.
Using Amazon S3 as the HBase storage mode
Starting with the EMR 5.2.0 release, you can integrate HBase on top of Amazon S3 where you can configure HBase to store its root directory, HBase stores files, and table metadata directly in S3. With Amazon S3 as the persistent data store, you can size your EMR cluster only for compute needs, instead of considering 3x storage with the default HDFS replication factor.
This opens up support for transient EMR cluster use cases, where a cluster can be terminated after its job is completed and again start the cluster by just pointing HBase to its existing Amazon S3 root directory. You just need to make sure that at any time, only one cluster is writing to the S3 root directory path, to avoid conflict or data corruption. But you can have a read replica cluster pointing to the same path for only read operations.
Starting from the EMR 6.2.0 release, HBase uses its hbase:storefile system table to track the HFile paths that are used for read operations and the table is enabled by default. Thus, you don't need to perform any additional manual configuration or data migration.
The following diagram explains HBase integration with Amazon S3:

Figure 4.1 – Architecture reference for HBase on Amazon S3
Next, let's understand how you can configure HBase on your cluster to work with Amazon S3 as its persistent store.
Configuring HBase on Amazon S3 using the AWS console and the AWS CLI
You can specify configuration for HBase to work with Amazon S3 while launching the EMR cluster through the AWS console, the AWS CLI, or the AWS SDK. The following explains how you can configure it using the EMR console or the AWS CLI.
While creating the cluster through the AWS console, you can follow these steps to specify configuration for HBase on S3:
- In the EMR console, click on Advanced options to create the cluster.
- The first section of Advanced options you will notice is Software Configurations, where you can choose HBase or any other applications you plan to deploy.
- Then, under HBase Storage Settings, select HDFS or S3 and you can then select the rest of the steps as per your requirement.
If you are using an AWS CLI command to create a cluster, then please specify the following JSON configuration, where hbase.emr.storageMode will have a value of s3 and then hbase.rootdir of the hbase-site classification will point to your S3 path:
[
{
"Classification": "hbase-site",
"Properties": {
"hbase.rootdir": "s3://<Bucket-Name>/<HbaseStore-Path>"
}
},
{
"Classification": "hbase",
"Properties": {
"hbase.emr.storageMode": "s3"
}
}
]
This section explained how you can configure HBase to work with Amazon S3. Next, you will learn what some of the HBase parameters are you can tune to get better performance.
Performance tuning parameters for HBase on Amazon S3
The following are some of the HBase configuration parameters, that you can tune to get better performance when you are using HBase on Amazon S3:
- hbase.bucketcache.size: This parameter represents the amount of EC2 instance store and EBS volume disk space reserved in MB for BucketCache storage, which is applicable to all the region server EC2 instances. By default, the value for this parameter is 8192 and a larger size value might improve performance.
- hbase.hregion.memstore.flush.size: This is the parameter that decides at what size or data limit (in bytes) MemStore will flush the cache data to Amazon S3. The default value for this is 134217728.
- hbase.hregion.memstore.block.multiplier: This parameter helps HBase decide if it should block updates and look to do compaction or a MemStore flush. This parameter value gets multiplied by the hbase.hregion.memstore.flush.size value to define the upper limit, beyond which it should block updates. The default value for this parameter is 4.
- hbase.hstore.blockingStoreFiles: This parameter also provides an upper limit for the maximum number of StoreFiles that can exist before blocking new updates. The default value for this is 10.
- hbase.hregion.max.filesize: This represents the maximum size (in bytes) of a region before HBase decides to split the region. The default value for this is 10737418240.
Apart from this, you can also refer to the Apache HBase documentation for other parameters that can be tuned.
Gracefully shutting down a cluster to avoid data loss
When you are using HBase with Amazon S3, it's important to shut down the cluster gracefully so that HBase flushes all MemStore cache files to new store files in Amazon S3. You can do that by executing the following shell script available in EMR:
bash /usr/lib/hbase/bin/disable_all_tables.sh
Alternatively, you can add a step to EMR too by using the following command:
Name="Disable HBase tables",Jar="command-runner.jar",Args=["/bin/bash","/usr/lib/hbase/bin/disable_all_tables.sh"]
This disables all the tables, which forces each region server to flush MemStore cache data to S3.
Using an HBase read replica cluster
Starting from the EMR 5.7.0 release, HBase started supporting read replica clusters on Amazon S3. A single writer cluster can write to an S3 root directory and at the same time, multiple EMR read replica clusters can have read-only workloads running on top of it.
The read replica cluster is set up the same way as the primary cluster, with only one difference in the JSON configuration, which specifies the hbase.emr.readreplica.enabled property to be true.
The following is an example of the JSON configuration:
[
{
"Classification": "hbase-site",
"Properties": {
"hbase.rootdir": "s3://<Bucket-Name>/<HbaseStore-Path>"
}
},
{
"Classification": "hbase",
"Properties": {
"hbase.emr.storageMode": "s3",
"hbase.emr.readreplica.enabled":"true"
}
}
]
Here, you learned how you can create an EMR HBase read replica cluster pointing to an existing S3 HBase root directory. Next, we will understand how the data gets synced while the primary cluster does write operations.
Synchronizing the read replica cluster while data is being written from the primary cluster
When you write something to HBase, it is first written to an in-memory store called memstore and once memstore reaches a certain size defined in HBase configurations, it flushes data to the persistent storage layer, which can be HDFS or an Amazon S3 layer.
When you have a read replica cluster reading from the primary cluster's HBase root directory S3 path, it will not see the latest data till the primary cluster flushes the data to S3. So to provide the read replica access to the latest data, you need to flush the data from the primary cluster more frequently, and you can do that manually or by reducing the size specified in the flush settings.
In addition to that, you will need to run the following commands in the read replica cluster to make it see the latest data:
- Run the refresh_meta command when the primary cluster does compaction or region split happens, or any new tables are added or removed.
- Run the refresh_hfile command when new records are added or existing records are modified through the primary cluster.
Using Amazon S3 to store HBase snapshots
Apart from pointing the HBase root directory to Amazon S3, you do have the option to use S3 to store a backup of your HBase table data using the HBase built-in snapshot functionality. Starting with the EMR 4.0 release, you can create HBase snapshots and store them in Amazon S3, then use the same snapshot to restore cluster data.
You can execute hbase snapshot CLI commands in the cluster master node and then export it to Amazon S3. You can see how you can do it using the master node's command prompt or as an EMR step in the following example.
Exporting and restoring HBase snapshots using the master node's command prompt
You can refer to the following steps to export an HBase snapshot from one cluster and restore it in another cluster using the HBase command line:
- Create a snapshot using the following command:
hbase snapshot create -n <snapshot-name> -t <table-name>
- Then export the snapshot to an Amazon S3 path:
hbase snapshot export -snapshot <snapshot-name> -copy-to s3://<bucket-name>/<folder> -mappers 2
- If you have the snapshot ready, then import it into your new cluster using the following command:
sudo -u hbase hbase snapshot export -D hbase.rootdir=s3://<bucket-name>/<folder> -snapshot <snapshot-name> -copy-to hdfs://<master-public-dns-name>:8020/user/hbase -mappers 2
- After the snapshot is available in your HDFS path, you can execute the following commands, which involve disabling the table first, restoring the snapshot, and enabling it again. This is needed to avoid data corruption:
echo 'disable <table-name>;
restore_snapshot snapshotName;
enable <table-name>' | hbase shell
- Please note the preceding command uses echo on the bash shell and it might still fail even if EMR returns a 0 exit code for it. If you plan to run the shell command as an EMR step, ensure you check the step logs.
In all the preceding commands, please replace the <snapshot-name>, <table-name>, <bucket-name>, <folder>, and <master-public-dns-name> variables with your input.
Exporting and restoring HBase snapshots using EMR steps
You can refer to the following steps to export and restore an HBase snapshot using EMR steps:
- Create a snapshot using the following command:
aws emr add-steps --cluster-id <cluster-id> --steps Name="HBase Shell Step", Jar="command-runner.jar", Args=[ "hbase", "snapshot", "create","-n","<snapshot-name>","-t","<table-name>"]
- Then export the snapshot to an Amazon S3 path:
aws emr add-steps --cluster-id <cluster-id> --steps Name="HBase Shell Step", Jar="command-runner.jar", Args=[ "hbase", "snapshot", "export","-snapshot","<snapshot-name>","-copy-to","s3://<bucket-name>/<folder>","-mappers","2","-bandwidth","50"]
- Then import the snapshot to your new cluster using the following command:
aws emr add-steps --cluster-id <cluster-id> --steps Name="HBase Shell Step", Jar="command-runner.jar", Args=["sudo","-u","hbase","hbase snapshot export","-snapshot","<snapshot-name>", "-D","hbase.rootdir=s3://<bucket-name>/<folder>", "-copy-to","hdfs://<master-public-dns-name>:8020/user/hbase","-mappers","2","-chmod","700"]
- After the snapshot is available in your HDFS path, you need to restore the snapshot against the table for which you took the snapshot. To restore it using the AWS CLI, you can create a JSON file, which will have the following configuration, which includes the same disable and enable table commands:
[{
"Name": "restore",
"Args": ["bash", "-c", "echo $'disable "<tableName>"; restore_snapshot "<snapshot-name>"; enable "<table-name>"' | hbase shell"],
"Jar": "command-runner.jar",
"ActionOnFailure": "CONTINUE",
"Type": "CUSTOM_JAR"
}]
- Assuming you have saved this JSON file with the name as restore-snapshot.json, you can add the following step to EMR to trigger the restore snapshot action:
aws emr add-steps --cluster-id <cluster-id> --steps file://./restore-snapshot.json
In all the preceding commands, please replace the <cluster-id>, <snapshot-name>, <table-name>, <bucket-name>, <folder>, and <master-public-dns-name> variables with your input.
Hue
Hadoop User Experience (Hue) is an open source project of the Hadoop ecosystem that provides a web interface to interact with different Hadoop applications such as HDFS, Hive, Pig, Oozie, Solr, and so on. You can use your desktop system's browser to access the Hue web interface, where you can navigate through HDFS, submit queries to Hive, write Pig scripts, connect to remote databases and run queries against them, or monitor Oozie-based workflows or coordinators.
You can use Hue to act as your frontend application where you can do user management, define who can access which application, and avoid giving SSH access to your users. Your users might be data analysts or data scientists who might be interested in querying data through Hive, and they can write Hive queries, save queries, look at results in tabular format, or download a query result as CSV. They can also upload and download files through the HDFS interface or monitor Oozie workflows to track failure and restart jobs.
In EMR, Hue is installed by default when you use the Quick Create option in the AWS console. You can choose not to install Hue by going to the advanced options in the EMR console, or not to specify Hue as an application while using the AWS CLI. Apart from browsing HDFS, Hue in EMR does provide access to browse objects in S3 too.
Important Note
Hue in EMR does not support Hue Dashboard and PostgreSQL connectivity. Also, to access Hue Notebook for Spark, you must set up Hue with Spark and Livy.
EMR 6.3.0 includes Hue 4.9.0 and you can refer to the EMR release history in the AWS documentation to find which version of EMR includes which version of Hue.
Using Amazon RDS as a Hue database
Hue internally uses a local MySQL database hosted in EMR's master node to store its user information and query history. But you have the option to externalize the database by integrating Amazon RDS so that you can avoid data loss and can also support transient EMR cluster use cases.
To use Amazon RDS as a Hue database, you can create a configuration file in Amazon S3 pointing to the Amazon RDS database you created and use that while creating your EMR cluster.
Follow the steps given in the following section to learn how to integrate an RDS database with Hue.
Creating an Amazon RDS database using the AWS console
You can follow these steps to first create an Amazon RDS database that will be used as a Hue database:
- Navigate to Amazon RDS in the AWS console.
- Click Databases from the left navigation and then select Create database.
- Then choose MySQL as the database engine type.
- Then you have the option to select a Multi-AZ deployment if it's a production-critical database, which you can leave as the default and choose Provisioned IOPS Storage, then click Next. For non-production environments, you can select a single AZ as your deployment mode.
- Then you can leave Instance Specifications at their defaults, specify Settings, and then click Next.
- On the Configure Advanced Settings page, you need to specify the database name and a security group that allows inbound access to port 3306 from your EMR master node. If you have not created the cluster yet, then you can allow 3306 port access from all sources and restrict it after the EMR cluster is created.
- Then click Launch DB Instance.
- Next, you need to capture or save the database hostname, username, and password to connect from Hue. You can navigate to RDS Dashboard, select the instance you have created, and then, if it is available, capture all these connection credentials.
After your RDS database is ready, we can see how you can use its connection credentials with Hue, while launching your EMR cluster.
Specifying Amazon RDS for Hue while creating an EMR cluster using the AWS CLI
To specify the Amazon RDS database for Hue, the first step is to create a configuration file in Amazon S3, which will have connection credentials. Please note, I would recommend enabling S3 server-side encryption for this configuration file to keep it secure.
The following is an example of the JSON configuration file, where you can specify connection details for hue-ini classification:
[{
"Classification": "hue-ini",
"Properties": {},
"Configurations": [
{
"Classification": "desktop",
"Properties": {},
"Configurations": [
{
"Classification": "database",
"Properties": {
"name": "<database-name>",
"user": "<db-username>",
"password": "<db-password>",
"host": "<rds-db-hostname>",
"port": "3306",
"engine": "mysql"
},
"Configurations": []
}
]
}
]
}]
Please replace the <database-name>, <db-username>, <db-password>, and <rds-db-hostname> variables with your connection credentials.
Let's assume you have saved this configuration file with the name as hue-db-config.json. Next, you can use the following AWS CLI command to create your EMR cluster that specifies the configuration file's S3 path:
aws emr create-cluster --name "EMR Hue External DB" --release-label emr-6.3.0 --applications Name=Hue Name=Spark Name=Hive --instance-type m5.xlarge --instance-count 3 --configurations https://s3.amazonaws.com/<bucket-name>/<folder-name>/hue-db-config.json --use-default-roles
Please replace the <bucket-name> and <folder-name> variables as per your S3 path.
In this section, you have learned about Hue, how you can configure it in EMR, and how you can externalize its metastore by integrating Amazon RDS. Next, we will learn about Ganglia, which helps in monitoring your cluster resources.
Ganglia
Ganglia is an open source project that is scalable and designed to monitor the usage and performance of distributed clusters or grids. You can set up and integrate Ganglia on your cluster to monitor the performance of individual nodes and the whole cluster.
In an EMR cluster, Ganglia is configured to capture and visualize Hadoop and Spark metrics. It provides a web interface where you can see your cluster performance with different graphs and charts representing CPU and memory utilization, network traffic, and the load of the cluster.
Ganglia provides Hadoop and Spark metrics for each EC2 instance. Each metric of Ganglia is prefixed by category, for example, distributed file systems have dfs.* as the prefix, Java Virtual Machine (JVM) metrics are prefixed as jvm.*, and MapReduce metrics are prefixed as mapred.*.
For Spark, it provides metrics related to its DAGScheduler and jobs. For jobs, you can find both driver and executor metrics with a YARN application ID. As an example, they are prefixed as application_xxxxxxxxxx_xxxx.driver.*, application_xxxxxxxxxx_xxxx.executor.* and DAGScheduler.*. Please note, YARN based metrics are available from EMR 4.5.0 and above.
In EMR 6.3.0, Ganglia 3.7.2 version is included. You can refer to the AWS documentation to find the Ganglia version included in each EMR release.
The following is an example of the AWS CLI command that shows how you can create an EMR cluster with Ganglia as the selected service. The command is the same as you have seen for other Hadoop applications:
aws emr create-cluster --name "EMR cluster with Ganglia" --release-label emr-6.3.0
--applications Name=Spark Name=Ganglia
--ec2-attributes KeyName=<myEC2KeyPair> --instance-type m5.xlarge
--instance-count 3 --use-default-roles
You will have to replace <myEC2KeyPair> in the preceding command with your EC2 key pair.
In this section, you learned about different big data applications and how they are configured in EMR to work with other AWS services such as Amazon S3, IAM, Glue Catalog, and more. In the next section, we will provide an overview of a few of the machine learning frameworks that are available in EMR, such as TensorFlow and MXNet.
Machine learning frameworks available in EMR
There are several machine learning libraries or frameworks that you can configure in your EMR cluster. TensorFlow and MXNet are a couple of popular ones, which are available as applications that you can choose while creating the cluster.
Even though TensorFlow and MXNet are available as pre-configured machine learning frameworks in EMR, you do have the option to configure other alternatives such as PyTorch and Keras as custom libraries.
Now let's get an overview of the TensorFlow and MXNet applications in EMR.
TensorFlow
TensorFlow is an open source platform using which you can develop machine learning models. It provides tools, libraries, and a community of resources that will help researchers and data scientists to easily develop and deploy machine learning models.
TensorFlow has been available in EMR since the 5.17.0 release and the recent 6.3.0 release includes TensorFlow v2.4.1.
If you plan to configure TensorFlow in your EMR cluster, then please note that EMR uses different builds of the TensorFlow library based on the EC2 instance types you select for your cluster. For example, M5 and C5 instance types have TensorFlow 1.9.0 built with Intel MKL optimization and the P2 instance type has Tensorflow 1.9.0 built with CUDA 9.2 and cuDNN 7.1.
Using TensorBoard
TensorBoard provides a suite of visualization tools that you can use for machine learning model data exploration or experimentation. Using TensorBoard, you can track and visualize different metrics such as loss or accuracy, draw histograms, or profile your TensorFlow programs.
If you plan to configure TensorBoard in your EMR cluster, then please note that you need to start it in the EMR cluster's master node. You can refer to the following command to start TensorBoard in the master node and specify the log directory path by replacing the <my/log/dir> variable:
python3 -m tensorboard.main --logdir=</my/log/dir>
By default, TensorBoard uses port 6006 on the master node and you can access its web interface using the master node's public DNS. The following is the output you get in the command line after you start the service, which includes the web URL you can use.
TensorBoard 1.9.0 at http://<master-public-dns-name>:6006 (Press CTRL+C to quit)
MXNet
Apache MXNet is another popular machine learning framework that is built to ease the development of neural network and deep learning applications. Its flexible programming model with multiple languages, such as Python, Java, Scala, and R, and scalability allows for fast model training deployment.
It helps you to design neural network architectures by automating common workflows so that you can save effort on low-level computational implementations such as linear algebra operations.
Recently, MXNet started becoming more popular with its adoption across different industry use cases such as manufacturing, transportation, healthcare, and many more, with use cases related to computer vision, NLP and time series, and so on.
EMR started supporting MXNet starting in its 5.10.0 release and its recent 6.3.0 release includes the MXNet 1.7.0 version.
Notebook options available in EMR
In today's world, usage of web-based notebooks for interactive development is very common and EMR provides a few options for integrating Jupyter and Zeppelin notebooks.
Jupyter Notebook is a very popular open source web application that allows developers and analysts to do interactive development by writing live code, executing it line by line for debugging, building visualizations on top of data, and also providing narratives on code. You can also share notebooks with others, who can import code into their notebook.
Within an EMR cluster, you have the option to use EMR Notebooks and JupyterHub, and outside of your EMR cluster, you have EMR Studio, which you can attach to your EMR cluster.
Now let's dive deep into each of these options.
EMR Notebooks
EMR Notebooks is available in the EMR console. Notebooks are serverless and can be attached to any EMR cluster running Hadoop, Spark, and Livy. Using EMR Notebooks, you can open Jupyter Notebook or JupyterLab interfaces and any queries or code that you execute are instead run as a client submitting queries to your EMR on an EC2 cluster.
Your EMR Notebooks contents are saved to Amazon S3 for durability and reuse, which provides you with the option to launch a cluster, attach a notebook to the cluster for interactive development, and then terminate the cluster. As the notebook acts as a client, multiple users can have their own notebook using which they can submit queries or commands to the same EMR cluster kernel. With this feature, you don't need to configure your notebook for different EMR clusters and you can use them on-demand to save costs.
Important Note
Support for EMR Notebooks started from the EMR 5.18.0 release but it's recommended to use it with clusters having the latest release of 5.30.0, 5.32.0, and later or version 6.2.0 and later. There was a change made with these specific EMR releases that makes the Jupyter kernels run on the attached EMR cluster instead of the Jupyter instance, which improves performance.
There are a few limitations to consider while using EMR Notebooks:
- For EMR v5.32.0 and later, or v6.2.0 and later releases, your cluster must have the Jupyter Enterprise Gateway application running.
- EMR Notebooks works with clusters that have the VisibleToAllUsers setting set to true while creating the cluster and currently supports Spark-only clusters.
- EMR Notebooks does not support clusters that have Kerberos authentication enabled or clusters that have multiple master nodes.
- Installing custom libraries or kernels is not supported if your EMR cluster has Lake Formation permissions enabled.
Please check the AWS documentation for detailed configuration considerations and limitations.
Setting up and working with EMR Notebooks
Let's look at the following steps to guide you on how you can create an EMR notebook using the AWS console:
- Navigate to the EMR service in the AWS console.
- Choose Notebooks from the left-side navigation and then select Create notebook.
- Specify your notebook name and description.
- If you have already created an EMR cluster, then leave the default Choose an existing cluster option selected and click Choose. Then select your cluster from the list and click Choose cluster or select Create cluster and populate all fields as needed for your cluster.
- For the final step, choose Create Notebook.
After your cluster is created, it goes through statuses such as Pending, Starting, and Ready. Once it is in the Ready state, you can choose Open in Jupyter or Open in JupyterLab, which will open the interface in a new tab of your browser.
Now you can select your preferred programming language, Kernel, from the Kernel menu and start writing, executing your code in an interactive way.
EMR Notebooks also provides a feature to execute them programmatically through EMR APIs, which allows you to pass runtime parameters that can be used as input variables in your notebook code. If you plan to execute the same code with different input variables, then this feature is very helpful as you can avoid duplicating the notebook.
The following shows a sample AWS CLI command using which you can trigger a notebook execution with a few runtime parameters:
aws emr --region us-east-1
start-notebook-execution
--editor-id <editor-id>
--notebook-params '{"parameter-1":"value-1", "parameter-2":["value-1", "value-2"]}'
--relative-path <notebook-name>.ipynb
--notebook-execution-name <execution-name>
--execution-engine '{"Id" : "<id>"}'
--service-role EMR_Notebooks_DefaultRole
As you can see, you can pass parameters using the —notebook-params option. Please do replace <editor-id>, <notebook-name>, <execution-name>, <id>, and parameter values before executing it.
JupyterHub
JupyterHub also provides the Jupyter Notebook interface with an additional feature to host multiple instances of a single user notebook server, which creates a Docker container on the cluster master node that includes all JupyterHub components with Sparkmagic within the container.
JupyterHub includes Python 3 and Sparkmagic kernels include PySpark 3, PySpark, and Spark kernels. Sparkmagic kernels allow Jupyter Notebook to interact with the Spark service installed in your cluster using Apache Livy, which acts as a REST server for Spark. If you need to install additional kernels or libraries, you can install them manually within the container.
If you would like to list the installed libraries using conda, then you can run the following commands on your cluster master node's command line:
sudo docker exec jupyterhub bash -c "conda list"
Alternatively, you can use the following pip command too to list the installed libraries:
sudo docker exec jupyterhub bash -c "pip freeze"
Let's look at the following diagram, which explains the core components of JupyterHub in EMR with an authentication mechanism for administrators and notebook users.
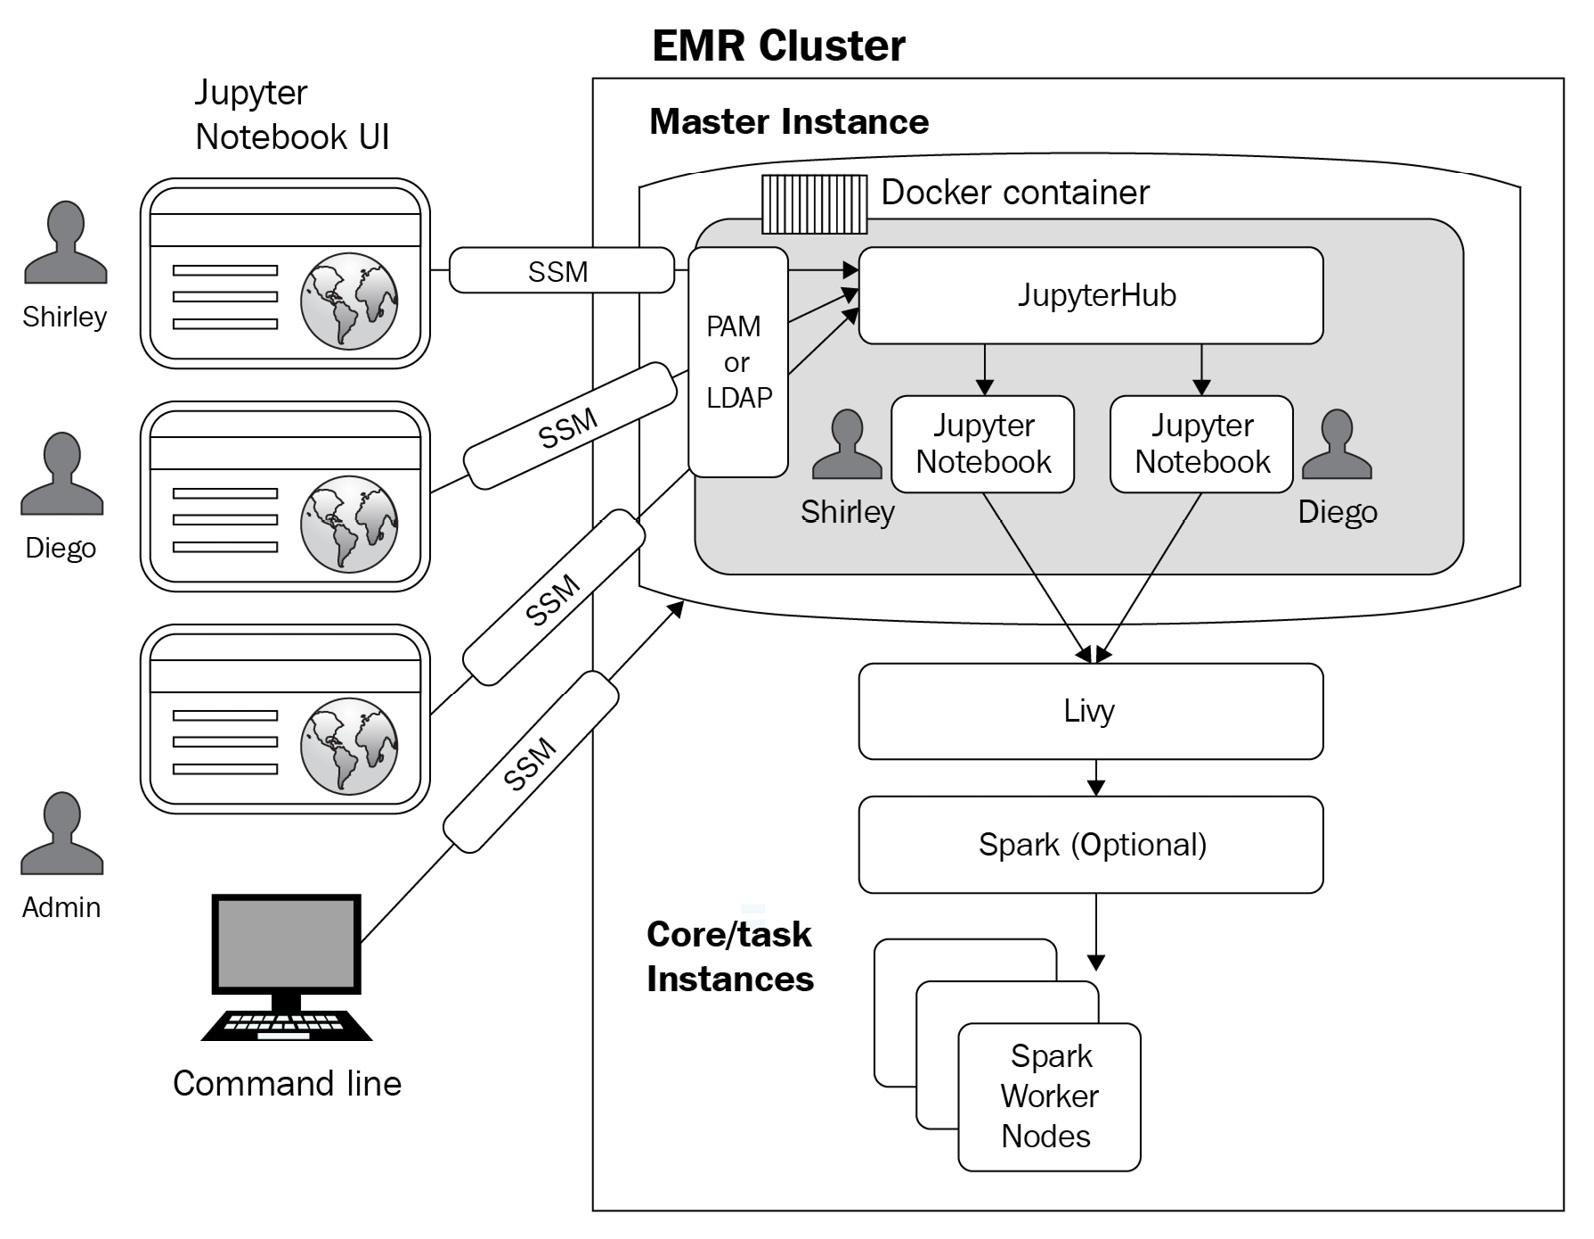
Figure 4.2 – JupyterHub architecture in EMR
EMR v6.3.0 includes JupyterHub v1.2.0 and you can refer to the AWS documentation to understand which EMR release includes which version of JupyterHub.
Setting up and configuring JupyterHub
JupyterHub is available as an application that you can choose while creating a cluster through the AWS console, the AWS CLI, or the EMR API.
While setting up JupyterHub, we need to make sure that the cluster is not created with the option to auto terminate, and the administrators and notebook users can access the EC2 key pair attached to the cluster.
The following is an example AWS CLI command, which you can use to create an EMR cluster with JupyterHub:
aws emr create-cluster --name="JupyterHub EMR Cluster" --release-label emr-6.3.0 --applications Name=JupyterHub --log-uri s3://<log-bucket>/<jupyter-cluster-logs> --use-default-roles --instance-type m5.xlarge --instance-count 2 --ec2-attributes KeyName=<EC2KeyPairName>
Please replace the <log-bucket>, <jupyter-cluster-logs>, <EC2KeyPairName> variables before executing the command.
Important Note
User-created notebooks and related files are saved on the cluster's master node, which creates a risk of data loss if the cluster gets terminated. It is recommended that you have a scheduler script that continuously backs up this data.
If you have done additional custom configuration changes on the container, then they will get lost if the container gets restarted. So you should have automation scripts ready that you can run to apply the custom configuration changes after the container is restarted every time.
You can also provide the following additional JSON configuration while creating your EMR cluster, which uses jupyter-s3-conf classification to configure JupyterHub to persist notebooks in Amazon S3:
[
{
"Classification": "jupyter-s3-conf",
"Properties": {
"s3.persistence.enabled": "true",
"s3.persistence.bucket": "<jupyter-backup-bucket>"
}
}
]
With this configuration, notebooks saved by each EMR user will be saved into the s3://<jupyter-backup-bucket>/jupyter/<jupyterhub-user-name> path, where <jupyter-backup-bucket> represents the S3 backup bucket and <jupyterhub-user-name> represents the username of the logged-in user.
EMR Studio
EMR Studio also provides a fully managed Jupyter Notebook like EMR Notebooks but comes up with a few additional features:
- AWS Single Sign-On integration, which allows directly logging in with your corporate credentials.
- It does not need EMR console access and you can submit jobs to EMR on the EKS cluster.
- Integrates with GitHub or Bitbucket for code repository sharing.
- Provides capabilities for simpler application debugging or automating job submission to production EMR clusters using orchestration tools such as AWS Step Functions, Apache Airflow, and Amazon Managed Workflows for Apache Airflow.
Often, an organization's data engineers and data scientists do not have access to the AWS or EMR console and they would like to have their own notebook that has multiple kernels to do interactive development. For such use cases, EMR Studio is a great fit.
You can point your EMR Studio to existing EMR clusters or new ones and can also submit jobs to EMR on EKS clusters. EMR Studio adds value when it comes to building data engineering or data science applications, where you can simplify development, debugging, and deployment to production pipelines.
While setting up EMR Studio, you need to associate it with a few AWS resources such as an Amazon VPC and subnets of that VPC with a current limitation of five subnets of that VPC. As EMR Studio is associated with one VPC, you are allowed to access EMR clusters or EMR on EKS virtual clusters within that VPC and defined subnets.
EMR Studio controls its access with IAM user and permission management. Each EMR Studio instance uses a defined IAM service role and security group to provide access to an EMR cluster. It uses the IAM user role with IAM session policies to control access of an EMR Studio user.
EMR Studio is available in EMR v5.32.0 and 6.2.0 and later releases. You don't pay anything for creating or using EMR Studio and the cost is calculated based on the amount of resources you use on your EMR cluster or Amazon S3.
Workspaces in EMR Studio
A workspace is the primary building block or component of EMR Studio. The first thing you do in EMR Studio is to create a workspace, which has a similar user interface as JupyterLab and it provides additional features such as creating and attaching a workspace to EMR clusters, exploring sample notebooks, linking with GitHub or Bitbucket repositories, and executing jobs.
After a workspace is created, you can assign one of the subnets of EMR Studio to the workspace and then attach it to EMR on EC2 or EMR on an EKS cluster.
EMR Studio is associated with an Amazon S3 location and your workspace periodically autosaves the notebook cell and content to the associated Amazon S3 location between sessions. Apart from autosave, you can also manually save your notebook content with the Ctrl + S keys or the Save option under the File menu. Alternatively, you can also link your workspace with its repository to save it remotely and share it with your peers.
When you delete a single notebook from your workspace, its respective backup version automatically gets deleted from S3. But if you delete the workspace completely without deleting individual notebook files, then the notebook backup files does not get deleted from S3, which might add to storage costs.
Installing kernels and libraries
EMR Studio comes with pre-defined libraries and kernels but it also provides the option to install custom libraries.
The following are a couple of ways using which you can customize your EMR Studio environment when it's attached to EMR on an EC2 cluster:
- Install Python libraries and Notebook kernels in an EMR cluster's master node: With this option, the installed libraries will be available to all workspaces attached to the cluster. You can install libraries or kernels from the notebook itself or can SSH to your cluster's master node and install them through it.
- Notebook-scoped libraries: With this option, you can install libraries through your notebook cell and these notebook-scoped libraries are available to that notebook only. This option is good when some libraries are workload-specific and need not be shared across the cluster.
Please note, EMR Studio attached to EMR on an EKS virtual cluster currently does not support installing additional custom libraries or kernels.
Zeppelin
Apart from Jupyter Notebook, Apache Zeppelin also provides a web-based interactive development environment that is integrated with several interpreters, including Spark, Python, SQL, JDBC, Shell, and so on. Similar to Jupyter notebooks, you can also use Zeppelin notebooks for data ingestion, exploration, analysis, visualization, and collaboration.
Zeppelin notebooks are integrated into EMR starting with the v5.0.0 release and a few previous releases included it as a sandbox application. EMR v6.3.0 includes Zeppelin v0.9.0 and you can refer to the AWS documentation to find which version of Zeppelin is included in other releases of EMR. Starting with EMR 5.8.0, Zeppelin supports integrating AWS Glue Data Catalog as the metastore for Spark SQL. This integration is useful when you plan to persist your metadata outside of an EMR cluster or you plan to share the metastore with other EMR clusters. Please note, Zeppelin in EMR does not support SparkR Interpreter.
Summary
Over the course of this chapter, we have dived deep into a few popular big data applications available in EMR, how they are set up in EMR, and what additional configuration options or features you get when you integrate with Amazon S3. Then we provided an overview of the TensorFlow and MXNet applications, which are the machine learning and deep learning libraries available in EMR. These applications are the primary building blocks when you implement a data analytics pipeline using EMR.
Finally, we covered the different notebook options you have and how you can configure and use them for your interactive development.
That concludes this chapter! Hopefully, you have got a good overview of these distributed applications and are ready to dive deep into EMR cluster creation and configuration in the next chapter.
Test your knowledge
Before moving on to the next chapter, test your knowledge with the following questions:
- You have terabyte-scale data available in Amazon S3 and your data analysts are looking for a query engine using which they can interactively query the data using SQL. You already have a persistent EMR cluster, which is being used for multiple ETL workloads, and to save costs you are looking for an application within EMR that can provide the interactive query engine needed. Which big data application in EMR best fits your need?
- Your team is using EMR with Spark for multiple ETL workloads and it uses Amazon S3 as the persistent data store. For one of the use cases, you receive data that does not have a fixed schema and you are looking for a NoSQL solution that can provide data update capabilities and also can provide fast lookup. Which EMR big data application can support this technical requirement?
- Your data scientists are looking for a web-based notebook that they can use for their interactive data analysis and machine learning model development. Your organization has strict security policies that do not allow AWS console access, and also, to support centralized user management, you are looking for a notebook in EMR that can easily support signing in with corporate credentials. Which notebook option in EMR best suits your needs?
Further reading
Here are a few resources you can refer to for further reading:
- EMR release documentation, which includes EMR releases with big data applications it supports: https://docs.aws.amazon.com/emr/latest/ReleaseGuide/emr-release-components.html
- Detailed steps for setting up EMR Studio: https://docs.aws.amazon.com/emr/latest/ManagementGuide/emr-studio-set-up.html
- IAM permissions and limits while using the AWS Glue Data Catalog as a Hive external Metastore: https://docs.aws.amazon.com/emr/latest/ReleaseGuide/emr-hive-metastore-glue.html