
Chapter 14: Best Practices and Cost-Optimization Techniques
Welcome to the last chapter of the book! During all the previous chapters, you learned about EMR and its advanced configurations and security. You also learned how you can migrate your on-premise workloads to AWS and how you can implement batch, streaming, or interactive workloads in the AWS cloud. In this chapter, we will focus on some of the best practices and cost optimization techniques you can follow to get the best out of Amazon EMR.
When considering best practices for implementing big data workloads in EMR, we should look at different aspects such as EMR cluster configuration, sizing your cluster, scaling it, applying optimization on S3 or HDFS storage, implementing security best practices, and different architecture patterns. Apart from these, optimizing costs is also a best practice and AWS provides several ways to optimize costs and offers various tools to monitor, forecast, and get notified when your spending goes beyond the defined budget threshold.
The following are the high-level topics we will be covering in this chapter:
- Best practices around EMR cluster configurations
- Optimization techniques for data processing and file storage
- Security best practices
- Cost-optimization techniques
- Limitations of Amazon EMR and possible workarounds
As we saw in Chapter 13, Migrating On-Premises Hadoop Workloads to EMR, migrating to AWS or using AWS resources provides a lot of benefits, but understanding how you can get the best out of those AWS services and how you can optimize your workloads on AWS adds a lot of value as you truly get the power of the AWS cloud. Apart from best practices, it is also important to understand different limitations, so that you can plan for different workarounds.
Best practices around EMR cluster configurations
When you start using EMR clusters for your Hadoop workloads, the primary focus is on writing logic for the ETL pipeline, so that your data gets processed and is available for end user consumption. There are several factors you might have considered to optimize your ETL code and the business logic integrated into it but, apart from optimizing code, there are several other optimizations that you can consider in terms of EMR cluster configurations that can help optimize your usage.
Let's understand some of the best practices that you can follow.
Choosing the correct cluster type (transient versus long-running)
As explained in Chapter 2, Exploring the Architecture and Deployment Options, there are two ways you can integrate EMR clusters. One is a long-running EMR cluster, which is useful for multi-tenant workloads or real-time streaming workloads. Then we have short-term job-specific transient clusters that get created when an event occurs or on a schedule, and then get terminated after the job is done.
When you have batch workloads, there will be some jobs where you need a fixed-capacity cluster. Then there might be a few other workloads where the cluster capacity you need will be variable and you will have to take advantage of EMR's cluster scaling feature.
So, looking at your workload, selecting the type of EMR cluster is the first best practice you can follow. The following diagram shows all three types of implementations you can choose:

Figure 14.1 – Reference architecture for multiple EMR workloads sharing S3 and a metadata catalog
As you can see, all the EMR clusters are sharing the same external metastore and Amazon S3 persistent store. Let's understand how it helps using Amazon S3 with EMRFS and what value is added with an external metastore.
Choice of storage (HDFS versus Amazon S3)
While implementing multiple transient EMR clusters, Amazon S3 plays a crucial role as all transient EMR clusters share data using S3 and you can also leverage other AWS services such as AWS Glue, Amazon Athena, or Amazon Redshift to access and process the same datasets. With S3, you get higher reliability and also can integrate different security and encryption mechanisms.
While Amazon S3 is widely used for most big data processing use cases, still there are some use cases where HDFS storage is needed for faster querying. For those workloads, you can think of initiating your cluster with a DistCp step that copies data to your EMR cluster for long-running workloads and then syncs it back to Amazon S3 so that your other EMR clusters or AWS Glue-based jobs can read the same datasets.
Externalizing the metastore
As we learned in Chapter 4, Big Data Applications and Notebooks Available in Amazon EMR, externalizing a cluster metastore such as a Hive or Hue metastore is one of the best practices as it enables you to split your workloads into multiple transient workloads and also provides higher reliability.
When you externalize your Hive metastore, integrating AWS Glue Data Catalog is recommended as that is a managed scalable service and also enables you to integrate other AWS services such as Amazon Redshift, AWS Glue, Amazon Athena, Amazon QuickSight, or AWS Lake Formation in the same centralized catalog and provides unified data governance.
In this section, we have looked at best practices around cluster type, metadata catalogs, and persistent storage. Next, let's see what best practices we can follow while configuring an EMR cluster.
Best practices around sizing your cluster
When you are configuring an EMR cluster, there are a few best practices that you can follow to get the best out of it. The following are some of the priority ones, but there can be others, depending on the workload.
Choosing the right instance type
When you are configuring an EMR on EC2 cluster, you have flexibility to select the type of instance you will be integrating for the master as well as core or task nodes. Depending on your workloads, you should choose the right EC2 instance type.
Choosing the master node instance type
The master nodes in Hadoop or EMR clusters do not process ETL jobs or tasks, rather they act as driver nodes to coordinate between core, task nodes and also keep track of cluster and node status. For master nodes, its best to choose either EC2 M5, C5, or R5 instances depending on the use case:
- If you have fewer than 50 core and task nodes, then we can consider that a low or medium cluster and a master node of m5.xlarge instance type will be able to manage the cluster jobs.
- If you have more than a 50-node cluster, then the next thing you can check is whether you have workloads that have a heavy network I/O. If yes, then the C5 or R5 instance family with enhanced networking is the recommended option. If you don't need enhanced networking, then you can choose higher than the m5.xlarge instance type.
These are general guidelines to give you a starting point. Then, depending on your use case, which might have higher read versus write or a higher number of jobs running in parallel, you need to experiment a bit with different instance types before making a decision.
Choosing the core and task node instance type
For core or task nodes, you need to first understand and identify the purpose of your EMR cluster. Then, based on that, you can select any of the following:
- General Purpose: In general, batch ETL workloads fall into this category, which can integrate M4 or M5 EC2 instance family nodes.
- Compute Intensive: You might have compute-heavy workloads such as machine learning jobs that need more CPU power. For those workloads, you can consider integrating C4 or C5 instances.
- Memory Intensive: For memory-intensive workloads such as interactive analysis or fast querying use cases, you can consider integrating R5 or X1 instances that have higher memory capacity.
- Dense Storage: If you have workloads that require large HDFS capacity, which means every core node should have more disk capacity, then you can consider D2 or I3 EC2 instance family nodes.
These instance type suggestions are based on the type of EC2 instances available while writing this book. Please refer to the latest supported instance types while configuring your EMR cluster.
Deciding the number of nodes for your cluster
After selecting the correct instance type for your use case, the next question we need to answer is how many instances we should configure for our cluster.
As you might be aware, for Hadoop workloads, every input dataset gets divided into multiple splits and then gets executed in parallel using multiple core or task nodes. If you have configured a bigger instance type, then your job will have higher memory and CPU capacity, which might help you to complete the job faster. On the other hand, if the cluster has smaller instance types, then your mapper or reducer tasks wait for the resources to be available and take a comparatively longer time to complete the job.
All your mappers can run in parallel, but that does not mean you can add unlimited nodes to your cluster so that your mappers complete without having to be queued. But in reduce or aggregate operations, most of the nodes go into the idle state, so you have to experiment and arrive at the right number of nodes. In addition, you can try answering the following questions, which can guide you to arrive at the correct number of instances to start with:
- How many tasks will you have to execute?
Look at the input file size, using which you can guess the file split size, and then look at the operation you are going to do to have a rough guess of the number of total tasks you might need.
- How soon do you want the job to be completed?
This question will help you evaluate how much parallelism you should be aiming at and also how many tasks each of the core or task nodes can handle based on the CPU or memory the job or task might have.
- How many core or task nodes might you need?
HDFS and Hadoop services run only on the core nodes. So, depending on the HDFS size you need, you can select the number of core nodes and configure the rest as task nodes where you can implement auto-scaling. Please try to maintain a 1:5 ratio between core and task nodes, which means do not add more than five task nodes per single core node.
In general, one of the recommendations you can follow is to prefer a smaller cluster with a larger instance type as that can provide better data locality and your Hadoop or Spark processes can avoid more shuffling between nodes.
Determining cluster size for transient versus persistent clusters
Depending on whether you have a transient or persistent cluster, the following are some of the sizing best practices you can follow:
- Transient cluster use cases: For transient EMR cluster use cases, which are mostly used for batch ETL workloads, if you do not have strict Service-Level Agreements (SLAs), then think of using Spot EC2 instances with task nodes, so that you can save costs. If you have strict SLAs to meet, then you can consider using on-demand or reserved instances for predictable costs.
- Persistent cluster use cases: For persistent clusters, think of using Reserved Instances for master and core nodes. For scaling needs, use Spot or On-Demand instances, depending on your SLA requirements.
After understanding how you should choose cluster instance type and the number of nodes, next we will explain how you can configure high availability for your cluster's master node.
Configuring high availability
For high availability, you should configure multiple master nodes (three master nodes) for your cluster, so that your cluster does not go down when a single master node goes down.
Important Note
All the master nodes are configured in a single Availability Zone and in the event of failover, the master node cannot be replaced if its subnet is overutilized. So, it is recommended to reserve the complete subnet for the EMR cluster and also make sure the master node subnet has enough private IP addresses.
Apart from master nodes, if you need to enable high availability for core nodes, then consider using a core node instance group with at least four core nodes. If you are launching a cluster with a smaller number of core nodes, then you can think of increasing the HDFS data replication by setting it to two or more.
Best practices while configuring EMR notebooks
In Chapter 4, Big Data Applications and Notebooks Available in Amazon EMR, we explained the usage and benefits of EMR notebooks, which you can use for interactive development and attach them to an EMR cluster for job execution.
The following are some of the best practices you can follow while integrating EMR notebooks:
- It's better if you keep the notebooks outside of the cluster so that you can attach them to or detach them from different clusters as needed.
- You can configure multiple users to attach their notebooks to the same cluster. You can also enable auto-scaling on the clusters to support them with the required resources.
- Configure to save notebooks to Amazon S3 for better reliability.
- Integrate GitHub control for code sharing.
- Enable tag-based access control.
Next, we will explain how Apache Ganglia can help in monitoring your cluster resources.
Using Ganglia for cluster usage monitoring
As explained in Chapter 4, Big Data Applications and Notebooks Available in Amazon EMR, Apache Ganglia is an open source project, which is scalable and designed to monitor the usage and performance of distributed clusters or grids.
In an EMR cluster, Ganglia is configured to capture and visualize Hadoop and Spark metrics. It provides a web interface where you can see your cluster performance with different graphs and charts representing CPU and memory utilization, network traffic, and the load of the cluster.
Ganglia provides Hadoop and Spark metrics for each EC2 instance. Each metric of Ganglia is prefixed by category, for example, distributed filesystems have the dfs.* prefix, Java Virtual Machine (JVM) metrics are prefixed as jvm.*, MapReduce metrics are prefixed as mapred.*.
If you have a persistent EMR cluster, then Ganglia is a great tool to monitor the usage of your cluster nodes and analyze their performance.
Tagging your EMR cluster
Tagging your AWS resources is a general best practice, which you can apply to Amazon EMR too. Every time you create a cluster, it's better to provide as much metadata as possible using tags such as project name, team name, owner, type of workload, and job name.
For example, you can identify EC2 instances that are part of your EMR cluster using the following tags:
- aws:elasticmapreduce:instance-group-role=CORE
- aws:elasticmapreduce:job-flow-id=j-<id>
You can use these tags for reporting, analytics, and controlling costs too. It is recommended you arrive at a set of tag keys first and use it consistently across clusters.
As a best practice, do not include any sensitive information as part of your tag keys or values as they are used by AWS for reporting.
Optimization techniques for data processing and storage
We have recommended using Amazon S3 as the EMR cluster's persistent storage as it provides better reliability, support for transient clusters, and it is cost-effective. But there are several best practices we can follow while storing the data in Amazon S3 or an HDFS cluster.
Let's understand some of the general best practices that you can follow to get better performance and save costs from a storage and processing perspective.
Best practices for cluster persistent storage
As part of your cluster storage, there are some general best practices that apply to both Amazon S3 and HDFS cluster storage. The following are a few of the most important ones.
Choosing the right file format
You might be receiving files in CSV, JSON, or as TXT files, but after processing through the ETL process, when you write to a data lake based on S3 or HDFS, you should choose the right file format to get the best performance while querying it.
We can divide the file formats into two types – columnar or row-based formats. Row-based formats are good for write-heavy workloads, whereas columnar formats are great for read-heavy workloads.
Most of the big data workloads are related to analytics use cases, where data analysts or data scientists perform column-level operations such as finding the average, sum, or median of a column. Because of that, for analytical workloads, columnar formats such as Parquet are very popular.
Apart from the columnar nature, you should also be considering whether the file format is splittable, which means can the Hadoop or Spark framework split the file for parallel processing. In addition, we should check whether the file format supports schema evolution, which means whether incremental files can support additional columns.
The following table shows a comparison of features supported by the text, ORC, Avro, and Parquet file formats:
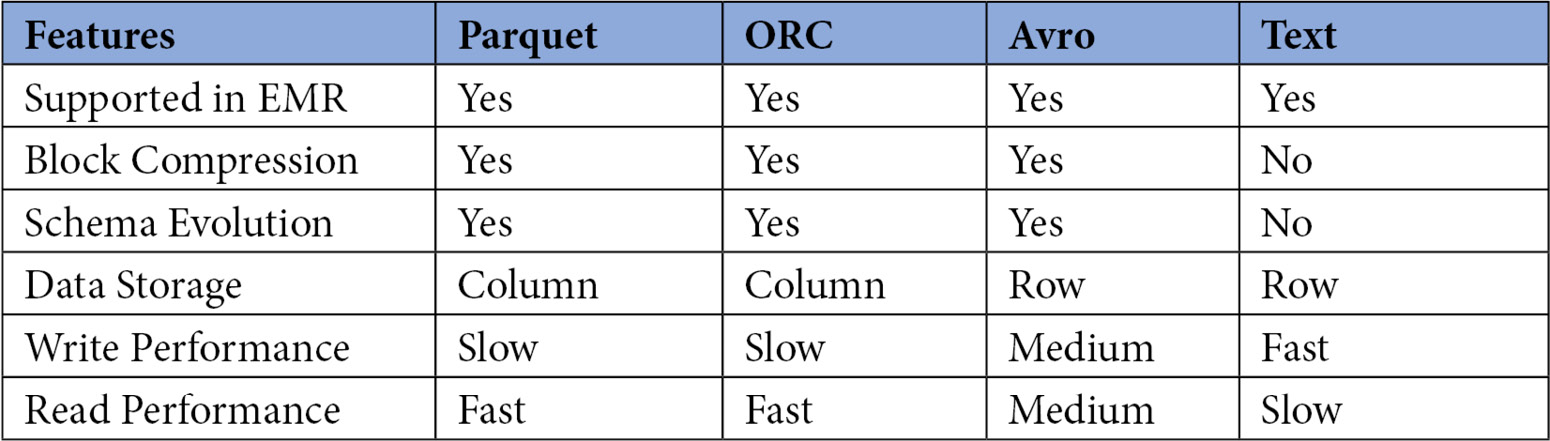
Figure 14.2 – Table comparing features of different file formats
These four formats are commonly used and by looking at their features, you can choose the right file format for your use case.
Choosing the compression algorithm
On top of the correct file format, you can also apply an additional compression algorithm to get improved performance for file transfers. While choosing a compression algorithm, we also need to make sure the compression algorithm is splittable so that it can be split by Hadoop or Spark frameworks for parallel processing.
Each compression algorithm has a rate of compression that reduces your original file size by x percentage. The higher the compression rate, the more time it takes to decompress. So, it's a space-time trade-off, where you save more storage with a high compression rate and spend more time decompressing it.
The following table shows a comparison of the popular compression algorithms.

Figure 14.3 – Table comparing compression algorithms
This should help you make a decision on the file format and compression algorithm you should integrate.
Choosing an S3 storage class
If you are using Amazon S3 as your cluster's persistent storage, then you have additional flexibility to choose from different S3 storage classes. S3 standard is the commonly used storage class, assuming you are accessing your data frequently. But if you have data that is not being frequently accessed and you would like to save costs, then you should move your data to any of the following S3 storage classes:
- S3 Standard-IA
- S3 One Zone-IA
- S3 Glacier Instant Retrieval
- S3 Glacier Flexible Retrieval
- S3 Glacier Deep Archive
- S3 Intelligent Tiering
Out of all the preceding options, S3 Intelligent Tiering can be a good option to choose if your access patterns are not fixed and you are not sure when to move to another storage class. S3 Intelligent Tiering looks at your access pattern and automatically moves objects to the most cost-effective storage tier without any effect on performance or without any retrieval costs or operational overhead. It provides high performance for Frequent, Infrequent, and Archive Instant Access tiers.
Data partitioning
This is applicable to both Amazon S3 and HDFS storage, where you need to structure your data into folders and subfolders so that your queries perform better. Assume you are receiving weather data every day and your query patterns on them are mostly date-based filters. In such use cases, if you store your data with the <year>/<month>/<date> sub-folder structure and you write SQL queries with WHERE year=<value> AND month=<value>, it will scan the respective sub-folder to get the data instead of scanning all the folders.
In S3, the path will look like this: s3://<bucket-name>/<year>/<month>/<day>/.
Best practices while processing data using EMR
While processing your data in EMR, you have the option to use Hive, Spark, Tez, or any other Hadoop frameworks for your ETL or streaming workloads. Based on the framework you are using, you can apply its tuning parameter to get the best performance. For example, if you are using Spark, you can play with the Spark executor or the driver's memory and CPU parameters to get the best performance, or you can pass any other tuning parameters open source Spark offers.
Security best practices
Security is one of the important aspects when you move to the AWS cloud. It includes authentication, authorization on cluster resources, protecting data at rest and in transit, and finally, protecting infrastructure from unauthorized access. We have discussed these topics in detail in Chapter 7, Understanding Security in Amazon EMR.
The following are a few of the general best practices that you can follow while implementing security:
- Follow the least privilege principle of AWS and provide the minimal required access to your cluster.
- Avoid using the same AWS IAM role for multiple clusters; rather, create use case or cluster-specific roles to reduce the blast radius.
- If you do not have a specific EMR release dependency, then prefer to use the latest EMR release, which has all the security patches integrated.
- It's better to consider all security aspects from the very beginning, as implementing it later is more complex and expensive.
- Continuously review your organization's security guidelines and review your implementation in AWS and Amazon EMR.
- Use EMR security configuration to templatize the setup and apply it to multiple clusters.
- It's better if you launch your clusters within a private subnet so that you can limit access to your cluster.
- Leverage AWS CloudFormation to create cluster resources so that you can use the application to create resources on other lower or higher environments.
Apart from the general security best practices, you can consider a few of the following specific best practices to make your environment more secure.
Configuring edge nodes outside of the cluster to limit connectivity
When you have a persistent EMR cluster and you plan to provide SSH access to it, or you would like to configure port forwarding to access the Spark history server or Ganglia web UI, then it is recommended to create a separate edge node, instead of providing access to the EMR cluster's master node.
Not only for a single cluster but if you have multiple EMR clusters, then you can have a common edge node in a public subnet of your VPC to limit access to your cluster nodes.
The following is a reference architecture that shows how you can configure a common edge node in a public subnet, which can be used as a jump box to connect to EMR clusters available in private subnets.
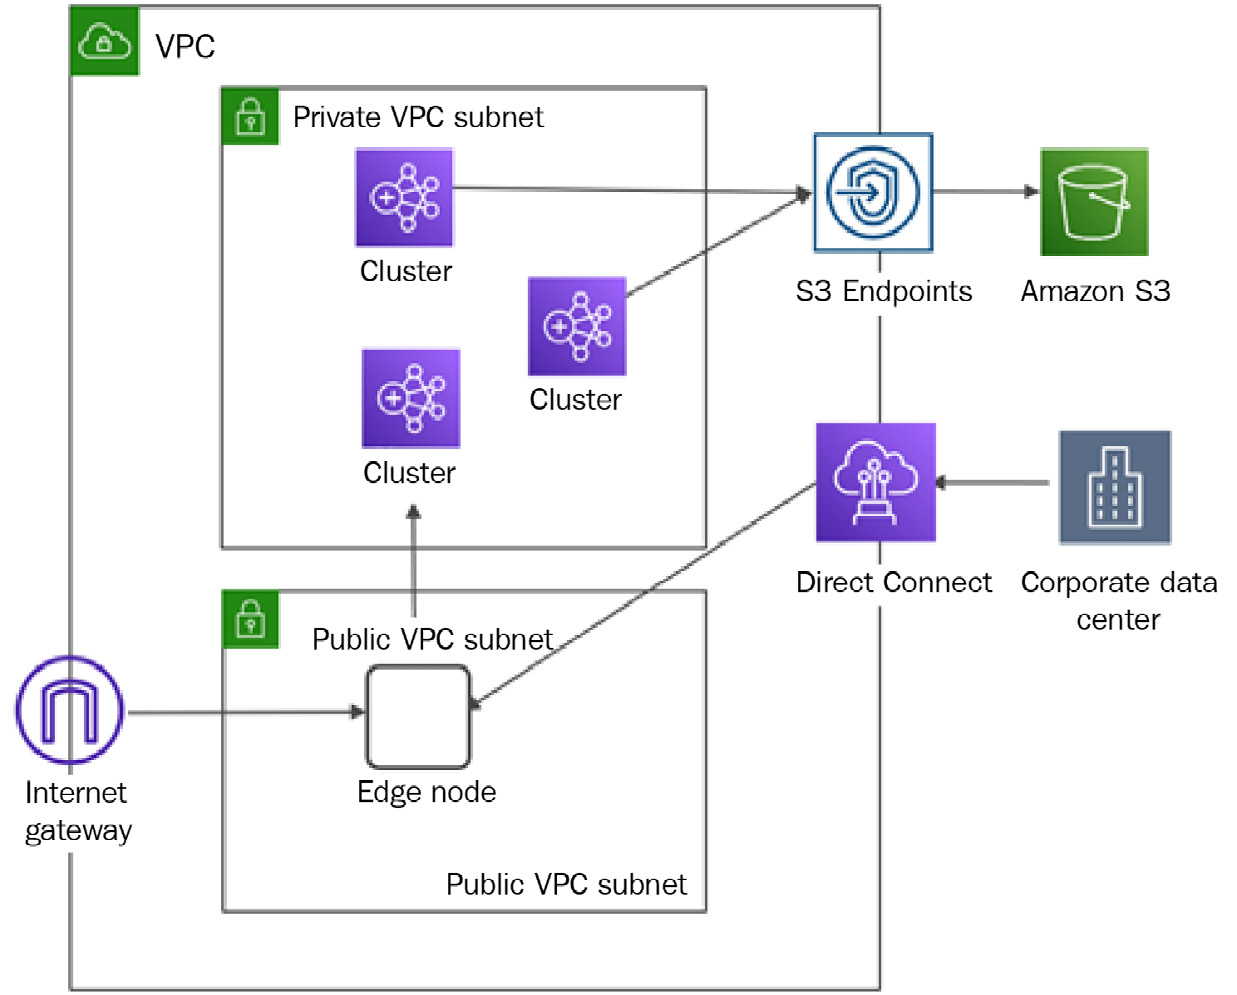
Figure 14.4 – Reference architecture for an edge node to be outside of the EMR cluster
This also provides another recommendation, which is to configure an S3 endpoint to access Amazon S3, which can avoid the request routing through the public internet and gets better performance with access through an Amazon internal network.
You can connect to the edge node from your corporate data center using Direct Connect, or can directly access it through an internet gateway as the edge node is available in the public subnet.
Integrating logging, monitoring, and audit controls into your cluster
When you have production EMR workloads, it is recommended to enable logging, monitoring, and audit controls on your EMR cluster. This helps in debugging or troubleshooting failures, monitoring cluster usage or performance, and auditing activity for security controls.
You should integrate AWS CloudWatch for logging and monitoring, and AWS CloudTrail for audit controls. With CloudTrail audit trails, you can look for unauthorized cluster access and take the required action to harden your security implementation.
If you have integrated AWS Lake Formation on top of the Glue Data Catalog, then you should also monitor Lake Formation activity history to monitor unauthorized access on your central metastore catalog.
Blocking public access to your EMR cluster
EMR provides a great security feature, which restricts users from launching clusters with security groups that allow public access. The following screenshot shows the EMR console's Block public access configuration:

Figure 14.5 – The EMR console's Block public access settings
By default, all the ports are blocked, except port 22 for SSH access. You can add more ports to the exception list so that it is applicable to all clusters. You can override the port configurations through cluster security groups.
This configuration is enabled by default and is applicable to a single region of an AWS account, which means any new cluster you launch will have the same restrictions apply.
Protecting your data at rest and in transit
Data is the center of everything and protecting that is the topmost priority. When we think of protecting data, we need to consider securing it at rest and in transit.
As explained in Chapter 7, Understanding Security in Amazon EMR, for encryption at rest, you should encrypt your data stored in Amazon S3, HDFS, or the EMR cluster node's local disc. For data security in transit, you can configure SSL or TLS protocols.
When you consider encrypting data in transit or at rest, you should follow these best practices:
- Make sure you rotate your encryption keys regularly.
- If you do not have a specific requirement, then you can integrate AWS Key Management Service (KMS) to manage your keys, which seamlessly integrates with all AWS services, including Amazon EMR.
Having understood best practices around cluster configuration and security, next, we will explain some of the cost-optimization techniques that you can follow.
Cost-optimization techniques
There are several cost-optimization techniques that AWS offers and the primary ones are related to compute and storage resources. Let's understand some of the cost optimization techniques you can apply.
Cost savings with compute resources
When you are creating EMR on an EC2 cluster, then you have the option to choose any of the following EC2 pricing models:
- On-Demand Instances: This follows the pay-as-you-go model, where you pay for the EC2 instance, for the duration of time you have used it, without any commitment.
- Savings Plans: With Savings Plans, you get up to a 72% discount when you commit for a certain amount of usage ($/Hr) for 1 to 3 years. You can choose from no upfront, partial upfront, or all upfront.
- Standard Reserved Instances: Standard Reserved Instances (RIs) are the same as Savings Plans but with a variation that you must commit for specific EC2 instance type usage and also need to validate the AWS services that support RIs such as Redshift, EC2, and RDS. This offers a higher discount with less flexibility and you get a better discount with partial upfront or all upfront payment.
- Spot Instances: With Spot Instances, you can expect up to a 90% discount on your EC2 hourly cost. These are unused EC2 instances, with which you can take a risk but they also come with the risk of getting terminated.
Choosing the right type of EC2 pricing model can provide great savings. Analyze your cluster usage to identify the type of instances you should integrate and whether you have the flexibility to opt for a 1-year or 3-year commitment.
The following are some of the best practices you can follow to save costs:
- If you have persistent clusters and you are aware of the minimum number of nodes that will always be active, then look at RIs to save costs.
- If you do not have tight SLAs, then look to integrate Spot Instances for task nodes, which provide great discounts.
- For variable workloads, take advantage of EMR managed scaling, where you start small and scale as per your need.
- Use On-Demand Instances only for master and core nodes and select the appropriate instance type to optimize usage.
- Continuously monitor the usage of the CPU and memory of cluster nodes and readjust the instance type or the number of nodes as needed.
These best practices are applicable to EMR on EC2 only as with EMR on EKS, you can follow best practices for your EKS cluster. Next, we will learn what optimization techniques we can apply to the storage layer.
Cost savings with storage
There are several cost savings you can get from the storage side. The following are a few of the main ones:
- Use S3 as your persistent storage to save costs.
- Use an appropriate S3 storage class to avoid paying the cost of S3 Standard. S3 Intelligent tiering is a good option if your access patterns are not consistent.
- Define life cycle policies to move unused data to S3 Glacier for archival.
- Use columnar formats with compression, which can help with storage savings.
- If you are using cluster HDFS instead of Amazon S3, then based on the sensitivity of data or SLAs, specify different HDFS replication factors. For example, for less sensitive data that you can reproduce easily, go with replication factor 1, so that in the event of data loss, you can recover easily and can save storage costs. For highly sensitive data that has a tighter SLA, configure a replication factor of 2 or 3.
- As explained earlier, implementing partitioning provides great performance as you scan less data. It also provides great cost savings if you are planning to use Amazon Athena to query data, which has pricing based on the amount of data you are scanning.
Having understood compute- and storage-related cost savings, now let's understand what other tools AWS provides to monitor and optimize costs.
Integrating AWS Budgets and Cost Explorer
AWS Budgets and Cost Explorer are great tools to monitor costs and define thresholds to get alerted about costs going beyond the defined budget.
AWS Cost Explorer
AWS Cost Explorer is a tool that you can use to filter or group your AWS service usage costs to analyze and build visualization reporting, or you can use it to forecast your usage costs. It provides an easy-to-use web interface, where you can apply filters by AWS account, AWS service, or different date ranges and save reports for ongoing analysis. You can build some of the reports, such as monthly cost by AWS service, hourly or resource-level reports, and also a report of Savings Plans to RIs utilization costs.
AWS Cost Explorer also allows you to identify trends in usage or detect anomalies. The following is a screenshot of AWS Cost Explorer that shows its usage for the past two quarters and its forecast for the next quarter.

Figure 14.6 – AWS Cost Explorer report for EC2 usage
Having understood how you can benefit from AWS Cost Explorer, next let's understand how AWS Budgets can help to control your costs.
AWS Budgets
When you get started on AWS, you follow a pay-as-you-go pricing model, which means as you make progress using AWS services, your usage costs go up. As a business owner, you must have control over your costs and should have a budget defined, and if spending goes beyond that threshold, you should be notified for manual verification. This feature is offered by AWS Budgets, where you can set a custom budget and integrate notifications using Amazon Simple Notification Service (SNS) or email if actual spending or forecasted spending goes beyond the defined maximum threshold.
You can also define alarms or notifications on Savings Plans and RI usage. AWS Budgets integrates with several AWS services, including AWS Cost Explorer, to identify spending and can send notifications to your Slack channel or Amazon Chime room.
When integrating AWS Cost Explorer and AWS Budgets, you should take note of the following features and patterns:
- Use AWS Budgets to set custom budgets to track your costs and usage.
- Configure alert notifications using SNS to get notified if your usage exceeds your defined maximum budget.
- Configure notifications to be alerted if your usage of Savings Plans or RIs drops below your defined threshold.
- Use AWS Cost Explorer to continuously monitor your costs and do analysis for optimization or anomaly detection.
- AWS Budgets also natively integrates with AWS Service Catalog and that gives you the flexibility to track costs on the approved list of AWS services. AWS Service Catalog is a tool or service in AWS that allows you to define a list of services approved for usage in the organization and helps you to put restrictions on something that is not approved for usage. AWS users treat these approved services as available for use.
Having learned about AWS Cost Explorer and AWS Budgets, next we will learn about the AWS Trusted Advisor tool to understand what it offers.
AWS Trusted Advisor
AWS Trusted Advisor is one of the great tools provided by AWS. It scans your AWS service usage and provides recommendations on performance, security, fault tolerance, service limits, and cost optimization pillars.
For cost optimization recommendations, the tool looks for several factors, including the following to identify issues and potential savings:
- Low utilization of Amazon EC2 instances
- Amazon EC2 RI optimization
- Underutilized Amazon EBS volumes
- Amazon RDS database idle instances
- Amazon RDS RI optimization
- Unassociated Elastic IP addresses
The following is a screenshot of AWS Trusted Advisor, which suggests potential monthly savings with the number of checks that have passed and the number of items that need action or investigation:

Figure 14.7 – AWS Trusted Advisor showing recommendations for cost optimization
Apart from cost optimizations, please do review recommendations suggested for performance, security, and fault tolerance to increase the stability of your AWS service implementation.
Cost allocation tags
Cost allocation tags are a unique feature offered by the AWS Billing service, which allows you to tag resources for cost calculations. It offers two types of tags – AWS generated tags and user-defined tags. AWS or AWS Marketplace Independent Software Vendors (ISVs) automatically assign tags prefixed by aws:, whereas for user-defined tags you define your custom tagging based on department, application name, cost center, or any other category.
The aws:createdBy tag is applied automatically to resources that are created after the tag has been activated. The user-defined tags created by users need to be activated first so that they appear in Cost Explorer or Cost and Usage Reports (CURs).
The cost allocation report that is generated at the end of each billing period includes both tagged and untagged resources so you can filter and order them to analyze the data based on the tags you have defined and can decide to optimize costs.
As a best practice, please make sure only authorized personnel get access to cost allocation tags in the AWS Billing console so that all the finance-related details are limited to authorized employees. Also, it's a good practice to use AWS-generated cost allocation tags.
In this section, you learned about different cost optimization techniques and available tools that can help. Next, we will cover some of the limitations that you should be aware of when you are integrating EMR for your big data analytics workloads.
Limitations of Amazon EMR and possible workarounds
Understanding best practices is very important as that helps to optimize your usage in AWS and will give you the best performance and cost optimization. Apart from best practices, it is also important to understand different limitations the service has so that you can plan for alternate workarounds.
The following are some of the limitations that you should consider while implementing big data workloads in Amazon EMR:
- S3 throughput: When you are writing to or reading from S3, there are a few API limits that you should be aware of. S3 has a limit of 3,500 PUT/POST/DELETE requests per second per prefix in a bucket and 5,500 GET requests per second per prefix in a bucket. These limits are per S3 prefix but there is no limit on how many prefixes you might have. So, as a workaround, you should think of having more prefixes and leverage a partition or sub-partition structure while storing data in S3. As an example, if you have 10 S3 prefixes, then you can get 55,000 read requests per second.
Please note, these throughput limits are based on what AWS published while writing this chapter and are subject to change. Please check the Amazon S3 documentation (https://docs.aws.amazon.com/AmazonS3/latest/userguide/optimizing-performance.html) for up-to-date information.
- EMR master failover: EMR's cluster with multiple master nodes provide high availability but all its master nodes are on a single Availability Zone (AZ). If, out of three master nodes, any two fail simultaneously or the entire AZ goes down, then your EMR cluster will go down and, in that case, it is not fault-tolerant. This is another reason to consider S3 as your persistent store and use CloudFormation to create resources so that in the event of AZ failure, you can create another cluster quickly pointing to the same S3 bucket.
- Supported applications for multiple master nodes: Note that EMR does not support high availability for all Hadoop or big data services it deploys and it also does not guarantee fault tolerance of the cluster services. Please refer to https://docs.aws.amazon.com/emr/latest/ManagementGuide/emr-plan-ha-applications.html to have up-to-date information on supported applications for multi-master nodes.
- Cluster Monitoring: In terms of cluster monitoring, EMR integrates with Amazon CloudWatch and provides different metrics for monitoring. But note that EMR currently does not provide any metrics specific to YARN or HDFS. So as a workaround, you can look at MultiMasterInstanceGroupNodesRunning, MultiMasterInstanceGroupNodesRunningPercentage, or MultiMasterInstanceGroupNodesRequested CloudWatch metrics to monitor how many master nodes are running, or on the verge of failure or replacement.
For example, if the value of MultiMasterInstanceGroupNodesRunningPercentage metrics is between 0.5 and 1.0, then the cluster might have lost a master node and EMR will attempt to replace it. If MultiMasterInstanceGroupNodesRunningPercentage falls below 0.5, that means two master nodes are down and the cluster cannot recover and you should be ready to take manual action.
- EMR Studio: There are multiple considerations and limitations listed for EMR Studio. One example is EMR Studio is not supported on EMR clusters that have a security configuration attached to them with Kerberos authentication enabled. Another example is EMR Studio is not supported on an EMR cluster that is integrated with multi-master nodes or AWS Lake Formation or if the cluster integrates EC2 graviton instance types. Also note that if the EMR cluster is deployed on EKS, then it does not support SparkMagic with EMR Studio.
- AWS Lake Formation Integration: When you integrate AWS Lake Formation with Amazon EMR, it only supports authorization for EMR Notebooks, Apache Zeppelin, and Apache Spark through EMR Notebooks. EMR with Lake Formation does not support Single Sign-On (SSO) integration and you cannot query Glue Data Catalog tables that have partitions under a different S3 path.
- Service Quotas and Limits: Look for EMR service limits that can affect your production workloads. When you launch an EMR cluster on EC2, check for EC2 limits on your account. In addition, check for limits around the maximum number of concurrent active clusters you can have in your account, and in a cluster, how many maximum instances you can have per instance group.
If you are integrating EMR SDKs or APIs, then you should be aware of the API limits it has. The two sets of limits we should be aware of are the burst limit and rate limit. The burst limit is the number of API calls you can make per second, whereas the rate limit is the cooldown period you need to have before hitting the Burst API again. For example, the AddInstanceFleet API call has a limit of 5 calls per second, which is the burst limit, and if you hit that limit, then you need to wait for 2 seconds before making another API call, which is called the rate limit.
These limitations are around the commonly used services or features of EMR and there will be others that you should consider while implementing your workloads. Please check the latest AWS documentation for your service before implementing it so that you can plan for alternate workarounds if possible.
Summary
Over the course of this chapter, we have learned about recommendations around choosing between transient and persistent clusters, how you can right-size your cluster with different EC2 instance types, and EC2 pricing models. We have also provided best practices around EMR cluster configurations that included cluster scaling, high availability, monitoring, tagging, catalog management, persistent storage, and security best practices.
Then, later in the chapter, we covered cost-optimization techniques that included recommendations around compute and storage, and also covered different tools AWS offers, such as AWS Cost Explorer, AWS Trusted Advisor, and cost allocation tags to monitor and control your costs with alarm notifications with AWS Budgets.
That concludes this chapter and, with it, we have reached the end of the book! Hopefully, this book has helped you to get deep knowledge of EMR's features, usage, integration with other AWS services, on-premise migration approaches, and best practices you can follow while implementing your big data analytics pipelines.
Thank you for your patience while going through this journey. If we helped you to gain knowledge, please do share your feedback and share the book with your friends and colleagues who want to get started with Amazon EMR. Thanks again, and happy learning!
Test your knowledge
Before finishing this last chapter, test your knowledge with the following questions:
- Assume you have recently migrated your on-premise Hadoop cluster to Amazon EMR by following a lift and shift model. You have several batch and streaming workloads running on the same cluster. You have integrated your EMR cluster with AWS CloudWatch and while monitoring the cluster usage, you found not all the EC2 resources are always optimally used. What's the best architecture pattern you can follow to optimize your resource usage and costs?
- Assume you have around five different teams who have requested to have their own persistent EMR clusters for different big data workloads. They need SSH access to the cluster master node and would like to access the web interface of Hadoop applications. How should you provide them with access while maintaining security best practices?
- Assume you have a multi-tenant persistent EMR cluster that is deployed on EC2. It has 5 core nodes and 10 task nodes and you have enabled auto-scaling rules defined to scale the task nodes to 50 nodes as the demand arises. Which EC2 pricing model could reduce costs for you?
Further reading
Here are a few resources you can refer to for further reading:
- Spark Performance Optimization in EMR: https://docs.aws.amazon.com/emr/latest/ReleaseGuide/emr-spark-performance.html
- AWS Cost Explorer: https://aws.amazon.com/aws-cost-management/aws-cost-explorer/
- AWS Trusted Advisor: https://aws.amazon.com/premiumsupport/technology/trusted-advisor/
- AWS Cost Allocation Tags: https://docs.aws.amazon.com/awsaccountbilling/latest/aboutv2/cost-alloc-tags.html
- EMR Studio Considerations: https://docs.aws.amazon.com/emr/latest/ManagementGuide/emr-studio-considerations.html
- Considerations and limitations with AWS Lake Formation integration: https://docs.aws.amazon.com/emr/latest/ManagementGuide/emr-lf-scope.html