
Chapter 11: Implementing UPSERT on S3 Data Lake with Apache Spark and Apache Hudi
In the previous two chapters, we learned how to implement a batch ETL pipeline with Amazon EMR and real-time streaming with Spark Streaming. In this chapter, we will learn how to implement UPSERT or merge on your Amazon S3 data lake using the Apache Hudi framework integrated with Apache Spark.
Amazon S3 is immutable by default, which means you cannot update the content of an object or file in S3. Instead, you have to read its content, then modify it and write a new object. Currently, as data lake and lake house architectures are becoming popular, organizations look for update capability on Amazon S3 or other object stores. Frameworks such as Apache Hudi, Apache Iceberg, and AWS Lake Formation Governed Tables have started offering ACID transactions and UPSERT capabilities on data lakes.
Apache Hudi is a popular open source framework that is integrated into Amazon EMR and AWS Glue and is also very popular within the open source community.
In this chapter, we will learn how you can integrate the Apache Hudi framework with Apache Spark to update and delete data from your data lake. To showcase this capability, we will use an EMR notebook so that you can learn how you can do interactive development on a long-running EMR cluster. The following are the topics that we will cover in this chapter:
- Apache Hudi overview
- Creating an EMR cluster and an EMR notebook
- Interactive development with Apache Spark and Apache Hudi
Getting an overview of Apache Hudi and its integration with Spark and Amazon EMR will give you a starting point to learn how to integrate the UPSERT feature in a data lake, which might help you with General Data Protection Regulation (GDPR) compliance or other regulatory requirements that compel you to update or delete data based on certain filter criteria.
Technical requirements
In this chapter, we will showcase interactive development using an EMR notebook and the Apache Spark and Apache Hudi frameworks. So, before getting started, make sure you have the following:
- An AWS Account with the ability to create Amazon S3, Amazon EMR, Amazon Athena, and AWS Glue Catalog resources
- An IAM user that can create IAM roles, which will be used to trigger or execute jobs
- Access to the Jupyter notebook that is available in our GitHub repository here: https://github.com/PacktPublishing/Simplify-Big-Data-Analytics-with-Amazon-EMR-/tree/main/chapter_11
Now, let's dive deep into the use case and hands-on implementation steps starting with the overview of Apache Hudi.
Check out the following video to see the Code in Action at https://bit.ly/3svY3i9
Apache Hudi overview
Apache Hudi is an open source framework, which is popular for providing record-level transaction support on top of data lakes. The Hudi framework supports integration with open file formats such as Parquet and stores additional metadata for its operations.
Apache Hudi provides several capabilities and the following are the most popular ones:
- UPSERT on top of data lakes
- Support for transactions and rollbacks
- Integration with popular distributed processing engines such as Spark, Hive, Presto, and Trino
- Automatic file compaction in data lakes
- The option to query recent update views or past transaction snapshots
Hudi supports both read and write-heavy workloads. When you write data to an Amazon S3 data lake using Hudi APIs, you have the option to specify either of the following storage types:
- Copy on Write (CoW): This is the default storage type, which creates a new version of the file and stores the output in Parquet format. This is useful when you want to have the UPSERT version ready as soon as the new data is written. This is great for read-heavy workloads as you can create a new version of the file as soon as it's written, and all read workloads get the latest view.
- Merge on Read (MoR): This storage type is helpful for write-heavy workloads, where the merging does not happen during the write process but instead happens on demand when a read request comes in. This stores data in a combination of Parquet and row-based Avro formats. Each new update creates a row-based incremental delta file and is compacted when needed to create a new version of the file in Parquet format.
After writing the data with the appropriate storage type, you can query it using any of the following logical views that Hudi offers:
- Read optimized view: This includes the latest compacted data from MoR tables and the latest committed data from CoW tables. This view does not include the delta files that are not committed or compacted yet.
- Incremental view: This is helpful for downstream ETL jobs as it provides an incremental change view from CoW tables.
- Real-time view: This view is helpful when you plan to access the latest copy of data, which merges the columnar Parquet files and the row-based Avro delta files.
The following diagram shows how CoW works for different insert and update transactions:
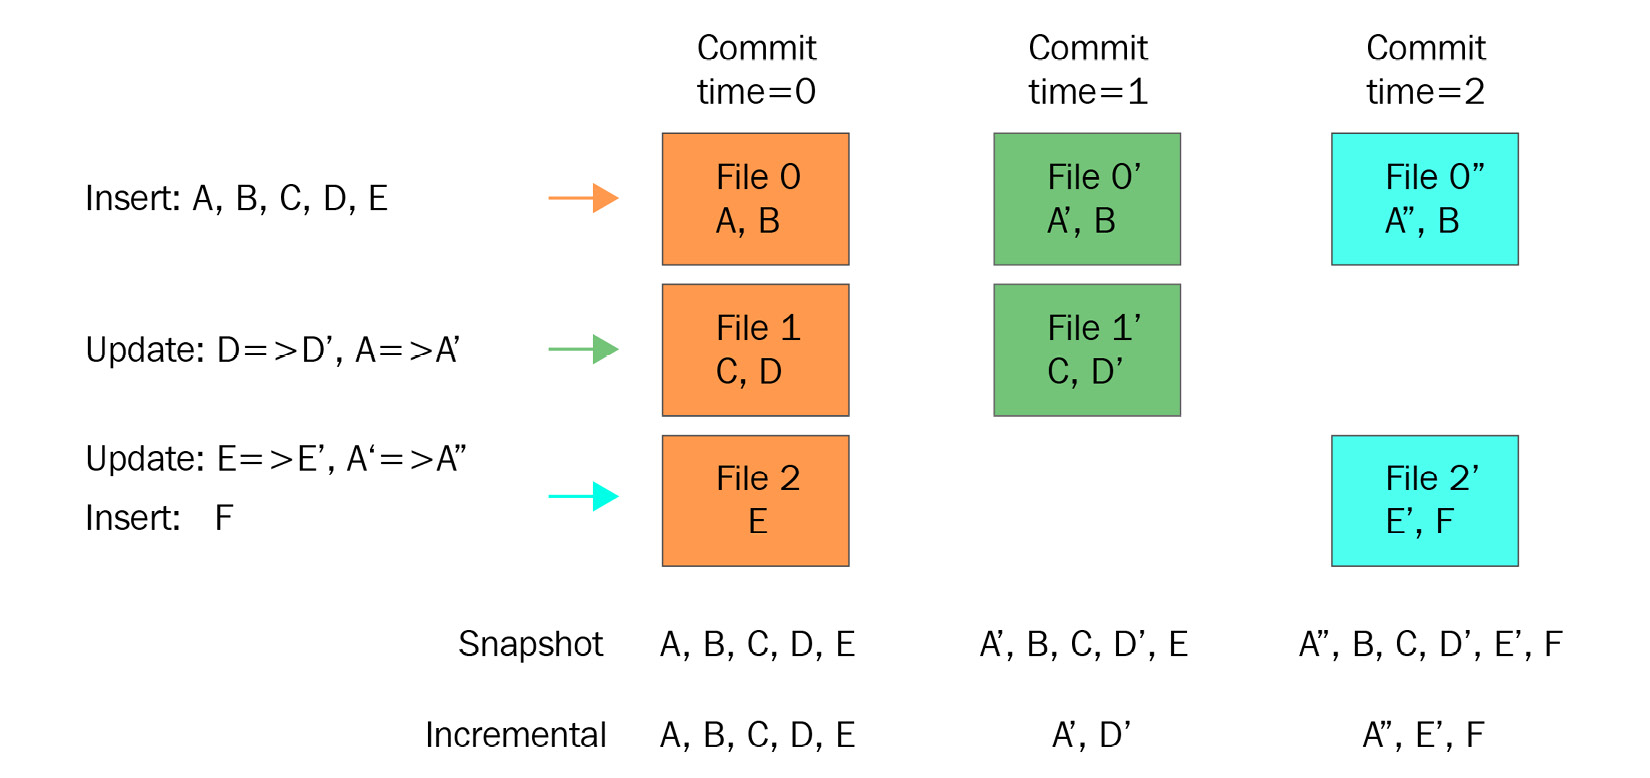
Figure 11.1 – Apache Hudi CoW commit flow (source: https://cwiki.apache.org/confluence/display/HUDI/Design+And+Architecture)
Let's explain the preceding diagram:
- The first transaction inserts new records called A, B, C, D, and E that get split into three files and are marked as Commit time=0. At that point, both the snapshot and incremental views show the same set of records as output.
- The second transaction is an update for D and A, which creates Commit time=1. This will show A, B, C, D, and E in the snapshot and only A and D as incremental output.
- The third transaction will have an update for A and E and an insert for F, which creates Commit time=2. This will show all values, A, B, C, D, E, and F, in the snapshot and only A, E, F in the incremental output.
As you can see, the snapshot shows all the records as the merging happens instantly during writing action itself.
Now, let's learn how the MoR table type handles the same transactions. The following diagram represents the flow:
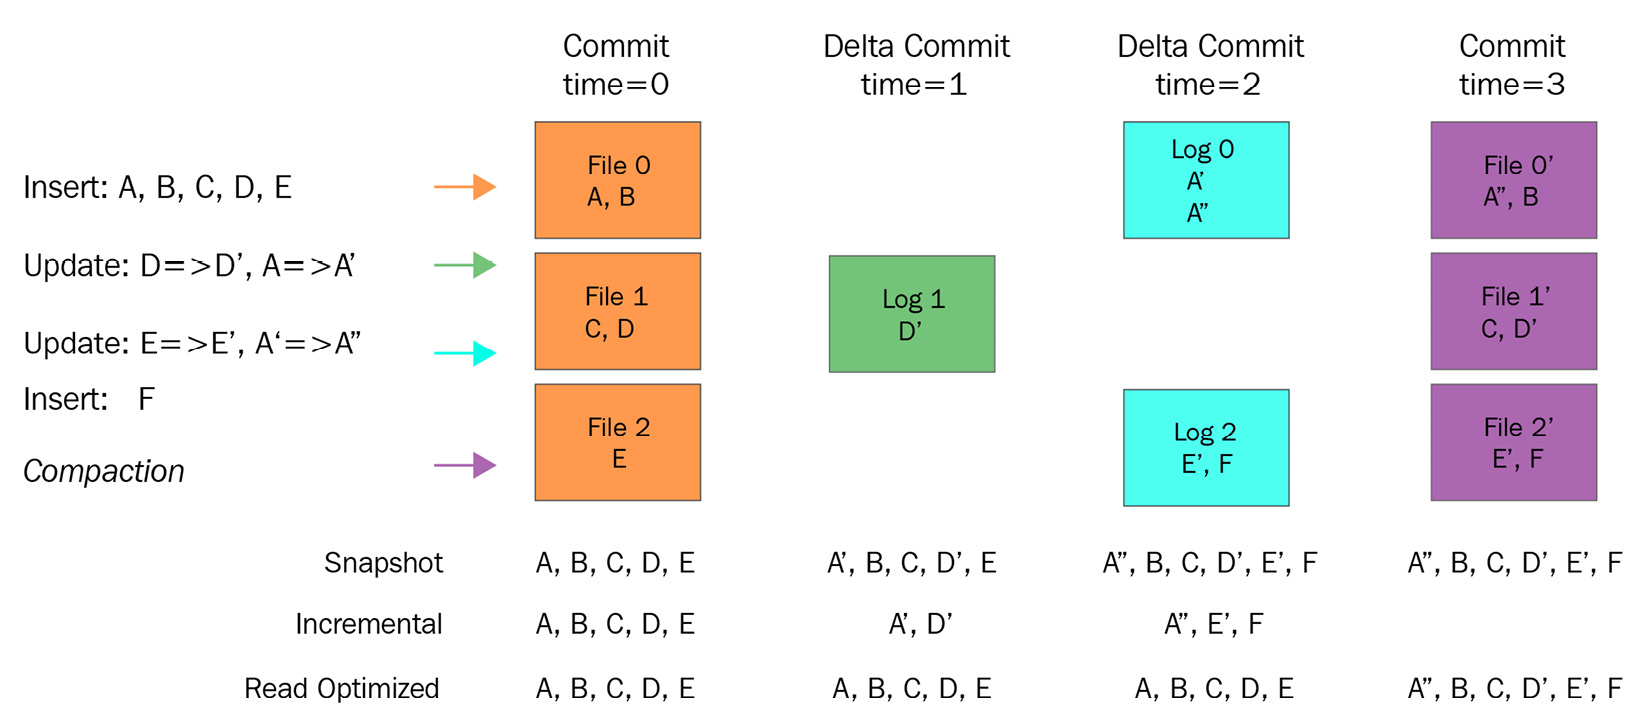
Figure 11.2 – Amazon Hudi MoR commit flow (Source: https://cwiki.apache.org/confluence/display/HUDI/Design+And+Architecture)
As explained earlier, CoW does the delta data merging instantly, whereas MoR does the merging while reading. As you can see in the preceding diagram, there is a new view called the Read Optimized view that shows all latest data by getting it from the MoR table and the latest committed data from CoW tables.
Now that we understand how Hudi works, let's look at some of the popular use cases for which the Hudi framework is most appropriate.
Popular use cases
The following are some of the popular use cases for which the Hudi framework is widely adopted:
- Updating and deleting data from a data lake to meet compliance requirements: Often for privacy regulations such as the California Consumer Privacy Act (CCPA) or the General Data Protection Regulation (GDPR), organizations are required to delete records of specific users or delete data after a specific time, which requires record-level transactions in data lakes. Hudi maintains additional metadata to keep track of the records and updates or deletes them with simple API invocations.
- Incremental data processing: When you are trying to set up a data lake that receives incremental Change Data Capture (CDC) data from a source system, you can use Hudi to apply the incremental changes to the data lake so that your end users can see the latest view of the data.
- Near-real-time event streaming: When you integrate a real-time streaming pipeline in which you might receive data for IoT systems or from a message bus such as Kinesis Data Stream, you can use Hudi with Spark Structured Streaming to update data in a data lake.
- Having a unified data store for analytics: When data scientists or data analysts use data for analytics, for some use cases they look for recent real-time views and for other use cases they look for incremental update views. Hudi provides the option to query different views of the data, making it a unified data store for analytics.
From the 5.28.0 release, Amazon EMR supports integration with Hudi, which means it installs Hudi-related libraries when you create an EMR cluster with Hive, Spark, or Presto.
Registering Hudi data with your Hive or Glue Data Catalog metastore
Like other Hive metastore tables, if you register your Hudi dataset with a Hive metastore then you can query your Hudi table using the Hive, Spark SQL, or Presto query engines. In addition, you can also integrate Hudi tables with your AWS Glue catalog.
As explained at the beginning of this chapter, Hudi provides two options when you write to a dataset: one is CoW and the other is MoR. When you register a table as MoR, then in your metastore, you will see two separate tables. One table has the original name that you specified, and another additional table will have a suffix of _rt to provide a real-time view of the data.
If you are using Spark to register a table with Hudi, then you should set the HIVE_SYNC_ENABLED_OPT_KEY option to true. Alternatively, you can also use the hive_sync_tool CLI utility to register your Hudi data as a metastore table in Hive or as a Glue catalog metastore.
Creating an EMR cluster and an EMR notebook
Before getting started with our use case, we need to create an EMR cluster and then create an EMR notebook that points to the EMR cluster we have created. Let's assume this EMR cluster is a long-running cluster that is active to support your development workloads as you plan to do interactive development with EMR notebooks.
Now let's learn how to create the EMR cluster and notebook.
Creating an EMR cluster
As explained in Chapter 5, Setting Up and Configuring EMR Clusters, to create an EMR cluster, follow these steps:
- Navigate to Amazon EMR's Create cluster screen at https://console.aws.amazon.com/elasticmapreduce/home?region=us-east-1#quick-create.
- Select Go to advanced options and, from the advanced options screen, select the latest stable release. We have selected the emr-6.4.0 release because that was the latest stable release while writing this chapter. From the Applications list, make sure you select the JupyterHub and JupyterEnterpriseGateway applications with Spark as they will be needed for the EMR notebook.
The following is a screenshot of the EMR release and applications we have selected:

Figure 11.3 – Amazon EMR Create cluster Software Configuration screen
- Next, under Hardware configurations, enable Cluster scaling with the default values for EMR-managed scaling. Then, under Auto-termination, disable the Enable auto-termination checkbox.
- In General Cluster Settings, keep everything as the default values and then, on the Security and access screen, select EC2 key pair, with which you can SSH to the EMR cluster's master node. The following screenshot shows the values we have selected:

Figure 11.4 – Amazon EMR Create cluster screen – Hardware and security configuration
- Then select Create cluster, which will take you to the EMR cluster detail screen and have a status of Starting.
After a few minutes, you will notice the cluster status changes to Running when the initial Setup hadoop debugging default job runs, and after the job is complete, it changes to Waiting, which means all the resources are provisioned and we are ready to submit jobs to the cluster.
Let's see how to create an EMR notebook that points to our EMR cluster.
Creating an EMR notebook
To create an EMR notebook, follow these steps:
- Navigate to the EMR notebook list in the EMR console at https://console.aws.amazon.com/elasticmapreduce/home?region=us-east-1#notebooks-list.
- Click Create notebook, which will open a form on the web interface to configure your notebook.
- On the Create notebook form, add a notebook name and then, in the Clusters field, select the Choose an existing cluster option and then click Choose, which will open a pop-up overlay with a list of the EMR clusters you have.
- Select the EMR cluster you created in the previous step and click Choose cluster.
- Keep the rest of the field values as the defaults and then click Create notebook.
The following screenshot shows the Create notebook form in the EMR console:

Figure 11.5 – The Create notebook form
Clicking on the Create notebook button will take you to the EMR Notebook's detail page, with a status of Starting. In a few minutes, the status will change to Ready.
Now you can click the Open in Jupyter button on the notebook detail page, as shown in the following screenshot:
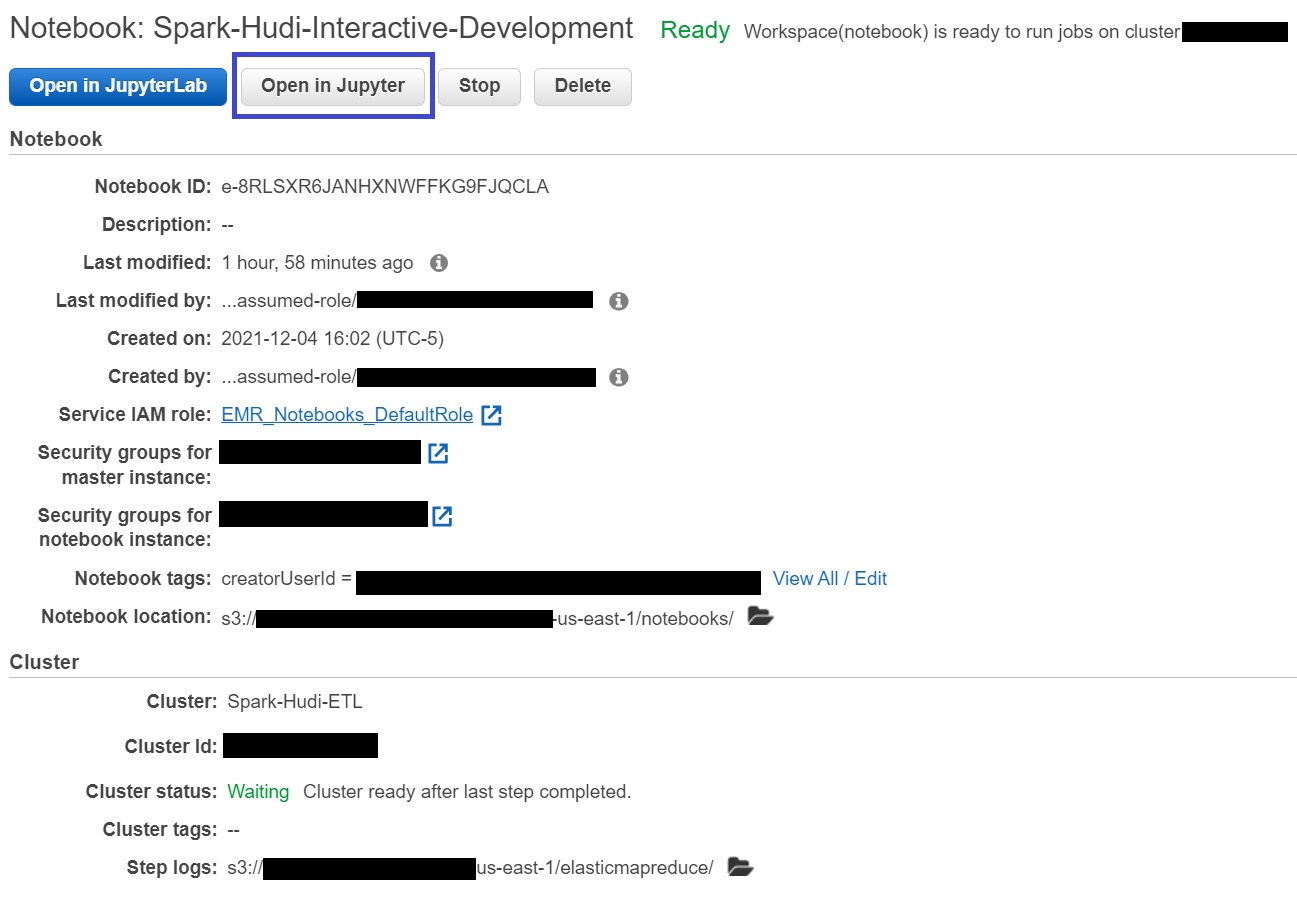
Figure 11.6 –EMR notebook detail page
This will take you to Jupyter Notebook, where you can create interactive notebooks for development. Jupyter Notebook provides options to create a notebook in languages such as PySpark, SparkR, Python 3, or the Linux command-line Terminal.
As a next step, before moving onto the Spark and Hudi implementation, let's first create an Amazon S3 bucket, which we can use to store Hudi datasets.
Creating an Amazon S3 bucket
Please refer to the following steps to create the S3 bucket, which we have followed in previous chapters too:
- Navigate to Amazon S3 console at https://s3.console.aws.amazon.com/s3/home?region=us-east-1#.
- From the buckets list, choose Create Bucket. This will open a form on the web interface to provide your bucket name and related configurations.
We have called our bucket hudi-data-repository and kept everything else as the default values.
- Then, click the Create bucket button to create the bucket.
The following screenshot shows the AWS console, using which we have created the bucket:

Figure 11.7 – Amazon S3 Create bucket page
As we have now created all the resources, next we will dive deep into our use case implementation with Spark and Hudi.
Interactive development with Spark and Hudi
Our EMR cluster and notebook are now ready for use. Let's learn how to do interactive development using an EMR notebook.
For interactive development, we are considering a use case where we will integrate the Hudi framework with Spark to do UPSERT (update/merge) operations on top of an S3 data lake.
Let's navigate to our EMR notebook to get started.
Creating a PySpark notebook for development
To get started, in Jupyter Notebook, choose New and then PySpark, as shown in the following screenshot:
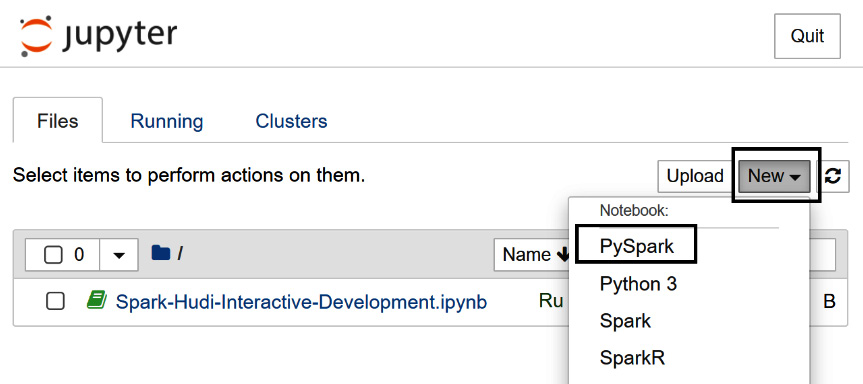
Figure 11.8 – The Jupyter Notebook landing page
This will create a new PySpark notebook. In every cell, you can write scripts and execute them line by line for easy development or debugging.
Next, we will learn how to integrate Hudi libraries with the notebook.
Integrating Hudi with our PySpark notebook
By default, Hudi libraries are not available in our EMR notebook. To make them available, you need to copy the Hudi Java ARchive (JAR) files from the EMR cluster's master node to HDFS so that the EMR notebook can refer to them. Follow these steps to do so:
- Navigate to your EMR cluster list at https://console.aws.amazon.com/elasticmapreduce/home?region=us-east-1#cluster-list.
- Choose the cluster you have created, which will be in the Waiting state. This will take you to the cluster detail page.
- Copy the cluster's Master public DNS URL and SSH to the master node using PuTTY or an equivalent tool. You can also click the Connect to the Master Node Using SSH link below the DNS URL to learn how you can SSH to the master node using Windows, macOS, and Linux systems.
The following screenshot shows the cluster details page, from where you can copy the master node's public DNS URL:

Figure 11.9 – EMR cluster details page
For our implementation, we used PuTTY to SSH to the EMR master node, and to do that, we specified the master public DNS URL in the Session | Host Name field and then specified the EC2 key pair private key (.ppk) under Connection | SSH | Auth, as shown in the following screenshot:

Figure 11.10 – Specifying the PPK file for authentication to the EC2 instance
When you click Open and try to connect for the first time, PuTTY will ask you to confirm whether you trust the connection. Click Yes, as shown in the following screenshot:
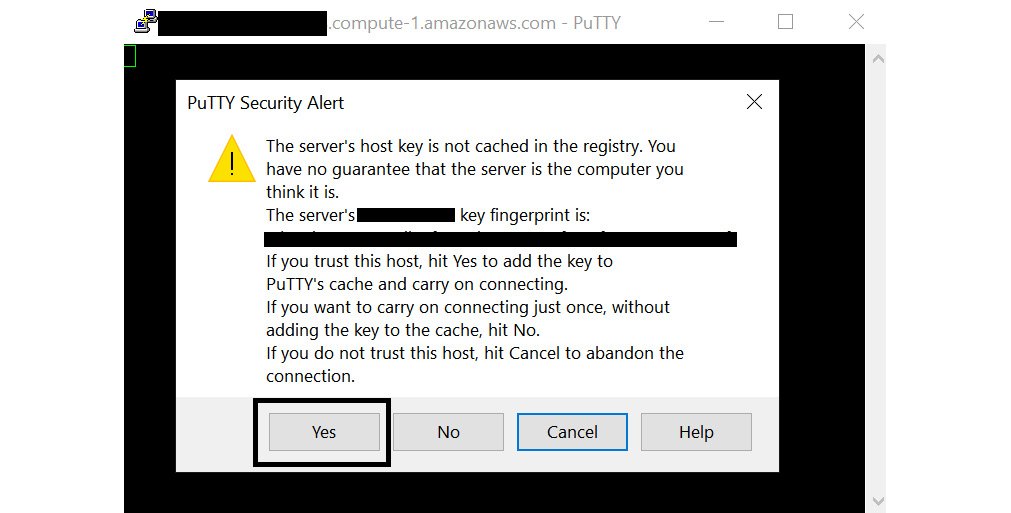
Figure 11.11 – PuTTY Security Alert
After you click Yes, you will be prompted to enter the login user name, for which you should type hadoop. That will connect successfully, as shown in the following screenshot:
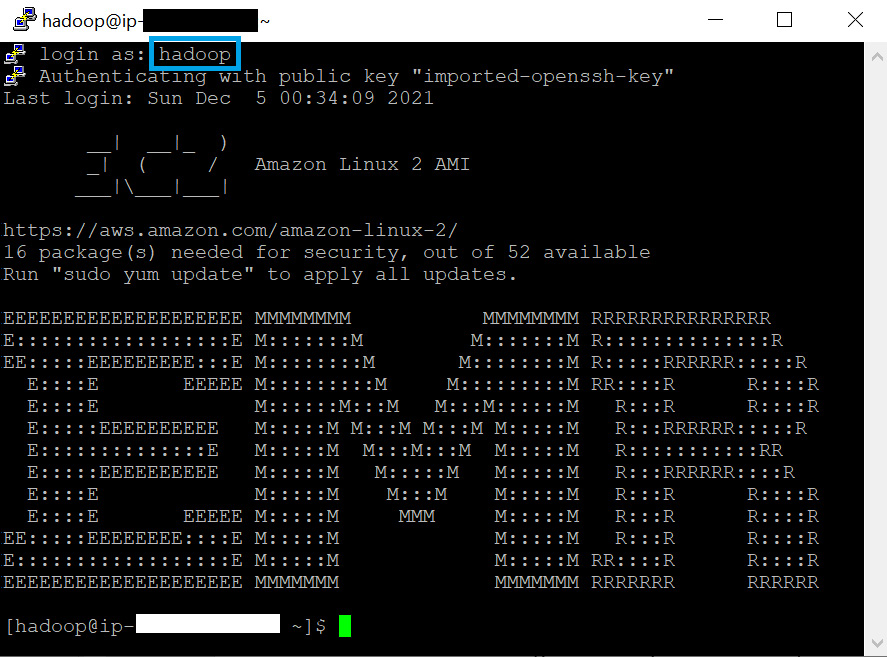
Figure 11.12 – PuTTY SSH login
Once you are successfully logged in, you can execute the following commands to copy the Hudi JAR files from the master node's local filesystem to HDFS.
First, create a new directory path in HDFS. We have used the /applications/hudi/lib path in HDFS, but you can use your own path. You need to keep a note of this path so that you can use it in your EMR notebook:
hdfs dfs -mkdir -p /applications/hudi/lib
Then execute the following command to copy the hudi-spark-bundle.jar file to HDFS:
hdfs dfs -copyFromLocal /usr/lib/hudi/hudi-spark-bundle.jar /applications/hudi/lib/hudi-spark-bundle.jar
Finally, execute the following command to copy the spark-avro.jar file to HDFS:
hdfs dfs -copyFromLocal /usr/lib/spark/external/lib/spark-avro.jar /applications/hudi/lib/spark-avro.jar
Once these two files are copied to HDFS, you can refer to them in your EMR notebook.
Configuring your EMR notebook to use Hudi JARs
After you have the Hudi JARs available in HDFS, you can navigate back to your EMR PySpark notebook and execute the following command:
%%configure -f
{
"conf": {
"spark.jars":"hdfs:///applications/hudi/lib/hudi-spark-bundle.jar,hdfs:///applications/hudi/lib/spark-avro.jar",
"spark.sql.hive.convertMetastoreParquet":"false",
"spark.serializer":"org.apache.spark.serializer.KryoSerializer"
}
}
This makes the Hudi JARs available to SparkContext so that the Spark code can use its libraries. The following screenshot shows the output you should see in your notebook:

Figure 11.13 – Additional configuration settings
After our setup is complete, let's look at a few Hudi APIs and example scripts using which you can create CoW or MoR tables and can do transactions on top of the tables.
Executing Spark and Hudi scripts in your notebook
Now that our notebook is ready, with all the required JARs, let's dive into Hudi APIs that enable ACID transactions on top of our data lake. We will use PySpark scripts to interact with Hudi functions.
For our use case, we have created an example product inventory dataset, which has product_id, category, product_name, quantity_available, and last_update_time fields. We will write the input data to our S3 data lake in Hudi format, then will update and delete some records and then query to validate the transactional updates.
Let's now work throughout this step by step.
Inserting new product inventory data into our S3 data lake
The first step for us is to ingest new product inventory data in our data lake. product_id is the unique key to identify a product and the category field is used to partition the data in S3.
With the following code, we create a Spark DataFrame using some product records:
# Create a DataFrame that represents Product Inventory
inputDF = spark.createDataFrame(
[
("100", "Furniture", "Product 1", "25", "2021-12-01T09:51:39.340396Z"),
("101", "Cosmetic", "Product 2", "20", "2021-12-01T10:14:58.597216Z"),
("102", "Furniture", "Product 3", "30", "2021-12-01T11:51:40.417052Z"),
("103", "Electronics", "Product 4", "10", "2021-12-01T11:51:40.519832Z"),
("104", "Electronics", "Product 5", "50", "2021-12-01T11:58:00.512679Z")
],
["product_id", "category", "product_name", "quantity_available", "last_update_time"]
)
Next, we create the hudiOptions configuration variable, which specifies the Hudi parameters that represent the table name, record key, partition key, and more:
# Specify common DataSourceWriteOptions in the single hudiOptions variable
hudiOptions = {
'hoodie.table.name': 'product_inventory',
'hoodie.datasource.write.recordkey.field': 'product_id',
'hoodie.datasource.write.partitionpath.field': 'category',
'hoodie.datasource.write.precombine.field': 'last_update_time',
'hoodie.datasource.hive_sync.enable': 'true',
'hoodie.datasource.hive_sync.table': 'product_inventory',
'hoodie.datasource.hive_sync.partition_fields': 'category',
'hoodie.datasource.hive_sync.partition_extractor_class': 'org.apache.hudi.hive.MultiPartKeysValueExtractor'
}
Next, we can write the product records to Amazon S3 using the hudiOptions configuration variable:
# Write the product Inventory DataFrame as a Hudi dataset to S3
inputDF.write.format('org.apache.hudi')
.option('hoodie.datasource.write.operation', 'insert')
.options(**hudiOptions)
.mode('overwrite')
.save('s3://hudi-data-repository/product-inventory/')
As you can see, the hoodie.datasource.write.operation parameter has a value of insert to represent its new insert. The following screenshot shows the output of the execution:

Figure 11.14 – Data ingestion output
After the successful execution of the preceding code, you can navigate to your S3 bucket to validate the data being written in Hudi format with partition folders for the category field. The following screenshot shows the output:
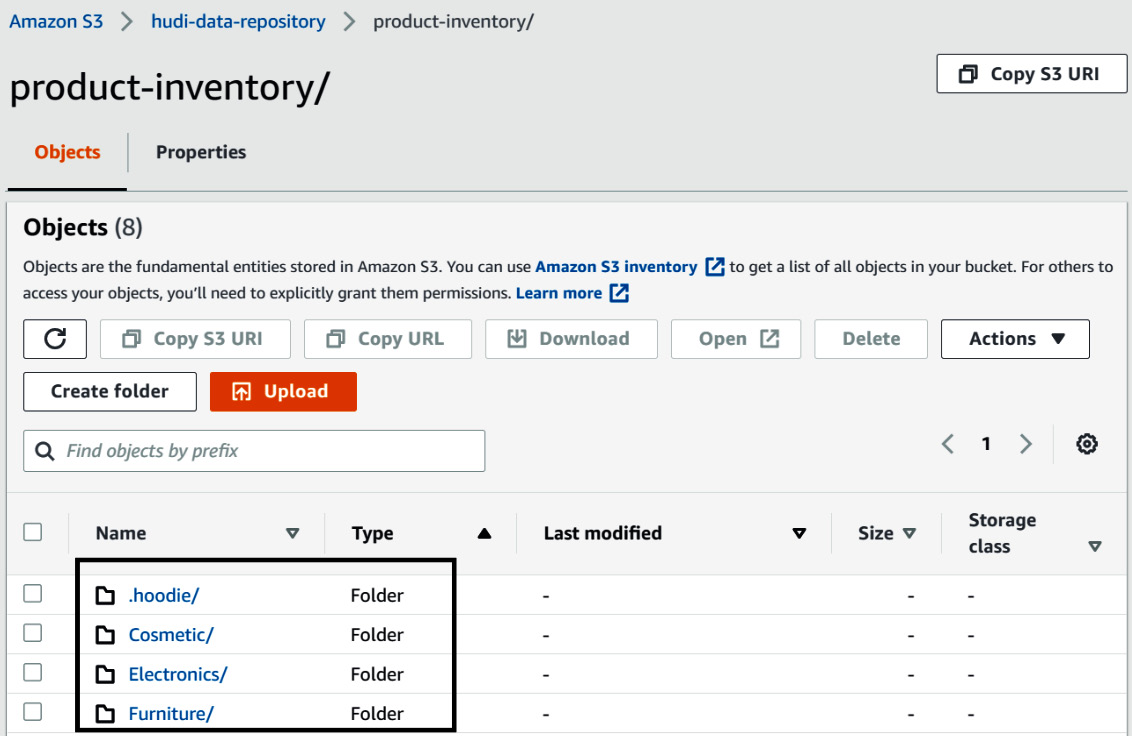
Figure 11.15 – S3 output with partitioning folders
After the initial data is written, we can try to update and delete a few records.
Updating and deleting records from our S3 data lake using Hudi and Spark
Before updating records, let's first query the data and validate how it looks. The following code block reads data from s3://hudi-data-repository/product-inventory with /*/* so that it reads all partitions:
# Read the Hudi dataset from S3 and validate your field output
HudiProductDF = spark.read.format('org.apache.hudi').load('s3://hudi-data-repository/product-inventory' + '/*/*')
HudiProductDF.select("product_id", "category", "product_name", "quantity_available", "last_update_time").show()
After executing this code, you should see the following output, which shows the data of all the five products you have ingested:

Figure 11.16 – Data ingestion output
Next, let's assume you have sold one unit of product ID 102 and would like to update its quantity to 29. The following code shows how to do this. As you can see, the hoodie.datasource.write.operation parameter value is set to upsert:
# Update quanity of product_id 102
from pyspark.sql.functions import col,lit
newDF = inputDF.filter(inputDF.product_id==102).withColumn('quantity_available',lit('29'))
newDF.write
.format('org.apache.hudi')
.option('hoodie.datasource.write.operation', 'upsert')
.options(**hudiOptions)
.mode('append')
.save('s3://hudi-data-repository/product-inventory/')
Next, let's assume you have stopped selling product ID 101 and would like to delete it from your inventory table. The following code block shows how to delete a product using Hudi. As you can see, we have passed an additional parameter, hoodie.datasource.write.payload.class, with a value of org.apache.hudi.common.model.EmptyHoodieRecordPayload to represent deleting the record:
# Delete product record with ID 101
deleteDF = inputDF.filter(inputDF.product_id==101)
deleteDF.write
.format('org.apache.hudi')
.option('hoodie.datasource.write.operation', 'upsert')
.option('hoodie.datasource.write.payload.class', 'org.apache.hudi.common.model.EmptyHoodieRecordPayload')
.options(**hudiOptions)
.mode('append')
.save('s3://hudi-data-repository/product-inventory/')
After the executing both the update and delete transactions, we can validate the output by executing the following PySpark script, which reads the updated data from S3:
# Read from S3 to validate the update and delete record
HudiProductNewDF = spark.read.format('org.apache.hudi').load('s3://hudi-data-repository/product-inventory' + '/*/*')
HudiProductNewDF.select("product_id", "category", "product_name", "quantity_available", "last_update_time")
.orderBy("product_id").show()
The following screenshot shows the output of the execution. The record with product_id 101 is missing and the record with product_id 102 has a quantity value of 29:

Figure 11.17 – Output after update and delete
So far, we have learned how to create Hudi tables, ingest new data, and update and delete datasets using Spark and Hudi. Next, let's learn how to query incremental data and some of the additional metadata attributes Hudi provides.
Querying incremental data using Hudi
In our previous execution, when we tried to query data, we defined specific columns to validate our data. Now let's try to print the complete dataset and make a note of the additional attributes Hudi appends:
# List all columns on the dataframe to showcase additional metadata fields Hudi appends
HudiProductNewDF.show()
The following screenshot highlights the additional attributes Hudi appends, and all of them are prefixed with _:

Figure 11.18 – Hudi attributes
As you can see in this output, all the records have a hoodie commit time of 20211205222848, except product_id 102, which has a hoodie commit time of 20211205225705 because we updated that record after our initial data ingestion.
Next, let's try to query the incremental data by listing all the records changed after a certain timestamp, such as 20211205222848. The following code block shows how to query incremental data using Hudi:
# Incremental query output, that fetches change data beyond certain time
incrementalQueryOptions = {
'hoodie.datasource.query.type': 'incremental',
'hoodie.datasource.read.begin.instanttime': "20211205222848",
}
incQueryDF = spark.read.format('org.apache.hudi').options(**incrementalQueryOptions)
.load('s3://hudi-data-repository/product-inventory')
incQueryDF.show()
The following screenshot highlights the output we get after executing the incremental query and, as you can see, there is one record, that is, product_id 102:

Figure 11.19 – Hudi incremental query output
In this section, we have walked you through the Spark and Hudi code using which you can insert, update, delete, and query Hudi datasets. Having the UPSERT capability on top of our S3 data lake provides a lot of flexibility in terms of meeting compliance requirements or having a golden copy for querying. This should give you a starting point for your Hudi implementation, and you can refer to the Hudi documentation for additional information.
Note
During this chapter, we have executed Hudi scripts using an EMR notebook, but you can automate the execution by saving the script into a Python file and submitting it as an EMR step job, as explained in Chapter 9, Implementing Batch ETL Pipeline with Amazon EMR and Apache Spark.
Summary
Over the course of this chapter, we have dived deep into Apache Hudi and looked at its features, use cases, and how it is integrated with AWS and Amazon EMR.
We have covered how to create an EMR notebook that points to a long-running EMR cluster and how to use the notebook for interactive development. To showcase interactive development, we explained a small use case using Spark and Hudi, which can enable you to do UPSERT transactions on top of a data lake.
That concludes this chapter! Hopefully, this has helped you get an idea of how to use EMR notebooks for interactive development. In the next chapter, we will explain how to build a workflow to build a data pipeline using Amazon EMR.
Test your knowledge
Before moving on to the next chapter, test your knowledge with the following questions:
- Assume your data science team is using EMR notebooks for their interactive development and they are primarily using Python 3 for machine learning model development. When they started executing the Python code, they found some of their scripts are not getting executed; they get an error stating that the Python module does not exist. How would you make the additional Python modules available in the EMR notebook so that your data science team can continue executing their scripts for machine learning model development?
- Assume you have an S3 data lake on top of which you have created Hudi tables for ACID transactions and UPSERT. You are updating records as they change, which creates multiple versions of the records in the Hudi table. You have received a business requirement to find the value of a specific column at a specific time. How would you fulfill that requirement using Hudi libraries?
Further reading
Here are a few resources you can refer to for further reading:
- Apache Hudi documentation: https://hudi.apache.org/
- EMR and Hudi integration: https://docs.aws.amazon.com/emr/latest/ReleaseGuide/emr-hudi.html
- Considerations and limitations while using Hudi with Amazon EMR: https://docs.aws.amazon.com/emr/latest/ReleaseGuide/emr-hudi-considerations.html
- Learn more about EMR Notebooks: https://docs.aws.amazon.com/emr/latest/ManagementGuide/emr-managed-notebooks.html