
Chapter 7: Resource Manager – Staffing for Success!
In the previous chapter, we learned the foundational concepts of resourcing through the experience of the practice manager.
In this chapter, we are going to bring these foundational concepts to a centralized model and identify how a resource manager (and the Resource Management Offices) (RMOs) can create a schedule more effectively. As a result, you will be able to work with the Schedule board to optimize scheduling.
Therefore, in this chapter, you will learn about the following concepts:
- Staffing projects for success
- Generating bookings
- Maximizing the Schedule board
- Resource utilization management
By the end of this chapter, you will be able to lead the RMO and its function to improve the overall staffing and efficiency of a project's execution.
Technical requirements
To perform the tasks in this chapter, you will need the following:
- An Microsoft 365 account and an Azure Active Directory (Azure AD) login
- A Microsoft Dynamics 365 Project Operations Customer Relationship Management (CRM) license
- A Microsoft Project Plan license
- A Resource Manager security role
Please visit the following link to check the CiA videos: https://bit.ly/3abRHw7
Staffing projects for success
As a resource manager or a member of the RMO, it is your priority to match the right team members to the right projects and tasks. You are responsible for forming project teams with the proper skills to meet project demands. In this section, we will learn to build a team to take us on a path to success. We will begin with generic resources.
Generic resources
To perform this function, you will generally begin with a project that has been constructed with generic resources, representing the roles needed in a project.
Our work breakdown structure (WBS) has tasks assigned to the generic resources that represent the types of roles we want on our project. These also show up in the Teams tab on the Project form in Project Operations.
For example, in our project, we are implementing Project Operations at 123 Architects, and therefore we need to have Dynamics 365-qualified team members working on the project. In addition, we need to have an admin available to help keep some contractual obligations. The following screenshot shows what we see in the Teams tab of our project:

Figure 7.1 – Generic resources in a project
Each of these roles will need to be supported by the scheduling requirements. As we proceed with matching team members to projects, there are other considerations to take into account.
At the highest level is the role. The role will drive the broad-brush capabilities a team member can perform. Note that a team member may be qualified to perform multiple roles in a project. For example, as a Dynamics 365 Architect, a team member may also be able to perform a Dynamics 365 Project Manager role. This may apply when you are resource-constrained in terms of a role.
Specific patterns
Time constraints are the most common constraints a resource manager will face in the scheduling of a project. It is common for a client to want a project to begin the day they sign the contract. However, unless you have team members on the bench (that is to say, not working on a project), then you need to find out what a reasonable starting point will be with a project. This is where we will begin: with the generation of a resource requirement for a role. The following screenshot shows the ability to specify a pattern for a role:
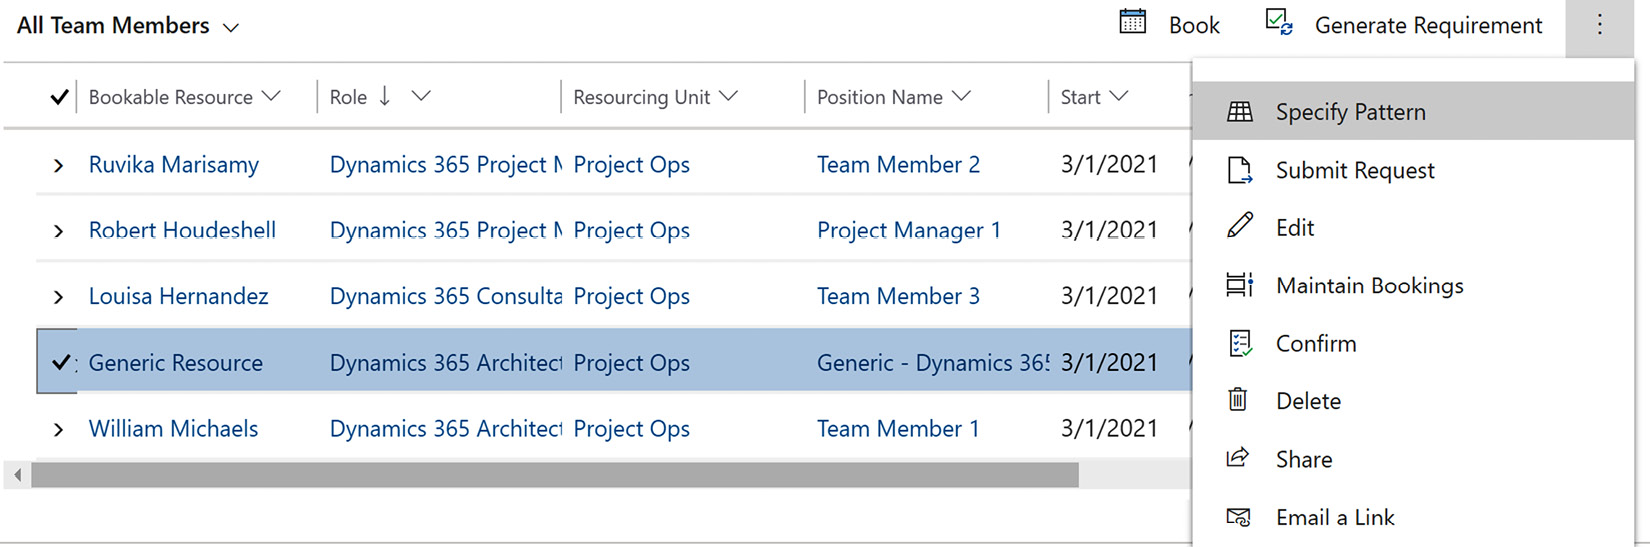
Figure 7.2 – With the role highlighted, you can specify the hours needed on a project
Since our project is beginning quickly, we need to get a team member engaged upfront to begin the work. We have inquired and found out that we have a Dynamics 365 Architect that we can have start on Monday, but she only has 2 hours a day available until Thursday, at which time she can begin working 8 hours a day. Therefore, we can get to the level of specificity shown in the following screenshot:

Figure 7.3 – Hours specific to a role per day
Figure 7.3 reflects the requirement shown from 3/1/2021 to 3/19/2021 of 83.5 hours. However, across this 2-week time period, we have shortened Monday, Tuesday, and Wednesday to 2 hours a day, thus reducing the duration of the role for this first week. However, because we are increasing our hours to 8 hours a day thereafter, we do not have quite as much of a deficit as we could have had.
Generating requirements
Now that we have specified how we can begin the project with a Dynamics 365 Architect, we will generate the requirement that can be used by the Schedule board to determine availability. From the same Team tab, with the Generic Resource – Dynamics 365 Architect role highlighted, click on the upper right of the pane shown in the following screenshot and select Generate Requirement, as highlighted:

Figure 7.4 – Generating the requirement for a centralized scheduling model
Upon generating the requirement, what this is doing is creating demand on the Schedule board that can be met by finding a team member with the roles, skills, and other factors necessary. Upon generating the requirement, you will be able to view the open requirements in the Schedule board, which we will discuss later in this chapter.
To view all outstanding requirements, we should now go into the Resources area and select the Requirements menu. Find the requirement that you have generated and open it. You can now add some additional detail to the requirement in order to communicate most effectively.
Note that generating the requirement puts the requirement on the Schedule board as well as in the Requirements menu. When on the Schedule board, this requirement is available to book at that point. However, you may also have a request that has been generated from the requirement as well. Therefore, think about how you may work through the workflow in your company when you are both generating a requirement and submitting a request.
The following screenshot shows more specificity added to the Skills and Resource Preferences sections:
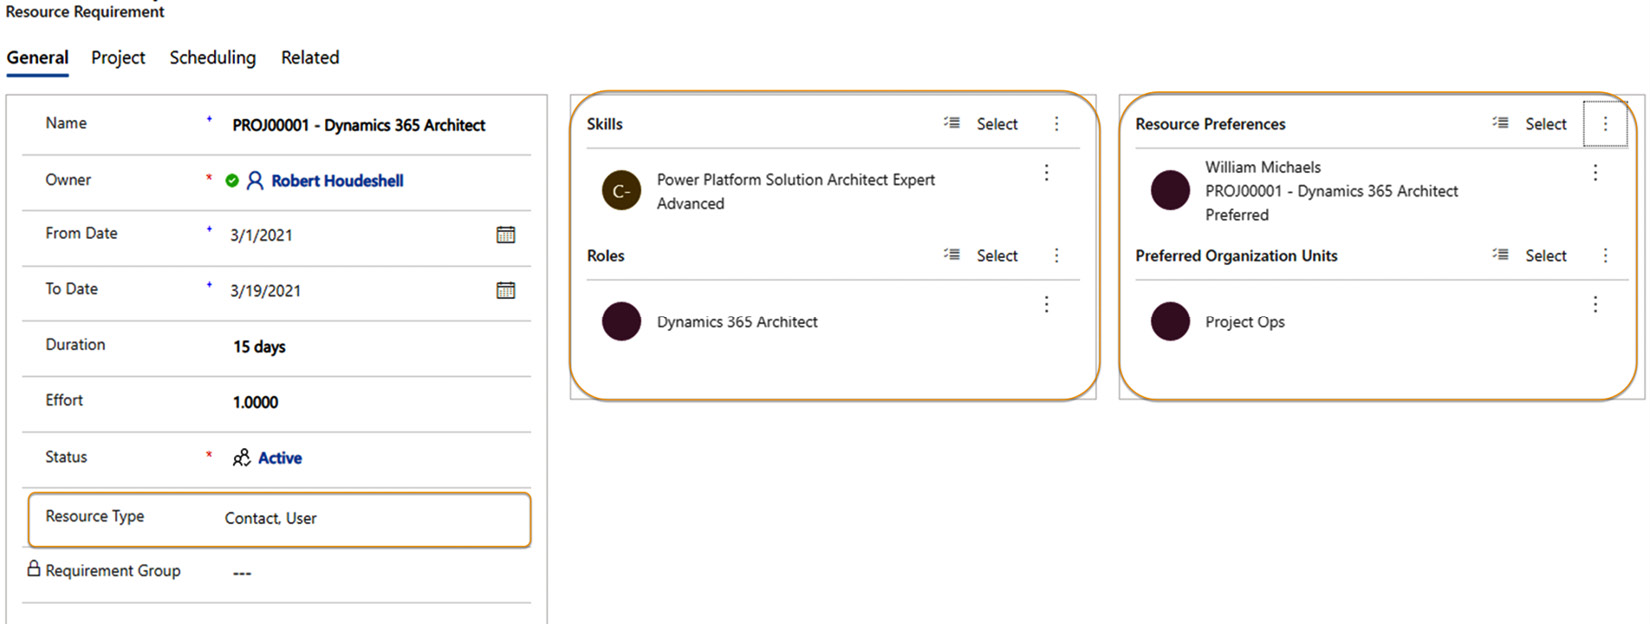
Figure 7.5 – Resource Requirement – additional details
Some of the key fields highlighted in Figure 7.5 are outlined here:
- Resource Type: We have chosen Contact and User, meaning that we could use a partner resource (contact) or a user (internal team member).
- Skills: We have chosen to add a skill, such as certification in Dynamics 365 Solution Architecture.
- Roles: Defaults to the role that is associated with this requirement.
- Resource Preferences: We have chosen William Michaels as a resource as we know he could potentially work on this project, but this needs to be validated.
- Preferred Organization Units: Defaults to our current organizational unit but can also be set to some other organizational unit to choose from a different resource pool.
There are some additional scheduling options you can specify as well, as shown in the following screenshot:

Figure 7.6 – Resource Requirement – Scheduling tab
As you can see, you can specify the work location, priority, and territory when these criteria are needed to perform the proper scheduling. When scheduling on-site work this becomes even more helpful, as you can find resources matching the territories involved.
When we add these criteria, they immediately filter into the Schedule Assistant Filter in the Schedule board to find the right resources, as shown in the following screenshot:
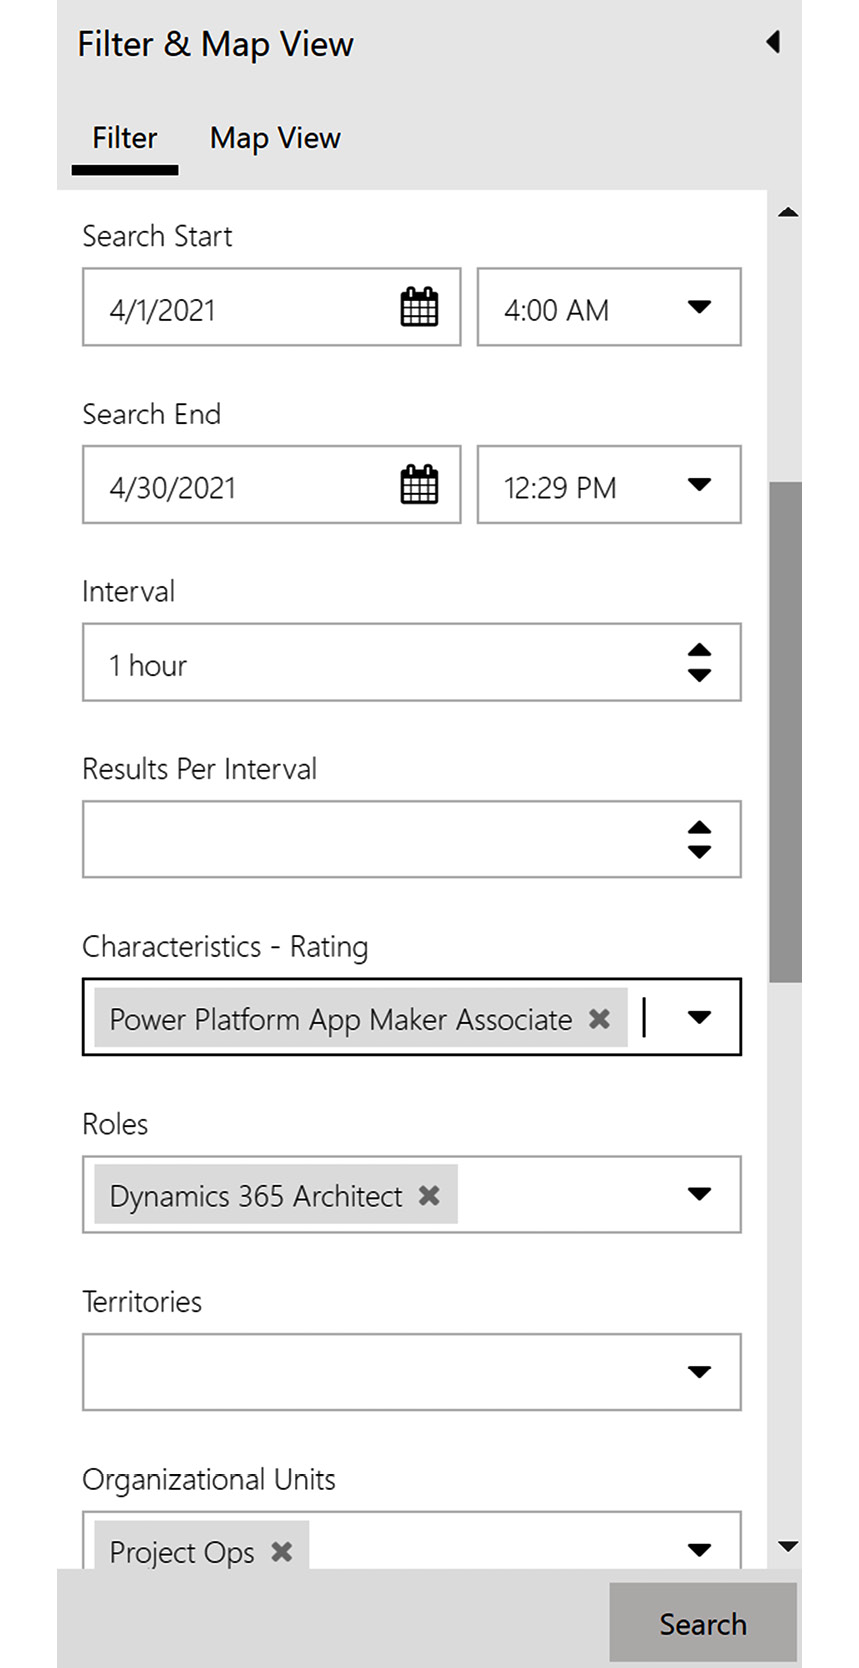
Figure 7.7 – Schedule Assistant showing your parameters in the filters
The preceding work completes the requirement for the resource and provides us with more details for the Resource Manager.
Submitting a request
Once you have your details outlined, you can submit this requirement, which means this: the requirement becomes a request that can be viewed and approved within a requests queue.
The purpose behind this in a centralized scheduling scenario is that you will utilize this to provide the resource manager with the ability to assign resources to a project. After a resource request is fulfilled, then the generic resource that was in the WBS's task is replaced with a named resource.
Therefore, there are a couple of ways in which demand (requirements) meets supply (team members). Let's take a look at the role bookings play in this situation as well.
Generating bookings
Generating bookings is an efficient way of assigning work to team members to benefit the time entry of these team members.
Bookings relate to the core assignment of a team member to a project, a task, and a timeline. Bookings have a variety of booking statuses and allocation methods that drive bookings for a team member.
Bookings are important since they are most likely going to be the basis of many management decisions. Some of the decisions may include the following:
- What is our forecasted utilization?
- Do we have enough team members to meet the demand of our clients?
- Do we have team members who are underutilized?
- What is our finance forecast based on bookings?
- What other constraints do we have in our business?
- How are our team members performing against their bookings?
- Are team members working the assigned number of hours?
There is also the potential to book directly from the Bookings screen. Let's take a look at it further.
Direct bookings
Bookings can be created manually by performing the booking process from the requirement. From the Team tab on a project, you can also directly book a team member onto a project by selecting the Book button, as shown in the following screenshot:

Figure 7.8 – Direct booking for a direct scheduling model
As we perform bookings, it is important to know that there are different elements within the bookings to be fully aware of.
Booking types
Bookings are generally broken up into hard and soft bookings when companies talk about how a team member is staffed.
Many times, when a project is coming onboard, the practice manager or other leaders in the company will begin sketching out who can work on the project. Some of this may come from team member assignments within the tasks that are in the WBS. Alternatively, though, team members can be booked onto a project in what is called a soft booking. This generally results in a booking that a team member may even put their time against as part of their timecard entry. However, since it is a soft booking, there may still be some contractual paperwork to be fulfilled.
A hard booking is a booking type that factors directly into a resource's time entry as well as resource reconciliation. Only hard bookings are considered when reconciling bookings against assignments.
Note that the terminology around booking types varies from company to company. Some may call soft bookings unconfirmed bookings. Other terms abound. Therefore, this is a field that you can customize to your company's terminology.
There are multiple ways of looking at a booking status as well.
Booking statuses
Booking statuses can be as detailed or summarized as you need them to be. They are set up within the Resources area | Settings | Booking Statuses. Depending upon how you look at your implementation, some of this may be duplicative.
Out of the box, the statuses are shown here:
- Cancelled
- Committed
- Hard
- Proposed
- Soft
You can modify this list, and each of the statuses (regardless of what you call them) map to the standard three system statuses of Proposed, Committed, and Cancelled. These should be pretty self-explanatory but if you need more details, you can refer to the Microsoft online documentation.
Booking statuses should be used as a way to communicate organizationally the status of work being allocated to a project. This manifests itself in the words we use, such as We have soft booked that project for now, or Rachael, we have hard booked you on this project to task # 3.
Bookings are created on a daily basis in the system and therefore show as daily entries in the Active Bookable Resource Bookings view, shown in the following screenshot:

Figure 7.9 – Booking statuses
The preceding booking statuses represent a common mix that a team may see across their work schedule. You may notice a structured duration of 4 or 8 hours, matching a full or half day of a booking. This potentially happens with the Specify Pattern option shown earlier in this chapter. It also happens with the allocation methods in the bookings.
Booking allocation methods
When booking resources, there are a number of factors that come into the equation. At the highest level is the work calendar of the team member. The calendar is going to determine—for example—the holiday schedule for the company, which will factor in global days off.
Secondarily, each team member has a work schedule such as Monday through Friday from 9:00 A.M. to 5:00 P.M., equating to 8 hours a day, 5 days a week, for 40 total hours. One thing to note here, though, is this: set up the team member's work calendar so that it runs from 9:00 A.M. to 5:00 P.M., or 8 hours a day. If you set it up to run from 8:00 A.M. to 5:00 P.M., assuming an hour off for lunch, the system does not factor that in. The system will calculate 9 hours per day or 45 hours a week, which will throw your scheduling off.
With that as a backdrop, we now may have a team member who works 40 hours a week but is already booked on a project for 20 hours a week. When we are booking our project to this team member, how are we going to consume the remaining 20 hours a week? This is where allocation methods come into play.
There are six booking allocation methods in Project Operations. Taking the preceding paragraph's example, let's assume the team member is working 20 hours a week for the next 2 weeks. Furthermore, we have 80 hours of work to book for the next 2 weeks. We can use one of the following booking allocation methods to do this:
- Full capacity: This booking allocation method will book 40 hours each week, regardless of any previous bookings. What this does is book an additional 40 hours to the first and second week, resulting in total bookings of 60 hours per week for the next 2 weeks. This may not be desirable, but be aware that this is the result.
- Remaining capacity: This booking allocation method will be available from the Schedule board and will result in a neatly scheduled team member. What this does is take the 20 hours already booked and allocate 20 hours per week for the new booking for the next 2 weeks. The result is that in the third week and beyond, you still have another 40 hours to book. If the team member's schedule frees up, then the remaining capacity is used up in future weeks.
- Percentage capacity: This booking allocation method will allocate based upon a percentage. If, in our example, we choose 75% allocation (or 30 hours per week), this will result in our team member having their original 20 hours per week plus the 75% or 30 hours, meaning that they will be expected to work 50 hours for the next 2 weeks. The remaining hours in the booking will need to be consumed in the weeks subsequent to our 2-week booking.
- Evenly distribute hours: This booking allocation method will allocate an even amount, such as 20 hours per week, as 4 hours per day. Should this method be used, it can be powerful in fully allocating a team member's schedule, but it can also result in overbookings.
- Front load hours: This booking allocation method will perform all the math to front-load all the bookable hours upfront to fill all the remaining capacity. However, if the team member is already fully booked, an error message may be displayed.
- None: This is the default setting for the project manager role that gets assigned when a project is created. You may be that project manager and wonder: How do I get my time booked against capacity? You can resolve this by making modifications in the Teams tab on the project or by using the Extend Booking setting in the Resource Reconciliation tab.
In the preceding outlined scenarios, the Full, Percentage, and Even Distribution allocations can potentially overbook resources. This will be important to factor into your business processes, especially if you are tracking team member performance against their bookings.
Looking at a booking in more detail, there are a few other considerations to include. They can be viewed in the bookings themselves, through the Scheduling tab. In here, you will see some other information that may be helpful, such as travel and location information.
All of this factors into the Schedule board, as we will see next.
Maximizing the Schedule board
As we begin talking about the Schedule board, let's first understand what the Schedule board is and what it does. The Unified Schedule Board, as it is sometimes called, is a resource that is used extensively across both the Field Service and Project Operations solutions. The Schedule board has these dual functions, but for the purposes of this chapter and book, we will focus only on the scheduling of resources to projects.
To begin with, we will look at the Schedule board and its various elements. A key thing to know about the Schedule board is that it is configurable, meaning that you can make it look the way you want through the settings. It is also customizable, meaning that you can extend it through additional fields. It also has a variety of areas that we will point out in the following overview.
The following screenshot shows the Schedule board with the Weekly view default setting:
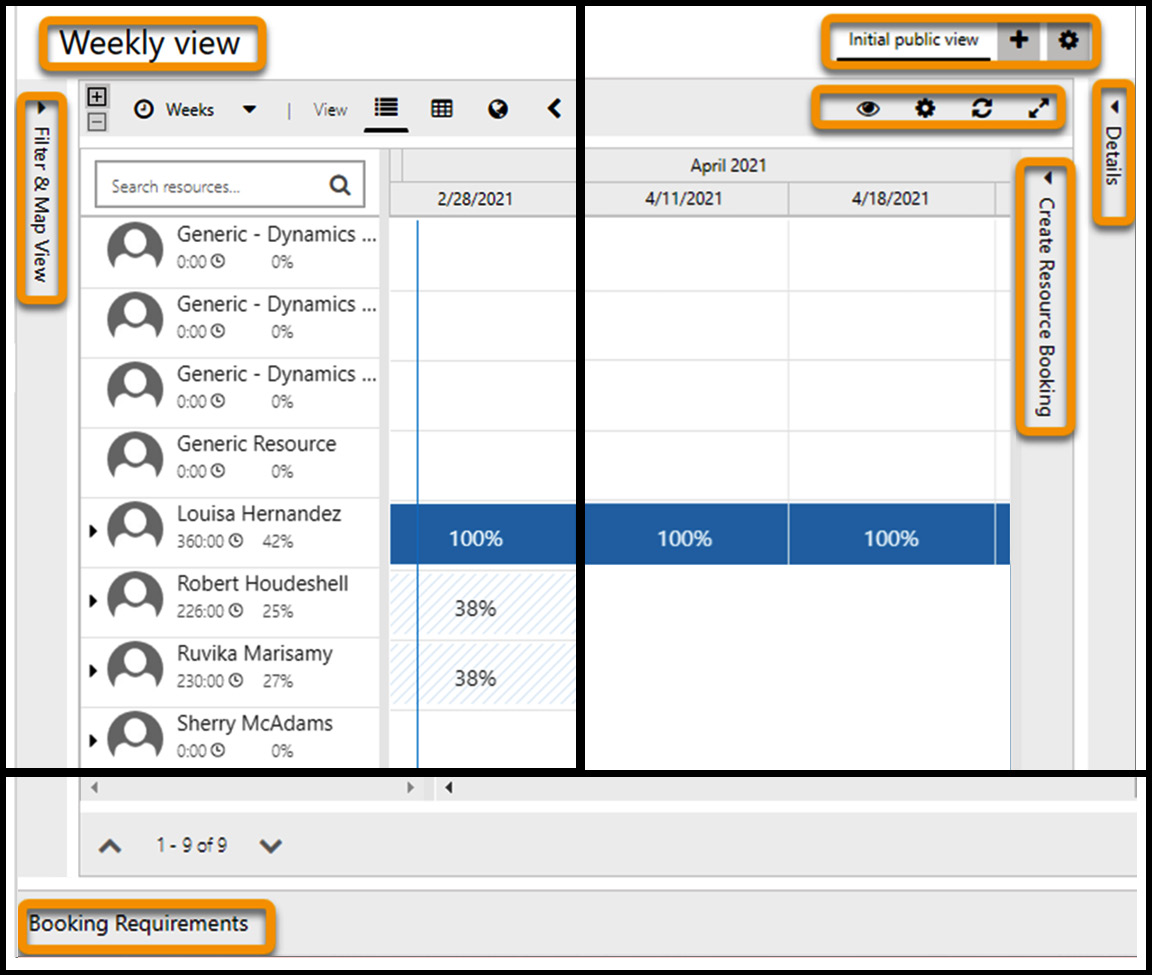
Figure 7.10 – The Schedule board
Note
The preceding screenshot has been edited to provide a clear view of the options.
For this section, we are going to review each of the following areas that are highlighted in the preceding screenshot, beginning in the upper-left corner and rotating clockwise:
- Weekly view: This is the title of the view, which changes upon altering the view from Weeks to Months or Days.
- Initial public view: This is where the system begins the view you initially see. However, with the settings and the ability to create your own views, you can capitalize on this to create a view that is unique to how you plan your projects.
- Settings area: This is where we set the accessibility mode and the Settings button, which allows you to modify what you see and how you view your own personal view. This also allows you to expand the view to fill the screen.
- Details: Provides you with the booking detail.
- Create Resource Booking: Creates a resource booking for a booking requirement.
- Booking Requirements: This shows all outstanding booking requirements generated through the project creation.
- Filter & Map View: This is where your requirement's specifics filter to the most qualified candidates.
Now, at this point, it is probably becoming very clear to you that you may need an upgrade to your monitor to be able to take all of this detail into account. The screenshots we are going to cover will represent a different monitor size from ones you will likely work with. In the case of the Schedule board, bigger curved monitors work well when dedicated as a secondary monitor.
Configuration and settings changes
To work through a practical example, we will first make some changes to our display. To do so, next to the Settings area, click on the settings gear to open the Settings view, shown in the following screenshot:

Figure 7.11 – Schedule board settings
Some common changes here include changing the Resources Per Page setting and the Number of Weeks Per Page setting. This basically defines the timeline in which you are scheduling. For more daily scenarios such as Field Service, this is down to the daily level (working in minutes and hours) versus project operations, where it may involve weekly or monthly scheduling, and working time is in hours and days.
A change I like to make is to the row height and column width. I generally change these to be more visible in the monitor I am using. The other fields are pretty well named, thus I will not go through explaining each of them. I recommend clicking on Tab Settings, to arrive at the following screen:

Figure 7.12 – Schedule board: Tab Settings
The Tab Settings functionality allows you to create your own Schedule board that will provide you with custom elements and configuration settings for your company. In the upper level, you can name this whatever you want it to be named. Furthermore, the Schedule board can be shared with everyone or be private/shared with specific people. In the Default area, rest assured that if you make some hideous changes, you can reset to the default setting.
Without going into every detail, suffice it to say that you can change views from their <Default View> setting to very specific views created in the Project Operations system. You can add your own custom web resources, as well as modify the Schedule board colors to be more meaningful to your company.
In the Schedule Assistant area, you can make modifications to the Schedule Assistant, which drives who can be seen in the Schedule board. Let's now take a look at this in practice.
Requirement for bookings
Reflecting on the generation of project requirements, we now have a number of requirements that were created from generic roles attached to the project. Furthermore, some requirements had some additional specificity relative to skills and certifications, as well as territory requirements.
From the Schedule board in the Booking Requirements section, click the expander to view the booking requirements we created. In here, we are going to select the requirement we created that resulted in a Dynamics 365 Architect being required from the Project Operations Organizational Unit that is either a user (an internal team member) or a contact (which is a partner resource). This is the scenario shown in the following screenshot:

Figure 7.13 – Schedule board resource bookings (screenshot cropped to show detail)
In the preceding example, we have all of the filtering that has come from our specific requirements and that now drives the Schedule Assistant.
In the middle section, we have the timeline in which we are searching, showing that William Michaels is available and can be assigned to the project beginning in March and continuing through April and May.
In the right section, we see the specific booking that occurred for William Michaels, and will reflect this in his work schedule.
The end result of this is that we have generated project requirements that have the roles, the duration, and additional requirements, and all information needed has been submitted to a centralized resource management function.
Upon generation, these requirements—along with all other requirements—can be reviewed and matched with team members (either internal or partner team members) who meet the needs of the project.
Upon completion, William now has work booked throughout May for this project.
We will now take a look at how to manage resource usage.
Resource utilization management
As is the case with many services companies, team members are sometimes overbooked. The following screenshot shows how Louisa Hernandez has been overbooked for the first 3 weeks of the month of March:
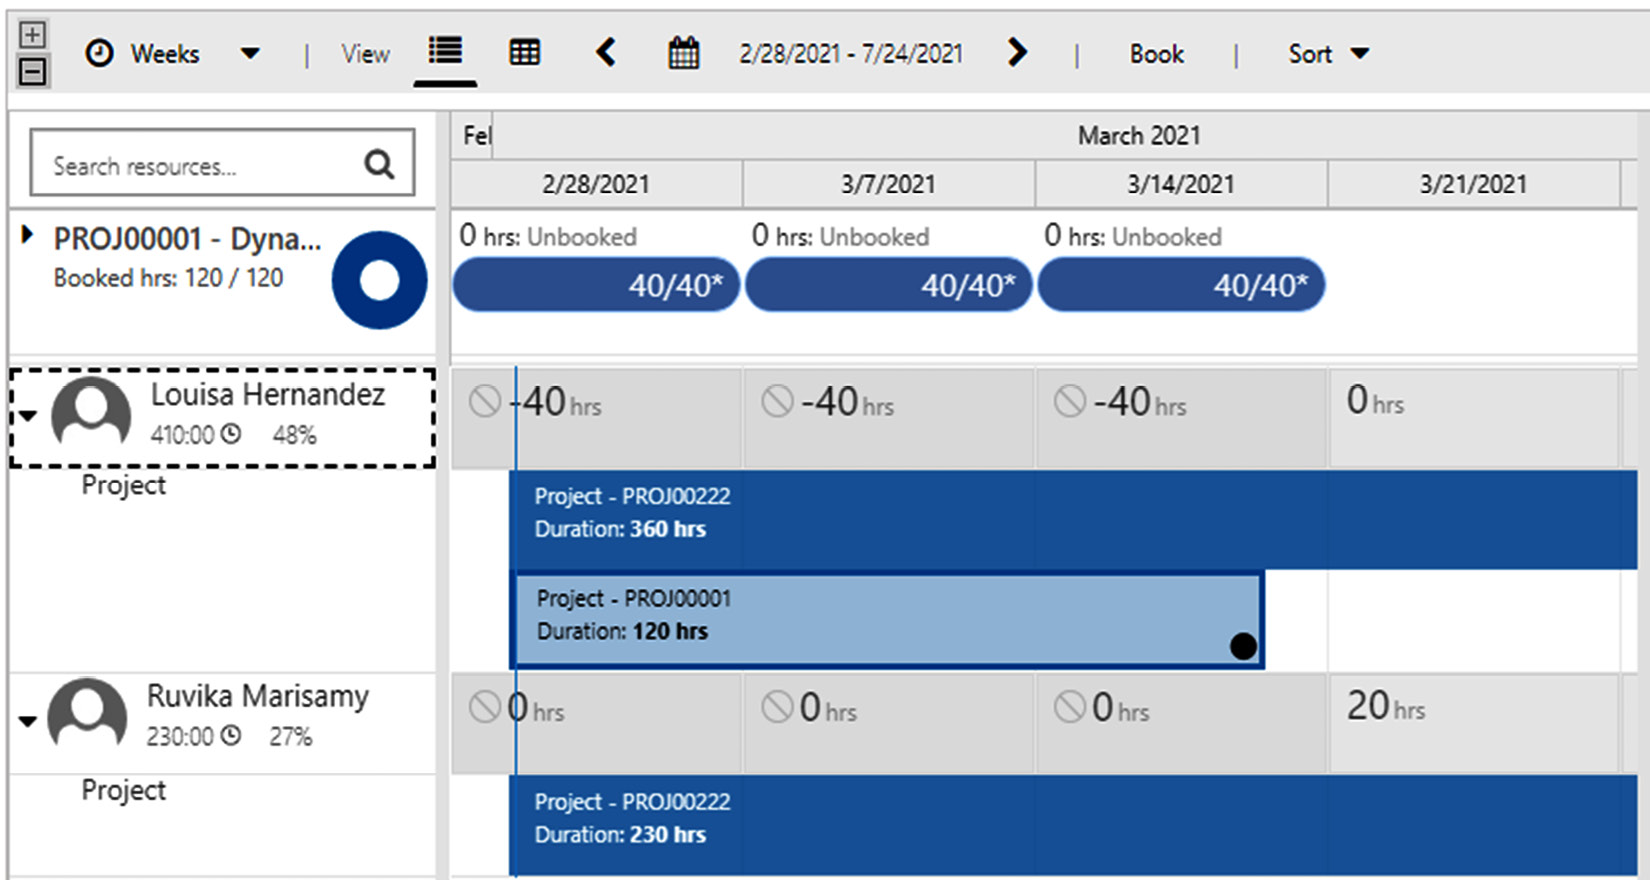
Figure 7.14 – Schedule board showing an overbooking for Louisa
There are options here that resource managers know they can take advantage of, including moving the work to Ruvika Marisamy, who has some availability during the required timeframe. Furthermore, this work can be pushed out to the month of May to enable Louisa Hernandez to be the assigned team member, as shown in the following screenshot (with the Schedule board, this is a drag and drop of the booking to the new date):

Figure 7.15 – Schedule board showing the booking reassigned for May
From a 30,000-foot view, a resource manager can see the overall usage of their resources, open requirements, and team availability in one screen—the same screen we have been working in. The Schedule board is a powerful tool to use to do this, as can be seen in the following screenshot:

Figure 7.16 – Schedule board 30,000-foot view
Resource management, through all its various approaches, is a vital part of a service company's functions. A resource manager is responsible for making sure the right team members are staffed to projects they will succeed in. Furthermore, the productivity and optimization of a team will enhance a company's bottom line.
Summary
In this chapter, we built upon the preceding knowledge of finding the right team members to staff our projects. This is important since this will drive the success of projects, productivity of the team, and profitability of the company.
When staffing projects, we learned how important roles are to the overall staffing model. We built upon that by identifying specific patterns of scheduling and adding specifics to each requirement. The value of this is to improve communication for the people responsible for scheduling.
We then were able to generate requirements and submit requests to be processed through the Schedule board. This provides a company with the management tools to keep team members assigned to the right tasks.
Building upon the concepts of booking types, statuses, and allocation methods, we reviewed how to maximize the Schedule board and improve the overall productivity of a company.
As we enter into Chapter 8, Managing a Project to Success, we will see how we can utilize out-of-the-box project management functionality, combined with Microsoft Teams collaboration and delivery of time-entry functions in Microsoft Outlook.
Questions
- A generic resource is a role that provides which function in the Project Operations system?
- Generic resources are utilized in the WBS or ____________ _____________ __________ to define the required hours per team member type.
- What is the function that allows you to outline the specific hours per week or day a team member role is needed?
- True or False: Generating requirements shows the requirement on the Schedule board.
- What is the purpose of resource requests?
- True or False: Resource Requirement—additional details do not filter through to the resource requirement.
- True or False: From the Team tab on a project, using the Book button you can book a resource directly.
- Hard and soft bookings drive which function within the resourcing of team members?
- Which three allocation methods may result in overbookings?
- Where can a resource manager view a 30,000-foot view of resource utilization?