
Chapter 3: The How-Tos of Setting Up Project Operations
As we learned in the previous chapter, there is an overall, underlying framework to the Project Operations solution. In this chapter, we are going to review all the considerations necessary before going forward, one of which is deployment.
Deploying requires some pre-planning and decision making that will drive the deployment type your firm chooses. Decisions will depend upon corporate strategy, software solutions already deployed, types of users of the system, and many other factors.
This chapter will walk you through the decision points, provide you with guidance on the best paths forward depending upon your answers, provide real-life examples of deployments, and finally give a step-by-step approach for deployments.
In this chapter, you will learn about the following concepts:
- Understanding the deployment approach
- Non-dynamics integrated approach
- Upgrade path for existing customers
- Setting up Dynamics 365 CE – Sales
- Setting up Project Operations
- Dynamics 365 CE – Sales Customizations
- Data Import
- Integration strategies
By the end of this chapter, you will know how to deploy Project Operations for your firm's needs. Specifically, you will learn about the following:
- A functional, step-by-step guide to get started
- How to deploy Project Operations without Dynamics 365 CE customers
- How to deploy Project Operations without Dynamics Finance customers
- Integration strategies for moving data to and from Finance and Operations
Let's begin by discussing the deployment approach.
Technical requirements
To perform the tasks in this chapter, there are some technical requirements:
- An Office 365 account and an Azure Active Directory (AD) login
- A Microsoft Dynamics 365 Project Operations (CRM) license
- A Microsoft Project Plan license
- If integrating with Finance and Operations, a Dynamics 365 for Finance and Operations license
- Global admin rights in Office 365
Please visit the following link to check the CiA videos:
Understanding the deployment approach
To begin your deployment of Project Operations, you should first work to gain understanding and agreement in your firm on some key decisions, as these will have (organizational, technical, financial, business, and political) implications that the firm will be required to live with for many years into the future.
In the following image you can see Project Operation's deployment journey:

Figure 3.1 – Project Operations deployment journey
To guide the decisions, let's ask a few questions and discuss the ramifications of the answers. Remember, we are attempting to outline, across three different areas of Microsoft technology, how to configure a solution.
To understand what is involved in Project Operations deployment, the previous chapter showed Table 2.1 – The components of the Project Operations solution, which outlined the pillars of the solution.
The table shows that there are some components that stand alone, such as the Microsoft 365 components. This deployment is valid and is actually in use in business today. The Dynamics 365 CE apps and Microsoft 365 components together create the lite deployment. Adding in the accounting software completes the integrated solution.
Therefore, there are some questions we should ask before deploying Microsoft 365 overall.
Microsoft 365 framework question
A very foundational question is this:
We have two answers, obviously:
- If the answer is yes, then your firm has already made a very foundational decision to move to the Microsoft 365 platform. If this sounds important, it is because it is. Microsoft Azure Active Directory and Authentication controls access to everything from your licensing to the documents you have access to and the systems you will use as part of your overall IT policy and infrastructure.
- If the answer is no, then you may be utilizing a competing platform such as Google Cloud Platform and the G-Suite of apps, or a best-of-breed environment of specific applications. Such examples are firms that adopted the G-Suite of applications to perform the same functions as Microsoft Office. Therefore, this environment is not a native Microsoft Azure Active Directory environment, and therefore the authentication model and all key components of the Microsoft 365 and Dynamics 365 environment are going to be a challenge to overcome.
There are a number of Dynamics-related questions that need to be resolved to move us forward.
Microsoft Dynamics questions
Dynamics 365 is a power set of apps that empower and engage the firm. Therefore, a few key questions should be asked, including this one:
Microsoft Dynamics 365 CE is a foundational sales application that many firms adopt to drive marketing, sales, and customer support efforts across the enterprise. Therefore, it is not uncommon for you to have already chosen this solution for your marketing, selling, and support functions. The solution may already be implemented or it may be a part of the implementation strategy of Project Operations. Either way, this foundational decision will benefit the organization with tight collaboration between marketing, sales, and Project Operations functions.
If, however, your firm is utilizing a different CRM system, such as Salesforce.com, Sugar CRM, or any other solution, this will not preclude you from utilizing Project Operations. It just means that the frontend sales functionality will be performed in an outside system and integrated into Project Operations using tools from the non-Dynamics CRM system.
Microsoft Dynamics 365 finance and accounting functionality is an element of the Project Operations solution that can take on a life of its own. Furthermore, the use of Finance and Operations will largely be driven by the finance, accounting, and executive teams. Sometimes referred to as the ERP system, the decision to move from another system to Finance and Operations is one that would typically be made alongside a larger effort to determine a migration path forward.
However, if you are using an older ERP system, maybe something on-premises such as Microsoft Dynamics SL, Sage Intacct, or enterprise solutions from Oracle or SAP, integrating into these solutions is not uncommon. The line of delineation is the cut-off point of transactional information coming from Project Operations into the ERP system such as time entries, billing transactions, costing information, and other data.
You may have already used Microsoft's Project Service Automation solution previously in the shape of its original release back in 2016, or in a subsequent version such as V3.0 prior to the release of the Project Operations solution. If so, you will be pleasantly surprised to find that the functionality of the solution is going to be familiar to you but with some added features. The highlights are that Project Operations added more contract type functionality for not-to-exceed and retainer billing, as well as changing out the planning function from the older model's Gantt chart-only style to a more modern project for the web functionality that includes task, board, and timeline views of the planning information.
If you have not been using Microsoft Project Service Automation, you may have been using a different solution with a similar structure. It has not been uncommon for some of the key concepts to roll forward from other solutions into the Project Operations solution with very similar types of functions. Other solutions have taken similar approaches to the needs of professional services firms.
This leads us to the organizational questions that will need to be asked.
Organizational questions
Organizationally, the move to Dynamics 365 Project Operations is a big endeavor! There will be a multitude of opportunities to work across the organization and collaborate with many of your peers and leaders who will contribute to the overall success of the solution. Furthermore, there will be opportunities to work with Microsoft partners who have been expertly trained and certified on the solution and will most assuredly bring a valued perspective to the deployment.
Implementing Project Operations is a strategic project that can benefit greatly from wise counsel, and there are many Microsoft partners who specialize in the Project Operations solution. Furthermore, if you're implementing the full solution from CE to Project Operations to the accounting components in Finance and Operations, there will be advanced topics to be covered above and beyond what is available on a self-service or research basis.
Undoubtedly, you will need more than a few team members, executive sponsors, and others across the organization to make the deployment of Project Operations a success. The best approach is to begin identifying upfront some of the key areas of operation that you or the firm intends to benefit from Project Operations. This will provide you with an overview of who from these areas will need to be involved. You will probably want to have managers, executives, and subject matter experts (SMEs) involved in the decisions leading up to and including your implementation strategy and execution.
This leads us into the next few sections to evaluate each of the options for deployment and discuss their functions and the overall approach for each.
Lite deployment
The lite deployment option of Project Operations provides you with the functionality of Dynamics 365 CE plus the Project Operations apps that drive the project services capabilities. The solution provides a sales process (business process flow) for projects that extends Dynamics 365 CE Sales and provides your users with a guided selling experience.
The lite deployment is not actually "lite" on functionality. It is just a name that Microsoft has tagged it with. Within the lite deployment itself, there are a lot of decision points around functionality that will need to be made.
This deployment leverages Microsoft Project for the web to build a work breakdown structure and task management capabilities. The resource management functionality is built into the WBS to assign specific resources to a task, assign hours, and provide resource management through the use of the unified resource management schedule board.
When you deploy Dynamics 365 CE and utilize the sales management functionality in CE to provide opportunity management, quoting, and project contract management, you are able to create contracts easily and quickly. Contract management provides you with the basic functionality of contracts (time and materials and fixed-price contracts) plus advanced contract functionality, including not-to-exceed limits, retainer billing, and split billing. The combination of contract types will provide the project managers with the flexibility that will benefit the firm when billing out the project.
Advanced customer pricing supports multi-dimensional pricing models that allow for the creation and use of default selling rates, customer-specific rates, and project-specific rates built using chargeable and non-chargeable roles native to the Project Operations solution. Furthermore, roles are used to define not only the selling rates but also the costing rates that are applicable by role, so you can receive a project profitability view by project based upon the roles, hours, rates, and costs.
On the operational, day-to-day side of things, this deployment provides time tracking, approvals, and management. The team members have their own app that can be limited to show only the time entry functionality, should you wish for that. The time entry functionality provides the ability to enter time through the Project Operations interface in a browser or through the Outlook app for Dynamics 365. Time is entered weekly and submitted for approval with each line entry uniquely tied to a project, task, and hours worked basis.
Time can be imported automatically from resource assignments, resource bookings, and from a team member's Outlook calendar. With each of these options, the goal is to get a timecard entered quickly and efficiently. Furthermore, you can copy a week from a previous week and provide a baseline of entry from work performed previously.
Also, time entries for absence, vacation, overtime, and administrative or sales time can be tracked in Project Operations. The time entry capabilities are robust and sophisticated, providing for almost all time entry scenarios.
Approvals are sent to the project manager or other delegated approvers who can approve the time for the team member. Time can also be sent back to the team member for corrections with notifications and information on what needs to be corrected. Furthermore, time that has been approved can be recalled as well, providing the ability to have an overall time management continuum.
Basic expenses are a part of the solution as well. You can have chargeable and non-chargeable transactions and produce proper invoicing based upon the expense type. They are basic, meaning that you can categorize expenses with airfare, mileage, hotel, and so on, and you can enter expenses with attachments for receipts. However, missing from the solution is a sophisticated expense policy management infrastructure.
The options for that policy management and enforcement include using Microsoft Dynamics 365 for Finance and Operations (one of the other deployment options) to perform the policy and management. Alternatively, many organizations will use an SAP Concur type of solution and integrate the expenses into the project for costing purposes.
To perform billing and invoicing in this deployment, you will utilize what become actuals and journals from the Project Operations solution. These are produced through the act of approving time, expenses, invoices, and other billable transactions that become the actuals, thus generating an accounting transaction. Upon review and approval of the actuals, journals are created, and it is in this journaling that you can integrate into your third-party or other ERP system or accounting system. The integration approach you take will greatly depend upon the ERP system's capabilities. Some can leverage Microsoft technologies, others will require third-party integration tools.
Proforma and customer-facing invoicing can be generated out of Project Operations and rendered in a form that is customer-facing and accurate from a Project Operations perspective. However, missing from this will be a tax engine that will add taxes to the invoice and perform the sophisticated tax processing inherent in many ERP systems today.
This deployment model depends upon a number of key data setup tasks that will be discussed in future sections and chapters. Furthermore, we will discuss the impacts and options around the setup tasks.
An integrated Dynamics 365 CE to Finance and Operations deployment model may be right for some firms that are wanting to deploy all aspects of the solution in a unified environment.
Project Operations for resourcing
This deployment method builds upon the lite deployment – deal to proforma invoicing deployment method in a number of ways. In this deployment, you will receive and perform many of the same tasks that we have already discussed. You will still set up and implement the following areas:
- Sales process for projects that extend the Dynamics 365 Sales application
- Project planning using Microsoft Project for the web
- Multi-dimensional pricing
- Unified resource management
- Time tracking and management
However, you will have more sophisticated functionality around these specific areas:
- Full expense policy, entry, and management capabilities
- The ability to scan receipts with Optical Character Recognition (OCR)
- The ability to create proforma and customer-facing invoicing
- The ability to enact revenue recognition for projects
To enable this deployment, you will perform the same steps as in the lite deployment plus the configuration of Dynamics 365 for Finance and Operations. Performing this level of configuration will require a number of key IT decisions, purchases of subscriptions, and deployment of Finance and Operations. This is generally an accounting and finance task coupled with the IT team and the Microsoft partner.
At a baseline, setting up Finance and Operations requires four key components that all interact and work together to set up the accounting system:
- The first area is the setup and configuration of the Microsoft Dataverse (previously Common Data Service) to enable the integration between Project Operations and the Finance and Operations accounting system.
- Next, you will set up a project in Microsoft Lifecycle Services, also called LCS. The licensing for Finance and Operations will be provided by Microsoft and your Cloud Solution Provider or CSP. LCS is available at https://lcs.dynamics.com/v2 and is the baseline to set up a new project in LCS to deploy Finance and Operations.
- Setting up an Azure environment is a critical element of this deployment method. Azure is the Microsoft subscription and server configuration that will provide the underlying infrastructure for Finance and Operations. Deployed in the cloud, the end result of the Finance and Operations deployment will be an app that is accessible, being integrated into the same portal you use to access all the other project apps.
- Setting up and configuring Microsoft's Dual Write functionality will enable an integrated environment that you will benefit from. The complete data model in Project Operations will integrate seamlessly into Finance and Operations.
The additional functionality will include the ability in the accounting system to set up expense policy and entry as well as approval and management capabilities. Adding to this is the ability to scan receipts with OCR to automate the entry of expense data from the expense receipt itself.
On the invoicing side of things, when creating invoices through the time and materials, fixed price, or other billing events, these invoices are transferred through the integration journal into Finance and Operations. This creates a proposed invoice resulting in a fully functional customer-facing invoicing system complete with sales tax information.
Furthermore, revenue recognition for projects is automated in the Finance and Accounting system to recognize revenue on a percentage basis and provide the ability to recognize revenue as needed for your project environment. Chapter 11, Project Accounting and Operations provides more detail on this process.
The high-level steps to accomplish the implementation of Finance and Accounting are as follows:
- Set up LCS with a project to implement Finance and Accounting.
- Set up Azure and configure with LCS.
- Install Finance and Accounting.
- Enable initial sync between systems.
- Set up the dual-write integration.
- Get started with configuration and personalization in Finance and Operations apps.
- Configure your user interface in Finance and Operations apps.
- Configure a chart of accounts in Dynamics 365 Finance.
- Create fiscal calendars, years, and periods in Dynamics 365 Finance.
- Configure currencies in Dynamics 365 Finance.
- Configure ledgers and journals in Dynamics 365 Finance.
The end result of all this work will provide you with a unified environment that produces a solution looking something like this:

Figure 3.2 – Project Operations unified environment
Project Operations supports non-stocked/resource-based scenarios (discussed here) as well as stocked/production order scenarios in the same environment through legal entity-level configurations. As an example, a company (called Contoso in our demo database scenarios) can use the stocked/production order capabilities in their US manufacturing facility (legal entity = Contoso Manufacturing United States). Contoso can use the non-stocked/resource-based capabilities in their Contoso Robotics Arms servicing facility in the UK (legal entity = Contoso Robotics United Kingdom). So, let's now explore the stocked/production order scenario.
Project Operations for production orders
The Project Operations for stocked/production order scenarios is a deployment option available at the legal entity level within Project Operations. What this means is that you can have a mixed environment where, for example, you have a manufacturing or job shop configuration of Project Operations working in one legal entity while having a delivery or setup function in another legal entity. A real-world scenario that has commonly been encountered is companies that both manufacture and deliver their own products. The benefit of this deployment is that you can uniquely manage the needs of both legal entities and then combine them at a financial level to view the overall performance of the company.
With this deployment, you will use Project Operations (CE functionality) to perform project planning using Microsoft Project for the web, and you will use the work breakdown structures that we see used prevalently in Microsoft Project for the web.
However, in Project Operations (specifically, the Finance and Operations functionality), you will manage the project-based sales and marketing in Finance and Operations apps. Project pricing and costing will incorporate the cost rate and bill rate configurations in Finance and Operations.
Resource management, project progress, expense management with receipt capture using OCR, invoicing using sales tax and date-effective exchange rates, configurable project groups for Work in Process (WIP) accounting and accruals, and project revenue recognition are all performed in the Finance and Operations app functionality.
Procurement and consumption of stocked inventory to projects will be conducted utilizing a Finance and Operations app for Supply Chain Management. This means direct costing and consumption of inventory will be costed to a project (job) in Finance and Operations.
The results of this are that you will work in a project management system that manages inventoried items and job costing for internal and billable projects for schedules and financials.
The expense management system will provide you with a fully functional, policy-based expense entry and approval system to expense billable and non-billable expenses to projects.
Furthermore, you will be using a robust sales tax management solution that provides exchange rate engine processing to generate customer-facing invoices. Furthermore, invoicing can be conducted through intercompany invoicing, providing a robust invoicing method for the borrowing and lending legal entities. This is accomplished through intercompany timesheets, expenses, and vendor invoices. You can accrue the WIP revenue in the lending legal entity. This provides you with transfer rates for sales and costs so that project costing will be accurate across multiple legal entities. More advanced functionality such as pay-when-paid vendor invoicing and forecast models for project budgets are available.
Finally, at a financial level, you will be using an International Financial Reporting Standards (IFRS)-compliant project accounting and revenue recognition system. This means that, as a multinational corporation, you can utilize this deployment option to accurately report on all aspects of your project accounting.
There are some situations, though, where a firm may want to deploy only parts of the solution to begin with and then deploy more as the firm gets some wins.
Non-dynamics integrated approach
There are scenarios where the entire end-to-end Project Operations solution does not fully meet the requirements of the firm, resulting in a non-dynamics integration approach.
As much as there is a benefit to having an all-in-one integrated Project Operations environment, it is probably more common to take on portions of functionality that bring the most value most quickly when moving to a unified solution. However, as a case in point, some clients may start by implementing Dynamics 365 CE Sales and Marketing while also then implementing Project Operations. Let's look at both in the next subsections.
The CE Sales and Project Operations scenario
So, this type of client will typically deploy Dynamics 365 CE Sales first, or deploy along with Project Operations, and will perform the deployment method of lite deployment – deal to proforma invoicing. This then will necessitate integration into the ERP system that will manage the accounting activities related to the projects. The type of accounting software that can do these accounting activities ranges from entry-level solutions such as QuickBooks Enterprise with job/project costing to mid-size solutions such as Sage Intacct and high-end solutions such as SAP, Oracle, and Workday. The accounting software will be as varied as the integration technologies involved.
Some consistent factors exist, though. The first factor is that if the accounting system is to track the project costing, then there needs to be the feature of job or project costing inherent within the solution. This will allow more robust integration between systems with project costing information being stored in the accounting system at a project and task level. However, if that level of project accounting is not required, then some integrations simply take the project invoice data and compile it into a project invoice for the accounting system to consume. Upon consumption, it is stored as a standard invoice in the accounting system to be paid by the customer. Credits and rebills are integrated between the two systems to credit an invoice, back it out in Project Operations, and rebill in the Project Operations system to integrate again into the accounting system.
In this scenario, the accounting system is the system of record for all accounting and customer invoice information, whereas the Project Operations solution is the system of record for all project-related activity. Furthermore, some integration between the CE Sales customer records and the accounting system customer records will need to be in place.
The third-party CRM and Project Operations scenario
A recent enterprise-level implementation involved a high-tech client who re-platformed from Salesforce.com to Microsoft Dynamics for the high-volume side of their business but kept Salesforce.com for the enterprise side of their business. In this scenario, we deployed the Dynamics CE and Project Operations solution, but on the Salesforce side of things, we integrated project opportunities at a specific stage into Project Operations. This resulted in a completely uniform process for project initiation through closeout. The result of this is that salespeople do not need to do anything different in their business processes and the results are the same: a unified Project Operations platform to conduct project execution.
Upgrade path for existing customers
Project Service Automation (PSA) from Microsoft has been available commercially since 2016. Clients have worked on and implemented PSA since 2016 and have upgraded to PSA 3.0, which was commercially available until Project Operations in the fall of 2020. Upon the release of Project Operations, which supplants and deprecates PSA, the clients who are on PSA 3.0 will upgrade to Project Operations as a matter of the typical upgrade cycle in Dynamics 365.
In the Microsoft Dynamics Wave 1 release notes (https://docs.microsoft.com/en-us/dynamics365-release-plan/2021wave1/finance-operations/dynamics365-project-operations/), we see that the upgrade path for Dynamics 365 PSA clients is scheduled for September 2021.
On a related note, there are three other features that are listed as included in the spring release. The first is one that we will use in later chapters and this is the integrated task-based billing setup for projects. This is a significant improvement to address previous limitations and I have found it to be highly beneficial for a wide array of clients.
Another feature is an improved and seamless provisioning and application lifecycle management (ALM) experience. This is going to include better provisioning questionnaires coupled with automatic linking of environments and enablement of dual-write entity maps for new and existing environments. Furthermore, there is the new trials experience, which guides customers to the correct deployment approach based upon their scenario.
Tracking the pricing and use of non-stocked materials is a need for some Project Operations clients. These capabilities include estimating and pricing non-stocked materials during the sales cycle for a project as well as tracking the use of non-stocked materials during project delivery. It also includes integrating vendor costs from project-based vendor invoices for non-stocked items from Dynamics 365 for Finance and Operations. Also, there are feature accounts for project costs and revenue on projects.
With that in mind, let's explore the setup of Dynamics 365 CE sales functionality.
Setting up Dynamics 365 CE Sales
We are now going to utilize the information we have covered up to this point by taking all the information we have learned and putting it into practice:
Note
It is likely best to use Incognito/InPrivate browsing to perform the following steps. You may find it better to deploy using Google Chrome rather than Edge, but that is largely subjective and based upon the cache you have in your browser and the number of accounts you use.
- Let's get started with the deployment of Project Operations by logging in to http://portal.office365.com/ with your Azure AD account with administrator privileges. From here, choose the Admin/Settings icon, on the left navigation bar. From here, select Users | Active and locate your user who is logged in to the portal.
- In the vertical ellipsis next to your username, select Manage product licenses and within the Licenses and apps pane on the right, you should have the following licenses enabled:
Project Plan 3
Dynamics 365 Project Operations
Project for Project Operations
- To perform this step, you must be a user in Azure AD, have a valid Dynamics CE license, and have global admin or equivalent access. Upon validation of licensing, navigate to https://admin.powerplatform.microsoft.com/ to build a new Dynamics 365 CE environment. From the Environments menu on the left navigation bar, choose New at the top of the screen to create a new environment. Give the environment a name, choose Sandbox for now (you can promote it later), choose your region, and choose to create a database for this environment, as shown here:
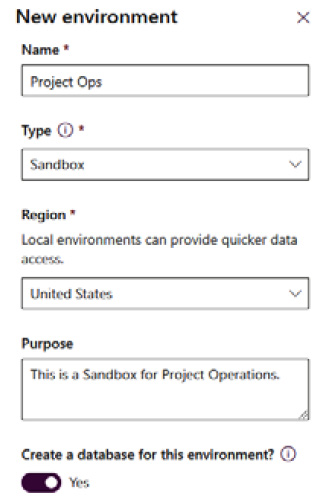
Figure 3.3 – New environment configuration screen
- Click Next to proceed to the next screen. On the next screen, you will input the following option:
URL: Required if you want to create a custom URL, such as ProjectOperations.crm.dynamics.com. This must be unique for your organization:
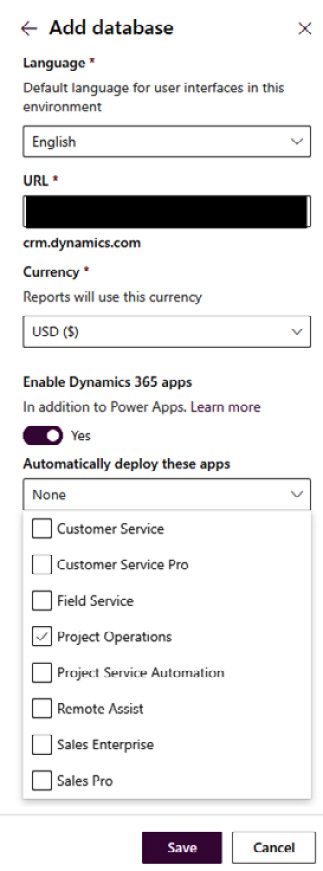
Figure 3.4 – Add database configuration screen
- From the Environments list screen, choose the horizontal ellipsis and choose Open environment:
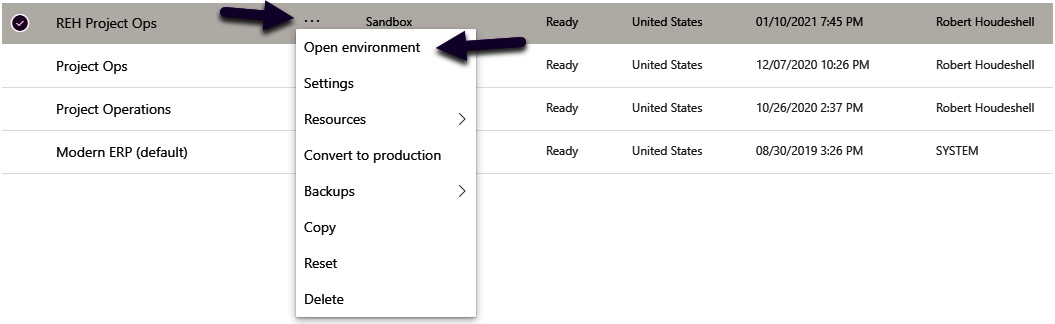
Figure 3.5 – Environment list screen
Congratulations! You have just deployed Project Operations! When you open the environment, the following apps will appear:
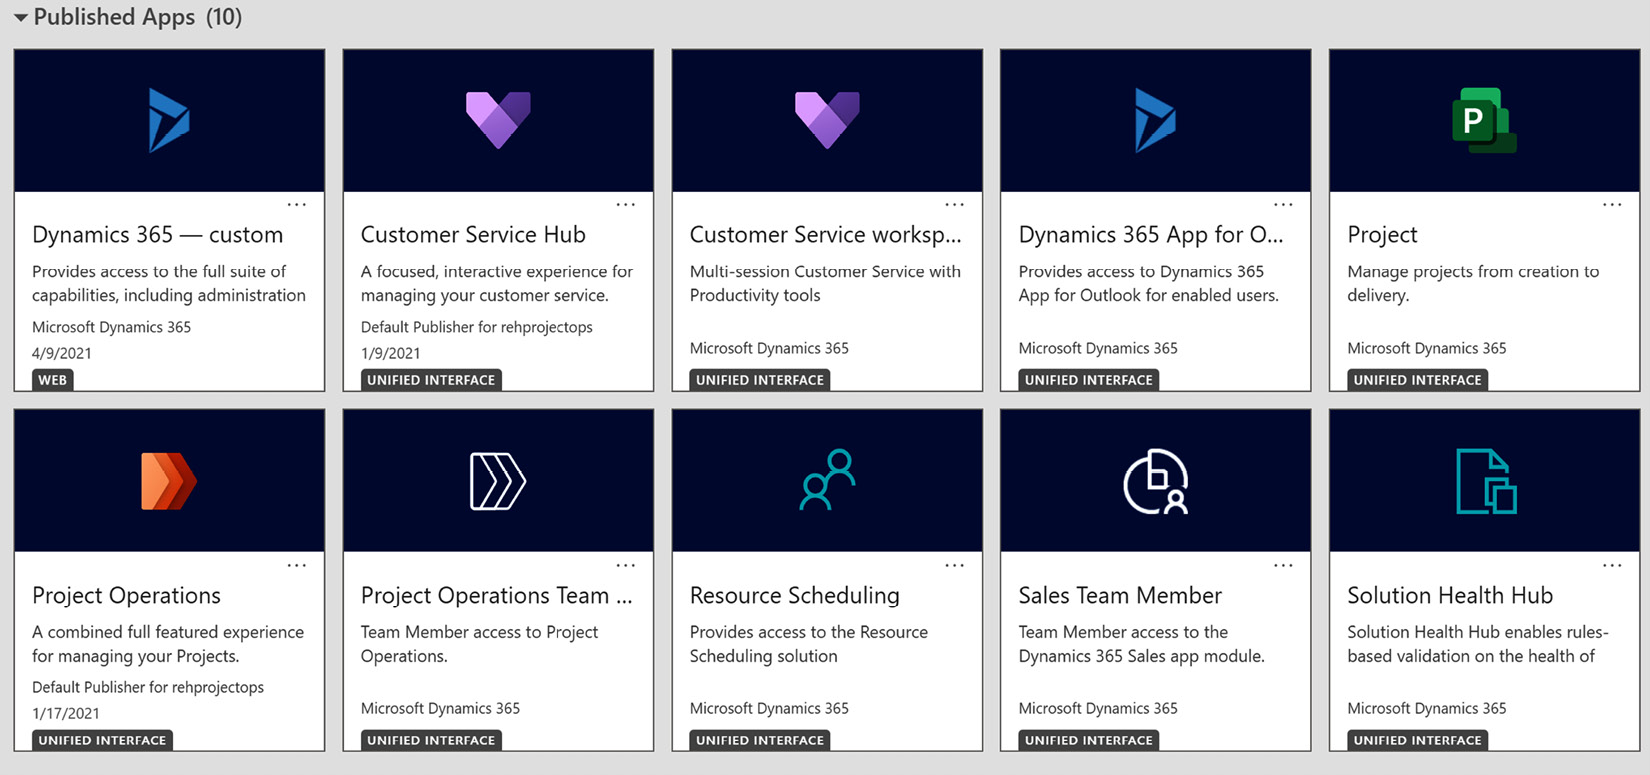
Figure 3.6 – Published Apps screen
From each of these apps, you can select their respective apps and pin them to the top of the portal for easy access. As an administrator, you can also open them in App Designer and manage roles for access control to each of the apps. Before we begin in Project Operations, let's first open the first app listed as Dynamics 365 – custom to begin some deployment discussions around Dynamics 365 Sales (as a foundation for Project Operations). Therefore, click on Dynamics 365 – custom.
In the settings area, select Advanced Settings, and let's review a few things that will drive the system functionality.
Advanced settings
The advanced settings area will drive a number of system-wide configuration choices that will impact all users in the system:
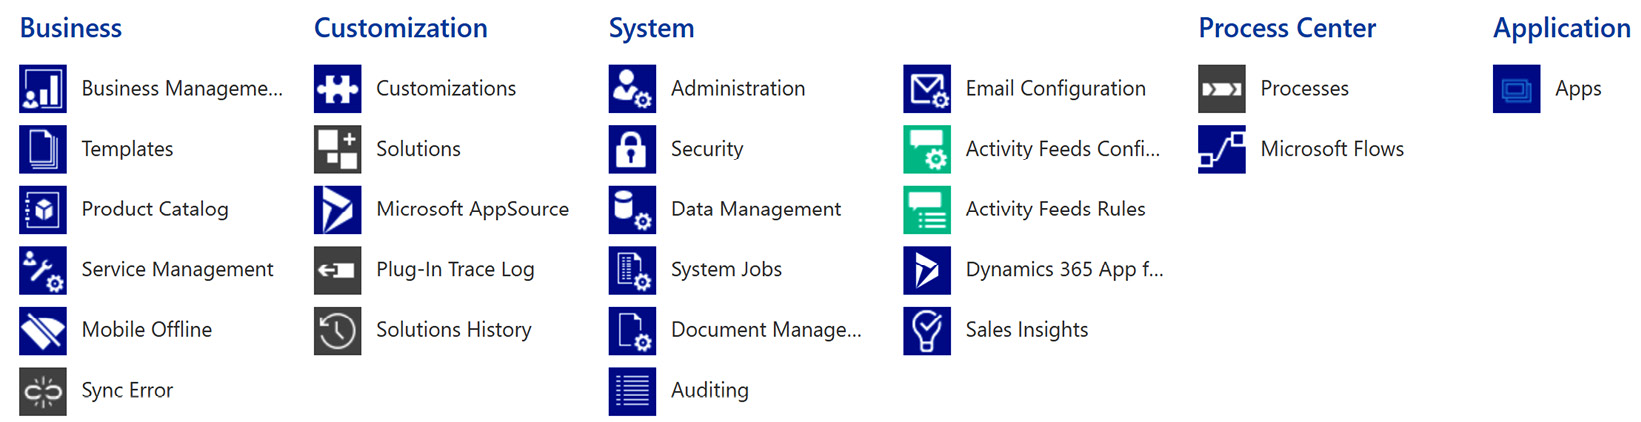
Figure 3.7 – Advanced settings
Although there are a number of screens in each of these subareas to review, some notable areas to be sure to validate and set up include the following:
- Business Management: You can set up everything from fiscal year settings to business closures, currencies, and connection roles.
- Customization: The customization area is where you have the ability to customize and/or configure the system with changes to existing entities (records), fields, forms, views, and relationships, as well as creating new ones. This greatly augments the system and allows it to be able to extend beyond the out-of-the-box functionality. Also, under Publishers in Customizations, you can set the prefixes for new entity names and other default behaviors.
- Solutions: These are packages of customizations to existing and new functionalities. Solutions allow you to group together all code to move easily and quickly from one system, such as a development environment, into test and then into production. You should use these solutions to group your customizations differently than the out-of-the-box grouping.
- Microsoft AppSource: This is the main marketplace to find Independent Software Vendor (ISV) solutions to add into Dynamics 365 CE.
- Administration: This will allow you to set your system-wide settings, autonumbering, and other administrative functions. In Autonumbering, you will likely want to set the prefixes and numbering schemes for contracts, quotes, orders, and invoices specifically for Project Operations. We will cover this topic in more detail in the next section.
- Security: This is where you will want to apply proper security roles to the users in the system. Note: best practice is to copy the security roles from the baseline system and modify them to be your roles to use as part of your deployment. The roles themselves define entity-level access across the full spectrum of the system, from the organization to the child business units, business units, and user level. Once defined, you will assign roles to the specific users to manage their access. Furthermore, note that if a user does not have access to an entity, they will not see or be able to access the data in that entity at the assigned levels.
- Data Management: This provides you with overall data management and controls such as duplicate detection settings, rules, and jobs. Data import is made easier by creating templates for data imports, setting up data maps, and managing the data imports through a wizard-driven interface. There is also the ability to import sample data, encrypt data, and set import field translations for localization.
- System Jobs: This gives you the ability to manage and control jobs that run in the Microsoft Dynamics CE environment.
- Dynamics 365 App for Outlook: This controls the deployment of Microsoft's integrated environment with your Outlook app on your desktop, laptop, or other device.
- Processes: The processes native to Dynamics 365 CE or custom processes, such as Business Process Flows, in Dynamics 365 CE.
- Microsoft Flows: These provide access to the workflow engine inside and outside of Microsoft Dynamics 365 CE and interact with the rest of the Microsoft 365 framework as well as many (hundreds of) external applications.
- Apps: This section provides you with control of and access to App Designer, providing the ability to change the layout of the sitemap as well as adding custom processes to the overall solution.
So, let's start with the setup.
System Settings
To manage the overall system capabilities, the System Settings function turns on functionality that is quite important to the system usage across the rest of the Microsoft ecosystem. Therefore, let's take a look at the System Settings screen for some more information:

Figure 3.8 – System Settings screen
The System Settings area controls a significant number of system-wide capabilities. The list is quite exhaustive and as such we will briefly touch on a couple of areas and go deeper into two specific setup options.
Overall, Microsoft and the partner community can help you understand the overall implications of the System Settings screens. An important thing to focus on is to validate that your formats are correct for your firm. You will also want to focus on the Email and Outlook tabs and set them as per your firms needs.
However, in a project business, there are a couple of key considerations to focus on: Bing Maps and Microsoft Teams.
Setting up Bing Maps integration
Project businesses who arrive at their customer/client site rely on optimizing all time during the day. Wasted time in commuting is a wasted revenue opportunity with the client. Therefore, turning on Bing Maps is beneficial to integrate Bing Maps in the Client (Account) form natively. This is done by selecting Enable Bing Maps from the General tab as shown in the following figure:
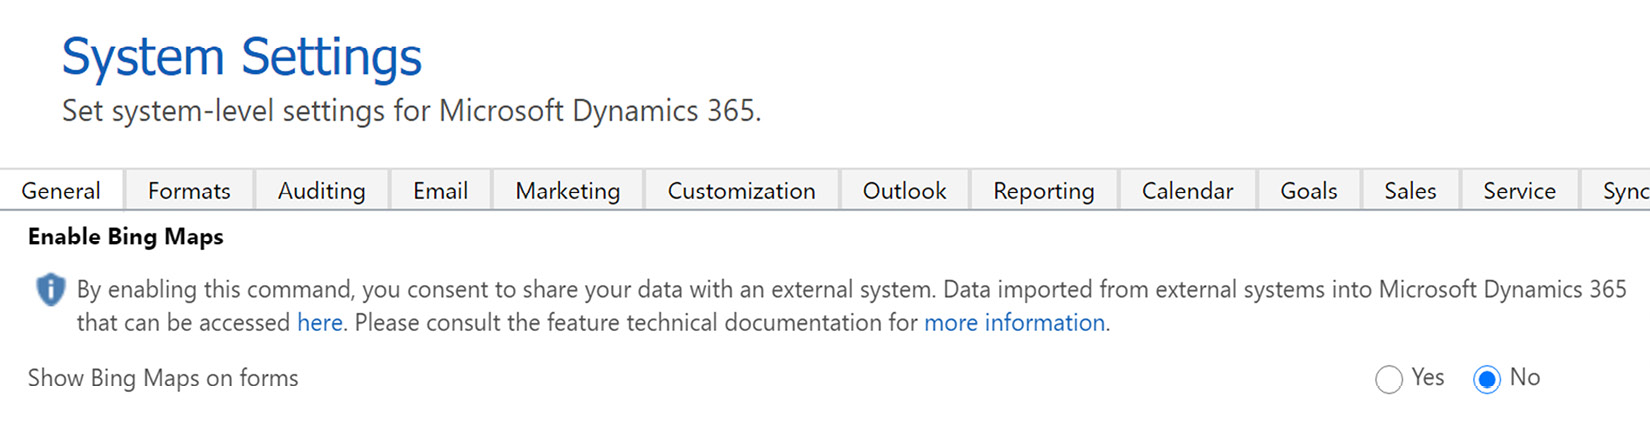
Figure 3.9 – Enabling Bing Maps integration
While working with your clients is the number one priority, most project businesses rely on collaboration across the firm to get results for the client. Therefore, Microsoft Teams is integrated with Dynamics 365 CE and the Project Operations solution.
Microsoft Teams integration and collaboration
Microsoft Teams is a highly collaborative and configurable environment to work together across the firm. I have worked with clients who use both Microsoft and non-Microsoft add-ins in Teams that provide a great deal of functionality, from wikis to lists, to embedded functionality such as Dynamics 365 CE.
To enable Teams integration, go to the Advanced Settings area, select Administration, and then System Settings. Within System Settings, you can select Microsoft Teams Integration to turn it on:
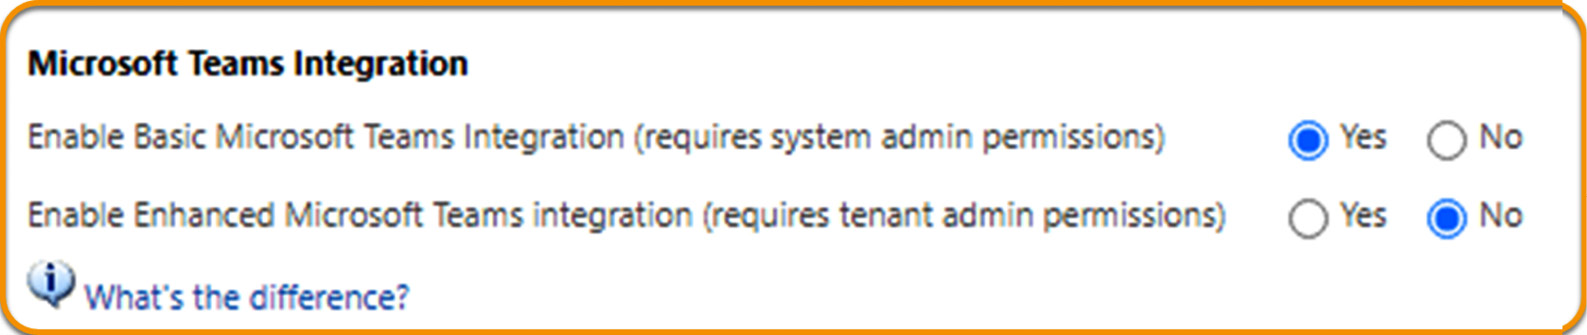
Figure 3.10 – Set Teams Collaboration
Once you complete the preceding steps, on an entities page, such as on Projects, you can click the Collaborate button in the ribbon bar and it will take you to the following screen:
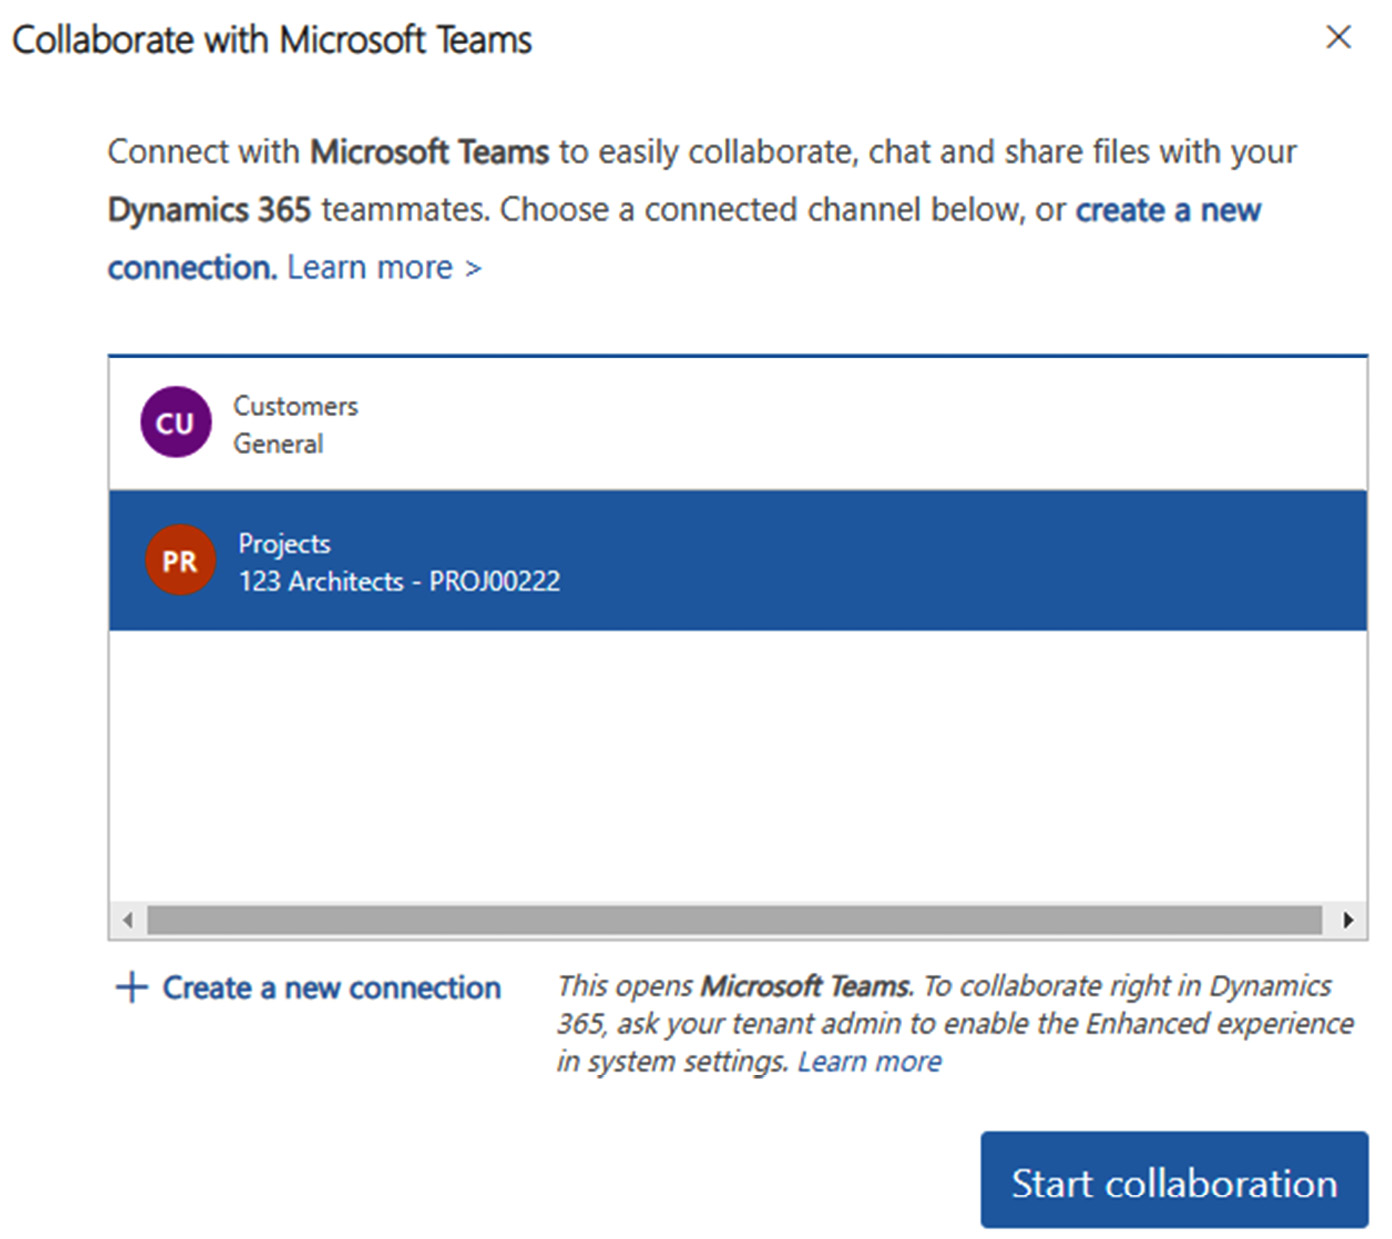
Figure 3.11 – Link Teams with Dynamics
Once linked, the project is embedded within Teams. You can now upload files and folders for document management shown here:

Figure 3.12 – Teams Collaboration around Projects
However, there are many more activities that you can do, such as having a wiki, creating new Teams channels, as well as clicking the Meet button to meet in the context of this project. As we have been building this, we need to understand that security is an overarching element that controls what we do and how we do it. So, lets take a look at this further.
Security setup
To accomplish this, in Dynamics 365 CE, navigate to the settings gear in the top right of the Dynamics 365 screen and select Advanced Settings | Settings | Security and Users. You can add users on the Dynamics 365 CE Users screen.
You can assign roles to each of the users by opening the user record and, at the top of the screen, choosing Manage Roles.
The following setup will represent some out-of-the-box security setups. However, if you want to customize the roles, first copy them and then rename them to YOURORG.RoleName, where you are making a custom role that will not be overwritten in future upgrades.
Account Manager
The Account Manager is the main project seller, business developer, or customer manager in your firm that will use CRM to develop sales activities. For out-of-the-box security setup related to the Account Manager type of user, you will need to assign them to the following roles:
- Sales Manager
- Project System
- Project User
- Potentially Project Manager (if the Account Manager will have any project management or creation functions)
Project Manager
The Project Manager will need to have access to all aspects of the project system in CRM to plan, deliver, and manage projects. For the Project Manager, you will need to set up the following roles:
- Project System
- Project User
- Project Manager
- Project Approver
Practice Manager
The Practice Manager, and sometimes a portfolio or program manager, will manage many projects or have oversight of them. For the Practice Manager, you will need to set up the following roles:
- Project System
- Project User
- Project Manager
- Project Approver
- Practice Manager
- Resource Manager – to view the Schedule board
Resource Manager
The Resource Manager, or resource management office, will provide resources (people or team members) to staff a project. For the Resource Manager, you will need to set up the following roles:
- Project System
- Project User
- Resource Manager – to view the Schedule board
Project Billing Manager
The Project Billing Manager will export out billable transactions to Dynamics 365 for Finance and Operations or another ERP/accounting system. For the Project Billing Manager, you will need to set up the following roles:
- Project System
- Project User
- Project Manager
- Project Approver – if they will need to perform ad hoc approvals
- Project Billing Administrator
Team Member
The team members are the resources (people) entering time cards and expenses against a project. For Team Member users entering times and expenses, you will need to set up the following roles:
- Project System
- Project User
- Project Resource
Each of these roles will have the proper rights set up for each of the roles. Some additional configuration may need to be conducted to get the right security for your organization.
As a new user of Dynamics 365 CE Sales, there are some key navigational techniques that are necessary to know in order to follow the directions in the rest of this chapter.
Navigation notes
Some general navigation notes in Dynamics 365 CE will be important to have going forward. The following is the main/home screen as you log in to the Dynamics 365 CE Sales app:
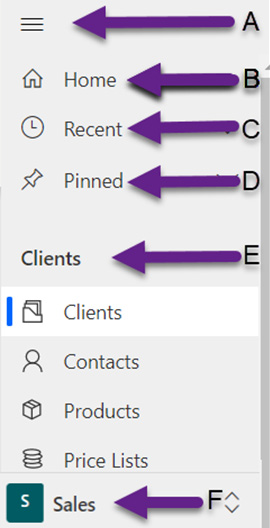
Figure 3.13 – Navigation tips
The following points correlate to each of the arrows in the preceding screenshot:
- A: The main Dynamics 365 menu bar navigation.
- B: The home screen will return you to your default home view/dashboard view.
- C: This will show you the screens and records you have recently accessed.
- D: This will show you the screens and records you have pinned to your environment.
- E: The menu grouping area, which shows you the menu items grouped together logically.
- F: The area menu will navigate you between the Sales, Service, and Training apps as they are published in the Published Apps section. Your Dynamics 365 CE instance can have multiple apps. Each app can have multiple areas, each area can have multiple groups, each group can have multiple subareas, and finally, each subgroup can hold a single entity, dashboard, or external URL.
While we have covered navigation at a high level, there are also personal settings that can be useful for your personal experience.
Personal settings
From the settings menu, select Set Personal Options; you will get the following screen:

Figure 3.14 – Set Personal Options
Here, you can set your user-specific, personal options that are relevant to you only, things such as records per page. I personally prefer the highest setting of 250 so I can view a larger record set when I initiate views in the system.
Each user in the system will want to check out these settings to get the best user experience.
To further understand the Dynamics 365 CE system, let's review the sales entities that make up the system.
Sales entities
The following are some of the main areas you will need to know about relationships in Project Operations overall:

Figure 3.15 – Dynamics 365 CE – sales entities
We've covered each of the navigational elements, so now let's review what some of the main sales entities are. The navigation is generally broken down into subareas that group your work together. So, we will review these from the top down.
My Work
The My Work section covers the things most pertinent to you, the signed-in user. This includes the following:
- Dashboards: This area provides you with the system-provided, custom, and user-configured dashboards that you can use to manage and drive the business. Dashboards are built off of views in the system and therefore are totally configurable to you. You can choose different presentation elements and types of dashboards to view. Select the dropdown to choose from various dashboards. Once enabled, Power BI dashboards can be added to the list to enhance the user experience:

Figure 3.16 – Available dashboards in Project Operations
- Activities: These are your activities that are due or becoming due of all types. Activities can be broken down into the following:
Tasks – Things to do
Email – Messages to send
Appointment – Calendar events
Phone Call – Calls to make
Letter – Letters to write
Fax – If using faxes, faxes to send
Service Activity – If using Customer Services
Campaign Response – If using marketing – campaign responses to activities in Marketing
Booking Alert – To notify you of new bookings in Project Operations
Customers
These are your client records we use to track company/customer levels of information. There are two types of customers:
- Accounts: The company-level information for customers you work with
- Contacts: The people-level information linked to the account so that an account can have many contacts related to it
Sales
The Sales area is where an Account Manager will spend most of their time. The sales area is focused around primarily business development and selling so you have the following types of entities you work with:
- Leads: New interests from potential or existing customers to buy your services
- Opportunities: Qualified leads that represent the monetary potential of the business
- Competitors: If tracking, the competitors that may be going after the same business
Collateral
The Collateral area will represent a few different things in Project Operations, but we will talk about them here from a purely Sales perspective:
- Quotes: After qualifying a lead, typically the client will ask for a quote of services or products to consider doing business with you. Quotes become orders in the next step of the process.
- Orders: In the Project Operations world, these represent project contracts. However, in a pure-play Sales world, they potentially relate to a product or service not related to projects.
- Invoices: Orders become invoices when the client accepts the order and you are now invoicing them for the goods or service.
- Products: Specific products you are selling, tied to price lists.
As you can see, these areas are all related to the overall Dynamics 365 CE – Sales navigation and usage of the system. As an overview, this gets you started. There are more supporting entities in the backend that are not visible in the app but are used in processing and can be added to the app by customizing the sitemap in App Designer. Now, let's expand into Project Operations on the Dynamics 365 CE side of things and outline the key considerations around Project Operations.
Setting up Project Operations
Pressing the Dynamics home button will take you back to Published Apps Menu. However, if, for some reason, you are missing any published apps, click the Sync button in the top right. This should refresh your view with all your apps.
In Project Operations, the view will have changed significantly, as shown here:
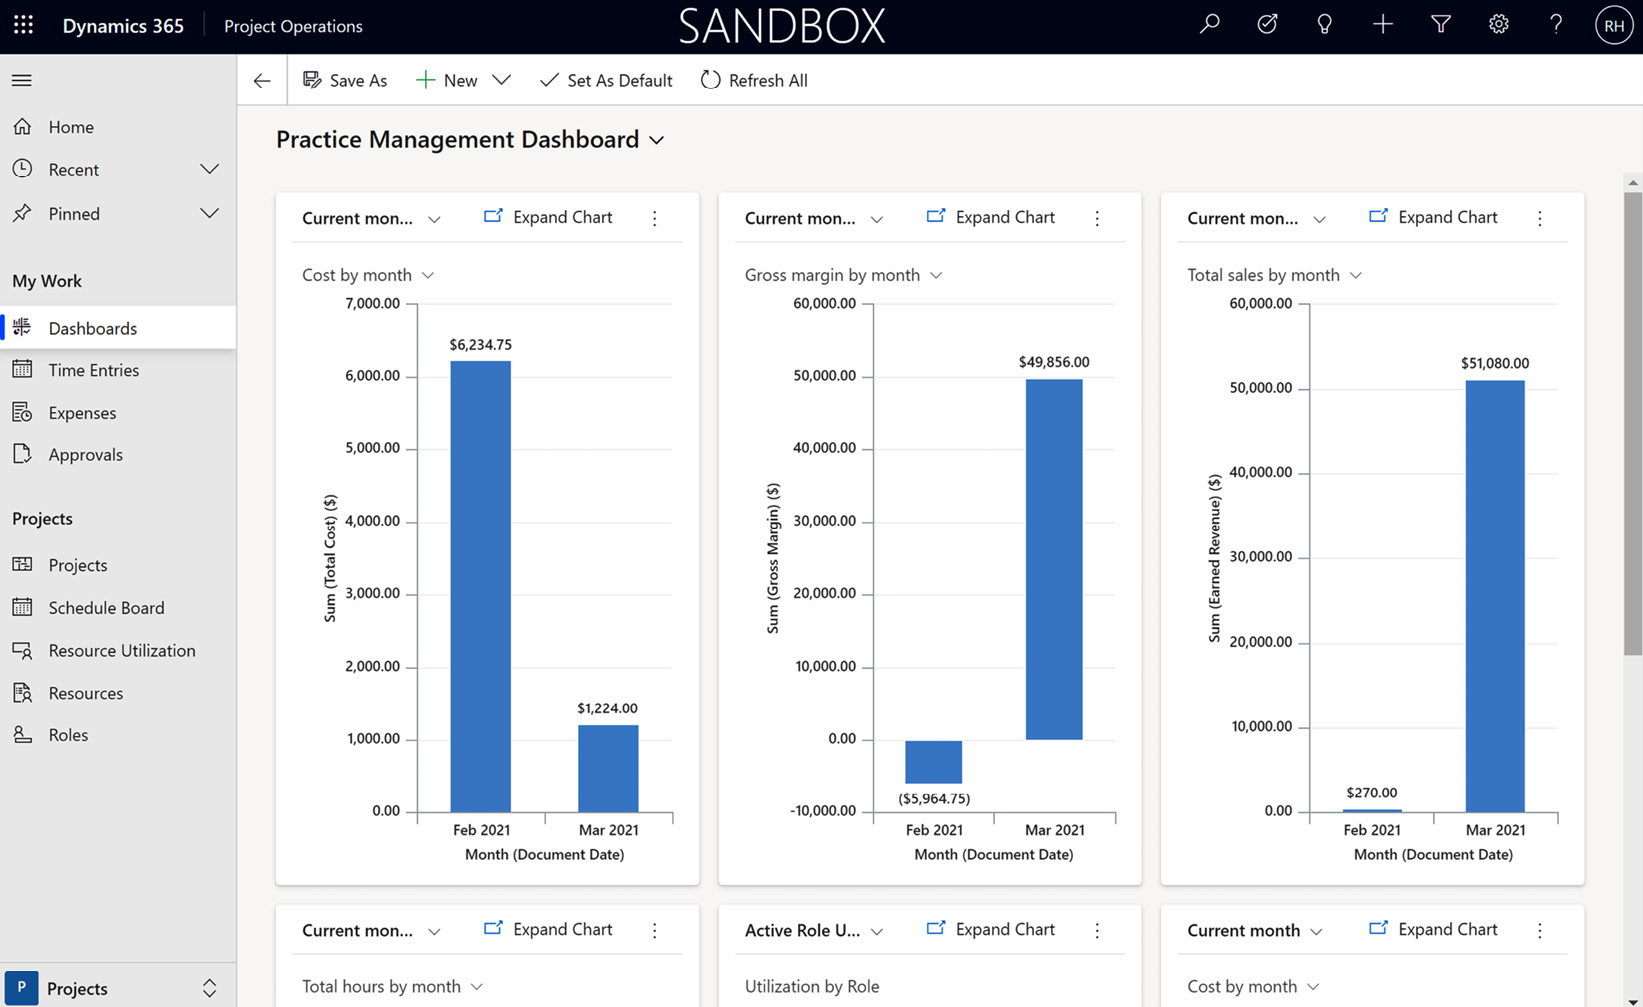
Figure 3.17 – Dynamics Project Operations home screen
Notice that some things have remained the same and some have changed. The overall navigation remains, as do the Home, Recent, Pinned, and other dashboard areas. Other things have changed, though, including the Project Operations entities:
- My Work
Time Entries – Timecard entry functionality for team members, Project Manager users, or anyone who needs to enter a timecard.
Expenses – Expense entry functionality for team members, Project Manager users, sales managers, executives, or anyone who needs to enter expenses.
Approvals – For time and expense, the approvals drive the behaviors behind each of the time and expense records. For example, some times or expenses may be approved and some rejected, based upon policy and criteria.
- Projects
Projects – The main navigation page for viewing, entering, and managing the outstanding projects in your firm.
Schedule Board – The main board, which will show you the schedule by team, skill, role type, or any number of setup criteria that your firm needs. It shows projected utilization and over-utilization so you can keep the team busy but not over the top.
Resource Utilization – The main tracking mechanism to show historical utilization in the system. This shows historical actual work performed based upon time entries.
Resources – These are the team members who make up your project team.
Roles – These are the roles that define what kind of work a team member can do. Team members can have multiple roles and those roles can have different cost and selling prices by the organizational unit.
Now let's take a look into the Resource Manager view of Project Operations.
The Resource Manager view of Project Operations
To navigate to the Resources area, in the lower left of the menu screen, select Resources:
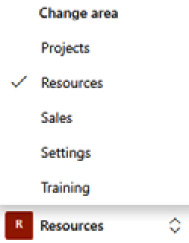
Figure 3.18 – Resources
We now see there are a number of additional entities that are visible. We've seen some of them before, since this is intended to be a person's main screen that they would log in to to do their work. So, as a Resource Manager user, these are some of the key areas I work in:

Figure 3.19 – Dynamics Project Operations Resource Manager menu
Some of the key elements of a Resource Manager user's view include these:
- Resources
Requirements – Requirements are generated by the Project Manager user, who looks at a project and the generic requirements and generates project requirements that state the role type and the number of hours needed to fulfill a task for the project. These requirements then feed into the Schedule board for resource fulfillment.
Requests – A step before requirements, generally a request is a submission to the Resource Manager user to fulfill what is to become a requirement.
Bookings – Whether using hard, soft, proposed, or some other naming convention, a booking is a commitment of a specific resource (a team member) to a task.
- Settings
Roles – Roles are entities that tie together pricing, team members (resources), skills, and others to work together in the Schedule Board and all throughout the system.
Skills – What comes under this may be identified as skills, certifications, characteristics, or simply adapted to whatever naming convention your firm may have. Skills are user-configurable and have multiple levels of proficiency.
Proficiency Models – Coupled with skills, proficiency models drive the level of skills attained by the resource.
Priorities – The priority levels used throughout Project Operations are outlined here.
Requirement Statuses – The statuses of requirements in Project Operations are outlined here.
Booking Statuses – The statuses of the bookings in Project Operations are outlined here.
Scheduling Parameters – The main settings screen for resource scheduling, including refresh intervals of the scheduling screen and other parameters.
The Resource Manager user's view will provide them with the most important screens for a resource manager or a resource management office. Remember, you can also add or remove screens to this view as well.
The Sales/Account Manager view of Project Operations
There is another area, Sales, specifically designed for the Sales/Account Manager user to work in. It contains all the relevant screens to drive the sales efforts of the firm. Some of them we have already reviewed, so let's look at the material relevant to Project Operations:
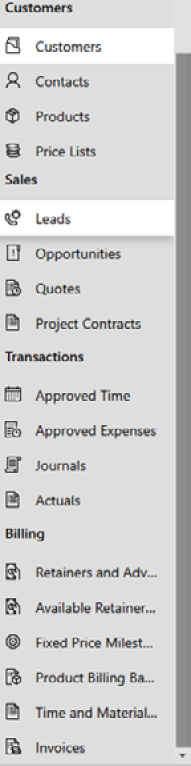
Figure 3.20 – Dynamics Project Operations Sales/Account Manager menu
Customers
Of significance to this section are the price lists, which drive the pricing that is specific to the firm (such as a rate card) and the pricing that is associated with a specific client or down to a specific project. This is called multi-dimensional pricing.
Alongside the price lists are the project contracts, and the associated lines and line items drive all the selling prices related to the project.
Transactions
In the Transactions section are a few areas of significance to discuss:
- Approved Time is a view into all approved time in Project Operations and has multiple views to see the information you need.
- Approved Expenses is a view into all approved expenses in Project Operations and it too has multiple views.
- Journals contains journals, which are used either as a correction from the approved actuals (time that was entered and approved) or other transactions; journals aggregate and post accounting system-level information.
- Actuals has information on the production of actuals resulting from approved time, expense, or other entries into the system; the actuals are part of the accounting system information.
Billing
The Billing section will generally be accessed by the project accounting team or others who work through the billing processes:
- Retainers and Advances is where to go to set up retainers or advances. It combines with Available Retainers and Advances, which is a view used to view the outstanding retainers and advances.
- Fixed Price Milestones is where to go to set up fixed price milestones in the system.
- Product Billing Backlog is used to view any not-to-exceed projects.
- Time and Material Billing Backlog is used to view any time and materials billings in the backlog.
- Invoices is where to go to view all invoices in the system.
Project Operations system settings
The Project Operations system has system-wide settings specific to Project Operations functionality:

Figure 3.21 – Dynamics Project Operations system settings menu
The following are the system-wide settings you will need to consider in Project Operations. This section sets up some of the system-wide functionality that will be used as part of the Project Operations system:
- Parameters: Allows you to enable multi-currency cost price lists, default organizational units, invoice frequency, default Project Manager and team member roles, and work hour templates and resource allocation modes.
- Organizational Units: This is where you set up each organizational unit, the unit's currency, and (a very important costing function) the cost price list for the roles that are related to this organizational unit – for example, different costs by country or region with different currencies.
- Transaction Categories: Here you set up unit groups and billing types, such as chargeable, non-chargeable, and complementary, to be used with pricing and billing customers.
- Expense Categories: Here you determine the various expense types that are then associated with expense reports.
- Invoice Frequencies: Here you determine the billing frequencies in the Project Operations system.
- Recurring Invoice Setup: Here you set up the batch jobs to perform recurring invoices.
- Calendar Templates: Here you define your default working times for a work template.
As you have seen, there are a number of areas that drive functionality within Project Operations. While that is great, there is also a need to make system-specific changes to support business needs. This is where customization comes into play.
Dynamics 365 CE – Sales customizations
We are going to begin with the baseline setup of Dynamics 365 CE – Sales. Note that without this information, you will not be able to work through the rest of the system. For example, to sell a contract, you need to have accounts (customers or clients) in the system. Let's begin with some baseline configuration changes, decisions that will help you go forward.
Customizations and configurations
There are a number of customizations and configuration changes that will help to make Project Operations a more friendly environment for your users. Microsoft has made Project Operations somewhat generic, counting on the partner community and the clients of Project Operations to further tailor it to their businesses.
Dynamics 365 Project Operations uses the process of solutioning each group of customizations as a way to perform customization in, for example, a development system, and then transfer into a test system for testing before a final transfer into production for production usage. This solutioning capability provides portability and future-proofing of the customizations that you create for your firm. This can be automated with an Azure DevOps Continuous Integration/Continuous Deployment (CI/CD) pipeline.
So, let's create a couple of example customizations to learn from that we can use throughout our solution.
Let's begin with a very practical application.
Changing Account to Client
One of the first things you will want to perform as the system customizer is to create a solution in CE to begin compiling your changes into. Use solutions to extend the capability of Dynamics 365 and group together your customizations so that you can build them in a development environment (sandbox) and test them in a test environment (sandbox) before applying them to a production environment. This will greatly benefit the overall development strategy and will help you move customizations around:
- To begin, navigate to Advanced Settings | Settings | Customizations | Publishers to create a new publisher for your customizations.
- Next, navigate to Advanced Settings | Settings | Solutions as shown here:

Figure 3.22 – Solutions
- From this area, select New and fill out the fields as follows:

Figure 3.23 – New solution creation
- From within this new solution, select Add Existing and then choose Entity. Choose the Account entity and select OK. Next, click (in the upper right of the screen) Add All Assets. Click Finish. Then, if you see a Missing Required Components box, choose Yes, include required components. and click OK.
- Now, open the Account entity and change the display name to Client and the plural name to Clients. Next, select the Fields icon under Accounts and rename Display Name for Account to Client.
- Let's now change the form data. Click on Forms and choose the Account form. Change Account Name to Client Name as shown here. Also, while you are here, change the Section name from ACCOUNT INFORMATION to CLIENT INFORMATION:
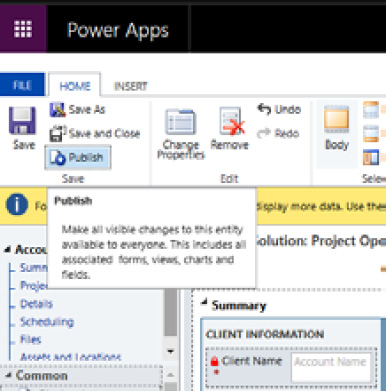
Figure 3.24 – Changing Account to Client
- Alternatively, you can change the field name in App Designer as shown here:

Figure 3.25 – Changing Account to Client in App Designer
- Next, click the Save icon and then the Publish icon.
Next, navigate to admin.powerplatform.microsoft.com and log in. Note that you may want to use Chrome/Incognito mode for this. Find and select the horizontal ellipsis to choose OPEN IN APP DESIGNER:
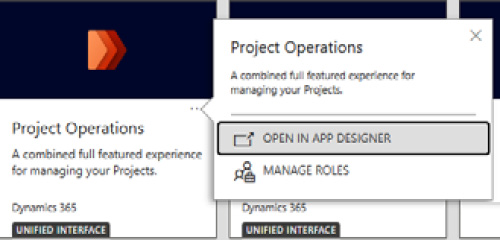
Figure 3.26 – App Designer mode
- Once in App Designer, choose to edit Sitemap. Change the Customers section to Clients and change Customers to Clients. Click Save and Publish:
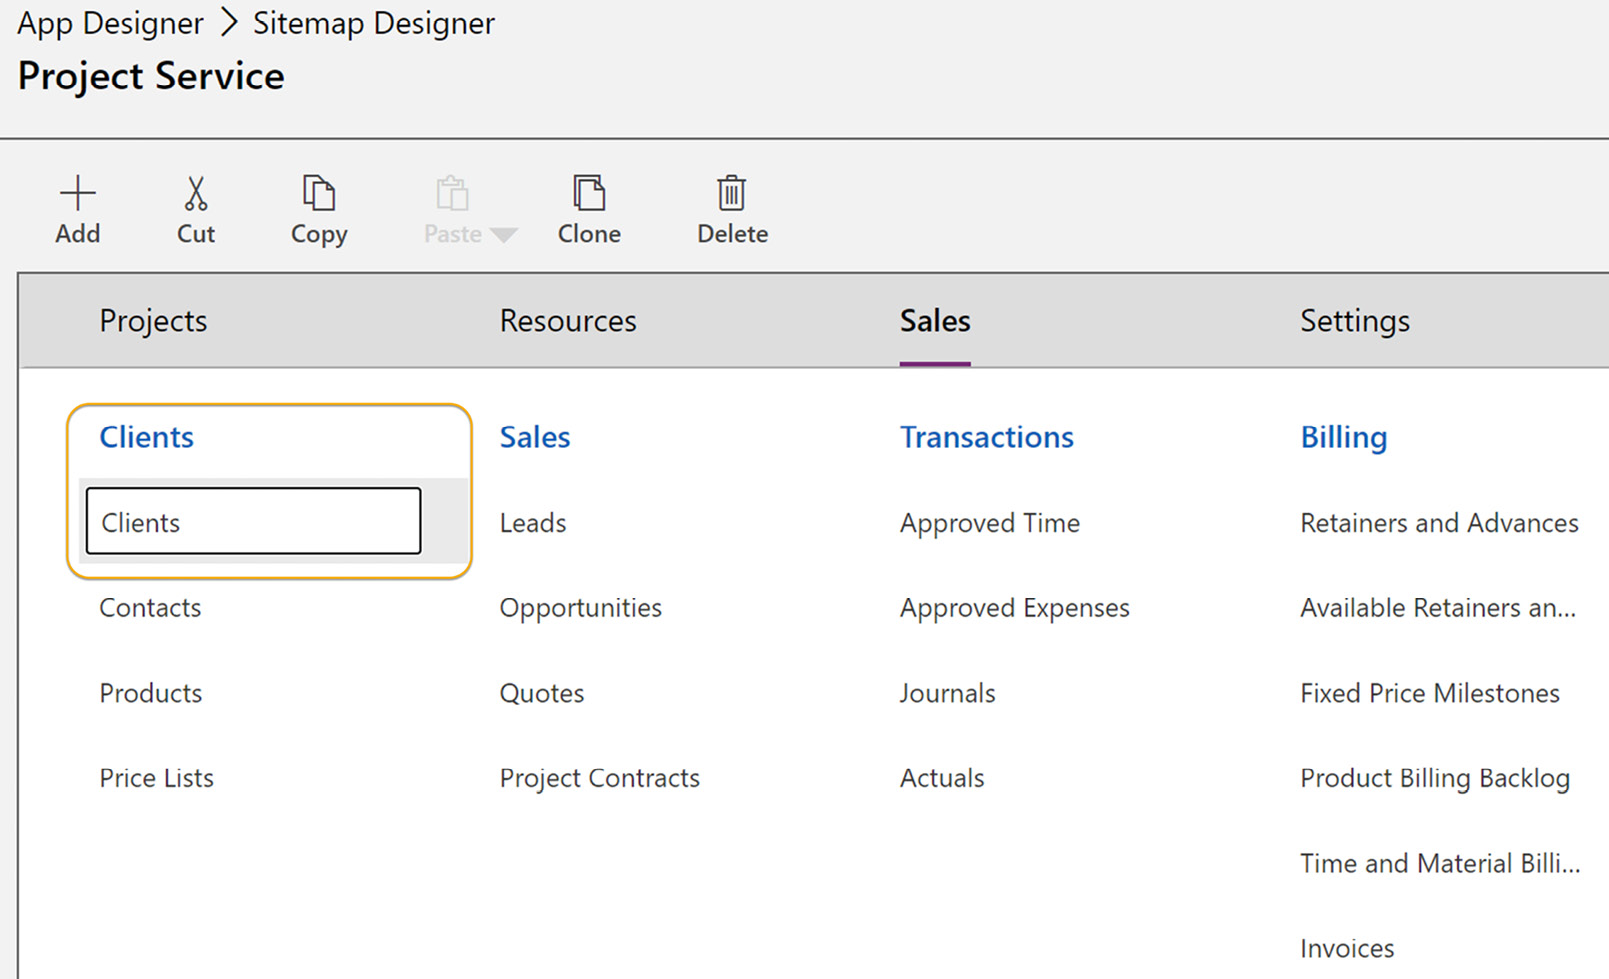
Figure 3.27 – Sitemap changes
- This should now have renamed your menu section to Clients in Project Operations – Sales and your form should be all cleaned up to represent the Client nomenclature versus Account:
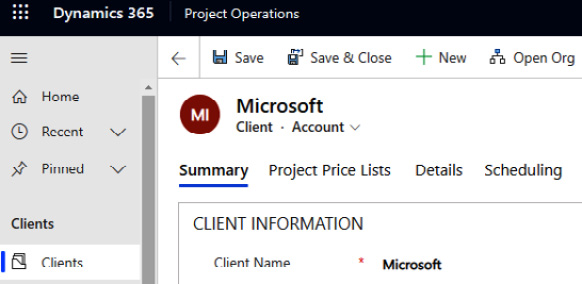
Figure 3.28 – Resulting change from Account to Client
Although to some, this seems like a small change, the implications for user adoption of the system are tremendous. Similar terminology changes will provide great communication across the teams using the same words.
Opportunity customizations
Using the same solution as you used for the prior customization, we will add the Opportunity entity to the solution so that we can add some specific customizations that will be used in the Lead to Opportunity business process flow.
Following the same steps as before, add the following fields to the Opportunity entity:
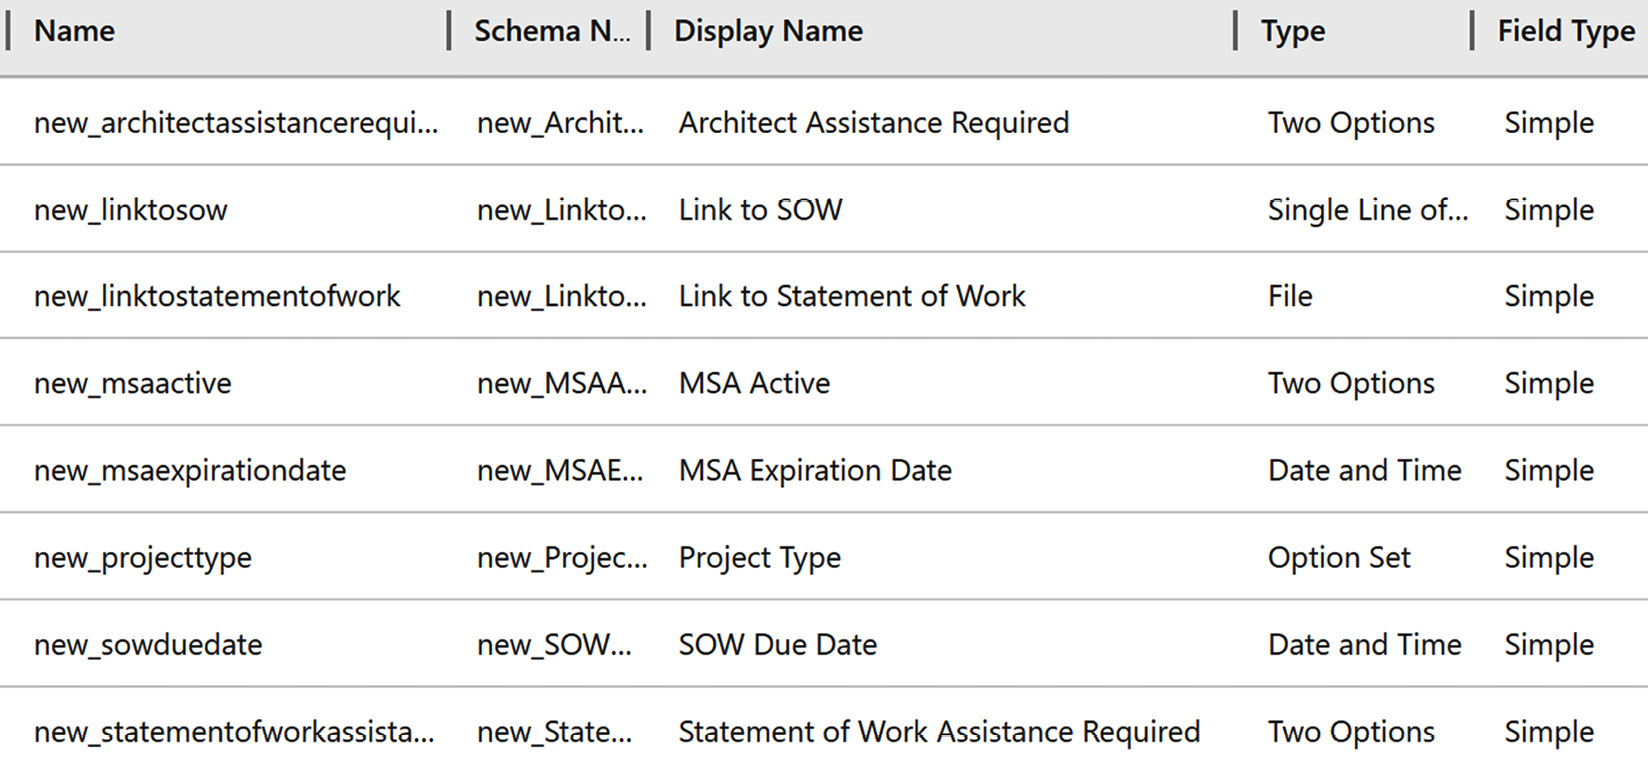
Figure 3.29 – New Opportunity fields
Creating these customizations (and any similar customizations you require) will greatly enhance the system, and they will be available to business process flows.
Business process flows
We are now going to modify the business process flow to give your users a guided selling experience through sales stages and process flows.
Using the Advanced Settings | Settings | Apps menu, open the Project Operations app in App Designer and select the business process flow to configure Lead to Opportunity Sales Process. Select the edit pencil to edit the sales process:

Figure 3.30 – Editing the Lead to Opportunity sales process
As we will see in the rest of this chapter, this is the main business process flow that will outline for you the specific steps (required, recommended, or optional) that will help the Account Manager user perform their tasks.
Some common changes in Stage 1 – Lead Qualify are as follows:
- Change Existing Account to Existing Client.
- Change Purchase Timeframe to Project Timeframe.
- Change Purchase Process to Decision Process.
Note
After each individual change, be sure to click Apply!
Some common changes in Stage 2 – Opportunity Develop are as follows:
- Change Customer Need to Client Project Requirements.
- Add a data step to include the Project Type custom field that you just created.
Some common changes in Stage 3 – Opportunity Propose are as follows:
- Change Identify Sales Team to Identify Project Team.
- Add a data step to include the Architect Assistance Required custom field.
- Add a data step to include the Statement of Work Assistance Required custom field.
- Add a data step to include the SOW Due Date custom field.
Now, click Validate and then Update. Return to the main Project Operations App Designer page. In the upper right, click Save and then Publish.
Perform the same types of changes for Project Service – Opportunity Sales Process. Also, add a stage between Qualify and Propose and name it Opportunity SOW Information. Set Category to Develop and Entity to Opportunity. The end result should look like this:
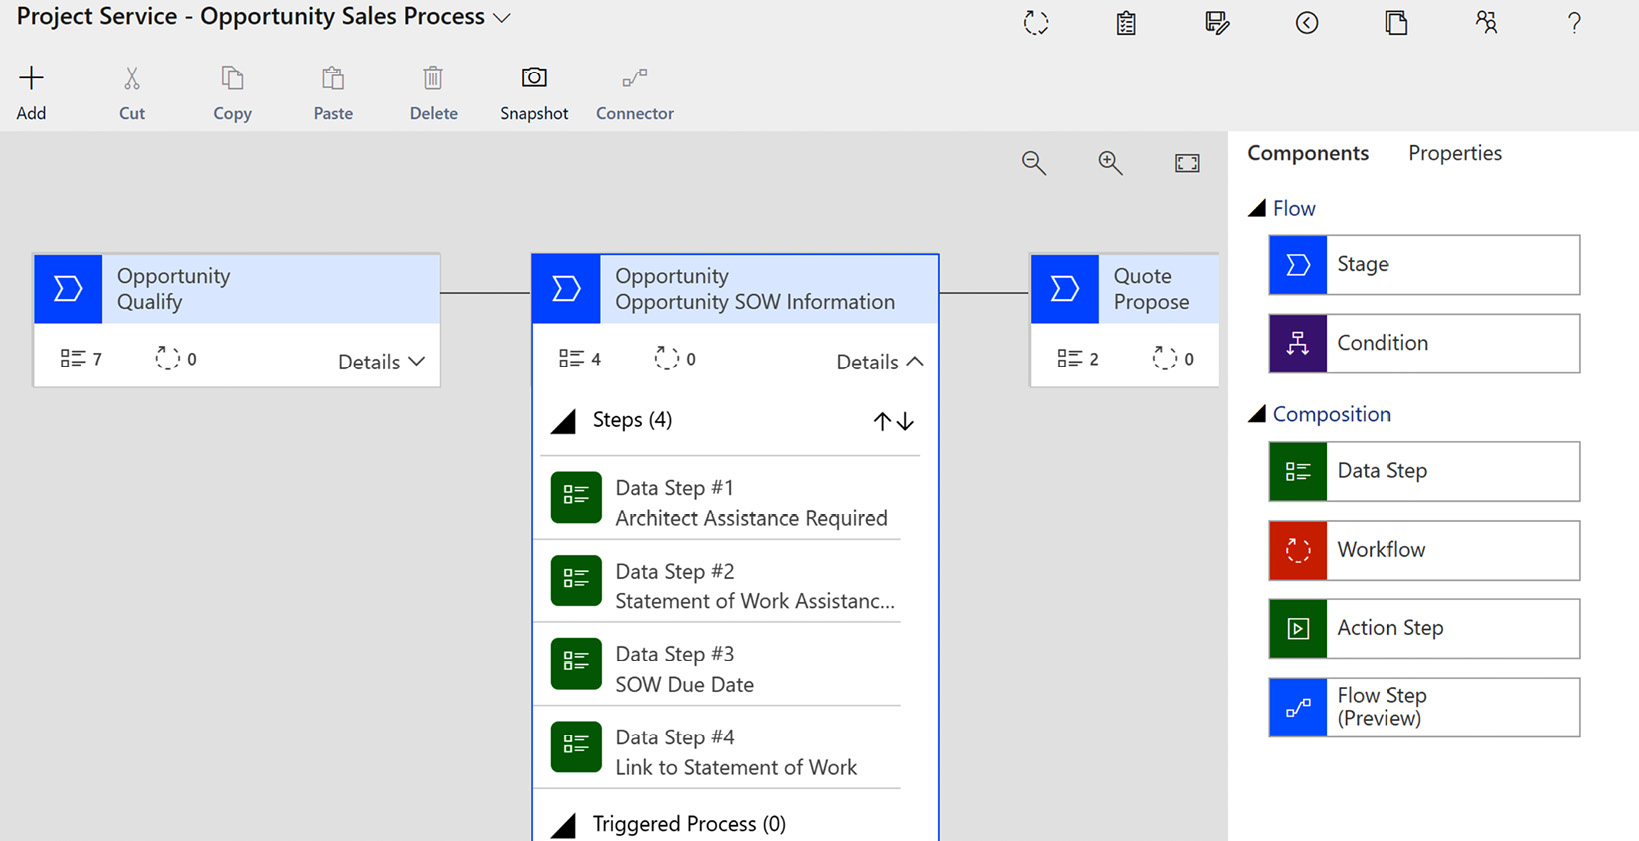
Figure 3.31 – Editing Project Service–Opportunity Sales Process
These are just a few of the customization and configuration changes that you may want to make to further benefit a Project Operations deployment. The intention here has also been to give you an idea of some of the things that you can do in the Project Operations system to make for a much better deployment across the firm.
It is also possible to add steps to the business process flows by clicking the + Add button as shown here.
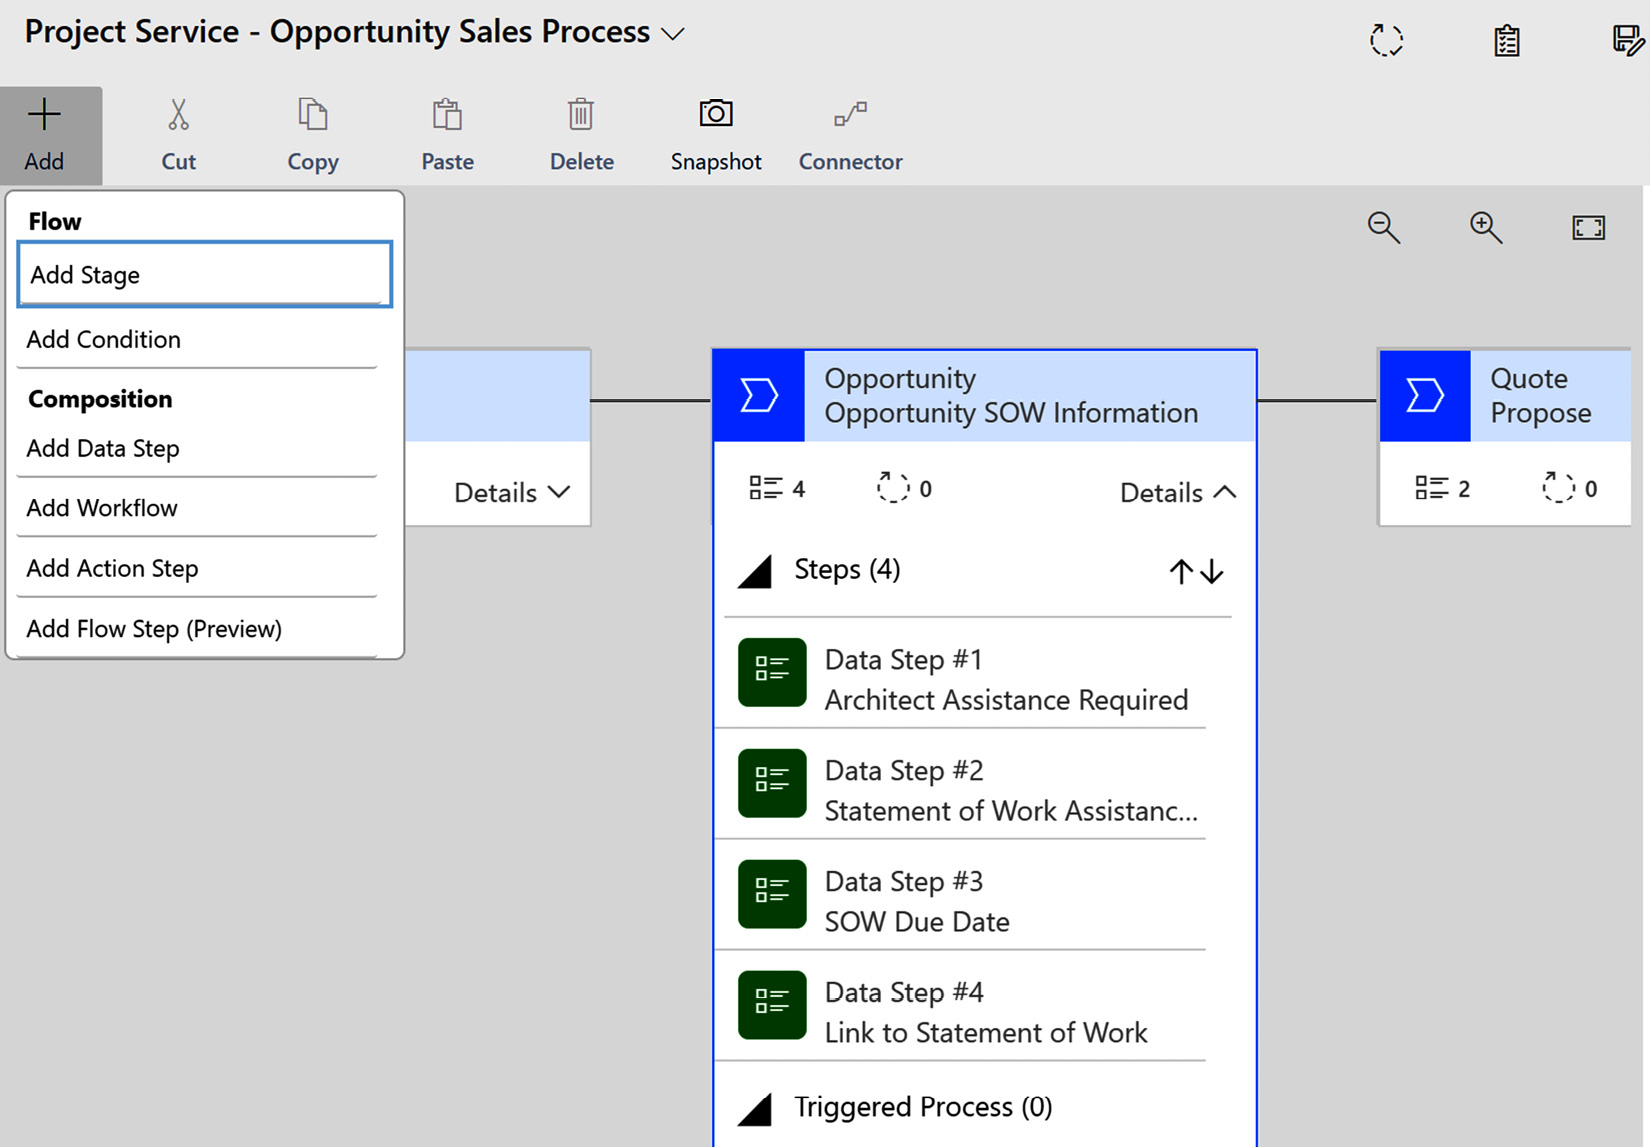
Figure 3.32 – Adding Stages and Steps
The foundation of the system will be the data brought in through your data migration strategy. Therefore, let us look into this further.
Data import
Now that we have set up some users, let's bring in some data to use in the system. The key entities we wish to populate are as follows:
- Account: We will customize this to be called Client. These are the company records for the companies you do business with.
- Contacts: These are the people related to a client record whom you need to maintain contact records with. For example, you may have Bob Smith and a phone number, but you may also track their Skype ID or other forms of communication in their working-from-home environment.
- Leads: These are the initial information records of potential new customers of your business.
- Opportunities: Typically, these will come in as either open opportunities from your current system or newly created opportunities.
To begin importing data, navigate to the Advanced Settings | Settings | Data Management area as shown here:

Figure 3.33 – Data Management
Within Data Management, select Templates for Data Import to create a template for Clients and Contacts. Select Client (note how it has been renamed from Account) and click Download. Repeat this for Contacts:
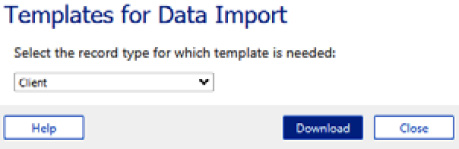
Figure 3.34 – Data import template
The files are now in your download folder to save for importing. You can begin by populating the Client spreadsheet in Microsoft Excel. Notice as you navigate through that there are prepopulated drop-down fields where there are specific values needed to input. This allows you to easily identify the values needed in the records. Furthermore, each field is named according to its purpose. If you added new fields, the template will be aware of those changes and will populate those fields into the template as well. To use this Excel file, select File | Save as and save as a CSV file format. This is the file format Microsoft uses to import.
Some key things to note
If you are populating the CSV file programmatically, be sure to populate the spreadsheet/CSV file as though it was manually input. For example, a client of mine recently entered NULL where there was no data. That is problematic since the import function does not know how to process NULL, and thus we changed the NULLs to blanks… and no values were entered into the fields.
Now we can import the data through the Imports process. This wizard-driven process provides you with the necessary, easy-to-follow steps to bring your data into the system.
For our process, we are going to bring in Clients first so that when we bring in Contacts, we can link to Clients directly. So, the first step is to import Clients. From the Imports screen, choose Import Data and follow the prompts from the wizard. During the import, we typically choose and use automatic mapping. Furthermore, at the end of the wizard, you can choose the option to allow or disallow duplicates and select an owner for the records.
Optionally, you can save the options you have chosen as a data map name that can be reused.
Next, import the contacts that link to the clients. Upon completion of these steps, you will have the foundation you need to use Project Operations:
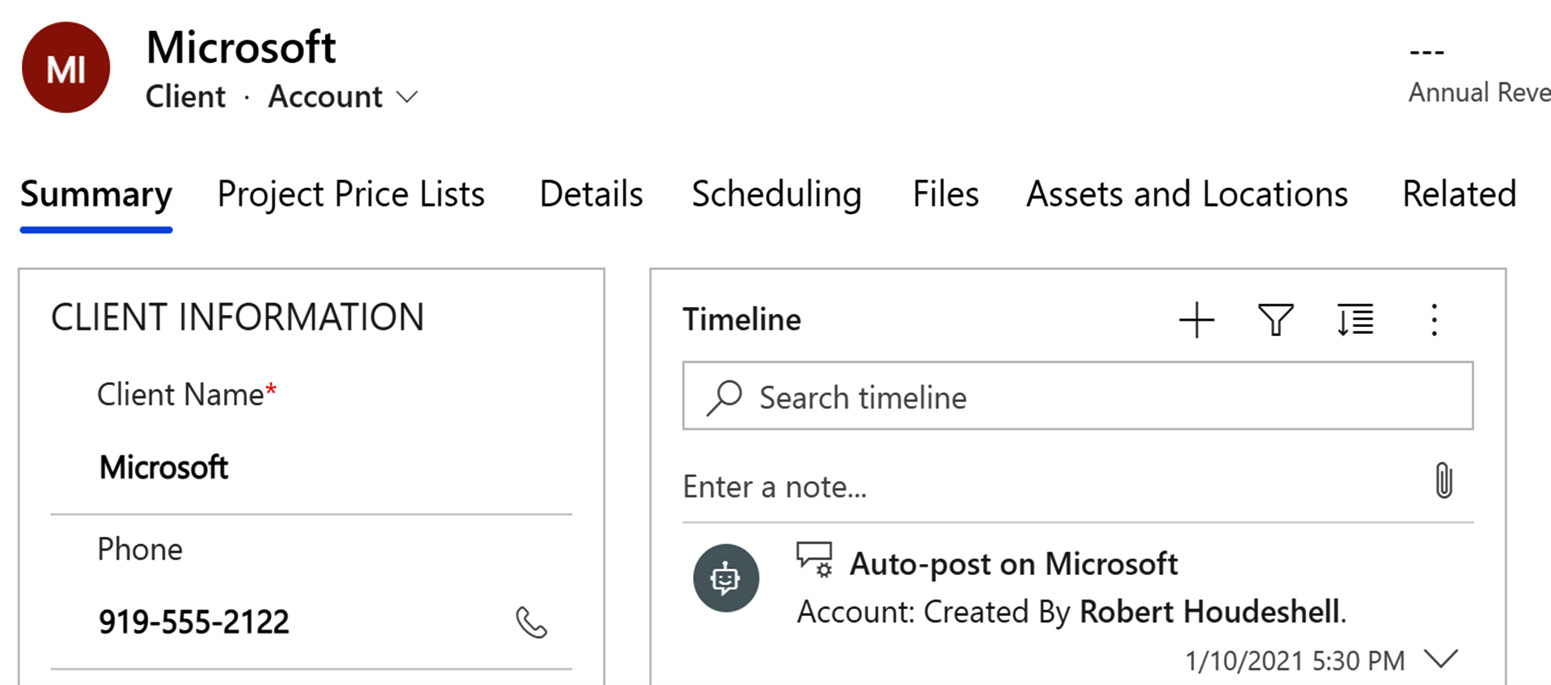
Figure 3.35 – Client information after import
This same process can be followed for both Lead entities and Opportunity entities to bring them in for an initial load. For Lead entities, however, many clients choose to have their frontend marketing lead generation tools integrate directly into the Lead entities so that they can be automatically routed for sales activities and follow-up.
Now that you have a good understanding of some key data import routines, you can use this same approach for anything that you wish to populate in the system. Some of the things that you may run into when importing data are complex lookup requirements when mapping fields in the data import wizard. For example, you may have contacts that you have already imported and you need to look up a contact to set a Primary Contact field.
Furthermore, you will definitely want to import a number of records for Project Operations or have them integrated into the system through some other method. These records include, but are not limited to, the following:
- Resources: Your team members.
- Roles: Chargeable and non-chargeable characteristics, which relate to the roles your team members will perform.
- Skills: These are the skills inventory lists that are needed to help find the right people to work on a project using the Schedule Board.
- Client-level price lists: Specific rates for a client.
- Project-level price lists: Specific rates for a project.
- Open project contracts.
- Open projects.
Ongoing data integration is a key need and requirement of any Project Operations implementation. Therefore, let's take a look into this topic.
Integration strategies
There are some areas that will just make sense to integrate through Project Operations. Some of them are on the input side of the system and include the application of sales tax logic, which will affect the invoicing that your client receives. When considering this topic, first search Microsoft's AppSource (https://appsource.microsoft.com/) to determine whether there is an ISV that integrates readily.
A number of clients will also want to integrate their expense entry and reporting system. Some systems, such as Gorilla Expense, Expensify, and Concur, have varying levels of sophistication, but all of them can be integrated into Project Operations. However, look for out-of-the-box integrations first and then build upon that if available. Project Operations integrations with expense systems are typically a multi-directional integration where Project Operations feeds the expense system with projects, tasks, team member information, and other information that is used in the entry of expenses. Then, the resulting approved expense reports integrate back into Project Operations for costing information.
Across ERP systems, Microsoft has two of the most prevalent integration approaches from Project Operations to Finance and Operations for functions such as billing, revenue recognition, project costing, and others.
Microsoft's Data Integrator is a scheduled, asynchronous, one-direction solution that results in duplicated data across the CRM/Project Operations and Finance and Operations system. It works well with bulk data and is change tracking-enabled.
In Chapter 2, the Using Microsoft Dynamics 365 Framework for Success, we learned about Dual Write as an integration technology. As an out-of-the-box integration technology for Project Operations, Dual Write is near real time, synchronous, and bi-directional. Although it too results in duplicated data, it is business logic-enabled and single transaction-enabled, which makes it the solution for out-of-the-box integration.
There are a number of different integration tools and technologies, including at the enterprise level, using an enterprise service bus technology that is API-driven and results in a high-volume, high-fidelity data integration platform.
Summary
In this chapter, we learned that there are a number of firm-driven decisions that can result from the questions we asked in the first part of this chapter. One of the key questions we asked was about working with a Microsoft partner who can help drive the success of a deployment. Knowing how to approach the deployment options will be key to the success of your project.
We outlined three different deployment options, ranging from a lite deployment to a resource/non-stocked deployment or a stocked/production deployment. We learned the differences between them and when to use them. Furthermore, we outlined how certain non-Dynamics CRM and ERP components fit into deployment scenarios. We also outlined the upgrade path for customers who have previously used Project Service Automation. Your choice of deployment option will directly impact licensing as well as the full implementation.
We walked through the setup considerations of the Dynamics 365 CE Sales system and then thoroughly reviewed all the elements of Project Operations before tying this together with the high-level steps for implementation. To improve the system for professional services firms, we introduced some customizations and walked through some data migration examples. This should have helped you to understand some key concepts.
Also, we customized the client entity and business process flow, and we identified how to most effectively make Dynamics 365 CE a solution that works for your firm. This will drive user adoption and the success of any implementation.
In the next chapter, we are going to get hands-on with each of the steps needed to configure project selling and outline a path for success in using the system.
Questions
- Is an Office 365/Azure AD required to use Project Operations?
- Is Microsoft Dynamics 365 CE – Sales required to use Project Operations?
- Is Microsoft Dynamics Finance and Operations required to use Project Operations?
- Which deployment type utilizes only Dynamics 365 CE and Project Operations in the CE environment?
- Which deployment type provides you with full expense policy management, the ability to scan receipts with OCR, the ability to create customer-facing tax integrated invoices, and revenue recognition?
- What is the first step in setting up Project Operations?
- What is the https://admin.powerplatform.microsoft.com/ site used for in setting up Project Operations?
- In Dynamics 365 CE – Sales, where do you set up numbering sequences and other advanced settings?
- Where does a user set up their personal preferences?
- In Project Operations, where do you set up Project Operations-specific settings?
Further reading
- Read more on specific deployment types at https://docs.microsoft.com/en-us/dynamics365/project-operations/environment/determine-deployment-type.