
Chapter 5: Project Contracts and Pricing
In the previous chapter, we learned how to create project opportunities through the business process flow and about various other capabilities of the system that will guide an account manager through the processes of selling.
In this chapter, we are going to follow an opportunity through to the contracts and contract types that will drive the billing and revenue recognition of the project we are selling.
This chapter will show you how to set up contracts that will represent the types of work your firm does and build pricing models to support all levels of pricing. Whether your client projects are easy to set up or complex, with mixed line-item types and multidimensional client-pricing models, this chapter will cover it.
In this chapter, you will learn about the following concepts:
- Understanding the workflow from opportunity to project contract
- Implementing project contracts and contract lines
- Contract types (time and material; fixed-price; not-to-exceed; retainers)
- Developing price lists and custom price lists
- Exploring roles and role types to control pricing
By the end of this chapter, you will fully understand the opportunity-to-quote-to-contract workflow and its implications for selling. You will be able to implement project contracts, contract lines, relationship-to-price lists, and projects. You will learn to develop standard price lists, custom price lists, roles, and role types to control pricing (chargeable, non-chargeable, and complimentary). The intersectionality of these components will help you to create multidimensional pricing.
Technical requirements
To perform the tasks in this chapter, you will need the following:
- An Microsoft 365 account and an Azure Active Directory (Azure AD) login
- A Microsoft Dynamics 365 Project Operations Customer Relationship Management (CRM) license
- A Microsoft Project Plan license
Please visit the following link to check the CiA videos:
Understanding the workflow from opportunity to project contract
As we saw previously in Chapter 4, The Account Manager – Project Selling, our opportunity in the Customer Engagement (CE) system resulted in a quote and quote lines that mirrored this opportunity. The quote was produced and sent to the customer in Portable Document Format (PDF) format while simultaneously storing the quote on the timeline so that others who might pick up somewhere in the middle of the process would still be able to see what had been done, each step of the way.
At this point, it is important to talk through the process flow as it relates to the Project Operations system. In the Dynamics 365 CE – Sales system, when we are selling a product, we have a process that is very similar to ours in which we are producing a quote, then a quote becomes an order, and an order becomes an invoice.
The Project Operations process is different—it is a quote to contract invoice(s), meaning multiple invoices for a project. The difference is that a project will produce invoices potentially upon initiation, definitely throughout the project, and at other points in between. This depends greatly upon the contract type. In our example, which we will explore throughout this chapter, we are going to begin with a fixed-fee contract type, which is very simple overall from a billing standpoint. However, from a revenue-recognition standpoint, it can be much more complicated.
Our work example is going to introduce an additional complexity of a time and materials contract for out-of-scope work. Our assumption in the fixed-fee contract is that it is a fixed fee and a fixed scope. Therefore, if there are any items the client wants to have us perform against but that are not part of the scope of the project, we will bill those against the time and materials contract.
We are now going to need to take our project quote and close it as won in order to progress through the system. When we do, we are going to work with a project contract that, if you look closely at the system, is a variation of the sales order that is used in the product-based scenarios in CRM/CE. This same entity is used for project-based work and has related line items associated. How Microsoft accomplished this is to utilize the Project Operations solution to produce multiple forms and default specific forms in the sitemap in Dynamics 365 CE. This ties together the concepts you worked through in Chapter 3, The How-Tos of Setting Up Project Operations (in the Customizations and configuration section), and the work with the sitemap for the Project Operations app.
Therefore, let's get started by first closing the quote and marking it as won!
Implementing project contracts and contract lines
We now have a project contract in the system that relates to the quote and opportunity we worked with previously. In Figure 5.1, you'll notice that these previous documents are easily accessed with a hyperlink click, thus keeping everything front and center for your benefit.
The project contract
The project contract is a grouping of project contract lines, milestones, and roles that result in the financial impact of a project on a firm. Therefore, as shown in the following screenshot, this project contract drives all further financial activity in the system:

Figure 5.1 – The project contract header showing key fields
There are a lot of additional details that you may want to complete. Remember that you can add fields through customizations and configuration, or update existing field definitions as per your business requirements.
Project contract lines
Project contract lines are used to provide additional line-item detail for contracts.
When navigating to the project contract lines section, we get a view of both the project contract and the product lines on one screen. By opening the New Project Need project contract line we created, we now have the ability to tie this together with other assets in the system—namely, the project we will manage. We will further set up invoice schedules and define our billing around this project.
First, from the contract line (order line), let's create a project to link this contract with, as shown in the following screenshot:

Figure 5.2 – The project contract line: Project link
As shown in the preceding screenshot, click into the Project field and select + New Project, which will initiate the new project Quick Create screen, as illustrated in the following screenshot:

Figure 5.3 – The project Quick Create screen
Note
The contract line and project combination must be unique. Duplicate combinations are not allowed.
Although for this first contract line we are using a billing method of Fixed Price, we can also use the Time and Material billing method on another, distinct contract line. We are going to review this scenario shortly.
The billing method drives the contract types that are available within Project Operations. The contract types are as follows:
- Time and Material: A contract type where you bill out time at an agreed-upon rate and bill out materials or expenses at agreed-upon rates.
- Time and Material Not to exceed: This allows you to place a not-to-exceed limit or a cap on a project.
- Fixed-Price Lump Sum Billings: A specific scope and price for a project set contractually with the client.
- Fixed-Price Milestone Billings: An invoice schedule produces milestone billings, which allow you to bill out according to milestones specified in the contract.
- Fixed-Price Date Based Billing: Invoice schedules allow you to bill out based on an agreed-upon schedule.
- Fixed-Price Retainers: Project contract line details give you the ability to bill out retainer fees and expenses.
Additional considerations for the project contract line are outlined here:
- Chargeable roles: Identifying roles we are going to bill for on the contract
- Chargeable categories: Identifying which expense categories (along with Fixed Price – Contract Line Details) will be billed
In the Project field, either enter the project (which may already be defined) or create a new project to use as the management tool. The result should be a project that looks like this:

Figure 5.4 – The project that is linked to the contract line
The reason we need the project is to have something to enter the time against, as we have team members working on the project.
Next, we need to create an invoice schedule from the contract line. For this type of project, we are going to have three invoices, two for $50,000 and one for $25,000, representing the entirety of your milestones. Now, you may wonder: why milestones? Typically, a milestone project is designed to have either a date or a deliverable become the milestone or marker within the project, to say we are going to conduct a billing event.
Note
Milestones of the ancient kind could be found across the former Roman Empire and have recently been unearthed in construction projects. Milestones such as mile markers on our modern roadways marked the distance traveled on a road. Our milestones are a little more modern!
Our billing schedule is set up to reflect the initial billing being conducted in March and the final billing being conducted in May. In all instances, the billing is generated on the seventh day of the respective months, and that was set up within the Invoice Frequency setting. The invoicing frequency drives the monthly billings of the project.
You can see the Invoice Frequency setting in the following screenshot:
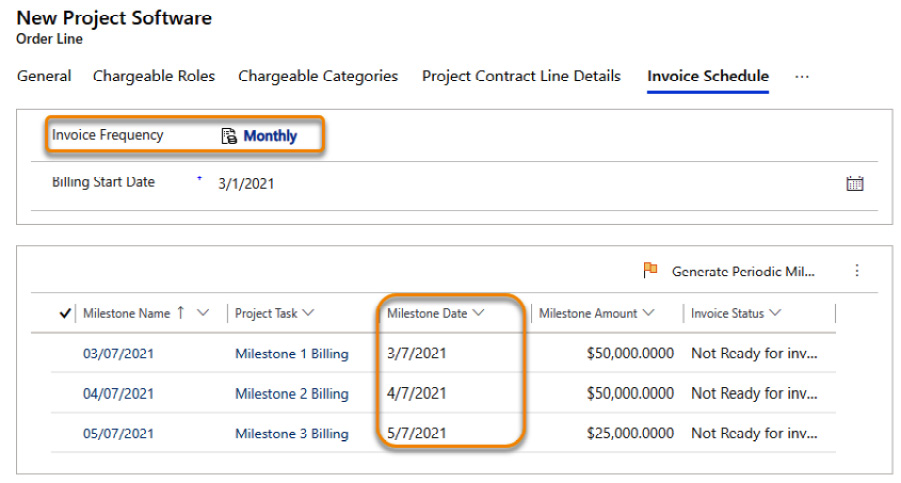
Figure 5.5 – The billing milestones
This project is running off a Monthly invoicing frequency. You can have different invoicing frequencies representing different business requirements. An example may be where you are billing a subscription on a specific day of the month but labor on a different day. You may also have different business units billing on different days. The Invoice Frequency setting provides you with this capability.
Since we have three milestones, we are keeping our tasks simple as well. When we are working on a project that is fixed-fee, we still have chargeability concerns regarding the tasks. We will get into chargeability more as we explore roles a little later on.
For now, though, note that since you added a project task to the Invoice Schedule, there are respective Chargeable Tasks that are being used in this contract line, as shown in the following screenshot:
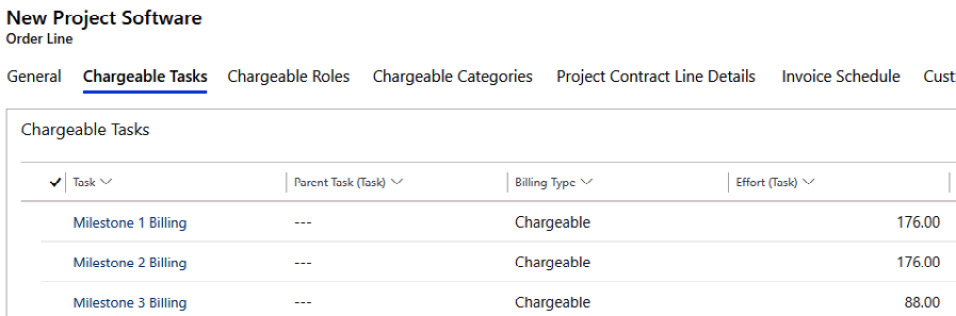
Figure 5.6 – Chargeable Tasks
Then, there are Chargeable Roles, which show the different types of roles included in this contract line that will be used for chargeability. Chargeability is driven by the roles, and the roles have a selling price and costs that directly impact the project profitability.
The following screenshot shows the roles that, if placed on a project, will have costs and selling rates associated with them that apply to the project:

Figure 5.7 – Chargeable Roles
Chargeable Categories are expenses chargeable to the project. Most of the time, expenses become billable and become part of the client's invoice for things such as travel and expenses. Here's what the Chargeable Categories tab looks like to bill out expenses to the client:

Figure 5.8 – Chargeable Categories
Important note
Many a time, people often get confused with the terms chargeability and billability. For your understanding in this book and for the Project Operations book, chargeability will reflect the fact that the time or expense entered against a project will be chargeable against it, meaning that for every dollar chargeable, a dollar will be reduced from the project's profit. However, billability means that the resulting charges will be marked up (as in a time and materials contract) or will be passed through (as in an expense for travel).
In this scenario, the charges result in a billable invoice line that makes it to the customer.
Why is this important? A firm's financial lifeblood is the profit derived from the work performed. If we as a firm miss out on billing expenses, the impact on profit is significant. Consider, if you will, a straightforward example of a contract that has the following rebill scenario:
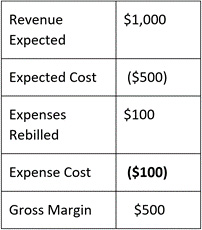
Table 5.1 – Proper expense rebill scenario
What happens if we do not bill out our expenses? Well, it looks something like this:

Table 5.2 – Gross margin impact
Thus, that $100 that we do not rebill immediately gets deducted from the gross margin. If your typical gross margin is 33% of revenue, that means you have really taken away $300 in revenue impact.
Not-to-exceed limit
There are some exciting capabilities with Project Operations that allow for more flexibility on a contract. For example, our contract with our client is for a $125,000 fixed fee. As we know, nothing goes as planned, right? Therefore, the client has agreed to a contingency fee equal to 20% of the overall contract.
Therefore, we have added a contract line for $25,000 as a time and material line item with a not-to-exceed limit of $25,000. Not-to-exceed contract limits are best used in a scenario such as this, where you are providing equal contractual protection for both the client and your firm by agreeing to a contingency but not allowing the out-of-scope task to take on a life of its own.
The following screenshot shows how to produce a not-to-exceed contract line:
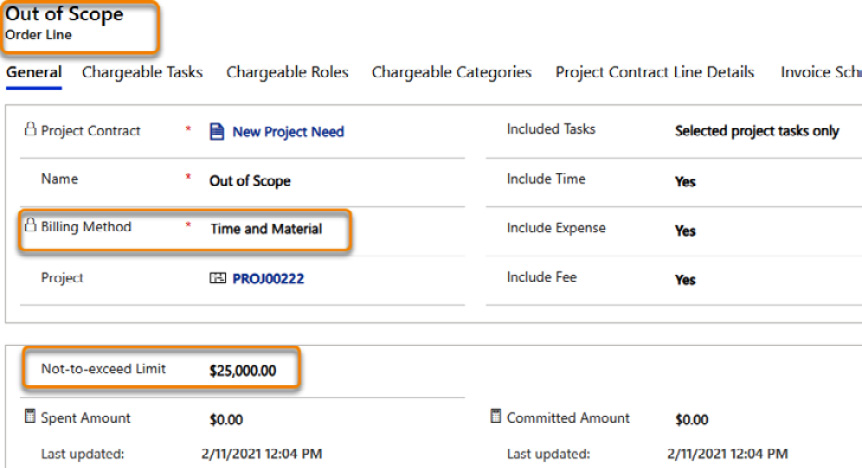
Figure 5.9 – Out of Scope contract lines
The process shown in Figure 5.9 shows that we are setting up a new order line with a name that outlines this is for out-of-scope work. The billing method is Time and Material and, when chosen, this then allows you to place in the Not-to-exceed Limit monetary amount. The subsequent fields are for tracking purposes.
This concludes the contract components for the project we are working with. In this section, we have identified the various contract types we have for our project. We have set up fixed-price contract lines and billings for the main work we will perform. We have also set up a time and material line for any out-of-scope work. On that line, we also set the out-of-scope work to Not-to-exceed Limit, as per the contract with the client.
There are still some additional pricing and costing considerations that we will explore in the next section.
Developing price lists and custom price lists
Multidimensional pricing is a feature of Project Operations that provides a professional services firm with the functionality it require to meet the firm's—and the client's—needs. Professional services firms typically have rates they have defined for roles within a firm. There are typically two rate types: selling and costing. Let's have a quick rundown on each.
Selling rates
Selling rates are most typically spoken of as a rate card, coming from the historical, physically printed rate card that was carried by partners of a firm to communicate the hourly price of a particular role within the firm. As you may expect, though, clients expect preferential pricing, especially if they are larger clients of a firm. Furthermore, if a preferential client is taking on a large project, they might even expect further price concessions.
A firm is typically going to protect its rates at various levels as much as possible. The rate card represents its first line of defense. This sets a price within the firm and one outside the firm, for roles. The client rate sets the expectation of pricing for the client, while the project rate sets the pricing for a project.
Let's take a look at each. From the Project Operations app menu, go to the Sales area under the Customers section and navigate to the Price Lists menu. From here, you will see the three price lists that we have created, as shown in the following screenshot:
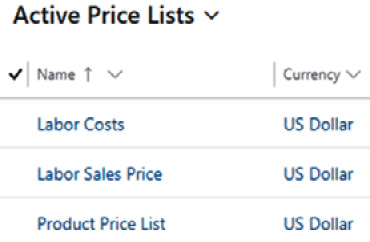
Figure 5.10 – Three common price lists
In the preceding screenshot, the three price lists shown are common for any firm. The Labor Costs and Labor Sales Price lists drive sales and labor cost pricing for Project Operations. The Product Price List list is used to drive the sale of products in the system.
For the selling rates, click on the Labor Sales Price list. This price list is date-respective, meaning that you can make your rates date-effective; so, you can have a 2021 rate, a 2022 rate, and so on. The rates are also currency-respective, so you can utilize multiple currencies. You will further notice the Time Unit listing, which identifies what you are selling— typically an Hour unit.
Let's explore, though, the actual rates associated with our roles. In our firm, we have four roles working in Dynamics 365. They have selling rates (rate-card rates) that are published. When a rate card is published, this is generally based upon the firm's history and tradition. Sometimes, a firm will reevaluate its rates on an annual basis and adjust accordingly. This helps the firm to readjust its rates to accommodate team member raises in salary.
The following screenshot shows the labor rates for the four Dynamics 365 roles we set up in the system:
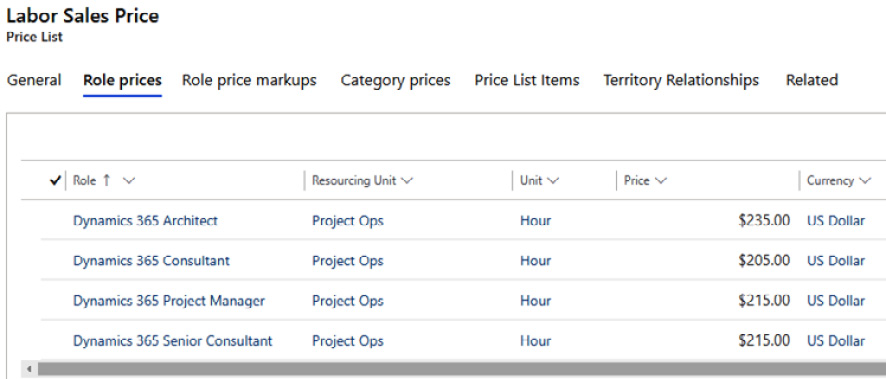
Figure 5.11 – A firm's rate card
To set up a client-specific price list, navigate to the client record in Project Operations and choose the Project Price Lists section. Next, select the Add New Project Price List button and add a named price list for the client, and then select the Labor Sales Price list. This will create a client-specific price list, but you now need to open this price list and modify the role prices for the client's pricing.
The following screenshot shows the process of creating a custom price list for the client:

Figure 5.12 – The client's rate card
Notice how the rates for each role are discounted. As a real-life application, notice that none of our rates has been reduced below $200 per hour. Keeping your rates above a numerical threshold has an impact on the rates' value.
For our project, however, our client is requesting even further discounts on their rates. To accommodate this, we now need to navigate back to the project contract. From the Project Price Lists section, choose Create Custom Pricing and select the record you created. Notice that as you pulled this in, it pulled in the client's price list as a baseline. This is quite convenient because you can then be assured that you are working with the specific pricing for your client, and you can now modify the rates to the terms of the contract.
The following screenshot shows the process of creating a custom price list for a project:

Figure 5.13 – The project's rate card
We have successfully used multidimensional sales pricing to create a rate card for a firm and have used custom pricing for the client, as well as project-specific pricing. All of these price lists are within the sales context, meaning they are all customer-facing prices.
However, there is a costing component to Project Operations as well that will, when combined, provide the ability to perform project profitability reporting.
Costing rates
Role-based costing is also part of the Project Operations system. For example, our rate card for a Dynamics 365 Architect is a $235-per-hour selling price. However, that is not our cost per hour for that role.
Costing rates are generally set up as a blended rate, derived from the following factors:
- Salary: The average or blended salary of team members in this role
- Benefits, overhead, and burden: The average factor above and beyond the salary to account for additional costs per role
- Other costs: Firm-specific costs per role
- Utilization expectations such as 50% utilization or 80% utilization
Therefore, if you have a blended team cost of $150,000 per year, with a burden rate of 30% and a utilization expectation of 80%, then the formula looks like this:

To transform this into an hourly rate, you must divide your number of workable hours per year. Your workable hours will be custom to your firm. For our example, we will use a 260-day year minus 10 days for holidays and 10 days for paid time off. Multiply this by an 8-hour day and you get 1,920 hours billable. The result is $126.95, or roughly a $127-per-hour cost.
This is one example, and for your firm this may be vastly different from the calculations and factors you use. However, the results end up the same, which is a blended rate per hour for the cost of a role.
Some additional notes about costing. Some firms call blended costing standard costing. Regardless of the name one main concept remains, and this is vitally important. It is not actual costing.
Actual costing is something potentially concerning for a firm if you try to do this in a Project Operations system. For example, our preceding calculations would not be used but, instead, the average cost of a role would simply be divided by the number of hours, and team members could derive from this that one person's role makes much more money than a different role. Thus, this could cause some unwanted problems for firms.
Furthermore, even though the costing information for a blended cost is much more padded with other costs, as you can see from the following screenshot, there are still some assertions to be made about salary and roles:
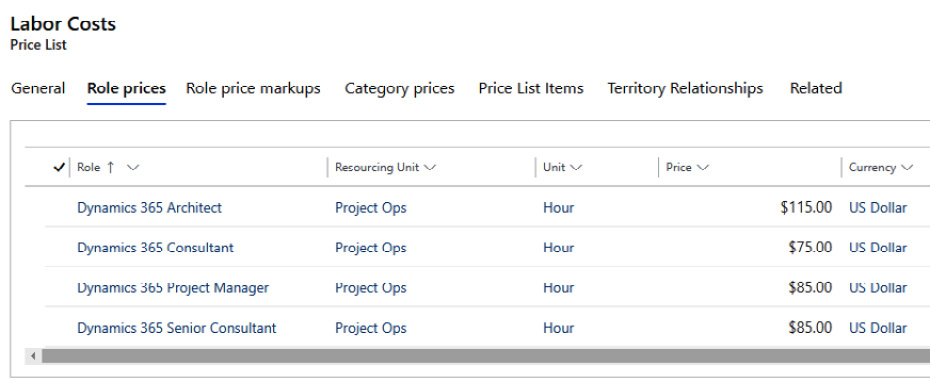
Figure 5.14 – Labor Costs price list
The costing of projects is significantly important to a firm so that the right costs are associated with a project.
Additional labor-costing considerations
There are instances where you may have offshore, nearshore, and domestic developers with different rates. Each of these can have costing effective to each of their scenarios, with currency effectiveness as well.
There is one really critical thing you will need to do, or your costs will not come through on a project: set up your version of Project Operations! Setting up Project Operations relies on the Cost Price Lists functionality of the Organizational Unit to create costing. The following screenshot outlines the most critical costing link in the system:

Figure 5.15 – Organization-level Labor Costs price list
Without the cost price list at the organizational unit level, when you approve timecards (time) each hour billed would have a selling price (since the project has a contract) but would not have a costing price.
Therefore, the combination of cost price lists and the organizational unit can allow for different cost rates and bill rates per organizational unit. The following table outlines this:
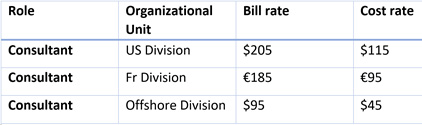
Table 5.3 – Organizational unit costing
Whether you are a large tech firm or a small company delivering services across the country, these principles of price lists will drive revenue and costing, thus resulting in profitability for your firm.
There are additional factors that need to be discussed around roles and pricing, so let's get into that next.
Exploring roles and role types to control pricing
In Project Operations, we now have the ability to perform task-level chargeability, as we saw in our contract lines setup section. This flexibility gives you the best ability to meet the needs of your clients, as well as account for those needs organizationally.
We will now discuss how to set up roles that, when combined with all the project contract lines, will provide the necessary pricing structure for your clients.
Non-chargeable roles
We will create a contract administration that needs to be added to the project. We can do so in the contract lines, as shown in the following screenshot:

Figure 5.16 – Tasks list showing the Admin – Non Chargeable tasks
However, there are also times where a particular role within a firm is always non-chargeable. An example of this may be a pre-sales role.
This scenario sometimes plays out where a firm may want to have a deep understanding of its sales (customer/client acquisition) costs. Many times, a firm is thrilled to have new business come its way, and the project may even appear to be profitable—that is, until they look at the 300-plus hours of pre-sales time that was spent to get the deal. Some firms will then track the entire sales team's time spent on a pursuit, to further analyze and evaluate what the true cost of client acquisition is. This helps them to then further determine what their rates should be and which deals they ought to pursue.
To set up a non-chargeable role in Project Operations, navigate to Projects | Roles Add a new role, as shown next:
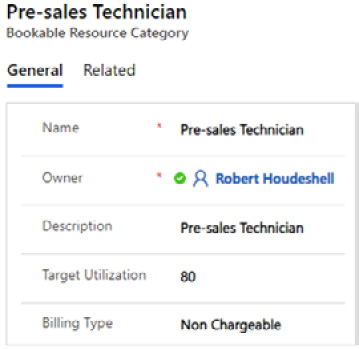
Figure 5.17 – Non-chargeable roles
Setting up this role type and linking this to a team member who performs that role will provide the team member with a way to input their timecard against the sales pursuits they have, while providing a way for a firm to account for their time but not bill the customer.
Nothing special needs to be done for the team member to input their time. However, how you use this data will be key. To have some meaningful data to pursue, you may want to set up a labor cost for the Pre-sales Technician role, as shown in the following screenshot:
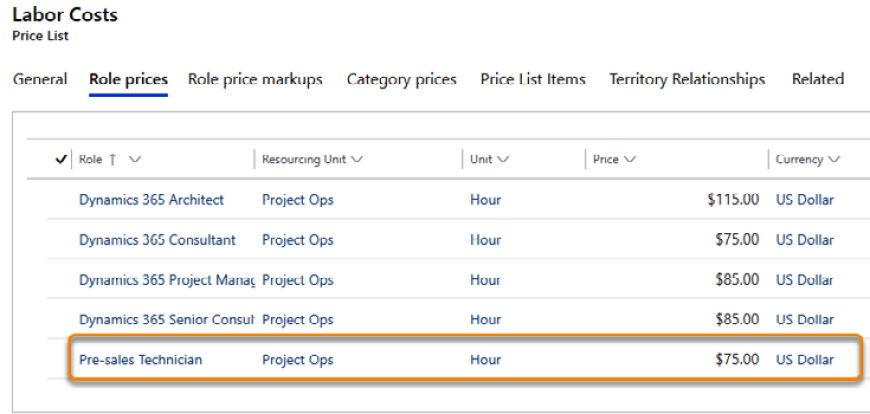
Figure 5.18 – Non-chargeable role with a cost associated
The preceding scenario will provide data for each team member assigned to the Pre-sales Technician role who enters a time to calculate their total costs as they are posted into the Actuals records in Project Operations.
Complimentary roles
There is one more category of role that may be appropriate to capture in your Project Operations deployment. In many firms, there are Practice Managers, Practice Directors, or—sometimes—Customer/Client Relationship Managers who work on projects to keep them progressing forward.
Therefore, the following setup will allow for a complimentary service that can be accounted for on a project as well:
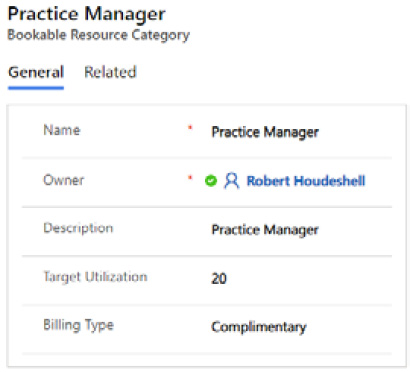
Figure 5.19 – A complimentary role
Similar to the Pre-sales Technician role, we can cost this role as well, for the same reasons. The following is the labor cost setup for a Practice Manager role:

Figure 5.20 – A complimentary role with labor costs
Let's summarize the costing conversation. You may sometimes encounter costing issues where you might run into resistance when trying to set up some of the costing scenarios listed previously.
For example, a firm may not want to expose any level of costing information to users of the system. This is a reasonable objection. What I have done previously to overcome this objection is one of the following two things:
- The first option is to use field-level security and only allow practice managers or other elevated roles to see the costing fields that come as standard in Microsoft.
- The second option is to create a new form based on the Project form, using customization and solutions. In this new form, you can assign it to a specific group, such as the Project Manager Security Role group, then remove all the fields that relate to cost from that form. You can also change views and assign them to the Project Manager Security Role group.
Other things you may run into are that project managers and other staff in a firm may not want to see all of the invisible costs (admin, pre-sales, practice managers) on the costs of the project. This is a decision point that will need to be made.
Overall, come to a consensus with your team on which factors and formulas you wish to use, and you will have a mutually agreeable solution for your firm.
Summary
In this chapter, we followed the sales process from the opportunity through to the project contracts and associated price lists. We took a quote and turned it into a project contract. The project contract has the line-level detail that sets up the billing types and allows you to link to a task level within a project.
We set up an example project that has a fixed-fee contract line and a time and material line. The time and material line was set up with a not-to-exceed contract limit. The skills learned here will provide you with the ability to meet the contractual needs of the client and the company.
The sales price lists are important to all of this, specifically when working with time and material contracts, since the price list will drive the hourly rate that factors out to the billable amount. The cost price lists are important to all other aspects of a contract, since all the costs associated with a team member and their role will factor into the costs of the project.
As we enter into the next chapter, we will work through the project director and project manager roles as they relate to the Project Operations system.
Questions
- In the Project Operations system, what is a record called when it changes from a quote to won?
- True or False: The Project Operations system only allows one invoice per project.
- What type of billing can be used to set up billing on a periodic basis?
- True or False: You can relate multiple contract lines to a contract.
- True or False: Contract lines can only be of one type per project/contract combination.
- What function does the Invoice Frequency setting perform?
- Selling rates or billable rates are applicable to which type of contract: fixed-price or time and materials?
- What are the three levels of multidimensional pricing?
- True or False: Labor cost rates only apply to time and materials contracts.
- True or False: Project costing is simply a matter of populating the labor cost rate tables and assigning them to the appropriate roles.