
Chapter 15: Going Beyond the Foothold
On this crazy ball flying through space that we call home, there are few things as exciting as seeing that Meterpreter session pop up after firing off an exploit. Sometimes, your compromise has yielded you a domain administrator and you can pretty much do anything you want; you can probably just log in to other systems on the domain to gather yourself a handful of compromised computers and grab the loot you find on them. However, the more likely scenario is that you just successfully pulled off an exploit on one of only a few machines that are actually visible from your position in the network due to firewalling and segmentation – you’ve established a foothold. The word foothold is borrowed from rock climbing terminology – it’s a spot in the rock face where you can place your feet for security as you prepare to progress further. Getting a foothold in a pen test means you’ve found a hole in the rock of your client’s defense that you can use to launch yourself up, but the climbing lies before you.
In this chapter, we’re going to do the following:
- Review concepts and methods for leveraging a foothold position
- Introduce enumeration from our foothold position
- Discuss pivoting through the network
- Leverage pilfered credentials to compromise systems deeper in our target’s network
Technical requirements
The technical requirements for this chapter are as follows:
- Kali Linux.
- A Windows environment with several hosts on different LANs is ideal.
Gathering goodies – enumeration with post modules
The big happy family of Metasploit modules designed to turn your foothold into total compromise are called post modules. There are a few types of post module, but there are two primary subfamilies – gather and manage. First, let’s draw a distinction between the post manage and post gather modules:
- The post manage modules are what I like to call compromise management tools. In other words, they allow us to manage the compromise we’ve accomplished, mainly by modifying features of the host.
- The post gather modules are just what they sound like: they allow us to gather information from the target that will inform further compromise. Pushing past the initial foothold will require more information; a full penetration of the target network is an iterative process. Don’t expect to only do recon and footprinting once at the beginning of the assessment – you’ll be doing it again at your foothold.
We don’t have enough room to dive into all of the post modules, but you’ll always need to do some enumeration once you’ve cracked that outer shell. You need to understand where you are in the network and what kind of environment you’re in. So, let’s take a look at some core enumeration with gather modules.
For our example, we’ve just compromised a Windows 7 Enterprise machine on our client’s main office network and we have a Meterpreter session. We’re about to discover that this machine has another NIC attached to a hidden network. Later in the chapter, we’ll take a look at this scenario to demonstrate pivoting our way into that hidden network. For now, let’s explore the environment of our foothold PC.
ARP enumeration with Meterpreter
Once we’re established with Meterpreter, we control the machine (at least in the user context of the payload execution, but we’ll talk about escalation later). We can play with our fun Meterpreter toys, or we can just go old school and play around with the command line. Let’s kick off Windows’ ipconfig. Thankfully, this command is already built into Meterpreter:

Figure 15.1 – ipconfig in a Meterpreter session
Check that out – a 192.168.249.0/24 network that isn’t visible to our Kali box. If you read the early chapters of this book, you’re already deeply in love with ARP, so let’s get acquainted with this network. Simply pass the arp command to Meterpreter:

Figure 15.2 – The remote ARP table in Meterpreter
Quite an effective host enumeration from beyond the perimeter. All that’s happening here is that Meterpreter is dumping the host’s ARP table instead of sending data into the network to find other targets; we used our foothold as a layer 2 spy, reporting its intel back to us. If there’s a computer in our foothold’s broadcast domain(s) and it has announced its presence via ARP replies, we have its IP address and MAC address mapping right here.
Beware of ARP Counterintelligence
Remember that this result is what our foothold believes is the correct mapping. If there’s any ARP poisoning going on, the poisoned table is what you’re seeing.
Let’s make sense of this result in our lab. Since this is an ARP table, it will include things such as multicast and broadcast addresses – those can be ignored. What’s interesting to us is that there’s another host on the hidden network – 192.168.249.154. Now we have a lead on one possible direction to further compromise. Let’s keep that in mind for later – first, let’s grab some loot from our foothold PC. It may come in handy as we leap from host to host.
Forensic analysis with Meterpreter – stealing deleted files
There is a digital equivalent of just tossing whole documents into the trash instead of through a cross-cut shredder: deleting the file off your computer. Most IT folks are aware that when you delete a file in Windows, the operating system simply marks that space as free. This is far more efficient than actually erasing everything, but it also means old data can be very stubborn. There are known techniques for recovering deleted files and plenty of freeware tools for it. Metasploit takes that functionality and turns it into a friendly looting module.
When you’re interacting with a Meterpreter session and you’d like to get back to the Metasploit console, use the background command to put your session on the back burner. You can then use the sessions command to list your Meterpreter sessions and use the -i flag to interact with one. In our lab environment, I have only one session so far – but when you’re in the field, you may have several. These modules can be set up like ordinary exploits from the console, or they can be called with the run command from within Meterpreter – definitely an awesome feature for those times when you know exactly what you want to do. However, in the field, we’ll often need reminders of what modules Metasploit has in store for us and the options they offer. So, let’s background our session and try searching for what we want: some forensics work. Type search type:post forensics and hit Enter:

Figure 15.3 – Searching for forensics modules
The search command lets us narrow our search down to a module type, and forensics are part of the post modules. After the type parameter is set, we simply provide our search term, forensics. We want to try some deleted file enumeration and recovery, so let’s use post/windows/gather/forensics/recovery_files, which is in index position 1, with use 1:

Figure 15.4 – Configuring the deleted file recovery module
You can set TIMEOUT for whatever you like; the default is one hour. If you set it to 0, then it won’t stop running until it’s found everything it can. Of course, this can take a long time. Type run to get started:

Figure 15.5 – Deleted files with unique IDs
If you don’t specify a file extension, the module will just look for all deleted files. Note that each one gets a unique ID. The FILES= option in the module can be used for either specifying extensions or by choosing an individual file by ID. I’ve found a file I’d like to recover, so I run the command again with the file ID in the FILES parameter:
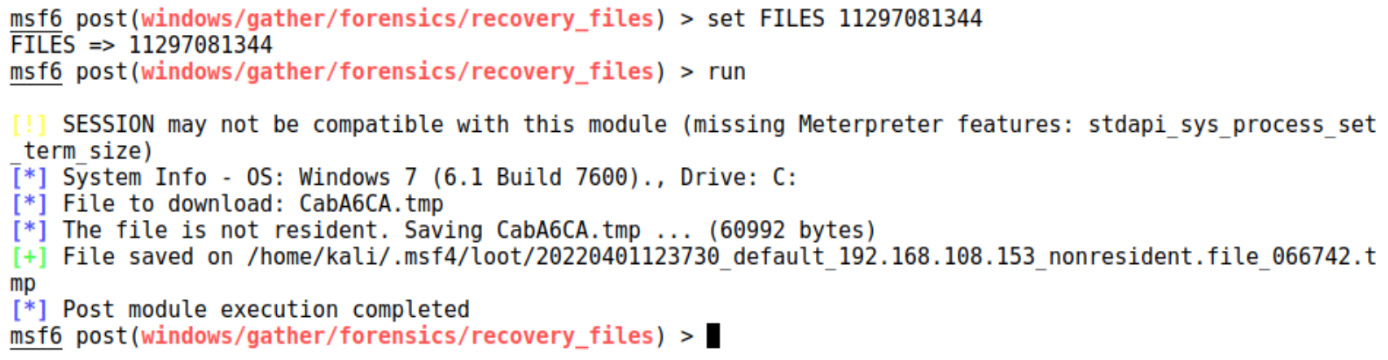
Figure 15.6 – Recovering deleted files
The scanner runs over the file again, matches the ID, and dumps it into my bag o’ loot. Showing a deleted document with confidential data in it to an executive is a powerful statement for your exit meeting.
Internet Explorer enumeration – discovering internal web resources
I know, I know – Internet Explorer? Really? Even though Chrome and Firefox are all the rage these days, you’ll be surprised at the role Internet Explorer still plays in the enterprise. And yes, I specified Internet Explorer over Edge.
Enterprises are often running applications on servers and appliances with administrator consoles that are typically accessed through a browser. Why are they not very often optimized for newer browsers? I can’t say for sure; it depends on the vendor. But it’s important to be cognizant of the role Internet Explorer plays. Getting your hands on Internet Explorer history, cookies, and stored credentials will allow you to enumerate important internal resources and inform future attacks against them. If you score some credentials, you may even be able to log in. Make sure to leverage your position at or beyond the foothold when you do this – that way, the application will see a login from a familiar client.
Enumeration is very easy in this case, too; no options to worry about. Just execute run post/windows/gather/enum_ie inside your Meterpreter session:

Figure 15.7 – Raiding Internet Explorer for goodies
Despite IE clinging on for dear life, you can still raid the target for artifacts from modern browsers, too – the post/windows/gather/forensics/browser_history module will seek out artifacts from Skype, Firefox, and Chrome.
Now that we’ve rummaged through the pockets of our foothold system, let’s start looking at how to take the next step.
Network pivoting with Metasploit
Let’s back up to the beginning of the chapter, where we found our dual-homed Windows 7 box, and look at a real-world foothold and pivot scenario. We have valid credentials, though we only have a password hash that we dumped from another machine. We’ll be passing them to our target with the psexec exploit. Don’t worry, we’ll take a closer look at pass-the-hash (PtH) attacks shortly. For now, let’s grab our foothold:

Figure 15.8 – Configuring a psexec module with a captured hash
We are targeting 192.168.108.153, so we configure the target with set RHOSTS 192.168.108.153. We use set SMBPass to configure our captured credentials, along with set SMBUser. Then, we fire off the attack with run:

Figure 15.9 – Running ipconfig on the target to find additional networks
Magic sparks fly through the air as our Meterpreter session is established. The first thing I’ll do is issue a quick ipconfig to see what other hosts can be seen at the link layer. Immediately, we can see an additional interface assigned the IP address 192.168.249.153 with a netmask of 255.255.255.0. Bingo! We’ve compromised a dual-homed host.
Just a quick review of subnetting
Remember that an IPv4 address is 32 bits long, split into four groups of 8 bits each. With CIDR notation, an IP address is followed by a slash and a number that represents the amount of bits needed to represent the network portion of the address; the remaining bits would then be assigned to hosts. Therefore, you can always subtract the number at the end of the CIDR notation from 32 to get the number of bits for host assignment. Let’s look at a couple of examples.
192.168.105.0/24 means that the first 24 bits identify the network. To understand this, let’s see 192.168.105.0 in binary:
11000000.10101000.01101001.00000000
When assigning addresses in this subnet, we’d only change the final 8 bits, with the highest value, 11111111, being the broadcast address of this subnet:
11000000.10101000.01101001.00000000
Network Hosts
Calculating netmasks from the CIDR notation and vice versa is easy – whatever bits make up the network portion, turn those into all ones and turn the host’s portion into all zeros. Then, convert that value into an IP address. That’ll be your netmask:
11111111.11111111.11111111.00000000
255 255 255 0
Here’s one more example for the road, 10.14.140.0/19:
11111111.11111111.11100000.00000000
255 255 224 0
Now that we’re caught up on our networking basics, let’s look at how we can build routes into our discovered networks for deeper enumeration.
Launching Metasploit into the hidden network with autoroute
At the Meterpreter prompt, fire off the run post/multi/manage/autoroute command. You’ll see that the host’s routing table is automatically analyzed:

Figure 15.10 – Using autoroute with a Meterpreter session
This creates a route into the hidden subnet, managed by the Meterpreter session on our foothold box (which we will call our pivot point):

Figure 15.11 – Visual representation of pivoting
The output is somewhat anticlimactic – but keep in mind that that subnet is now available to Metasploit as if you were on the LAN. To test this theory, I’m going to look for FTP servers on the hidden network. I background my Meterpreter session with the background command and jump into the auxiliary modules to grab the native port scanner with use auxiliary/scanner/portscan/tcp:
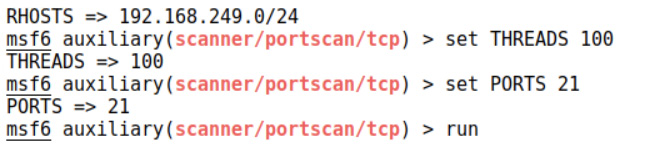
Figure 15.12 – Portscanning via our routes
Note that RHOSTS can take a subnet, so I set the hidden network with set RHOSTS 10.0.0.0/24. Threading can speed up the scan but also overwhelm the network and/or make a lot of noise, so configure set THREADS with caution. (Hint: I wouldn’t use set THREADS 100 in a production network on a gig.) Of course, I’m just looking for FTP, so I configure set PORTS 21, but you can add more ports with commas or provide a range. It’s an auxiliary module, so we fire it off with run:

Figure 15.13 – Completing the port scan via our newly configured route
We found port 21 open on 192.168.249.154. Remember that you can’t see this host from your Kali box; this response is courtesy of Meterpreter running on our foothold Windows 7 pivot point and routing traffic to the target network. This is pretty great, but there’s something missing – the ability to fire off our favorite Kali tools outside of the Metasploit Framework, including our own juicy Python scripts we worked so hard on. What we need is a port-forwarding mechanism. Have no fear, Meterpreter heard your cry.
Let’s get back into our established session with sessions -i 4. The -i flag means interact and the number 4 specifies the session. When you’re neck-deep in someone’s network, you might have a dozen Meterpreter sessions established – in which case, sessions is your friend. Anyway, let’s get back to our humble single session and execute portfwd -h:

Figure 15.14 – Configuring portfwd
Let’s take a closer look at these options, in a logical order rather than the order in which they appear:
- -R is a reverse port forward. I know, I know: how can you go forward in reverse? This just specifies the direction taken when establishing this route. Why would we need this? The simple way of thinking about port forwarding in a pivoting scenario is that you, the attacker, want to reach a service running on a target via your pivot point. However, think back to our previous chapters when we were hosting the payloads on our machine. We might want the target to have requests forwarded to us via the pivot point. This is a reverse port forward.
- -L specifies the local host. It’s optional except for two scenarios – you’re doing a reverse port forward, or you have multiple local interfaces with different addresses and you need the traffic to pass through a specific one. Note that if you do set this option, you must use the address specified here when connecting through the port forward.
- -l specifies the local port to listen on. You’ll be pointing your tools at the local host and the port specified here in order to reach the target on the desired port.
- -i assigns an index to your port forward route. You didn’t think we could only have one route at a time, did you? We can have multiple port forwards to multiple hosts and ports. You’ll need indices to keep up.
- -p is the remote port that we’re forwarding our traffic to. This is where it gets a little confusing if you’re leveraging the reverse port forward: this option is the remote port to listen on. For example, a payload could be configured to connect to the pivot point on port 9000.
- -r is simply the remote IP address.
I create the relay with the portfwd add -L 192.168.108.211 -l 1066 -p 21 -r 192.168.249.154 command. This tells Meterpreter to establish a local listener on port 1066 and forward any requests to the target on port 21. In short, the address 192.168.108.211:1066 has just become, for all intents and purposes, 192.168.249.154:21. Meterpreter will confirm the setup:

Figure 15.15 – New portfwd relay up and running
Go ahead and point your tools at this proxy. Just to confirm access, I try to connect to the local listener with netcat:

Figure 15.16 – Chatting with a service behind the foothold
Here we are, chatting with a service running on another subnet that our Kali box can’t see. If you’ve just finished the previous chapter, then you will recognize the FTP service running here as the vulnerable one we just learned how to compromise. With your foothold and an established pivot point, you now have a paved road straight to delivering shellcode on a machine deeper in the target network.
There’s an important clue for understanding how this works on the FTP server at the end of our portfwd chain. Check out what this looks like on the FTP server when we run a netstat:
Figure 15.17 – Running netstat on the target FTP server
Is that the IP address of your Kali box? Of course not – that’s the Meterpreter host that we’ve compromised. We can thus exploit trust relationships to bypass firewalls using this method. Now that we’re here, it’s time to exploit these new channels to conduct some attacks down the line.
Escalating your pivot – passing attacks down the line
Let me paint a scenario for you. From inside the restricted network you were able to plug into, you’ve just established your foothold on a Windows 7 Enterprise machine with a NIC facing an internal 192.168.249.0/24 network. You can’t see this network from your position, so using your Meterpreter session, you establish routing via your Windows 7 pivot point. After some further reconnaissance, you determine that 192.168.249.128 is running an FTP service. However, you can’t connect to it from your pivot point. After watching the LAN, you notice traffic passing between 192.168.249.128 and 192.168.249.130, so you suspect a trust relationship between those two hosts. You also see the Windows user Phil frequently, so it could be an administrator’s account that is used on different machines or a shared local account for the purposes of setting up these hosts.
I already tried to pivot to 192.168.249.128:21 with portfwd, and I tried connecting with the Win 7 pivot point’s native FTP client, but no cigar. There’s a firewall blocking our traffic. It seems we have a better shot from 192.168.249.130, but that host is on the hidden network. This means we’ll need to leverage our pivot point to compromise a host beyond our foothold. Let’s take a look at how we can leverage what we’ve captured so far to escalate beyond the foothold.
Using your captured goodies
In pen testing, you’ll do the occasional bit of off-the-cuff magic. Most of the time, however, you’ll be relying on simple, tried-and-true methods to take small steps elsewhere in the enterprise. One such trick is reusing credentials that you find. I don’t care if I find a password under someone’s keyboard (yes, people still do that) or after shoulder surfing someone logging into a teller system in a bank – I always know I can be surprised at what that password will get me into. Let me tell you a couple of war stories to demonstrate what I mean:
- I was once on an assessment at a financial institution when I managed to get domain administrator access. I extracted all the hashes from the domain to crack offline. One of the passwords that I recovered in cleartext was for an account called BESAdmin, which is associated with BlackBerry Enterprise. Weeks later, I was at a totally different client, but I noticed during the assessment that their IT services contractor was the same company as used by the previous client. I found a BESAdmin account there, too. When I got to the third client using the same contractor with another BESAdmin account, I tried to log in with the recovered password and voilà – it worked. The convenience of a single password allowed me to effectively compromise a domain administrator account for dozens of companies that used that contractor.
- I was at another client site for a company that manages paid-parking structures. At the entrance of these structures is a small machine that accepts a credit card and prints tickets and receipts. All these XP Embedded machines (about 100 in total) check in with a Microsoft SQL database every 5 minutes. You guessed it – they authenticate with a privileged domain account. I was able to downgrade authentication so that the cracking effort took 45 seconds. That password not only got me into the database and all of the payment machines, but it also got me into a few other systems off the domain.
Both scenarios depict some practices that aren’t very secure, but what’s interesting is when I present my findings to the IT staff. Most of the time, they are already aware of the implications of these practices! They feel trapped by dated configurations and stubborn management. I’ve had IT administrators pull me aside and thank me for giving them ammunition to deploy a layer of defense they’ve been asking for. I think password attacks are very important because of the total value they can provide to a client.
Let’s get back to our scenario and depict a similar attack. We’re going to use credentials on our pivot point to penetrate deeper into the network. This time, however, we don’t have time to crack the password. How can we use a password without cracking it first?
Quit stalling and Pass-the-Hash – exploiting password equivalents in Windows
Remember that Windows passwords are special (it isn’t a compliment this time) in that they aren’t salted. If my password is Phil, then the NTLM hash you find will always be 2D281E7302DD11AA5E9B5D9CB1D6704A. Windows never stores or transmits a password in any readable form; it only verifies hashes. There’s an obvious consequence to this and it’s exploited with the Pass-the-Hash (PtH) attack.
Why did Microsoft decide to not use salts? Microsoft has stated that salting isn’t necessary due to the other security measures in place, but I can’t think of a security practitioner who would agree. The real reason is likely due to those recurring themes in Windows design: backward compatibility and interoperability. A salt is almost like having an extra password for every password, so systems would need mechanisms for exchanging this data securely. This is a tall order, but would it be worth it? Salting is considered a bare-minimum single layer of defense, not a panacea for password security threats.
Check out the following account names and NTLM hashes. The hashes would be difficult to crack without powerful resources (good luck, reader!), so knowing the actual password isn’t an option. What do we know about these accounts and what can we infer about their relationships to other accounts?
- Administrator: 5723BB80AB0FB9E9A477C4C090C05983
- user: 3D477F4EAA3D384F823E036E0B236343
- updater: C4C537BADA97B2D64F82DBDC68804561
- Jim-Bob: 5723BB80AB0FB9E9A477C4C090C05983
- Guest: 45D4E70573820A932CF1CAC1BE2866C2
- Exchange: 7194830BD866352FD9EB0633B781A810
That’s right, Eagle Eye, the Administrator password is the exact same as the Jim-Bob password. With salted hashes, we’d have no way of knowing this fact from just a glance; but in the Windows world, after literally a moment’s review, we know that Jim-Bob is using the same password on his personal account as the Administrator account. What we can infer, then, is that Jim-Bob is the administrator. If we can’t crack the hashes, how does this help us? Well, for one, now we know that targeting Jim-Bob with other password attacks such as a phishing scam or key logging provides a decent chance of grabbing the almighty Administrator account. Let’s get back to the other consequence of unsalted hashes: the fact that in Windows, the naked hash is a password equivalent, which means passing the hash to an authentication mechanism is literally the same thing as typing the password.
Jump back into your Meterpreter session and confirm that you’re running as SYSTEM; if not, escalate with getsystem. Next, we’ll execute our built-in hash-dumping module with hashdump:

Figure 15.18 – Using hashdump in a Meterpreter session
You need to run as SYSTEM to have unchecked access to all of Windows. getsystem is a wonderful escalation module that will attempt a few different classic tricks, such as named pipe impersonation and token cloning. We’ll cover this and more in Chapter 16, Escalating Privileges.
The hashdump module does the heavy lifting and puts together everything that it finds quite nicely. We’re going to proceed with psexec for passing the hash. Background your Meterpreter session with the background command so we can configure the psexec module. Issue the use exploit/windows/smb/psexec command to get the module on deck, then run show options.
Now, there are two things to consider here: our RHOST and the Meterpreter payload type. Recall that our target, 192.168.249.130, is not visible from our Kali box, but we’ve established routing to the target subnet with the autoroute module. Metasploit will automatically route this attack via our pivot point! That being said, that’s also why we’ll use bind_tcp instead of connecting back since our Kali box is not visible to the target.
For set SMBPass, use the LM:NTLM format from hashdump. You can mix and match, by the way; for example, we could take the hashes from the Jim-Bob account in our preceding example but set SMBUser to Administrator. This will simply try the Jim-Bob unknown password against the Administrator account. In our scenario, we’re trying our luck with the Phil account. Finally, fire it off with exploit:

Figure 15.19 – Passing the hash behind the foothold
Now we’re sporting two fancy Meterpreter sessions – session 1 is via our foothold into the hidden network, and session 2 is with the host we suspect has a trust relationship with the FTP server. When you’re playing around in your lab, you may be used to a single Meterpreter session; be prepared to organize your sessions when you leverage Metasploit’s power for pivoting.
Let’s try the good old-fashioned portfwd again. By establishing it within our second Meterpreter session, the traffic will actually come from the trusted host:
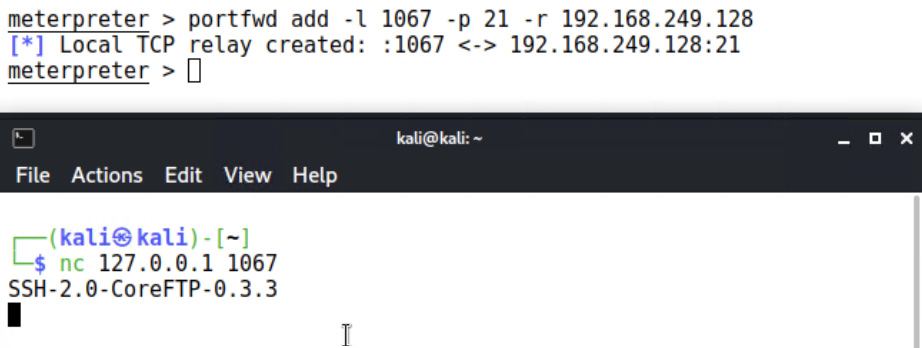
Figure 15.20 – The netcat session via the compromised trusted host
And there you have it – we’ve bypassed a restrictive firewall by compromising the trusted host. It’s one thing to somehow bypass controls directly from our box, leaving a trail of evidence pointing at the IP address associated with a network drop in the conference room near the front door. It’s another thing altogether to see the source as a trusted host inside the firewall. Imagine the potential of chaining targets together as we work our way in.
Summary
In this chapter, we introduced some of the options available to us once we’ve established our foothold in a client’s environment. We covered the initial recon and enumeration that allows us to springboard off our foothold into secure areas of the network, including discovering hidden networks after compromising dual-homed hosts, ARP-scanning hidden networks, and the gathering of sensitive and deleted data. From there, we enhanced our understanding of the pivot concept by setting up routes into the hidden network and enabling port forwarding to allow interaction with hosts on the hidden network with Kali’s tools. Finally, we pressed forward by leveraging credentials on our pivot host to compromise a computer inside the perimeter.
In the next chapter, we’ll explore the power of privilege escalation: taking our lowly foothold and turning it into a privileged compromise to gain access to critical resources. Tying this together with the knowledge from this chapter will prepare you for sophisticated movement within the target’s environment.
Questions
Answer the following questions to check your knowledge of this chapter:
- I have just established a Meterpreter session with a dual-homed host, so I configure and execute the portscan module to search for hosts on the other network. I am curious about the status of the scan, so I pull up Wireshark on my machine. There’s no scan traffic visible. What’s wrong?
- I just issued the following command in Meterpreter, but nothing happened: execute -f ipconfig. Why didn’t I see the output of ipconfig?
- I don’t need to specify ________ when running a module within Meterpreter, since the command is sent to that system only.
- A deep packet analysis of the Meterpreter ARP scan will reveal the IP address of our attacking Kali box. (True | False)
- Using fewer threads during a Meterpreter port scan reduces the risk of our traffic tripping an IDS. (True | False)
- When configuring a PtH attack, the salt must be specified. (True | False)
- My PtH attack works because I see a new Meterpreter session; however, it dies about 2 seconds later. Is there anything I can do to keep the session alive?
Further reading
For more information regarding the topics that were covered in this chapter, take a look at the following resources:
- Microsoft TechNet presentation and discussion on PtH attacks (https://technet.microsoft.com/en-us/dn785092.aspx)