
Chapter 8: Microsoft Defender for Office – Threats to Productivity
Microsoft Defender for Office (MDO) is the next Defender product in our sights, this time for your email and collaboration tools. This seems to be one of the more underutilized sets of tools, and I think that's primarily because a lot of this suite has come into its own recently. Bringing the features of MDO under the Security.Microsoft.com portal umbrella has helped shine a light on them for those not familiar with them.
I think there are plenty of exciting things to cover with MDO, such as Exchange Online Protection (EOP), which is included by default as it's really at the core of MDO. Then, there are other features, such as safe links, safe attachments, anti-phishing, and attack simulation training. We'll cover these in detail throughout this chapter. Two licenses can sum up everything we'll discuss, which we'll cover quickly before continuing with this chapter. As I mentioned previously, EOP is included as a core product – it's included in all tenants that have online mailboxes. Once we start looking at the products that provide post-breach, automation, and simulation training, we will move that slider toward the P2 license, as shown in the following diagram. This flow of features is also how you would typically go about configuring them in any environment you work in, starting with EOP and working toward the full MDO suite:
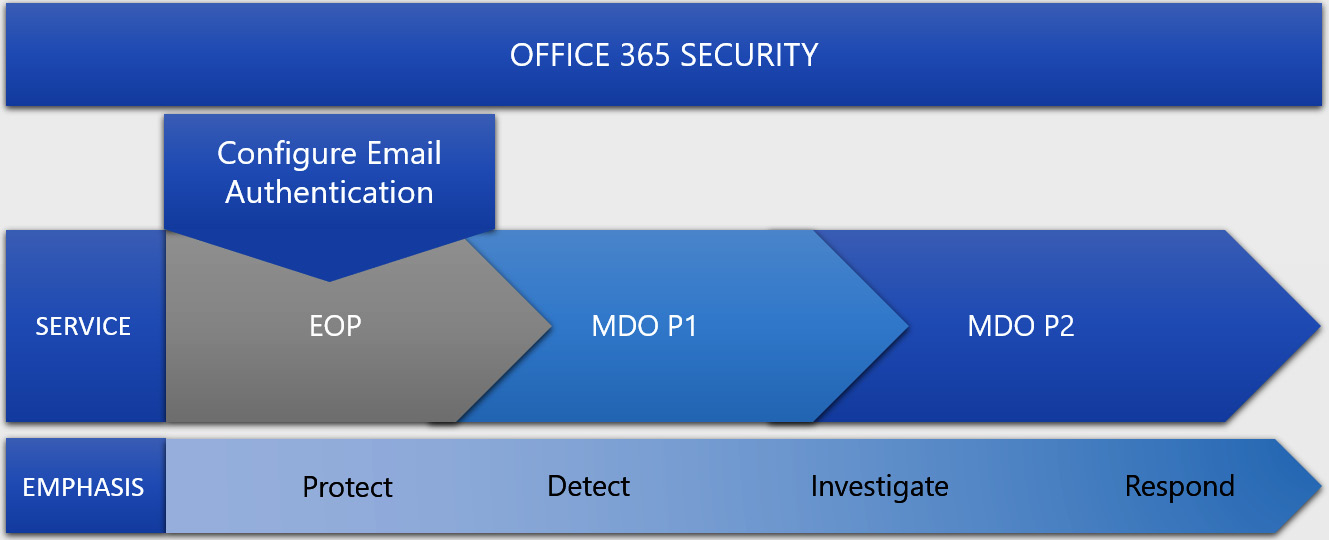
Figure 8.1 – Microsoft Defender for Office license diagram
We'll break these features down into the four categories that Microsoft poses for us. These categories will outline this chapter for us, so let's take a look at the topics we'll be covering:
- Threat protection policies
- Threat investigation and response capabilities
- Automated investigation and response capabilities
- Data loss prevention and insider risk
Technical requirements
The technical requirements for this chapter will be less holistic in terms of environmental variables. What I mean by that is that it's less about operating systems and patch levels and more about the features themselves as they pertain to productivity configurations. Nonetheless, we'll define a few areas you'll want to be familiar with when it comes to this chapter, as follows:
- The Security.Microsoft.com portal
- Exchange Online and the Exchange admin center (AEC)
- Email authentication
- Safe attachments, phishing, and anti-spam concepts
- Navigating SharePoint OneDrive and Teams documents libraries
- Microsoft information protection and data loss prevention concepts
Threat protection policies
Threat protection policies provide a great way to configure the necessary protection for your organization when it comes to Office 365. They're all conveniently in one spot for you to view. Before we get into the policies themselves, let's highlight what policies there are and the two main ways we can configure them.
First things first, let's head over to https://security.microsoft.com/threatpolicy. From here, we'll see two sections for policies: Templated policies (Figure 8.2) and Policies (Figure 8.3).
Templated policies, or preset policies, provide a centralized approach to applying a series of policies at once in either a strict or standard fashion. This gives you a bundles approach so that you can apply strict policies leadership and maybe standard policies to everyone else, ensuring the most sensitive communication is protected. Like most things in Windows environments, when you have situations where both are applied, the most restrictive wins that battle. Note that standard policies take precedence over custom ones.
In this section, we'll look at the configuration analyzer, which gives you a breakdown of where all of your current settings fall and whether the recommended protection is being used. This will also show you when new settings arrive, so be sure to check it frequently to get those enabled. A breakdown of the policies it analyzes are as follows:
- EOP policies:
- Microsoft Defender for Office 365 policies:
- Anti-phishing policies in Microsoft Defender for Office 365, which include the following:
- The same spoof settings that are available in the EOP anti-phishing policies.
- Impersonation settings
- Advanced phishing thresholds:
- Safe Links policies
- Safe Attachments policies
- Anti-phishing policies in Microsoft Defender for Office 365, which include the following:
The following screenshot shows some templated policies:

Figure 8.2 – Templated policies for MDO
Moving on from the presets and what those can configure, let's dive into the policies themselves. The next section is where you can configure each policy individually if you wanted more granular control. Looking at the following screenshot, let's start from the top and work our way down:
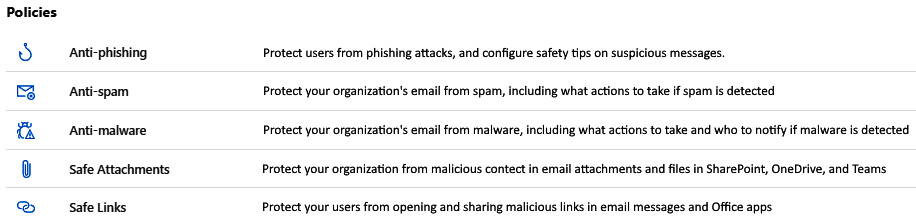
Figure 8.3 – Policies for MDO
Let's delve deeper into these policies, starting with anti-phishing policies.
Anti-phishing
Anti-phishing policies help protect against phishing attempts, which are attacks where the main objective is to bait you into giving up sensitive information. This is generally accomplished by sending messages that look legitimate and from trusted senders. Phishing is often broken into a few different categories, such as the following:
- Spear phishing, which is usually specifically tailored to the recipient.
- Whaling, which is meant for executives and other high-value targets.
- Business email compromise, where trusted senders are forged and trick people into giving up information or even approving payments or fund transfers.
- Ransomware, which is one of the worst kinds. Detecting these kinds of phishing emails can stop large-scale campaigns from hitting companies.
The following screenshot shows an example of what the policy pane looks like when it's selected for edits:
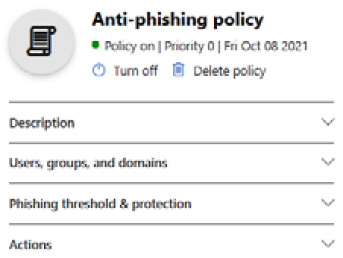
Figure 8.4 – The Anti-phishing policy window
Looking at the protection that's provided in this policy, we have things such as spoof intelligence, which allows you to review detected senders in messages that come in from external or even internal domains and manually mark them as Allow or Block. Other protection includes implicit email authentication, which enhances standard email authentication by checking for things such as SPF, DKIM, and DMARC. These can help you decipher sender reputation, sender history, and receipt history:
- Sender Policy Framework (SPF): This is the process of updating DNS so that you can use the SPF's email authentication with your domain. It's a way to help validate outbound emails so that it's easier to prove that they came from your domain.
- DomainKeys Identified Mail (DKIM): This is the second form of authentication that helps prevent threat actors from sending messages that look like they're from your environment. DKIM adds a signature to your outbound mail inside the header as extra validation.
- Domain-based Message Authentication Reporting and Conformance (DMARC): This works as the third authentication protection. It works alongside SPF and DKIM to authenticate senders to make sure the destination email systems trust messages from your domain.
To learn more about email authentication and what it can do, go to https://docs.microsoft.com/en-us/microsoft-365/security/office-365-security/email-validation-and-authentication?view=o365-worldwide.
Anti-spam
Anti-spam policies are designed to help reduce the amount of junk email a domain receives. It's comprised of a proprietary filtering technology to identify and separate mail to do just that. Let's look at some of the things that make up the anti-spam policy:
- Connection Filtering: This is a feature that determines good email sources from bad ones based on what's defined in the IP Allow or Block list, as well as the safe list.
- Spam Filtering: Using the spam filtering verdicts from EOP, it classifies messages as spam, bulk email, or phishing.
- Outbound Spam Filtering: This works on the outbound side of things to ensure people aren't sending spam out.
Spam filtering is configured by default to send messages marked as spam to your junk folder. However, if the environment you're working in has a hybrid configuration, you'll need to configure mail flow rules to get this same behavior.
The following screenshot shows what the policy pane looks like when it's been selected for edits:
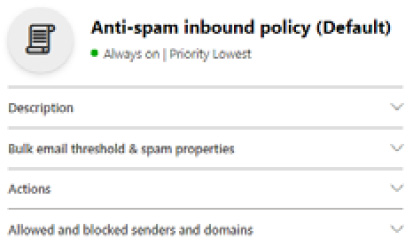
Figure 8.5 – The Anti-spam inbound policy (Default) window
Now that we have covered anti-spam policies, let's delve into anti-malware policies.
Anti-malware
Anti-malware policies help you defend against messages that may contain malware; any such message that's found is immediately quarantined. These types of messages can be broken into three different categories:
- Viruses: These traditionally infect other programs and data, speeding through the network looking to do the same thing where it can.
- Spyware: This is something that can gather information, such as sign-in details or personal information, to then send it back to its author.
- Ransomware: This, as we've mentioned many times so far in this book, aims to encrypt your data and demand payment for decryption.
Three main forms of protection are working behind the scenes with this policy when it's enabled, in a layered approach for optimal protection. These features are as follows:
- Layered Defenses Against Malware: This consists of several anti-malware scanning engines that provide self-learning detection in an attempt to give early detection during an outbreak.
- Real-Time Threat Response: This is an incredible service that works behind the scenes. The anti-malware team can use it to provide policy rules that detect threats before any definitions are written and deployed for use in the anti-malware engine. Rules of this kind are published to a global network every 2 hours for organizations to leverage.
- Fast Anti-Malware Definition Deployment: This is similar in concept to real-time protection on the AV side of things. This service leverages relationships with several close partners of Microsoft who also develop anti-malware engines to provide updated definitions by the hour.
The following screenshot shows what the policy pane looks like when it's been selected for edits:
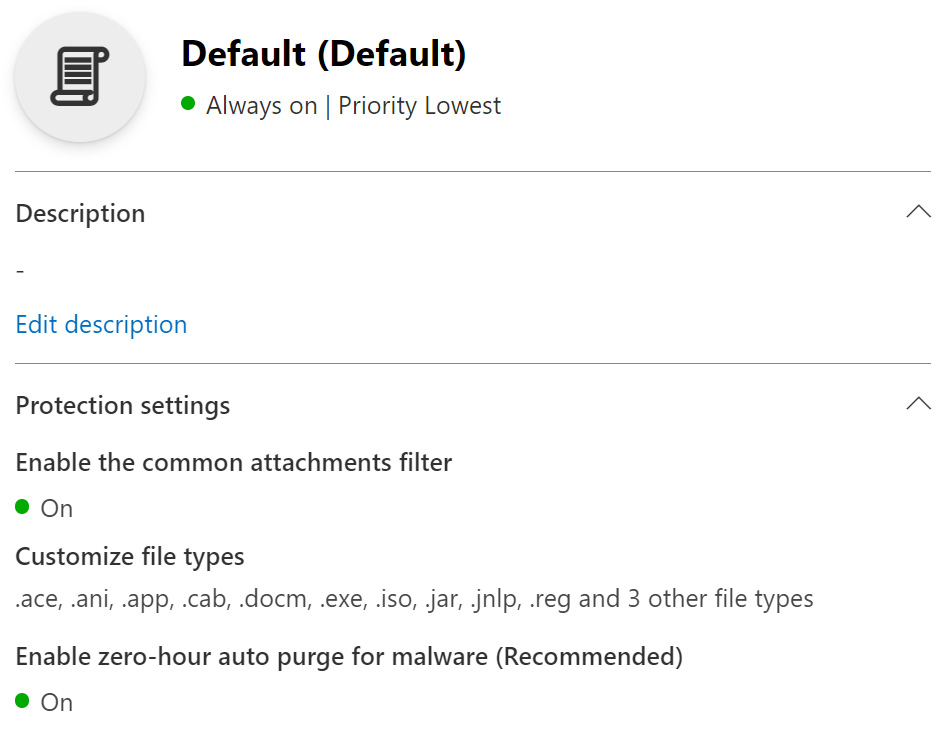
Figure 8.6 – Anti-malware policy window
Before we get into Safe-Attachment and Safe-Links, I wanted to talk about zero-hour purge (ZAP), which is something that's used in anti-phishing, anti-malware, and anti-spam. ZAP is a feature that can retroactively detect and remove malicious messages that were already delivered to a mailbox. It does this by leveraging the spam and malware signatures that are updated in real time daily, to continuously monitor messages even when they've already been delivered. Owners of the mailbox are not even aware of this service; it's seamless and will remove messages without the user knowing.
One caveat of this is that the safe sender lists override this protection, which is why it's very important to be careful when you're configuring what messages can bypass filtering. Overdoing it with additions can remove some of your protection, such as ZAP. To learn more about ZAP and where and how it's used, go to https://docs.microsoft.com/en-us/microsoft-365/security/office-365-security/zero-hour-auto-purge?view=o365-worldwide#zero-hour-auto-purge-zap-for-phishing.
Safe attachments
Moving onto the last two topics now, let's talk about safe attachments. Safe attachments is yet another layer of protection that's provided by MDO. This is an additional scan beyond what the anti-malware service may have already done. It does this by something called detonation, where it opens the attachment in a virtual environment before it's delivered to see if it's malicious. It does this in a data center in the same region where your tenant resides for the best performance.
An important note about safe attachments is that, unlike the other policies, there is no default policy – you need to create one to get this protection. Visit the following URL for additional information on it and its policies: https://docs.microsoft.com/en-us/microsoft-365/security/office-365-security/safe-attachments?view=o365-worldwide.
Safe links
Finally, there's safe links. This is a URL scanning form of protection that provides protection when emails contain URLs that could be obscured to encourage users to click on and give up sensitive information. This is done in addition to the anti-spam and anti-malware protection that's performed on incoming messages. This protection is available for Office 365 apps, as well as Microsoft Teams. To learn more about safe links, visit the following URL: https://docs.microsoft.com/en-us/microsoft-365/security/office-365-security/safe-links?view=o365-worldwide.
Now that we've covered the threat policies and what protection they can provide, let's discuss investigating threats and what response capabilities we have to combat them!
Threat investigation and response capabilities
When it comes to threat investigation and threat response in MDO, Microsoft provides a suite of best-in-class tools, with things such as threat trackers, Threat Explorer, real-time detection, and attack simulation training, which helps train users to learn the dos and don'ts of mail security. With that said, we'll break this section down into the following categories:
- Threat trackers
- Threat Explorer (real-time detection)
- Attack simulation training
You'll find these sections under Email & collaboration in the security.microsoft.com portal, as shown in the following screenshot:
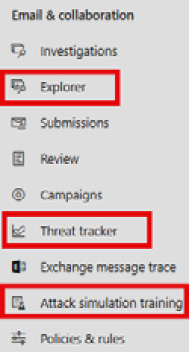
Figure 8.7 – Email & collaboration
Let's dive into the first category: threat trackers.
Threat trackers
Threat trackers are specific views about trending malware campaigns, broken into trending campaigns and noteworthy campaigns, as well as Saved or Tracked queries, which allow you to get back to saved view filters, as shown in the following screenshot:
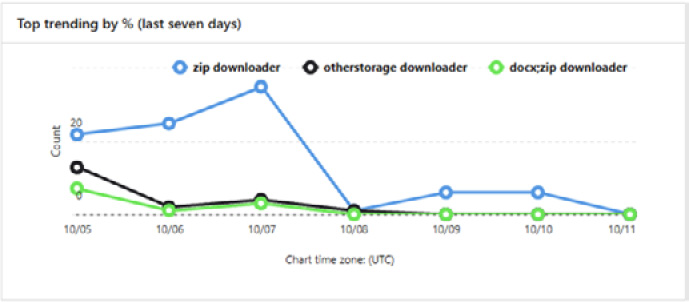
Figure 8.8 – Threat tracker trends
These are updated periodically to help you understand what trends are affecting your environment over time, which may help you implement stricter policies or other changes to cut down on those attack types. The following screenshot shows the chronological trend view:
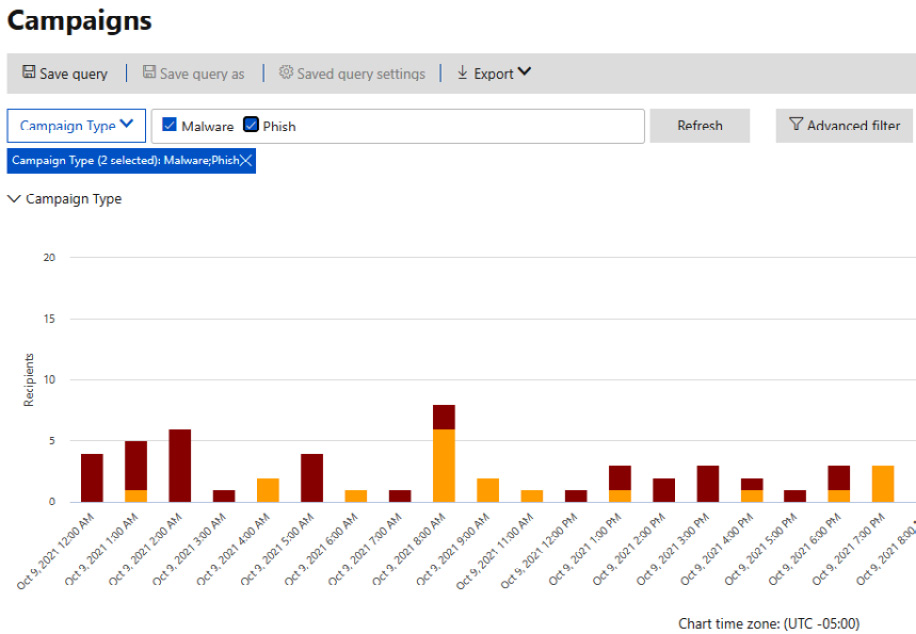
Figure 8.9 – Threat tracker trends
Below the graph, you get to see the breakdown of these campaigns and look at the messages that fall into the different categories. In the following screenshot, you can see an example of this, where there are categories regarding what percentage of the environment was targeted, the type, the recipients that got it, how many clicked it, and the click rate:

Figure 8.10 – Threat tracker – campaign breakdown
You can choose one of the examples and you'll see a pane slide out, as shown in the following screenshot. Here, you can see some more granular information, as well as a link that takes you right to the Explorer:

Figure 8.11 – Threat tracker – campaign example
Circling back to some terms we mentioned earlier, let's cover the Noteworthy and Trending trackers in more detail. Noteworthy trackers are going to be the more prominent threats that Microsoft feels you should have awareness of. These are going to be related to things that are potentially happening in your environment, as well as how they may impact you. Some of the topics here are around bigger campaigns that you should be reviewing continually with your security team.
When it comes to trending trackers, that's more related to new things that are coming into your environment. These will be things you need to understand and ensure you have the proper protection in place to protect against.
No matter what you're reviewing within Office 365 from a threat perspective, whether that's email or content and, soon to come, Office activities, threat trackers can help with your investigation as you track certain risks and threats within an organization. Next, we'll talk about Threat Explorer, which also compliments the threat trackers.
Threat Explorer (real-time detection)
Threat Explorer is another security tool your SOC can use when they're investigating and responding to threats. It gives you a view of what features you have enabled are blocking, as well as phishing URL verdict data on clicks. It also lets you start an automated investigation on a threat you see, as shown in the following screenshot:

Figure 8.12 – Actions in Threat Explorer
One thing I like to use is the Detection technology filter because it shows you which protection you have configured and the work it's doing. The following screenshot shows an example of this:
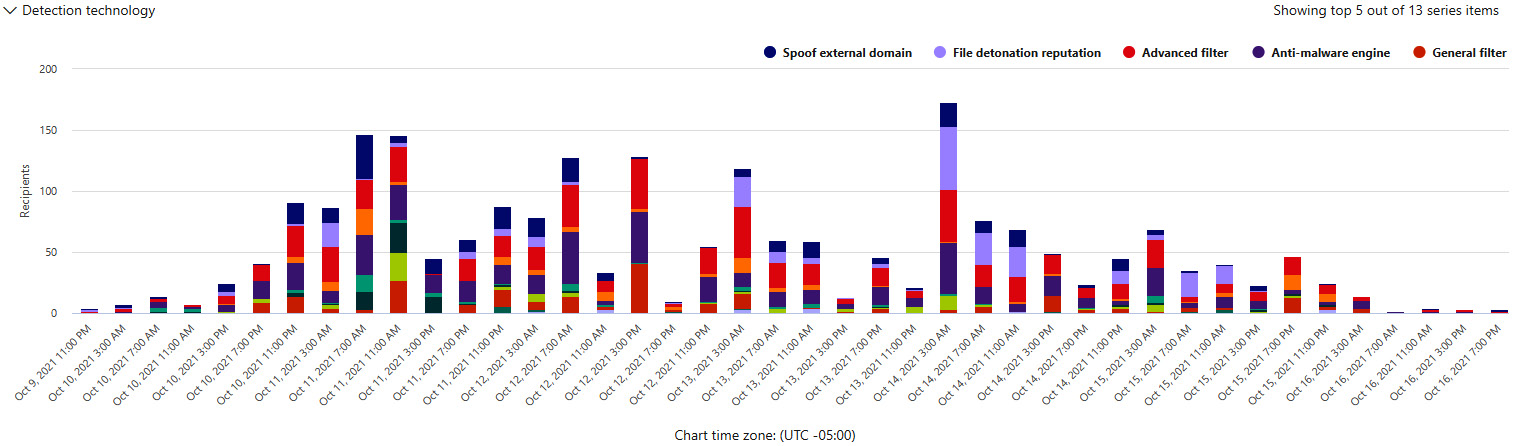
Figure 8.13 – Detection technology – Threat Explorer
To wrap up this section, we'll talk about some of the information on emails that's provided, such as pre-delivery and post-delivery information. This includes the actions that are taken by the ZAP process, which we covered earlier, as well as spam verdict, threat level, and the delivery locations of said message. All of this gets put into a single view for you to review as needed.
Attack simulation training
Something that is talked about a lot when it comes to Office 365 is its attack simulation feature. There's a handful of third-party tools out there that we could all name, but today, we'll be focusing on the Microsoft version of it. This allows you to run realistic scenarios in your environment that help you identify areas where you need to increase training for your end users.
The following screenshot shows the dashboard section. Here, you can see what simulations are in progress or have been completed, along with their behavior impact, if they were successful:
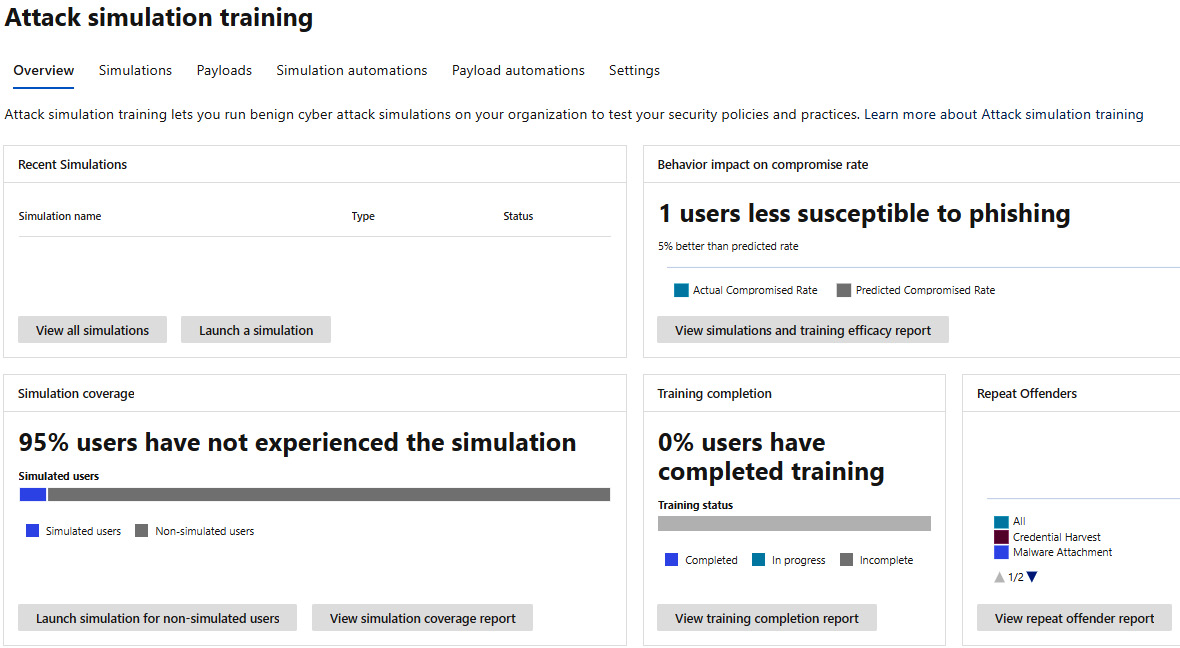
Figure 8.14 – Attack simulation training
The bottom part of the dashboard, as shown in the following screenshot, shows the percentage of your users that have not experienced any simulations, as well as the percentage of users that have completed training:

Figure 8.15 – Attack simulation dashboard, coverage, and training
There are five different types of campaigns you can run, as follows:
- Credential harvest: This typically contains a URL that tries to encourage you to enter credentials by mimicking a site you may or may not use.
- Malware attachment: This is an email that contains an attachment that, when run, can launch malicious code and compromise a machine.
- Link in attachment: This is similar to credential harvest but is contained within a document that acts as another method to try to entice you to enter credentials.
- Link to malware: Generally, this is a URL that directly takes you to a malicious file that can be downloaded and run malicious code as well.
- Drive-by-URL: Also referred to as a watering hole attack, this email contains a URL that takes a user to a site, where the site tries to run code to gather information or even run code on the device itself.
Once you get through a few simulations, you'll start seeing improvement actions – the same actions that can be found in Microsoft Secure Score. These are based on the payloads that you use in your simulations and are geared toward helping protect your users against those types of attacks.
To learn more about attack simulation, check out the following URL to get started: https://docs.microsoft.com/en-us/microsoft-365/security/office-365-security/attack-simulation-training-faq?view=o365-worldwide.
Automated investigation and response capabilities
When it comes to investigating and responding to alerts, it can be exhausting. Having some level of automated investigation and response capabilities can save your SOC from burnout and give them time to focus on deeper investigations. Automated investigation and response, or AIR, can help your team operate more effectively. Let's cover an example of this feature.
In this example, the alert is from a user submitting a suspicious email as a phishing attack, as shown in the following screenshot. On top of the message being sent to Microsoft for further analysis, it also gets sent to your administrators and is visible in Threat Explorer, under Submissions:
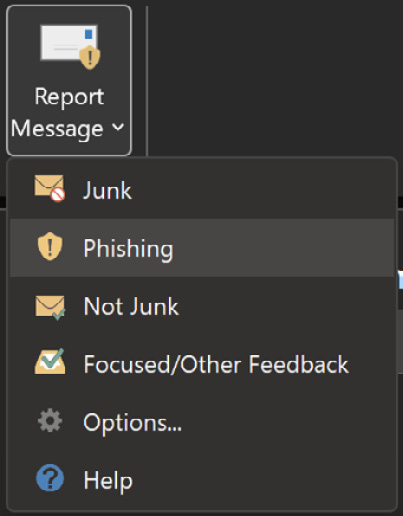
Figure 8.16 – Report message add-on
Once this submission comes in, it kicks off an investigation workflow automation, which includes the following phases:
- Determining what type of threat it might be and who sent it
- Where the email was sent from
- Whether other instances of the email were delivered or blocked
- An assessment from our analysts
- Whether the email is associated with any known campaigns
Once this has been done, recommendations are provided as actions to take on the email, as well as any entities involved. Once those investigations are done, there are a series of threat hunting steps that take place:
- Similar email messages are identified via email cluster searches.
- The signal is shared with other platforms, such as Microsoft Defender for Endpoint.
- A check is done to see if any users have clicked any malicious links in suspicious email messages.
- A check is done across EOP and Microsoft Defender for Office 365 to see if other, similar messages have been reported by users.
- A check is done to see if a user has been compromised. This check leverages signals across Office 365, Microsoft Defender for Cloud Apps, and Azure Active Directory, correlating any related user activity anomalies.
You can find other examples at https://docs.microsoft.com/en-us/microsoft-365/security/office-365-security/automated-investigation-response-office?view=o365-worldwide#example-a-user-reported-phish-message-launches-an-investigation-playbook.
The final step in this process is approving pending actions such as soft deleting email messages or clusters, as well as turning off external mail forwarding.
To learn more about remediation actions, go to https://docs.microsoft.com/en-us/microsoft-365/security/office-365-security/air-review-approve-pending-completed-actions?view=o365-worldwide.
Data loss prevention and insider risk
Finishing on protection within Microsoft 365 as it pertains to the productivity suite, let's talk a little about data loss prevention (DLP) and insider risk, as these are two more topics that are covered in the exam. We'll cover each topic at a high level as they are much smaller parts of the exam topics, but they're still important.
DLP
DLP policies are there to help you monitor activities that users perform on sensitive items, both at rest and in transit. Once you've done this, you can perform actions on them. A simple example of this is when a user tries to copy something marked as sensitive to an unapproved location or application. When DLP policies have been applied, actions can be taken automatically. This includes things such as the following:
- Showing a pop-up policy tip to the user that warns them that they may be trying to share a sensitive item inappropriately.
- Blocking sharing capabilities and, via a policy tip, allowing the user to override the block and capture the users' justification.
- Blocking sharing capabilities without the override option.
- For data at rest, sensitive items can be locked and moved to a secure quarantine location.
- For Teams chat, sensitive information will not be displayed.
DLP policies can be applied across the Microsoft 365 productivity stack, which includes locations such as the following:
- Exchange Online email
- SharePoint Online sites
- OneDrive accounts
- Teams chat and channel messages
- Microsoft Defender for Cloud Apps
- Windows 10 devices
- On-premises repositories
To learn more about preparing for and deploying DLP policies, go to https://docs.microsoft.com/en-us/microsoft-365/compliance/dlp-learn-about-dlp?view=o365-worldwide#prepare-for-dlp.
To take DLP a little further, you can read about endpoint DLP, where you can learn how actions on Windows devices can be reported to the security portal, as well as how to leverage MDE: https://docs.microsoft.com/en-us/microsoft-365/compliance/endpoint-dlp-learn-about?view=o365-worldwide#whats-different-in-endpoint-dlp.
Insider risk
Insider risk is the last topic we're going to cover before we wrap up this chapter. It's not a part of the MDO suite of tools per se, but it's still very relevant when it comes to protecting your productivity suite. It's a compliance suite that helps protect against insider risk by defining a policy that looks for malicious activities inside the organization when it comes to data. The following screenshot shows the head of the Insider risk management dashboard in the compliance.microsoft.com portal, which shows all the immediate options, as well as alerts below that:
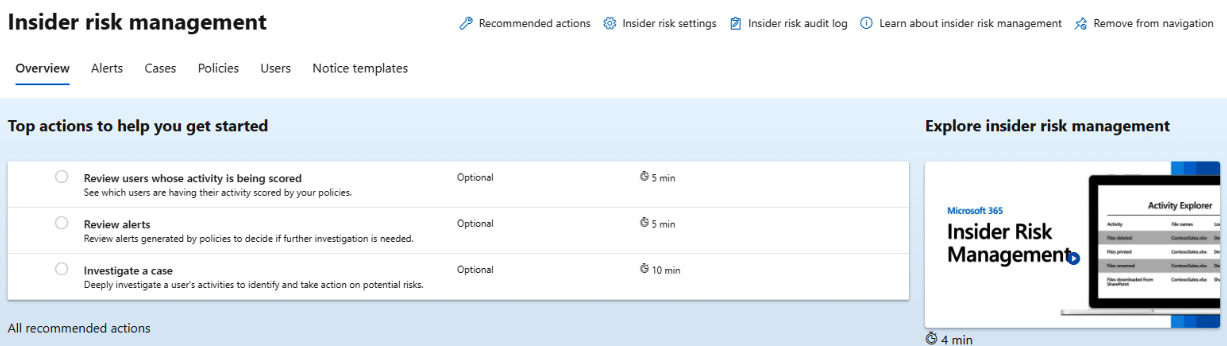
Figure 8.17 – Insider risk management
There are a few behaviors that come to mind when it comes to insider risk, such as confidential data being leaked, confidentiality violations, IP theft, and insider trading. The amount of data that's being moved around in different areas across many applications can be challenging to govern. Here, you can identify potential risks with analytics, a feature that's in preview at the time of writing. Scans run daily and are a great way to keep on top of potential risks as new things are added to the Office 365 suite.
It can scan from sources such as the following:
- Microsoft 365 audit logs
- Exchange Online
- Azure Active Directory
The following screenshot shows the dialog to get those scans going. You'll see this in your recommendations when you get started, as shown here:
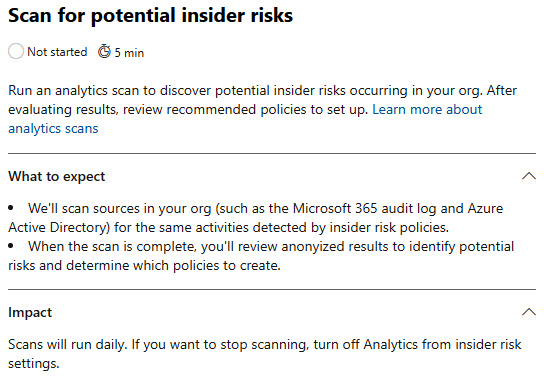
Figure 8.18 – Insider risk analytics scan
To learn more about the analytics piece, go to https://docs.microsoft.com/en-us/microsoft-365/compliance/insider-risk-management-settings?view=o365-worldwide#analytics-preview.
Let's cover the templates that are provided out of the box before we finish up; see the following screenshot for an example of what you get to start with. These categories can be broken into the following templates:
- Data theft by departing users
- General data leaks
- Data leaks by priority users (preview)
- Data leaks by disgruntled users (preview)
- General security policy violations (preview)
- Security policy violations by departing users (preview)
- Security policy violations by priority users (preview)
- Security policy violations by disgruntled users (preview):
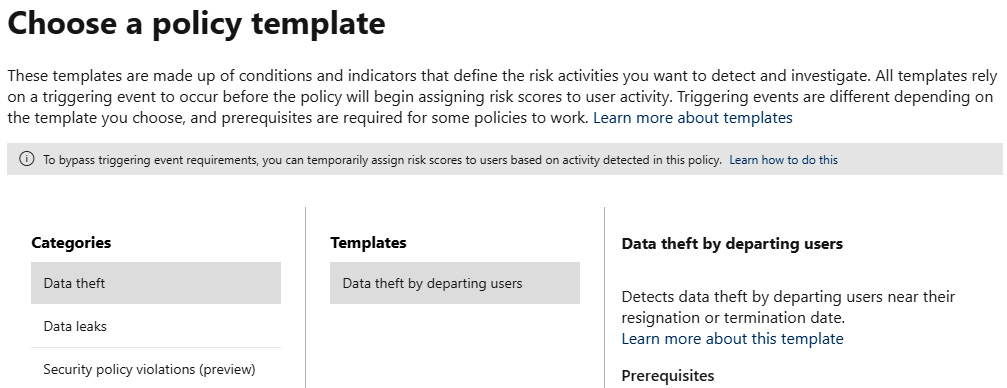
Figure 8.19 – Insider risk policy wizard
There is a lot more to insider risk, but as I stated earlier, it's not a huge part of the exam, so we don't need to spend a ton of time here. I would still recommend that you go and read the documentation if you end up working in that area more: https://docs.microsoft.com/en-us/microsoft-365/compliance/insider-risk-management?view=o365-worldwide.
Summary
In this chapter, we looked at Defender for Office and made sure our productivity suite is ready for the world. We covered a lot. You could read into all the topics we covered in much more detail, and I encourage you to. These products change monthly, with new features already in preview. We covered various topics, from the various threat policies MDO offers, how you can perform investigations and respond to threats, the automated investigation and response capabilities of MDO, and DLP and insider risk. This chapter has hopefully helped you understand what needs to be protected outside of endpoints and servers. If this is an area you specialize in or want to specialize in, spend some time going through the documentation – it's great and it's endless. Get in the lab, play with it, break it, fix it, and so on, but more importantly, have fun with it.
Moving into Chapter 9, Microsoft Defender for Cloud Apps and Protecting your Cloud Apps, we'll cover what MDCA can do for your cloud apps with its rich visibility and control over data.