
5
Working with Classes, Structs, and OOP
For obvious reasons, the goal of this book isn’t to give you a splitting headache from information overload. However, these next topics will take you out of the beginner’s cubicle and into the open air of object-oriented programming (OOP). Up to this point, we’ve been relying exclusively on predefined variable types that are part of the C# language: under-the-hood strings, lists, and dictionaries that are classes, which is why we can create them and use their properties through dot notation. However, relying on built-in types has one glaring weakness—the inability to deviate from the blueprints that C# has already set.
Creating your classes gives you the freedom to define and configure blueprints of your design, capturing information and driving action that is specific to your game or application. In essence, custom classes and OOP are the keys to the programming kingdom; without them, unique programs will be few and far between.
In this chapter, you’ll get hands-on experience creating classes from scratch and discuss the inner workings of class variables, constructors, and methods. You’ll also be introduced to the differences between reference and value type objects, and how these concepts can be applied in Unity. The following topics will be discussed in more detail as you move along:
- Introducing OOP
- Defining classes
- Declaring structs
- Understanding reference and value types
- Integrating the object-oriented mindset
- Applying OOP in Unity
Introducing OOP
Object-Oriented Programming is the main programming paradigm that you’ll use when coding in C#. If classes and structs are the blueprints of our programs, then OOP is the architecture that holds everything together. When we refer to OOP as a programming paradigm, we are saying that it has specific principles for how the overall program should work and communicate.
Essentially, OOP focuses on objects rather than pure sequential logic—the data they hold, how they drive action, and, most importantly, how they communicate with each other.
Defining classes
Back in Chapter 2, The Building Blocks of Programming, we talked briefly about how classes are blueprints for objects (in this case objects in code, not GameObjects in Unity) and mentioned that they can be treated as custom variable types. We also learned that the LearningCurve script is a class, but a special one that Unity can attach to objects in the scene. The main thing to remember with classes is that they are reference types—that is, when they are assigned or passed to another variable, the original object is referenced, not a new copy. We’ll get into this after we discuss structs in the Declaring structs section. However, before any of that, we need to understand the basics of creating classes.
For now, we’re going to set aside how classes and scripts work in Unity and focus on how they are created and used in C#. Classes are created using the class keyword, as follows:
accessModifier class UniqueName
{
    Variables
    Constructors
    Methods
}
Any variables or methods declared inside a class belong to that class and are accessed through its unique class name.
To make the examples as cohesive as possible throughout this chapter, we’ll be creating and modifying a simple Character class that a typical game would have. We’ll also be moving away from code screenshots to get you accustomed to reading and interpreting code as you would see it “in the wild.” However, the first thing we need is a custom class of our own, so let’s create one.
We’ll need a class to practice with before we can understand their inner workings, so let’s create a new C# script and start from scratch:
- Right-click on the
Scriptsfolder that you created in Chapter 1, Getting to Know Your Environment, and choose Create > C# Script. - Name the script
Character, open it up in Visual Studio, and delete all the generated code except the first three lines that start with theusingkeyword. - Declare a public class called
Characterfollowed by a set of curly braces {}, and then save the file. Your class code should exactly match the following code:using System.Collections; using System.Collections.Generic; using UnityEngine; public class Character { }
We deleted the generated code because we won’t need to attach this script to a Unity GameObject.
Character is now registered as a public class blueprint. This means that any class in the project can use it to create characters. However, these are just the instructions—to create a character takes an additional step. This creational step is called instantiation and is the subject of the next section.
Instantiating class objects
Instantiation is the act of creating an object from a specific set of instructions, which is called an instance. If classes are blueprints, instances are the houses built from their instructions; every new instance of Character is its object, just as two houses built from the same instructions are still two different physical structures. What happens to one doesn’t have any repercussions for the other.
In Chapter 4, Control Flow and Collection Types, we created lists and dictionaries, which are default classes that come with C#, using their types and the new keyword. We can do the same thing for custom classes such as Character, which you’ll do next.
We declared the Character class as public, which means you can create a Character instance in any other class. Since we have LearningCurve working already, let’s declare a new character in the Start() method.
Open LearningCurve and declare a new Character type variable, called hero, in the Start() method:
Character hero = new Character();
Let’s break this down one step at a time:
- The variable type is specified as
Character, meaning that the variable is an instance of that class. - The variable is named
hero, and it is created using thenewkeyword, followed by theCharacterclass name and two parentheses (). This is where the actual instance is created in the program’s memory, even if the class is empty right now. - We can use the
herovariable just like any other object we’ve worked with so far. When theCharacterclass gets variables and methods of its own, we can access them fromherousing dot notation.
You could just as easily have used an inferred declaration when creating the hero variable, like so:
var hero = new Character();
Now, our character class can’t do much without any class fields to work with. You’ll be adding class fields and more in the next few sections.
Adding class fields
Adding variables, or fields, to a custom class is no different from what we’ve already been doing with LearningCurve. The same concepts apply, including access modifiers, variable scope, and value assignments. However, any variables belonging to a class are created with the class instance, meaning that if there are no values assigned, they will default to zero or null. In general, choosing to set initial values comes down to what information they will store:
- If a variable needs to have the same starting value whenever a class instance is created, setting an initial value is a solid idea. This would be useful for something like experience points or the starting score.
- If a variable needs to be customized in every class instance, like
CharacterName, leave its value unassigned and use a class constructor (a topic that we’ll get to in the Using constructors section).
Every character class is going to need a few basic fields; it’s your job to add them.
Let’s incorporate two variables to hold the character’s name and the number of starting experience points:
- Add two
publicvariables inside theCharacterclass’s curly braces—astringvariable for the name, and anintegervariable for the experience points. - Leave the
namevalue empty, but set the experience points to0so that every character starts from the bottom:public class Character { public string name; public int exp = 0; } - Add a debug log in
LearningCurveright after theCharacterinstance was initialized. Use it to print out the new character’snameandexpvariables using dot notation:Character hero = new Character(); Debug.LogFormat("Hero: {0} - {1} EXP", hero.name, hero.exp); - When
herois initialized,nameis assigned a null value that shows up as an empty space in the debug log, whileexpprints out as0. Notice that we didn’t have to attach theCharacterscript to any GameObjects in the scene; we just referenced them inLearningCurveand Unity did the rest. The console will now debug our character information, which is referenced as follows:

Figure 5.1: Screenshot of custom class properties printed in the console
To provide a complete view of the Unity editor, all our screenshots are taken in full-screen mode. For color versions of all book images, use the link below: https://packt.link/7yy5V.
At this point, our class is working, but it’s not very practical with these empty values. You’ll need to fix that with what’s called a class constructor.
Using constructors
Class constructors are special methods that fire automatically when a class instance is created, which is similar to how the Start method runs in LearningCurve. Constructors build the class according to its blueprint:
- If a constructor is not specified, C# generates a default one. The default constructor sets any variables to their default type values—numeric values are set to
0, Booleans tofalse, and reference types (classes) tonull. - Custom constructors can be defined with parameters, just like any other method, and are used to set class variable values at initialization.
- A class can have multiple constructors.
Constructors are written like regular methods but with a few differences; for instance, they need to be public, have no return type, and the method name is always the class name. As an example, let’s add a basic constructor with no parameters to the Character class and set the name field to something other than null.
Add this new code directly underneath the class variables, as follows:
public class Character
{
    public string name;
    public int exp = 0;
    public Character()
    {
        name = "Not assigned";
    }
}
Run the project in Unity and you’ll see the hero instance using this new constructor. The debug log will show the hero’s name as Not assigned instead of a null value:
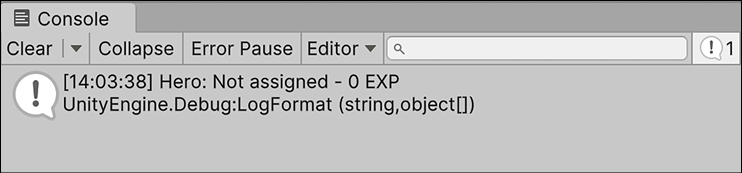
Figure 5.2: Screenshot of unassigned custom class variables printed to the console
This is good progress, but we need the class constructor to be more flexible. This means that we need to be able to pass in values so that they can be used as starting values, which you’ll do next.
Now, the Character class is starting to behave more like a real object, but we can make this even better by adding a second constructor to take in a name at initialization and set it to the name field:
- Add another constructor to
Characterthat takes in astringparameter, calledname. Having multiple constructors in a single class is called constructor overloading. - Assign the parameter to the class’s
namevariable using thethiskeyword:public class Character { public string name; public int exp = 0; public Character() { name = "Not assigned"; } public Character(string name) { this.name = name; } } - For convenience, constructors will often have parameters that share a name with a class variable. In these cases, use the
thiskeyword to specify which variable belongs to the class. In the example here,this.namerefers to the class’s name variable, whilenameis the parameter; without thethiskeyword, the compiler will throw a warning because it won’t be able to tell them apart. For clarity, you could also have used thethiskeyword in the default constructor where we set thenameproperty toNot assigned. - Create a new
Characterinstance inLearningCurve, calledheroine. Use the custom constructor to pass in a name when it’s initialized and print out the details in the console:Character heroine = new Character("Agatha"); Debug.LogFormat("Hero: {0} - {1} EXP", heroine.name, heroine.exp); - When a class has multiple constructors or a method has multiple variations, Visual Studio will show a set of arrows in the autocomplete popup that can be scrolled through using the arrow keys:

Figure 5.3: Screenshot of multiple method constructors in Visual Studio
- We can now choose between the basic and custom constructors when we initialize a new
Characterclass. TheCharacterclass itself is now far more flexible when it comes to configuring different instances for different situations:

Figure 5.4: Screenshot of multiple custom class instances printed in the console
Now the real work starts; our class needs methods to be able to do useful things besides acting as a storage facility for variables. Your next task is to put this into practice.
Declaring class methods
Adding methods to custom classes is no different from adding them to LearningCurve. However, this is a good opportunity to talk about a staple of good programming—Don’t Repeat Yourself (DRY). DRY is a benchmark of all well-written code. Essentially, if you find yourself writing the same line, or lines, over and over, it’s time to rethink and reorganize. This usually takes the form of a new method to hold the repeated code, making it easier to modify and call that functionality elsewhere in the current script or even from other scripts.
In programming terms, you’ll see this referred to as abstracting a method or feature.
We have a fair bit of repeated code already, so let’s take a look and see where we can increase the legibility and efficiency of our scripts.
Our repeated debug logs are a perfect opportunity to abstract out some code directly into the Character class:
- Add a new
publicmethod with avoidreturn type, calledPrintStatsInfo, to theCharacterclass. - Copy and paste the debug log from
LearningCurveinto the method body. - Change the variables to
nameandexp, since they can now be referenced from the class directly:public void PrintStatsInfo() { Debug.LogFormat("Hero: {0} - {1} EXP", this.name, this.exp); } - Replace the character debug log that we previously added to
LearningCurvewith method calls toPrintStatsInfo, and click on Play:Character hero = new Character(); hero.PrintStatsInfo(); Character heroine = new Character("Agatha"); heroine.PrintStatsInfo(); - Now that the
Characterclass has a method, any instance can freely access it using dot notation. Sinceheroandheroineare both separate objects,PrintStatsInfodebugs their respectivenameandexpvalues to the console.
This behavior is better than having the debug logs directly in LearningCurve. It’s always a good idea to group functionality into a class and drive action through methods. This makes the code more readable—as our Character objects are giving a command when printing out the debug logs, instead of repeating code.
The entire Character class should look like the following code:
using System.Collections;
using System.Collections.Generic;
using UnityEngine;
public class Character
{
public string name;
public int exp = 0;
public Character()
{
name = "Not assigned";
}
public Character(string name)
{
this.name = name;
}
public void PrintStatsInfo()
{
      Debug.LogFormat("Hero: {0} - {1} EXP", this.name, this.exp);
}
}
With classes covered, you’re well on your way to writing modularized code that’s readable, lightweight, and reusable. Now it’s time to tackle the class’s cousin object —the struct!
Declaring structs
Structs are similar to classes in that they are also blueprints for objects you want to create in your programs. The main difference is that they are value types, meaning they are passed by value instead of reference, like classes are. When structs are assigned or passed to another variable, a new copy of the struct is created, so the original isn’t referenced at all. We’ll go into this in more detail in the next section. First, we need to understand how structs work and the specific rules that apply when creating them.
Structs are declared in the same way as classes, and can hold fields, methods, and constructors:
accessModifier struct UniqueName
{
    Variables
    Constructors
    Methods
}
Like classes, any variables and methods belong exclusively to the struct and are accessed by its unique name.
However, structs have a few limitations:
- Variables cannot be initialized with values inside the struct declaration unless they’re marked with the
staticorconstmodifier—you can read more about this in Chapter 10, Revisiting Types, Methods, and Classes. For example, the following code would throw an error:public struct Author { string name = "Harrison"; int age = 32; } - Constructors without parameters aren’t permitted. For example, the following code would also throw an error:
public struct Author { public Author() { } } - Structs come with a default constructor that will automatically set all variables to their default values according to their type.
Every character requires a good weapon, and these weapons are the perfect fit for a struct object over a class. We’ll discuss why that is in the Understanding reference and value types section of this chapter. However, first, you’re going to create one to play around with.
Our characters are going to need good weapons to see them through quests, which are good candidates for a simple struct:
- Right-click on the
Scriptsfolder, choose Create, and select C# Script. - Name it
Weapon, open it up in Visual Studio, and delete all the generated code afterusing UnityEngine. - Declare a public struct called
Weapon, followed by a set of curly braces, and then save the file. - Add a field for
nameof typestringand another field fordamageof typeint. - You can have classes and structs nested within each other, but this is generally frowned upon because it clutters up the code:
public struct Weapon { public string name; public int damage; } - Declare a constructor with the
nameanddamageparameters, and set the struct fields using thethiskeyword:public Weapon(string name, int damage) { this.name = name; this.damage = damage; } - Add a debug method below the constructor to print out the weapon information:
public void PrintWeaponStats() { Debug.LogFormat("Weapon: {0} - {1} DMG", this.name, this.damage); } - In
LearningCurve, create a newWeaponstruct using the custom constructor and thenewkeyword, then use thePrintWeaponStatsmethod to debug the struct values:Weapon huntingBow = new Weapon("Hunting Bow", 105); huntingBow.PrintWeaponStats(); - Our new
huntingBowobject uses the custom constructor and provides values for both fields on initialization.
It’s a good idea to limit scripts to a single class, but it’s fairly common to see structs that are used exclusively by a class included in the file.
Now that we have an example of both reference (class) and value (struct) objects, it’s time to get acquainted with each of their finer points. More specifically, you’ll need to understand how each of these objects is passed and stored in memory.
Understanding reference and value types
Other than keywords and initial field values, we haven’t seen much difference between classes and structs so far. Classes are best suited for grouping together complex actions and data that will change throughout a program; structs are a better choice for simple objects and data that will remain constant for the most part, like values that stay the same throughout the entire project. Besides their uses, they are fundamentally different in one key area—that is, how they are passed or assigned between variables. Classes are reference types, meaning that they are passed by reference; structs are value types, meaning that they are passed by value.
Reference types
When the instances of our Character class are initialized, the hero and heroine variables don’t hold their class information—instead, they hold a reference to where the object is located in the program’s memory. If we assigned hero or heroine to another variable in the same class, the memory reference is assigned, not the character data. This has several implications, the most important being that if we have multiple variables storing the same memory reference, a change to one affects them all.
Topics like this are better demonstrated than explained; it’s up to you to try this out in a practical example, next.
It’s time to test that the Character class is a reference type:
- Declare a new
Charactervariable inLearningCurvecalledvillain. Assignvillainto theherovariable and use thePrintStatsInfomethod to print out both sets of information. - Click Play and take a look at the two debug logs that show up in the console:
Character hero = new Character(); Character villain= hero; hero.PrintStatsInfo(); villain.PrintStatsInfo(); - The two debug logs will be identical because
villainwas assigned toherowhen it was created. At this point, bothheroandvillainpoint to whereherois stored in memory:
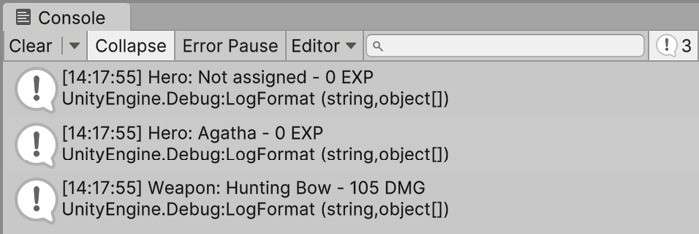
Figure 5.5: Screenshot of the struct stats printed to the console
- Now, change the name of
villainto something fun and click Play again:Character villain = hero; villain.name = "Sir Kane the Bold"; - You’ll see that both
heroandhero2now have the same name, even though only one of our characters’ data was changed:
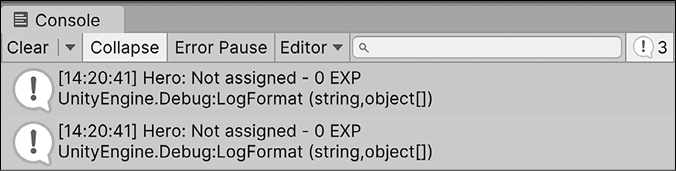
Figure 5.6: Screenshot of class instance properties printed to the console
The lesson here is that reference types need to be treated carefully and not copied when assigned to new variables. Any change to one reference trickles through all other variables holding the same reference.
If you’re trying to copy a class, either create a new, separate instance or reconsider whether a struct might be a better choice for your object blueprint. You’ll get a better glimpse of value types in the following section.
Value types
When a struct object is created, all of its data is stored in its corresponding variable with no references or connections to its memory location. This makes structs useful for creating objects that need to be copied quickly and efficiently, while still retaining their separate identities. Try this out with our Weapon struct in the following exercise.
Let’s create a new weapon object by copying huntingBow into a new variable and updating its data to see whether the changes affect both structs:
- Declare a new
Weaponstruct inLearningCurve, and assignhuntingBowas its initial value:Weapon huntingBow = new Weapon("Hunting Bow", 105); Weapon warBow = huntingBow; - Print out each weapon’s data using the debug method:
huntingBow.PrintWeaponStats(); warBow.PrintWeaponStats(); - The way they’re set up now, both
huntingBowandwarBowwill have the same debug logs, just like our two characters did before we changed any data:

Figure 5.7: Screenshot of the struct instances printed to the console
- Change the
warBow.nameandwarBow.damagefields to values of your choice and click on Play again:Weapon warBow = huntingBow; warBow.name = "War Bow"; warBow.damage = 155; - The console will show that only the data relating to
warBowwas changed, and thathuntingBowretains its original data.
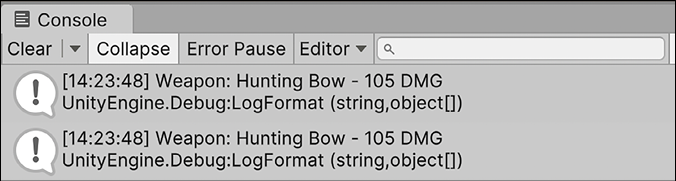
Figure 5.8: Screenshot of updated struct properties printed to the console
The takeaway from this example is that structs are easily copied and modified as their separate objects, unlike classes, which retain references to an original object. Now that we understand a little more about how structs and classes work under the hood, and have confirmed how reference and value types behave in their natural habitat, we’re in a good place to start talking about one of the most important coding topics, OOP, and how it fits into the programming landscape.
Integrating the object-oriented mindset
Things in the physical world operate on a similar level to OOP; when you want to buy a soft drink, you grab a can of soda, not the liquid itself. The can is an object, grouping related information and actions together in a self-contained package. However, there are rules when dealing with objects, both in programming and the grocery store—for instance, who can access them. Different variations and generic actions all play into the nature of the objects all around us.
In programming terms, these rules are the main tenets of OOP: encapsulation, inheritance, and polymorphism. Let’s discuss these topics in the next few sections!
Encapsulation
One of the best things about OOP is that it supports encapsulation—defining how accessible an object’s variables and methods are to outside code (this is sometimes referred to as calling code). Take our soda can as an example—in a vending machine, the possible interactions are limited. Since the machine is locked, not just anyone can come up and grab one; if you happen to have the right change, you’ll be allowed provisional access to it, but in a specified quantity. If the machine itself is locked inside a room, only someone with the door key will even know the soda can exists.
The question you’re asking yourself now is, how do we set these limitations? The simple answer is that we’ve been using encapsulation this entire time by specifying access modifiers for our object variables and methods.
If you need a refresher, go back and visit the Access modifiers section in Chapter 3, Diving into Variables, Types, and Methods.
Let’s try out a simple encapsulation example to understand how this works in practice. Our Character class is public, as are its fields and methods. However, what if we wanted a method that can reset a character’s data to its initial values? This could come in handy, but could prove disastrous if it was accidentally called, making it a perfect candidate for a private object member:
- Create a
privatemethod calledReset, with no return value inside theCharacterclass. Set thenameandexpvariables back to"Not assigned"and0, respectively:private void Reset() { this.name = "Not assigned"; this.exp = 0; } - Try and call
Reset()fromLearningCurveafter printing out thehero2data:
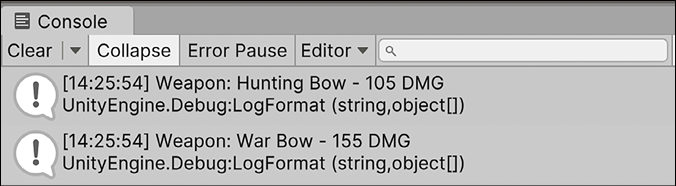
Figure 5.9: Screenshot of an inaccessible method in the Character class
If you’re wondering whether Visual Studio is broken, it’s not. Marking a method or variable as private will make it inaccessible using dot notation; it can only be called from within the class or struct it belongs to. If you manually type it in and hover over Reset(), you’ll see an error message regarding the method being protected.
To actually call this private method, we could add a Reset() command inside the class constructor or any other Character class method:
    public Character()
    {
        Reset();
    }
Encapsulation does allow more complex accessibility setups with objects; however, for now, we’re going to stick with public and private members. As we begin to flesh out our game prototype in the next chapter, we’ll add different modifiers as needed.
Now, let’s talk about inheritance, which is going to be your best friend when creating class hierarchies in your future games.
Inheritance
A C# class can be created in the image of another class, sharing its member variables and methods, but able to define its unique data. In OOP, we refer to this as inheritance, and it’s a powerful way of creating related classes without having to repeat code. Take the soda example again—there are generic sodas on the market that have all the same basic properties, and then there are special sodas. The special sodas share the same basic properties but have different branding, or packaging, that sets them apart. When you look at both side by side, it’s obvious that they’re both cans of soda—but they’re also obviously not the same.
The original class is usually called the base or parent class, while the inheriting class is called the derived or child class. Any base class members marked with the public, protected, or internal access modifiers are automatically part of the derived class—except for constructors. Class constructors always belong to their containing class, but they can be used from derived classes to keep repeated code to a minimum. Don’t worry too much about the different base class scenarios right now. Instead, let’s try out a simple game example.
Most games have more than one type of character, so let’s create a new class called Paladin that inherits from the Character class. You can add this new class to the Character script or create a new one. If you’re adding the new class to the Character script, make sure it’s outside the Character class’s curly brackets:
public class Character
{
    // All our previous code...
}
public class Paladin: Character
{
}
Just as LearningCurve inherits from MonoBehavior, all we need to do is add a colon : and the base class we want to inherit from, and C# does the rest. Now, any Paladin instances will have access to a name property and an exp property along with a PrintStatsInfo method.
It’s generally considered best practice to create a new script for different classes instead of adding them to existing ones. This separates your scripts and avoids having too many lines of code in any single file (called a bloated file).
This is great, but how do inherited classes handle their construction? You can find out in the following section.
Base constructors
When a class inherits from another class, they form a pyramid of sorts with member variables flowing down from the parent class to any of its derived children. The parent class isn’t aware of any of its children, but all children are aware of their parent. However, parent class constructors can be called directly from child constructors with a simple syntax modification:
public class ChildClass: ParentClass
{
    public ChildClass(): base()
    {
    }
}
The base keyword stands in for the parent constructor—in this case, the default constructor. However, since base is standing in for a constructor, and a constructor is a method, a child class can pass parameters up the pyramid to its parent constructor.
Since we want all Paladin objects to have a name variable, and Character already has a constructor that handles this, we can call the base constructor directly from the Paladin class and save ourselves the trouble of rewriting a constructor:
- Add a constructor to the
Paladinclass that takes in astringparameter, calledname. Use a colon (:) and thebasekeyword to call the parent constructor, passing inname:public class Paladin: Character { public Paladin(string name): base(name) { } } - In
LearningCurve, create a newPaladininstance calledknight. Use the base constructor to assign a value. CallPrintStatsInfofromknightand take a look at the console:Paladin knight = new Paladin("Sir Arthur"); knight.PrintStatsInfo(); - The debug log will be the same as our other
Characterinstances, but with the name that we assigned to thePaladinconstructor:
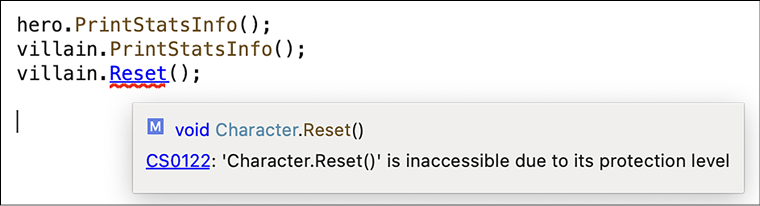
Figure 5.10: Screenshot of base character constructor properties
When the Paladin constructor fires, it passes the name parameter to the Character constructor, which sets the name value. Essentially, we used the Character constructor to do the initialization work for the Paladin class, making the Paladin constructor only responsible for initializing its unique properties, which it doesn’t have at this point.
Aside from inheritance, there will be times when you want to make new objects out of a combination of other existing objects. Think of LEGO®; you don’t start building from nothing—you already have different colored blocks and structures to work with. In programming terms, this is called composition, which we’ll discuss in the following section.
Composition
Aside from inheritance, classes can be composed of other classes. Take our Weapon struct, for example. Paladin can easily contain a Weapon variable inside itself and have access to all its properties and methods. Let’s do that by updating Paladin to take in a starting weapon and assign its value in the constructor:
public class Paladin: Character
{
    public Weapon weapon;

    public Paladin(string name, Weapon weapon): base(name)
    {
        this.weapon = weapon;
    }
}
Since weapon is unique to Paladin and not Character, we need to set its initial value in the constructor. We also need to update the knight instance to include a Weapon variable. So, let’s go back into LearningCurve.cs and use huntingBow:
Paladin knight = new Paladin("Sir Arthur", huntingBow);
If you run the game now, you won’t see anything different because we’re using the PrintStatsInfo method from the Character class, which doesn’t know about the Paladin class’s weapon property. To tackle this problem, we need to talk about polymorphism.
Polymorphism
Polymorphism is the Greek word for many-shaped and applies to OOP in two distinct ways:
- Derived class objects are treated the same as parent class objects. For example, an array of
Characterobjects could also storePaladinobjects, as they derive fromCharacter. - Parent classes can mark methods as
virtual, meaning that their instructions can be modified by derived classes using theoverridekeyword. In the case ofCharacterandPaladin, it would be useful if we could debug different messages fromPrintStatsInfofor each one.
Polymorphism allows derived classes to keep the structure of their parent class while also having the freedom to tailor actions to fit their specific needs. Any method you mark as virtual will give you the freedom of object polymorphism. Let’s take this new knowledge and apply it to our character debug method.
Let’s modify Character and Paladin to print out different debug logs using PrintStatsInfo:
- Change
PrintStatsInfoin theCharacterclass by adding thevirtualkeyword betweenpublicandvoid:public virtual void PrintStatsInfo() { Debug.LogFormat("Hero: {0} - {1} EXP", name, exp); } - Declare the
PrintStatsInfomethod in thePaladinclass using theoverridekeyword. Add a debug log to print out thePaladinproperties in whatever way you like:public override void PrintStatsInfo() { Debug.LogFormat("Hail {0} - take up your {1}!", this.name, this.weapon.name); } - This might look like repeated code, which we already said is bad form, but this is a special case. What we’ve done by marking
PrintStatsInfoasvirtualin theCharacterclass is to tell the compiler that this method can have many shapes according to the calling class. - When we declared the overridden version of
PrintStatsInfoinPaladin, we added the custom behavior that only applies to that class. Thanks to polymorphism, we don’t have to choose which version ofPrintStatsInfowe want to call from aCharacterorPaladinobject—the compiler already knows:

Figure 5.11: Screenshot of polymorphic character properties
This was a lot to take in, I know. So, let’s review some of the main points of OOP as we approach the finish line:
- OOP is all about grouping related data and actions into objects—objects that can communicate and act independently of each other
- Access to class members can be set using access modifiers, just like variables
- Classes can inherit from other classes, creating trickle-down hierarchies of parent/child relationships
- Classes can have members of other class or struct types
- Classes can override any parent methods marked as
virtual, allowing them to perform custom actions while retaining the same blueprint
OOP is not the only programming paradigm that can be used with C#—you can find practical explanations of the other main approaches here: http://cs.lmu.edu/~ray/notes/paradigms.
All the OOP you’ve learned in this chapter is directly applicable to the C# world. However, we still need to put this into perspective with Unity, which is what you’ll spend the rest of the chapter focusing on.
Applying OOP in Unity
If you’re around OOP languages enough, you’ll eventually hear the phrase “everything is an object” whispered like a secret prayer between developers. Following OOP principles, everything in a program should be an object, but GameObjects in Unity can represent your classes and structs. However, that’s not to say all objects in Unity have to be in the physical scene, so we can still use our newfound programmed classes behind the scenes.
Objects are a class act
Back in Chapter 2, The Building Blocks of Programming, we discussed how a script is transformed into a component when it’s added to a GameObject in Unity. Think of this in terms of the OOP principle of composition—GameObjects are the parent containers, and they can be made up of multiple components. This might sound contradictory to the idea of one C# class per script but, in truth, that’s more of a guideline for better readability than an actual requirement. Classes can be nested inside one another—it just gets messy fast. However, having multiple script components attached to a single GameObject can be very useful, especially when dealing with manager classes or behaviors.
Always try to boil down objects to their most basic elements, and then use composition to build bigger, more complex objects out of those smaller classes. It’s easier to modify a GameObject made out of small, interchangeable components than a large, clunky one.
Let’s take a look at Main Camera to see this in action:
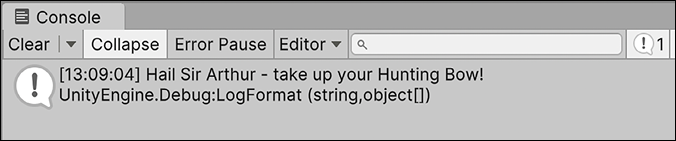
Figure 5.12: Screenshot of the Main Camera object in the Inspector
Each component in the preceding screenshot (Transform, Camera, Audio Listener, and the Learning Curve script) started as a class in Unity. Like instances of Character or Weapon, these components become objects in computer memory when we click on Play, complete with their member variables and methods.
If we were to attach LearningCurve (or any script or component) to 1,000 GameObjects and click on Play, 1,000 separate instances of LearningCurve would be created and stored in memory.
We can even create our instances of these components using their component name as the data type. Like classes, Unity component classes are reference types and can be created like any other variable. However, finding and assigning these Unity components is slightly different than what you’ve seen so far. For that, you’ll need to understand a little more about how GameObjects work in the following section.
Accessing components
Now that we know how components act on GameObjects, how do we go about accessing their specific instances? Lucky for us, all GameObjects in Unity inherit from the GameObject class, which means we can use their member methods to find anything we need in a scene. There are two ways to assign or retrieve GameObjects that are active in the current scene:
- Through the
GetComponent()orFind()methods in theGameObjectclass, which work with public and private variables. However, it’s important to be careful with these two methods; for optimal performance and best practices, the result of theGetComponent()call should always be saved in its own variables andFind()should be used sparingly and never in anUpdate()loop. - By dragging and dropping the GameObjects themselves from the
Projectpanel directly into variable slots in the Inspector tab. This option only works with public variables in C#, since they are the only ones that will appear in the Inspector. If you decide you need a private variable displayed in the Inspector, you can mark it with theSerializeFieldattribute.
You can learn more about attributes and SerializeField in the Unity documentation: https://docs.unity3d.com/ScriptReference/SerializeField.html.
Let’s take a look at the syntax of the first option.
Accessing components in code
Using GetComponent is fairly simple, but its method signature is slightly different from other methods that we’ve seen so far:
GameObject.GetComponent<ComponentType>();
All we need is the component type that we’re looking for, and the GameObject class will return the component if it exists and null if it doesn’t. There are other variations of the GetComponent method, but this one is the simplest because we don’t need to know specifics about the GameObject class that we’re looking for.
This is called a generic method, which we’ll discuss further in Chapter 13, Exploring Generics, Delegates, and Beyond. However, for now, let’s just work with the camera’s Transform.
Since LearningCurve is already attached to the Main Camera object, let’s grab the camera’s Transform component and store it in a public variable. The Transform component controls an object’s position, rotation, and scale in Unity, so it’s a handy example:
- In
LearningCurve, add a new publicTransformtype variable, calledCamTransform:public Transform CamTransform; - Initialize
CamTransforminStartusing theGetComponentmethod from theGameObjectclass. Use thethiskeyword, sinceLearningCurveis attached to the sameGameObjectcomponent as theTransformcomponent. - Access and debug the
localPositionproperty ofCamTransformusing dot notation (notice we’re storing the component in its own variable for performance):void Start() { CamTransform = this.GetComponent<Transform>(); Debug.Log(CamTransform.localPosition); } - We’ve added an uninitialized
public Transformvariable at the top ofLearningCurveand initialized it using theGetComponentmethod insideStart.GetComponentfinds theTransformcomponent attached to thisGameObjectcomponent and returns it toCamTransform. WithCamTransformnow storing aTransformobject, we have access to all its class properties and methods—includinglocalPositionin the following screenshot:
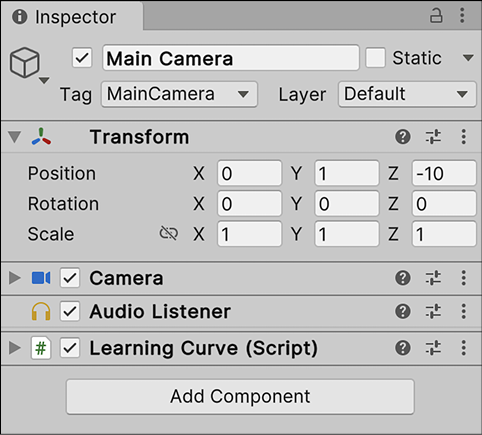
Figure 5.13: Screenshot of the Transform position printed to the console
The GetComponent method is fantastic for quickly retrieving components, but it only has access to components on the GameObject that the calling script is attached to. For instance, if we use GetComponent from the LearningCurve script attached to the Main Camera, we’ll only be able to access the Transform, Camera, and Audio Listener components.
If we want to reference a component on a separate GameObject, such as Directional Light, we would need to get a reference to the object first using the Find method. All it takes is the name of a GameObject, and Unity will kick back the appropriate GameObject for us to store or manipulate.
For reference, the name of each GameObject can be found at the top of the Inspector tab with the object selected:
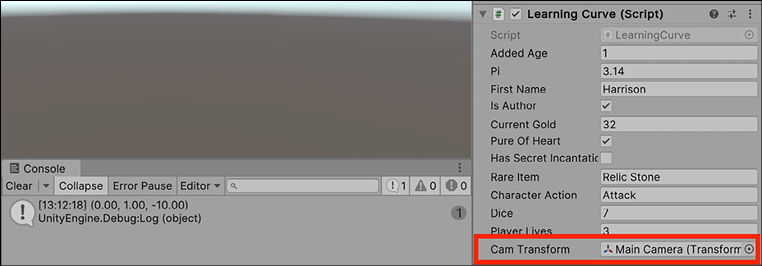
Figure 5.14: Screenshot of the Directional Light object in the Inspector
Finding objects in your game scenes is crucial in Unity, so you’ll need to practice. Let’s take the objects we have to work with and practice finding and assigning their components.
Let’s take the Find method out for a spin and retrieve the Directional Light object from LearningCurve:
- Add two variables to
LearningCurveunderneathCamTransform—one of typeGameObjectand one of typeTransform:public GameObject DirectionLight; public Transform LightTransform; - Find the
Directional Lightcomponent by name, and use it to initializeDirectionLightinside theStart()method:void Start() { DirectionLight = GameObject.Find("Directional Light"); } - Set the value of
LightTransformto theTransformcomponent attached toDirectionLight, and debug itslocalPosition. SinceDirectionLightis its GameObject now,GetComponentworks perfectly:LightTransform = DirectionLight.GetComponent<Transform>(); Debug.Log(LightTransform.localPosition); - Before running the game, it’s important to understand that method calls can be chained together to cut down the number of code steps. For instance, we could initialize
LightTransformin a single line by combiningFindandGetComponentwithout having to go throughDirectionLight:GameObject.Find("Directional Light").GetComponent<Transform>();
A word of warning—long lines of chained code can lead to poor readability and confusion when working on complex applications. It’s a good rule of thumb to avoid lines longer than this example.
While finding objects in code always works, you can also simply drag and drop the objects themselves into the Inspector tab. Let’s demonstrate how to do that in the following section.
Drag and drop
Now that we’ve covered the code-intensive way of doing things, let’s take a quick look at Unity’s drag and drop functionality. Although dragging and dropping is much faster than using the GameObject class in code, Unity sometimes loses the connections between objects and variables made this way when saving or exporting projects, or when Unity updates.
When you need to assign a few variables quickly, then, by all means, take advantage of this feature. For most cases, I’d advise sticking with code.
Let’s change LearningCurve to show how to assign a GameObject component using drag and drop:
- Comment the following line of code, where we used
GameObject.Find()to retrieve and assign the Directional Light object to theDirectionLightvariable://DirectionLight = GameObject.Find("Directional Light"); - Select the Main Camera GameObject, drag Directional Light to the
Direction Lightfield in the Learning Curve component, and click on Play:
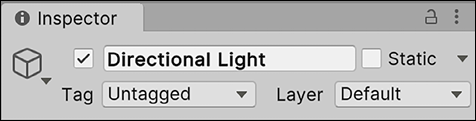
Figure 5.15: Screenshot of dragging Directional Light to the script property
- The Directional Light GameObject is now assigned to the
DirectionLightvariable. No code was involved because Unity assigned the variable internally, with no change to theLearningCurveclass.
It is important to understand a few things when deciding whether to assign variables using drag and drop or GameObject.Find(). First, the Find() method is marginally slower, leaving your game open to performance issues if you are calling the method multiple times in multiple scripts. Second, you need to be sure your GameObjects all have unique names in the scene hierarchy; if they don’t, it may lead to some nasty bugs in situations where you have several objects of the same name or change the object names themselves.
Summary
Our journey into classes, structs, and OOP marks the end of the first section on the fundamentals of C#. You’ve learned how to declare your classes and structs, which is the scaffolding for every application or game you’ll ever make. You’ve also identified the differences in how these two objects are passed and accessed and how they relate to OOP. Finally, you got hands-on with the tenets of OOP—creating classes using inheritance, composition, and polymorphism.
Identifying related data and actions, creating blueprints to give them shape, and using instances to build interactions are strong foundations for approaching any program or game. Add the ability to access components to the mix, and you’ve got the makings of a Unity developer.
The next chapter will segue into the basics of game development and scripting object behavior directly in Unity. We’ll start by fleshing out the requirements of a simple open-world adventure game, work with GameObjects in the scene, and finish off with a white-boxed environment ready for our characters.
Pop quiz—all things OOP
- What method handles the initialization logic inside a class?
- Being value types, how are structs passed?
- What are the three main tenets of OOP?
- Which
GameObjectclass method would you use to find a component on the same object as the calling class?
Don’t forget to check your answers against mine in the Pop Quiz Answers appendix to see how you did!
Join us on discord!
Read this book alongside other users, Unity game development experts and the author himself.
Ask questions, provide solutions to other readers, chat with the author via. Ask Me Anything sessions and much more.
Scan the QR code or visit the link to join the community.