
8
Scripting Game Mechanics
In the last chapter, we focused on using code to move the player and camera, with a trip into Unity physics on the side. However, controlling a playable character isn’t enough to make a compelling game; in fact, it’s probably the one area that remains fairly constant across different titles.
A game’s unique spark comes from its core mechanics, and the feeling of power and agency those mechanics give to the players. Without fun and engrossing ways to affect the virtual environment you’ve created, your game doesn’t stand a chance of repeat play, to say nothing of fun. As we venture into implementing the game’s mechanics, we’ll also be upgrading our knowledge of C# and its intermediate-level features.
This chapter will build on the Hero Born prototype by focusing on individually implemented game mechanics, as well as the basics of system design and user interfaces (UIs). You’ll be diving into the following topics:
- Making the player jump
- Shooting projectiles
- Creating a game manager
- Adding a user interface
Adding jumps
Remember from the last chapter that Rigidbody components add simulated real-world physics to GameObjects, and Collider components interact with each other using Rigidbody objects.
Another great thing that we didn’t discuss in the previous chapter about using a Rigidbody component to control player movement is that we can easily add in different mechanics that rely on applied force, such as jumping. In this section, we’ll get our player jumping and write our first utility function.
A utility function is a class method that performs some kind of grunt work so that we don’t clutter up gameplay code—for instance, wanting to check whether the player capsule is touching the ground to jump.
Before that, you’ll need to get acquainted with a new data type called enumerations, which you’ll do in the following section.
Introducing enumerations
By definition, an enumeration type is a set, or collection, of named constants that belong to the same variable. These are useful when you want a collection of different values, but with the added benefit of them all being of the same parent type.
It’s easier to show rather than tell with enumerations, so let’s take a look at their syntax in the following code snippet:
enum PlayerAction { Attack, Defend, Flee };
Let’s break down how this works, as follows:
- The
enumkeyword declares the type followed by the variable name - The different values an
enumcan have are written inside curly brackets, separated by a comma (except for the last item) - The
enumhas to end with a semicolon, just like all other data types we’ve worked with
In this case, we’re declaring a variable called PlayerAction, of type enum, which can be set to one of three values—Attack, Defend, or Flee.
To declare an enumeration variable, we use the following syntax:
PlayerAction CurrentAction = PlayerAction.Defend;
Again, we can break this down, as follows:
- The type is set as
PlayerAction, since our enumeration is just like any other type, like a string or integer - The variable is named
currentActionand set equal to aPlayerActionvalue - Each
enumconstant can be accessed using dot notation
Our currentAction variable is now set to Defend, but it can be changed to Attack or Flee at any time.
Enumerations may look simple at first glance, but they are extremely powerful in the right situations. One of their most useful features is the ability to store underlying types, which is the next subject you’ll be jumping into.
Underlying types
Enums come with an underlying type, meaning that each constant inside the curly brackets has an associated value. The default underlying type is int and starts at 0, just like arrays, with each sequential constant getting the next highest number.
Not all types are created equal—underlying types for enumerations are limited to byte, sbyte, short, ushort, int, uint, long, and ulong. These are called integral types, which are used to specify the size of numeric values that a variable can store.
This is a bit advanced for this book, but you’ll be using int in most cases. More information on these types can be found here: https://docs.microsoft.com/en-us/dotnet/csharp/language-reference/keywords/enum.
For example, our PlayerAction enumeration values right now are listed as follows, even though they aren’t explicitly written out:
enum PlayerAction { Attack = 0, Defend = 1, Flee = 2 };
There’s no rule that says underlying values need to start at 0; in fact, all you have to do is specify the first value, and then C# increments the rest of the values for you, as illustrated in the following code snippet:
enum PlayerAction { Attack = 5, Defend, Flee };
In the preceding example, Defend equals 6, and Flee equals 7 automatically. However, if we wanted the PlayerAction enum to hold non-sequential values, we could explicitly add them in, like this:
enum PlayerAction { Attack = 10, Defend = 5, Flee = 0};
We can even change the underlying type of PlayerAction to any of the approved types by adding a colon after the enum name, as follows:
enum PlayerAction : byte { Attack, Defend, Flee };
Retrieving an enum’s underlying type takes an explicit conversion, but we’ve already covered those, so the following syntax shouldn’t be a surprise:
enum PlayerAction { Attack = 10, Defend = 5, Flee = 0};
PlayerAction CurrentAction = PlayerAction.Attack;
int ActionCost = (int)CurrentAction;
Since CurrentAction is set to Attack, ActionCost would be 10 in the above example code.
Enumerations are extremely powerful tools in your programming arsenal. Your next challenge is to use your knowledge of enumerations to gather more specific user input from the keyboard.
Now that we have a basic grasp of enumeration types, we can capture keyboard input using the KeyCode enum. Update the PlayerBehavior script with the following highlighted code, save it, and hit Play:
public class PlayerBehavior : MonoBehaviour
{
    // ... No other variable changes needed ...

    // 1
    public float JumpVelocity = 5f;
    private bool _isJumping;

    void Start()
    {
        _rb = GetComponent<Rigidbody>();
    }

    void Update()
    {
        // 2
        _isJumping |= Input.GetKeyDown(KeyCode.J);
        // ... No other changes needed ...
    }

    void FixedUpdate()
    {
        // 3
        if(_isJumping)
        {
            // 4
            _rb.AddForce(Vector3.up * JumpVelocity, ForceMode.Impulse);
        }
        // 5
        _isJumping = false;
        // ... No other changes needed ...
    }
}
Let’s break down this code, as follows:
- First, we create two new variables—a public variable to hold the amount of applied jump force we want and a private Boolean to check if our player should be jumping.
- We set the value of
_isJumpingto theInput.GetKeyDown()method, which returns aboolvalue depending on whether a specified key is pressed during the current frame and will only fire once even if held down:- We use the
|=operator to set_isJumping, which is the logicalorcondition. This operator makes sure that we don’t have consecutive input checks override each other when the player is jumping. - The method accepts a key parameter as either a
stringor aKeyCode, which is an enumeration type. We specify that we want to check forKeyCode.J, or the J key being pressed.Checking for inputs in
FixedUpdatecan sometimes lead to input loss or even double inputs because it doesn’t run once per frame. To avoid this problem, we’re checking for inputs inUpdateand then applying force or setting the velocity inFixedUpdate, which is where physics are applied.
- We use the
- We use an
ifstatement to check if_isJumpingis true, and trigger the jump mechanic if it is. - Since we already have the Rigidbody component stored, we can pass the
Vector3andForceModeparameters toRigidBody.AddForce()and make the player jump:- We specify that the vector (or applied force) should be in the
updirection, multiplied byJumpVelocity. - The
ForceModeparameter determines how the force is applied and is also an enumeration type.Impulseapplies instant force to an object while taking its mass into account, which is perfect for a jump mechanic.Other
ForceModechoices can be useful in different situations, all of which are detailed here: https://docs.unity3d.com/ScriptReference/ForceMode.html.
- We specify that the vector (or applied force) should be in the
- At the end of every
FixedUpdateframe, we reset_isJumpingtofalseso the input check knows a complete jump and the landing cycle have been completed.
If you play the game now, you’ll be able to move around and jump when you hit the spacebar. However, the mechanic allows you to keep jumping indefinitely, which isn’t what we want. We’ll work on limiting our jump mechanic to one at a time in the next section, using something called a layer mask.
Working with layer masks
Think of layer masks as invisible groups that a GameObject can belong to, used by the physics system to determine anything from navigation to intersecting collider components. While more advanced uses of layer masks are outside the scope of this book, we’ll create and use one to perform a simple check—whether the player capsule is touching the ground—in order to limit the player to one jump at a time.
Before we can check that the player capsule is touching the ground, we need to add all the environment objects in our level to a custom layer mask. This will let us perform the actual collision calculation with the Capsule Collider component that’s already attached to the player, in order to detect when the player lands on the ground. Proceed as follows:
- Select any environment GameObject in the Hierarchy, and in the corresponding Inspector pane, click on Layer | Add Layer..., as illustrated in the following screenshot:

Figure 8.1: Selecting layers in the Inspector pane
To provide a complete view of the Unity editor, all our screenshots are taken in full-screen mode. For color versions of all book images, use the link below: https://packt.link/7yy5V.
- Add a new layer called
Groundby typing the name into the first available slot, which is Layer 6. Layers 0–5 are reserved for Unity’s default layers, even though Layer 3 is empty, as illustrated in the following screenshot:
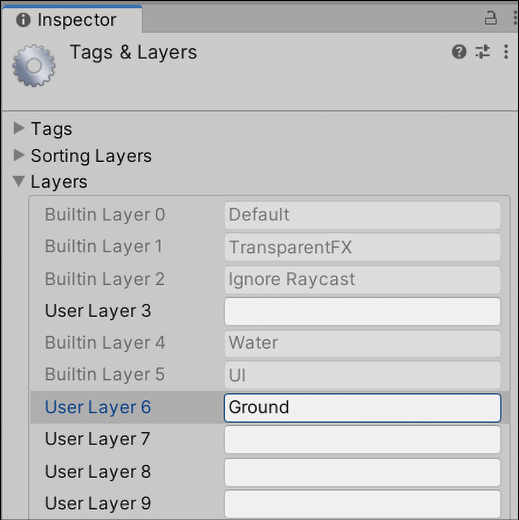
Figure 8.2: Adding layers in the Inspector pane
- Select the Environment parent GameObject in the Hierarchy, click on the Layer dropdown, and select Ground:

Figure 8.3: Setting a custom layer
After you have selected the Ground option shown in the preceding screenshot, click Yes, change children when a dialog appears asking you if you want to change all child objects. Here, you’ve defined a new layer called Ground and assigned every child object of Environment to that layer. Even though we can’t jump off the walls of the arena, marking all our environment objects with the ground layer is easier than going through each child object.
Going forward, all the objects on the Ground layer can be checked to see if they intersect with a specific object. You’ll use this in the following challenge to make sure the player can perform a jump if it’s on the ground; no unlimited jump hacks here.
Since we don’t want code cluttering up the Update() method, we’ll do our layer mask calculations in a utility function and return a true or false value based on the outcome. To do so, proceed as follows:
- Add the following highlighted code to
PlayerBehaviorand play the scene again:public class PlayerBehavior : MonoBehaviour { // 1 public float DistanceToGround = 0.1f; // 2 public LayerMask GroundLayer; // 3 private CapsuleCollider _col; // ... No other variable changes needed ... void Start() { _rb = GetComponent<Rigidbody>(); // 4 _col = GetComponent<CapsuleCollider>(); } void Update() { // ... No changes needed ... } void FixedUpdate() { // 5 if(IsGrounded() && _isJumping) { _rb.AddForce(Vector3.up * JumpVelocity, ForceMode.Impulse); } // ... No other changes needed ... } // 6 private bool IsGrounded() { // 7 Vector3 capsuleBottom = new Vector3(_col.bounds.center.x, _col.bounds.min.y, _col.bounds.center.z); // 8 bool grounded = Physics.CheckCapsule(_col.bounds.center, capsuleBottom, DistanceToGround, GroundLayer, QueryTriggerInteraction.Ignore); // 9 return grounded; } } - With the
PlayerBehaviorscript selected, set Ground Layer in the Inspector pane to Ground from the Ground Layer dropdown, as illustrated in the following screenshot:

Figure 8.4: Setting the Ground Layer
Let’s break down the preceding code, as follows:
- We create a new variable for the distance we’ll check between the player Capsule Collider and any Ground Layer object.
- We create a
LayerMaskvariable that we can set in the Inspector and use for the collider detection. - We create a variable to store the player’s Capsule Collider component.
- We use
GetComponent()to find and return the Capsule Collider attached to the player. - We update the
ifstatement to check whetherIsGroundedreturnstrueand the J key is pressed before executing the jump code. - We declare the
IsGrounded()method with aboolreturn type. - We create a local
Vector3variable to store the position at the bottom of the player’s Capsule Collider, which we’ll use to check for collisions with any objects on the Ground layer:- All Collider components have a
boundsproperty, which gives us access to the min, max, and center positions of its x, y, and z axes - The bottom of the Collider is the 3D point at center x, min y, and center z
- All Collider components have a
- We create a local
boolto store the result of theCheckCapsule()method that we call from thePhysicsclass, which takes in the following five arguments:- The start of the capsule, which we set to the middle of the Capsule Collider since we only care about checking whether the bottom touches the ground.
- The end of the capsule, which is the
capsuleBottomposition we’ve already calculated. - The radius of the capsule, which is the
DistanceToGroundalready set. - The layer mask we want to check collisions on, set to
GroundLayerin the Inspector. - The query trigger interaction, which determines whether the method should ignore colliders that are set as triggers. Since we want to ignore all triggers, we use the
QueryTriggerInteraction.Ignoreenum.We could also use the
Distancemethod from theVector3class to determine how far we are from the ground, since we know the height of the player capsule. However, we’re going to stick with using thePhysicsclass, since that’s the focus of this chapter.
- We return the value stored in
groundedat the end of the calculation.We could have done the collision calculation manually, but that would require more complex 3D math than we have time to cover here. However, it’s always a good idea to use built-in methods when available.
That was an involved piece of code that we just added into PlayerBehavior, but when you break it down, the only new thing we did was use a method from the Physics class. In plain English, we supplied CheckCapsule() with a start point and endpoint, a collision radius, and a layer mask. If the endpoint gets closer than the collision radius to an object on the layer mask, the method returns true—meaning the player is touching the ground. If the player is in a mid-jump position, CheckCapsule() returns false.
Since we’re checking IsGround in the if statement every frame in Update(), our player’s jump skills are only allowed when touching the ground.
That’s all you’re going to do with the jump mechanic, but the player still needs a way to interact and defend themself against the hordes of enemies that will eventually populate the arena. In the following section, you’ll fix that gap by implementing a simple shooting mechanic.
Shooting projectiles
Shooting mechanics are so common that it’s hard to think of a first-person game without some variation present, and Hero Born is no different. In this section, we’ll talk about how to instantiate GameObjects from Prefabs while the game is running, and use the skills we’ve learned to propel them forward using Unity physics.
Instantiating objects
The concept of instantiating a GameObject in the game is similar to instantiating an instance of a class—both require starting values so that C# knows what kind of object we want to create and where it needs to be created. To create objects in the scene at runtime, we use the GameObject.Instantiate() method and provide a Prefab object, a starting position, and a starting rotation.
Essentially, we can tell Unity to create a given object with all its components and scripts at this spot, looking in this direction, and then manipulate it as needed once it’s born in the 3D space. Before we instantiate an object, you’ll need to create the object Prefab itself, which is your next task.
Before we can shoot any projectiles, we’ll need a Prefab to use as a reference, so let’s create that now, as follows:
- Select + | 3D Object | Sphere in the Hierarchy panel and name it
Bullet:- Change its Scale to
0.15in the x, y, and z axes in the Transform component
- Change its Scale to
- Select the Bullet in the Inspector and use the Add Component button at the bottom to search for and add a Rigidbody component, leaving all default properties as they are.
- Create a new material in the
Materialsfolder using Create | Material, and name itBullet_Mat:- Change the Albedo property to a deep yellow
- Drag and drop the material from the Materials folder onto the
BulletGameObject in the Hierarchy pane:

Figure 8.5: Setting projectile properties
- Select the Bullet in the Hierarchy panel and drag it into the
Prefabsfolder in the Project panel (you can always tell when an object in the Hierarchy is a Prefab because it turns blue). Then, delete it from the Hierarchy to clean up the scene:
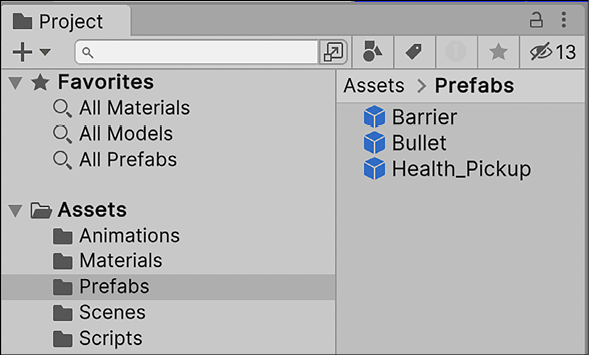
Figure 8.6: Creating a projectile Prefab
You created and configured a Bullet Prefab GameObject that can be instantiated as many times as you need in the game and updated as needed. This means you’re ready for the next challenge—shooting projectiles.
Adding the shooting mechanic
Now that we have a Prefab object to work with, we can instantiate and move copies of the Prefab whenever we hit the spacebar key to create a shooting mechanic, as follows:
- Update the
PlayerBehaviorscript with the following code:public class PlayerBehavior : MonoBehaviour { // 1 public GameObject Bullet; public float BulletSpeed = 100f; // 2 private bool _isShooting; // ... No other variable changes needed ... void Start() { // ... No changes needed ... } void Update() { // 3 _isShooting |= Input.GetKeyDown(KeyCode.Space); // ... No other changes needed ... } void FixedUpdate() { // ... No other changes needed ... // 4 if (_isShooting) { // 5 GameObject newBullet = Instantiate(Bullet, this.transform.position + new Vector3(0, 0, 1), this.transform.rotation); // 6 Rigidbody BulletRB = newBullet.GetComponent<Rigidbody>(); // 7 BulletRB.velocity = this.transform.forward * BulletSpeed; } // 8 _isShooting = false; } private bool IsGrounded() { // ... No changes needed ... } } - In the Inspector, drag the Bullet Prefab from the Project panel into the Bullet property of
PlayerBehavior, as illustrated in the following screenshot:

Figure 8.7: Setting the Bullet Prefab
- Play the game and use the left mouse button to fire projectiles in the direction the player is facing!
Let’s break down the code as follows:
- We create two variables: one to store the Bullet Prefab, the other to hold the Bullet speed. The best practice is to always declare new variables as private unless there’s a good reason to make them public.
- Like our jumping mechanic, we use a Boolean in the
Updatemethod to check if our player should be shooting. - We set the value of
_isShootingusing theorlogical operator andInput.GetKeyDown(KeyCode.Space), just like we did for the jumping mechanic. Then, we check if our player is supposed to be shooting using the_isShootingvariable. - We create a local GameObject variable every time the left mouse button is pressed:
- We use the
Instantiate()method to assign a GameObject tonewBulletby passing in theBulletPrefab. We also use the player capsule’s position to place the newBulletPrefab in front of the player (one unit forward along the z axis) to avoid any collisions. - We append it as a
GameObjectto explicitly cast the returned object to the same type asnewBullet, which in this case is a GameObject.
- We use the
- We call
GetComponent()to return and store the Rigidbody component onnewBullet. - We set the
velocityproperty of the Rigidbody component to the player’stransform.forwarddirection multiplied byBulletSpeed:- Changing the
velocityinstead of usingAddForce()ensures that gravity doesn’t pull our bullets down in an arc when fired
- Changing the
- Finally, we set the
_isShootingvalue tofalseso our shooting input is reset for the next input event.
Again, you’ve significantly upgraded the logic the player script is using. You should now be able to use the mouse to shoot projectiles that fly straight out from the player’s position.
However, the problem now is that your game scene, and Hierarchy, is flooded with spent Bullet objects. Your next task is to clean those objects up once they’ve been fired, to avoid any performance issues.
Managing object build-up
Whether you’re writing a completely code-based application or a 3D game, it’s important to make sure that unused objects are regularly deleted to avoid overloading the program. Our bullets don’t exactly play an important role after they are shot; they just keep existing on the floor near whatever wall or object they collided with.
With a mechanic such as shooting, this could result in hundreds, if not thousands, of bullets down the line, which is something we don’t want. Your next challenge is to destroy each bullet after a set delay time.
For this task, we can take the skills we’ve already learned and make the bullets responsible for their self-destructive behavior, as follows:
- Create a new C# script in the
Scriptsfolder and name itBulletBehavior. - Drag and drop the
BulletBehaviorscript onto theBulletPrefab in thePrefabsfolder and add the following code:using System.Collections; using System.Collections.Generic; using UnityEngine; public class BulletBehavior : MonoBehaviour { // 1 public float OnscreenDelay = 3f; void Start () { // 2 Destroy(this.gameObject, OnscreenDelay); } }
Let’s break down this code, as follows:
- We declare a
floatvariable to store how long we want the Bullet Prefabs to remain in the scene after they are instantiated. - We use the
Destroy()method to delete the GameObject:Destroy()always needs an object as a parameter. In this case, we use thethiskeyword to specify the object that the script is attached to.Destroy()can optionally take an additionalfloatparameter as a delay, which we use to keep the bullets on screen for a short amount of time.
Play the game again, shoot some bullets, and watch as they are deleted from the Hierarchy by themselves in the scene after a specific delay. This means that the bullet executes its defined behavior, without another script having to tell it what to do, which is an ideal application of the Component design pattern.
Now that our housekeeping is done, you’re going to learn about a key component of any well-designed and organized project—the manager class.
Creating a game manager
A common misconception when learning to program is that all variables should automatically be made public, but in general, this is not a good idea. In my experience, variables should be thought of as protected and private from the start, and only made public if necessary. One way you’ll see experienced programmers protect their data is through manager classes, and since we want to build good habits, we’ll be following suit. Think of manager classes as a funnel where important variables and methods can be accessed safely.
When I say safely, I mean just that, which might seem unfamiliar in a programming context. However, when you have different classes communicating and updating data with each other, things can get messy. That’s why having a single contact point, such as a manager class, can keep this to a minimum. We’ll get into how to do that effectively in the following section.
Tracking player properties
Hero Born is a simple game, so the only two data points we need to keep track of are how many items the player has collected and how much health they have left. We want these variables to be private so that they can only be modified from the manager class, giving us control and safety. Your next challenge is to create a game manager for Hero Born and populate it with helpful functionality.
Game manager classes will be a constant facet of any project you develop in the future, so let’s learn how to properly create one, as follows:
- Create a new C# script in the
Scriptsfolder and name itGameBehavior.Usually, this script would be named
GameManager, but Unity reserves that name for its own scripts. If you ever create a script and a cogwheel icon shows up next to its name instead of the C# file icon, that tells you it’s restricted.
- Create a new empty GameObject in the Hierarchy by using + | Create Empty, and name it
Game Manager. - Drag and drop the
GameBehavior.csscript from the Scripts folder onto theGame Managerobject, as illustrated in the following screenshot:
Figure 8.8: Attaching the game manager script
Manager scripts, and other non-game files, are set up on empty objects to put them in the scene, even though they don’t interact with the actual 3D space.
- Add the following code to the top of
GameBehavior.cs:public class GameBehavior : MonoBehaviour { private int _itemsCollected = 0; private int _playerHP = 10; }
Let’s break down this code. We added two new private variables to hold the number of items picked up and how many lives the player has left; these are private because they should only be modifiable in this class. If they were made public, other classes could change them at will, which could lead to the variables storing incorrect or concurrent data.
Having these variables declared as private means that you are responsible for how they are accessed. The following topic on get and set properties will introduce you to a standard, safe way to accomplish this task going forward.
The get and set properties
We’ve got our manager script and private variables set up, but how do we access them from other classes if they’re private? While we could write separate public methods in GameBehavior to handle passing new values to the private variables, let’s see whether there is a better way of doing things.
In this case, C# provides all variables with get and set properties, which are perfectly suited to our task. Think of these as methods that are automatically fired by the C# compiler whether we explicitly call them or not, similar to how Start() and Update() are executed by Unity when a scene starts.
get and set properties can be added to any variable, with or without an initial value, as illustrated in the following code snippet:
public string FirstName { get; set; };
// OR
public string LastName { get; set; } = "Smith";
However, using them like this doesn’t add any additional benefits; for that, you need to include a code block for each property, as illustrated in the following code snippet:
public string FirstName
{
    get {
        // Code block executes when variable is accessed
    }
    set {
        // Code block executes when variable is updated
    }
}
Now, the get and set properties are set up to execute additional logic, depending on where it’s needed. We’re not done yet though, as we still need to handle the new logic.
Every get code block needs to return a value, while every set block needs to assign a value; this is where having a combination of a private variable, called a backing variable, and a public variable with get and set properties comes into play. The private variable remains protected, while the public variable allows controlled access from other classes, as shown in the following code snippet:
private string _firstName
public string FirstName {
    get {
        return _firstName;
    }
    set {
        _firstName = value;
    }
}
Let’s break this down, as follows:
- We can
returnthe value stored in the private variable from thegetproperty anytime another class needs it, without actually giving that outside class direct access - We can update the private variable anytime an outside class assigns a new value to the public variable, keeping them in sync
- The
valuekeyword is a stand-in for whatever new value is assigned
This can seem a little esoteric without an actual application, so let’s update GameBehavior with public variables with getter and setter properties to go along with our existing private variables.
Now that we understand the syntax of the get and set property accessors, we can implement them in our manager class for greater efficiency and code readability.
Update the code in GameBehavior, as follows:
public class GameBehavior : MonoBehaviour
{
    private int _itemsCollected = 0;
    private int _playerHP = 10;

    // 1
    public int Items
    {
        // 2
        get { return _itemsCollected; }
        // 3
        set {
               _itemsCollected = value;
               Debug.LogFormat("Items: {0}", _itemsCollected);
        }
    }
    // 4
    public int HP
    {
        get { return _playerHP; }
        set {
               _playerHP = value;
               Debug.LogFormat("Lives: {0}", _playerHP);
         }
    }
}
Let’s break down the code, as follows:
- We declare a new
publicvariable calledItemswithgetandsetproperties. - We use the
getproperty toreturnthe value stored in_itemsCollectedwheneverItemsare accessed from an outside class. - We use the
setproperty to assign_itemsCollectedto the newvalueofItemswhenever it’s updated, with an addedDebug.LogFormat()call to print out the modified value of_itemsCollected. - We set up a
publicvariable calledHPwithgetandsetproperties to complement the private_playerHPbacking variable.
Both private variables are now readable, but only through their public counterparts; they can only be changed in GameBehavior. With this setup, we ensure that our private data can only be accessed and modified from specific contact points. This makes it easier to communicate with GameBehavior from our other mechanical scripts, as well as to display the real-time data in the simple UI we’ll create at the end of the chapter.
Let’s test this out by updating the Items property when we successfully interact with an item pickup in the arena.
Updating item collection
Now that we have our variables set up in GameBehavior, we can update Items every time we collect an Item in the scene, as follows:
- Add the following highlighted code to the
ItemBehaviorscript:public class ItemBehavior : MonoBehaviour { // 1 public GameBehavior GameManager; void Start() { // 2 GameManager = GameObject.Find("Game Manager").GetComponent<GameBehavior>(); } void OnCollisionEnter(Collision collision) { if (collision.gameObject.name == "Player") { Destroy(this.transform.parent.gameObject); Debug.Log("Item collected!"); // 3 GameManager.Items += 1; } } } - Hit Play and collect the pickup item to see the new console log printout from the manager script, as illustrated in the following screenshot:

Figure 8.9: Collecting a pickup item
Let’s break down the code, as follows:
- We create a new variable of the
GameBehaviortype to store a reference to the attached script. - We use
Start()to initializeGameManagerby looking it up in the scene withFind()and adding a call toGetComponent().You’ll see this kind of code done in a single line quite often in Unity documentation and community projects. This is done for simplicity, but if you feel more comfortable writing out the
Find()andGetComponent()calls separately, go right ahead; there’s nothing wrong with clear, explicit formatting.
- We increment the
Itemsproperty using theGameManagerclass instance inOnCollisionEnter()after the Item Prefab is destroyed.
Since we already set up ItemBehavior to take care of collision logic, it’s easy to modify OnCollisionEnter() to communicate with our manager class when an item is picked up by the player. Keep in mind that separating functionality like this is what makes the code more flexible and less likely to break as you make changes during development.
The last piece Hero Born is missing is some kind of interface that displays game data to the player. In programming and game development, this is called a UI. Your final task in this chapter is to familiarize yourself with how Unity creates and handles the UI code.
Creating a GUI
At this point, we have several scripts working together to give players access to movement, jumping, collecting, and shooting mechanics. However, we’re still missing any kind of display or visual cue that shows our player’s stats, as well as a way to win and lose the game. We’ll focus on these two topics as we close out this last section.
Displaying player stats
UIs are the visual components of any computer system. The cursor, folder icons, and programs on your laptop are all UI elements. For our game, we want a simple display to let our players know how many items they’ve collected and their current health, and a textbox to give them updates when certain events happen.
UI elements in Unity can be added in the following two ways:
- Unity UI (uGUI)
- UI Toolkit
uGUI is an older UI system in Unity, but we’re going to use it over UI Toolkit because it’s based on GameObjects that can be easily manipulated right in the Scene view like any other object.
We’ll be going over the basics in this chapter, but you can find more information at: https://docs.unity3d.com/Packages/[email protected]/manual/index.html.
While UI Toolkit is a newer addition to the Unity engine, it uses UI Documents (UXML), which is based on standard web technologies and isn’t written in C#. Since we want to keep things squarely focused on C# as much as possible, we’ll be opting for uGUI instead.
If you’re interested in learning the newest Unity features when it comes to user interfaces, check out the UI Toolkit documentation at: https://docs.unity3d.com/2022.1/Documentation/Manual/UIElements.html.
If you’re curious about the comparison specifics between the different UI options in Unity, check out: https://docs.unity3d.com/2022.1/Documentation/Manual/UI-system-compare.html.
Your next task is to add a simple UI to the game scene that displays the items collected, player health, and progress information variables that are stored in GameBehavior.cs.
First, let’s create three text objects in our scene. User interfaces in Unity work off of a canvas, which is exactly what it sounds like. Think of the canvas as a blank painting that you can draw on that Unity will render on top of the game world for you. Whenever you create your first UI element in the Hierarchy panel, a Canvas parent object is created along with it:
- Right-click in the Hierarchy panel and select UI | Text - TextMeshPro. When the TMP Importer window pops up and asks you to import the missing assets, select Import TMP Essentials:

Figure 8.10: Importing TextMeshPro assets
TextMeshPro is Unity’s system for handling, rendering, and styling text. This topic is a little advanced for us to get into here, but if you’re interested you can read the documentation at: https://docs.unity3d.com/Manual/com.unity.textmeshpro.html.
- Select the new Text(TMP) object in the Hierarchy, hit Enter, and name it Health. Notice that a Canvas parent object and the new Text(TMP) object were created for you all at once:

Figure 8.11: Creating a Text element
- To see the canvas correctly, select 2D mode at the top of the Scene tab. From this view, our entire level is the tiny white line in the lower-left-hand corner:
- Even though the Canvas and level don’t overlap in the scene, when the game plays Unity will automatically overlay them correctly:

Figure 8.12: Canvas in the Unity editor
- If you select the Health object in the Hierarchy, you’ll see that the new text object was created in the lower-left corner of the canvas by default, and it has a whole list of customizable properties, like text and color, in the Inspector pane:
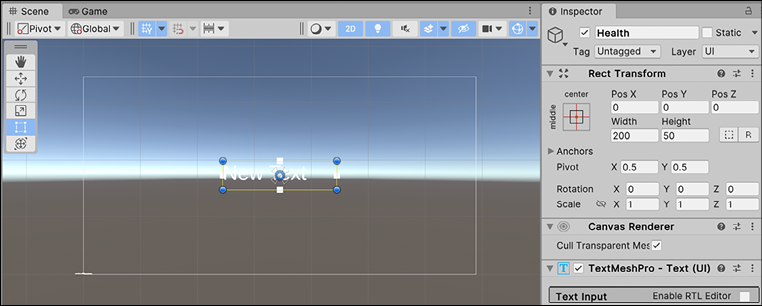
Figure 8.13: Text element on the Unity Canvas
- With the Health object selected in the Hierarchy pane, click on the Anchor presets in the Rect Transform component of the Inspector and choose Top Left:
- Anchors set a UI element’s point of reference on the canvas, meaning that whatever the size of the device screen, our health points will always be anchored to the top left of the screen:

Figure 8.14: Setting anchor presets
- With the Health object still selected in the Hierarchy, scroll down in the Inspector to the Main Settings, click on the color bar to the right of Vertex Color, and change it to black:

Figure 8.15: Setting text color properties
- In the Inspector pane, change the Rect Transform position to 110 on the X axis and –35 on the Y axis to position the text in the upper-right corner. Also, change the Text property to say Health:. We’ll be setting the actual value in code in a later step:

Figure 8.16: Setting text properties
- Repeat steps 1-6 to create a new UI Text object and name it Items:
- Set the anchor presets to Top Left, the Pos X to 110, and the Pos Y to –85
- Set Text to Items:

Figure 8.17: Creating another Text element
- Repeat steps 1-6 to create a new UI Text object and name it Progress:
- Set the anchor presets to Bottom Center, the Pos X to 0, the Pos Y to 15, and the Width to 435
- Set Text to Collect all the items to win!

Figure 8.18: Creating a progress text element
Now that we have our UI set up, let’s connect the variables we already have in our game manager script. Proceed as follows:
- Update
GameBehaviorwith the following code to collect an item and display onscreen text when items are collected:// 1 using TMPro; public class GameBehavior : MonoBehaviour { // 2 public int MaxItems = 4; // 3 public TMP_Text HealthText; public TMP_Text ItemText; public TMP_Text ProgressText; // 4 void Start() { ItemText.text += _itemsCollected; HealthText.text += _playerHP; } private int _itemsCollected = 0; public int Items { get { return _itemsCollected; } set { _itemsCollected = value; // 5 ItemText.text = "Items Collected: " + Items; // 6 if(_itemsCollected >= MaxItems) { ProgressText.text = "You've found all the items!"; } else { ProgressText.text = "Item found, only " + (MaxItems - _itemsCollected) + " more!"; } } } private int _playerHP = 10; public int HP { get { return _playerHP; } set { _playerHP = value; // 7 HealthText.text = "Player Health: " + HP; Debug.LogFormat("Lives: {0}", _playerHP); } } } - Select Game_Manager in the Hierarchy and drag over our three text objects one by one into their corresponding
GameBehaviorscript fields in the Inspector:

Figure 8.19: Dragging text elements to script components
- Run the game and take a look at our new onscreen GUI boxes, shown in the following screenshot:
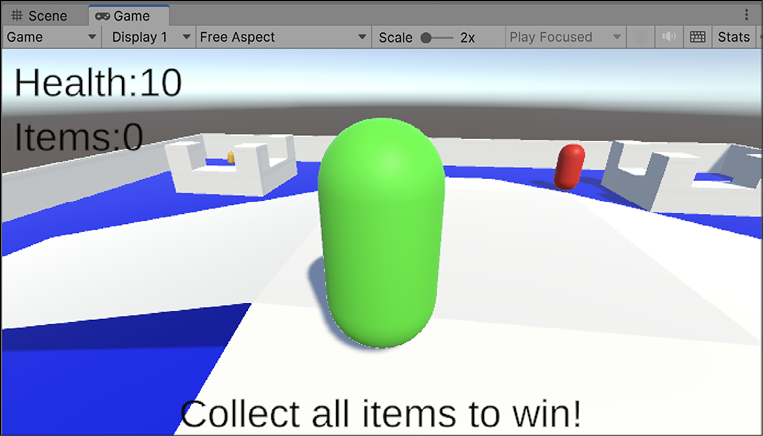
Figure 8.20: Testing UI elements in play mode
Let’s break down the code, as follows:
- We add the
TMPronamespace so we have access to the TMP_Text variable type, which is what our text objects in the Hierarchy are. - We create a new public variable for the max number of items in the level.
- We create three new TMP_Text variables, which we connect in the Inspector panel.
- Then, we use the
Startmethod to set the initial values of our health and items text using the += operator. - Every time an item is collected, we update the
textproperty of ItemText to show the updateditemscount. - We declare an
ifstatement in the set property of_itemsCollected:- If the player has gathered more than or equal to
MaxItems, they’ve won, andProgressText.textis updated - Otherwise,
ProgressText.textshows how many items are still left to collect
- If the player has gathered more than or equal to
- Every time the player’s health is damaged, which we’ll cover in the next chapter, we update the
textproperty ofHealthTextwith the new value.
When we play the game now, our three UI elements show up with the correct values; when an Item is collected, the ProgressText and _itemsCollected counts update, as illustrated in the following screenshot:

Figure 8.21: Updating the UI text
Every game can either be won or lost. In the last section of this chapter, your task is to implement those conditions and the UI that goes along with them.
Win and loss conditions
We’ve implemented our core game mechanics and a simple UI, but Hero Born is still missing an important game design element: its win and loss conditions. These conditions will manage how the player wins or loses the game and execute different code depending on the situation.
Back in the game document from Chapter 6, Getting Your Hands Dirty with Unity, we set out our win and loss conditions as follows:
- Collecting all items in the level with at least 1 health point remaining to win
- Taking damage from enemies until health points are at 0 to lose
These conditions are going to affect both our UI and game mechanics, but we’ve already set up GameBehavior to handle this efficiently. Our get and set properties will handle any game-related logic and changes to the UI when a player wins or loses.
We’re going to implement the win condition logic in this section because we have the pickup system already in place. When we get to the enemy AI behavior in the next chapter, we’ll add in the loss condition logic. Your next task is to determine when the game is won in code.
We always want to give players clear and immediate feedback, so we’ll start by adding in the logic for a win condition, as follows:
- Update
GameBehaviorto match the following code://1 using UnityEngine.UI; public class GameBehavior : MonoBehaviour { // 2 public Button WinButton; private int _itemsCollected = 0; public int Items { get { return _itemsCollected; } set { _itemsCollected = value; ItemText.text = "Items Collected: " + Items; if (_itemsCollected >= MaxItems) { ProgressText.text = "You've found all the items!"; // 3 WinButton.gameObject.SetActive(true); } else { ProgressText.text = "Item found, only " + (MaxItems - _itemsCollected) + " more to go!"; } } } } - Right-click in the Hierarchy and select UI | Button - TextMeshPro, then name it Win Condition:
- Select Win Condition and set the Pos X and Pos Y to 0, its Width to 225, and its Height to 115

Figure 8.22: Creating a UI button
- Click on the arrow to the right of the Win Condition button to expand its text child object, then change the text to say You won!:

Figure 8.23: Updating button text
- Select the Win Condition parent object again and click the checkmark icon in the upper right of the Inspector:

Figure 8.24: Deactivating the GameObject
This will hide the button until we’ve won the game:

Figure 8.25: Testing the hidden UI button
- Select Game_Manager in the Hierarchy and drag the Win Condition button from the Hierarchy to the Game Behavior (Script) in the Inspector, just like we did with the text objects:
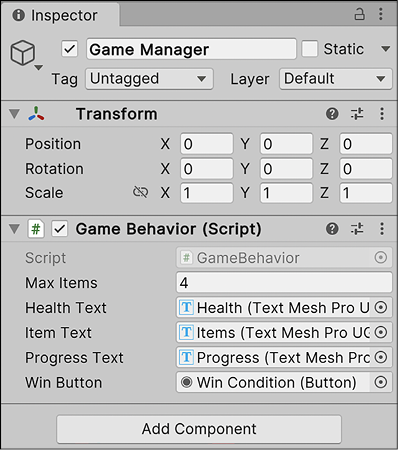
Figure 8.26: Dragging the UI button onto the script component
- Change Max Items to
1in the Inspector to test out the new screen, as illustrated in the following screenshot:

Figure 8.27: Showing the win screen
Let’s break down the code, as follows:
- We added the
usingdirective forUnityEngine.UIto access the Button class. - We created a UI button variable to connect to our Win Condition button in the Hierarchy.
- Since we set the Win Condition button as Hidden when the game starts, we reactivate it when the game is won.
With Max Items set to 1, the Win button will show up on collecting the only Pickup_Item in the scene. Clicking the button doesn’t do anything right now, but we’ll address that in the following section.
Pausing and restarting the game with using directives and namespaces
Right now, our win condition works as expected, but the player still has control over the capsule and doesn’t have a way of restarting the game once it’s over. Unity provides a property in the Time class called timeScale, which when set to 0 freezes the game scene. However, to restart the game, we need access to a namespace called SceneManagement that isn’t accessible from our classes by default.
A namespace collects and groups a set of classes under a specific name to organize large projects and avoid conflicts between scripts that may share the same names. A using directive needs to be added to a class to access a namespace’s classes.
All C# scripts created from Unity come with three default using directives, shown in the following code snippet:
using System.Collections;
using System.Collections.Generic;
using UnityEngine;
These allow access to common namespaces, but Unity and C# offer plenty more that can be added with the using keyword followed by the name of the namespace.
Since our game will need to be paused and restarted when a player wins or loses, this is a good time to use a namespace that isn’t included in new C# scripts by default:
- Add the following code to
GameBehaviorand play:using System.Collections; using System.Collections.Generic; using UnityEngine; using TMPro; using UnityEngine.UI; // 1 using UnityEngine.SceneManagement; public class GameBehavior : MonoBehaviour { // ... No changes needed ... private int _itemsCollected = 0; public int Items { get { return _itemsCollected; } set { _itemsCollected = value; if (_itemsCollected >= MaxItems) { ProgressText.text = "You've found all the items!"; WinButton.gameObject.SetActive(true); // 2 Time.timeScale = 0f; } else { ProgressText.text= "Item found, only " + (MaxItems – _itemsCollected) + " more to go!"; } } } public void RestartScene() { // 3 SceneManager.LoadScene(0); // 4 Time.timeScale = 1f; } // ... No other changes needed ... } - Select Win Condition from the Hierarchy, scroll down in the Inspector to the OnClick section of the Button component, and hit the plus icon:
- Every Button has an OnClick event, which means you can assign a method from a script to execute when the button is pushed
- You can have multiple methods fire when a button is clicked, but we only need one in this case:
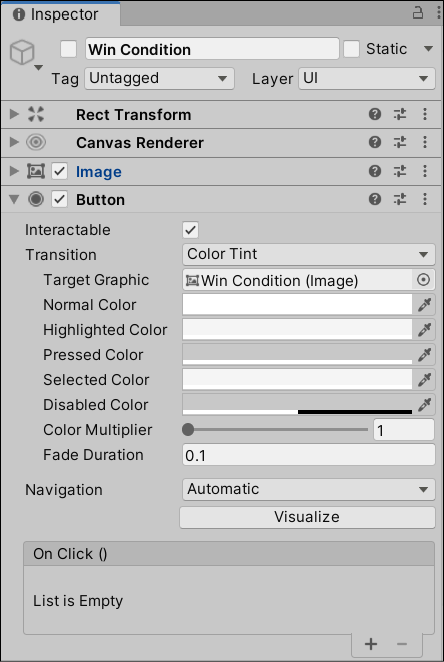
Figure 8.28: OnClick section of the button
- From the Hierarchy, drag the Game_Manager into the slot underneath Runtime to tell the button we want to choose a method from our manager script to fire when the button is pushed:

Figure 8.29: Setting the Game_Manager object in On Click()
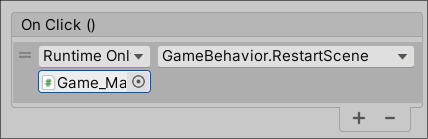
Figure 8.30: Choosing the restart method for the button click
- If the lighting in your scene is turned off or dimmed when the level restarts, go to Window | Rendering | Lighting and select Generate Lighting at the bottom. Make sure Auto Generate is not selected:

Figure 8.31: Lighting panel in the Unity editor
Let’s break down the code, as follows:
- We add the
SceneManagementnamespace with theusingkeyword, which handles all scene-related logic like creating loading scenes. - We set
Time.timeScaleto0to pause the game when the win screen is displayed, which disables any input or movement. - We create a new method called
RestartSceneand callLoadScene()when the win screen button is clicked:LoadScene()takes in a scene index as anintparameter- Because there is only one scene in our project, we use index
0to restart the game from the beginning
- We reset
Time.timeScaleto the default value of1so that when the scene restarts, all controls and behaviors will be able to execute again.
Now, when you collect an item and click on the win screen button, the level restarts, with all scripts and components restored to their original values and set up for another round!
Summary
Congratulations! Hero Born is now a playable prototype. We implemented jumping and shooting mechanics, managed physics collisions and spawning objects, and added in a few basic UI elements to display feedback. We even got as far as resetting the level when the player wins.
A lot of new topics were introduced in this chapter, and it’s important to go back and make sure you understand what went into the code we wrote. Pay special attention to our discussions on enumerations, get and set properties, and namespaces. From here on in, the code is only going to get more complex as we dive further into the possibilities of the C# language.
In the next chapter, we’ll start working on getting our enemy GameObjects to take notice of our player when we get too close, resulting in a follow-and-shoot protocol that will up the stakes for our player.
Pop quiz – working with mechanics
- What type of data do enumerations store?
- How would you create a copy of a Prefab GameObject in an active scene?
- Which variable properties allow you to add functionality when their values are referenced or modified?
- Which Unity method displays all UI objects in the scene?
Don’t forget to check your answers against mine in the Pop Quiz Answers appendix to see how you did!
Join us on discord!
Read this book alongside other users, Unity game development experts and the author himself.
Ask questions, provide solutions to other readers, chat with the author via. Ask Me Anything sessions and much more.
Scan the QR code or visit the link to join the community.