
7
Movement, Camera Controls, and Collisions
One of the first things a player does when starting a new game is to try out character movement (if, of course, the game has a moveable character) and camera controls. Not only is this exciting, but it lets your player know what kind of gameplay they can expect. The character in Hero Born will be a capsule object that can be moved and rotated using the W, A, S, D, and arrow keys, respectively.
We’ll start by learning how to manipulate the player object’s Transform component and then replicate the same player control scheme using applied force. This produces a more realistic movement effect. When we move the player, the camera will follow along from a position that is slightly behind and above the player, making aiming easier when we implement the shooting mechanic. Finally, we’ll explore how collisions and physical interactions are handled by Unity’s physics system by working with our item pickup Prefab.
All of this will come together at a playable level, albeit without any shooting mechanics just yet. It’s also going to give us our first taste of C# being used to program game features by tying together the following topics:
- Managing player movement
- Moving the player with the
Transformcomponent - Scripting camera behavior
- Working with the Unity physics system
Managing player movement
When you’re deciding on how best to move your player character around your virtual world, consider what’s going to look the most realistic and not run your game into the ground with expensive computations. This is somewhat of a trade-off in most cases, and Unity is no different.
The three most common ways of moving a GameObject and their results are as follows:
- Option A: Use a
GameObject'sTransformcomponent for movement and rotation. This is the easiest solution and the one we’ll be working with first. - Option B: Use real-world physics by attaching a Rigidbody component to a
GameObjectand apply force in code.Rigidbodycomponents add simulated real-world physics to anyGameObjectthey are attached to. This solution relies on Unity’s physics system to do the heavy lifting, delivering a far more realistic effect. We’ll update our code to use this approach later on in this chapter to get a feel for both methods.Unity suggests sticking to a consistent approach when moving or rotating a
GameObject; manipulate either an object’sTransformorRigidbodycomponent, but never both at the same time.
- Option C: Attach a ready-made Unity component or Prefab, such as Character Controller or First-Person Controller. This cuts out the boilerplate code and still delivers a realistic effect while speeding up the prototyping time.
We won’t be doing any work with Option C, but there are tons of assets in the Asset Store and out in the Unity community for you to explore!
You can find more information on the Character Controller component and its uses at: https://docs.unity3d.com/ScriptReference/CharacterController.html.
The First-Person Controller Prefab is available from the Standard Assets package, which you can download from: https://assetstore.unity.com/packages/essentials/asset-packs/standard-assets-32351.
Since you’re just getting started with player movement in Unity, you’ll start off using the player Transform component in the next section, and then move on to Rigidbody physics later in the chapter.
Moving the player with the Transform component
We want a third-person adventure setup for Hero Born, so we’ll start with a capsule that can be controlled with keyboard input and a camera to follow the capsule as it moves. Even though these two GameObjects will work together in the game, we’ll keep them, and their scripts, separate for better control.
Before we can do any scripting, you’ll need to add a player capsule to the scene, which is your next task.
We can create a nice player capsule in just a few steps:
- Click on + > 3D Object > Capsule from the Hierarchy panel and name it
Player. - Position the player capsule in the level wherever you like, but I like to put it close to one of the central ramps. It’s also important to position the capsule above the ground plane, so be sure to set the
Transform Yposition value to 1 in the Inspector. - Select the
PlayerGameObject and click on Add Component at the bottom of the Inspector tab. Search for Rigidbody and hit Enter to add it. We won’t use this component until later, but it’s good to set things up properly at the beginning. - At the bottom of the Rigidbody component, expand the Constraints property:
- Check the boxes for Freeze Rotation on the x, y, and z axes so the player can’t be rotated by accident during collisions or other physics interactions. We want to limit rotation to the code we’ll write later:

Figure 7.1: Rigidbody component
To provide a complete view of the Unity editor, all our screenshots are taken in full-screen mode. For color versions of all book images, use the link below: https://packt.link/7yy5V.
- Select the
Materialsfolder in the Project panel and click on Create | Material. Name itPlayer_Mat. - Select
Player_Matin the Hierarchy, then change the Albedo property in the Inspector to a bright green. - Drag the material to the Player object in the Hierarchy panel:

Figure 7.2: Player material attached to a capsule
You’ve created the Player object out of a capsule primitive, a Rigidbody component, and a new bright green material. Don’t worry about what the Rigidbody component is just yet—all you need to know right now is that it allows our capsule to interact with the physics system. We’ll go into more detail in the Working with the Unity physics system section at the end of this chapter. Before we get to that, we need to talk about a very important subject in 3D space: vectors.
Understanding vectors
Now that we have a player capsule and camera set up, we can start looking at how to move and rotate a GameObject using its Transform component. The Translate and Rotate methods are part of the Transform class that Unity provides, and each needs a vector parameter to perform its given function.
In Unity, vectors are used to hold position and direction data in 2D and 3D spaces, which is why they come in two varieties—Vector2 and Vector3. These can be used like any other variable type we’ve seen; they just hold different information. Since our game is in 3D, we’ll be using Vector3 objects, which means we’ll need to construct them using x, y, and z values.
For 2D vectors, only the x and y positions are required. Remember, the most up-to-date orientation in your 3D scene will be displayed in the upper-right graphic that we discussed in the previous chapter, Chapter 6, Getting Your Hands Dirty with Unity:

Figure 7.3: Vector gizmos in Unity Editor
If you would like more information about vectors in Unity, refer to the documentation and scripting reference at: https://docs.unity3d.com/ScriptReference/Vector3.html.
For instance, if we wanted to create a new vector to hold a position in our scene, we could use the following code:
Vector3 Origin = new Vector(1f, 1f, 1f);
All we’ve done here is created a new Vector3 variable and initialized it with a 1 for the x position, 1 for the y position, and 1 for the z position, in that order. Float values can be written with or without a decimal, but they always need to end with a lowercase f.
We can also create directional vectors by using the Vector2 or Vector3 class properties:
Vector3 ForwardDirection = Vector3.forward;
Instead of holding a position, ForwardDirection references the forward direction in our scene along the z axis in the 3D space. The neat thing about using the Vector3 direction is that no matter which way we make the player look, our code will always know which way is forward. We’ll look at using vectors later in this chapter, but for now just get used to thinking about 3D movement in terms of x, y, and z positions and directions.
Don’t worry if the concept of vectors is new to you—it’s a complicated topic. Unity’s vector cookbook is a great place to start: https://docs.unity3d.com/Manual/VectorCookbook.html.
Now that you understand vectors a bit more, you can start implementing the basics of moving the player capsule. For that, you’ll need to gather player input from the keyboard, which is the topic of the following section.
Getting player input
Positions and directions are useful in themselves, but they can’t generate movement without input from the player. This is where the Input class comes in, which handles everything from keystrokes and mouse position to acceleration (applied force in a direction) and gyroscopic data (rotation).
We’re going to be using the W, A, S, D, and arrow keys for movement in Hero Born, coupled with a script that allows the camera to follow where the player points the mouse. To do that, we’ll need to understand how input axes work.
First, go to Edit | Project Settings | Input Manager to open the Input Manager tab shown in the following screenshot:
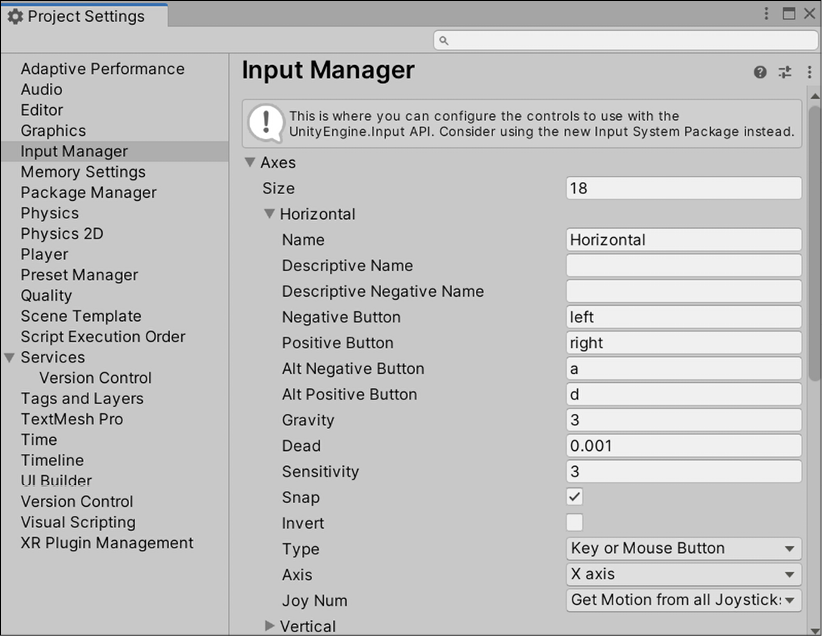
Figure 7.4: Input Manager window
Deciding how to handle player input in Unity has become more complicated in the last few years because Unity introduced a new input system that removes a lot of setup and coding work by wrapping input handling into a component you can use from the editor. I’ve chosen to stay with the older, programmatic approach in this chapter to avoid introducing topics like delegates and actions too early, which are necessary with the new Input System.
However, once you finish this book and are comfortable with your C# skills, I recommend diving into the new Input System for your future projects to stay with the times. You can find more documentation on the new Input System at https://unity.com/features/input-system and a great tutorial at https://learn.unity.com/project/using-the-input-system-in-unity.
You’ll see a long list of Unity’s default inputs already configured, but let’s take the Horizontal axis as an example. You can see that the Horizontal input axis has the Positive and Negative buttons set to left and right, and the Alt Negative and Alt Positive buttons set to the A and D keys.
Whenever an input axis is queried from the code, its value will be between -1 and 1. For example, when the left arrow or A key is pushed down, the horizontal axis registers a -1 value. When those keys are released, the value returns to 0. Likewise, when the right arrow or D key is used, the horizontal axis registers a value of 1. This allows us to capture four different inputs for a single axis with only one line of code, as opposed to writing out a long if-else statement chain for each.
Capturing input axes is as simple as calling Input.GetAxis() and specifying the axis we want by name, which is what we’ll do with the Horizontal and Vertical inputs in the following sections. As a side benefit, Unity applies a smoothing filter, which makes the input frame rate independent.
Default inputs can be modified in any way you need, but you can also create custom axes by increasing the Size property in the input manager and renaming the copy that’s been created for you. You have to increase the Size property in order to add a custom input.
Let’s start getting our player moving using Unity’s input system and a custom locomotion script of our own.
Moving the player
Before you get the player moving, you’ll need to attach a script to the player capsule:
- Create a new C# script in the
Scriptsfolder, name itPlayerBehavior, and drag it onto the Player capsule in the Hierarchy panel. - Add the following code and save:
using System.Collections;
using System.Collections.Generic;
using UnityEngine;
public class PlayerBehavior : MonoBehaviour
{
    // 1
    public float MoveSpeed = 10f;
    public float RotateSpeed = 75f;
    // 2
    private float _vInput;
    private float _hInput;
    void Update()
    {
        // 3
        _vInput = Input.GetAxis("Vertical") * MoveSpeed;
        // 4
        _hInput = Input.GetAxis("Horizontal") * RotateSpeed;
        // 5
        this.transform.Translate(Vector3.forward * _vInput *
        Time.deltaTime);
        // 6
        this.transform.Rotate(Vector3.up * _hInput *
        Time.deltaTime);
    }
}
Using the this keyword is optional. Visual Studio may suggest that you remove it to simplify the code, but I prefer leaving it in so my code is always super clear. When you have empty methods, such as Start, in this case, it’s common to delete them for clarity.
Here’s a breakdown of the preceding code:
- Declares two public variables to be used as multipliers:
MoveSpeedfor how fast we want thePlayerto go forward and backwardRotateSpeedfor how fast we want thePlayerto rotate left and right
- Declares two private variables to hold inputs from the player; initially set with no value:
_vInputwill store the vertical axis input_hInputwill store the horizontal axis input
Input.GetAxis("Vertical")detects when the up arrow, down arrow, W, or S key is pressed and multiplies that value byMoveSpeed:- The up arrow and W keys return a value of 1, which will move the player in the forward (positive) direction
- The down arrow and S keys return -1, which moves the player backward in the negative direction
Input.GetAxis("Horizontal")detects when the left arrow, right arrow, A, or D key is pressed and multiplies that value byRotateSpeed:- The right arrow and D keys return a value of 1, which will rotate the capsule to the right
- The left arrow and A keys return -1, rotating the capsule to the left
If you’re wondering whether it’s possible to do all the movement calculations on one line, the simple answer is yes. However, it’s better to have your code broken down, even if you’re the only one reading it.
- Uses the
Translatemethod, which takes in aVector3parameter, to move the capsule’s Transform component:- Remember that the
thiskeyword specifies the GameObject the current script is attached to, which, in this case, is the player capsule. Vector3.forwardmultiplied by_vInputandTime.deltaTimesupplies the direction and speed the capsule needs to move forward or back along the z axis at the speed we’ve calculated.Time.deltaTimewill always return the value in seconds since the last frame of the game was executed. It’s commonly used to smooth values that are captured or run in theUpdatemethod instead of letting it be determined by the device’s frame rate.
- Remember that the
- Uses the
Rotatemethod to rotate the capsule’s Transform component relative to the vector we pass in as a parameter:Vector3.upmultiplied by_hInputandTime.deltaTimegives us the left/right rotation axis we want- We use the
thiskeyword andTime.deltaTimehere for the same reasonsAs we discussed earlier, using direction vectors in the
TranslateandRotatefunctions is only one way to go about this. We could have created newVector3variables from our axis inputs and used them as parameters just as easily.
When you click Play, you’ll be able to move the capsule forward and backward using the up/down arrow keys and the W/S keys, while rotating or turning with the left/right arrow keys and the A/D keys. Since the camera doesn’t follow our player yet, you may need to move the camera to a higher position to see the capsule move when you press the input keys.
With these few lines of code, you’ve set up two separate controls that are frame rate independent and easily modified. However, our camera doesn’t follow the capsule as it moves around, so let’s fix that in the following section.
Scripting camera behavior
The easiest way to get one GameObject to follow another is to make one of them a child of the other. When an object is a child of another, the child object’s position and rotation are relative to the parent. This means that any child object will move and rotate with the parent object.
However, this approach means that any kind of movement or rotation that happens to the player capsule also affects the camera (like a waterfall affects the water downstream), which is something we don’t necessarily want. We always want the camera to be positioned a set distance behind our player and always rotate to look at it, no matter what. Luckily, we can easily set the position and rotation of the camera relative to the capsule with methods from the Transform class. It’s your task to script out the camera logic in the next challenge.
Since we want the camera behavior to be entirely separate from how the player moves, we’ll be controlling where the camera is positioned relative to a target we can set from the Inspector tab:
- Create a new C# script in the
Scriptsfolder, name itCameraBehavior, and drag it into Main Camera in the Hierarchy panel. - Add the following code and save it:
using System.Collections;
using System.Collections.Generic;
using UnityEngine;
public class CameraBehavior : MonoBehaviour
{
    // 1
    public Vector3 CamOffset= new Vector3(0f, 1.2f, -2.6f);
    // 2
    private Transform _target;
    void Start()
    {
        // 3
        _target = GameObject.Find("Player").transform;
    }
    // 4
    void LateUpdate()
    {
        // 5
        this.transform.position = _target.TransformPoint(CamOffset);
        // 6
        this.transform.LookAt(_target);
    }
}
Here’s a breakdown of the preceding code:
- Declares a
Vector3variable to store the distance we want between the Main Camera and the Player capsule:- We’ll be able to manually set the x, y, and z positions of the camera offset in the Inspector because it’s
public - These default values are what I think looks best, but feel free to experiment
- We’ll be able to manually set the x, y, and z positions of the camera offset in the Inspector because it’s
- Creates a variable to hold the player capsule’s
Transforminformation:- This will give us access to its position, rotation, and scale
- We don’t want any other script to be able to change the camera’s target, which is why it’s
private
- Uses
GameObject.Findto locate the capsule by name and retrieve itsTransformproperty from the scene:- This means the capsule’s x, y, and z positions are updated and stored in the
_targetvariable every frame. - Finding objects in the scene is a computationally expensive task, so it’s good practice to only do it once in the
Startmethod and store the reference. Never useGameObject.Findin theUpdatemethod, as that will try to continually find the object you’re looking for and potentially crash the game.
- This means the capsule’s x, y, and z positions are updated and stored in the
LateUpdateis aMonoBehaviormethod, likeStartorUpdate, that executes afterUpdate:- Since our
PlayerBehaviorscript moves the capsule in itsUpdatemethod, we want the code inCameraBehaviorto run after the movement happens; this guarantees that_targethas the most up-to-date position to reference.
- Since our
- Sets the camera’s position to
_target.TransformPoint(CamOffset)for every frame, which creates the following effect:- The
TransformPointmethod calculates and returns a relative position in the world space - In this case, it returns the position of the
target(our capsule) offset by0on the x axis,1.2on the y axis (putting the camera above the capsule), and-2.6on the z axis (putting the camera slightly behind the capsule)
- The
- The
LookAtmethod updates the capsule’s rotation at every frame, focusing on theTransformparameter we pass in, which, in this case, is_target:

Figure 7.5: Capsule and following camera in Play mode
This was a lot to take in, but it’s easier to process if you break it down into its chronological steps:
- We created an offset position for the camera.
- We found and stored the player capsule’s position.
- We manually updated its position and rotation every frame so that it’s always following at a set distance and looking at the player.
When using class methods that deliver platform-specific functionality, always remember to break things down to their most basic steps. This will help you to stay above water in new programming environments.
While the code you’ve written to manage player movement is perfectly functional, you might have noticed that it’s a little jerky in places. To create a smoother, more realistic movement effect, you’ll need to understand the basics of the Unity physics system, which you’ll dive into next.
Working with the Unity physics system
Up to this point, we haven’t talked about how the Unity engine works, or how it manages to create lifelike interactions and movement in a virtual space. We’ll spend the rest of this chapter learning the basics of Unity’s physics system.
The two main components that power Unity’s NVIDIA PhysX engine are as follows:
- Rigidbody components, which allow GameObjects to be affected by gravity and add properties such as Mass and Drag. Rigidbody components can also be affected by an applied force if they have a Collider component attached, which generates more realistic movement:

Figure 7.6: Rigidbody component in the Inspector pane
- Collider components, which determine how and when GameObjects enter and exit each other’s physical space or simply collide and bounce away. While there should only be one Rigidbody component attached to a given GameObject, there can be several Collider components if you need different shapes or interactions. This is commonly referred to as a compound Collider setup:

Figure 7.7: Box collider component in the Inspector pane
When two Collider components interact with each other, the Rigidbody properties determine the resulting interaction. For example, if one GameObject’s mass is higher than the other, the lighter GameObject will bounce away with more force, just like in real life. These two components are responsible for all physical interactions and simulated movement in Unity.
There are some caveats to using these components, which are best understood in terms of the types of movement Unity allows:
- Kinematic movement happens when a Rigidbody component is attached to a GameObject, but it doesn’t register to the physics system in the scene. In other words, kinematic objects have physics interactions but don’t react to them, like a wall in real life. This is only used in certain cases and can be enabled by checking the Is Kinematic property of a Rigidbody component. Since we want our capsule to interact with the physics system, we won’t be using this kind of motion.
- Non-kinematic movement is when a Rigidbody component is moved or rotated by applying force rather than manually changing a GameObject’s Transform properties. Our goal for this section is to update the
PlayerBehaviorscript to implement this type of motion.
The setup we have now, that is, manipulating the capsule’s Transform component while using a Rigidbody component to interact with the physics system, was meant to get you thinking about movement and rotation in a 3D space. However, it’s not meant for production and Unity suggests avoiding a mix of kinematic and non-kinematic movement in your code.
Your next task is to use applied force to convert the current movement system into a more realistic locomotion experience.
Rigidbody components in motion
Since our player has a Rigidbody component attached, we should let the physics engine control our movement instead of manually translating and rotating the Transform. There are two options when it comes to applying force:
- You can do it directly by using Rigidbody class methods such as
AddForceandAddTorqueto move and rotate an object, respectively. This approach has its drawbacks and often requires additional code to compensate for unexpected physics behavior such as unwanted torque or applied force during collisions. - Alternatively, you can use other Rigidbody class methods such as
MovePositionandMoveRotation, which still use applied force.
We’ll take the second route in the next section so that Unity takes care of the applied physics for us, but if you’re curious about manually applying force and torque to your GameObjects, then start here: https://docs.unity3d.com/ScriptReference/Rigidbody.AddForce.html.
Either of these will give the player a more lifelike feel and allow us to add jumping and dashing mechanics in Chapter 8, Scripting Game Mechanics.
If you’re curious about what happens when a moving object without a Rigidbody component interacts with pieces of the environment that have them equipped, remove the component from the Player and run around the arena. Congratulations—you’re a ghost and can walk through walls! Don’t forget to add the Rigidbody component back, though!
The player capsule already has a Rigidbody component attached, which means that you can access and modify its properties. First, though, you’ll need to find and store the component, which is your next challenge.
You’ll need to access and store the Rigidbody component on our player capsule before modifying it. Update PlayerBehavior with the following changes:
using System.Collections;
using System.Collections.Generic;
using UnityEngine;
public class PlayerBehavior : MonoBehaviour
{
    public float MoveSpeed = 10f;
    public float RotateSpeed = 75f;
    private float _vInput;
    private float _hInput;
    // 1
    private Rigidbody _rb;
    // 2
    void Start()
    {
        // 3
        _rb = GetComponent<Rigidbody>();
    }
    void Update()
    {
      _vInput = Input.GetAxis("Vertical") * MoveSpeed;
      _hInput = Input.GetAxis("Horizontal") * RotateSpeed;
      /*
      this.transform.Translate(Vector3.forward * _vInput *
      Time.deltaTime);
      this.transform.Rotate(Vector3.up * _hInput * Time.deltaTime);
      */
    }
}
Here’s a breakdown of the preceding code:
- Adds a private variable of type
Rigidbodythat will contain a reference to the capsule’s Rigidbody component. - The
Startmethod fires when a script is initialized in a scene, which happens when you click on Play, and should be used any time variables need to be set at the beginning of a class. - The
GetComponentmethod checks whether the component type we’re looking for, in this case,Rigidbody, exists on the GameObject the script is attached to and returns it:- If the component isn’t attached to the GameObject, the method will return
null, but since we know there’s one on the player, we won’t worry about error checking right now
- If the component isn’t attached to the GameObject, the method will return
- Comments out the
TransformandRotatemethod calls in theUpdatefunction so that we won’t be running two different kinds of player controls:- We want to keep our code that captures player input so that we can still use it later on
You’ve initialized and stored the Rigidbody component on the player capsule and commented out the obsolete Transform code to set the stage for physics-based movement. The character is now ready for the next challenge, which is to add force.
Use the following steps to move and rotate the Rigidbody component. Add the following code to PlayerBehavior underneath the Update method, and then save the file:
// 1
void FixedUpdate()
{
    // 2
    Vector3 rotation = Vector3.up * _hInput;
    // 3
    Quaternion angleRot = Quaternion.Euler(rotation *
        Time.fixedDeltaTime);
    // 4
    _rb.MovePosition(this.transform.position +
        this.transform.forward * _vInput * Time.fixedDeltaTime);
     // 5
     _rb.MoveRotation(_rb.rotation * angleRot);
}
Here’s a breakdown of the preceding code:
- Any physics- or Rigidbody-related code always goes inside the
FixedUpdatemethod, rather thanUpdateor the otherMonoBehaviormethods:FixedUpdateis frame rate independent and is used for all physics code
- Creates a new
Vector3variable to store our left and right rotations:Vector3.up * _hInputis the same rotation vector we used with theRotatemethod in the previous example
Quaternion.Eulertakes aVector3parameter and returns a rotation value in Euler angles:- We need a
Quaternionvalue instead of aVector3parameter to use theMoveRotationmethod. This is just a conversion to the rotation type that Unity prefers.You can read more about how Unity handles object rotations and orientation at: https://docs.unity3d.com/Documentation/Manual/QuaternionAndEulerRotationsInUnity.html.
- We multiply by
Time.fixedDeltaTimefor the same reason we usedTime.deltaTimeinUpdate.
- We need a
- Calls
MovePositionon our_rbcomponent, which takes in aVector3parameter and applies force accordingly:- The vector that’s used can be broken down as follows: the capsule’s
Transformposition in the forward direction, multiplied by the vertical inputs andTime.fixedDeltaTime - The Rigidbody component takes care of applying movement force to satisfy our vector parameter
- The vector that’s used can be broken down as follows: the capsule’s
- Calls the
MoveRotationmethod on the_rbcomponent, which also takes in aVector3parameter and applies the corresponding forces under the hood:angleRotalready has the horizontal inputs from the keyboard, so all we need to do is multiply the current Rigidbody rotation byangleRotto get the same left and right rotationBe aware that
MovePositionandMoveRotationwork differently for non-kinematic GameObjects. You can find more information in the Rigidbody scripting reference at: https://docs.unity3d.com/ScriptReference/Rigidbody.html
If you click on Play now, you’ll be able to move forward and backward in the direction you’re looking, as well as rotate around the y axis.
Applied force produces stronger effects than translating and rotating a Transform component, so you may need to fine-tune the MoveSpeed and RotateSpeed variables in the Inspector pane. You’ve now recreated the same type of movement scheme as before, just with more realistic physics.
If you run up a ramp or drop off the central platform, you might see the player launch into the air, or slowly drop to the ground. Even though the Rigidbody component is set to use gravity, it’s fairly weak. We’ll tackle applying our gravity to the player in the next chapter when we implement the jump mechanic. For now, your job is to get comfortable with how Collider components handle collisions in Unity.
Colliders and collisions
Collider components not only allow GameObjects to be recognized by Unity’s physics system, but they also make interactions and collisions possible. Think of colliders as invisible force fields that surround GameObjects; they can be passed through or bumped into depending on their settings, and they come with a host of methods that execute during different interactions.
Unity’s physics system works differently for 2D and 3D games, so we will only be covering the 3D topics in this book. If you’re interested in making 2D games, refer to the Rigidbody2D component at: https://docs.unity3d.com/Manual/class-Rigidbody2D.html and the list of available 2D colliders at: https://docs.unity3d.com/Manual/Collider2D.html.
Take a look at the following screenshot of the Capsule in the Health_Pickup object. If you want to see the Capsule Collider a little better, increase the Radius property:

Figure 7.8: Capsule collider component attached to pickup item
The green shape around the object is the Capsule Collider, which can be moved and scaled using the Center, Radius, and Height properties.
When a primitive is created, the Collider matches the primitive’s shape by default; since we created a capsule primitive, it comes with a Capsule Collider.
Colliders also come in Box, Sphere, and Mesh shapes and can be manually added from the Component | Physics menu or from the Add Component button in the Inspector.
When a Collider comes into contact with other components, it sends out what’s called a message, or broadcast. Any script that adds one or more of those methods will receive a notification when the Collider sends out a message. This is called an event, which is a topic that we’ll cover in more detail in Chapter 14, The Journey Continues.
For example, when two GameObjects with colliders come into contact, both objects register an OnCollisionEnter event, complete with a reference to the object they ran into. Think of an event like a message being sent out—if you choose to listen for it, you’ll get notified when a collision happens in this case. This information can be used to track a variety of interactive events, but the simplest one is picking up an item. For cases where you want objects to be able to pass through others, you can use collision triggers, which we’ll talk about in the next section.
A complete list of Collider notifications can be found underneath the Messages header at: https://docs.unity3d.com/ScriptReference/Collider.html.
Collision and trigger events are only sent out when the colliding objects belong to a specific combination of Collider, Trigger, and RigidBody components and kinematic or non-kinematic motion. You can find details under the Collision action matrix section at: https://docs.unity3d.com/Manual/CollidersOverview.html.
The health item you previously created is a perfect place to test out how collisions work. You’ll tackle that in the next challenge.
Picking up an item
To update the Health_Pickup object using collision logic, you need to do the following:
- Create a new C# script in the
Scriptsfolder, name itItemBehavior, and then drag it onto theHealth_Pickupobject in the Hierarchy panel:- Any script that uses collision detection must be attached to a GameObject with a Collider component, even if it’s the child of a Prefab
- Select
Health_Pickupin the Hierarchy panel, click the three-vertical-dots icon in the Inspector to the right of the Item Behavior (Script) component, and choose Added Component | Apply to Prefab ‘Health_Pickup’:
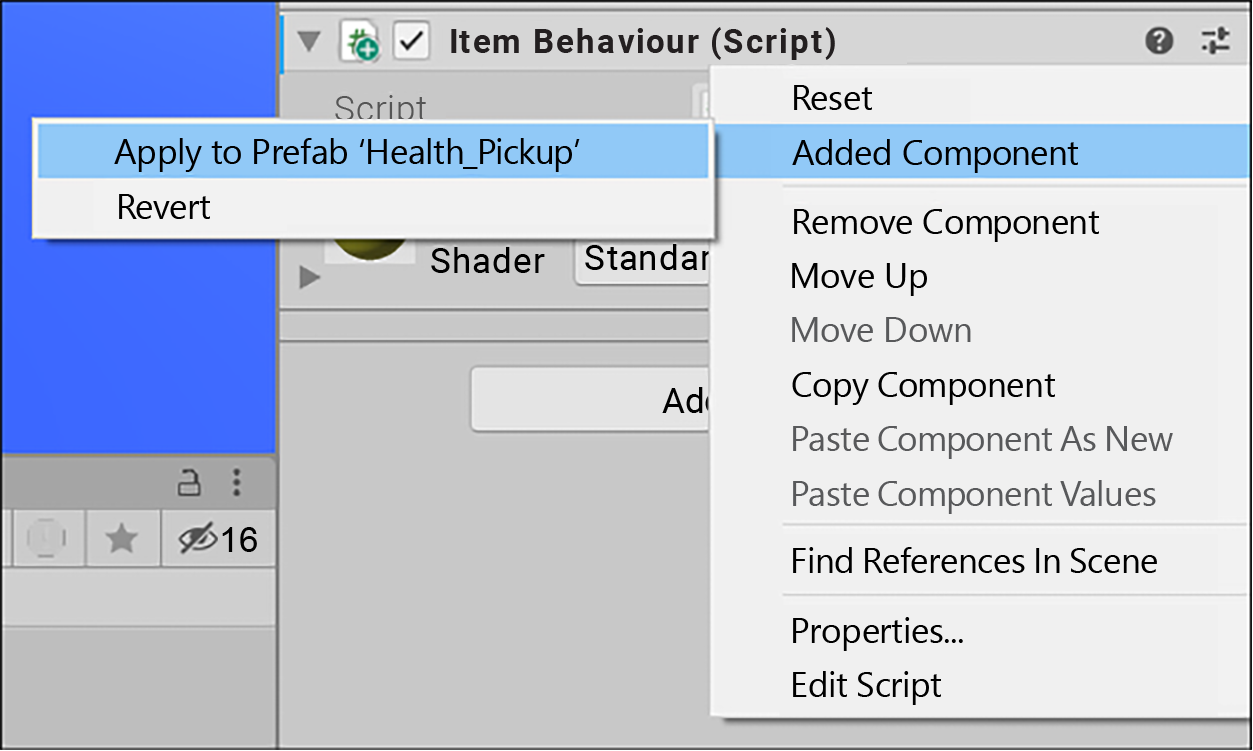
Figure 7.9: Applying Prefab changes to a pickup item
- Replace the default code in
ItemBehaviorwith the following, and then save it:using System.Collections; using System.Collections.Generic; using UnityEngine; public class ItemBehavior : MonoBehaviour { // 1 void OnCollisionEnter(Collision collision) { // 2 if(collision.gameObject.name == "Player") { // 3 Destroy(this.transform.gameObject); // 4 Debug.Log("Item collected!"); } } } - Click on Play and move the player over the capsule to pick it up!
Here’s a breakdown of the preceding code:
- When another object runs into the
ItemPrefab, Unity automatically calls theOnCollisionEntermethod:OnCollisionEntercomes with a parameter that stores a reference to the Collider that ran into it- Notice that the collision is of type
Collision, notCollider
- The
Collisionclass has a property, calledgameObject, that holds a reference to the colliding GameObject’s Collider:- We can use this property to get the GameObject’s name and use an
ifstatement to check whether the colliding object is the player
- We can use this property to get the GameObject’s name and use an
- If the colliding object is the player, we’ll call the
Destroy()method, which takes in a GameObject parameter and removes the object from the scene. - It then prints out a simple log to the console that we have collected an item:

Figure 7.10: Example of game objects being deleted from a scene
We’ve set up ItemBehavior to essentially listen for any collisions with the Health_Pickup object Prefab. Whenever a collision occurs, ItemBehavior uses OnCollisionEnter() and checks whether the colliding object is the player and, if so, destroys (or collects) the item.
If you’re feeling lost, think of the collision code we wrote as a receiver for notifications from the Health_Pickup; any time it’s hit, the code fires.
It’s also important to understand that we could have created a similar script with an OnCollisionEnter() method, attached it to the player, and then checked whether the colliding object was a Health_Pickup Prefab. Collision logic depends on the perspective of the object being collided with.
Now the question is, how would you set up a collision without stopping the colliding objects from moving through each other? We’ll tackle that in the next section.
Using Collider triggers
By default, Colliders are set with the isTrigger property unchecked, meaning that the physics system treats them as solid objects and will raise a collision event on impact. However, in some cases, you’ll want to be able to pass through a Collider component without it stopping your GameObject. This is where triggers come in. With isTrigger checked, a GameObject can pass through it, but the Collider will send out the OnTriggerEnter, OnTriggerExit, and OnTriggerStay notifications instead.
Triggers are most useful when you need to detect when a GameObject enters a certain area or passes a certain point. We’ll use this to set up the areas around our enemies; if the player walks into the trigger zone, the enemies will be alerted, and, later on, attack the player. For now, you’re going to focus just on the enemy logic in the following challenge.
Creating an enemy
Use the following steps to create an enemy:
- Create a new primitive using + | 3D Object | Capsule in the Hierarchy panel and name it
Enemy. - Inside the
Materialsfolder, use + | Material, name itEnemy_Mat, and set its Albedo property to a bright red:- Drag and drop
Enemy_Matinto theEnemyGameObject
- Drag and drop
- With
Enemyselected, click on Add Component, search for Sphere Collider, and hit Enter to add it:- Check the isTrigger property box and change the Radius to
8:
- Check the isTrigger property box and change the Radius to

Figure 7.11: Sphere collider component attached to an enemy object
Our new Enemy primitive is now surrounded by an 8-unit trigger radius shaped like a sphere. Any time another object enters, stays inside, or exits that area, Unity will send out notifications that we can capture, just like we did with collisions. Your next challenge will be to capture that notification and act on it in code.
To capture trigger events, you’ll need to create a new script by following these steps:
- Create a new C# script in the
Scriptsfolder, name itEnemyBehavior, and then drag it into Enemy. - Add the following code and save the file:
using System.Collections; using System.Collections.Generic; using UnityEngine; public class EnemyBehavior : MonoBehaviour { // 1 void OnTriggerEnter(Collider other) { //2 if(other.name == "Player") { Debug.Log("Player detected - attack!"); } } // 3 void OnTriggerExit(Collider other) { // 4 if(other.name == "Player") { Debug.Log("Player out of range, resume patrol"); } } } - Click Play and walk over to the
Enemyto set off the first notification, then walk away from theEnemyto set off the second notification.
Here’s a breakdown of the preceding code:
OnTriggerEnter()is fired whenever an object enters the enemy’s Sphere Collider radius:- Similar to
OnCollisionEnter(),OnTriggerEnter()stores a reference to the trespassing object’s Collider component - Note that
otheris of typeCollider, notCollision
- Similar to
- We can use
otherto access the name of the colliding GameObject, and check whether it’s thePlayerwith anifstatement.If it is, the console prints out a log that the
Playeris in the danger zone:
Figure 7.12: Collision detection between player and enemy objects
OnTriggerExit()is fired when an object leaves the enemy Sphere Collider radius:- This method also has a reference to the colliding object’s Collider component
- We check the object leaving the Sphere Collider radius by name using another
ifstatement:- If it’s
Player, we print out another log to the console saying that they’re safe:
- If it’s

Figure 7.13: Example of collision triggers
The Sphere Collider on our Enemy sends out notifications when its area is invaded, and the EnemyBehavior script captures two of those events. Whenever the player enters or exits the collision radius, a debug log appears in the console to let us know that the code is working. We’ll continue to build on this in Chapter 9, Basic AI and Enemy Behavior.
Unity makes use of something called the Component design pattern. Without going into too much detail, that’s a fancy way of saying objects (and, by extension, their classes) should be responsible for their behavior as opposed to having all the code in one huge file. This is why we put separate collision scripts on the pickup item and enemy instead of having a single class handle everything. We’ll discuss this further in Chapter 14, The Journey Continues.
Since this book is all about instilling as many good programming habits as possible, your last task for the chapter is to make sure all your core objects are converted into Prefabs.
Hero’s trial—all the Prefabs!
To get the project ready for the next chapter, go ahead and drag the Player and Enemy objects into the Prefabs folder.
Remember, from now on you always need to right-click on the Prefab in the Hierarchy panel, switch to the Inspector panel and select the three vertical dots icon, then choose Added Component | Apply to Prefab to solidify any changes you make to these GameObjects.
With that done, continue to the Physics roundup section and make sure that you’ve internalized all the major topics we’ve covered before moving on.
Physics roundup
Before we wrap up the chapter, here are a few high-level concepts to cement what we’ve learned so far:
- Rigidbody components add simulated real-world physics to the GameObjects they are attached to.
- Collider components interact with each other, as well as objects, using Rigidbody components:
- If a Collider component is not a trigger, it acts as a solid object
- If a Collider component is a trigger, it can be walked through
- An object is kinematic if it uses a Rigidbody component and has Is Kinematic checked, telling the physics system to ignore it.
- An object is non-kinematic if it uses a Rigidbody component and applied force or torque to power its movement and rotation.
- Colliders send out notifications based on their interactions. These notifications depend on whether the Collider component is set to be triggered or not. Notifications can be received from either colliding party, and they come with reference variables that hold an object’s collision information.
Remember, a topic as broad and complex as the Unity physics system isn’t learned in a day. Use what you’ve learned here as a springboard to launch yourself into more intricate topics!
Summary
This wraps up your first experience of creating independent gameplay behaviors and tying them all together into a cohesive, albeit simple, game prototype. You’ve used vectors and basic vector math to determine positions and angles in a 3D space, and you’re familiar with player input and the two main methods of moving and rotating GameObjects. You’ve even gone down into the bowels of the Unity physics system to get comfortable with Rigidbody physics, collisions, triggers, and event notifications. All in all, Hero Born is off to a great start.
In the next chapter, we’ll start tackling more game mechanics, including jumping, dashing, shooting projectiles, and interacting with parts of the environment. This will give you more hands-on experience in using force with Rigidbody components, gathering player input, and executing logic.
Pop quiz—player controls and physics
- What data type would you use to store 3D movement and rotation information?
- What built-in Unity component allows you to track and modify player controls?
- Which component adds real-world physics to a GameObject?
- What method does Unity suggest using to execute physics-related code on GameObjects?
Don’t forget to check your answers against mine in the Pop Quiz Answers appendix!
Join us on discord!
Read this book alongside other users, Unity game development experts and the author himself.
Ask questions, provide solutions to other readers, chat with the author via. Ask Me Anything sessions and much more.
Scan the QR code or visit the link to join the community.
