
9
Basic AI and Enemy Behavior
Virtual scenarios need conflicts, consequences, and potential rewards to feel real. Without these three things, there’s no incentive for the player to care about what happens to their in-game character, much less continue to play the game. And while there are plenty of game mechanics that deliver on one or more of these conditions, nothing beats an enemy that will seek you out and try to end your session.
Programming an intelligent enemy is no easy task, and often goes hand in hand with long working hours and frustration. However, Unity has built-in features, components, and classes we can use to design and implement AI systems in a more user-friendly way. These tools will push the first playable iteration of Hero Born over the finish line and provide a springboard for more advanced C# topics.
In this chapter, we’ll focus on the following topics:
- The Unity navigation system
- Working with a navigation mesh
- Navigation agents
- Procedural programming and logic
- Taking and dealing damage
- Adding a loss condition
- Refactoring and keeping it DRY
Let’s get started!
Navigating 3D space in Unity
When we talk about navigation in real life, it’s usually a conversation about how to get from point A to point B. Navigating around virtual 3D space is largely the same, but how do we account for the experiential knowledge we humans have accumulated since the day we first started crawling? Everything from walking on a flat surface to climbing stairs and jumping off of curbs is a skill we learned by doing; how can we possibly program all that into a game without going insane?
Before you can answer any of these questions, you’ll need to know what navigation components Unity has to offer.
Navigation components
The short answer is that Unity has spent a lot of time perfecting its navigation system and delivering components that we can use to govern how playable and non-playable characters can get around. Each of the following components is included with the new Unity AI Navigation package and has complex features already built in:
- A NavMeshSurface is essentially a map of the walkable surfaces in a given level; the NavMeshSurface component itself is created from the level geometry in a process called baking. Baking a NavMeshSurface into your level creates a unique project asset that holds the navigation data.
- If a NavMeshSurface is the level map, then a NavMeshAgent is the moving piece on the board. Any object with a NavMeshAgent component attached will automatically avoid other agents or obstacles it comes into contact with.
- The navigation system needs to be aware of any moving or stationary objects in the level that could cause a NavMeshAgent to alter its route. Adding NavMeshObstacle components to those objects lets the system know that they need to be avoided.
While this description of the Unity navigation system is far from complete, it’s enough for us to move forward with our enemy behavior. For this chapter, we’ll be focusing on adding a NavMeshSurface to our level, setting up the Enemy Prefab as a NavMeshAgent, and getting the Enemy Prefab to move along a predefined route in a seemingly intelligent way.
You can find more information on the new Navigation system at https://docs.unity3d.com/Packages/[email protected]/manual/NavigationSystem.html
The AI Navigation package isn’t installed by default, so let’s fix that:
- Go to Window > Package Manager
- Click the + sign in the upper-left corner and select Add package by name:
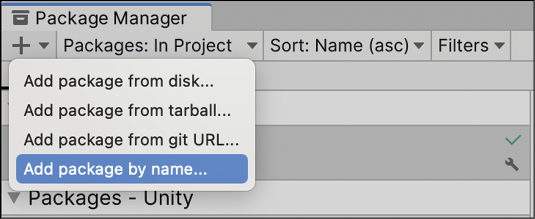
Figure 9.1: Adding package by name in the Package Manager
To provide a complete view of the Unity editor, all our screenshots are taken in full-screen mode. For color versions of all book images, use the link below: https://packt.link/7yy5V.
- Enter
com.unity.ai.navigationand click Add:

Figure 9.2: Entering package name manually
You’ll see the package is marked Experimental at the time of writing, but this may be integrated into Unity by the time you read this – either way, you’re ready to go:

Figure 9.3: AI Navigation package installed
Your first task in setting up an “intelligent” enemy is to create a NavMeshSurface over the arena’s walkable areas. Let’s set up and configure our level’s NavMeshSurface:
- Select the Environment GameObject, click on Add Component in the Inspector window, and choose NavMeshSurface:

Figure 9.4: Adding a NavMeshSurface component
- In the Inspector, leave everything set to the default values and click Bake in the NavMeshSurface component:

Figure 9.5: NavMeshSurface component added in the Hierarchy
- Go to Window | AI | Navigation and select the Bake tab. Leave everything set to the default values and click Bake. Once baking is finished, you’ll see a new folder inside the Scenes folder with a new navigation mesh data:

Figure 9.6: NavMeshSurface baking data in the Assets
Our newly baked NavMeshSurface is now setup for us to interact with and a light blue overlay in has been added to show all the walkable surfaces a NavMeshAgent component attached:

Figure 9.7: NavMeshSurface overlay on the Environment object
It’s somewhat hard to see on our blue floor, but the NavMeshSurface is covering the entire surface. Your next task is to add get the Enemy walking around using the built-in navigation system!
Setting up enemy agents
Let’s register the Enemy Prefab as a NavMeshAgent:
- Select the Enemy Prefab in the Prefabs folder, click Add Component in the Inspector window, and search for NavMeshAgent:

Figure 9.8: Adding a NavMeshAgent component
- Click + | Create Empty from the Hierarchy window and name the GameObject
Patrol_Route:

Figure 9.9: Creating an empty patrol route object
- Create three more empty child objects in
Patrol_Route, name themLocation_2,Location_3, andLocation_4, respectively, and position them in the remaining corners of the level to form a square:

Figure 9.10: Creating all empty patrol route objects
Adding a NavMeshAgent component to the Enemy tells the NavMeshSurface component to take notice and register it as an object that has access to its autonomous navigation features. Creating the four empty GameObjects in each corner of the level lays out the simple route we want our enemies to eventually patrol; grouping them in an empty parent object makes it easier to reference them in code and makes for a more organized Hierarchy window. All that’s left is the code to make the enemy walk the patrol route, which you’ll add in the next section.
Moving enemy agents
Our patrol locations are set and the Enemy Prefab has a NavMeshAgent component, but now we need to figure out how to reference those locations and get the enemy moving on its own. To do that, we’ll first need to talk about an important concept in the world of software development: procedural programming.
Procedural programming
Even though it’s in the name, the idea behind procedural programming can be elusive until you get your head around it; once you do, you’ll never see a code challenge the same way.
Any task that executes the same logic on one or more sequential objects is the perfect candidate for procedural programming. You already did a little procedural programming when you debugged arrays, lists, and dictionaries with for and foreach loops. Each time those looping statements were executed, you performed the same call to Debug.Log(), iterating over each item sequentially. The idea now is to use that skill to get a more useful outcome.
One of the most common uses of procedural programming is adding items from one collection to another, often modifying them along the way. This works great for our purposes since we want to reference each child object in the Patrol_Route parent and store them in a list. We’ll spend the next section implementing that technique in our code.
Referencing the patrol locations
Now that we understand the basics of procedural programming, it’s time to get a reference to our patrol locations and assign them to a usable list:
- Add the following code to
EnemyBehavior:public class EnemyBehavior : MonoBehaviour { // 1 public Transform PatrolRoute; // 2 public List<Transform> Locations; void Start() { // 3 InitializePatrolRoute(); } // 4 void InitializePatrolRoute() { // 5 foreach(Transform child in PatrolRoute) { // 6 Locations.Add(child); } } void OnTriggerEnter(Collider other) { // ... No changes needed ... } void OnTriggerExit(Collider other) { // ... No changes needed ... } } - Select
Enemyin the Hierarchy window and drag thePatrol_Routeobject from the Hierarchy window onto the Patrol Route variable inEnemyBehavior:
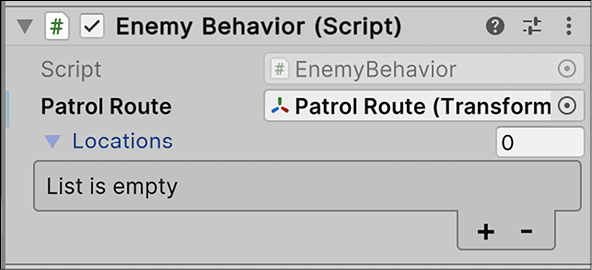
Figure 9.11: Dragging Patrol_Route to the Enemy script
- Hit the arrow icon next to the Locations variable in the Inspector window and run the game to see the list populate:

Figure 9.12: Testing procedural programming
Let’s break down the code:
- First, it declares a variable for storing the
PatrolRouteempty parent GameObject. - Then, it declares a
Listvariable to hold all the childTransformcomponents inPatrolRoute. - After that, it uses
Start()to call theInitializePatrolRoute()method when the game begins. - Next, it creates
InitializePatrolRoute()as a private utility method to procedurally fillLocationswithTransformvalues:- Remember that not including an access modifier makes variables and methods
privateby default
- Remember that not including an access modifier makes variables and methods
- Then, we use a
foreachstatement to loop through each child GameObject inPatrolRouteand reference itsTransformcomponent:- Each
Transformcomponent is captured in the localchildvariable declared in theforeachloop
- Each
- Finally, we add each sequential
childTransformcomponent to the list of locations using theAdd()method as we loop through the child objects inPatrolRoute:
While we could have assigned each location GameObject to Locations by dragging and dropping them directly from the Hierarchy window into the Inspector window, it’s easy to lose or break these connections; making changes to the location object names, object additions or deletions, or project updates can all throw a wrench in a class’s initialization. It’s much safer, and more readable, to procedurally fill GameObject lists or arrays in the Start() method.
Due to that reasoning, I also tend to use GetComponent() in the Start() method to find and store component references attached to a given class instead of assigning them in the Inspector window. However, in situations where components you’re looking for might be in other child objects or nested in complex Prefabs, it may be easier to drag-and-drop the components directly in the Inspector window.
Now, we need the enemy object to follow the patrol route we laid out, which is your next task.
Moving the enemy
With a list of patrol locations initialized on Start(), we can grab the Enemy NavMeshAgent component and set its first destination.
Update EnemyBehavior with the following code and hit Play:
// 1
using UnityEngine.AI;
public class EnemyBehavior : MonoBehaviour
{
    public Transform PatrolRoute;
    public List<Transform> Locations;
    // 2
    private int _locationIndex = 0;
    // 3
    private NavMeshAgent _agent;
    void Start()
    {
        // 4
        _agent = GetComponent<NavMeshAgent>();
        InitializePatrolRoute();
        // 5
        MoveToNextPatrolLocation();
    }
    void InitializePatrolRoute()
    {
         // ... No changes needed ...
    }

    void MoveToNextPatrolLocation()
    {
        // 6
        _agent.destination = Locations[_locationIndex].position;
    }
    void OnTriggerEnter(Collider other)
    {
        // ... No changes needed ...
    }
    void OnTriggerExit(Collider other)
    {
        // ... No changes needed ...
    }
}
Let’s break down the code:
- First, it adds the
UnityEngine.AIusingdirective so thatEnemyBehaviorhas access to Unity’s navigation classes, in this case,NavMeshAgent. - Then, it declares a variable to keep track of which patrol location the enemy is currently walking toward. Since
Listitems are zero-indexed, we can have the Enemy Prefab move between patrol points in the order they are stored inLocations. - Next, it declares a variable to store the NavMeshAgent component attached to the Enemy GameObject. This is
privatebecause no other classes should be able to access or modify it. - After that, it uses
GetComponent()to find and return the attached NavMeshAgent component to the agent. - Then, it calls the
MoveToNextPatrolLocation()method onStart(). - Finally, it declares
MoveToNextPatrolLocation()as a private method and sets_agent.destination:destinationis aVector3position in 3D spaceLocations[_locationIndex]grabs theTransformitem inLocationsat a given index- Adding
.positionreferences theTransformcomponent’sVector3position
Now, when our scene starts, locations are filled with patrol points and MoveToNextPatrolLocation() is called to set the destination position of the NavMeshAgent component to the first item at _locationIndex 0 in the list of locations. The next step is to have the enemy object move from the first patrol location to all the other locations in sequence.
Our enemy moves to the first patrol point just fine, but then it stops. What we want is for it to continually move between each sequential location, which will require additional logic in Update() and MoveToNextPatrolLocation(). Let’s create this behavior.
Add the following code to EnemyBehavior and hit Play:
public class EnemyBehavior : MonoBehaviour
{
    // ... No changes needed ...
    void Update()
    {
        // 1
        if(_agent.remainingDistance < 0.2f && !_agent.pathPending)
        {
            // 2
            MoveToNextPatrolLocation();
        }
    }
    void MoveToNextPatrolLocation()
    {
        // 3
        if (Locations.Count == 0)
            return;

        _agent.destination = Locations[_locationIndex].position;
        // 4
        _locationIndex = (_locationIndex + 1) % Locations.Count;
    }
    // ... No other changes needed ...
}
Let’s break down the code:
- First, it declares the
Update()method and adds anifstatement to check whether two different conditions are true:remainingDistancereturns how far the NavMeshAgent component currently is from its set destination, so we’re checking if that is less than 0.2pathPendingreturns atrueorfalseBoolean, depending on whether Unity is computing a path for the NavMeshAgent component
- If _
agentis very close to its destination, and no other path is being computed, theifstatement returnstrueand callsMoveToNextPatrolLocation(). - Here, we added an
ifstatement to make sure thatLocationsisn’t empty before the rest of the code inMoveToNextPatrolLocation()is executed:- If
Locationsis empty, we use thereturnkeyword to exit the method without continuing. Ifstatements that only have one line of code can be written without any brackets, which can make them easier to write and read (but this is entirely a personal preference).- This is referred to as defensive programming, and, coupled with refactoring, it is an essential skill to have in your arsenal as you move toward more intermediate C# topics. We will consider refactoring at the end of the chapter.
- If
- Then, we set
_locationIndexto its current value,+1, followed by the modulo (%) ofLocations.Count:- This will increment the index from 0 to 4 and then restart it at 0 so that our Enemy Prefab moves in a continuous path.
- The modulo operator returns the remainder of two values being divided—2 divided by 4 has a remainder of 2 when the result is an integer, so 2 % 4 = 2. Likewise, 4 divided by 4 has no remainder, so 4 % 4 = 0.
Dividing an index by the maximum number of items in a collection is a quick way to always find the next item. If you’re rusty on the modulo operator, revisit Chapter 2, The Building Blocks of Programming.
We now need to check that the enemy is moving toward its set patrol location every frame in Update(); when it gets close, MoveToNextPatrolLocation() is fired, which increments _locationIndex and sets the next patrol point as the destination.
If you drag the Scene view down next to the Console window, as shown in the following screenshot, and hit Play, you can watch the Enemy Prefab walk around the corners of the level in a continuous loop:

Figure 9.13: Testing the enemy patrol route
The enemy now follows the patrol route around the outside of the map, but it doesn’t seek out the player and attack when it’s within a preset range. You’ll use the NavAgent component to do just that in the next section.
Enemy game mechanics
Now that our enemy is on a continuous patrol circuit, it’s time to give it some interaction mechanics of its own; there wouldn’t be much risk or reward if we left it walking around with no way to act against us.
Seek and destroy: changing the agent’s destination
In this section, we’ll be focusing on switching the target of the enemies’ NavMeshAgent component when the player gets too close and dealing damage if a collision occurs. When the enemy successfully lowers the player’s health, it will return to its patrol route until its next run-in with the player.
However, we’re not going to leave our player helpless; we’ll also add in code to track enemy health, detect when an enemy is successfully hit with one of the player’s bullets, and when an enemy needs to be destroyed.
Now that the Enemy Prefab is moving around on patrol, we need to get a reference to the player’s position and change the destination of NavMeshAgent if it gets too close.
Add the following code to EnemyBehavior:
public class EnemyBehavior : MonoBehaviour
{
    // 1
    public Transform Player;
    public Transform PatrolRoute;
    public List<Transform> Locations;
    private int _locationIndex = 0;
    private NavMeshAgent _agent;
    void Start()
    {
        _agent = GetComponent<NavMeshAgent>();
        // 2
        Player = GameObject.Find("Player").transform;
        // ... No other changes needed ...
    }
    /* ... No changes to Update,
           InitializePatrolRoute, or
           MoveToNextPatrolLocation ... */
    void OnTriggerEnter(Collider other)
    {
        if(other.name == "Player")
        {
            // 3
            _agent.destination = Player.position;
            Debug.Log("Enemy detected!");
        }
    }
    void OnTriggerExit(Collider other)
    {
        // .... No changes needed ...
    }
}
Let’s break down the code:
- First, it declares a
publicvariable to hold thePlayercapsule’sTransformvalue. - Then, we use
GameObject.Find("Player")to return a reference to the Player object in the scene:- Adding
.transformdirectly references the object’sTransformvalue in the same line
- Adding
- Finally, we set
_agent.destinationto the player’sVector3position inOnTriggerEnter()whenever the player enters the enemies’ attack zone that we set up earlier with a Collider component.
If you play the game now and get too close to the patrolling enemy, you’ll see that it breaks from its path and comes straight for you. Once it reaches the player, the code in the Update() method takes over again and the Enemy Prefab resumes its patrol.
We still need the enemy to be able to hurt the player in some way, which we’ll learn how to do in the next section.
Lowering player health
While our enemy mechanic has come a long way, it’s still anti-climactic to have nothing happen when the Enemy Prefab collides with the player Prefab. To fix this, we’ll tie in the new enemy mechanics with the game manager.
Update PlayerBehavior with the following code and hit Play:
public class PlayerBehavior : MonoBehaviour
{
    // ... No changes to public variables needed ...
    // 1
    private GameBehavior _gameManager;
    void Start()
    {
        _rb = GetComponent<Rigidbody>();
        _col = GetComponent<CapsuleCollider>();
        // 2
        _gameManager = GameObject.Find("Game Manager").GetComponent<GameBehavior>();
    }
    /* ... No changes to Update,
           FixedUpdate, or
           IsGrounded ... */
    // 3
    void OnCollisionEnter(Collision collision)
    {
        // 4
        if(collision.gameObject.name == "Enemy")
        {
            // 5
            _gameManager.HP -= 1;
        }
    }
}
- First, it declares a
privatevariable to hold the reference to the instance ofGameBehaviorwe have in the scene. - Then, it finds and returns the
GameBehaviorscript that’s attached to theGame Managerobject in the scene:- Using
GetComponent()on the same line asGameObject.Find()is a common way to cut down on unnecessary lines of code
- Using
- Since our player is the object being collided with, it makes sense to declare
OnCollisionEnter()inPlayerBehavior. - Next, we check for the name of the colliding object; if it’s the Enemy Prefab, we execute the body of the
ifstatement. - Finally, we subtract
1from the publicHPvariable using the_gameManagerinstance.
Collisions between two objects work both ways, so you could also put this code in the EnemyBehavior script and look for a collision with the Player object.
Whenever the enemy now tracks and collides with the player, the game manager will fire the set property on HP. The UI will update with a new value for player health, which means we have an opportunity to put in some additional logic for the loss condition later on. For now, let’s move on to detecting when bullets hit our enemies and potentially take them out of commission.
Detecting bullet collisions
Now that we have our loss condition, it’s time to add a way for our player to fight back and survive enemy attacks.
Open up EnemyBehavior and modify it with the following code:
public class EnemyBehavior : MonoBehaviour
{
    //... No other variable changes needed ...
    // 1
    private int _lives = 3;
    public int EnemyLives
    {
        // 2
        get { return _lives; }
        // 3
        private set
        {
            _lives = value;
            // 4
            if (_lives <= 0)
            {
                Destroy(this.gameObject);
                Debug.Log("Enemy down.");
            }
        }
    }
    /* ... No changes to Start,
           Update,
           InitializePatrolRoute,
           MoveToNextPatrolLocation,
           OnTriggerEnter, or
           OnTriggerExit ... */
    void OnCollisionEnter(Collision collision)
    {
        // 5
        if(collision.gameObject.name == "Bullet(Clone)")
        {
            // 6
            EnemyLives -= 1;
            Debug.Log("Critical hit!");
        }
    }
}
Let’s break down the code:
- First, it declares a
private intvariable called_liveswith apublicbacking variable calledEnemyLives. This will let us control howEnemyLivesis referenced and set, just like inGameBehavior. - Then, we set the
getproperty to always return_lives. - Next, we use
private setto assign the new value ofEnemyLivesto_livesto keep them both in sync.We haven’t seen
private getorprivatesetbefore, but they can have access modifiers just like any other executable code. Declaringgetorsetasprivatemeans that only the parent class has access to their functionality.
- Then, we add an
ifstatement to check whether_livesis less than or equal to 0, meaning that the enemy should be dead:- When that’s the case, we destroy the
EnemyGameObject and print out a message to the console
- When that’s the case, we destroy the
- Because
Enemyis the object getting hit with bullets, it’s sensible to include a check for those collisions inEnemyBehaviorwithOnCollisionEnter(). - Finally, if the name of the colliding object matches a bullet clone object, we decrement
EnemyLivesby1and print out another message.Notice that the name we’re checking for is
Bullet(Clone), even though our bullet Prefab is namedBullet. This is because Unity adds the(Clone)suffix to any object created with theInstantiate()method, which is how we made them in our shooting logic.You can also check for the GameObject’s tag, but since that’s a Unity-specific feature, we’re going to leave the code as-is and do things with pure C#.
Now, the player can fight back when the enemy tries to take one of its lives by shooting it three times and destroying it. Again, our use of the get and set properties to handle additional logic proves to be a flexible and scalable solution. With that done, your final task is to update the game manager with a loss condition.
Updating the game manager
To fully implement the loss condition, we need to update the manager class:
- Open up
GameBehaviorand add the following code:public class GameBehavior : MonoBehaviour { // ... No other variable changes... // 1 public Button LossButton; private int _itemsCollected = 0; public int Items { // ... No changes needed ... } private int _playerHP = 10; public int HP { get { return _playerHP; } set { _playerHP = value; HealthText.text = "Player Health: " + HP; // 2 if(_playerHP <= 0) { ProgressText.text= "You want another life with that?"; LossButton.gameObject.SetActive(true); Time.timeScale = 0; } else { ProgressText.text = "Ouch... that's got hurt."; } } } } - In the Hierarchy window, right-click on Win Condition, choose Duplicate, and name it
Loss Condition: - Select Game Manager in the Hierarchy window and drag Loss Condition into the Loss Button slot in the Game Behavior (Script) component:

Figure 9.14: Game behavior script with text and button variables completed in the Inspector pane
- First, we declare a new button that we want to show when the player loses the game.
- Then, we add in an
ifstatement to check when_playerHPdrops below0:- If it’s
true,ProgessTextandTime.timeScaleare updated and the Loss Condition button is activated - If the player is still alive following an enemy collision,
ProgessTextshows a different message: “Ouch… that’s got to hurt.”
- If it’s
Now, change _playerHP to 1 in GameBehavior.cs and get the Enemy Prefab to collide with you and observe what happens.
That’s a wrap! You’ve successfully added a “smart” enemy that can damage the player and be damaged right back, as well as a loss screen through the game manager.
Before we finish this chapter, there’s one more important topic that we need to discuss, and that’s how to avoid repeating code.
Repeated code is the bane of all programmers, so it makes sense that you learn how to keep it out of your projects early on!
Refactoring and keeping it DRY
The Don’t Repeat Yourself (DRY) acronym is the software developer’s conscience: it tells you when you’re in danger of making a bad or questionable decision, and gives you a feeling of satisfaction after a job well done.
In practice, repeated code is part of programming life. Trying to avoid it by constantly thinking ahead will put up so many roadblocks in your project that it won’t seem worthwhile carrying on. A more efficient—and sane—approach to dealing with repeating code is to quickly identify it when and where it occurs and then look for the best way to remove it. This task is called refactoring, and our GameBehavior class could use a little of its magic right now.
You may have noticed that we set the progress text and timescale in two separate places, but we could easily make ourselves a utility method to do this for us in a single place.
As you get more comfortable with programming you won’t need to clean up after yourself as much—you’ll naturally learn how to make things easier on yourself in advance and reduce the need for refactoring after every new addition. However, that doesn’t mean refactoring should be ignored, it’s always important to check your code for opportunities you may have missed to write cleaner, more efficient code.
To refactor the existing code, you’ll need to update GameBehavior.cs as follows:
public class GameBehavior: MonoBehaviour
{
    // 1
    public void UpdateScene(string updatedText)
    {
        ProgressText.text = updatedText;
        Time.timeScale = 0f;
    }
    private int _itemsCollected = 0;
    public int Items
    {
        get { return _itemsCollected; }
        set
        {
            _itemsCollected = value;
            ItemText.text = "Items Collected: " + Items;
            if (_itemsCollected >= MaxItems)
            {
                WinButton.gameObject.SetActive(true);
                // 2
                UpdateScene("You've found all the items!");
            }
            else
            {
                ProgressText.text = "Item found, only " + (MaxItems - _itemsCollected) + " more to go!";
            }
        }
    }
    private int _playerHP = 10;
    public int HP
    {
        get { return _playerHP; }
        set
        {
            _playerHP = value;
            HealthText.text = "Player Health: " + HP;
            if (_playerHP <= 0)
            {
                LossButton.gameObject.SetActive(true);
                // 3
                UpdateScene("You want another life with that?");
            }
            else
            {
                ProgressText.text = "Ouch... that's got hurt.";
            }
            Debug.LogFormat("Lives: {0}", _playerHP);
        }
    }
}
Let’s break down the code:
- We declared a new method called
UpdateScene, which takes in a string parameter that we want to assign toProgressTextand setsTime.timeScaleto0. - We deleted our first instance of duplicated code and used our new method to update our scene when the game is won.
- We deleted our second instance of duplicated code and update the scene when the game is lost.
There’s always more to refactor if you look in the right places.
Summary
With that, our enemy and player interactions are complete. We can dish out damage as well as take it, lose lives, and fight back, all while updating the on-screen GUI. Our enemies use Unity’s navigation system to walk around the arena and change to attack mode when within a specified range of the player. Each GameObject is responsible for its behavior, internal logic, and object collisions, while the game manager keeps track of the variables that govern the game’s state. Lastly, we learned about simple procedural programming and how much cleaner code can be when repeated instructions are abstracted out into their methods.
You should feel a sense of accomplishment at this point, especially if you started this book as a total beginner. Getting up to speed with a new programming language while building a working game is no easy trick. In the next chapter, you’ll be introduced to some intermediate topics in C#, including new type modifiers, method overloading, interfaces, and class extensions.
Pop quiz—AI and navigation
- How is a NavMeshSurface component created in a Unity scene?
- What component identifies a GameObject to a NavMeshSurface?
- Executing the same logic on one or more sequential objects is an example of which programming technique?
- What does the acronym DRY stand for?
Don’t forget to check your answers against mine in the Pop Quiz Answers appendix to see how you did!
Join us on discord!
Read this book alongside other users, Unity game development experts and the author himself.
Ask questions, provide solutions to other readers, chat with the author via. Ask Me Anything sessions and much more.
Scan the QR code or visit the link to join the community.