
Chapter 13: Introduction to Unity Scripting with C#
Unity has a lot of great built-in tools to solve the most common problems in game development, such as the ones we have seen so far. Even two games of the same genre have their own little differences that make the games unique, and Unity cannot foresee that, so that's why we have scripting. Through coding, we can extend Unity's capabilities in several ways to achieve the exact behavior we need, all through a well-known language—C#. We will introduce how to create custom components using C# scripts.
One thing I should point out here is that this chapter is mainly a recap of C# scripting basics for Unity, but in one of the sections, I will explain some advanced tips for experienced programmers. So, try to not skip this chapter if you have programming experience but not in Unity.
In this chapter, we will examine the following scripting concepts:
- Creating C# scripts
- Using events and instructions
We are going to create our own Unity components, learning the basic structure of a class and the way that we can execute actions and expose properties to be configured. Let's start by discussing the basics of script creation.
Creating C# scripts
This book is intended for readers with some programming knowledge, but in this first section, we are going to discuss the C# script structure to make sure you have a strong foundation for the behaviors we will code in the following chapters.
In this section, we will examine the following script creation concepts:
- Initial setup
- Creating a MonoBehaviour-based class
- Adding fields
We are going to create our first Unity script, which will serve to create our component, discussing the tools needed to do so and exploring how to expose our class fields to the editor. Let's start with the basics of script creation.
Initial setup
One thing to consider before creating our first script is how Unity compiles code. While coding, we are used to having an Integrated Development Environment (IDE), which is a program to create our code and compile or execute it. In Unity, we will just use an IDE as a tool to create scripts easily with coloring and auto-completion because Unity doesn't have a custom code editor, and if you have never coded before, these are valuable tools for beginners. The scripts will be created inside the Unity project and Unity will detect and compile them if any changes are made, so you won't compile in the IDE. Don't worry—you can still use breakpoints in this method.
We can use Visual Studio, Visual Studio Code, Rider, or whatever C# IDE you'd like to use, but when you install Unity, you will probably see an option to install Visual Studio automatically, which allows you to have a default IDE. This installs the free version of Visual Studio, so don't worry about the licenses here. If you don't have an IDE on your computer and didn't check the Visual Studio option while installing Unity, you can do the following:
- Open Unity Hub.
- Go to the Installs section.
- Click on the three dots in the top-right area of the Unity version you are using and click on Add Modules:

Figure 13.1 – Adding a module to the Unity installation
- Check the option that says Visual Studio; the description of the option will vary depending on the version of Unity you are using.
- Hit the NEXT button at the bottom right:

Figure 13.2 – Installing Visual Studio
- Wait for the operation to end. This might take a few minutes.
If you have a preferred IDE, you can install it yourself and configure Unity to use it. If you can afford it or you are a teacher or a student (as it is free in these cases), I recommend Rider. It is a great IDE with lots of C# and Unity features that you will love; however, it is not vital for this exercise. In order to set up Unity to use a custom IDE, do the following:
- Open the project.
- Go to Edit | Preferences in the top menu of the editor.
- Select the External Tools menu from the left panel.
- From the external script editor, select your preferred IDE; Unity will automatically detect the supported IDEs:

Figure 13.3 – Selecting a custom IDE
- If you don't find your IDE in the list, you can use the Browse… option, but usually, IDEs that require you to use this option are not very well supported—but it's worth a shot.
Finally, some IDEs, such as Visual Studio, Visual Studio Code, and Rider, have Unity integration tools that you need to install in your project, which are optional but can be useful. Usually, Unity installs these automatically, but if you want to be sure that they are installed, do the following:
- Open Package Manager (Window | Package Manager).
- Search the list for your IDE or filter the list by using the search bar. In my case, I used Rider, and I can find a package called JetBrains Rider Editor:
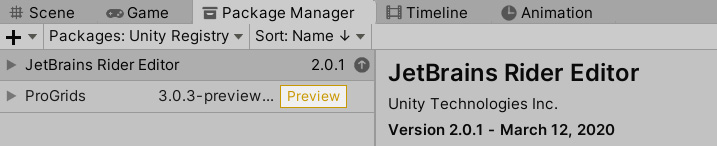
Figure 13.4 – Custom IDE editor extension installation—in this case, the Rider one
- Check whether your IDE integration package is installed by looking at the buttons in the bottom-right part of the package manager. If you see an Install or Update button, click on it, but if it says Installed, everything is set up.
Now that we have an IDE configured, let's create our first script.
Creating a MonoBehaviour-based class
C# is a heavily object-oriented language, and this is no different in Unity. Any time we want to extend Unity, we need to create our own class—a script with the instructions we want to add to Unity. If we want to create custom components, we need to create a class that inherits from MonoBehaviour, the base class of every custom component.
We can create C# script files directly within the Unity project using the editor, and you can arrange them in folders right next to other assets folders. The easiest way to create a script is by doing the following:
- Select any game object that you want to have the component we are going to create. As we are just testing this out, select any object.
- Click on the Add Component button at the bottom of the Inspector and look for the New script option at the bottom of the list, displayed after clicking on Add Component:
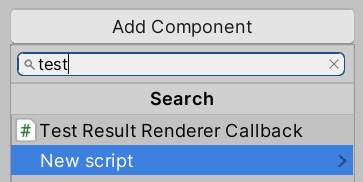
Figure 13.5 – The New script option
- In the Name field, enter the desired script name. In my case, I will call it MyFirstScript, but for the scripts that you will use for your game, try to enter descriptive names, regardless of the length:

Figure 13.6 – Naming the script
Important note:
It is recommended that you use Pascal case for script naming. In Pascal case, a script for the player's shooting functionality would be called PlayerShoot. The first letter of each word of the name is in uppercase and you can't use spaces.
- You can see how a new asset, called as the script was, is created in Project View. Remember that each component has its own asset, and I suggest you each component to a Scripts folder:

Figure 13.7 – Script asset
- Now, you will also see that your Game Object has a new component in the Inspector window, which is named the same as your script. So, you have now created your first component class:

Figure 13.8 – Our script added to a game object
Now that we have created a component class, remember that a class is not the component itself. It is a description of what the component should be—a blueprint of how a component should work. To actually use the component, we need to instantiate it by creating a component based on the class. Each time we add a component to an object using the editor, we are instantiating it. Generally, we don't instantiate using new, but by using the editor or specialized functions. Now, you can add your component as you would any other component by using the Add Component button in the Inspector window and looking for it in the Scripts category or searching it by name:

Figure 13.9 – Adding a custom component in the Scripts category
Something that you need to consider here is that we can add the same component to several game objects. We don't need to create a class for each game object that uses the component. I know this is basic programmers' knowledge, but remember that we are trying to recap the basics here. In the next chapter, we will look at more interesting topics.
Now that we have our component, let's explore how it looks and carry out a class structure recap by doing the following:
- Locate the script asset in Project View and double-click on it. Remember that it should be located in the Scripts folder you created previously.
- Wait for the IDE to open; this can take a while. You will know that the IDE has finished the initialization when you see your script code and its keywords properly colored, which varies according to the desired IDE. In Rider, it looks as in the following screenshot. In my case, I knew that Rider had finished initializing because the MonoBehaviour type and the script name are colored the same:

Figure 13.10 – A new script opened in the Rider IDE
- The first three lines—the ones that start with the using keyword—include common namespaces. Namespaces are like code containers, which is, in this case, code created by others (such as Unity, C# creators, and so on). We will be using namespaces quite often to simplify our tasks; they already contain solved algorithms that we will use. We will be adding and removing the using component as we need; in my case, Rider is suggesting that the first two using components are not necessary because I am not using any code inside them, and so they are grayed out. But for now, keep them as you will use them in later chapters of this book. Remember, they should always be at the beginning of the class:

Figure 13.11 – The using sections
- The next line, the one that starts with public class, is where we declare that we are creating a new class that inherits from MonoBehaviour, the base class of every custom component. We know this because it ends with : MonoBehaviour. You can see how the rest of the code is located inside brackets right below that line, meaning that the code inside them belongs to the component:

Figure 13.12 – The MyFirstScript class definition inherits from MonoBehaviour
Now that we have our first component, let's edit it, starting with the fields.
Adding fields
When we added components as Rigidbody or as different kinds of colliders, adding the components wasn't enough. We needed to properly configure them to achieve the exact behavior that we need. For example, Rigidbody has the Mass property to control the object's weight, and the colliders have the Size property to control their shape. This way, we can reuse the same component for different scenarios, preventing the duplication of similar components. With a Box collider, we can represent a square or rectangular box just by changing the size properties. Our components are no exception; if we have a component that moves an object and if we want two objects to move at different speeds, we can use the same component with different configurations.
Each configuration is a class field, a specific type variable where we can hold the parameter's value. We can create class fields that can be edited in the editor in two ways—by marking the field as public, but breaking the encapsulation principle, or by making a private field and exposing it with an attribute. Now, we are going to cover both methods, but if you are not familiar with Object-Oriented Programming (OOP) concepts, such as encapsulation, I recommend you use the first method.
Suppose we are creating a movement script. We will add an editable number field representing the velocity using the first method—that is, by adding the public field. We will do this by following these steps:
- Open the script by double-clicking it as we did before.
- Inside the class brackets, but outside any brackets within them, add the following code:

Figure 13.13 – Creating a speed field in our component
Important note:
The public keyword specifies that the variable can be seen and edited beyond the scope of the class. The float part of the code says that the variable is using the decimal number type, and speed is the name we chose for our field—this can be whatever you want. You can use other value types to represent other kinds of data, such as bool to represent checkboxes or Booleans and string to represent text.
- To apply the changes, just save the file in the IDE (usually by pressing Ctrl + S or command + S) and return again to Unity. When you do this, you will notice a little loading wheel at the bottom-right part of the editor, indicating that Unity is compiling the code. You can't test the changes until the wheel finishes. Remember that Unity will compile the code; don't compile it in the IDE:

Figure 13.14 – The loading wheel
- After the compilation is finished, you can see your component in the Inspector window and the Speed variable should be there, allowing you to set the speed you want. Of course, right now, the variables do nothing. Unity doesn't recognize your intention by the name of the variable; we need to set it for use in some way, but we will do that later:

Figure 13.15 – A public field to edit data that the component will use later
- Try adding the same component to other objects and set a different speed. This will show you how components in different game objects are independent, allowing you to change some of their behaviors via different settings.
The second way to define properties is similar, but instead of creating a public field, we create a private field, encouraging encapsulation and exposing it using the SerializeField attribute, as shown in the following screenshots. These screenshots show two ways of doing this—both will produce the same results; the only difference is the styling. Use the one that best fits your coding standards:

Figure 13.16 – Two ways to expose private attributes in the Inspector window
If you are not familiar with the OOP concept of encapsulation, just use the first method, which is more flexible for beginners. If you create a private field, it won't be accessible to other scripts because the SerializeField attribute only exposes the variable to the editor. Remember that Unity won't allow you to use constructors, so the only way to set initial data and inject dependencies is via serialized private fields or public fields and setting them in the editor (or using a dependency injection framework, but that is beyond the scope of this book). For simplicity, we will use the first method in most of the exercises in this book.
If you want, try to create other types of variables and see how they look in the inspector. Try replacing float with bool or string, as previously suggested. Now that we know how to configure our components through data, let's use that data to create some behaviour.
Using events and instructions
Now that we have a script, we are ready to do something with it. We won't implement anything useful in this chapter, but we will settle the concepts to add some types of behavior for the scripts we are going to create in the next chapters.
In this section, we are going to cover the following concepts:
- Events and instructions
- Using fields in instructions
- Common beginner errors
We are going to explore the Unity event system, which will allow us to respond to these situations by executing Unity functions. These functions will also be affected by the value of the editor, and fields exposed to our script will be configurable. Finally, we are going to discuss common scripting errors and how to solve them. Let's start by introducing the concept of Unity events.
Events and instructions
Unity allows us to create behavior in a cause-effect fashion, which is usually called an event system. An event is a situation that Unity is monitoring—for example, when two objects collide or are destroyed, Unity tells us about this situation, allowing us to react according to our needs. As an example, we can reduce the life of a player when it collides with a bullet. Here, we will explore how to listen to these events and test them by using some simple actions.
If you are used to event systems, you will know that they usually require us to subscribe to some kind of listener or delegate, but in Unity, there is a simpler method available. We just need to write the exact function for the event we are looking for exactly—and I mean exactly. If a letter of the name doesn't have the correct casing, it won't execute and no warning will be raised. This is the most common beginner's error that is made, so pay attention.
There are lots of events or messages to listen to in Unity, so let's start with the most common one—Update. This event will tell you when Unity wants you to update your object, depending on the purpose of your behavior; some don't need them. The Update logic is usually something that needs to be executed constantly; to be more precise, in every frame. Remember that every game is like a movie—a sequence of images that your screen switches through fast enough to look like we have continuous motion. A common action to do in the Update event is to move objects a little bit, and by doing this, every frame will make your object constantly move.
We will learn about the sorts of things we can do with Update and other events or messages later. Now, let's focus on how to make our component at least listen to this event. Actually, the base component already comes with two event functions that are ready to use, one being Update and the other one being in the script. If you are not familiar with the concept of functions in C#, we are referring to the snippet of code in the following screenshot, which is already included in our script. Try to find it in yours:

Figure 13.17 – A function called Update, which will be executed with every frame
You will notice a (usually) green line of text (depending on the IDE) above the void Update()line—this is called a comment. These are basically ignored by Unity. They are just notes that you can leave to yourself and must always begin with // to prevent Unity from trying to execute them and failing. We will use this to temporarily disable lines of code later.
Now, to test whether this actually works, let's add an instruction to be executed all the time. There's no better test function than print. This is a simple instruction that tells Unity to print a message to the console, where all kinds of messages can be seen by the developers to check whether everything is properly working. The user will never see these messages. They are similar to the classic log files that developers sometimes ask you for when something goes wrong in the game and you are reporting an issue.
In order to test events using functions, do the following:
- Open the script by double-clicking on it.
- To test, add print("test"); within the event function. In the following screenshot, you can see an example of how to do that in the Update event. Remember to write the instruction exactly, including the correct casing, spaces, and quotes symbols:

Figure 13.18 – Printing a message in all the frames
- Save the file, go to Unity, and play the game.
Important note:
Remember to save the file before switching back to Unity from the IDE. This is the only way that Unity knows your file has changed. Some IDEs, such as Rider, save the file automatically for you, but I don't recommend you use auto-save, at least in big projects (you don't want accidental recompilations of unfinished work; that takes too long in projects with lots of scripts).
- Look for the Console tab and select it. This is usually found next to the Project View tab. If you can't find it, go to Window | General | Console, or press Ctrl + Shift + C (command + shift + C on macOS).
- You will see lots of messages saying "test" being printed in every frame of the Console tab. If you don't see this, remember to save the script file before playing the game.
- Let's also test the Start function. Add print("test Start"); to it, save the file, and play the game. The full script should look as follows:

Figure 13.19 – The script that tests the Start and Update functions
If you check the console now and scroll all the way up, you will see a single "test Start" message and lots of "test" messages following it. As you can guess, the Start event tells you that the game has started and allows you to execute the code that needs to happen just once at the beginning of the game. We will use this later in this book.
For the void Update() syntax, we will say to Unity that whatever is contained in the brackets below this line is a function that will be executed in all the frames. It is important to put the print instruction inside the Update brackets (the ones inside the brackets of the class). Also, the print function expects to receive text inside its parentheses, called an argument or parameter, and text in C# must be enclosed by quotation marks. Finally, all instructions inside functions such as Update or Start must end with a semicolon.
Here, I challenge you to try to add another event called OnDestroy using a print function to discover when it executes. A small suggestion is to play and stop the game and look at the bottom of the console to test this one.
For advanced users, you can also use breakpoints if your IDE allows you to do that. Breakpoints allow you to freeze Unity completely before executing a specific code line to see how our field's data changes over time and to detect errors. Here, I will show you the steps to use breakpoints in Rider, but the Visual Studio version should be similar:
- Click on the vertical bar at the left of the line where you want to add the breakpoint:

Figure 13.20 – A breakpoint in the print instruction
- Go to Run | Attach to Unity Process (in Visual Studio, go to Debug | Attack Unity Debugger. Remember that you need the Visual Studio Unity plugin and the Visual Studio integration package of Package Manager):
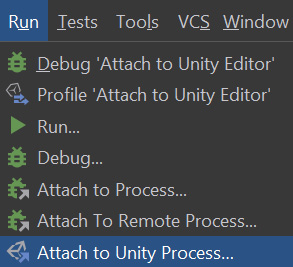
Figure 13.21 – Attacking our IDE with a Unity process
- From the list, look for the specific Unity instance you want to test. The list will show other opened editors or executing debugging builds.
Stopping the debugging process won't close Unity. It will just detach the IDE from the editor.
Now that we created both fields and instructions, let's combine them to make configurable components.
Using fields in instructions
We have created fields to configure our components' behavior, but we have not used them so far. We will create meaningful components in the next chapter, but one thing we will often need is to use the fields we have created to change the behavior of the object. So far, we have no real use of the speed field that we created. However, following the idea of testing whether our code is working (also known as debugging), we can learn how to use the data inside a field with a function to test whether the value is the expected one, changing the output of print in the console according to the field's value.
In our current script, our speed value doesn't change during runtime. However, as an example, if you are creating a life system with shield damage absorption and you want to test whether the reduced damage calculation is working properly, you might want to print the calculation values to the console and check whether they are correct. The idea here is to replace the fixed message inside the print functions with a field. When you do that, print will show the field's value in the console. So, if you set a value of 5 in speed and you print it, you will see lots of messages saying 5 in the console, and the output of the print function is governed by the field. To test this, your print message within the Update function should look as follows:

Figure 13.22 – Using a field as a print function parameter
As you can see, we just put the name of the field without quotation marks. If you use quotation marks, you will print a "speed" message. In other scenarios, you can use this speed value within some moving functions to control how fast the movement will be, or you can perhaps create a field called "fireRate" (fields use camel case instead of Pascal, with the first letter being in lowercase) to control the cooldown time between one bullet and the next:
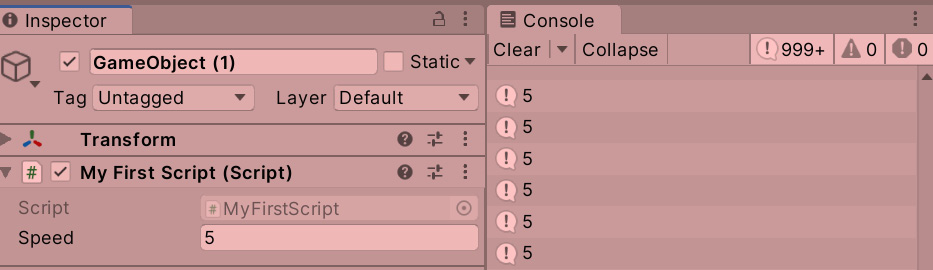
Figure 13.23 – Printing the current speed
Important note:
You can see that my editor is tinted in red, and thats because i configured it to be tinted in red when playing the game to easily detect that. You can do that going to Edit > Preferences > Colors and changing Playmode tint.
With all this, we now have the necessary tools to start creating actual components. Before moving on, let's recap some of the common errors that you will likely encounter if this is your first time creating scripts in C#.
Common beginner errors
If you are an experienced programmer, I bet you are quite familiar with these, but let's recap the common errors that will make you lose lots of time when you are starting with scripting. Most of them are caused by not copying the shown code exactly. If you have an error in the code, Unity will show a red message in the console and won't allow you to run the game, even if you are not using the script. So, never leave anything unfinished.
Let's start with a classic error, which is a missing semicolon, which has resulted in many programmer memes and jokes. All fields and most instructions inside functions (such as print), when called, need to have a semicolon at the end. If you don't add a semicolon, Unity will show an error, such as the one in the screenshot on the left in the following figure, in the console. You will also notice that the screenshot on the right in the following figure also has an example of bad code, where the IDE is showing a red icon suggesting something is wrong in that place:

Figure 13.24 – An error in the print line hinted by the IDE and the Unity console
You will notice that the error shows the exact script (MyFirstScript.cs), the exact line of code (18, in this case), and usually, a descriptive message—in this case, ; [semicolon] expected. You can simply double-click the error and Unity will open the IDE highlighting the problematic line. You can even click on the links in the stack to jump to the line of the stack that you want.
I already mentioned why it is important to use the exact case for every letter of the instruction. However, based on my experience of teaching beginners, I need to stress this particular aspect more. The first scenario where this can happen is in instructions. In the following screenshots, you can see how a badly written print function looks—that is, you can see the error that the console will display and how the IDE will suggest that there is something wrong. First, in the case of Rider, the instruction is colored red, saying that the instruction is not recognized (in Visual Studio, it will show a red line instead). Then, the error message says that Print does not exist in the current context, meaning that Unity (or C#, actually) does not recognize any instruction named Print. In another type of script, Print in uppercase may be valid, but not in regular components, which is why the in the current context clarification exists:

Figure 13.25 – Error hints when writing an instruction wrong
Now, if you write an event with the wrong casing, the situation is worse. You can create functions such as Start and Update with whatever name you want for other purposes. Writing update or start is perfectly valid as C# will think that you are going to use those functions not as events but as regular functions. So, no error will be shown, and your code will just not work. Try to write update instead of Update and see what happens:
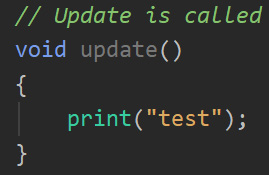
Figure 13.26 – The wrong casing in the Update function will compile the function but won't execute it
Another error is to put instructions outside the function brackets, such as inside the brackets of the class or outside them. Doing this will give no hint to the function as to when it needs to execute. So, a print function outside an Event function makes no sense, and it will show an error such as the ones in the following screenshots. This time, the error is not super descriptive. Identifier expected says that C# is expecting you to create a function or a field—the kind of structures that can be put directly inside a class:

Figure 13.27 – Misplaced instruction or function call
Finally, another classic mistake is to forget to close open brackets. If you don't close a bracket, C# won't know where a function finishes and another starts or where the class function ends. This may sound redundant, but C# needs that to be perfectly defined. In the following screenshots, you can see how this would look:

Figure 13.28 – Missing closed brackets
This one is a little bit difficult to catch because the error in the code is shown way after the actual error. This is caused by the fact that C# allows you to put functions inside functions (not used often) and so C# will detect the error later, asking you to add a closing bracket. However, as we don't want to put update inside Start, we need to fix the error before, at the end of Start. The error message will be descriptive in the console, but again, don't put the close bracket where the message suggests you do so unless you are 100% sure that position is correct.
You will likely face lots of errors aside from these ones, but they all work the same. The IDE will show you a hint and the console will display a message; you will learn them with time. Just have patience as every programmer experiences this. There are other kinds of errors, such as runtime errors, code that compiles but will fail when being executed due to some misconfiguration, or the worst—logic errors, where your code compiles and executes with no error but doesn't do what you intended.
Summary
In this chapter, we explored the basic concepts that you will use while creating scripts. We discussed the concepts of classes and instances and how they must inherit from MonoBehaviour to be accepted by Unity to create our own scripts. We also saw how to mix events and instructions to add behavior to an object and how to use fields in instructions to customize what they do.
We just explored the basics of C# scripting to ensure that everyone is on the same page. However, from now on, we will assume that you have basic coding experience in some programming language and you know how to use structures such as if, for, array, and so on. If not, you can still read through this book and try to complement the areas you don't understand with a C# introduction book as you need.
In the next chapter, we are going to start seeing how we can use what we have learned to create movement and spawning scripts.