
Chapter 10: Sound and Music Integration
We just achieved good enough graphics quality, but we are missing an important part of the game aesthetics: the sound. Often relegated to being a final step in game development, sound is one of those things that if it's there, you won't notice its presence, but if you don't have it, you will feel that something is missing. It will help you to reinforce the ambience you want in your game and must match the graphics setting.
In this chapter, we will examine the following sound concepts:
- Importing audio
- Integrating and mixing audio
Importing audio
As with graphic assets, it is important to properly set up the import settings of audio assets, which can be resource-intensive if not done properly.
In this section, we will examine the following audio importing concepts:
- Audio types
- Configuring import settings
Let's start by discussing the different kinds of audio we can use.
Audio types
There are different types of audio present in video games, which are the following:
- Music: Music used to enhance the player's experience according to the situation.
- Sound effects (SFX): Sounds that happen as a reaction to player or NPC actions, such as clicking a button, walking, opening a door, and shooting a gun.
- Ambient sound: A game that only has sounds as reactions to events would feel empty. If you are recreating an apartment in the middle of the city, even if the player is just idle in the middle of the room doing nothing, lots of sounds should be heard, and the sources of most of them will be outside the room, such as an aeroplane flying overhead, a construction site two blocks away, and cars in the street. Creating objects that won't be seen is a waste of resources. Instead, we can place individual sounds all over the scene to recreate the desired ambience, but that would be resource-intensive, requiring lots of CPU and RAM to achieve believable results. Considering that these sounds usually are in the second plane of the user's attention, we can just combine them all into a single looping track and just play one audio, and that's exactly what ambient sound is. If you want to create a café scene, you can simply go to a real café and record a few minutes of audio, using that as your ambient sound.
For almost all games, we will need at least one music track, one ambient track, and several SFX to start the production of the audio. As always, we have different sources of audio assets, but we will use the Asset Store. It has three audio categories to search for the assets we need:
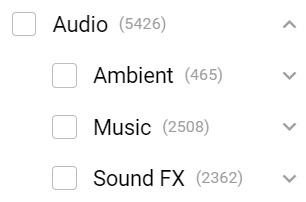
Figure 10.1 – Audio categories in the Asset Store
In my case, I also used the search bar to further filter the categories, searching for weather to find a rain effect. Sometimes, you can't find the exact audio separately; in such cases, you will need to dig in Packs and Libraries, so have patience here. In my case, I picked the three packages you can see in the following figure, but importing just some of the included sounds, all of them would weight a lot in the project. For ambience, I picked rain. Then, I picked Music – Sad Hope for music, and for SFX, I picked one gun sound effect package for our future Player's Hero Character. Of course, you can pick other packages to better suit your game's needs:
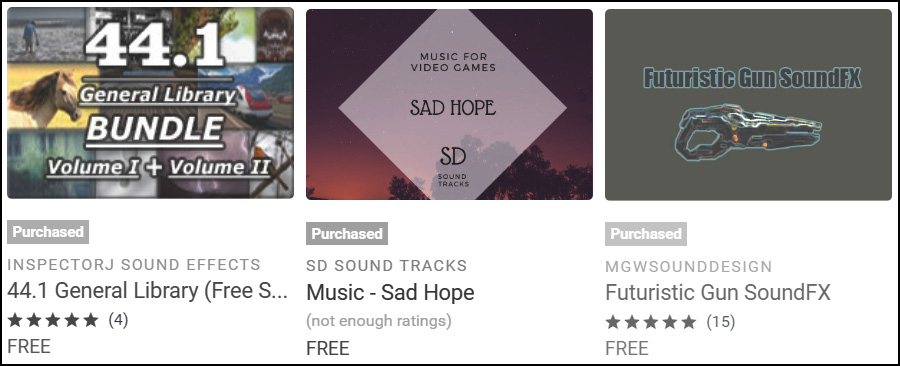
Figure 10.2 – The packages for our game
Please remember that those exact packages might not available at the moment you read this. In that case, you can either download other ones, or pick the files I used from the GitHub repo. Now that we have the necessary audio packages, let's discuss how to import them.
Configuring import settings
We have several import settings we can tweak, but the problem is that we need to consider the usage of the audio to properly set it up, so let's see the ideal settings for each case. In order to see the import settings, as always, you can select the asset and see it in the Inspector panel, as in the following screenshot:

Figure 10.3 – Audio import settings
Let's discuss the most important ones, starting with Force To Mono. Some audio may come with stereo channels, meaning that we have one sound for the left ear and another one for the right ear. This means that one piece of audio can actually contain two different audio tracks. Stereo sound is useful for different effects and instrument spatialization in the case of music, so we want that in those scenarios, but there are other scenarios where stereo is not useful. Consider 3D sound effects such as a shooting gun or some walking-pace steps. In those cases, we need the sound to be heard in the direction to the source. If the shooting of a gun happened to my left, I need to hear it coming from my left. In these cases, we can convert stereo audio to mono audio by checking the Force To Mono checkbox in the audio import settings. This will make Unity combine the two channels into a single one, reducing the size of the audio usually to almost half its size (sometimes more, sometimes less, depending on various aspects).
You can verify the impact of that and other settings at the bottom of the Audio Asset inspector, where you can see the imported audio size:

Figure 10.4 – Left: audio imported without Force to Mono. Right: same audio with Force To Mono
The next setting to discuss, and an important one at that, is Load Type. In order to play some audio, Unity needs to read the audio from disk, decompress, and then play it. Load Type changes the way those three processes are handled. We have the following three options here:
- Decompress on Load: The most memory-intensive option. This mode will make Unity load the audio uncompressed in memory when the scene is loaded. That means that the audio will take lots of space in RAM because we have the uncompressed version loaded. The advantage of using this mode is that playing the audio is easier because we have the raw audio data ready to play in RAM.
- Streaming: The total opposite of Decompress on Load. This mode never loads audio in RAM. Instead, while the audio is playing, Unity reads a piece of the audio asset from disk, decompresses it, plays it, and repeats, running this process once for each piece of audio playing in Streaming. This means that this mode will be CPU - intensive, but will consume almost zero bytes of RAM.
- Compressed in Memory: The middle ground. This mode will load the audio from disk when the scene is loaded but will keep it compressed in memory. When Unity needs to play the audio, it will just take a piece from RAM, decompress it, and play it. Remember that reading pieces of the audio asset from RAM is considerably faster than reading from disk.
Maybe if you are an experienced developer you can easily determine which mode is better suited for which kind of audio, but if this is your first encounter with video games, it may sound confusing, so let's discuss the best modes for different cases:
- Frequent short audio: This could be a shooting gun or the sound of footsteps, which are sounds that last less than 1 second but can occur in several instances and play at the same time. In such cases, we can use Decompress On Load. Uncompressed short audio won't have a huge size difference from its compressed version. Also, since this is the most performant CPU option, having several instances won't have a huge impact on performance.
- Infrequent large audio: This includes music, ambient sound, and dialog. These kinds of audio usually have just one instance playing, and they are usually big. Those cases are better suited for Streaming mode because having them compressed or decompressed in RAM can have a huge impact in low-end devices such as mobile devices (on PCs, we can use Compressed in Memory sometimes). A CPU can handle having two or three bits of audio playing in Streaming, but try to have no more than that.
- Frequent medium audio: This includes pre-made voice chat dialog in multiplayer games, character emotes, long explosions, or any audio that is more than 500 KB (that is not a strict rule – this number depends a lot on the target device). Having this kind of audio decompressed in RAM can have a noticeable impact on performance, but due to the fact that this audio is fairly frequently used, we can have it compressed in memory. Their relatively smaller size means they usually won't make a huge difference in our game and we will avoid wasting CPU resources in reading from disk.
There are other cases to consider, but those can be extrapolated based on the previous ones. Remember that the previous analysis was made by taking into account the requirements of the standard game, but this can vary a lot according to your game and your target device. Maybe you are making a game that won't consume lots of RAM but is pretty intensive in terms of CPU resources, in which case you can just put everything in Decompress on Load. It's important to consider all aspects of your game and to balance your resources accordingly.
Finally, another thing to consider is the compression format, which will change the way Unity will encode the audio in the published game. Different compression formats will give different compression ratios in exchange for less fidelity with the original audio, or higher decompression times, and all this varies a lot based on the audio patterns and length. We have three compression formats:
- PCM: The uncompressed format will give you the highest audio quality, with no noise artifacts, but will result in a bigger asset file size.
- ADPCM: Compressing audio this way reduces file size and yields a fast uncompressing process, but this can introduce noise artifacts that can be noticeable in certain types of audio.
- Vorbis: A high-quality compression format that will yield almost zero artifacts but takes longer to decompress, so playing Vorbis audio will be slightly more intensive than for other formats. It also provides a quality slider to select the exact amount of compression aggressiveness.
Which one should you use? Again, that depends on the features of your audio. Short smooth audio can use PCM, while long noisy audio can use ADPCM; the artifacts introduced by this format will be hidden in the audio itself. Maybe long smooth audio where compression artifacts are noticeable could benefit from using Vorbis. Sometimes, it's just a matter of trial and error. Maybe use Vorbis by default and when performance is reduced, try to switch to ADPCM, and if that causes glitches, just switch to PCM. Of course, the problem here is being sure that the audio processing is really what's responsible for the performance issues – maybe switching all audio to ADPCM and checking whether that made a difference is a good way to detect that, but a better approach would be to use the Profiler, a performance measurement tool that we will see later in this book.
We have other settings, such as Sample Rate Setting, that again, with a little trial and error, you can use to detect the best setting.
I have set up the audio that I downloaded from the Asset Store as you can see in the following screenshots. The first one shows how I set up the music and ambient audio files (large files):
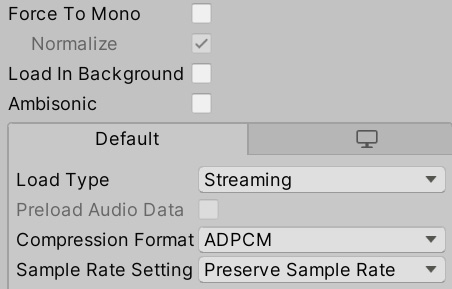
Figure 10.5 – Music and ambient settings
Should be stereo (Force To Mono unchecked), use Streaming Load Type because they are large and will have just one instance playing and ADPCM Compression Format because Vorbis didn't result in a huge size difference.
This second screenshot shows how I set up the SFX files (small files):
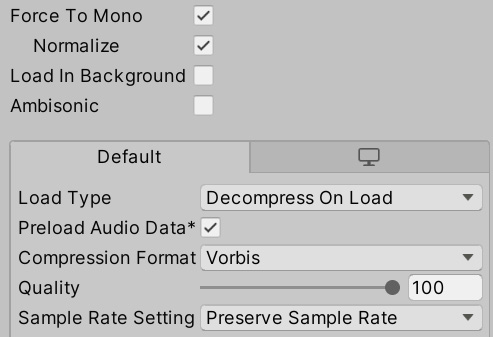
Figure 10.6 – Shooting SFX settings
Will be a 3D sound, so Force To Mono should be checked.. Will be short, so Decompress on Load Load Type works better. Vorbis Compression Format reduced the ADPCM size by more than a half
Now that we have our pieces of audio properly configured, we can start to use them in our scene.
Integrating and mixing audio
We can just drag our bits of audio into our scene to start using it, but we can dig a little bit further to explore the best ways to configure them to each possible scenario.
In this section, we will examine the following audio integration concepts:
- Using 2D and 3D AudioSources
- Using audio mixers
Let's start exploring AudioSources, objects that are in charge of audio playback.
Using 2D and 3D AudioSources
AudioSources are components that can be attached to GameObjects. They are responsible for emitting sound in our game based on AudioClips, which would be the audio assets we downloaded previously. It's important to differentiate an AudioClip from an AudioSource: we can have a single - explosion AudioClip, but lots of AudioSources playing it, simulating several explosions. In this way, an AudioSource can be seen as an instance of an AudioClip.
The simplest way to create an AudioSource is to pick an AudioClip (an audio asset) and drag it to the Hierarchy window. Try to avoid dragging the audio into an existing object; instead, drag it between objects, so Unity will create a new object with the AudioSource instead of adding it to an existing object (sometimes, you want an existing object to have the AudioSource, but let's keep things simple for now):
Figure 10.7 – Dragging an AudioClip to the Hierarchy window between objects
The following screenshot shows the AudioSource generated by dragging the music asset to the scene. You can see that the AudioClip field has a reference to the dragged audio:

Figure 10.8 – AudioSource configured to play our music asset
As you can see, the AudioSource has several settings, so let's review the common ones in the following list:
- Play On Awake: Determines whether the audio starts playing automatically when the game starts. We can uncheck that and play the audio via scripting, perhaps when the player shoots or jumps (more on that in Part 3 of the book).
- Loop: Will make the audio repeat automatically when it finishes playing. Remember to always check this setting on the music and ambient audio clips. It is easy to forget this because those tracks are long and we may never reach the end of them in our tests.
- Volume: Controls the audio intensity.
- Pitch: Controls the audio velocity. This is useful for simulating effects such as slow motion or the increasing revolutions of an engine.
- Spatial Blend: Controls whether our audio is 2D or 3D. In 2D mode, the audio will be heard at the same volume at all distances, while 3D will make the audio volume decrease as the distance from the camera increases.
In the case of our music track, I have configured it as shown in the following screenshot. You can drag the ambient rain sound to add it to the scene and use the same settings as these because we want the same ambient effect in all our scenes. In complex scenes, though, you can have different 3D ambient sounds scattered all over the scene to change the sound according to the current environment:

Figure 10.9 – Music and ambient settings. This will loop, is set to Play On Awake, and is 2D
Now, you can drag the shooting effect and configure it as shown in the following screenshot. As you can see, the audio, in this case, won't loop because we want the shooting effect to play once per bullet. Remember that, in our case, the bullet will be a prefab that will spawn each time we press the shoot key, so each bullet will have its own AudioSource that will play when the bullet is created. Also, the bullet is set to a 3D Spatial Blend, meaning that the effect will be transmitted through different speakers based on the position of the Audio Source relative to the position of the camera:

Figure 10.10 – Sound effect setting. This won't loop and is a 3D sound
Something to consider in the case of 3D sounds is the Volume Rolloff setting, which is inside the 3D sound settings section. This setting controls how the volume decays over distance to the camera. By default, you can see that this setting is set to Logarithmic Rolloff, the way real-life sound works, but sometimes you don't want real-life sound decay, because sounds in real life are usually heard slightly even if the source is very far away.
One option is to switch to Linear Rolloff and configure the exact maximum distance with the Max Distance setting:

Figure 10.11 – A 3D sound with a maximum distance of 10 metres, using Linear Rolloff
Now that we can configure individual pieces of audio, let's see how to apply effects to groups of audio instances using an Audio Mixer.
Using an Audio Mixer
We will have several audio instances playing all over our game: the footsteps of characters, shooting, bonfires, explosions, rain, and so on. Controlling exactly which sounds are supposed to sound louder or lower depending on the case and applying effects to reinforce certain situations, such as being stunned due to a nearby explosion, is called audio mixing – the process of mixing several sounds together in a cohesive and controlled way.
In Unity, we can create an Audio Mixer, an asset that we can use to define groups of sounds. All changes to a group will affect all sounds inside it, by raising or lowering the volume, perhaps, or by applying an effect. You can have SFX and music groups to control sounds separately – as an example, you could lower the SFX volume while in the Pause menu but not the music volume. Also, groups are organized in a hierarchy, where a group can also contain other groups, so a change in a group will also apply changes to its sub-groups. As a matter of fact, every group you create will always be a child group of the master group, the group that will affect every single sound in the game (that uses that mixer).
Let's create a mixer with SFX and music groups:
- In the Project window, using the + button, select the Audio Mixer option. Name the asset as you wish; in my case, I chose Main Mixer.
- Double-click the created asset to open the Audio Mixer window:
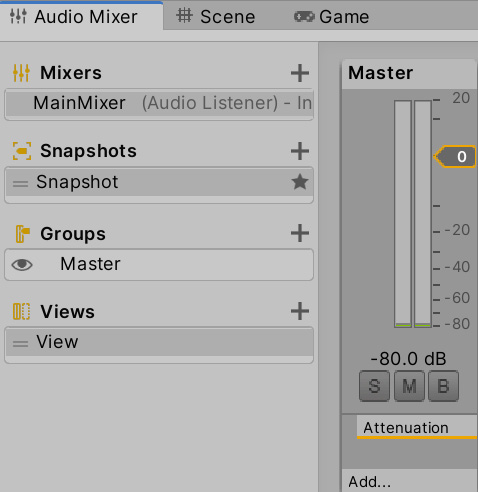
Figure 10.12 – Audio Mixer window
- Click the + button at the right of the Groups label to create a child group of the master node. Name it SFX:

Figure 10.13 – Group creation
- Click on the Master group and click again on the + button to create another master node child group called Music. Remember to select the Master group before clicking the + button, because if another group is selected, the new group will be a child of that one. Anyway, you can rearrange a group child-parent relationship by dragging in the Hierarchy window:
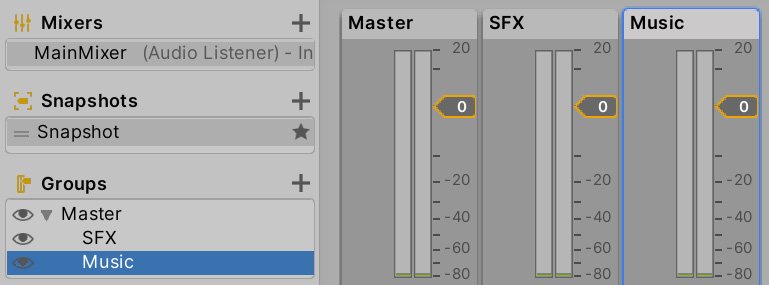
Figure 10.14 – The Master, SFX, and Music groups
- Select the Music GameObject in the Hierarchy window and look for the AudioSource component in the Inspector window.
- Click the circle to the right of the Output property and select the Music group in the Audio Mixer group selector. This will make that AudioSource be affected by the settings on the specified Mixer group:
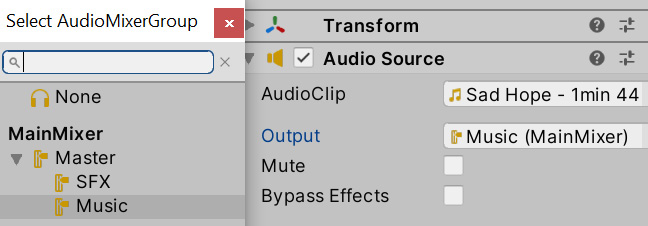
Figure 10.15 – Making an AudioSource belong to an Audio Mixer group
- If you play the game now, you can see how the volume meters in the Audio Mixer start to move, indicating that the music is going through the Music group. You will also see that the Master group volume meter is also moving, indicating that the sound that is passing through the Music group is also passing through the Master group (the parent of the Music group) before going to the sound card of your computer:
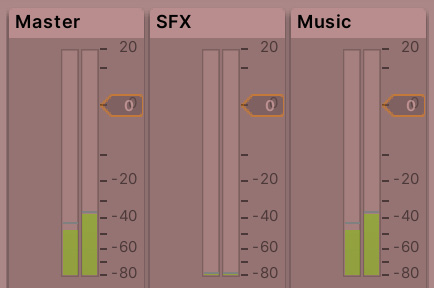
Figure 10.16 – Group volume levels
- Repeat steps 5 and 6 for the ambient and shooting sounds to make them belong to the SFX group.
Now that we have separated our sounds into groups, we can start adjusting the groups' settings. But, before doing that, we need to take into account the fact that we won't want the same settings all the time, as in the previously mentioned pause menu case, where the SFX volume should be lower. To handle those scenarios, we can create snapshots, which are presets of our mixer that can be activated via scripting during our game. We will deal with the scripting steps in Part 3 of this book, but we can create a normal snapshot for the in-game settings and a pause snapshot for the pause menu settings.
If you check the Snapshots list, you will see that a single snapshot has already been created – that can be our normal snapshot. So, let's create a pause snapshot by doing the following:
- Click on the + button to the right of the Snapshots label and call the snapshot Pause. Remember to stop the game to edit the mixer or click the Edit in Playmode option to allow Unity to change the mixer during play. If you do the latter, remember that the changes will persist when you stop the game, unlike changes to GameObjects. Actually, if you change other assets during Play mode, those changes will also persist – only GameObject changes are reverted (and some other specific cases that we won't discuss right now):
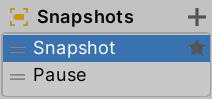
Figure 10.17 – Snapshot creation
- Select the Pause snapshot and lower the volume slider of the SFX group:
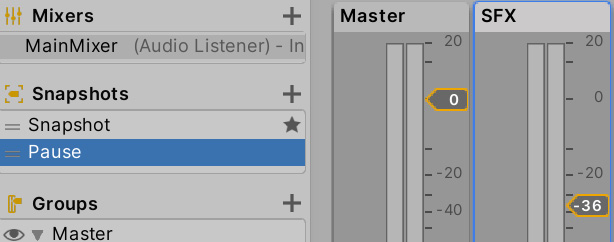
Figure 10.18 – Lowering the volume of the Pause snapshot
- Play the game and hear how the sound is still at its normal volume. That's because the original snapshot is the default one – you can see that by checking for the star to its right. You can right-click any snapshot and make it the default one using the Set as Start Snapshot option.
- Click on Edit in Playmode to enable Audio Mixer modification during runtime.
- Click on the Pause snapshot to enable it and hear how the Shooting and Ambient sound volumes have decreased.
As you can see, one of the main uses of the mixer is to control group volume, especially when you see that the intensity of a group's volume is exceeding the 0 mark, indicating that the group is too loud. Anyway, there are other uses for the mixer, such as applying effects. If you've played any war game, you will have noticed that whenever a bomb explodes nearby, you hear the sound differently for a moment, as if the sound were located in another room. That can be accomplished using an effect called Low Pass, which blocks high-frequency sounds, and that's exactly what happens with our ears in those scenarios: the stress of the high-volume sound generated by an explosion irritates our ears, making them less sensitive to high frequencies for a while.
We can add effects to any channel and configure them according to the current snapshot, just as we did for the volume, by doing the following:
- Click on the Add… button at the bottom of the Master group and select Lowpass Simple:
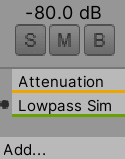
Figure 10.19 – The effects list of a channel
- Select the normal snapshot (the one called Snapshot) to modify it.
- Select the Master group and look at the Inspector panel, where you will see settings for the channel and its effects.
- Set the Cutoff freq property of the Lowpass Simple settings to the highest value (22000); this will disable the effect.
- Repeat steps 3 and 4 for the Pause snapshot; we don't want this effect in that snapshot.
- Create a new snapshot called Bomb Stun and select it to edit it.
- Set Cutoff freq to 1000:
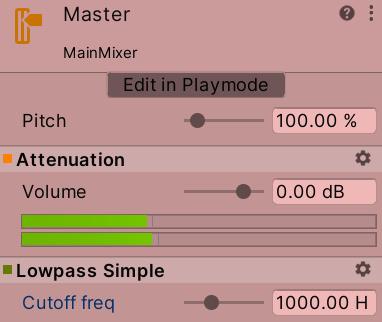
Figure 10.20 – Setting the cutoff frequency of the Lowpass Simple effect
- Play the game and change between snapshots to check the difference.
Aside from the Low Pass filter, you can apply several other filters, such as Echo, to create an almost dreamy effect, or a combination of Send, Receive, and Duck to make a group lower its volume based on the intensity of another group (for instance, you may want to lower SFX volume when dialog is happening). I invite you to try those and other effects and check the results to identify potential uses.
Summary
In this chapter, we discussed how to import and integrate sounds, considering the memory impact of them and applying effects to generate different scenarios. Sound is a big part of achieving the desired game experience, so take the proper amount of time to get it right.
Now that we have covered almost all of the vital aesthetic aspects in our game, let's create another form of visual communication, the user interface.