
Chapter 15: Physics Collisions and Health System
As games try to simulate real-world behaviors, one important aspect to simulate is physics, which dictates how Objects move and how they collide with each other, such as the collision of players and walls or bullets and enemies. Physics can be difficult to control due to the myriad of reactions that can happen after a collision, so we will learn how to properly configure it to obtain a semi-accurate Physics, which will generate the desired arcade movement feeling but get collisions working—after all, sometimes, real life is not as interesting as videogames.
In this chapter, we will examine the following collision concepts:
- Configuring Physics
- Detecting collisions
- Moving with Physics
First, we will learn how to properly configure Physics, a step needed for the collisions between Objects to be detected by our scripts, using new events we are also going to learn. Then, we are going to discuss the difference between moving with Transform, as we have done so far, and moving with Rigidbody and the pros and cons of each version. Let's start discussing Physics settings.
Configuring Physics
The Unity's Physics system is prepared to cover a great range of possible gameplay applications, so properly configuring it is important to get the desired result.
In this section, we will examine the following Physics settings concepts:
- Setting shapes
- Physics Object types
- Filtering collisions
We are going to start learning about the different kinds of colliders that Unity offers, to then learn about different ways to configure those to detect different kinds of Physics reactions (collisions and triggers). Finally, we will discuss how to ignore collisions between specific Objects to prevent situations such as the Player's bullets damaging the Player.
Setting shapes
At the beginning of this book, we learned that Objects usually have two shapes, the visual shape, which is basically the 3D mesh, and the physical one, the collider, the one that the Physics system will use to calculate collisions. Remember that the idea of this is to allow you to have a highly detailed visual model while having a simplified Physics shape to increase the performance.
Unity has several types of colliders, so here we will recap the common ones, starting with the primitive types, that is, Box, Sphere, and Capsule. These shapes are the cheapest ones (in terms of performance) to detect collisions due to the fact that the collisions between them are done via mathematical formulas, unlike other colliders such as the Mesh Collider, which allows you to use any mesh as the physics body of the Object, but with a higher cost and some limitations. The idea is that you should use a primitive type to represent your Objects or a combination of them, for example, a plane could be done with two Box Colliders, one for the body and the other one for the wings. You can see an example of this in the following screenshot, where you can see a weapons collider made out of primitives:

Figure 15.1 – Compound colliders
Anyway, try to avoid doing this; if we want the weapon to just fall to the ground, maybe a Box Collider covering the entire weapon can be enough, considering those kinds of collisions don't need to be accurate, thereby increasing performance. Also, some shapes cannot be represented even with a combination of primitive shapes, such as ramps or pyramids, where your only solution is to use a Mesh Collider, which asks for a 3D mesh to use for collisions, but we won't use them in this book; we will solve all of our Physics colliders with primitives.
Now, let's add the necessary colliders to our scene to prepare it to calculate collisions properly. Consider that if you used an Asset Store environment package other than mine, you may already have the scene modules with colliders; I will be showing the work I needed to do in my case, but try to extrapolate the main ideas here to your scene. To add the colliders, follow these steps:
- Select a wall in the base and check the Object and possible child Objects for collider components; in my case, I have no colliders. If you detect any Mesh Collider, you can leave it, but I would suggest you remove it and replace it with another option in the next step. The idea is to add the collider to it, but the problem I detected here is that, due to the fact that my wall is not an instance of a Prefab, I need to add a collider to every wall.
- One option is to create a Prefab and replace all of the walls for instances of the Prefab (the recommended solution) or to just select all walls in the Hierarchy (by clicking them while pressing Ctrl or Cmd on Mac) and, with them selected, use the Add Component button to add a collider to all of them. In my case, I will use the Box Collider component, which will adapt the size of the collider to the mesh. If it doesn't adapt, you can just change the Size and Center properties of the Box Collider to cover the entire wall:
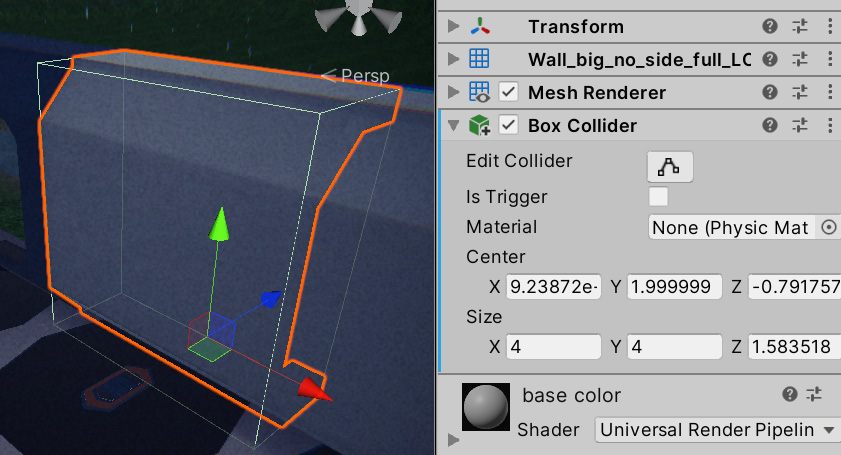
Figure 15.2 – A Box Collider added to a wall
- Repeat steps 1 and 2 for the corners, floor tiles, and any other obstacle that will block Player and Enemy movement.
For our Enemy and Player, we will be adding the Capsule Collider, the usual collider to use in movable characters due to the fact that the rounded bottom will allow the Object to smoothly climb ramps, and being horizontally rounded allows the Object to easily rotate in corners without getting stuck, along with other conveniences of that shape. Remember that the Enemy is a Prefab, so you will need to add the collider to the Prefab, while our Player is a simple Object in the scene, so you will need to add the collider to that one.
Important Note
You may be tempted to add several Box Colliders to the bones of the character to create a realistic shape of the Object, and while we can do that to apply different damage according to the part of the body where the enemies where shot, we are just creating movement colliders; the capsule is enough. In advanced damage systems, both capsule and bone colliders will coexist, one for the movement and the other for damage detection; but we will simplify this in our game.
Also, sometimes the collider won't adapt well to the visual shape of the Object, and in my case, the Capsule Collider didn't have a nice shape for the character. I needed to fix its shape to match the character by setting its values as shown in the following screenshot:
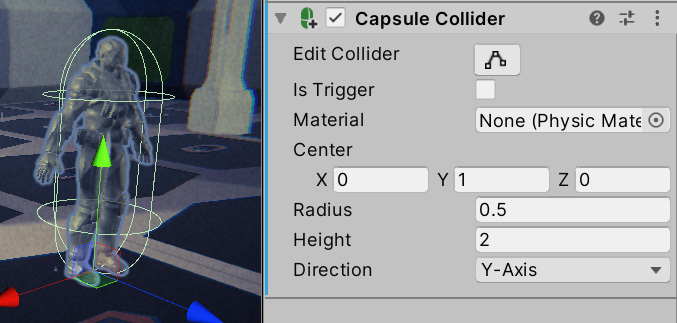
Figure 15.3 – Character Collider
The bullet we created with the Sphere already had a Sphere Collider, but if you replaced the mesh of the bullet with another one, you might want to change the collider. For now, we don't need other Objects in our game, so now that everyone has its proper collider, let's see how to set the different Physics settings to each Object to enable proper collision detection.
Physics Object types
Now that we have added colliders to every Object by making the Objects have a presence in the Physics Simulation, it is time to configure them to have the exact Physics behavior we want. We have a myriad of possible combinations of settings, but we will discuss a set of common profiles that cover most situations. Remember besides colliders, we saw the Rigidbody component at the beginning of this book, which is the one that applies physics to the Object. The following profiles are done with a combination of colliders and Rigidbody settings:
- Static Collider: As the name suggests, this kind of collider is the one that is not supposed to move by any means in the game, aside from some specific exceptions. Most of the environment Objects falls into this category, such as walls, floors, obstacles, and the Terrain. These kind of colliders are just colliders with no Rigidbody component, so they have a presence in the Physics Simulation, but don't have any Physics applied to them; they cannot be moved by other Objects, they won't have physics, and they will be fixed at their position no matter what. Take into account that this has nothing to do with the static checkbox at the top-right part of the Editor; those are for the previously seen systems (such as Lighting and others), so you can have a Static Collider with that checkbox unchecked if needed.
Important note
Take into account that these Objects can be moved via scripting, but you shouldn't. Unity applies an optimization technique to them, and every time a Static Collider is moved, the optimization becomes invalid, needing further calculation to update it, and doing that every frame is costly.
We just mentioned Terrain as an example, and if you check the Terrain's components, you will see that it has its own kind of collider, the Terrain Collider. For Terrains, that's the only collider to use.
- Physics Collider: These are colliders with a Rigidbody component, like the example of the falling ball we did in the first part of this book. These are fully Physics-driven Objects that have gravity and can be moved through forces; other Objects can push them and they perform every other Physics reaction you can expect. You can use this for the Player, grenade movement, or falling crates or in all Objects in heavily physics-based games such as The Incredible Machine.
- Kinematic Collider: These are colliders that have a Rigidbody component but have the Is Kinematic checkbox checked. These don't have the same Physics reactions to collisions and forces as Static Colliders, but they can be moved via scripting (transform.Translate) with no performance penalty. Consider that due to the fact they don't have Physics, they won't have collisions either, so they can pass through walls. These can be used in Objects that need to move using animations or custom scripting movement such as moving platforms, considering that, in this case, the platform won't collide with other Objects, but the Player, having usually a Physics Collider, will collide against them; actually, the Physics Collider is the one that will collide with every kind of collider.
- Trigger Static Collider: This is a regular Static Collider but with the Is Trigger checkbox of the Collider checked. The difference is that Kinematic and Physics Objects pass through it but by generating a Trigger event, an event that can be captured via scripting, and tells us that something is inside the collider. This can be used to create buttons or trigger Objects, in areas of the game when the Player passes through something happening, such as a wave of enemies being spawned, a door being opened, or winning the game in case that area is the goal place of the Player. Consider that regular Static Colliders won't generate a trigger event when passing through this type because those aren't supposed to move.
- Trigger Kinematic Collider: Kinematic Colliders don't generate collisions, so they will pass through any other Object, but they will generate Trigger events, so we can react via scripting. This can be used to create moveable power-ups that, when touched, disappear and gives us points, or bullets that move with custom scripting movement and no physics, just straight like our bullets, but that damage other Objects on contact.
- We can have a Trigger Physics Collider, a collider with Rigidbody but with Is Trigger checked, usually, it has no real use; it will be an ever-falling Object that will generate trigger events in the world, but passing through everything. Of course, other profiles can exist aside from the specified ones to use in some games with specific gameplay requirements, but considering all possible combinations of Physics settings are up to you to experiment with to see whether some are useful for your case, the described profiles will cover 99% of cases.
- To recap the previous scenarios, I leave you with the following table showing the reaction of contact between all of the types of colliders. You will find a row per each profile that can move; remember that static profiles aren't supposed to move. Each column represents the reaction when they collide with the other types, "Nothing" meaning the Object will pass through with no effect, "Trigger" meaning the Object will pass through but raising Trigger events, and "Collision" meaning that the Object won't be able to pass through the Object:
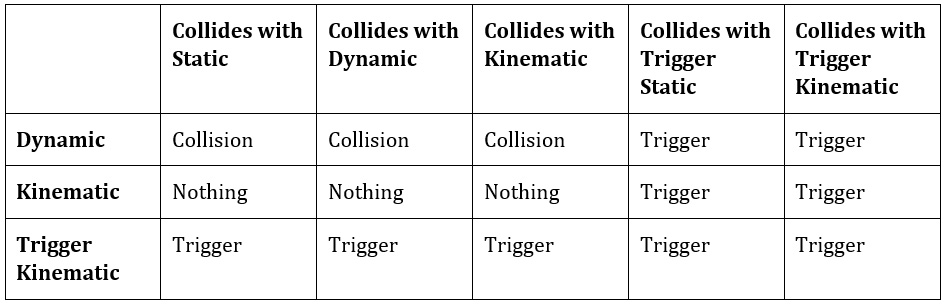
Table 15.4 Collision Reaction Matrix
Considering this, let's start configuring the physics of our Scene's Objects.
The walls, corners, floor tiles, and obstacles should use the Static Collider Profile, so they have no Rigidbody component on them and their colliders will have the Is Trigger checkbox unchecked:
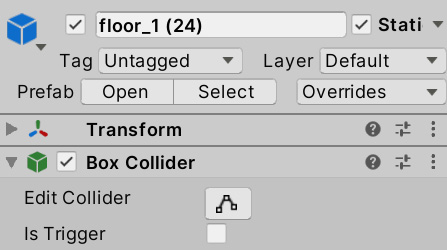
Figure 15.5 – Configuration for floor tiles; remember the static checkbox is for lighting only
The Player should move and generate collisions against Objects, so we need it to have a Dynamic Profile. This profile will generate a funny behavior with our current movement script (which I encourage you to test), especially when colliding against walls, so it won't behave as you expected. We will deal with this later in this chapter:
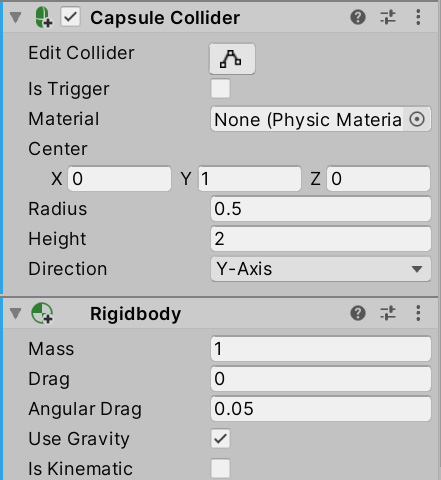
Figure 15.6 – Dynamic settings on the Player
For the Enemy Prefab, we will be using the Kinematic profile here because we will be moving this Object with Unity's AI systems later, so we don't need Physics here, and as we want the player to collide against them, we need a Collision reaction there, so there's no Trigger here:
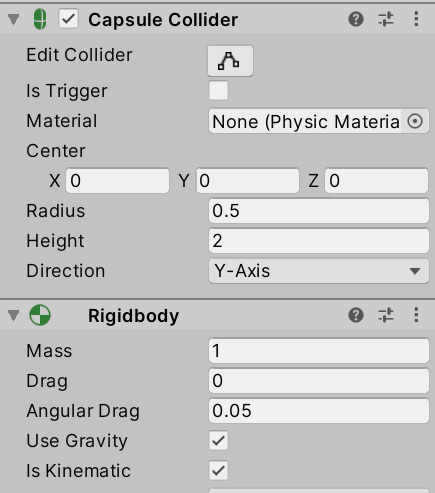
Figure 15.7 – Kinematic setting for the Enemy
For the Bullet Prefab, it will move but with simplistic movement via scripting (just move forward), and not Physics. We don't need collisions; we will code the bullet to destroy itself as soon as it touches something and will damage the collided Object (if possible), so a Kinematic Trigger profile is enough for this one; we will use the Trigger event to script the contact reactions:
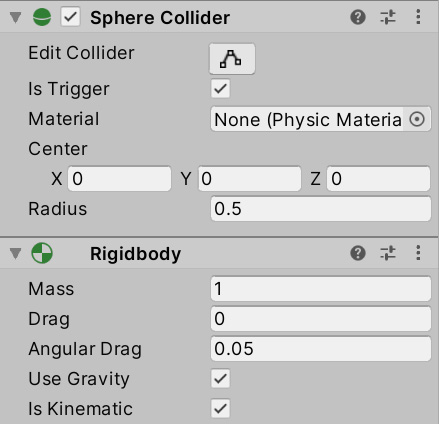
Figure 15.8 – The Kinematic Trigger setting for our bullet; Is Trigger and Is Kinematic are checked
Now that we have properly configured the Objects, let's check how to filter undesired collisions between certain Object types.
Filtering collisions
After all of the hassle of configuring Objects, do we want to prevent collisions? Actually, yes, sometimes we want certain Objects to ignore each other. As an example, the bullets shot by the Player shouldn't collide with the Player itself and the bullets from the enemies shouldn't hit them. We can always filter that with an If statement in the C# script, checking whether the hit Object is from the opposite team or whatever filtering logic you want, but by then, it is too late, the Physics system has already wasted resources by checking a collision between Objects that were never meant to collide. Here is where the Layer Collision Matrix can help us.
The Layer Collision Matrix sounds scary, but it is a simple setting of the Physics system that allows us to specify which groups of Objects should collide with other groups, for example, the Player's bullets should collide with enemies, and Enemy bullets should collide with the Player. The idea is to create those groups and put our Objects inside them, and in Unity, those groups are called layers. We can create layers and set the layer property of the GameObject (the top part of the Inspector) to assign the Object to that group or layer. Consider that you have a limited number of layers, so try to use them wisely.
Once we create the layers and assign the Object, we can go to the Physics settings and specify which layers will collide against other layers. We can achieve this by doing the following:
- Go to Edit | Project Settings and, inside it, look for the Tags and Layers option from the left pane:
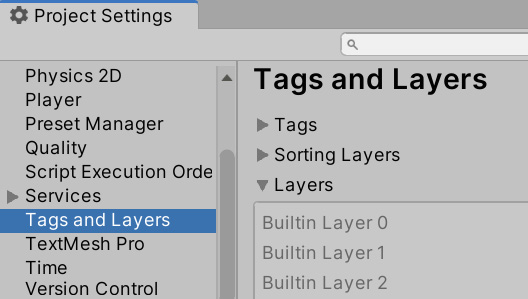
Figure 15.9 – Tags and Layers settings
- From the Layers section, use the empty spaces from Layer 10 onward to create the needed ones. In our case, we will use this for the bullet scenario, so we need four layers, Player, Enemy, PlayerBullet, and PlayerEnemy:
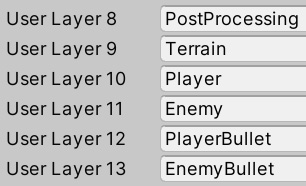
Figure 15.10 – Creating layers
- Select the Player and, from the top part of the Inspector, change the layer property to Player. Also, change the Enemy Prefab to have the Enemy layer. A window will show asking you whether you want to change the child Objects also; select that option:
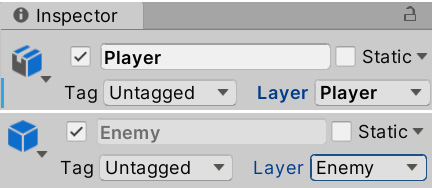
Figure 15.11 – Changing the layers of the Player and the Enemy Prefab
In the case of the bullet, we have a problem; we have one Prefab but two layers and a Prefab can only have one layer. We have two options, that is, changing the layer according to the shooter via scripting or have two bullet Prefabs with different layers. For simplicity, I will choose the latter, also taking the chance to apply another material to the Enemy bullet to make it look different.
We will be creating a Prefab Variant of the Player bullet. Remember that a Variant is a Prefab that is based on an original one like class inheritance. When the original Prefab changes, the Variant will change, but the Variant can have differences, which will make it unique:
- Drop a bullet in to the Scene to create an instance.
- Drag the instance again to the Prefabs folder, this time selecting the Prefab Variant option. Call it Enemy Bullet. Remember to destroy the Prefab instance in the scene.
- Create a second material similar to the Player bullet, but yellow or whatever color you like, and put it on the Enemy Bullet Prefab Variant.
- Select the Variant for the Enemy bullet, set its layer (EnemyBullet), and do the same for the original Prefab (PlayerBullet). Even if you changed the original Prefab layer, as the Variant modified it, the modified version (or override) will prevail, allowing each Prefab to have its own layer.
- Go to Edit | Project Settings and look for the Physics settings (not Physics 2D).
- Scroll down until you see the Layer Collision Matrix, a half grid of checkboxes. You will notice that each column and row is labeled with the names of the layers, so each checkbox in the cross of a row and column will allow us to specify whether these two should collide. In our case, we configured it as shown in the following screenshot:
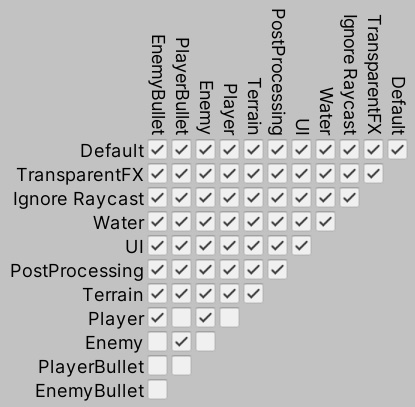
Figure 15.12 – Making Player bullets to collide with enemies and Enemy bullets with the Player
It is worth noticing that sometimes filtering logic won't be that fixed or predictable, for example, our bullet may only hit Objects that have a certain amount of life or Objects that don't have an invisibility temporal buff or conditions that can change during the game and are difficult to generate all possible layers for all possible groups. So, in these cases, we should rely on manual filtering after the Trigger or Collision event.
Now that we have filtered collisions, let's check whether our settings are working properly by reacting to collisions in the next section.
Detecting collisions
As you can see, proper Physics settings can be complicated and very important, but now that we have tackled that, let's do something with those settings by reacting to the contact in different ways and creating a Health System in the process.
In this section, we will examine the following collision concepts:
- Detecting Trigger events
- Modifying the other Object
First, we are going to explore the different collision and trigger events Unity offers to react to contact between two Objects through the Unity collision events. This allows us to execute any reaction code we want to place, but we are going to explore how to modify the contacted Object components using the GetComponent function.
Detecting Trigger events
If Objects are properly configured, as previously discussed, we can get two reactions, triggers and collisions. The Collision reaction has a default effect that is blocking the movement of the Objects, but we can add custom behavior on top of that using scripting, but with triggers, unless we add custom behavior, it won't produce any noticeable effect. Either way, we can script reactions to both possible scenarios such as adding a score, reducing health, and losing the game. To do so, we can use the suite of Physics events.
These events are split into two groups, Collision events and Trigger events, so according to your Object setting, you will need to pick the proper group. Both groups have three main events, Enter, Stay, and Exit, telling us when a collision or trigger began (Enter), whether they are still happening or are still in contact (Stay), and when they stopped contacting (Exit). For example, we can script a behavior such as playing a sound when two Objects start contact in the Enter event, such as a friction sound, and stop it when the contact ends, in the Exit event.
Let's test this by creating our first contact behavior, that is, the bullet being destroyed when contacting something. Remember that the bullets are configured to be triggers, so they will generate Trigger events on contact with anything. You can do this with the following steps:
- Create and add a script called ContactDestroyer on the Bullet Player Prefab; as the Bullet Enemy Prefab is a Variant of it, it will have also the same script.
- To detect when a trigger happens, such as with Start and Update, create an event function named OnTriggerEnter.
- Inside the event, use the Destroy(gameObject); line to make the bullet destroy itself when touching something:
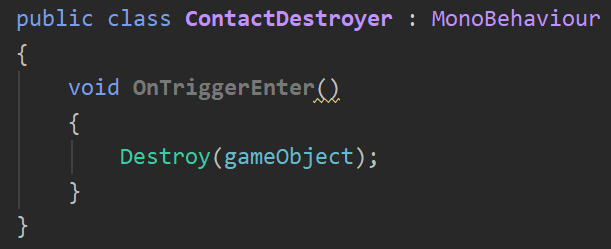
Figure 15.13 – Auto destroying on contact with something
- Save and shoot the bullets against the walls to see how they disappear instead of passing through it. Again, here, we don't have a collision but a trigger that destroys the bullet on contact. So, in this way, we are sure that the bullet will never pass through anything, but we are still not using Physics movement.
For now, we won't need the other Collision events, but in case you need them, they will work similarly; just put OnCollisionEnter instead. Now, let's explore another version of the same function. It not only tells us that we hit something but also what we contacted against. We will use this to make our Contact Destroyer also destroy the other Object. To do this, follow these steps:
- Replace the OnTriggerEnter method signature with the one in the following screenshot. This one receives a parameter of the Collider type, indicating the exact collider that hit us:

Figure 15.14 – Version of the trigger event that tells us which Object we collided with
- We can access the entire Object of that collider using the gameObject setter, so we can use this to destroy the other one also, as shown in the following screenshot. If we just use Destroy by passing the other reference, it would only destroy the Collider component:
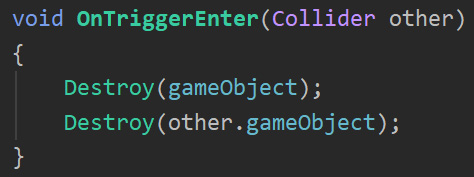
Figure 15.15 – Destroying both Objects
- Save and test the script. You will notice that the bullet will destroy everything it touches.
Of course, we don't want the bullet to destroy everything on contact, just itself and the other Object if it complies with certain criteria, such as being on the opposite team or something else, according to our game. In our case, we will move a step forward, and instead of directly destroying the Object on contact, we will make the Enemies and the Player have a life amount, so the bullets will reduce it until reaching 0.
Modifying the other Object
So far, we used the transform field to access a specific component of the Object, but what happens when we need to access others? In our scenario, for the bullet to damage the collided Object, it will need to access its Life component to change the amount of life. Remember that Unity doesn't have all kinds of possible behaviors for games. So, in our case, the Life component is the one that we are going to create just to hold a float field with the amount of life. Every Object that has this component will be considered as a damageable Object. Here is where the GetComponent function will help us.
If you have a reference to a GameObject or Component, you can use GetComponent to access a reference of a target component if the Object contains it (if not, it will return null). Let's see how to use that function to make the bullet lower the amount of life of the other Object if it is damaged by following these steps:
- Create and add a Life component with a public float field called amount to both the Player and enemies. Remember to set the value in the amount field for both Objects in the Inspector:
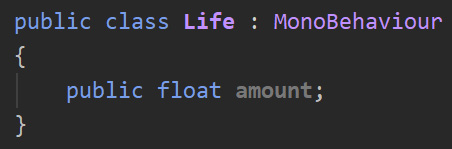
Figure 15.16 – The Life component
- Remove the ContactDestroyer component from the Player bullet, which will also remove it from the Enemy Bullet Variant, and instead add a new one called ContactDamager; you may need the ContactDestroyer behavior later. So, we are creating another component.
- Add an OnTriggerEnter event that receives the other collider and just add the Destroy function call that auto destroys itself, not the one that destroyed the other Object; our script won't be responsible for destroying it, just reducing its life.
- Add a float field called damage, so we can configure the amount of damage to inflict to the other Object. Remember to save the file and set a value before continuing.
- Use GetComponent on the reference to the other collider to get a reference to its life component and save it in a variable:

Figure 15.17 – Accessing the collided Object's Life component
- Before reducing the life of the Object, we must check whether the life reference isn't null, which would happen if the other Object doesn't have the Life component, as in the case of walls and obstacles. The idea is that the bullet will destroy itself when anything collides with it and reduce the life of the other Object if it is a damageable Object that contains the Life component.
In the following screenshot, you will find the full script finished:
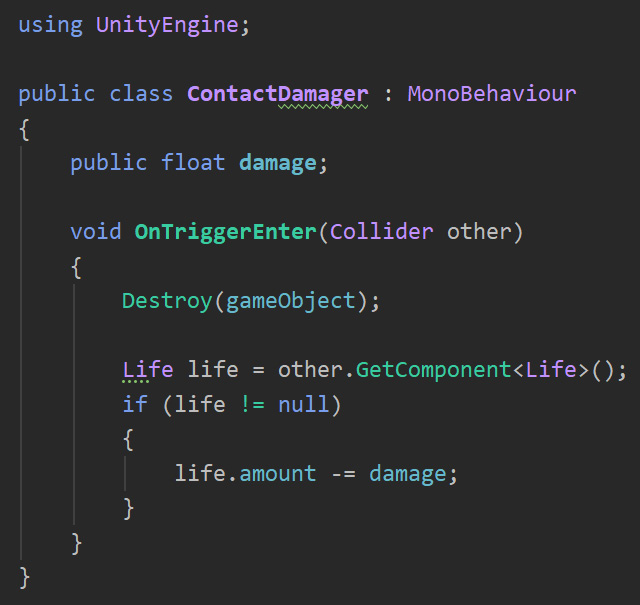
Figure 15.18 – Reducing the life of the collided Object
- Place an Enemy in the scene based on a Prefab and set the instance speed (the one in the scene) to 0 to prevent it from moving.
- Select it before hitting Play and start shooting at it.
You can see how the life value reduces in the Inspector. You can also press the Esc key to regain control of the mouse and select the Object while in Play Mode to see the life field change during the runtime in the Editor.
Now, you will notice that life is decreasing, but it will become negative; we want the Object to destroy itself when its life is below 0 instead. We can do this in two ways, one is to add an Update to the Life component, which will check all of the frames for whether life is below 0, destroying itself when that happens. The second way is by encapsulating the life field and checking that inside the setter to prevent checking all frames. I would prefer the second way, but we will implement the first one to make our scripts as simple as possible for beginners. To do this, follow these steps:
- Add Update to the Life component.
- Add If to check whether the amount field is below 0.
- Add Destroy in case the if condition is true.
- The full Life script will look like the following screenshot:

Figure 15.19 – The Life component
- Save and see how the Object is destroyed once its life value becomes 0.
Optionally, you can instantiate an Object when this happens such as a sound, a particle, or maybe a power-up. I will leave this as a challenge for you.
By using a similar script, you can make a life power-up that increases the life value or a speed power-up that accesses the PlayerMovement script and increases the speed field; from now on, use your imagination to create exciting behaviors using this.
Now that we have explored how to detect collisions and react to them, let's explore how to fix the Player falling when hitting some wall.
Moving with Physics
So far, the Player, the only Object that moves with the Dynamic Collider Profile and the one that will move with Physics, is actually moving through custom scripting using the Transform API. Every dynamic Object should instead move using the Rigidbody API functions in a way the Physics system understands better, so here we will explore how to move Objects, this time through the Rigidbody component.
In this section, we will examine the following Physics movement concepts:
- Applying forces
- Tweaking Physics
We will start seeing how to move Objects the correct physical way, through forces, and we will apply this concept to the movement of our player. Then, we will explore why real physics is not always fun, and how we can tweak the Physics properties of our Objects to have a more responsive and appealing behavior.
Applying forces
The physically accurate way of moving an Object is through forces, which affect the Object's velocity. To apply force, we need to access Rigidbody instead of Transform and use the AddForce and AddTorque functions to move and rotate, respectively. These are functions where you can specify the amount of force to apply to each axis of position and rotation. This technique of movement will have full Physics reactions; the forces will accumulate on the velocity to start moving and will suffer drag effects that will make the speed slowly decrease, and the most important aspect here is that it will collide against walls, blocking the Object's way.
To get this kind of movement, we can do the following:
- Create a Rigidbody field in the PlayerMovement script, but this time, make it private, meaning, do not write the public keyword in the field, which will make it disappear in the Editor; we will get the reference another way.
Certain coding standards specify that you need to explicitly replace the public keyword with the private keyword, but in C#, putting private and not putting it have the same effect, so it's up to your preference:

Figure 15.20 – The private Rigidbody reference field
- Using GetComponent in the Start event function, get our Rigidbody and save it in the field. We will use this field to cache the result of the GetComponent function; calling that function every frame to access the Rigidbody is not performant. Also, you can notice here that the GetComponent function can be used to retrieve not only components from other Objects (like the collision example) but also your own:
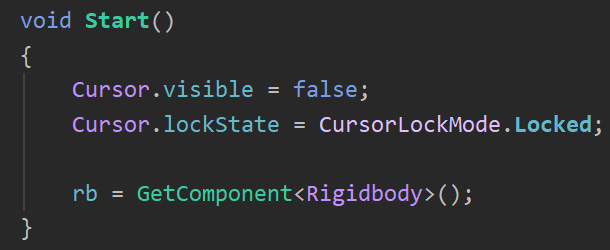
Figure 15.21 – Caching the Rigidbody reference for future usage
- Replace the transform.Translate calls with rb.AddRelativeForce. This will call the add force functions of the Rigidbody, specifically, the relative ones, which will consider the current rotation of the Object. For example, if you specify a force on the z axis (the third parameter), the Object will apply its force along with its forward vector.
- Replace the transform.Rotate calls with rb.AddRelativeTorque, which will apply rotation forces:
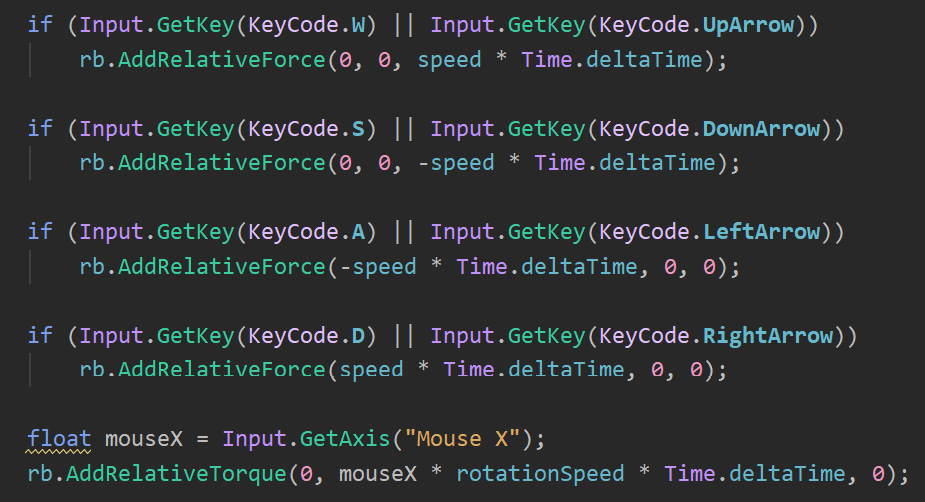
Figure 15.22 – Using the Rigidbody forces API
Important note
If you are familiar with Unity, you might be thinking that I need to do this in a Fixed Update, and while that's correct, doing this in the Update won't have any noticeable effect. I prefer to use Update in beginners' scripts to prevent problems that can happen when using GetKeyDown and GetKeyUp in FixedUpdate.
Now, if you save and test the results, you will probably find the Player falling and that's because now we are using real physics, which contains floor friction, and due to the force being applied at the center of gravity, it will make the Object fall. Remember that, in terms of Physics, you are a Capsule; you don't have legs to move, and here is where standard physics is not suitable for our game. The solution is to tweak Physics to emulate the kind of behavior we need.
Tweaking Physics
To make our Player move like in a regular platformer game, we will need to freeze certain axes to prevent the Object from falling. Remove the friction to the ground and increase the air friction (drag) to make the Player reduce its speed automatically when releasing the keys. To do this, follow these steps:
- In the Rigidbody component, look at the Constraints section at the bottom and check the X and Z axes of the Freeze Rotation property:
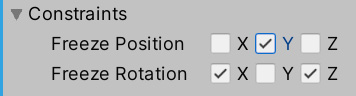
Figure 15.23 – Freezing rotation axes
This will prevent the Object from falling sideways but will allow the Object to rotate horizontally. You might also freeze the y axis of the Freeze Position property if you don't want the Player to jump, preventing some undesired vertical movement on collisions.
- You will probably need to change the speed values because you changed from a meters-per-second value to newtons per second, the expected value of the Add Force and Add Torque functions. Using 1000 in speed and 45 in rotation speed was enough for me.
- Now, you will probably notice that the speed will increase a lot over time, as will the rotation. Remember that you are using forces, which affects your velocity. When you stop applying forces, the velocity is preserved, and that's why the Player still keeps rotating even if you are not moving the mouse. The fix to this is to increase the Drag and Angular Drag values, which emulates air friction and which will reduce the movement and rotation respectively when no force is applied. Experiment with values that you see suitable; in my case, I used 2 for Drag and 10 for Angular Drag, needing to increase the Rotation Speed to 150 to compensate for the drag increase:
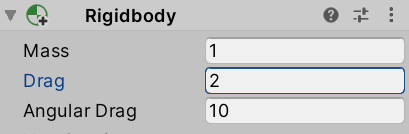
Figure 15.24 – Setting air friction for rotation and movement
- Now, if you move while touching the wall, instead of sliding, like most games, your Player will stick to the obstacles due to contact friction. We can remove this by creating a Physics Material, an asset that can be assigned to the colliders to control how they react in those scenarios. Start creating one by clicking on the + button from the Project window and selecting Physics Material (not the 2D version). Call it Player and remember to put it in a folder for those kinds of assets.
- Select it and set Static Friction and Dynamic Friction to 0, and Friction Combine to Minimum, which will make the Physics system pick the minimum friction of the two colliding Objects, being always the minimum—in our case, zero:
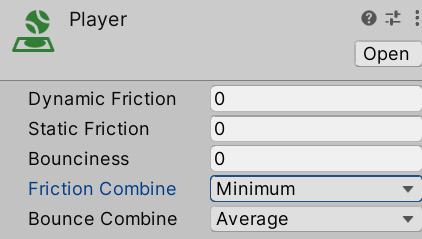
Figure 15.25 – Creating a Physics Material
- Select the Player and drag this asset to the Material property of the Capsule Collider:
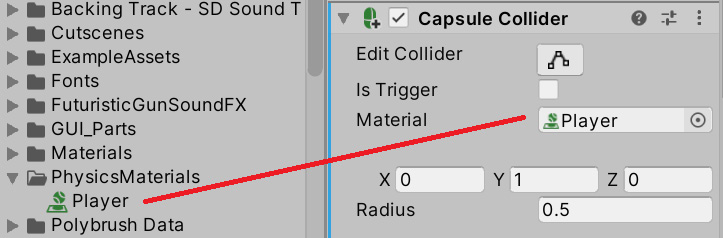
Figure 15.26 – Setting the Physics material of the Player
- If you play the game now, you may notice that the Player will move faster than before because now we don't have any kind of friction on the floor, so you may need to reduce the movement force.
- A little error you might find here is that the motion blur effect applied by the camera post-processing on the Player has some hiccups, such as frames where the Object is moving and others where it's not. The problem is that Physics is not executed in every frame due to the performance and determinism (by default, it is 50 times per frame), but the rendering does, and that is affecting the postprocessing. You can set the Interpolate property of the Rigidbody to the Interpolate value to make the Rigidbody calculate Physics at its own rate but interpolate the position every frame to simulate fluidness:
Figure 15.27 – Making the Rigidbody interpolate its position
As you can see, we needed to bend the Physics rules to allow a responsive player movement. You can get more responsiveness by increasing drags and forces, so the speeds are applied faster and reduced faster, but that depends, again, on the experience you want your game to have. Some games want an immediate response with no velocity interpolation, going from 0 to full speed and vice versa from one frame to the other, and in these cases, you can override the velocity and rotation vectors of the Player directly at your will or even use other systems instead of Physics, such as the Character Controller component, which have special physics for platformer characters; but let's keep things simple for now.
Summary
Every game has physics one way or the other, for movement, collision detection, or both. In this chapter, we learned how to use the Physics system for both, being aware of proper settings to make the system work properly, reacting to collisions to generate gameplay systems, and moving the Player in such a way it collides with obstacles, keeping its physically-inaccurate movement. We used these concepts to create our Player and bullet movement and make our bullets damage the Enemies, but we can reuse the knowledge to create a myriad of other possible gameplay requirements, so I suggest you play a little bit with the physics concepts seen here; you can discover a lot of interesting use cases.
In the next chapter, we will be discussing how to program the visual aspects of the game, such as effects, and make the UI react to input.