
Chapter 5: Configuring Kubernetes Security Boundaries
A security boundary separates security domains where a set of entities share the same security concerns and access levels, whereas a trust boundary is a dividing line where program execution and data change the level of trust. Controls in the security boundary ensure that execution moving between boundaries does not elevate the trust level without appropriate validation. As data or execution moves between security boundaries without appropriate controls, security vulnerabilities show up.
In this chapter, we'll discuss the importance of security and trust boundaries. We'll first focus on the introduction to clarify any confusion between security and trust boundaries. Then, we'll walk through the security domains and security boundaries within the Kubernetes ecosystem. Finally, we'll look at some Kubernetes features that enhance security boundaries for an application deployed in Kubernetes.
You should understand the concepts of security domain and security boundaries, and also understand the security boundaries built around Kubernetes based on the underlying container technology as well as the built-in security features, such as PodSecurityPolicy and NetworkPolicy.
We will cover the following topics in this chapter:
- Introduction to security boundaries
- Security boundaries versus trust boundaries
- Kubernetes security domains
- Kubernetes entities as security boundaries
- Security boundaries in the system layer
- Security boundaries in the network layer
Introduction to security boundaries
Security boundaries exist in the data layer, the network layer, and the system layer. Security boundaries depend on the technologies used by the IT department or infrastructure team. For example, companies use virtual machines to manage their applications – a hypervisor is the security boundary for virtual machines. Hypervisors ensure that code running in a virtual machine does not escape from the virtual machine or affect the physical node. When companies start embracing microservices and use orchestrators to manage their applications, containers are one of the security boundaries. However, compared to hypervisors, containers do not provide a strong security boundary, nor do they aim to. Containers enforce restrictions at the application layer but do not prevent attackers from bypassing these restrictions from the kernel layer.
At the network layer, traditionally, firewalls provide strong security boundaries for applications. In a microservices architecture, Pods in Kubernetes can communicate with others. Network policies are used to restrict communication among Pods and Services.
Security boundaries at the data layer are well known. Kernels limiting write access to system or bin directories to only root or system users is a simple example of security boundaries at the data layer. In containerized environments, chroot prevents containers from tampering with the filesystems of other containers. Kubernetes restructures the application deployment in a way that strong security boundaries can be enforced on both the network and system layers.
Security boundaries versus trust boundaries
Security boundary and trust boundary are often used as synonyms. Although similar, there is a subtle difference between these two terms. A trust boundary is where a system changes its level of trust. An execution trust boundary is where instructions need different privileges to run. For example, a database server executing code in /bin is an example of an execution crossing a trust boundary. Similarly, a data trust boundary is where data moves between entities with different trust levels. Data inserted by an end user into a trusted database is an example of data crossing a trust boundary.
Whereas a security boundary is a point of demarcation between different security domains, a security domain is a set of entities that are within the same access level. For example, in traditional web architecture, the user-facing applications are part of a security domain and the internal network is part of a different security domain. Security boundaries have access controls associated with it. Think of trust boundary as a wall and security boundary as a fence around the wall.
Identifying security and trust boundaries within an ecosystem is important. It helps ensure appropriate validation is done for instructions and data before it crosses the boundaries. In Kubernetes, components and objects span across different security boundaries. It is important to understand these boundaries to put risk mitigation plans in place when an attacker crosses a security boundary. CVE-2018-1002105 is a prime example of an attack caused by missing validation across trust boundaries; proxy request handling in the API server allowed an unauthenticated user to get admin privileges to the cluster. Similarly, CVE-2018-18264 allows users to skip the authentication process on the dashboard to allow unauthenticated users to access sensitive cluster information.
Now let's look at different Kubernetes security domains.
Kubernetes security domains
A Kubernetes cluster can be broadly split into three security domains:
- Kubernetes master components: Kubernetes master components define the control plane for the Kubernetes ecosystem. The master components are responsible for decisions required for the smooth operation of the cluster, such as scheduling. Master components include kube-apiserver, etcd, the kube-controller manager, DNS server, and kube-scheduler. A breach in the Kubernetes master components can compromise the entire Kubernetes cluster.
- Kubernetes worker components: Kubernetes worker components are deployed on every worker node and ensure that Pods and containers are running nicely. Kubernetes worker components use authorization and TLS tunneling for communicating with the master components. A cluster can function with compromised worker components. It is analogous to a rogue node within the environment, which can be removed from the cluster when identified.
- Kubernetes objects: Kubernetes objects are persistent entities that represent the state of the cluster: deployed applications, volumes, and namespaces. Kubernetes objects include Pods, Services, volumes, and namespaces. These are deployed by developers or DevOps. Object specification defines additional security boundaries for objects: defining a Pod with a SecurityContext, network rules to communicate with other Pods, and more.
The high-level security domain division should help you focus on the key assets. Keeping that in mind, we'll start looking at Kubernetes entities and the security boundaries built around them.
Kubernetes entities as security boundaries
In a Kubernetes cluster, the Kubernetes entities (objects and components) you interact with have their own built-in security boundaries. The security boundaries are derived from the design or implementation of the entities. It is important to understand the security boundaries built within or around them:
- Containers: Containers are a basic component within a Kubernetes cluster. A container provides minimal isolation to the application using cgroups, Linux namespaces, AppArmor profiles, and a seccomp profile to the application running within the container.
- Pods: A pod is a collection of one or more containers. Pods isolate more resources compared to containers, such as a network and IPC. Features such as security SecurityContext, NetworkPolicy, and PodSecurityPolicy work at the pod level to ensure a higher level of isolation.
- Nodes: Nodes in Kubernetes are also a security boundary. Pods can be specified to run on specific nodes using nodeSelectors. Kernels and hypervisors enforce security controls for pods running on the nodes. Features such as AppArmor and SELinux can help improve the security posture along with other host-hardening mechanisms.
- Cluster: A cluster is a collection of pods, containers, and the components on the master node and worker nodes. A cluster provides a strong security boundary. Pods and containers running within a cluster are isolated from other clusters at the network and the system layer.
- Namespaces: Namespaces are virtual clusters that isolate pods and services. The LimitRanger admission controller is applied at the namespace level to control resource utilization and denial-of-service attacks. Network policies can be applied to the namespace level.
- The Kubernetes API server: The Kubernetes API server interacts with all Kubernetes components, including etcd, controller-manager, and kubelet, which is used by cluster administrators to configure a cluster. It mediates communication with master components, so cluster administrators do not have to directly interact with cluster components.
We discussed three different threat actors in Chapter 3, Threat Modeling: privileged attackers, internal attackers, and end users. These threat actors may also interact with the preceding Kubernetes entities. We will see what the security boundaries from these entities an attacker is facing:
- End user: An end user interacts with either the ingress, exposed Kubernetes services, or directly to the open ports on the node. For the end user, nodes, Pods, kube-apiserver, and the external firewall protect the cluster components from being compromised.
- Internal attacker: Internal attackers have access to Pods and containers. Namespaces and access control enforced by kube-apiserver prevent these attackers from escalating privileges or compromising the cluster. Network policy and RBAC controls can prevent lateral movement.
- Privileged attacker: kube-apiserver is the only security boundary that protects the master components from compromise by privileged attackers. If a privileged attacker compromises kube-apiserver, it's game over.
In this section, we looked at security boundaries from a user perspective and showed you how security boundaries are built in the Kubernetes ecosystem. Next, let's look at the security boundaries in the system layer, from a microservice perspective.
Security boundaries in the system layer
Microservices run inside Pods, where Pods are scheduled to run on worker nodes in a cluster. In the previous chapters, we already emphasized that a container is a process assigned with dedicated Linux namespaces. A container or Pod consumes all the necessary resources provided from the worker node. So, it is important to understand the security boundaries from the system's perspective and how to fortify it. In this section, we will talk about the security boundaries built upon Linux namespaces and Linux capabilities together for microservices.
Linux namespaces as security boundaries
Linux namespaces are a feature of the Linux kernel to partition resources for isolation purposes. With namespaces assigned, a set of processes sees one set of resources while another set of processes sees another set of resources. We've already introduced Linux namespaces in Chapter 2, Kubernetes Networking. By default, each Pod has its own network namespace and IPC namespace. Each container inside the same pod has its own PID namespace so that one container has no knowledge about other containers running inside the same Pod. Similarly, a Pod does not know other Pods exist in the same worker node.
In general, the default settings offer pretty good isolation for microservices from a security standpoint. However, the host namespace settings are allowed to be configured in the Kubernetes workload, and more specifically, in the Pod specification. With such settings enabled, the microservice uses host-level namespaces:
- HostNetwork: The Pod uses the host's network namespace.
- HostIPC: The Pod uses the host's IPC namespace.
- HostPID: The Pod uses the host's PID namespace.
- shareProcessNamespace: The containers inside the same Pod will share a single PID namespace.
When you try to configure your workload to use host namespaces, do ask yourself the question: why do you have to do this? When using host namespaces, pods have full knowledge of other pods' activities in the same worker node, but it also depends on what Linux capabilities are assigned to the container. Overall, the fact is, you're disarming other microservices' security boundaries. Let me give a quick example. This is a list of processes visible inside a container:
root@nginx-2:/# ps aux
USER PID %CPU %MEM VSZ RSS TTY STAT START TIME COMMAND
root 1 0.1 0.0 32648 5256 ? Ss 23:47 0:00 nginx: master process nginx -g daemon off;
nginx 6 0.0 0.0 33104 2348 ? S 23:47 0:00 nginx: worker process
root 7 0.0 0.0 18192 3248 pts/0 Ss 23:48 0:00 bash
root 13 0.0 0.0 36636 2816 pts/0 R+ 23:48 0:00 ps aux
As you can see, inside the nginx container, only nginx processes and bash process are visible from the container. This nginx pod doesn't use a host PID namespace. Let's a look at what happens if a pod uses host PID namespace:
root@gke-demo-cluster-default-pool-c9e3510c-tfgh:/# ps axu
USER PID %CPU %MEM VSZ RSS TTY STAT START TIME COMMAND
root 1 0.2 0.0 99660 7596 ? Ss 22:54 0:10 /usr/lib/systemd/systemd noresume noswap cros_efi
root 20 0.0 0.0 0 0 ? I< 22:54 0:00 [netns]
root 71 0.0 0.0 0 0 ? I 22:54 0:01 [kworker/u4:2]
root 101 0.0 0.1 28288 9536 ? Ss 22:54 0:01 /usr/lib/systemd/systemd-journald
201 293 0.2 0.0 13688 4068 ? Ss 22:54 0:07 /usr/bin/dbus-daemon --system --address=systemd: --nofork --nopidfile
274 297 0.0 0.0 22520 4196 ? Ss 22:54 0:00 /usr/lib/systemd/systemd-networkd
root 455 0.0 0.0 0 0 ? I 22:54 0:00 [kworker/0:3]
root 1155 0.0 0.0 9540 3324 ? Ss 22:54 0:00 bash /home/kubernetes/bin/health-monitor.sh container-runtime
root 1356 4.4 1.5 1396748 118236 ? Ssl 22:56 2:30 /home/kubernetes/bin/kubelet --v=2 --cloud-provider=gce --experimental
root 1635 0.0 0.0 773444 6012 ? Sl 22:56 0:00 containerd-shim -namespace moby -workdir /var/lib/containerd/io.contai
root 1660 0.1 0.4 417260 36292 ? Ssl 22:56 0:03 kube-proxy --master=https://35.226.122.194 --kubeconfig=/var/lib/kube-
root 2019 0.0 0.1 107744 7872 ? Ssl 22:56 0:00 /ip-masq-agent --masq-chain=IP-MASQ --nomasq-all-reserved-ranges
root 2171 0.0 0.0 16224 5020 ? Ss 22:57 0:00 sshd: gke-1a5c3c1c4d5b7d80adbc [priv]
root 3203 0.0 0.0 1024 4 ? Ss 22:57 0:00 /pause
root 5489 1.3 0.4 48008 34236 ? Sl 22:57 0:43 calico-node -felix
root 6988 0.0 0.0 32648 5248 ? Ss 23:01 0:00 nginx: master process nginx -g daemon off;
nginx 7009 0.0 0.0 33104 2584 ? S 23:01 0:00 nginx: worker process
The preceding output shows the processes running in the worker node from an nginx container. Among these processes are system processes, sshd, kubelet, kube-proxy, and so on. Besides from the Pod using the host PID namespace, you can send signals to other microservices' processes, such as SIGKILL to kill a process.
Linux capabilities as security boundaries
Linux capabilities are a concept evolved from the traditional Linux permission check: privileged and unprivileged. Privileged processes bypass all kernel permission checks. Then, Linux divides privileges associated with Linux superusers into distinct units – Linux capabilities. There are network-related capabilities, such as CAP_NET_ADMIN, CAP_NET_BIND_SERVICE, CAP_NET_BROADCAST, and CAP_NET_RAW. And there are audit-related capabilities: CAP_AUDIT_CONTROL, CAP_AUDIT_READ, and CAP_AUDIT_WRITE. Of course, there is still an admin-like capability: CAP_SYS_ADMIN.
As mentioned in Chapter 4, Applying the Principle of Least Privilege in Kubernetes, you can configure Linux capabilities for containers in a pod. By default, here is a list of capabilities that are assigned to containers in Kubernetes clusters:
- CAP_SETPCAP
- CAP_MKNOD
- CAP_AUDIT_WRITE
- CAP_CHOWN
- CAP_NET_RAW
- CAP_DAC_OVERRIDE
- CAP_FOWNER
- CAP_FSETID
- CAP_KILL
- CAP_SETGID
- CAP_SETUID
- CAP_NET_BIND_SERVICE
- CAP_SYS_CHROOT
- CAP_SETFCAP
For most of the microservices, these capabilities should be good enough to perform their daily tasks. You should drop all the capabilities and only add the required ones. Similar to host namespaces, granting extra capabilities may disarm the security boundaries of other microservices. Here is an example output when you run the tcpdump command in a container:
root@gke-demo-cluster-default-pool-c9e3510c-tfgh:/# tcpdump -i cali01fb9a4e4b4 -v
tcpdump: listening on cali01fb9a4e4b4, link-type EN10MB (Ethernet), capture size 262144 bytes
23:18:36.604766 IP (tos 0x0, ttl 64, id 27472, offset 0, flags [DF], proto UDP (17), length 86)
10.56.1.14.37059 > 10.60.0.10.domain: 35359+ A? www.google.com.default.svc.cluster.local. (58)
23:18:36.604817 IP (tos 0x0, ttl 64, id 27473, offset 0, flags [DF], proto UDP (17), length 86)
10.56.1.14.37059 > 10.60.0.10.domain: 35789+ AAAA? www.google.com.default.svc.cluster.local. (58)
23:18:36.606864 IP (tos 0x0, ttl 62, id 8294, offset 0, flags [DF], proto UDP (17), length 179)
10.60.0.10.domain > 10.56.1.14.37059: 35789 NXDomain 0/1/0 (151)
23:18:36.606959 IP (tos 0x0, ttl 62, id 8295, offset 0, flags [DF], proto UDP (17), length 179)
10.60.0.10.domain > 10.56.1.14.37059: 35359 NXDomain 0/1/0 (151)
23:18:36.607013 IP (tos 0x0, ttl 64, id 27474, offset 0, flags [DF], proto UDP (17), length 78)
10.56.1.14.59177 > 10.60.0.10.domain: 7489+ A? www.google.com.svc.cluster.local. (50)
23:18:36.607053 IP (tos 0x0, ttl 64, id 27475, offset 0, flags [DF], proto UDP (17), length 78)
10.56.1.14.59177 > 10.60.0.10.domain: 7915+ AAAA? www.google.com.svc.cluster.local. (50)
The preceding output shows that inside a container, there is tcpdump listening on the network interface, cali01fb9a4e4b4, which was created for another pod's network communication. With a host network namespace and CAP_NET_ADMIN granted, you are able to sniff network traffic from the entire worker node inside a container. In general, the fewer capabilities granted to containers, the more secure the boundaries are for other microservices.
Wrapping up security boundaries in the system layer
The dedicated Linux namespaces and the limited Linux capabilities assigned to a container or a Pod by default establish good security boundaries for microservices. However, users are still allowed to configure host namespaces or add extra Linux capabilities to a workload. This will disarm the security boundaries of other microservices running on the same worker node. You should be very careful of doing so. Usually, monitoring tools or security tools require access to host namespaces in order to do their monitoring job or detection job. And it is highly recommended to use PodSecurityPolicy to restrict the usage of host namespaces as well as extra capabilities so that the security boundaries of microservices are fortified.
Next, let's look at the security boundaries set up in the network layer, from a microservice's perspective.
Security boundaries in the network layer
A Kubernetes network policy defines the rules for different groups of Pods that are allowed to communicate with each other. In the previous chapter, we briefly talked about the egress rule of a Kubernetes network policy, which can be leveraged to enforce the principle of least privilege for microservices. In this section, we will go through a little more on the Kubernetes network policy and will focus on the ingress rule. We will show how the ingress rules of network policies can help to establish the trust boundaries among microservices.
Network policies
As mentioned in the previous chapter, as per the network model requirement, Pods inside a cluster can communicate with each other. But still, from a security perspective, you may want to restrict your microservice to being accessed by only a few services. How can we achieve that in Kubernetes? Let's take a quick look at the following Kubernetes network policy example:
apiVersion: networking.k8s.io/v1
kind: NetworkPolicy
metadata:
name: test-network-policy
namespace: default
spec:
podSelector:
matchLabels:
role: db
policyTypes:
- Ingress
- Egress
ingress:
- from:
- ipBlock:
cidr: 172.17.0.0/16
except:
- 172.17.1.0/24
- namespaceSelector:
matchLabels:
project: myproject
- podSelector:
matchLabels:
role: frontend
ports:
- protocol: TCP
port: 6379
egress:
- to:
- ipBlock:
cidr: 10.0.0.0/24
ports:
- protocol: TCP
port: 5978
The NetworkPolicy policy is named test-network-policy. A few key attributes from the network policy specification worth mentioning are listed here to help you understand what the restrictions are:
- podSelector: A grouping of Pods to which the policy applies based on the Pod labels.
- Ingress: Ingress rules that apply to the Pods specified in the top-level podSelector. The different elements under Ingress are discussed as follows:
- ipBlock: IP CIDR ranges that are allowed to communicate with ingress sources
- namespaceSelector: Namespaces that are allowed as ingress sources based on namespace labels
- podSelector: Pods that are allowed as ingress sources based on Pod labels
- ports: Ports and protocols that all pods should be allowed to communicate with
- egress: Egress rules that apply to the Pods specified in the top-level podSelector. The different elements under Ingress are discussed as follows:
- ipBlock: IP CIDR ranges that are allowed to communicate as egress destinations
- namespaceSelector: Namespaces that are allowed as egress destinations based on namespace labels
- podSelector: Pods that are allowed as egress destination based on Pod labels
- ports: Destination ports and protocols that all Pods should be allowed to communicate with
Usually, ipBlock is used to specify the external IP block that microservices are allowed to interact with in the Kubernetes cluster, while the namespace selector and Pod selector are used to restrict network communications among microservices in the same Kubernetes cluster.
To strengthen the trust boundaries for microservices from a network aspect, you might want to either specify the allowed ipBlock from external or allowed microservices from a specific namespace. The following is another example to restrict the ingress source from certain Pods and namespaces by using namespaceSelector and podSelector:
apiVersion: networking.k8s.io/v1
kind: NetworkPolicy
metadata:
name: allow-good
spec:
podSelector:
matchLabels:
app: web
policyTypes:
- Ingress
ingress:
- from:
- namespaceSelector:
matchLabels:
from: good
podSelector:
matchLabels:
from: good
Note that there is no - in front of the podSelector attribute. This means the ingress source can only be pods with the label from: good in the namespace with the label from: good. This network policy protects Pods with the label app: web in the default namespace:
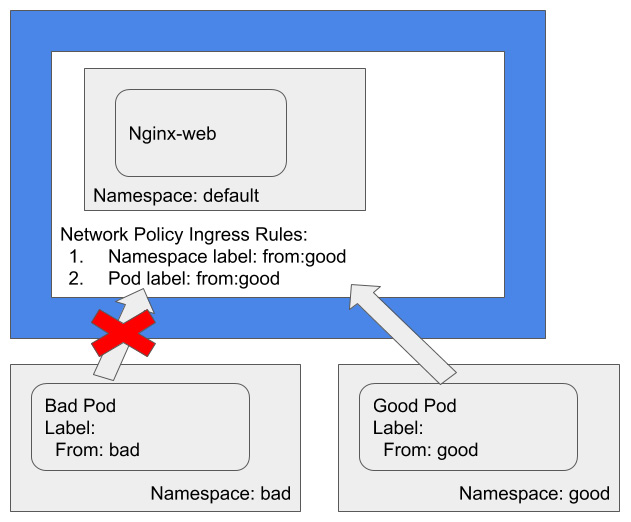
Figure 5.1 – Network policy restricting incoming traffic by Pod and namespace labels
In the preceding diagram, the good namespace has the label from: good while the bad namespace has the label from: bad. It illustrates that only Pods with the label from: good in the namespace with the label from: good can access the nginx-web service in the default namespace. Other Pods, no matter whether they're from the good namespace but without the label from: good or from other namespaces, cannot access the nginx-web service in the default namespace.
Summary
In this chapter, we discussed the importance of security boundaries. Understanding the security domains and security boundaries within the Kubernetes ecosystem helps administrators understand the blast radius of an attack and have mitigation strategies in place to limit the damage caused in the event of an attack. Knowing Kubernetes entities is the starting point of fortifying security boundaries. Knowing the security boundaries built into the system layer with Linux namespaces and capabilities is the next step. Last but not least, understanding the power of network policies is also critical to build security segmentation into microservices.
After this chapter, you should grasp the concept of the security domain and security boundaries. You should also know the security domains, common entities in Kubernetes, as well as the security boundaries built within or around Kubernetes entities. You should know the importance of using built-in security features such as PodSecurityPolicy and NetworkPolicy to fortify security boundaries and configure the security context of workloads carefully.
In the next chapter, we will talk about how to secure Kubernetes components. In particular, there are some configuration details you should pay attention to.
Questions
- What are the security domains in Kubernetes?
- What are the common Kubernetes entities you interact with?
- How can you restrict a Kubernetes user to access objects in a specific namespace?
- What does enable hostPID mean to a pod?
- Try to configure a network policy to protect your service that only allows specific Pods as ingress sources.
Further references
- Kubernetes network policies: https://kubernetes.io/docs/concepts/services-networking/network-policies/
- CVE-2018-18264: https://groups.google.com/forum/#!searchin/kubernetes-announce/CVE-2018-18264%7Csort:date/kubernetes-announce/yBrFf5nmvfI/gUO60KIlCAAJ
- CVE-2018-1002105: https://groups.google.com/forum/#!topic/kubernetes-announce/GVllWCg6L88