
Entourage 2004 is a capable PIM (personal information manager), but it truly shines as an email program. The changes to the email part of Entourage focus on making it easier for you to view your mail, and give you some new tools to arrange message lists to your liking.
The biggest news in email is the new Three Column View. This puts the Message List in a column between the Folder List and the Preview Pane (Figure 1).

Use this view if it works in your screen size and enhances your working style. With Three Column View active, you can see more of the selected message in the Preview Pane at once; depending on your screen resolution and the length of the message, you may be able to see the entire message without the hassle of scrolling. This view is great for owners of Apple Cinema Displays and other widescreen displays, such as the 15-inch and 17-inch PowerBooks. If your monitor resolution is smaller, you may find the view less useful.
In my case, in the office, I’m lucky enough to work with a 20-inch flat panel that runs at 1600 × 1200 pixels, so I can resize the Entourage window to show entire messages most of the time. On my 12-inch PowerBook, with its 1024 × 768 screen, I can use Three Column View, but the screen width is small enough that I must resize the column widths quite a bit.
Entourage 2004 comes set to Three Column View by default, but if you don’t like it, you can change things back to the norm for Entourage X (that has the Message List above the Preview Pane), or you can even get rid of the Preview Pane altogether:
Revert to the Entourage X view: choose View > Preview Pane > Below List (Command-Shift- [Backslash]).
Remove the Preview Pane: choose View > Preview Pane > None.
Entourage 2004 adds the concept of message groups (Figure 2). Message groups appear in the Message List, and group messages by date or other criteria that you choose. Groups can make it easier to find messages when you’re scanning the Message List. Message lists work the same whether you’re reading email messages or newsgroup messages, so you can use message groups in either.

By default, Entourage groups messages by day: Today, Yesterday, then by days of the week prior to yesterday, then Last Week, then by successively older labels. But you aren’t limited to arranging messages by time; click the Arrange By header of any Message List to pop up a menu that allows you to arrange the list by other criteria such as Message Status, Priority, Project, or others. For example, if you choose Priority, Entourage groups messages into the five Entourage Priority settings plus Junk.
Here are a few techniques for viewing (and hiding) messages in groups:
You can show or hide messages in a group by clicking the expansion triangle on the left of the group’s header or by selecting the group header and pressing the Right or Left arrow key.
Double-clicking a group’s header opens all the messages in that group in separate windows.
You can easily expand or collapse all the groups in a particular message list with the Expand All or Collapse All commands in the View menu.
If you prefer, you can get rid of message groups entirely. Click the Arrange By pop-up menu, then uncheck Show in Groups. Unfortunately, this is a folder-specific setting—to get rid of groups throughout the program, you must set each folder separately.
Tip
If you want to do something to most or all of the messages in a group, click the group’s header (but not the expansion triangle). Entourage highlights the entire group, and you can then delete the messages, change their Category, drag them all to another folder, mark them all as read, or whatever else you want. Don’t forget that you can Command-click individual messages to deselect them without losing the highlight of the rest.
To sort the Message List, click the Sort button in the list header, next to the Arrange By pop-up menu (the button isn’t labeled “Sort” at all; you’ll notice that its label changes depending on the list’s arrangement. For example, arranging the list by Subject or Categories results in alphabetical sort choices.)
The Sort button affects both the groups and the items within each group, in effect producing a two-tiered sort. Here’s an example. Let’s say that you have arranged the Message List by Received and sorted by Newest on Top. The Today group will be at the top of the Message List, and the Today group will list its messages with the most recently received message at the top, followed by the other message in order of their receipt.
If you need more specialized arrangements for your message lists, you can create them using the new Custom Arrangements feature. By creating and saving a Custom Arrangement, you can switch to a view of your messages that lets you quickly find messages that you need. A Custom Arrangement, once created, is available for use in any email or newsgroup message list.
Here’s an example of a Custom Arrangement that I use. When I write a book, I create a mail folder for all the mail associated with that book, and I create Incoming and Outgoing Mail Rules that automatically route the mail associated with the book to the folder. I normally arrange the folder by the Received date, with the newest messages at the top of the message list. Naturally, a lot of the mail associated with the book has file attachments—rough drafts of individual chapters, drafts of the cover, illustrations, and so on. To help me work quickly when I want to find a particular message with an attachment that came from one of my editors or co-authors, I created a Custom Arrangement that groups messages by whether or not they have file attachments, sorts the list so that messages with attachments are at the top, and then further sorts messages within each group by sender.
To create a Custom Arrangement, follow these steps:
At the top of any message list, click the Arrange By pop-up menu.
Choose Edit Custom Arrangements.
In the resulting Custom Arrangements: Mail window, click the New button. The Edit Custom Arrangements dialog appears.
Give the new Custom Arrangement a name, then make a choice from the Group Items By pop-up menu.
Items in the next two pop-up menus, Sort Groups By and Sort Items Within Groups By, can change depending on your choice in the Group Items By pop-up menu. For example, if you choose Attachment in the Group Items By pop-up menu, the list will be grouped in only two choices: Has Attachments and No Attachments. The Sort Groups By pop-up menus change to contain the only appropriate choices, to wit, Attachment and either With on Top or None on Top (Figure 3).
From the Sort Items Within Groups By pop-up menus, pick your desired sort.
Choose Expanded or Collapsed from the Default Display for Groups pop-up menu, click OK, then close the Custom Arrangements: Mail window.

To use your new Custom Arrangement, choose it from the Arrange By pop-up menu at the top of any message list.
Tip
If you want to create a new Custom Arrangement that is similar to an existing Custom Arrangement, save some time by selecting the existing one and clicking the Duplicate button in the Edit Custom Arrangements: Mail window. Then make the changes you need.
When you are working in another program, Entourage lets you know that you have new mail. The traditional method—bouncing the Entourage icon in the Dock—remains as an option that you can turn on, but now a more informative window pops up when each email message arrives (Figure 4), pauses for a moment, and then smoothly fades away if you don’t mouse over it.
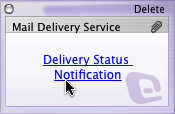
The great thing about this new feature is that you can get some details about an incoming message without leaving your current work. Though at first glance you might think that having windows pop up would be distracting, you may find that, like me, you like seeing what mail’s come in without having to switch away from other programs.
The window shows you the sender and the email’s subject, which is a hyperlink; click the link to make Entourage active and open the email in a new window. If you don’t want to keep the email, click Delete in the notification window. The message moves to Entourage’s Deleted Mail folder, and you can go back to your other work.
Tip
Normally, Entourage becomes active when you delete mail from the notification window, because you must answer the “Are you sure you want to delete?” dialog. If you’re comfortable with less confirmation, save time by turning the confirmation off. In the Notification preference pane, clear the Require Confirmation When Deleting checkbox.
The Notification window is turned on by default. To turn it off (or back on), use the Notification preference pane. Under the When New Mail Arrives section, deselect (or select) Display an Alert On My Desktop. Notice that you can also toggle the Animate Icon checkbox to set whether the Entourage icon animates in the Dock when mail arrives.
A favorite trick of spammers (and some legitimate businesses) is web bugs, which are images embedded into email and Web pages. Merely loading the image by viewing it triggers the web bug, which may report back to the spammer if and when a particular email message has been read and possibly your IP address.
To protect you from web bugs (not to mention offensive graphics like pornography in spam), Entourage 2004 no longer downloads pictures in email messages by default; instead, you can click a link in the header of the email to display pictures, if you think the email is innocuous. For senders you know are safe, you can set a preference to always allow pictures from contacts in your Address Book. To do so, open the Security pane in Entourage’s Preferences; then, Under the HTML Options section, check Automatically Download Pictures From My Address Book Contacts. This also allows pictures from senders listed in the Mailing List Manager.
If you write in a language other than English, you may be delighted with Office 2004’s new support for Unicode, an expanded character set that allows representation of the characters in virtually all languages. Now that Office supports Unicode, non-English language sets and fonts should display properly. I don’t read Russian, but I was surprised when I got a message in Cyrillic (a Russian-reading friend told me it was just spam for air conditioners, of all things). There’s nothing in this feature that you can Take Control of; it just works.
The languages supported for input, display, and basic editing of Unicode characters associated with the following keyboards are: Australian, Austrian, Belgian, Brazilian, British, Bulgarian, Canadian, Catalan, Cherokee, Chinese (Simplified), Chinese (Traditional), Croatian, Czech, Danish, Dutch, English, Estonian, Faroese, Finnish, French, German, Greek, Korean, Hawaiian, Hungarian, Icelandic, Inuktitut, Irish, Italian, Japanese, Latvian, Lithuanian, Macedonian, Norwegian, Northern Sami, Polish, Portuguese, Romanian, Russian, Serbian, Serbian-Latin, Slovak, Slovenian, Spanish, Swedish, Swiss French, Swiss German, Turkish, Ukrainian, and Welsh.
Office also supports input of the these languages through the following system-level Unicode input methods: Unicode Hex Input, US Extended, and the Character Palette.