Chapter 13. Implementing common Ajax patterns
In this chapter:
- Guidelines for developing debug and release versions of script files
- Helpers for automating the creation of client properties and events
- Unique URLs and logical navigation
- Declarative data binding
- Declarative widgets
Ajax applications have changed the way users interact with web pages. With Ajax, you can process a form in the background and eliminate page refreshing. In this way, the user interface remains responsive while input is being processed. Eventually, developers realized that Ajax introduced the need to handle new development scenarios. For example, how do you keep the user informed about what’s happening in the background? What’s the best strategy to perform data access on the client side?
To use Ajax, we need to develop new design patterns for web pages. Many patterns have been defined and catalogued, and many are being defined every day, as developers continue to experiment with Ajax and use it in production scenarios.
Covering every Ajax pattern would require a dedicated book, but we discussed some patterns in previous chapters. In this final chapter, we’ve picked some more patterns and implemented them with ASP.NET AJAX. The first half of the chapter explores coding patterns and how they help you write JavaScript code that is easier to debug and maintain. Then, we’ll address the problem of the broken Back button. Finally, we’ll show you how to implement client-side data binding and how to build draggable widgets using features available in the ASP.NET Futures package.
13.1. Script versioning
Embracing Ajax as your primary development technique for web applications involves writing a lot of JavaScript code. Many tasks that were previously accomplished on the server side can now be performed using JavaScript on the client side. As a consequence, the script files get bigger as you add functionality to a web application. In addition, client objects are often responsible for performing data access, as well as elaborating the results and displaying data to the user. For this reason, debugging the client code becomes a necessary and fundamental task for every Ajax developer.
In chapter 2, we discussed client-side debugging and mentioned a feature of ASP.NET AJAX called script versioning. Thanks to script versioning, you can have debug and release versions of the same JavaScript file. In the following sections, we’ll present guidelines for how to write the JavaScript code in the debug version of a script file. This will greatly improve your debugging experience and let you easily debug client code using one of the tools available, such as those discussed in appendix B.
13.1.1. Getting informative stack traces
When you want to define a method in a JavaScript object, you usually do so by assigning a function to a property of the object. Recall from chapter 3 that functions assigned to properties of an object can be invoked using the name of the property. For this reason, there’s no need to specify a name for the function, which can be declared anonymous. You can see this in listing 13.1, which defines a Person class using the Microsoft Ajax Library:
Listing 13.1. Using anonymous functions to declare methods of an object
function Person() {
    this._name = '';
}
Person.prototype = {
    get_name : function() {
        return this._name;
    },

    set_name : function(value) {
        this._name = value;
    }
}
Person.registerClass("Person");
In this listing, the functions assigned to the get_name and set_name properties have no name: They’re anonymous functions. This isn’t a big deal, because you can invoke the function through the name of the property:
var person = new Person();
person.set_name('Joe'),
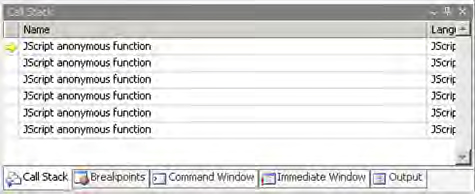
As a consequence, omitting the function names reduces the code size and makes it more readable. On the other hand, there’s a price to pay. For example, a debugger can’t prompt an informative stack trace if the code fails in an anonymous function. As a consequence, the stack trace will show a series of calls to functions with blank names, as in figure 13.1. This isn’t what we would call a helpful debugging experience.
Figure 13.1. The Call Stack window of the Visual Studio Debugger
To work around this problem, you can take advantage of the script-versioning technique provided by the Microsoft Ajax Library. You need to build a debug version of the script file where all the functions are declared with a name. This makes the code more verbose and less readable, but you can inspect the stack trace in your favorite JavaScript debugger with a simple two-step process:
1. Declare all the functions as global named functions in the debug version of the script file.
2. In the prototype object, define an alias for the corresponding function.
Listing 13.2 shows how the client Person class looks if you take this approach.
Listing 13.2. A debug version of the Person class
function Person$get$name() {
   return this._name;
}

function Person$set$name(value) {
   this._name = value;
}

function Person() {
   this._name = '';
}
Person.prototype = {
    get_name : Person$get$name,

    set_name : Person$set$name
}
Person.registerClass("Person");
The instance methods are first defined as global named functions. To better recognize the constructor to which they belong, you concatenate the constructor name with the name of the method, using a $ character. This is the same approach used in the debug versions of the Microsoft Ajax Library files, but you’re free to leverage your preferred naming technique. Finally, the functions are referenced in the prototype object of the Person constructor by assigning them to the get_name and set_name properties. Methods are invoked in the same way as before, but a debugger can display a more informative stack trace, as shown in figure 13.2.
Figure 13.2. Using named functions in the debug version of a script file lets you display a more informative stack trace.

Note
You may wonder why you need to declare the instance methods as global functions. Couldn’t you assign a name to the functions in the prototype object? Although the majority of ASP.NET AJAX supported browsers would be happy, at present the Safari browser would complain and refuse to parse the code.
Now that you know how to obtain a more informative stack trace, the second technique that we’ll illustrate involves adding comments to the code. As we’ll see, the Microsoft Ajax Library allows commenting the JavaScript code using a syntax similar to the one supported by the C# and VB.NET languages.
13.1.2. XML comments in JavaScript code
Often, you can distinguish between good and poorly written code by looking at comments. If code is well commented, developers who consume it get a clearer vision of the coder’s work. As result, they can read, use, and maintain it without much effort. Shipping uncommented code can reward developers—even those who wrote the code—with daily headaches.
Beside the good old inline comments, languages such as C# and VB.NET let you document classes and their properties, methods, and events. You do so with an XML syntax that can be added before the declaration of a class or one of its members. Tools can then generate documentation based on these comments. For example, the IntelliSense tool in Visual Studio can use this documentation system to generate documentation on the fly, as soon as you type the code.
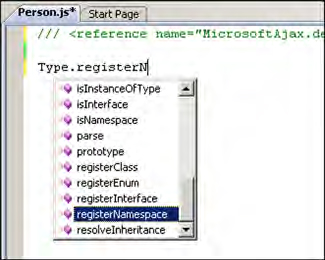
The Microsoft Ajax Library provides a similar technique on the client side, letting you add comments to JavaScript classes, properties, and methods. In a way similar to what happens with server-side classes, XML comments enable the use of the IntelliSense tool even in custom JavaScript files, with custom JavaScript objects. Figure 13.3 shows how the new IntelliSense works in a JavaScript file, in the new version of Visual Studio (codename Orcas).
Figure 13.3. The IntelliSense tool in Visual Studio Orcas can show properties of JavaScript objects.
To see how XML comments work in JavaScript, listing 13.3 shows how you can add comments to the Person class defined in listing 13.1, with the help of the Microsoft Ajax Library.
Listing 13.3. Adding XML comments to a JavaScript client class
function Person() {
    ///<summary>
    ///This class describes a person.
    ///</summary>

    this._name = '';
}
Person.prototype = {
    get_name : function() {
        ///<summary>
        ///Returns the name of the person.
        ///</summary>

        return this._name;
    },

    set_name : function(value) {
        ///<summary>
        ///Sets the name of the person.
        ///</summary>
        ///<param name="value" type="String">
        ///The name of the person.
        ///</param>

        this._name = value;
    }
}
Person.registerClass("Person");
Notice that you can add XML comments in a constructor, a property, or a method declaration. This is different from what happens on the server side, where XML comments are added outside an entity declaration. Other than this difference, the syntax used for the client-side comments is similar to that leveraged by the .NET framework on the server side.
Note
You can find a description of the XML tags available in the .NET framework documentation engine at http://msdn2.microsoft.com/en-us/library/b2s063f7.aspx.
The example uses the summary tag to provide a description of the client class and its method. The get_name and set_name methods are the getter and setter for the client name property. Note that in the setter, a param tag describes the parameter accepted by the set_name method. The attributes of the param tag are the same as those used in parameter descriptors, which we’ll discuss in section 13.1.4.
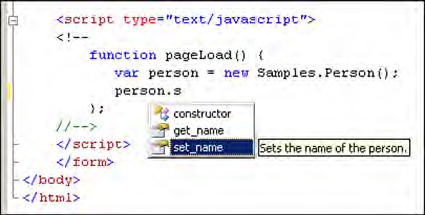
Figure 13.4 shows how the XML comments added to the Person class enhance the coding experience thanks to the new IntelliSense features available in Visual Studio Orcas.
Figure 13.4. XML Comments added to custom JavaScript objects are used by the IntelliSense tool in Visual Studio Orcas.
Before we complete our discussion of how to take advantage of script versioning, let’s see how you can enhance the debug version of a script file by performing validation on the parameters passed to JavaScript methods.
13.1.3. Validating function parameters
JavaScript doesn’t perform any kind of validation on the parameters passed to a method. Despite what happens in strongly typed languages like C# or VB.NET, where checks are performed at compile time, there’s no guarantee that the parameters you receive in a method are of the expected type. There could also be fewer or more than the expected number.
For example, consider a JavaScript function called add, which is supposed to return the sum of the two arguments it accepts:
function add(a, b) {
    return a + b;
}
If the parameters a and b are numbers, everything goes as expected. But what happens if you pass strings instead of numbers? In this case, the + operator is interpreted as the string-concatenation operator, and the function returns the string resulting from the concatenation of the strings passed as arguments. The function’s code doesn’t raise any errors; it just returns an unexpected result. Finally, if you pass arbitrary arguments to the function, such as a Boolean and a string, a JavaScript error is raised at runtime.
Even if you can’t prevent runtime errors from being raised, you can detect errors in the method and avoid returning unexpected results. An interesting feature introduced by the Microsoft Ajax Library is the ability to validate the parameters passed to a method. You can perform parameter validation through a method called Function._validateParams.
Warning
Because Function._validateParams is declared as a private method, we feel the need to add a disclaimer that says “use at your own risk.” Used properly, this method can be a great help in some scenarios. We hope that the Function._validateParams method will become a publicly accessible method in the next release of the Microsoft Ajax Library.
To illustrate how the method works, let’s rewrite the add function to ensure that you operate on the right parameter types (see listing 13.4).
Listing 13.4. Validating the parameters passed to a JavaScript function
function add(a, b) {
    var e = Function._validateParams(arguments,
      [
        {name:"a", type:Number, mayBeNull:false, optional:false},
        {name:"b", type:Number, mayBeNull:false, optional:false}
      ]
    );

    if(e) throw e;

    return a + b;
}
The Function._validateParams method is called just after the function declaration, and its result is stored in the e variable. The first argument passed to the method is a variable called arguments; This is a special variable defined by JavaScript and accessible only in a function. The arguments variable holds a list of all the arguments passed to the function.
The first argument passed to Function._validateParams is the list of method parameters to validate; these are the parameters passed to the add function when it’s called. The second argument passed to Function._validateParams is an array containing two objects that act as parameter descriptors. Note that parameter descriptors are associated with method parameters in the same order they’re stored in the arguments variable: The first descriptor is associated with the first parameter passed to the function, and so on.
Each descriptor describes a particular parameter by specifying a list of requirements that it must meet. These requirements are represented by properties of the object. For example, look at the first parameter descriptor supplied:
{name:"a", type:Number, mayBeNull:false, optional:false}
The name property contains a string with the parameter name. If the validation fails, you can access the name of the parameter through the Error object. The second property, type, puts a constraint on the type of the parameter. In this case, you mandate that the a parameter is of type Number. The third property, mayBeNull, determines whether you can pass null as the value of the argument. If the property is set to false, you can’t pass null as the value for the a parameter. The last property, optional, specifies whether the parameter is mandatory. If you set the property to false, the caller must supply at least one parameter, because you’re dealing with the first parameter descriptor.
The properties illustrated in the previous example aren’t the only ones available. Table 13.1 lists the properties you can declare in a parameter descriptor.
Table 13.1. Properties used in parameter descriptors
|
Property |
Description |
|---|---|
| type | The expected type of a parameter. The possible values are String, Number, Array, Function, and Object. |
| mayBeNull | If true, the parameter can be null. |
| optional | If true, the parameter can be omitted. |
| integer | If the parameter is a Number, specify if it must be an integer. |
| elementType | If a parameter is an Array, specify the expected type for its elements. The possible values are the same as for the type property. |
| elementMayBeNull | If a parameter is an Array, specify if it can contain null elements. |
| elementInteger | If a parameter is an Array, specify if its elements are integers. |
| domElement | If true, the parameter must be a DOM element. |
As we said previously, the return value of Function._validateParams is stored in the e variable. If the validation fails, the e variable contains an Error object with the information about the parameter that caused the error. The second statement in the add function in listing 13.4 raises a client exception if the validation fails:
if(e) throw e;
If the validation succeeds, Function._validateParams returns null, and the code in the body of the method is executed normally.
The Function._validateParams method is considered private because the name of the function starts with an underscore, which is a convention used by JavaScript developers to denote a function or member with private scope. The method is used internally by the Microsoft Ajax Library to help debug script files by validating the parameters passed to a method on every call. All calls to the Function._validateParams method are present only in the debug versions of the Microsoft Ajax Library files and are removed when in release mode.
This is done because the validation procedures are expensive in terms of statements executed. For example, validating the parameters of a method that is 5 statements long can result in 100 statements being executed at runtime, due to the execution of the internal validation routines. Abusing this function can result in a significant performance drop.
However, the Function._validateParams function and all its associated internal methods are defined in the release version of the library files. In the next section, we’ll discuss a couple of scenarios for using parameter validation in production code.
13.1.4. Parameter validation in production code
Using the Function._validateParams method to validate parameters whenever a function is called is expensive in terms of performance. You should use this method only in the debug versions of script files; but in a couple of scenarios, this method can be useful in production code.
The first scenario involves type checking at runtime. Suppose you want to create a dynamic array that accepts only strings. On the server side, you have strongly typed collections to accomplish this task. On the client side, you can achieve something similar is by using Function._validateParams as shown in listing 13.5.
Listing 13.5. A StringCollection object in JavaScript
Type.registerNamespace('Samples'),

Samples.StringCollection = function() {
    this._innerList = [];
}
Samples.StringCollection.prototype = {
    add : function(value) {
        var e = Function._validateParams(arguments,
          [
            {name: "value", type:String, mayBeNull:false,
               optional:false}
          ]);

        if(e) throw e;

        this._innerList.push(value);
    }
}
Samples.StringCollection.registerClass("Samples.StringCollection");
You create a StringCollection object that wraps a JavaScript array. You want to allow only strings to be added to the array. To do that, call the Function._validateParams method in the add method, which is used to add an element to the collection. The parameter descriptor for the value parameter mandates that it’s of type String, and not null; and the value parameter can’t be omitted. This ensures that only strings are added to the inner array. For simplicity, the code in listing 13.5 contains a single add method, but you can add more methods to simulate strongly typed collections in JavaScript.
Another interesting use of the Function._validateParams method ensures that required references are set before the initialization of a client component. In listing 13.6, the Function._validateParams method is used in the initialize method of a SomeControl control that is supposed to hold a reference to a DOM element called childElement. You ensure that the reference has been set correctly (for example, through a property) before the control is initialized.
Listing 13.6. Validating references in the initialization code
Samples.SomeControl.prototype = {
  initialize : function() {
     Samples.SomeControl.callBaseMethod(this, 'initialize'),

     var e = Function._validateParams(
        [this._childElement],
        [
          {name:"childElement", mayBeNull:false, optional:false,
             isDomElement:true},
        ]);

     if(e) throw e;

     // Initialization code continues here.
  }
}
The reference stored in the _childElement field is validated using the Function._validateParams method. To validate a DOM element, the corresponding parameter descriptor has the isDomElement property set to true. If the validation succeeds, you can safely execute the initialization code for the control.
Let’s continue discussing production code. In production, the script files are usually served to browsers using various kinds of network connections. To achieve a reasonable loading time even with slow clients, you need to minimize the size of the script files downloaded by the browser. Even if the browser can cache script files, you must seriously take into account first-time loading and empty caches. There’s no point in forcing users to wait while a script file is being downloaded just because you added 10 KB of XML comments that users will never see. In the following section, you’ll learn how to reduce the loading times of script files served using the ASP.NET AJAX ScriptResource handler.
13.1.5. Compressing and crunching script files
With ASP.NET AJAX, you can take advantage of the compression and crunching capabilities provided by the ScriptResource.axd HTTP handler. This handler is responsible for serving the JavaScript files embedded as web resources in separate assemblies. When a script file is requested through the handler (for example, by loading it through the ScriptManager control), the file is compressed and crunched before being sent to the browser. Crunching is the process of stripping all the comments and whitespace from the script file, to reduce its size. With compression, size is further reduced thanks to compression algorithms.
To activate compression and crunching, you have to modify some attributes in the website’s web.config file. You do this by inserting the following code in the system.web.extensions element of the web.config file:
<system.web.extensions>
  . . .
  <scripting>
    <scriptResourceHandler enableCompression="true"
      enableCaching="true" />
  </scripting>
  . . .
</system.web.extensions>
You need to set the enableCompression attribute of the scriptResourceHandler element to true if you want to activate compression of script files served through the ScriptResource.axd HTTP handler. You can also set to true the enableCaching attribute if you want to cache the served script files in the browser.
The techniques illustrated so far should be used when you’re developing debug and release versions of script files. In a debug configuration, it’s a good choice to pay the price of an increased file size and slower performance to take advantage of stack traces, XML comments, and parameter validation. When you’re dealing with production code, your goals should be obtaining the fastest possible code and decreasing file sizes as much as possible.
Let’s move to other kinds of coding patterns. Our next objective is showing what you gain and what you lose when you decide to tweak the Microsoft Ajax Library to automate common programming tasks.
13.2. Helpers, help me help you!
Ajax applications usually need to download a significant number of kilobytes of JavaScript code to the browser. Even if the browser’s cache can speed up the loading time of an Ajax-enabled web page, size matters for script files. Shorter script files lead to faster loading times, especially when you visit a website for the first time.
In the previous section, we explained how to take advantage of compression and crunching when you use ASP.NET AJAX to serve script files. In this section, you’ll further decrease the size of your JavaScript files by extending the Microsoft Ajax Library. The objective is to reduce the quantity of JavaScript code needed to perform common tasks when creating client objects. You’ll write two helpers (methods that help you perform a particular task) for declaring properties and events in JavaScript objects using a single statement. The rewards will be increased productivity, shorter script files, and a lot of saved keystrokes.
13.2.1. Automating the declaration of properties
If you read chapter 3, you should be aware that you can expose properties in JavaScript objects. Properties are nothing more than methods that act as the getter and setter for a particular value stored in an object. If you look at some of the listings in this book, you’ll notice that declaring a property is expensive in terms of lines of code written. This is true especially when you use properties to expose the value of private members without performing any additional logic. This situation is shown in listing 13.7, which reports the code for a property called someProperty, declared in the prototype of a client class called someClass.
Listing 13.7. A simple property declared in a client class
someClass.prototype = {
     get_someProperty : function() {
         return this._someMember;
     },

     set_someProperty : function(value) {
         this._someMember = value;
     }
}
Although declaring a single property has no impact on the size of a script file, in some situations an object exposes many properties. This can be a concern because the size of the script can increase significantly.
Let’s automate the process of declaring a simple property like the one shown in listing 13.7. The goal is to both reduce the size of the resulting script and save precious keystrokes. Listing 13.8 shows the code needed to declare a helper method called createProperty, which performs this task.
Listing 13.8. Code for automating the creation of a simple property
Type.prototype._createGetter = function(fieldName) {
    return function() {
        return this[fieldName];
    }
}

Type.prototype._createSetter = function(fieldName) {
    return function(value) {
        this[fieldName] = value;
    }
}
Type.prototype.createProperty = function(propName) {
    var fieldName = '_' + propName;

    var getter = this._createGetter(fieldName);

    var setter = this._createSetter(fieldName);

    this.prototype['get_' + propName] = getter;
    this.prototype['set_' + propName] = setter;
}
The previous code extends the Microsoft Ajax Library by adding functions to the Type.prototype object. As we explained in chapter 3, Type is an alias for the built-in Function object. Because client classes are JavaScript functions, you’re providing new static methods to all the client classes.
The first two methods, _createGetter and _createSetter, are supposed to be private methods used by the createProperty helper. Their purpose is to return a closure with the code for the property’s getter and setter. Closures are functions that can be bound to the local variables of the parent functions in which they’re declared, as we explained in section 3.1.3.
You declare a property with the createProperty method. It calls the _createGetter and _createSetter methods and assigns the returned functions to the prototype of the client class from which you call createProperty. Note that it’s not necessary to declare a private field in the constructor; the helper creates the field by adding an underscore character to the property name. Finally, the getter and setter methods are added as properties of the prototype object using the naming convention for properties introduced in section 3.3.3.
With the new createProperty method, adding properties to a class is easy. Listing 13.9 demonstrates by declaring a class called Samples.Customer that exposes three properties: fullName, address, and city.
Listing 13.9. Creating client properties with the createProperty method
Type.registerNamespace("Samples");

Samples.Customer = function() {
}
Samples.Customer.createProperty("fullName");
Samples.Customer.createProperty("address");
Samples.Customer.createProperty("city");

Samples.Customer.registerClass("Samples.Customer");
Properties are declared after the Samples.Customer constructor by calling the createProperty method on the constructor. The createHelper method accepts a string with the name of the property as an argument. As we mentioned previously, an interesting side effect of createProperty is that private fields are implicitly created by the _createSetter function when the following statement is executed:
this[fieldName] = value;
In this case, trying to access the fieldName variable on the current instance causes the field to be created if it doesn’t exist. By convention, private fields are created by prefixing the name of the property with the underscore character.
You’ve reached your first goal toward reducing the number of statements in a JavaScript file. With the createProperty method, you can declare a private field and the corresponding property with a single statement. Now, it’s time to automate the creation of client events.
13.2.2. Automating the creation of events
In section 3.7, we explained how to expose events in client objects. Recall that exposing an event requires writing methods for adding and removing an event handler, as well as a method for raising the event. This significantly increases the number of statements required to declare a single event in a client object. In chapter 3, you mitigated this issue by declaring a single method that can raise a generic event, given the event name and the event arguments.
In this section, you want to expose a client event using a single JavaScript statement. You’ll create a helper method called createEvent, in a manner similar to what you did in the previous section with the createProperty method. Let’s start by looking at the code, which is shown in listing 13.10.
Listing 13.10. Automating the creation of a client event
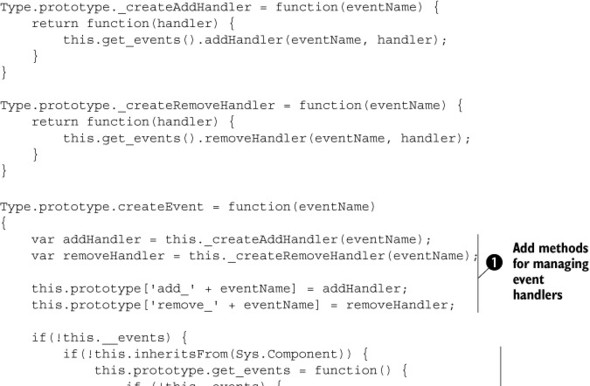
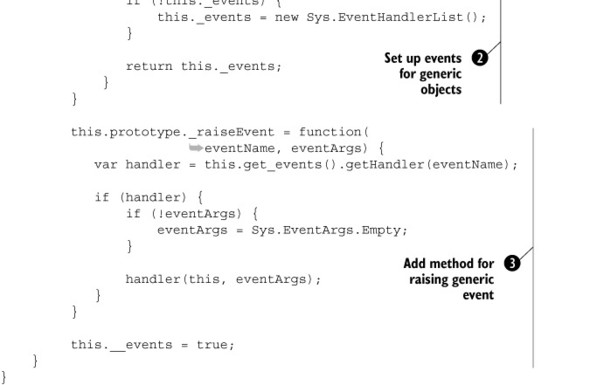
The code is structured in a manner similar to listing 13.8 for client properties. The functions declared in the code act as static methods that can be called from the client object that wants to expose an event. The first two methods, _createAddHandler and _createRemoveHandler, return the functions responsible for adding and removing an event handler. The code for these functions is the same that you wrote in section 3.7.1, when we discussed how to expose an event in a JavaScript object.
The createEvent method uses _createAddHandler and _createRemoveHandler to inject the returned functions in the prototype of the object. ![]() The injected methods follow the naming convention for events that we introduced in section 3.7.1.
The injected methods follow the naming convention for events that we introduced in section 3.7.1.
Then, the createEvent method checks whether the client object is a client component created with the Microsoft Ajax Library or just a JavaScript
object. As you know, client components come with an instance of the Sys.EventHandlerList class stored in a private _events member. This instance, which is needed to manage event handlers, is returned by a public method called get_events, exposed by the base Sys.Component class. If you’re dealing with a simple JavaScript object, you need to ![]() declare the _events variable as well as the get_events method.
declare the _events variable as well as the get_events method.
Finally, ![]() createEvent injects the _raiseEvent method in the prototype object. As you know from section 3.7, this method can raise a generic event exposed in the client object. All you have to do to raise an event is pass in the
event name and the event arguments to the _raiseEvent method.
createEvent injects the _raiseEvent method in the prototype object. As you know from section 3.7, this method can raise a generic event exposed in the client object. All you have to do to raise an event is pass in the
event name and the event arguments to the _raiseEvent method.
With the new createEvent helper, exposing client events is fast and easy. For example, you can create a customerInitialized event in the Samples.Customer class with the following code:
Type.registerNamespace("Samples");

Samples.Customer = function() {
   // Declare class members.
}
Samples.Customer.createEvent("customerInitialized");

Samples.Customer.registerClass("Samples.Customer");
The createEvent method is called just after the constructor as a static method of the Samples.Customer class. To raise the customerInitialized event, you can call the _raiseEvent method anywhere in an instance method, like so:
this._raiseEvent("customerInitialized");
Finally, an external object can subscribe to the event as usual, by passing an event handler to the add_customerInitialized method:
var customer = new Samples.Customer();
customer.add_customerInitialized(myEventHandler);

function myEventHandler(sender, e) {
    // Handle the event.
}
In the same manner, you can call the remove_customerInitialized method to remove an event handler added with add_customerInitialized. The nice thing is that all these methods are automatically created by the createEvent helper based on the name of the event passed as an argument to the method. You save plenty of keystrokes while decreasing the number of statements and the size of the script file that hosts the client object.
Now, we’ll abandon coding patterns and implement some of the most common Ajax design patterns. We’ll start with an implementation of the logical navigation and unique URLs patterns. Then, we’ll examine client-side data binding and draggable widgets.
13.3. Logical navigation and unique URLs
Ajax applications are frequently praised for the richness they provide. Users have come to expect pages that are interactive, fluid, and more responsive than traditional websites. Now that these pages have become a reality, a few of the features you’ve taken for granted in traditional web applications are missing or perceived as broken.
A frequent remark about Ajax applications is that the browser Back and Forward buttons no longer function as expected. Take, for example, the Google Maps (http://maps.google.com) and Windows Local Live (http://local.live.com) sites. Each of these web applications provides an interactive map, which the user can manipulate by clicking and dragging the mouse over the surface. As data is retrieved seamlessly in the background, the UI is dynamically updated to reflect the movements made with the mouse. Changes are made to the page and its appearance, but no items are entered into the browser’s history record—so the next time the user clicks the Back button, they aren’t taken to an earlier version of the map (before the dynamic updates began). Instead, they’re redirected away from the map page to the page or site that was previously viewed in the browser.
Another missing or broken characteristic that is often observed with Ajax applications is the inability to bookmark a version of a page after making significant updates to its state and appearance. Imagine going through the steps of finding your home or work address on Google Maps and then bookmarking the page in the browser. The next time the bookmark is restored from the browser, you understandably expect the state of the page to be similar to the way it was when you added the bookmark. The reality is that the page is rejuvenated to its original state, before any user interactions user began.
Ajax applications inherently behave differently than traditional applications because they don’t perform the same actions. They don’t perform a full page refresh when application updates are made, so no entry is made in the browser history. They also don’t provide unique URLs when a page is updated, so bookmarks aren’t aware of changes made to the application and its state. These intrinsic qualities present challenges for Ajax developers. Providing support for such innate browser activities will enhance your Ajax applications.
13.3.1. Logical navigation
The term logical navigation refers to the possibility of associating multiple logical views with the same page. Consider the UpdatePanel server control in ASP.NET AJAX: With its support on a page, you can show variations of the same interface without the price of reloading the entire page. Each page variation can be perceived as a separate logical view. Implementing logical navigation means offering the user the ability to navigate between views (or variations) with the browser’s Back and Forward buttons.
Support for the logical navigation pattern, often referred to as Back button support, is presented in the form of a History control.
History control
Debuting in the May 2007 release of ASP.NET Futures is a control called History. This control, which provides server-side and client-side support, lets you manage browser history during asynchronous updates on a page. We’ll begin our exploration of this control by investigating how you can apply it in a server-centric solution.
Note
The previous two chapters, and the third part of the book, are solely dedicated to features in the ASP.NET Futures CTP. We’re discussing the History control here instead because its use is more applicable to Ajax patterns and the topic of this chapter.
To use the controls in ASP.NET Futures, first create a new website and select the ASP.NET Futures AJAX Web Site option in the New Web Site dialog (see figure 13.5) in Visual Studio.
Figure 13.5. Installing ASP.NET Futures adds a website template for preconfiguring sites.
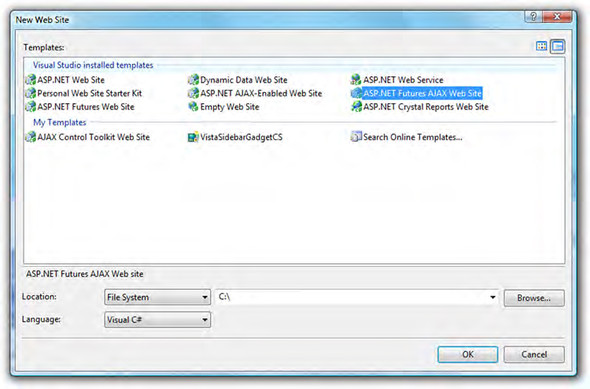
Selecting this option adds a reference to the Microsoft.Web.Preview.dll assembly that contains the controls and other features in the library. In addition, an update to the web.config file includes the tag mappings to the new controls:
<pages>
 <controls>
  <add tagPrefix="asp" namespace="System.Web.UI"
     assembly="System.Web.Extensions,
     Version=2.0.0.0, Culture=neutral,
     PublicKeyToken=31BF3856AD364E35"/>
  <add tagPrefix="asp" namespace="Microsoft.Web.Preview.UI"
     assembly="Microsoft.Web.Preview"/>
  <add tagPrefix="asp"
     namespace="Microsoft.Web.Preview.UI.Controls"
     assembly="Microsoft.Web.Preview"/>
  ...
For this exercise, you’ll update an application that uses the UpdatePanel control to dynamically render the page with different views of RSS feeds. Listing 13.11 illustrates the markup portion of the application prior to any updates made with the History control.
Listing 13.11. A simple RSS aggregator that uses the UpdatePanel to update the page
  <%@ Register Assembly="RssToolkit, Version=1.0.0.1, Culture=neutral,
      PublicKeyToken=02e47a85b237026a"
      Namespace="RssToolkit" TagPrefix="rssToolkit" %>
...

  <asp:ScriptManager ID="ScriptManager1" runat="server" />
  <div>

   <rssToolkit:RssDataSource ID="RssDataSource1"
      runat="Server" MaxItems="7">
   </rssToolkit:RssDataSource>

   <asp:UpdatePanel ID="UpdatePanel1" runat="server"
    RenderMode="Inline">
    <ContentTemplate>
   <asp:DropDownList ID="Blogs" runat="server" AutoPostBack="true"
     OnSelectedIndexChanged="Blogs_Changed" >
     <asp:ListItem Text="ASP.NET Weblogs"
       Value="http://weblogs.asp.net/MainFeed.aspx" />
     <asp:ListItem Text="MSDN Blogs"
       Value="http://blogs.msdn.com/MainFeed.aspx" />
     <asp:ListItem Text="DotNetSlackers Community"
       Value="http://dotnetslackers.com/community/blogs/MainFeed.aspx" />
   </asp:DropDownList>
   <hr />

   <asp:DataList ID="Posts" runat="server"
    DataSourceID="RssDataSource1">
    <ItemTemplate>
     <asp:HyperLink ID="TitleLink" runat="server"
          Text='<%# Eval("title") %>'
          NavigateUrl='<%# Eval("link") %>' Target="_blank" >
     </asp:HyperLink>
    </ItemTemplate>
   </asp:DataList>

  </ContentTemplate>
 </asp:UpdatePanel>
</div>
To accompany the markup portion of the solution, listing 13.12 shows the code-behind portion of the application that updates the feeds on the page.
Listing 13.12. Code-behind solution for a simple RSS reader application
protected void Page_Load(object sender, EventArgs e)
{
    if (!String.IsNullOrEmpty(Blogs.SelectedValue))
        RssDataSource1.Url = Blogs.SelectedValue;
}

protected void Blogs_Changed(object sender, EventArgs e)
{
    RssDataSource1.Url = Blogs.SelectedValue;
    Posts.DataBind();
}
The application uses an RSS component called the ASP.NET RSS Toolkit. You can download the source and binaries for this component from CodePlex (just like the Ajax Control Toolkit) at http://www.codeplex.com/ASPNETRSSToolkit. Also note that each time a selection is made from the DropDownList, a postback occurs because the control’s AutoPostBack property is set to true. Wrapping this region of the page and the DataList in an UpdatePanel replaces the traditional postback with an Ajax or asynchronous postback.
If you run the application in its current state, the feed content refreshes but no updates are reflected in the browser history. If this is the first page you load in the browser, then the Back and Forward buttons remain disabled even after updates to the page are made. The first step in resolving this situation is to add the History control to the page:
<asp:History ID="History1" runat="server"
     OnNavigate="NavigateHistory" />
Similar to the ScriptManager, only one instance of the control can exist on a page. It can also be placed on a master page to extend its reach to multiple pages. The Navigate event is raised on both the client and server and includes data about the state of the page in the URL. Handling this event and using the data appended to the address lets you re-create the state of the page for a specific logical view. Let’s examine these events more closely to add the functionality you’re looking for.
The History control has a method called AddHistoryPoint that adds an entry in the browser’s history repository. It’s important to note that the page and all the postback information aren’t placed in memory (that would be inefficient): Only the URL of the page and the appended variables that reflect its current state are added to the browser history. This will make more sense after you examine listing 13.13, which illustrates how to use the AddHistoryPoint method when the selected blog feed has changed.
Listing 13.13. Using the AddHistoryPoint method
protected void Blogs_Changed(object sender, EventArgs e)
{
    History1.AddHistoryPoint("blogState", Blogs.SelectedIndex);
    RssDataSource1.Url = Blogs.SelectedValue;
    Posts.DataBind();
}
You pass in two parameters to the AddHistoryPoint method. The first parameter is the key for an item in a dictionary called blogState. (You can name this key anything you’d like—blogState seemed descriptive.) The second parameter represents the value you want to associate with the key. Because you want to restore the page to its original state before the postback occurred, you store the index of the selected feed in history. You can then retrieve this value to restore the page when the Back or Forward button is clicked (more on this soon).
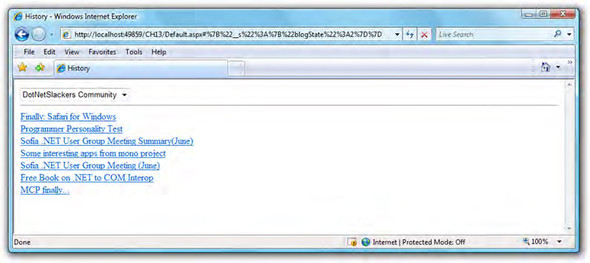
This time, when you run the application and select a different feed from the list, the URL is updated along with an entry in the browser history (see figure 13.6).
Figure 13.6. Calling AddHistoryPoint updates the URL with the state of the page and adds an entry to the history log.
Warning
At the time of this writing, the history state is unencrypted. This means a user could tamper with the state directly. You should implement measures to validate the data on both the client and server.
This is the first half of the pattern: adding an entry in the history repository. The second half is reading that entry and restoring the state of the page. Listing 13.14 shows how you can accomplish this in the Navigate event handler for the page.
Listing 13.14. Retrieving the state of the page and restoring it to completes the logical navigation
protected void NavigateHistory(object sender, HistoryEventArgs e)
{
    int index = 0;
    if (e.State.ContainsKey("blogState"))
        index = int.Parse(e.State["blogState"].ToString());

    Blogs.SelectedIndex = index;
    RssDataSource1.Url = Blogs.Items[index].Value;
    Posts.DataBind();
}
When the Navigate event is thrown, that is your opportunity to retrieve the state of the page and restore it. Passed in to the event is a set of arguments of type HistoryEventArgs (declared in the Microsoft.Web.Preview.UI.Controls namespace). The arguments include a State variable that contains the key/value pairs for the state of the page. With this information, you can retrieve the last state of the page and update the UI accordingly.
The logical navigation pattern can also be implemented from the client. You can add entries to the browser history as well as restore the page, all from JavaScript. To demonstrate, consider a page with three buttons. The click of each button updates an element on the page that displays which button was clicked. Listing 13.15 shows the complete solution for how you can manage history from JavaScript.
Listing 13.15. Managing the History control and the Navigate event from JavaScript
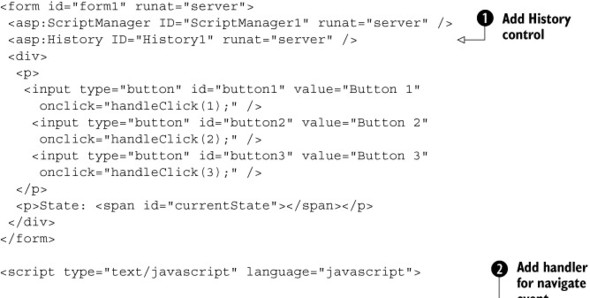
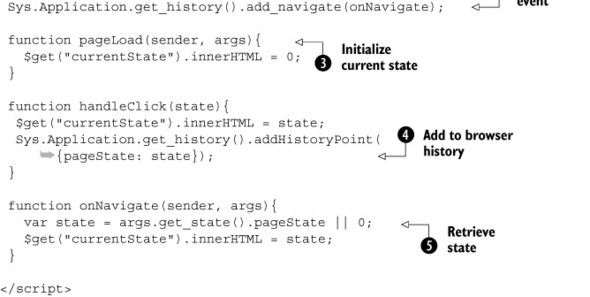
The declaration of the ![]() History control is placed immediately after the ScriptManager. Next, you declare the markup for the buttons and the element
on the page (currentState) that displays the current state.
History control is placed immediately after the ScriptManager. Next, you declare the markup for the buttons and the element
on the page (currentState) that displays the current state.
Now, let’s check out the script. To handle the Navigate event that is raised when the user clicks the Back or Forward button, you need an instance of the client-side History class. You can retrieve this from Sys.Application by calling ![]() get_history. Registering the event is accomplished by calling add_navigate (a global event handler named pageNavigate is also available, just like pageLoad). What follows are the handlers for the events on the page.
get_history. Registering the event is accomplished by calling add_navigate (a global event handler named pageNavigate is also available, just like pageLoad). What follows are the handlers for the events on the page.
First, the ![]() pageLoad function initializes the default state of the page (see chapters 2 and 7 for more about pageLoad and the client-side page lifecycle). By default, the state is 0, signifying that no button has been clicked. When a button is clicked, an instance of the client-side History class is retrieved so you can call the
pageLoad function initializes the default state of the page (see chapters 2 and 7 for more about pageLoad and the client-side page lifecycle). By default, the state is 0, signifying that no button has been clicked. When a button is clicked, an instance of the client-side History class is retrieved so you can call the ![]() addHistoryPoint function and pass in a dictionary object with the current state. Last, in the onNavigate event handler, you retrieve the state arguments
addHistoryPoint function and pass in a dictionary object with the current state. Last, in the onNavigate event handler, you retrieve the state arguments ![]() and restore the page by updating the currentState element.
and restore the page by updating the currentState element.
This sums up how you can manipulate and work with the browser history to fix the Back button. Next, we’ll take a look at unique URLs and how you can add richer bookmark support to your sites.
13.3.2. Unique URLs
The ability to link from one site to another, together with the capacity to bookmark a page and return to it later, are key to the success of the web. Earlier, we demonstrated how appending content to a URL provides a mechanism for retrieving the state of a page. This technique addresses the issue of the Back and Forward buttons in the browser but leaves you short of a solution to bookmark pages that have been updated dynamically. You still need a means of retrieving and sharing the state of a page across browser instances.
The term permalink was first coined to describe how users could bookmark a blog post that would otherwise be difficult to find later. The idea was that the permalink link would represent an unchanged connection to a page or some content that would otherwise be broken or become irrelevant over time—a process also known as link rot. Ajax applications frequently suffer from similar symptoms. For instance, many times, users would like to bookmark a page after investing a significant amount of time adjusting its state and appearance. Unfortunately, what commonly happens is that the bookmark or link they end up adding doesn’t hydrate the same version of the page they wished to capture.
For a permalink-like solution, the History objects on the client and server provide a function that retrieves the state string on the page. Using this formatted state string, you can bookmark and share a link that you can rely on. For server-side code, you can retrieve the link by calling the getStateString method:
Permalink.NavigateUrl = "#" + History1.getStateString();
In JavaScript, you can accomplish this by calling the get_stateString function:
plink.href = "#" + Sys.Application.get_history().get_stateString();
In both instances, the state string is prefixed with the # character so it can be formatted correctly in the browser. The formatted link can then be made available for the user. Listing 13.16 offers a JavaScript solution for providing a unique URL for the page.
Listing 13.16. Retrieving and formatting the state string to get a unique link to a page
function handleClick(state){
     ...
     updatePermalink();
}

function onNavigate(sender, args){
     ...
     updatePermalink();
}


function updatePermalink(){
    var plink = $get("permalink");
    plink.href = "#" +
     Sys.Application.get_history().get_stateString();
    if (plink.href !== "#")
        plink.innerHTML = "Permalink: " + plink.href;
    else
        plink.innerHTML = "Permalink";
}
Although this seems like a trivial task, this minor addition to a web application can greatly improve the user’s experience.
Now, let’s move to another design pattern. In the following sections, we’ll discuss client-side data binding and show you how to perform it using XML Script declarative code and a client control called the ListView.
13.4. Declarative data binding
In a web application, controls are often bound to data. The data coming from a database—or other kinds of data storage—is displayed in the UI of one of the web pages that make up the application. For example, a Label control might be in charge of displaying the description of one of the products contained in a store’s catalog. Similarly, a HyperLink control could be used to redirect the user to the details page for a specific product. In this case, the URL of the HyperLink would contain a reference to the product ID.
The process of displaying data through controls in the page is called data binding. With ASP.NET, data binding typically occurs on the server side, thanks to the many server controls available for this purpose, such as the Repeater, GridView, and DataList. In this section, you’ll perform data binding on the client side using ASP.NET AJAX and a client control contained in the ASP.NET Futures package. This control, ListView, is a templated control similar to the Repeater server control. Through the ListView, you can define a global layout as well as templates for the items to display, and also a template to display in case the data source is empty.
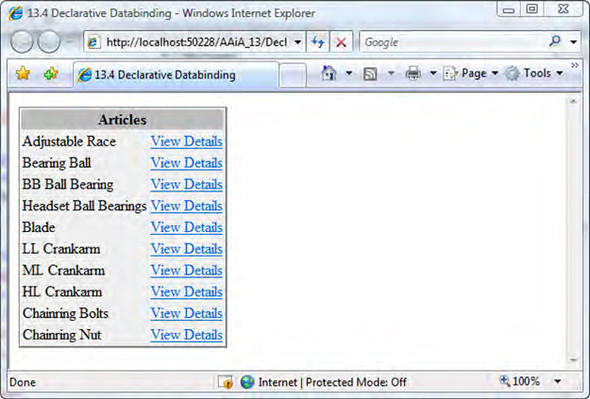
In the following example, you’ll use the ListView control to display a list of products extracted from the AdventureWorks database. (You can download this database for free from the Microsoft website and use it as a test database during the development phase. Appendix A contains instructions on how to set up the AdventureWorks database.) To make things more interesting, you’ll write the client-side logic using XML Script, the client declarative language that we discussed in chapter 11. As usual, you can download the complete code for the example from the book’s website, www.manning.com/gallo. Figure 13.7 shows the example up and running in Internet Explorer.
Figure 13.7. A ListView bound to a list of products using XML Script. The data, stored in the AdventureWorks database, is accessed through a Web Service.
13.4.1. Setting up the Web Service
Because the ListView control operates on the client side, the first thing to do is get the data to bind to the client control. To do that, you’ll create an ASP.NET Web Service that connects to the database and returns a list of Product objects. Each Product instance contains the ID and the description of a product extracted from the AdventureWorks database.
The Web Service is called ProductsService, and you create it in the root directory of an ASP.NET Futures-enabled website. The Web Service class is located in a file called ProductsService.asmx. The Web Service is configured for ASP.NET AJAX, following the procedure explained in chapter 5. The only web method exposed by the Web Service is called GetTopTenProducts. The web method returns the first 10 products extracted from the Product table of the AdventureWorks database. The relevant code for the Web Service is shown in listing 13.17.
Listing 13.17. Code for the ProductsService Web Service
[WebService(Namespace = "http://tempuri.org/")]
[WebServiceBinding(ConformsTo = WsiProfiles.BasicProfile1_1)]
[ScriptService]
public class ProductsService : WebService {

    [WebMethod]
    public Product[] GetTopTenProducts()

    {
        return GetProducts();
    }

    private Product[] GetProducts()
    {
        // ADO.NET code for accessing the AdventureWorks database.
    }
}
The ProductsService class is decorated with the ScriptService attribute. This instructs ASP.NET AJAX to generate a client proxy for calling the web methods from the client side. The GetTopTenProducts method uses a private method called GetProducts to access the database and return an array of Product objects. The code for the GetProducts method has been omitted for simplicity, but it opens an ADO.NET connection to the database and uses a textual query to retrieve the products records. Then, the returned records are used to build instances of the Product class, which is declared as shown in listing 13.18.
Listing 13.18. Code for the Product class
public class Product
{
    private int id;
    private string name;

    public int ID
    {
        get { return id; }
        set { id = value; }
    }

    public string Name
    {
        get { return name; }
        set { name = value; }
    }
}
The Product class exposes two properties: ID and Name. These properties hold the ID and the product name, respectively. Because the GetTopTenProducts web method returns an array of Product instances, the Product type is automatically proxied on the client side by the ASP.NET AJAX engine. As a consequence, Product instances are serialized to JSON and sent to the browser after the web method returns.
The next step is to set up the ASP.NET page that contains the client ListView control. This page contains the code for calling the web method, retrieving the list of products, and binding it to the ListView. Before we show the code, let’s introduce the ListView and its main features and properties.
13.4.2. The ListView control
The ListView is a templated client control for displaying data, similar to the Repeater and DataList controls provided by ASP.NET. The main difference with a server control such as the DataList is that whereas the DataList renders static HTML in the page, the ListView is rendered using dynamic HTML on the client side. The ListView control is defined in the Sys.Preview.UI.Data.ListView class and supports the following templates:
- Item template— Defines the appearance of a data item.
- Layout template— Defines the layout of the data container. For example, the layout template could be a table and the item template could be row of the table.
- Empty template— Contains the HTML to display when no data is available.
The templates are defined in the page using static HTML. Then, the IDs of the templates are passed to the ListView instance. Finally, the ListView control takes care of instantiating the templates to obtain the final layout of the control. Listing 13.19 shows the templates you use in the data-binding example.
Listing 13.19. Templates for the ListView control
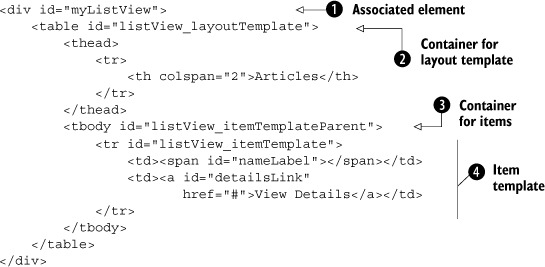
The templates are declared in a ![]() container element, which becomes the associated element of the ListView control. In the container element, the layout template
is declared as a
container element, which becomes the associated element of the ListView control. In the container element, the layout template
is declared as a ![]() table element with the ID listView_layoutTemplate. (The layout template is a portion of HTML that is always displayed on the page, even if there’s no data to bind to the control.)
table element with the ID listView_layoutTemplate. (The layout template is a portion of HTML that is always displayed on the page, even if there’s no data to bind to the control.)
Don’t forget to specify a container element for the item template ![]() . This element is used by the ListView as the container for all the data items. You obtain the HTML for each data item by
cloning the item template. In this case, the item template is represented by a table row
. This element is used by the ListView as the container for all the data items. You obtain the HTML for each data item by
cloning the item template. In this case, the item template is represented by a table row ![]() that contains a span element and an anchor tag. These elements are bound to the ID and the Name properties of each Product object returned by the web method.
that contains a span element and an anchor tag. These elements are bound to the ID and the Name properties of each Product object returned by the web method.
The entire job of instantiating the ListView and wiring it to the templates is straightforward if done using the declarative XML Script language. The declarative code for the example, shown in listing 13.20, should be embedded in an XML Script block in the ASP.NET page.
Listing 13.20. XML Script code for the declarative data-binding example

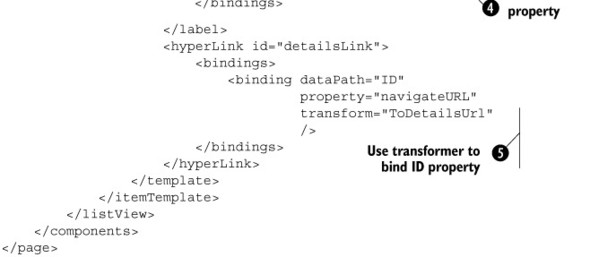
The ListView control is declared in the components node, with the ID myListView. The itemTemplateParentId attribute ![]() is set to the id of the HTML element that will contain the data rows. As we said before, each data row is obtained by cloning the elements
in the item template and adding them in the parent element.
is set to the id of the HTML element that will contain the data rows. As we said before, each data row is obtained by cloning the elements
in the item template and adding them in the parent element.
In the listView tag, you associate the HTML for the templates with the ListView control. You do so with the layoutTemplate, itemTemplate, and emptyTemplate tags. Each tag has a child node called template, with a layoutElement attribute ![]() . Its purpose is to specify the id of the HTML element that acts as the template container. In each template element, you can map the DOM elements to the corresponding
controls
. Its purpose is to specify the id of the HTML element that acts as the template container. In each template element, you can map the DOM elements to the corresponding
controls ![]() , as you do with the nameLabel label and the detailsLink hyperlink.
, as you do with the nameLabel label and the detailsLink hyperlink.
Because you want to bind the controls in the item template, you declare bindings for the label and the hyperlink. When you
bind the ListView control by setting its data property (you’ll do so in a moment), each control in the current data row can access the corresponding data item through
its dataContext property. This is also true for the bindings declared in the code, because they inherit the same data context as the containing
control. In this example, each data item is a Product instance. Therefore, you have to set the dataPath attribute of each binding to a property of the current Product instance. The label’s text is bound to the Name property ![]() and the hyperlink’s URL is bound to the ID property, through a transformer called ToDetailsUrl
and the hyperlink’s URL is bound to the ID property, through a transformer called ToDetailsUrl ![]() . The transformer turns the value of the ID property into a valid URL.
. The transformer turns the value of the ID property into a valid URL.
To complete the example, you have to add a JavaScript code block to the ASP.NET page. This block contains the code for the transformer, together with the other imperative code used in the example, as shown in listing 13.21.
Listing 13.21. Imperative code used in the declarative data-binding example
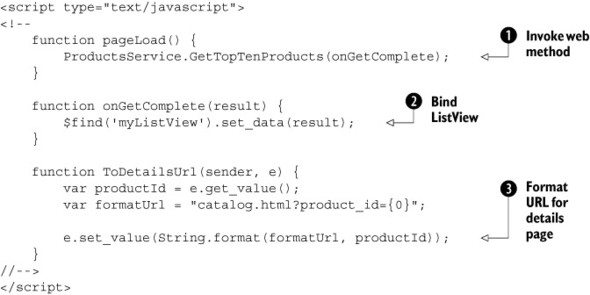
In the pageLoad function, you invoke the web method defined in the ProductsService service ![]() through the client proxy created by ASP.NET AJAX when you configured the Web Service. For simplicity, you pass only one callback,
onGetComplete, which is called as soon as the web method returns.
through the client proxy created by ASP.NET AJAX when you configured the Web Service. For simplicity, you pass only one callback,
onGetComplete, which is called as soon as the web method returns.
In the onGetComplete function, you call the set_data method of the ListView ![]() to pass the array of Product instances returned by the web method. As soon as the data property is set, the ListView generates the data rows and performs the data binding defined in the XML Script code.
to pass the array of Product instances returned by the web method. As soon as the data property is set, the ListView generates the data rows and performs the data binding defined in the XML Script code.
Finally, the ToDetailsUrl function is the transformer used to bind the ID property of each Product item to the navigateURL property of the HyperLink control. The transformer ![]() appends the value of the ID property of the current Product instance to the base URL of the details page for the current product.
appends the value of the ID property of the current Product instance to the base URL of the details page for the current product.
13.5. Declarative widgets
If you’ve ever visited Live.com, PageFlakes.com, or the Google personalized home page (http://www.google.com/ig?hl=en), then chances are great that you’ve encountered draggable items commonly known as widgets. These items are self-contained portions of the interface that the user can customize and drag around the page. Each widget, in turn, can be dragged from its original location and docked into a new area on the screen.
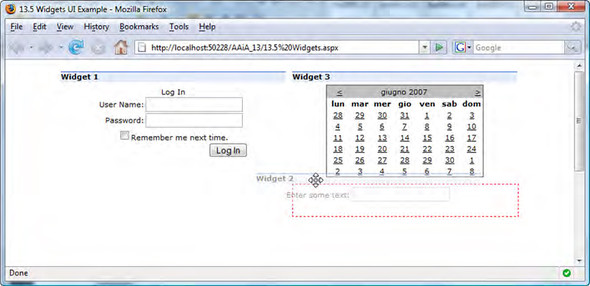
In this example, you’ll leverage two client components shipped with the ASP.NET Futures—DragDropList and DraggableListItem behaviors, to create a similar pattern. To build the example, you’ll take advantage of the XML Script declarative language discussed in chapter 11. Figure 13.8 shows what you’ll put together with these behaviors.
Figure 13.8. Example of widgets with drag-and-drop support, realized using the DragDropList and DraggableListItem behaviors.
Before we explain the steps needed to build the example, let’s do an overview of the DragDropList and DraggableListItem behaviors. These behaviors work together to create a list of draggable DOM elements. The DragDropList behavior lets you turn a DOM element into a container that hosts a group of draggable elements. In the container, you define the draggable elements—the widgets—as portions of static HTML. Then, you associate an instance of the DraggableListItem behavior with each widget to turn it into a draggable item.
To better clarify the concept of a drag-drop list, let’s examine the behaviors and their main features. We’ll discuss components that take advantage of the drag-and-drop engine, so you may want to review the concepts presented in chapter 12 before proceeding.
13.5.1. The drag-drop list
The DragDropList behavior can turn a DOM element—usually a div or a span—into a container of draggable elements. In the container, which is called the drag-drop list, a portion of static HTML can become a draggable item by being associated with a DraggableListItem behavior.
The DragDropList and DraggableListItem behaviors are shipped with the ASP.NET Futures package, which is available for download at the official ASP.NET AJAX website (http://ajax.asp.net). Appendix A provides instructions on how to install the package. The client classes relative to the behaviors are located in the PreviewDragDrop.js file, which is embedded as a web resource in the Microsoft.Web.Preview assembly. Specifically, the DragDropList behavior is defined in the Sys.Preview.UI.DragDropList class. The DraggableListItem behavior is defined in the Sys.Preview.UI.DraggableListItem class.
The following is a list of the main features offered by the DragDropList behavior:
- List items can be dragged outside the list or dropped in it. If the accepted data type is set to HTML, dropping an item in the list causes the automatic rearrangement of the remaining items to accommodate the dropped item (reorder-list functionality).
- The list can be rendered horizontally or vertically.
- You can specify a drag mode (Move or Copy). If you specify Move, the dragged element becomes the current drag visual. If you specify Copy, an alpha-blended clone of the element is used as the drag visual.
- You can declare an HTML template for the drag visual.
- You can declare an HTML template for the drop cue. The drop cue is used to highlight the area where an item can be dropped.
- The list can be data bound.
The Sys.Preview.UI.DragDropList class exposes the following properties:
- acceptedDataTypes— The accepted data types
- data— The data bound to the list
- dataType— The data type associated with the list
- emptyTemplate— The template to display when the list is empty
- dropCueTemplate— The template used to highlight the drop zone
- dropTargetElement— The element associated with the DragDropList
- direction— Specifies whether the list should be rendered horizontally or vertically
- dragMode— The drag mode (either Move or Copy)
To make the DragDropList behavior work, you need to create a block of structured markup. You must declare a portion of static HTML in the proper way. Usually, you start with a container element that becomes the DOM element associated with the DragDropList behavior. In the element, you declare a set of child nodes that become the list items. For example, the following HTML markup is suitable for use with a DragDropList behavior:
<div id="listContainer">
    <span id="listItem1">Item 1</span>
    <span id="listItem2">Item 2</span>
    <span id="listItem3">Item 3</span>
</div>
The div element is the list container and becomes the element associated with the DragDropList behavior. Each span element represents a list item and can have child elements. To create the drag-drop list, the container element is associated with the DragDropList behavior, and each item element must be associated with an instance of the DraggableListItem behavior.
The Sys.Preview.UI.DraggableListItem class works in conjunction with the DragDropList behavior to provide a list with drag-and-drop capabilities. The DraggableListItem class exposes the following properties:
- data— The data bound to the current item
- handle— The ID of the HTML element that acts as the handle for the draggable item
- dragVisualTemplate— A template to display while the item is being dragged
To become more confident with the DragDropList and the DraggableListItem behaviors, you’ll now learn how to implement the scenario illustrated in the introduction to section 13.5 using the XML Script declarative code. We covered the XML Script declarative language in great detail in chapter 11.
13.5.2. Widgets and XML Script
Finally, it’s time to put together the declarative widgets example. Let’s start by configuring the ASP.NET page that will host the widgets. Because you’ll use the DragDropList and DraggableListItem behaviors, you need to work in an ASP.NET Futures enabled website. Instructions on how to set up such a website can be found in appendix A. Then, you need to load some script files using the ScriptManager control that you’ll declare in a new ASP.NET page. You’ll write the client code using the XML Script declarative language, so you need to enable it in the page together with the drag-and-drop components. The ScriptManager control looks like this:
<asp:ScriptManager ID="scriptManager" runat="server">
    <Scripts>
        <asp:ScriptReference Assembly="Microsoft.Web.Preview"
               Name="PreviewScript.js" />
        <asp:ScriptReference Assembly="Microsoft.Web.Preview"
               Name="PreviewDragDrop.js" />
    </Scripts>
</asp:ScriptManager>
After the ScriptManager control, you have to define the static HTML that will become the drag-drop list. To obtain the kind of layout shown in figure 13.8, you style two div elements as the two columns that host the draggable widgets. This is done in a CSS file referenced in the ASP.NET page, which isn’t included in the following listings. (You can access and run the complete source code for this example after downloading it from www.manning.com/gallo.) Listing 13.22 shows the static HTML to add to the ASP.NET page.
Listing 13.22. Static HTML for the declarative widgets example
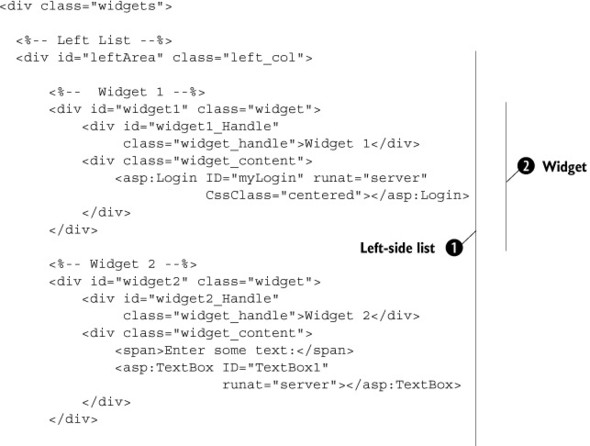

The static HTML includes two div elements, both containing two widgets. The outer div elements ![]() act as drop zones for the widgets and will be associated with instances of the DragDropList behavior. The div elements that act as the widgets
act as drop zones for the widgets and will be associated with instances of the DragDropList behavior. The div elements that act as the widgets ![]() will become items of the containing list and will be associated with instances of the DraggableListItem behavior.
will become items of the containing list and will be associated with instances of the DraggableListItem behavior.
At the bottom of the markup code, you define templates used by the DragDropList behavior. The drop-cue template ![]() highlights a valid drop zone for the widget being dragged. The empty template
highlights a valid drop zone for the widget being dragged. The empty template ![]() displays some text when a list doesn’t contain any items. Because the templates are used by the DragDropList, you don’t need to show them in the page; you just need to declare the HTML and wire it to a DragDropList instance. For this reason, templates are hidden by the templates CSS class, which sets the display mode of the child elements to false.
displays some text when a list doesn’t contain any items. Because the templates are used by the DragDropList, you don’t need to show them in the page; you just need to declare the HTML and wire it to a DragDropList instance. For this reason, templates are hidden by the templates CSS class, which sets the display mode of the child elements to false.
To turn the static HTML into dynamic HTML, you write some XML Script code in the page. The HTML Script code contains the declarative markup that wires the DOM elements to instances of the DragDropList and DraggableListItem behaviors. The entire XML Script block to embed in the ASP.NET page is shown in listing 13.23.
Listing 13.23. Declarative XML Script code for the widgets example

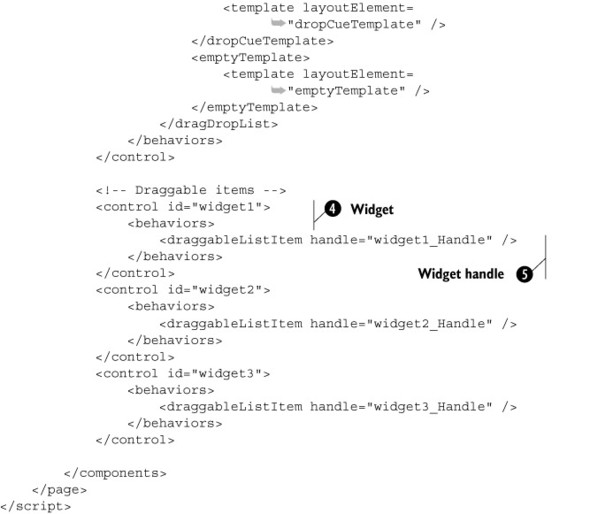
The approach followed in the code is to encapsulate the relevant DOM elements into generic client controls. You do so by declaring
a control tag with the id attribute set to the ID of the associated DOM element. In the XML Script code, you create controls for the two drag-drop
lists ![]() and the widgets
and the widgets ![]() . Because the two drag-drop lists are declared in a similar manner, let’s focus on the one that occupies the left portion
of the page area.
. Because the two drag-drop lists are declared in a similar manner, let’s focus on the one that occupies the left portion
of the page area.
Each DragDropList behavior is added as a behavior of the corresponding control. You do this by adding a dragDropList element in the behaviors element of the control. As a consequence, the control associated with the container div of the left list has a DragDropList behavior whose attributes are set as follows:
- The dragDataType attribute must be set to HTML to make the list automatically rearrange its items when a widget is dropped over the list’s area.
- The acceptedDataType attribute lets you specify a comma-separated list of accepted data types. Each data type is a string enclosed in single quotes. The dragDataType is set to HTML, so the acceptedDataTypes attribute contains at least the HTML data type.
- The dragMode attribute is set to Move. Copy mode has no effect on the DragDropList behavior.
- The direction attribute is set to Vertical to specify that the list has a vertical orientation.
The dropCueTemplate ![]() and emptyTemplate
and emptyTemplate ![]() tags wire the HTML for the templates to the DragDropList instance. This is done by specifying the ID of the DOM element that contains the HTML for the template in the id attribute of the template tag.
tags wire the HTML for the templates to the DragDropList instance. This is done by specifying the ID of the DOM element that contains the HTML for the template in the id attribute of the template tag.
Widgets ![]() are declared as generic client controls with an associated DraggableListItem instance. Each widget has a handle
are declared as generic client controls with an associated DraggableListItem instance. Each widget has a handle ![]() that is used to drag it around the page. The handle is represented by a div element rendered at the top of the widget, as shown in figure 13.8. To specify that this element is the widget’s handle, you set the handle attribute of the draggableListItem element to the ID of the handle element. All the remaining widgets have similar declarations.
that is used to drag it around the page. The handle is represented by a div element rendered at the top of the widget, as shown in figure 13.8. To specify that this element is the widget’s handle, you set the handle attribute of the draggableListItem element to the ID of the handle element. All the remaining widgets have similar declarations.
Note that you don’t have to wire the widgets to the drag-drop list in the XML Script code. The list items are considered child elements of the DOM element associated with the drag-drop list, as specified in the static structured HTML.
13.6. Summary
In the final chapter of this book, you have used the ASP.NET AJAX framework to implement some of the many Ajax patterns available. A large portion of the chapter has been dedicated to coding and development patterns. Due to the role of JavaScript as the main client development language for Ajax applications, we showed how to implement some patterns that make JavaScript files shorter and easier to debug. We provided patterns on how to provide informative stack traces, comment the JavaScript files (in order to also take advantage of the IntelliSense tool in Visual Studio Orcas) and performing parameters validation in the debug version of a script file.
Since in JavaScript size matters, we provided two helper methods for creating client properties and events using a single statement. These helpers, which extend the Microsoft Ajax Library itself, allow writing less client code and saving a lot of keystrokes, while decreasing the size of JavaScript files sent to the browser.
Then, we moved to examine the implementations of some design patterns. We started with logical navigation and unique URLs. Logical navigation fixes the “broken Back button” problem by allowing access to different views of the same page. Unique URLs is a pattern that allows bookmarking the state of a page, to realize a sort of permalink-like solution.
The last two patterns are related to drag and drop widgets (ala PageFlakes) and data binding. To implement these patterns, we used some of the features available in the ASP.NET Futures package, such as the declarative XML Script language and the drag and drop engine. For performing data binding on the client side, we took advantage of the client ListView control to display a list of products from the AdventureWorks database.
