
Chapter 3. Setting up the Mule and ServiceMix environments
- Using Spring, JiBX, and ActiveMQ
- Setting up the development environment
- Example implementation with Mule
- Example implementation with ServiceMix
When you work with open source ESBs, you can use other tools and frameworks to help you solve common problems. In this chapter we introduce three tools: Spring, which we use as a component container; JiBX, to help in transforming XML to Java and back again; and Apache ActiveMQ, which we use as our JMS broker to provide reliable messaging.
We also explain how to set up the development environment we’ll be working with. We provide you with an easy-to-use environment to test the examples in this book.
Finally, we show you some examples that illustrate how the technologies described in this chapter are used. You can find all this chapter’s examples in the source code at the book’s website.
When you’re working through this chapter, you’ll have a complete environment that you can use both for our examples and for your own projects. You’ll also gain a basic understanding of the tools that we use to solve some common integration problems and how they’re used with the open source ESBs Mule and ServiceMix.
3.1. Three technologies enhancing the ESB functionality
For our examples we use technologies (see table 3.1) that will make our work easier and allow for more reuse.
Table 3.1. The technologies we use to enhance the ESB functionality
|
Name |
Description |
|---|---|
| Spring | Spring is a component framework that makes it easy to work with Plain Old Java Objects (POJOs). We use this framework to create and configure our custom components. Spring is also integrated out of the box in both ServiceMix and Mule 2, so having a basic understanding of this technology is useful. |
| JiBX | JiBX is an XML-to-Java mapping framework that we use to transform the message format (XML) to an object that we can use in our POJOs. JiBX is able to transform Java objects back to XML. |
| Apache ActiveMQ (JMS broker) | An important part of an ESB is a message broker. A message broker provides functionality such as asynchronous message exchange and reliable messaging. In this book we use Apache ActiveMQ as a JMS broker implementation. |
We have chosen these three technologies because they extend the basic functionality of the ESBs Mule and ServiceMix and make solving integration problems easy by providing some additional functionality.
Some of you might already know how to use these technologies. The reason we introduce them here is to make sure everyone is on the same page and feels confident with these tools. Of these three tools, the first one we look at is Spring.
3.1.1. Using Spring as an object container
Spring is a component framework that lets you manage all your components. Spring was introduced in 2002 with Rod Johnson’s Expert One-on-One J2EE Design and Development (Wrox, 2002). In this book Johnson described a framework that could be used to make lightweight Java applications. The general response to this framework was so overwhelming that Johnson decided to make it open source, and this became the first version of the Spring framework. Nowadays, Spring is used by many tools and other frameworks, including ServiceMix and Mule, which use Spring for their configuration. The Spring framework has evolved from a dependency injection framework to a mature Java application framework that includes, among others, Model-View-Controller (MVC), Data Access Object (DAO), security, and web services modules.
There are many good books on Spring, and there is also a lot of great information to be found online. So if you want to know more about Spring, check out the Spring-Source website at www.springframework.org. Spring in Action, Second Edition (Manning, 2007), by Craig Walls with Ryan Breidenbach, serves as a great guideline for working with Spring.
What is Spring and how does it work?
We introduce you to the most important aspects of the Spring framework and explain how we use it in this book’s examples. The goals of Spring are to
- Simplify J2EE development— J2EE development is complex. You have to know a lot of different standards before you can start developing. Those of you who have worked with J2EE already know that it’s difficult to work with J2EE’s component model. Spring aims to make J2EE simpler, without sacrificing any of its power. So you will still have access to transactions, persistency, and messaging, but the development effort is much less. Remember that when Spring was started, J2EE wasn’t as easy as it is now. When you needed to write an EJB in those days, you had to write a whole lot of boilerplate code and XML deployment descriptors to expose a simple bean as an EJB.
- Facilitate best practices— Besides simplifying J2EE development, Spring makes it easy to follow best practices. It provides a clean separation between your business logic and the enterprise services such as persistency, transactions, and security (which Spring applies using aspect-oriented programming (AOP) techniques (for more information, see AspectJ in Action[Manning 2003]).
- Provide a simple POJO-based programming model— The last goal of Spring, and the one that we come back to in this book’s examples, is the programming model. Spring’s programming model is based on POJOs. This means we don’t need to write session beans following the rules set out by the J2EE specification or implement all kinds of lifecycle interfaces—we can just create a simple, testable POJO and use Spring to glue everything together.
The previous goals can easily be summarized with a well-known quote from Alan Kay (an American computer scientist known for his early pioneering work on object-oriented programming and windowing graphical user interface design):
Simple things should be simple and complex things should be possible.
Wikiquote
The POJO-based programming model that Spring uses is one of the most important concepts you should take away from this section. In other words, your applications can be completely coded by just using POJOs. When you’re working with Spring, you don’t need to worry about implementing specific interfaces or having to conform to a strict programming model (like, for instance, EJB 2x). You are able to create your business logic with basic Java classes.
This doesn’t mean that you can’t work together with these models. Spring has a number of utilities, templates, and more that can be used together with your POJOs to create advanced configurations, and thus allow you to apply enterprise services, such as transaction and security, to your POJOs. All this, however, is done nonintrusively, without tying your business logic to a certain technology. For instance, if you look back at the Mule architecture you’ll see something similar. The Mule components, where we locate our integration logic, are just simple POJOs, without a dependency to Mule.
Spring implements the inversion of control (IoC) and dependency injection (DI) paradigms to provide the flexibility we just described. Since this book isn’t about design patterns, we don’t spend too much time on these concepts, but we just give you a quick overview. Let’s first look at IoC. The analogy people most often make when talking about IoC is called the Hollywood principle: “Don’t call me, I’ll call you.” What this means is that you don’t call the framework code, but the framework will call certain methods on your components. This isn’t something new; for instance, when you look at the Servlet interface you can see that you must implement the init and destroy methods. These methods are called from the Servlet container on startup and shutdown of your servlet. This concept is also used in Spring to specify which methods to call on construction and destruction of your POJO.
DI is another important concept. This term, coined by Martin Fowler (http://mar-tinfowler.com/articles/injection.html), describes a pattern for performing wiring between beans. This means that any dependencies your POJO might have are injected into your component, instead of you having to retrieve them. In J2EE (at least until Java EE 5) when you required a resource (e.g., a data source or another bean) you had to use the JNDI API to pull that resource in. With DI you don’t have to do that anymore—your container will make sure you have the dependency pushed into your POJO by using getters and setters. In the new Java EE 5 specs, many of the same concepts are used.
Enough theory; let’s now look at how Spring is used as a component framework. Then we describe how you can use Spring in combination with Mule and ServiceMix.
Using Spring
In this section, we show how to use Spring to create a POJO-based application. First let’s look at a couple of simple beans; the first one is shown in listing 3.1, which contains a simple service implementation.
Listing 3.1. CustomerServiceImpl bean that will be configured with Spring

CustomerServiceImpl is a good example of a service bean implementation that we typically use with Spring. This service has two references: first
to the CustomerDAO
![]() , which we discuss in listing 3.2, and a second reference to a String property value
, which we discuss in listing 3.2, and a second reference to a String property value
![]() . In listing 3.3 you’ll learn how these references are injected into this class.
. In listing 3.3 you’ll learn how these references are injected into this class.
In listing 3.2 you can see the CustomerDAO implementation, which is used in the CustomerServiceImpl service bean.
Listing 3.2. CustomerDAO that will be injected into the CustomerBean
public class CustomerDAOImpl implements CustomerDAO {

  private String name;
  private String address;
  private String clientnumber;

  public void save() {
  // persist logic
  }

  // getters and setters not shown
}
Listing 3.2 contains an implementation of the CustomerDAO interface. This is not a real-life example of a Data Access Object (DAO), but is just used to demonstrate Spring’s functionality. The CustomerDAOImpl implementation defines a number of class attributes and a save method to persist a customer.
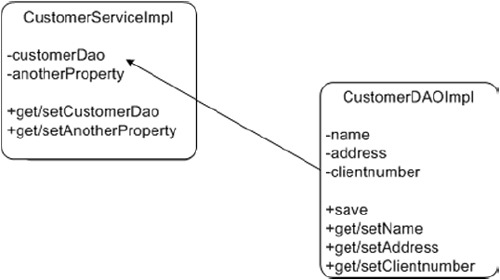
We configure Spring in such a way that this second bean will be injected in CustomerServiceImpl, as shown in figure 3.1.
Figure 3.1. A schematic overview of a customer service bean and a customer DAO class implementation. The customer DAO class is injected into the customerDAO property of the customer service bean.
Now we have implemented two Java classes: a service bean and a DAO class. At this point we can use Spring to inject the property values and a bean reference. To implement the DI functionality, we must define a Spring configuration file (see listing 3.3).
Listing 3.3. Spring dependency injection example

In listing 3.3 we configure two Spring beans: a customer bean
![]() , which is the implementation of the CustomerServiceImpl class, and a customerDAO
, which is the implementation of the CustomerServiceImpl class, and a customerDAO
![]() , which points to the CustomerDAOImpl. The customer bean defines two properties; one property points to the customerDAO bean
, which points to the CustomerDAOImpl. The customer bean defines two properties; one property points to the customerDAO bean
![]() and the other is a simple String property. These two properties will map to the setters we define in our implementations.
The customerDAO property maps to the setCustomerDAO method, and the anotherProperty property maps to the setAnotherProperty method.
and the other is a simple String property. These two properties will map to the setters we define in our implementations.
The customerDAO property maps to the setCustomerDAO method, and the anotherProperty property maps to the setAnotherProperty method.
When the customer bean is retrieved (we show you how later), Spring will make sure that an instance of the customerDAO is injected and that the other properties
![]() are set as well. So we as component developers don’t need to worry about retrieving all kinds of dependencies using factories,
singletons, and so forth; we just configure how everything is tied together and let Spring inject the dependencies.
are set as well. So we as component developers don’t need to worry about retrieving all kinds of dependencies using factories,
singletons, and so forth; we just configure how everything is tied together and let Spring inject the dependencies.
Using Spring with Mule and ServiceMix
If you need to create extensions for Mule or ServiceMix (such as custom components or transformers), you can easily do so using standard POJOs and then define and configure those components with Spring, as you’ve seen in the previous samples.
Let’s first look at how you can use Spring together with Mule. As we’ve already mentioned, everything configured in Mule 2 is configured in Spring. So whenever you configure Mule you’re actually already using Spring. Let’s start by looking at listing 3.4, which shows how you can create a Mule service that specifies a component directly by using a class name.
Listing 3.4. Using Spring together with Mule: an example service
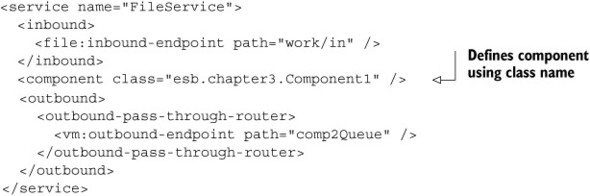
This service in itself is already defined using Spring. You’ll probably notice that this configuration looks very different from the beans we defined earlier. The reason for this is that with Spring 2, you can easily define your own custom XML configuration. We don’t go into the details, but it’s enough to know that even though it doesn’t look like Spring, under the covers Spring is still used.
If we want to use our own Spring beans from this configuration, instead of using the <component> tag with a class attribute, we first need to make our Spring beans available to Mule. To do this, we simply add them to this file or import them from an external file (which is a nice way to keep your configuration files organized). To import them from an external configuration file, use the following statement:
<spring:beans>
  <spring:import resource="components.xml"/>
</spring:beans>
This will import the Spring beans you’ve defined in that file into the context of Mule. Note that if we copied all the Spring bean definitions from that file to the Mule configuration, the result would be the same. You can now reference those beans directly from Mule by using the <spring-object> child element of the <component> element, as shown in listing 3.5.
Listing 3.5. Mule component referencing a Spring bean
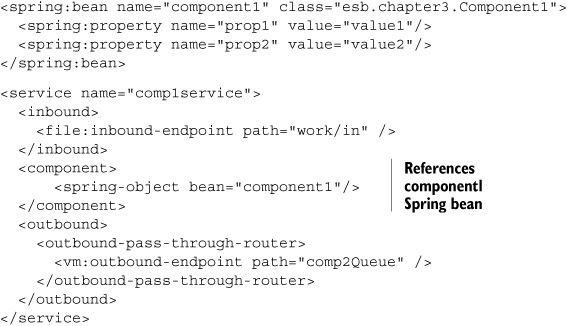
You will see this way of configuring components for Mule used throughout the examples in this book. Now that we’ve shown you how Spring is used and can be referenced from Mule, let’s see how to use Spring beans from ServiceMix.
You’ll recall from chapter 2 that in ServiceMix you’ve got a number of components to which you can deploy artifacts (in the form of service units). Those artifacts will then run inside the service engine or binding component. One of the JBI components to which you can deploy service units is the servicemix-bean service engine. This JBI component provides functionality to directly run POJOs using Spring, inside ServiceMix, without having to create components following the complete JBI spec. This is a simple way to add custom integration functionality.
Although the container is called a bean container and we talk about POJOs here, we do have to implement a specific interface when we want to deploy a Java class to the servicemix-bean service engine. As you might remember from chapter 2, in JBI we work with message exchanges. A JBI component doesn’t just receive the message content; it receives additional information about the message exchange. So if we want to create a simple component using Spring, we have to tell the JBI container how our JBI component can receive these message exchanges. We’ve got two options for this. We can either annotate a specific method with the @operation annotation, or we have to implement the MessageExchangeListener interface. In upcoming chapters we show you how to do this.
Besides the bean component, there is another way of using POJOs in ServiceMix. In chapter 6 we show you how you can use the JSR181 service engine to expose POJOs in ServiceMix to be consumed by other services. However, with the servicemix-bean service engine, you have easy access to the JBI context, which in the JSR181 service engine is more difficult. So it’s easier to use the JSR181 service engine when you already have functionality that doesn’t need to know anything about JBI, and it’s easier to use the servicemix-bean component when you require access to the JBI environment.
To use the servicemix-bean service engine, let’s configure a specific ServiceMix configuration, the xbean.xml (see listing 3.6).
Listing 3.6. ServiceMix configuration that references a POJO bean defined in Spring

The one thing to notice in listing 3.6 is the bean attribute
![]() ,
,
![]() . The bean attribute points to the #listenerbean Spring bean. You can also see that the bean endpoint that we defined here also defines service and endpoint names. The combination of the service and endpoint names uniquely
identifies this bean in the JBI container.
. The bean attribute points to the #listenerbean Spring bean. You can also see that the bean endpoint that we defined here also defines service and endpoint names. The combination of the service and endpoint names uniquely
identifies this bean in the JBI container.
We can also define the Spring bean in an external file to keep the servicemix-bean and the Spring bean configuration separated. To use this external file, we have to import it, just as we did for Mule. You can do this by adding the following to the XML configuration in listing 3.6:
<import resource="components.xml"/>
This will import the beans you’ve defined into the ServiceMix context. The components.xml file can be implemented with this code:
<?xml version="1.0" encoding="UTF-8"?>
<beans xmlns="http://www.springframework.org/schema/beans">
     <bean id="listenerBean" class="esb.chapter3.ListenerBean"/>
</beans>
And that’s all there is to it. We’ve now shown how Spring can be used with Mule and ServiceMix. As you can see, both Mule and ServiceMix make working with Spring very easy, since both already use a Spring-based configuration. What you’ve seen here so far is only the most basic usage of Spring in Mule and ServiceMix. In upcoming chapters you’ll see more complex examples.
Now that you know the basics of Spring and we’ve explored integrating Spring with Mule and ServiceMix, it’s time to move on to JiBX.
We’ve only covered the basics of Spring in this section. Spring has grown from an IoC object container to a large framework that covers areas such as web services, front-end development, batch processing, and more. One of the newer Spring projects, which is closely related to Mule and ServiceMix, is called Spring Integration. With Spring Integration you get the basic building blocks, such as channels, queues, routers, and adapters, which you can easily use in your own applications. Spring Integration provides an easy way to connect message-driven environments to your own POJOs without you having to worry about the infrastructure, events, JMS, and other concerns. In other words, it provides an abstraction layer between your application and the messaging middleware.
Configuring Spring Integration is done in much the same way as configuring Mule and ServiceMix. It has its own XML configuration language that defines, for example, incoming channels and adapters and connects them to your POJOs. So if you understand the basic ideas behind Mule and ServiceMix, working with Spring Integration won’t be too difficult. To see an example of how to use Spring Integration, see the end of chapter 4.
3.1.2. XML marshaling with JiBX
When you’re working with integration tools, you’re often working with XML. XML provides a standard format for exchanging information between systems. However, working with XML directly from Java is a bit cumbersome. In our integration logic, we want to work with standard Java objects, but we still need a generic format that can be sent between the various components. Many open source libraries are available that allow you to easily transform a Java object to XML and back again, such as Java Architecture for XML Binding (JAXB) and Service Data Objects (SDOs).
For this book we chose JiBX, an open source framework. Using JiBX you can create a mapping definition that provides the necessary functionality to map from XML messages to your existing Java objects and back again. The main reason why we chose this framework is its flexibility. You can easily reuse your existing Java classes and have full control of how the Java classes are mapped to XML, and vice versa.
Using JiBX together with Mule and ServiceMix will allow us to keep using Java objects inside our Java code instead of having to work with XML. In this section, we show you how JiBX works, and also how you can integrate JiBX into Mule and ServiceMix to provide easy mapping from and to XML.
Defining JiBX mapping configurations
To get JiBX to work, you need to create a mapping definition. This definition tells JiBX how an XML message is mapped to a Java object. In this definition file, you specify the name of the element in the XML message and then specify the name of the field in the Java object it needs to be mapped to. Let’s map the following XML message:
<person>
   <firstname>John</firstname>
   <lastname>Doe</lastname>
   <city>Amsterdam</city>
   <country>The Netherlands</country>
</person>
Of course, this is a simple XML message, but it’s a good one to start with. This XML message has a Java class equivalent:
public class Person {

   private String firstName;
   private String lastName;
   private String city;
   private String country;

   // getters and setters
}
To map the person XML message to the Person Java class and back again, we need to create a JiBX mapping file (see listing 3.7).
Listing 3.7. JiBX mapping file of the person XML message to a Person Java class
In the JiBX mapping file you define the root element name of the XML message (person in this case) and the Java class we want to map it to
![]() . Notice that there is a binding root element
. Notice that there is a binding root element
![]() , which is used by JiBX to represent the start of the mapping definitions. The next part involves defining the mapping between
the message child elements and the properties of the Java class
, which is used by JiBX to represent the start of the mapping definitions. The next part involves defining the mapping between
the message child elements and the properties of the Java class
![]() . We do this by specifying the name of the XML element (e.g., firstname), and then in the field property we can specify the corresponding Java property (e.g., firstName). Figure 3.2 shows the mapping of a value from an XML file to a property in a Java object.
. We do this by specifying the name of the XML element (e.g., firstname), and then in the field property we can specify the corresponding Java property (e.g., firstName). Figure 3.2 shows the mapping of a value from an XML file to a property in a Java object.
Figure 3.2. An example of how JiBX maps the elements of an XML message to a Java object
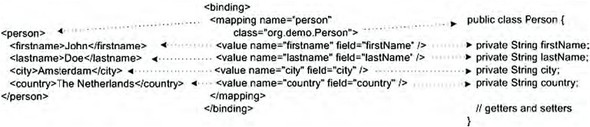
The example shown in figure 3.2 is the most basic JiBX mapping. We show you a couple more binding options that will allow you to map most Java objects to XML, and vice versa. Let’s start once again by showing you the XML message that we want to map in the following code snippet:
<person>
   <firstname>John</firstname>
   <lastname>Doe</lastname>
   <address>
     <city>Amsterdam</city>
     <country>The Netherlands</country>
   </address>
</person>
The corresponding Java object is shown in this code snippet:
public class Person {
   private String firstName;
   private String lastName;
   private Address address;
}

public class Address {
   private String city;
   private String country
}
As you can see, we can’t map the XML message to a single Java object. Part of the XML message, the address elements, has to be mapped to a separate Java class. We can do this by introducing a structure element, as listing 3.8 shows.
Listing 3.8. JiBX mapping example with a structure definition

In listing 3.8 we define a structure that maps the address element to the Java property in the Person class with the same name
![]() . We also specify that the structure element be mapped to the Java class Address. This way, we can easily map an element in an XML message to a Java class other than the root element (in this example, the
Person class). Inside the structure element, the same mappings we showed earlier are configured to map the address XML elements to the properties in the Address Java class, such as the country element
. We also specify that the structure element be mapped to the Java class Address. This way, we can easily map an element in an XML message to a Java class other than the root element (in this example, the
Person class). Inside the structure element, the same mappings we showed earlier are configured to map the address XML elements to the properties in the Address Java class, such as the country element
![]() .
.
Figure 3.3 illustrates how the previous mapping file maps the structure to the Java object.
Figure 3.3. An example that shows how JiBX maps a structure element to a Java class

Now that you understand the structure definition of JiBX, you should be able to map complex XML messages to corresponding Java objects. However, we haven’t discussed the use of namespaces yet.
XML namespaces are used to uniquely identify a certain XML element, and you’ll see these in most real-world XML usage. If you want to map an XML message that uses namespaces, you must configure these namespaces in the JiBX binding file. For our example, we use the same Java objects as we did in the previous example. But this time, we change the XML to use a namespace definition:
<ps:person xmlns:ps="http://demo/persons"
        xmlns:ad="http://demo/address">
   <ps:firstname>Jos</ps:firstname>
   <ps:lastname>Dirksen</ps:lastname>
   <ad:address>
     <ad:city>Eindhoven</ad:city>
     <ad:country>The Netherlands</ad:country>
   </ad:address>
</ps:person>
We add two namespaces to the person XML message: one for the person-specific elements, which uses the “ps” prefix, and one for the address-specific elements, which uses the “ad” prefix. We need to make some small changes to the binding file to support this (see listing 3.9).
Listing 3.9. An example of a JiBX binding file with namespaces
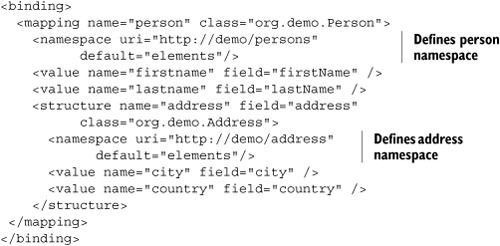
With the changes we made to the binding file compared to the one in listing 3.8, JiBX is now configured to look for the person element and its child elements, in the http://demo/persons namespace, and the address elements and its child elements should be in the http://demo/address namespace.
Using JiBX to transform XML messages into Java
In the previous section you learned how to configure the mappings between Java objects and XML messages with JiBX, but we haven’t shown you how to use these mappings. First you need to run the binding compiler, which will use the binding definition and compile it into your class files. In other words, your class files will be enriched with the information required to marshal XML objects to Java and back again.
Running this binding compiler isn’t difficult. You have two options. The first is to run the binding compiler directly:
java -jar jibx-bind.jar yourbinding.xml
Remember that if you choose this approach you have to ensure that all the classes you’re binding to (and superclasses as well) are on the classpath.
The second option is the one we use in this book. You can use an Ant task to run the binding compiler directly from your build file. To be able to run the binding compiler within an Ant build file, first create a new Ant task definition:
<!-- JiBX binding compiler task definition -->
<taskdef name="bind" classname="org.jibx.binding.ant.CompileTask"
    classpath="${jibx-lib}/jibx-bind.jar"/>
The JiBX task definition tells Ant which JiBX class should be executed to run the binding compiler and configures the classpath. With the JiBX task definition in place, we can define a bind configuration within an Ant target:
<!-- Run JiBX binding compiler -->
<bind verbose="true" load="true" binding="binding.xml">
  <classpath>
    <pathelement path="classes"/>
    <pathelement location="${jibx-lib}/jibx-run.jar"/>
  </classpath>
</bind>
Once you’ve run the binding compiler, you’re ready to use the bindings from your application. The binding compiler processes the binding file and creates Java classes to execute the XML marshaling at runtime.
When we use JiBX in the examples in this book, you don’t have to worry too much about running the JiBX binding compiler. The build files used to run and compile the examples in this book already use the previously shown JiBX Ant tasks.
Using JiBX from your application code is easy. Let’s first see how to use JiBX to marshal a Java object to an XML file:
StringWriter outWriter = new StringWriter();
IMarshallingContext ctx = BindingDirectory.getFactory(Person.class)
    .createMarshallingContext();
ctx.marshalDocument(person, "UTF-8", null, outWriter);
You first need to get an IMarshallingContext. With this context you can use the marshalDocument method on your object instance to write the XML output to a Writer implementation—for example, a StringWriter.
When you want to go from XML to Java, you must use similar steps. But instead of using an IMarshallingContext, you should use an IUnmarshallingContext, as you can see in the following code snippet:
IUnmarshallingContext ctx = BindingDirectory.getFactory(Person.class)
    .createUnmarshallingContext();
Object obj = ctx.unmarshalDocument(new StringReader(data));
You’ve now seen how to configure binding files for JiBX, how to run the binding compiler, and how to invoke the JiBX bindings from Java. So if you want to use JiBX from your application code, you can use the code snippets we showed you to do so. In the next section, you’ll learn how to use JiBX together with ServiceMix and Mule.
Using JiBX with Mule and Servicemix
JiBX is used in this book whenever a transformation is required from XML to Java or the other way around. In most examples, we send the data as XML between the various components. ServiceMix requires this, and it’s generally considered good practice. Mule doesn’t have any special requirements for the data sent between components; with Mule, you can just as easily send serialized Java objects between components.
It’s often a good practice to define a common format for the messages that are exchanged between the various components and services. This format is called a canonical data format. You might wonder why this is useful; why not simply apply a transformation between the formats and be done with it? Well, that approach works when you don’t have to integrate multiple applications. If you have two or three applications to integrate, it’s often not that hard to keep track of the different data format requirements of these applications. However, when the number of applications increases you have to write more and more transformations to keep all the applications talking to one another. If you add a new application and you use the canonical data format, you only need to write one transformation—the one from the canonical data format to the new application—instead of writing new transformations for all the applications that are already connected.
Note, though, that when using ServiceMix you don’t automatically have a canonical data format. What you’ve got is a normalized message, which describes what the data that is sent over the line looks like—XML in the case of ServiceMix. A canonical data format goes one step further. It defines not only the type of the message, but also the format (and in the optimal case, the semantics as well). So if, say, we want to use a canonical data format, we also have to specify an XML Schema that exactly describes the XML format of the messages that we’re sending over the line. As an example, consider the Universal Business Language (UBL) standard. This standard defines a number of XML Schemas and messages that you can use when you’re working with orders, receipts, and invoices. You could choose to use UBL as the canonical data format you’re using for your integration solution.
When there is already existing business logic implemented or when new business logic has to be included, you usually don’t want to work with XML messages directly. From a developer perspective, it’s much simpler to develop against Java objects. So we need an easy mechanism to transform the Java objects to XML messages, and vice versa.
Mule provides an easy access point for this with the transformer concept. Listing 3.10 shows an example of implementing a Java object–to-XML transformation step in Mule.
Listing 3.10. Implementation of the ObjectToXML transformer for Mule

In listing 3.10, we implement a transformer for Mule based on JiBX. In the previous examples we’ve shown how you can use JiBX to marshal
an object to XML. We can use this functionality without any change in a Mule transformer
![]() . When this transformer receives the message payload
. When this transformer receives the message payload
![]() , it checks the class of the object and retrieves the specific marshaling context for that class
, it checks the class of the object and retrieves the specific marshaling context for that class
![]() . Then the JiBX context marshals the Java object contents to an XML String representation.
. Then the JiBX context marshals the Java object contents to an XML String representation.
Of course, we also must be able to create a Java object from an XML message when we receive a message in a service bean. The Mule transformer implementation for the XML to Java marshaling is shown in listing 3.11.
Listing 3.11. Implementation of the XMLToObject transformer for Mule

The XMLToObject Mule transformer receives an XML String as input and transforms it into a Java object
![]() . To be able to create the JiBX unmarshaling context
. To be able to create the JiBX unmarshaling context
![]() , we need to specify the class of the Java object we want to transform to
, we need to specify the class of the Java object we want to transform to
![]() . This only works for objects for which we’ve created a mapping file and for which we’ve run the binding compiler.
. This only works for objects for which we’ve created a mapping file and for which we’ve run the binding compiler.
Now that you’ve seen how to implement a Mule transformer based on JiBX to transform Java to XML and back again, let’s implement a similar transformer for ServiceMix.
For ServiceMix we need to provide a helper class to implement the transformations. ServiceMix itself is JBI based, so all the data that’s sent between the components needs to be in line with the JBI specification—which means it has to be XML. So when we create our custom components for ServiceMix, we can use a helper class that handles the transformation for us. Let’s look at the servicemix-bean implementation that uses JiBX to marshal and unmarshal the XML messages (listing 3.12).
Listing 3.12. The servicemix-bean implementation, using the JiBX framework

The SimpleListenerBean implementation contains the onMessageExchange method of the MessageExchangeListener interface
![]() . The incoming message of the JBI message exchange is unmarshaled to a Person Java object, using a JiBX utility class that we discuss in listing 3.13. Then the name of the person is changed on the Java object and the object is marshaled to an XML message again. The XML message
is a Source instance; in this example we use a StreamSource.
. The incoming message of the JBI message exchange is unmarshaled to a Person Java object, using a JiBX utility class that we discuss in listing 3.13. Then the name of the person is changed on the Java object and the object is marshaled to an XML message again. The XML message
is a Source instance; in this example we use a StreamSource.
The SimpleListenerBean uses a JiBX utility class for the JiBX-specific functionality. Let’s look at the implementation of the JiBXUtil class in listing 3.13.
Listing 3.13. JiBXUtil class showing how to unmarshal and marshal XML messages
The methods in listing 3.13 look much like the methods we’ve seen for Mule, only this time we use a java.xml.transform.Source object as our input and output for the JiBX methods. ServiceMix uses this class to represent the XML messages in a message exchange.
Well, that’s it for our discussion on JiBX. For Mule we’ve defined transformers that take care of transforming a message into and from XML, and for ServiceMix we created a helper class that can, for instance, be used with the servicemix-bean service engine.
The final technology we discuss is ActiveMQ, which provides us with asynchronous communication and reliable messaging capabilities.
3.1.3. Using JMS with the ActiveMQ broker
ActiveMQ is an open source JMS broker that we use in our examples together with Mule and ServiceMix. You might ask yourself, “Why would we need a separate JMS broker, when we’ve already got a complete ESB?” The answer is rather simple. Mule doesn’t focus on the transport layer; its focus is to provide ESB functionality such as routing and transformation. In other words, for Mule it doesn’t matter whether all the messages are transported over HTTP, JMS, TCP, SMTP, or any of the other supported transports.
If you’re in a production environment you want a reliable transport mechanism, and you may choose JMS. With JMS you can support reliable messaging and ensure that your messages arrive at the target destination. Another advantage of using JMS is that it’s easily pluggable. You can, for instance, replace ActiveMQ with a different JMS-compliant broker such as Joram, WebSphere MQ, JBoss MQ, or any of the other dozen implementations.
So what about ServiceMix? Does ServiceMix also require a JMS broker for reliable messaging? Yes, it does. When you run ServiceMix using the default Staged Event-Driven Architecture (SEDA) flow, the message exchanges are routed using the default, nonpersistent, normalized message router. ServiceMix also has the option to run its normalized message router based on a JMS flow, which uses ActiveMQ. The JMS flow provides reliability, clustering, and fail-over capabilities to ServiceMix. ActiveMQ is delivered as part of the ServiceMix distribution, so you don’t have to perform a separate installation as you would with Mule.
Explaining the JMS specification
For those of you not familiar with JMS, let’s quickly discuss how JMS works (see figure 3.4).
Figure 3.4. The important concepts of the JMS specification. The JMS classes that are common when developing JMS-based functionality are shown as well.

With JMS it’s possible to create clients that receive messages from a JMS broker and clients that put messages on a JMS broker. These clients are called, respectively, Message-Consumers and MessageProducers. Before creating these clients, follow these steps:
1. Obtain a ConnectionFactory—There are two ways to get a connection factory. The official way is to use JNDI to look up a ConnectionFactory in a JNDI registry. We don’t bore you with all the details, but this is the most flexible method and allows you to easily change the JMS broker without altering the client code. The other (not recommended) way is to create a ConnectionFactory programmatically. This may be easier to do, but you’re pretty much wiring yourself to a specific JMS broker.
2. Create a connection—Once you have a ConnectionFactory you can use it to create a connection. The ConnectionFactory contains the information on how to connect to the JMS broker.
3. Create a session—Another abstraction layer used by JMS is the session. We can create multiple sessions on a connection, and sessions themselves can have multiple providers and consumers.
4. Create the MessageConsumer or MessageProducer—Now you can create a Message-Consumer (or a MessageProducer) to receive (or send) on a specific destination via the session instance.
In JMS we have two types of destinations. The first is a queue, which is used to implement point-to-point message channels. With a queue, you can have many different message producers and many different message consumers (though a JMS message can be consumed by only one consumer). In addition to queues, you can use topics, which can implement publish-subscribe message channels. You can have multiple publishers sending messages to a topic, and all the subscribers on that topic will receive the published messages. Note that when no subscribers are listening on the topic, the message may get lost.
We’ve only skimmed the surface of JMS, but this should be enough information to comprehend the JMS-related topics in this and upcoming chapters.
Apache ActiveMQ is a popular JMS broker, which can be used with both Mule and ServiceMix. The ServiceMix distribution even includes an ActiveMQ distribution out of the box. ActiveMQ is a very mature JMS broker and is simple to use and configure. We first look at some of the features of ActiveMQ, and then we show you an example configuration.
ActiveMQ Features
So what are the features that are interesting to us?
- Full support of JMS 1.1— Since we’ll be using the default JMS API, we need a JMS broker that supports the JMS specification; ActiveMQ provides full support for this specification.
- Supports easy persistence— We need a reliable transport to complement the Mule and ServiceMix ESBs. For a reliable transport, we need a way to persist messages so that when the ESB goes down, the messages on the JMS broker can be recovered. ActiveMQ provides an easy way to use JDBC for persisting messages.
- Spring support— This is a very important feature for us. Since we’re going to specify most of our reusable components in Spring, being able to configure ActiveMQ with Spring makes it all a lot more understandable.
- In-memory JMS provider— ActiveMQ can be used as an in-memory JMS provider. This means we can easily start a complete JMS broker from our code. This approach makes testing much more efficient.
Now let’s look at how we can configure ActiveMQ to be used as a reliable message broker.
Example of an ActiveMQ configuration
ActiveMQ is configured with an XML file named activemq.xml. Listing 3.14 shows an example ActiveMQ configuration using a PostgreSQL database for persistency.
Listing 3.14. ActiveMQ configuration using a PostgreSQL database for persistency

The example ActiveMQ configuration consists of the following parts:
- Persistency configuration
 —This section specifies that ActiveMQ must persist the messages in the queues and topics. We also specify the working directory
of ActiveMQ (work/activeMQ in this example) where the journal files are being stored. The final configuration here is the
database that’s going to be used to persist the messages.
—This section specifies that ActiveMQ must persist the messages in the queues and topics. We also specify the working directory
of ActiveMQ (work/activeMQ in this example) where the journal files are being stored. The final configuration here is the
database that’s going to be used to persist the messages.
- Transport connectors configuration
 —In this section we define how to connect to the ActiveMQ broker. This is an important section, since it specifies how Mule
and ServiceMix connect to ActiveMQ as their JMS provider. In this example we show that we can connect to this broker over
TCP using the port 61616 (this is also the default configuration of ActiveMQ).
—In this section we define how to connect to the ActiveMQ broker. This is an important section, since it specifies how Mule
and ServiceMix connect to ActiveMQ as their JMS provider. In this example we show that we can connect to this broker over
TCP using the port 61616 (this is also the default configuration of ActiveMQ).
- Data source definition
 —Finally, we configure how ActiveMQ can connect to our PostgreSQL database. These are the common properties you see with any
data source configuration.
—Finally, we configure how ActiveMQ can connect to our PostgreSQL database. These are the common properties you see with any
data source configuration.
Because ServiceMix delivers ActiveMQ out of the box, a standard ActiveMQ configuration is already present. By default, ServiceMix doesn’t use database persistency for its message exchanges. When you download ActiveMQ for use with Mule, the default configuration also doesn’t include database persistency. Let’s look at the details of using ActiveMQ with Mule and ServiceMix.
Using JMS and ActiveMQ in Mule and Servicemix
If you want to use ActiveMQ in Mule and Servicemix, we need to configure the ESBs in such a way that they can get a reference to the ActiveMQ connection factory. We need this functionality to be able to send and receive messages via a JMS transport.
Let’s start by looking at how to do this in a Mule configuration (see listing 3.15).
Listing 3.15. Definition of an ActiveMQ connection in a Mule configuration
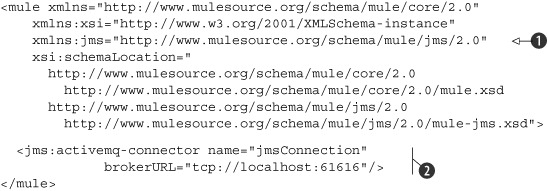
In listing 3.15 we specify the configuration of a connection to ActiveMQ by creating a connection factory specific for ActiveMQ
![]() . We also configure the connection factory to connect to the default location ActiveMQ is running on: tcp://localhost:61616. Notice that the activemq-conector element is namespace-qualified with a Mule JMS namespace
. We also configure the connection factory to connect to the default location ActiveMQ is running on: tcp://localhost:61616. Notice that the activemq-conector element is namespace-qualified with a Mule JMS namespace
![]() ,
,
![]() . For each transport Mule provides a transport-specific set of elements and a corresponding namespace. Now we can use the
JMS transport functionality to create JMS endpoints. (We show you how to do this in section 3.3, when we present an extensive Mule example.)
. For each transport Mule provides a transport-specific set of elements and a corresponding namespace. Now we can use the
JMS transport functionality to create JMS endpoints. (We show you how to do this in section 3.3, when we present an extensive Mule example.)
Configuring a connection to the ActiveMQ broker in ServiceMix isn’t that much harder. Again we only need to configure a connection factory to use JMS functionality in the ServiceMix environment. Listing 3.16 shows how to configure a connection to ActiveMQ as part of a servicemix-jms xbean.xml configuration.
Listing 3.16. Defining an ActiveMQ connection in a servicemix-jms configuration

The ServiceMix configuration is quite similar to the Mule configuration we saw in listing 3.15. The main difference is that ServiceMix doesn’t provide an element for defining an ActiveMQ broker connection, but it uses
a Spring bean to create the connection
![]() . We show a detailed example of how to define JMS consumers and providers in a servicemix-jms configuration in section 3.4.
. We show a detailed example of how to define JMS consumers and providers in a servicemix-jms configuration in section 3.4.
In the last couple of sections, we’ve introduced three technologies: Spring, JiBX, and ActiveMQ. This information provides a common background for the examples in this book. In the next section, wel look at setting up the development environment to be able to start working with the book’s examples.
3.2. Preparing the development environment
Let’s get started with setting up the environment that we use throughout this book. We explain how you can run (and play with) the provided examples. Note that you don’t need to use Eclipse to run our examples. We provide Ant scripts so that you can also run them from the command line or from other integrated development environments (IDEs) such as NetBeans or IntelliJ.
3.2.1. Setting up ESBs, tools, and required libraries
Before we get started, make sure you have the correct versions of Ant and Java installed. Mule and ServiceMix can run with older versions of Java, but some of our examples use Java 5 features, so make sure you’ve got an up-to-date Java version installed. Besides an up-to-date Java version, we use Ant for automating download, compile, build, and startup tasks, so we also require an up-to-date Ant version.
Installing the latest Java version
To check your version of Java, run java-version from the command line. This command should return something similar to this:
java version "1.6.0_06"
Java(TM) 2 Runtime Environment, Standard Edition (build 1.6.0_06-b02)
Java HotSpot(TM) Client VM (build 10.0-b22, mixed mode, sharing)
Notice that this is the output of a Java 6 runtime environment, but Java 5 is also fine. If the Java version shown is below 1.5, then please install a newer version from http://java.sun.com/javase/downloads/index.jsp.
Installing the latest Ant version
Besides an up-to-date Java version, we also use Ant to run the examples. If you don’t have Ant installed, please download and install the latest version from http://ant.apache.org. If you do have Ant installed, run the ant -version command to check the version of your installation. Verify that the version returned is at least 1.7. If you’ve installed an older version, go to http://ant.apache.org and download the latest version.
Setting up the environment with Ant
Now that you know that the correct versions of Java and Ant are installed on your system, let’s get the libraries, servers, and tools used in this book. Some of the tools used in this book, such as the Apache Directory Server in chapter 8, need a separate installation. We’ve created an archive that you can download from this book’s website, http://www.esbinaction.com/rademakers (if you haven’t done so already in chapter 1). Unpack this archive into a directory of your choice, and you’ll see that the following directory structure has been created:
-boxResources
-esb
-libraries
-prepareResources
-tools
-workspace
build.xml
In the esb subdirectory we’ll install ServiceMix and Mule. If you’ve worked through the examples in chapter 1, you’ve already installed Mule and ServiceMix in this directory. In the libraries subdirectory, we’ll store all the required libraries used in our examples. In the tools directory, we’ll install various servers such as an EJB container, and an XML and relational database. The workspace directory contains the examples and resources shown in this book. If you look through the directories, you’ll notice that most of them are still empty. This is because providing all the libraries would make the downloadable archive very large. So to get started, we’ll use the Ant build file in the root directory, build.xml, to download all the libraries, servers, and tools and then store them in the right directory structure.
For this book we chose to use Ant for all the builds and examples, and we also use Ant to set up the initial environment. The reason we use Ant instead of Ivy or Maven is that with Ant we can easily get the installation archives and unpack them to specific directories. This would also be possible with Maven or with Ivy, but would involve a lot of work in getting all the dependencies correct and getting the dependencies in the proper target directory.
The main reason to use Ant is that we’re not forced into a specific directory structure or project setup (Maven does force that on you). However, when you’re doing your own ServiceMix project, Maven might be a good option. The people behind ServiceMix have provided a nice set of Maven artifacts that you can use to set up and deploy service units and service assemblies to ServiceMix.
To get all the correct libraries (we list the versions in appendix G), you should run the ant script from the root directory where you unpacked the downloaded archive, which happens to be the directory where the Ant file is located. You do this by running the following command:
ant prepare-environment
When you run this example, you can get a cup of coffee, since this will start downloading all the required libraries, tools, and servers from various online repositories and websites. When you scroll back in your console, you’ll see output in your console that looks similar to this:
init:
    [mkdir] Created dir: tools
    [mkdir] Created dir: libraries
get-mule:
    [echo] Downloading Mule.... (38MB)
    [get] Getting: http://snapshots.dist.codehaus.org/mule/org/mule/distributions/mule-full/2.0.2/mule-full-2.0.2.zip
    [get] To: work/downloads/mule-full-2.0.2.zip
When the Ant build file has finished executing, you’ll have a completely configured environment that you can use to run the book’s examples and play around with the Mule and ServiceMix ESBs.
Navigate to the workspace folder and you’ll see two subdirectories. One directory contains a Mule workspace and the other a ServiceMix workspace. In these workspaces you’ll find all the examples from this book. So just navigate to the correct chapter in these workspaces and you’ll find an Ant file there that you can use to run the examples from that specific chapter. In all the upcoming chapters we explain which Ant file and which target you need for a specific example.
So far we’ve only set up a command line–based environment. Since developing and experimenting with the code is much easier from an IDE, let’s see how you can use Eclipse together with these examples.
3.2.2. Running examples from Eclipse
You don’t have to do much to run our examples from Eclipse. In this section we show how to import the examples in Eclipse. To do this, start Eclipse and create a new workspace that points to the workspace/workspace-mule directory (where you unpacked the downloaded archive). When Eclipse has started, select File > Import from the Eclipse menu. This opens the screen shown in figure 3.5.
Figure 3.5. Import an existing project into Eclipse using the Import wizard.
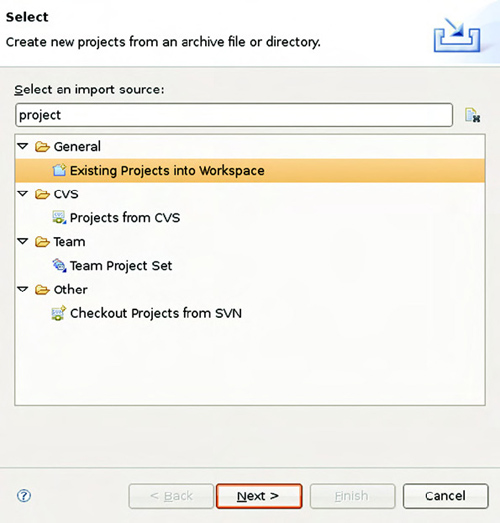
From this screen select Existing Projects into Workspace and click Next. This opens the Import Projects screen, shown in figure 3.6.
Figure 3.6. Select a project to import from the file system.

On the Import Projects screen, use the Browse button to navigate to the workspace/workspace-mule directory. After you’ve selected that directory, you can select the Mule project and import it into your own workspace. Make sure, though, that you don’t select the Copy projects into workspace option, since the project is already at the correct location.
And that’s it! You now have a configured Eclipse workspace from which you can run and experiment with our Mule examples. You might wonder why you don’t have to configure the classpath or do any other setup work. During the “prepare-environment” step, we also created the Eclipse-specific .classpath file to make it all a bit easier.
Now the Mule setup is finished, and we can do the same thing for ServiceMix. For this you can repeat the previously mentioned steps, but this time point the workspace to the workspace/workspace-servicemix directory instead of the workspace/workspace-mule directory. Then you can import the ServiceMix project in the same manner as we showed in figures 3.5 and 3.6.
The development environment is in place, and you can run the examples from both the command line and from Eclipse. Next let’s look at an example where everything we’ve done so far comes together. We start with a Mule-based example, and after that we show you a ServiceMix-based example.
3.3. Inaugurate the Mule environment
In this section we show how you can use the development environment created in the previous section and the technologies explained in the first part of this chapter together in a simple example.
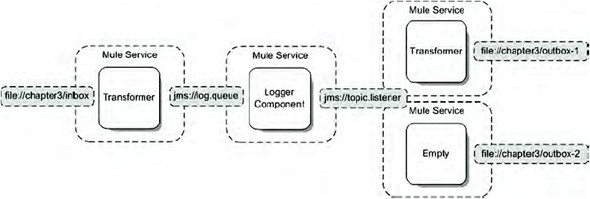
We walk through a specific integration scenario with Mule. In this scenario you’ll see how the technologies we’ve explained in the beginning of this chapter and Mule can work together. We first start with a general overview of the scenario in figure 3.7 and then dive into the various components and configurations.
Figure 3.7. A file-based integration scenario that will be used to show the Mule development environment with Spring, JiBX, and ActiveMQ

As you can see in figure 3.7, we check a certain directory in the file system where we pick up a file (which in our example is an XML file). This file is transformed into a Java object and bridged to a JMS queue. In the next step, we receive this message from the JMS queue, pass the object into our logging service component, and send it to a JMS topic, which is read by two message listeners that store the message in the file system. One of them stores it directly; the other first transforms the message back to XML. There’s a lot to do, so let’s start by looking at all the configuration files we need for this process.
3.3.1. Writing and configuring the Mule components
If you look at the example in figure 3.7 in the context of the Mule architecture, you’ll see we need to configure a number of services and endpoints. Figure 3.8 shows what we need to configure.
Figure 3.8. Mule services and endpoints required for the implementation of the integration scenario
Before we look at the services and endpoints defined in figure 3.8, let’s examine some general configuration that we need to take care of. First, we have to configure the ActiveMQ connection, as described in listing 3.15. In addition, we need to define the transformers we’ll be using. We’ve already explained this at the beginning of this chapter. Listing 3.17 shows the configuration of the ActiveMQ connection factory and the transformers.
Listing 3.17. Mule configuration with an ActiveMQ and transformer definition

The Mule configuration is started with an import statement, which includes the Spring bean definitions from the components.xml
file
![]() . In the components.xml file, we have defined a logger Spring bean, which we use to log the incoming person information.
. In the components.xml file, we have defined a logger Spring bean, which we use to log the incoming person information.
The byte-array–to-string-transformer might seem a bit odd
![]() . The reason we specify this transformer is that the default transformers are overridden when we add custom transformers on
an endpoint. Because we’ll define a custom transformer on a file endpoint, we also have to configure the default file transport
transformer, which is the byte array–to-String transformer.
. The reason we specify this transformer is that the default transformers are overridden when we add custom transformers on
an endpoint. Because we’ll define a custom transformer on a file endpoint, we also have to configure the default file transport
transformer, which is the byte array–to-String transformer.
Now we’ve defined the ActiveMQ connection and the transformers, we can implement the first service (listing 3.18), which listens on a directory via the File transport and sends the message on to a JMS queue. Note that this listing is part of the same Mule configuration as listing 3.17.
Listing 3.18. Mule service definition forming a bridge between a file and a JMS endpoint

The FileInboxService service is the starting point of our example implementation. In listing 3.18 we’re reading messages from an inbox directory
![]() and then transforming the incoming message in two steps. First, we transform the File instance to a String with the default byte array–to-String transformer, and then we transform this String, using our JiBX
transformer
and then transforming the incoming message in two steps. First, we transform the File instance to a String with the default byte array–to-String transformer, and then we transform this String, using our JiBX
transformer
![]() , to a Java object.
, to a Java object.
To bridge between a file and a JMS endpoint
![]() , we don’t have to configure any component implementation. This means that we don’t execute any additional integration logic,
but only pass the message from the file inbound endpoint to the JMS outbound endpoint. So after the message is transformed,
it’s sent to the specified JMS queue.
, we don’t have to configure any component implementation. This means that we don’t execute any additional integration logic,
but only pass the message from the file inbound endpoint to the JMS outbound endpoint. So after the message is transformed,
it’s sent to the specified JMS queue.
According to figure 3.8, the next Mule service is the logger service, which sends the incoming message from the JMS outbound endpoint defined in listing 3.18 to a JMS topic. Let’s look at listing 3.19 for the configuration of this logger service. Note that this service is again part of the same Mule configuration as the previous code listings.
Listing 3.19. Mule service that bridges from a JMS queue to a JMS topic
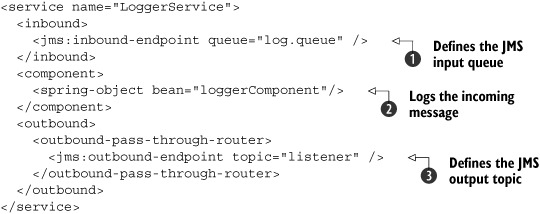
As you can see here, we consume JMS messages from the log.queue queue
![]() , and send the message on to the listener topic
, and send the message on to the listener topic
![]() . But before the message is sent to the JMS topic, it’s logged and enhanced with the Spring bean loggerComponent
. But before the message is sent to the JMS topic, it’s logged and enhanced with the Spring bean loggerComponent
![]() . In addition to logging the message, the incoming customer number is changed to another value.
. In addition to logging the message, the incoming customer number is changed to another value.
The implementation of the logger is simple and therefore only included in the source code of this book.
The last two services we need to implement, shown in listing 3.20, are straightforward and just store the messages received from the topic in the file system.
Listing 3.20. Two Mule services listening on a JMS topic and logging to the file system
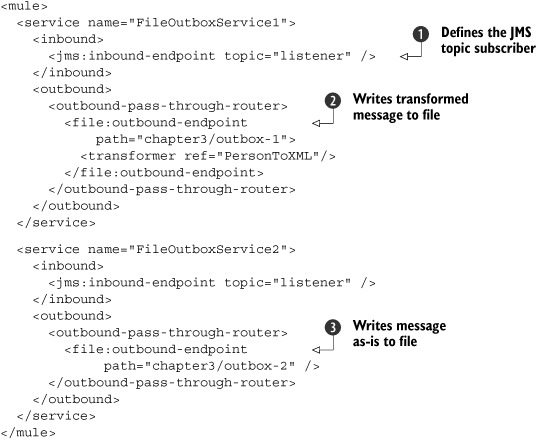
These last two Mule services of our example implementation are the services that subscribe
![]() to the topic defined as an outbound endpoint in listing 3.19. The first service, FileOutboxService1, uses a transformer to transform the message back to an XML format
to the topic defined as an outbound endpoint in listing 3.19. The first service, FileOutboxService1, uses a transformer to transform the message back to an XML format
![]() . The second service, FileOutboxService2, outputs the message as received, which means it’s serialized to the file system using standard Java-based serialization
. The second service, FileOutboxService2, outputs the message as received, which means it’s serialized to the file system using standard Java-based serialization
![]() .
.
3.3.2. Running the Mule example
It’s easy to run the example by using the supplied Ant build file. Open a command console and go to the directory where you unpacked the downloaded archive. From there, navigate to the workspace/workspace-mule/mule/resources/chapter3 directory. From the console, run ant –f ch3-examples.xml chapter3-combined. When you run this command, Ant will start up the Mule container with the configuration shown in listings 3.17 through 3.20.
We can now put a file into the chapter3/inbox directory and look at the result files in the outbox-1 and outbox-2 directories, which are also located in the chapter3 subdirectory. If everything went well, you should see the input file in both of the output directories.
If you want to run this example from Eclipse instead of from a command console, just open the Ant view in Eclipse and add the ch3-examples.xml Ant build file to this view by dragging it to the window. Now you can start the chapter3-combined target by double-clicking, and you can once again put a file in the chapter3/inbox directory and see it being processed by Mule.
Now that you’ve seen how to use Mule with JiBX, Spring, and ActiveMQ, let’s look at an example using ServiceMix.
3.4. Inaugurate the ServiceMix environment
The scenario we show you for ServiceMix will be a simple example that can help you get acquainted with the environment. This example will illustrate how Spring, ActiveMQ, and JiBX can be used with ServiceMix (see figure 3.9).
Figure 3.9. We use this scenario to show how ServiceMix can work together with Spring, JiBX, and ActiveMQ.

As you can see in figure 3.9, we listen to a certain directory and pick up any files put in there. These files, which should have an XML format, are sent to a bean via a JMS queue. In our custom bean, we transform the XML to Java, log some information, change the first name value in the input message, and send it again over JMS to another directory on the file system.
So to get this example to work, we must execute these steps:
1. Select the required binding components and service engines.
2. Configure the service units for this scenario.
3. Package all the service units into a service assembly, which we can deploy.
4. Deploy the service assembly to ServiceMix.
Let’s start by selecting the right service engines and binding components for the functionality described in figure 3.9.
3.4.1. Select the necessary JBI components
Before we can configure service units for a specific JBI component, we need to select the necessary binding components and service engines. To get an overview of the available JBI components, look in the esb/apache-servicemix-3.2.1 directory. Here you’ll find a directory named hotdeploy. Any JBI component or service assembly dropped into this directory is deployed automatically to ServiceMix. For our example we need these components available in the hotdeploy directory:
servicemix-bean-3.2.1-installer.zip
servicemix-file-3.2.1-installer.zip
servicemix-jms-3.2.1-installer.zip
You see more available JBI components in this directory. All the binding components and service engines available in ServiceMix are started automatically. If you want to speed things up when you start ServiceMix, you can remove unnecessary binding components and service engines from this directory. This is especially useful if you’re debugging or working with a specific service engine or binding component and want to minimize ServiceMix’s startup time.
Now it’s time to start ServiceMix. To do this, navigate to the workspace/workspace-servicemix/servicemix/resources/chapter3 directory in a command console and run ant –f ch3-build.xml start. This command will start the ServiceMix container and automatically deploy all the service engines and binding components from the hotdeploy directory.
Once you have ServiceMix running, let’s configure the service units that we’ll deploy to this running ServiceMix instance. If you’ve already run the Mule example, you’ll see there is a big difference in how the examples are started. With Mule we must specify the Mule configuration to run at startup time; for ServiceMix we start the container and can deploy our service assemblies at a later time. In short, ServiceMix is hot deployable and Mule, at the time of this writing, is not. The Mule project is working on an Open Services Gateway Initiative (OSGi) implementation of Mule that will be hot deployable.
3.4.2. Configuring the ServiceMix example implementation
In figure 3.9 you saw that we must read an XML file from the file system, and then put that XML message on a JMS queue for further processing. Another part of the example is listening on this queue and forwarding the message to our custom transformer component.
In the transformer component we use JiBX to transform the incoming message to a Java object, alter a value, and transform it back to XML. In the final step, we put the message on a JMS queue and bridge it to the file system. Figure 3.10 shows the example implementation in the context of the JBI architecture.
Figure 3.10. The binding components and service engines used in the implementation of our example

As you can see in figure 3.10, we have two binding components, which handle the communication from outside the container, and we have one service engine, which runs our own custom component that implements transformation functionality. In chapter 2 we defined a service unit as an artifact that can be deployed inside a JBI component. In this example implementation, we deploy four JBI services inside the JMS component—two consumers and two providers. We deploy two services inside the File component: a file sender and a file poller. Finally, we deploy one bean service into the servicemix-bean service engine.
Let’s see how we’re going to implement all this. Before we dive into the XML configuration, check out our custom Java component in listing 3.21, which we deploy to the servicemix-bean service engine.
Listing 3.21. Bean implementation that defines transformation and routing logic

A number of interesting things are going on in listing 3.21. You can see that the SimpleTransformerBean implements the MessageExchangeListener interface. This interface defines that this class is able to receive message exchanges. The next thing you see is that the
resources we need in this class are inserted by the ServiceMix container
![]() . In this case, we inject the DeliveryChannel, which we use to send and receive messages, and the ComponentContext, which we can use to search for registered JBI endpoints.
. In this case, we inject the DeliveryChannel, which we use to send and receive messages, and the ComponentContext, which we can use to search for registered JBI endpoints.
When we receive a message, we first check to see if it’s part of an active exchange, since we only need to process active
JBI message exchanges. We then start to process the message with JiBX to transform it to a Java object
![]() . After that, we finish the current exchange, because we are done processing. To finish the current in-only message exchange,
the channel, send(exchange) is executed with a status of done. Then we do a lookup
. After that, we finish the current exchange, because we are done processing. To finish the current in-only message exchange,
the channel, send(exchange) is executed with a status of done. Then we do a lookup
![]() for the target endpoint of the transformed message, which will be a JMS queue defined in listing 3.23.
for the target endpoint of the transformed message, which will be a JMS queue defined in listing 3.23.
The last step is to create a new JBI message exchange
![]() to send an XML message, transformed with JiBX, to the target destination.
to send an XML message, transformed with JiBX, to the target destination.
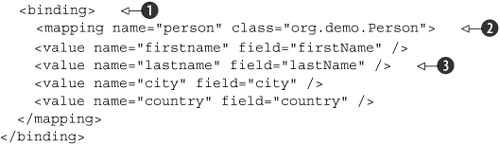
Before we dive into the configuration of the ServiceMix JBI components we use in this example, let’s quickly look at the JiBX configuration in listing 3.22, which shows how to map the incoming XML to a Java object.
Listing 3.22. JiBX mapping illustrating how to map between XML and Java
<binding>
    <mapping name="person"
            class="esb.chapter3.Person">
    <value name="customer-number" field="customerNumber"/>
    <value name="first-name" field="firstName"/>
    <value name="last-name" field="lastName"/>
    <value name="street" field="street"/>
    <value name="city" field="city"/>
    <value name="state" field="state"/>
    <value name="zip" field="zip"/>
    <value name="phone" field="phone"/>
    </mapping>
</binding>
Listing 3.22 shows a basic mapping that transforms a simple XML message to the esb.chapter3.Person Java class. We don’t show the Person class, since this is just a POJO with a getter and setter for all the fields specified in the mapping file. As we’ve mentioned before, we need to run the binding compiler before we can use this JiBX mapping configuration at runtime. All this is done automatically for you when you use the supplied Ant build file in the servicemix/resources/chapter3 directory from the servicemix-workspace to deploy this example to ServiceMix at the end of this section.
Now that the programming part is out of the way, the main thing missing is the configuration of the three JBI components. Let’s start with the JMS consumers and providers. ServiceMix already starts up an ActiveMQ broker in its default configuration, so we don’t have to start a separate JMS broker instance. We only have to configure the JMS consumers and providers and connect to this broker. We can do this by creating an ActiveMQConnectionFactory, and since the ServiceMix configuration already is based on Spring, this is easy to do:
<bean id="connectionFactory"
    class="org.apache.activemq.ActiveMQConnectionFactory">
  <property name="brokerURL" value="tcp://localhost:61616" />
</bean>
In this configuration, we define a connection to the ActiveMQ broker instance. This code is added to the service unit configuration, which we deploy to the servicemix-jms binding component. Listing 3.23 shows how we reference the ActiveMQConnection-Factory.
Listing 3.23. ServiceMix JMS configuration

We see two different types of JMS endpoints defined here: consumer endpoints and provider endpoints. A consumer endpoint listens
on a specific JMS input queue
![]() , and when a message is received, it invokes the specified target service, like, for example, the bean service
, and when a message is received, it invokes the specified target service, like, for example, the bean service
![]() . A provider sends a message to a queue
. A provider sends a message to a queue
![]() using the ActiveMQ connection factory
using the ActiveMQ connection factory
![]() defined at the bottom of the JMS service unit configuration. Table 3.2 shows the properties for a JMS endpoint.
defined at the bottom of the JMS service unit configuration. Table 3.2 shows the properties for a JMS endpoint.
Table 3.2. The ServiceMix JMS endpoint attributes
|
Attribute |
Description |
|---|---|
| service | The name of the service this endpoint will be registered on. |
| endpoint | The name of the endpoint this service can be reached on. |
| targetService | If a message is received on the queue, it’s sent to the service registered on this name. |
| targetEndpoint | The name of the endpoint we send the message to. |
| destinationName | The name of the queue a consumer listens to or a provider sends to. |
In listing 3.23 we have two providers that send messages to the inQueue and outQueue queues, and two consumers that listen to those queues and forward the messages to the osesb:beanService JBI service and the osesb:fileSender JBI service.
The final items we consider for this scenario are the configuration of the service unit for the bean component and the configuration of the service unit for the file component. The file component is a simple configuration, as shown in listing 3.24.
Listing 3.24. File endpoints configuration for the ServiceMix example

Listing 3.24 is pretty much self-explanatory. We have a file poller that listens on the chapter3/in directory
![]() , and a sender that sends the received messages to the chapter3/out directory
, and a sender that sends the received messages to the chapter3/out directory
![]() .
.
The final JBI component that we have to configure is the servicemix-bean (its Java code appears in listing 3.21):
<beans xmlns:bean="http://servicemix.apache.org/bean/1.0"
    xmlns:esb="http://opensourceesb/chapter3/">

  <bean:endpoint service="esb:beanService"
      endpoint="endpoint"
      bean="#SimpleTransformer"/>

  <bean id="SimpleTransformer"
      class="esb.chapter3.SimpleTransformerBean"/>
</beans>
Here we define a JBI service bean by configuring the name and endpoint of the service and the implementation class. The #SimpleTransformer reference tells ServiceMix to look up the component in the Spring context.
The final step is packaging all these service units into a service assembly and deploying it to the ServiceMix container.
3.4.3. Running the ServiceMix example
You can now run our example by using the supplied Ant build file. Since we already started ServiceMix at the beginning of this section, we only need to create and deploy the service assembly. From a command console, go to the resources/chapter3 directory in the ServiceMix workspace and execute the deploy-chapter3-example Ant target (ant -f ch3-build.xml deploy-chapter3-example). This will start up the ServiceMix container and initialize the JBI service engines and binding components. When ServiceMix has started, you can execute the deploy-chapter3-example Ant target (ant –f ch3-build.xml deploy-chapter3-example). This command will first compile our Java classes and then run the JiBX binding compiler. In the next step, all the service units are packaged into a single service assembly. This service assembly is then deployed to the running ServiceMix container by copying it to the hotdeploy directory in the ServiceMix distribution.
We can now test this example by copying a test file (e.g., person.xml, available in the resources/chapter3 directory) into the chapter3/in directory (within the ServiceMix distribution). We should see the output logged from our custom component, and see the file being written to the chapter3/out directory.
If you want to start this example from Eclipse, just use the Ant view as we explained in the previous Mule section. Drag the ch3-build.xml file to the Ant view window and you will be able to execute the Ant target deploy-chapter3-example as we just described.
In this section we’ve shown how you can combine ServiceMix with JiBX, Spring, and ActiveMQ. We’ve implemented a simple integration example in which Spring is used for the configuration, JiBX for the transformation, and ActiveMQ as the messaging broker.
3.5. Summary
We introduced you to some new technologies in this chapter. We started by exploring the technologies used throughout this book to provide additional functionality for Mule and ServiceMix. We introduced the Spring framework, which is used as the object container in which we configure all the components we’ll be implementing. We also described a Java-to-XML marshaling framework: JiBX. We’ll use this framework when we want to map XML content to a Java object, and vice versa. Finally, we explored JMS and Apache ActiveMQ, which give us a simple way to enable our components to communicate with one another in a reliable way.
We also explained how to set up your development environment for the two ESBs. You can use Ant build files for all the examples when you’re working from the command line. In addition, we demonstrated setting up an Eclipse environment. At this point you should have a fully configured Eclipse environment and a completely configured command-line environment from which you can run and experiment with our examples. In the last part of this chapter, you saw two examples of using the configured development environment together with Spring, JiBX, and JMS.
In the next few chapters, we investigate the core functionality of an ESB. This core functionality will be explored using the technologies and environments explained in this chapter, so if you have any difficulty while reading a specific section, you can always come back here for a short introduction.