
Chapter 4. The foundation of an integration solution
Now that we’ve discussed the basics of Mule and ServiceMix, it’s time to examine the foundational elements of a full integration solution: integration logic and message flows.
Integration logic is simply the logic you need to build your integration solution. Open source ESBs provide a lot of functionality out of the box, but most solutions need additional logic. This additional logic may involve something as simple as changing the content of an incoming message, but it can be as complex as including validation rules for EDI messages. One of the great features of open source ESBs is that implementing logic for your integration solution is fairly easy.
Writing components for specific integration logic is similar to writing components for Java or JEE applications. Open source ESBs such as Mule and ServiceMix are developed to make it as simple as possible to “click” your Java components in an integration solution. Because there’s no large set of requirements, your Java components can remain independent of specific Mule and ServiceMix classes. We look at the implementation of integration logic with Mule in section 4.1 and with ServiceMix in section 4.2.
Naturally, the development of integration logic isn’t enough to get your integration solution running. To be able to implement an integration solution within an open source ESB, you must combine integration logic and functionality that’s offered out of the box in so-called message flows. A message flow can be viewed as the final deliverable for an integration problem. Because the concept of a message flow is critical to understanding how you develop integration solutions, we look at the theory of message flows in section 4.3. Then we illustrate the theory with an example of a message flow for Mule in section 4.4 and for ServiceMix in section 4.5.
Let’s kick off this chapter with a discussion on implementing your own integration logic with Mule.
4.1. Implementing integration logic with Mule
When you want to implement an integration solution with Mule, you can utilize all the out-of-the-box functionality that Mule provides. Don’t make the mistake of underestimating this rich set of functionality, but implementing complex enterprise integration scenarios will require some custom logic. As you’ll see in this section, applying custom logic with Mule is simple.
4.1.1. Creating a logging solution with Mule
Let’s begin with developing a component that logs an incoming message to the console with the popular logging framework Log4j. Logging functionality is also provided out of the box with the LogComponent class, but this is a good starting point to learn about the development of custom logic in Mule. First, we have to develop the Java class that does the actual logging (see listing 4.1).
Listing 4.1. Simple logging implementation
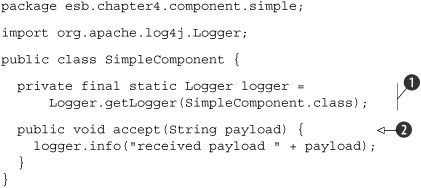
Well, this isn’t hard, is it? The SimpleComponent class defines a Log4j Logger class instance
![]() that can be used to log the incoming message. There’s just one method, accept
that can be used to log the incoming message. There’s just one method, accept
![]() , that receives one String parameter logged to the console with the Log4j logger instance. As you can see, this Java class has no dependency to any
Mule class at all. To be able to use our custom logic with Mule, we must define a Mule configuration that makes use of the
SimpleComponent class.
, that receives one String parameter logged to the console with the Log4j logger instance. As you can see, this Java class has no dependency to any
Mule class at all. To be able to use our custom logic with Mule, we must define a Mule configuration that makes use of the
SimpleComponent class.
The Mule configuration has to include a service definition with a component element that points to the SimpleComponent class we’ve just created. But before we can create the Mule configuration, we have to choose which transport protocol we’ll define for incoming messages. For this simple example, we use the so-called stdio Mule transport, which is able to accept command-line user input. Now we can complete the Mule configuration for our logging example (see listing 4.2).
Listing 4.2. The command-line Mule configuration: mule-config.xml
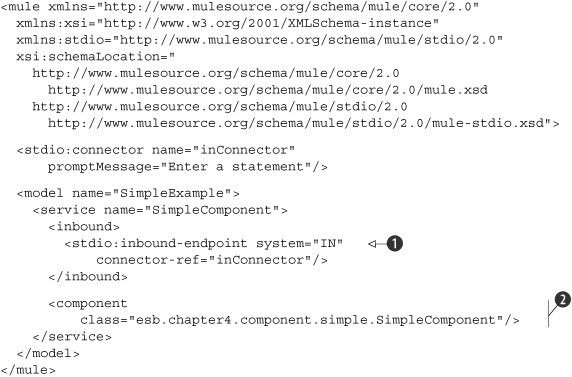
The main part of the Mule configuration in listing 4.2 is the component element
![]() . Here we define the implementation class that will handle messages arriving at the defined inbound endpoint
. Here we define the implementation class that will handle messages arriving at the defined inbound endpoint
![]() . As you can see, the SimpleComponent that we created in listing 4.1 is configured as the implementation class. The inbound router contains an endpoint definition that uses a standard IO (stdio)
connector. This connector accepts messages from the command-line equivalent to System.in. The input messages consist of the user’s responses to the message “Enter a statement,” which is configured on the connector
definition.
. As you can see, the SimpleComponent that we created in listing 4.1 is configured as the implementation class. The inbound router contains an endpoint definition that uses a standard IO (stdio)
connector. This connector accepts messages from the command-line equivalent to System.in. The input messages consist of the user’s responses to the message “Enter a statement,” which is configured on the connector
definition.
With the Mule configuration ready, we can execute this simple logging example. You have to use the Ant build file in the resources/chapter4 directory of Mule’s workspace in this book’s source code. Run the component Ant target that’s available in the ch4-examples.xml Ant build file to construct a JAR file with the Mule configuration file in listing 4.2 and a compiled SimpleComponent class. The component Ant target also deploys the JAR file to the lib/user directory in the Mule distribution so the example is available in the Mule classpath when Mule is started. At this point, from the command line you can run the example with the component script file (component.bat or component.sh) that’s available in the resources/chapter4/component directory of the source code.
Because of a conflict between using the stdio connector and running a Java program with Ant, we have to start Mule from the command line for the examples that involve the stdio connector. The stdio connector isn’t able to accept user input when running Mule via an Ant startup script. When we start Mule with the standard mule.bat or mule.sh script file in the bin directory of the Mule distribution, the stdio connector works just fine.
When Mule is started and the “Enter a statement” line appears in the console, you can provide a statement. The same message is logged with Log4j to the console as implemented in the SimpleComponent class.
This means that we’ve developed a very simple custom logic component, and we’ve also been able to run this component within Mule. You may be wondering how Mule is able to call the accept method in the SimpleComponent class; we haven’t instructed Mule to call this method. Here’s the answer: Mule uses reflection to determine the correct method to invoke. Since our implementation has only one method, this seems to be pretty simple, right?
Mule tries to find the proper entry point (i.e., method) based on the payload type of the incoming message. Our SimpleComponent implementation has a method that accepts a String parameter, and this corresponds with the payload type of the Stream provider (stdio connector) configured as an inbound router. If we change the String parameter into an int parameter and rerun the example, we get a NoSatisfiableMethodsException, meaning that no entry point can be determined for our SimpleComponent.
Or suppose we define two methods in the SimpleComponent class with the same parameter(s). We can, for example, duplicate the accept method and rename the copied method to deny. When we rerun the example, Mule throws a TooManySatisfiable-MethodsException. Therefore, be sure you carefully implement the proper entry points.
Mule provides other options for invoking the component’s methods. If you use the org.mule.api.lifecycle.Callable interface, you’ll need to include the onCall method. The onCall method will always be invoked if the component uses the Callable interface, so no reflection is used in that case. Another way to work with the method invocation logic is to specify the method to invoke in the endpoint URI. So if we have a component B with an inbound router that has a virtual machine (VM) inbound endpoint with path value componentB, we can invoke a specific method on component B. What’s needed is an outbound router on, say, component A, with a VM endpoint that has a path value of componentB?method=methodABC. This means that the method methodABC is invoked on component B. The method invocation logic is quite flexible, and you can adapt it to fit your needs.
In addition to the Callable interface and the specification of the method name, Mule provides so-called entry point resolvers. In chapter 2 we mentioned a number of these entry point resolvers. If you want another option for resolving entry points, you can always implement your own logic by implementing Mule’s EntryPoint-Resolver interface.
Because the entry point is, by default, determined based on the payload type of the incoming message, we seem to have a dependency between the transport provider and the custom logic implementation. But as you may recall, Mule provides transformers, which can be used to transform the payload of an incoming message to the expected payload type of the custom logic implementation. Mule offers a number of transformers out of the box with specific transport provider implementations, such as the JMSMessageToObject transformer for the JMS transport provider and the FileToString transformer for the File transport provider. You can even define your own transformer, as you’ll see next.
4.1.2. Developing a custom transformer with Mule
Suppose that instead of a string, we want to use the Integer message type in the SimpleComponent class’s accept method. There’s no default transformer to transform a string to an integer in Mule, so we have to develop our own StringToInteger transformer. So our accept method declaration changes to this:
public void accept(Integer payload) {
Mule defines an AbstractTransformer class that you can extend to implement your own transformer. We can use this abstract class for the implementation of the String-ToInteger class (see listing 4.3).
Listing 4.3. Implementation of the StringToInteger transformer
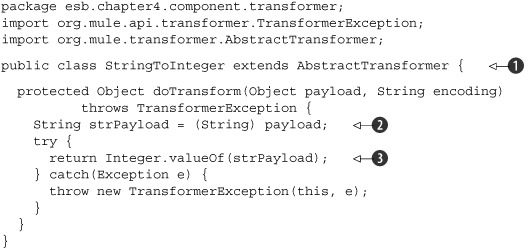
In listing 4.3, the StringToInteger custom transformer extends the Abstract-Transformer abstract class
![]() provided by Mule. Our transformer is thus forced to implement the doTransform method. Because we know that in cases where this transformer will be used the message payload will be of type String, we can just cast the standard payload type object to a string
provided by Mule. Our transformer is thus forced to implement the doTransform method. Because we know that in cases where this transformer will be used the message payload will be of type String, we can just cast the standard payload type object to a string
![]() . We also expect that the payload is a number, and therefore we create an integer object out of the string payload right away
. We also expect that the payload is a number, and therefore we create an integer object out of the string payload right away
![]() . When this conversion fails, we simply return a TransformerException that will contain the NumberFormatException.
. When this conversion fails, we simply return a TransformerException that will contain the NumberFormatException.
We can now use our just created transformer in a Mule configuration similar to listing 4.2, but this one expects the user to provide a number via the console. Listing 4.4 shows this new Mule configuration.
Listing 4.4. Mule configuration for the simple logging example with a transformer

Notice in listing 4.4 that we left out the namespace configuration for the mule element. This is just for convenience; you can check listing 4.2 for the full namespace definition. The new Mule configuration begins by registering our custom transformer that we described
in listing 4.3
![]() . The rest is similar to the previous example shown in figure 4.1, except for the definition of the registered transformer on the endpoint of the inbound router
. The rest is similar to the previous example shown in figure 4.1, except for the definition of the registered transformer on the endpoint of the inbound router
![]() . The transformer element on the inbound endpoint lets you register a number of transformers that must be applied before invoking the Java
class SimpleIntComponent (shown in the following code snippet):
. The transformer element on the inbound endpoint lets you register a number of transformers that must be applied before invoking the Java
class SimpleIntComponent (shown in the following code snippet):
public class SimpleIntComponent {

private final static Logger logger =
    Logger.getLogger(SimpleIntComponent.class);

public void accept(Integer payload) {
    logger.info("received payload " + payload);
  }
}
You can build this example using the component-transformer target in the ch4-examples Ant build file that we also used in the previous example. The component-transformer Ant target builds the JAR file with the Mule configuration and the Java classes, and then copies this JAR file to the Mule lib/user directory. You can run Mule by executing the intcomponent script. The Mule server is started with the configuration shown in listing 4.4. When you respond with a number to the “Enter a number” prompt, you’ll see that the number is logged to the console. If you respond with a non-number, Mule will log a transformer exception to the console. This behavior works as expected with the StringToInteger transformer, shown in listing 4.3.
You’ve already implemented two integration logic components in just a few pages, and you saw how easy it is to build your own components within Mule. Now let’s look at using the Spring Framework to build our components.
4.1.3. Integrating Mule and Spring
In the previous examples we haven’t yet utilized the Spring functionality to, for example, inject beans. So let’s develop a simple addition to the logging example of listing 4.2 and configure a few possible responses to user input. We’ll utilize Spring dependency injection for this purpose.
We need a Java class that’s able to hold a collection of responses and that can determine the proper response based on the user input. To implement this neatly, we also need an interface that this Java class implements. Listing 4.5 shows this interface, ResponseOptionsIF, and the implementation class, ResponseOptions.
Listing 4.5. Java interface and class that return a response to a given user input

In listing 4.5, the ResponseOptionsIF interface defines one method
![]() that returns a response to the user input. In the implementation class, ResponseOptions, a Map with the name options
that returns a response to the user input. In the implementation class, ResponseOptions, a Map with the name options
![]() is defined that’s able to hold a number of key/value pairs, where the key is the user input and the value is the corresponding
response. The little piece of logic to return the proper response to the user input is implemented in the getResponseOption method
is defined that’s able to hold a number of key/value pairs, where the key is the user input and the value is the corresponding
response. The little piece of logic to return the proper response to the user input is implemented in the getResponseOption method
![]() .
.
To use ResponseOptions, we have to adjust the component implementation from listing 4.1 a bit. In the previous examples, the component implementation didn’t return a response. For this example, we need to return the response determined in the ResponseOptions class (see listing 4.6).
Listing 4.6. Component implementation using ResponseOptions

As you can see in listing 4.6, this class isn’t difficult to understand. The important part is that there’s no dependency to the ResponseOptions implementation class but only to the ResponseOptionsIF interface
![]() . Therefore, the SimpleSpringComponent doesn’t know which implementation class it will invoke when the getResponseOption method is called
. Therefore, the SimpleSpringComponent doesn’t know which implementation class it will invoke when the getResponseOption method is called
![]() . This is a great way to reduce the coupling between these classes. The ResponseOptions class reference will be injected by Spring via the setResponse-Options method
. This is a great way to reduce the coupling between these classes. The ResponseOptions class reference will be injected by Spring via the setResponse-Options method
![]() . This all happens automatically, so you don’t need to do any additional coding for this.
. This all happens automatically, so you don’t need to do any additional coding for this.
The remaining part of our simple Spring example is the Mule configuration. We need to add the ResponseOptions configuration and an outbound router to give the response back to the user via the console. Listing 4.7 contains the full Mule configuration.
Listing 4.7. Mule configuration of the Spring example
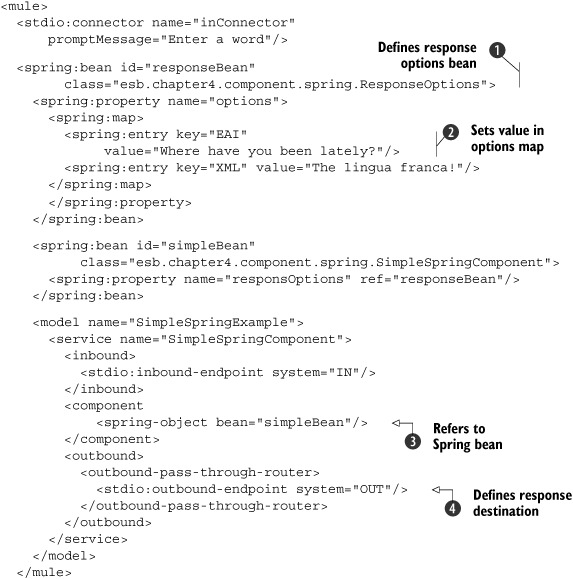
The Mule configuration may seem somewhat large at first, but we also implement quite a bit of functionality here. First, we
define a Spring bean with the spring:bean element that configures the ResponseOptions class
![]() . The spring prefix points to the namespace of the Spring Framework defined at the root element mule. To keep the example readable we left out the namespaces, but you can look in the book’s source code to see the entire configuration.
As part of the response option bean definition, we configure the content of the options map. With Spring we can fill a Map instance with several key/value pairs
. The spring prefix points to the namespace of the Spring Framework defined at the root element mule. To keep the example readable we left out the namespaces, but you can look in the book’s source code to see the entire configuration.
As part of the response option bean definition, we configure the content of the options map. With Spring we can fill a Map instance with several key/value pairs
![]() . To trim the configuration, we include only two possible user inputs and corresponding responses in listing 4.7.
. To trim the configuration, we include only two possible user inputs and corresponding responses in listing 4.7.
The SimpleSpringComponent class defined as a Spring bean can be referenced in the component implementation with the spring-object element
![]() . As you can see, it’s easy to use a Spring bean as the implementation of the component part of a Mule service. The last part
of our configuration shows an outbound router that passes the response value of the SimpleSpringComponent class to the console
. As you can see, it’s easy to use a Spring bean as the implementation of the component part of a Mule service. The last part
of our configuration shows an outbound router that passes the response value of the SimpleSpringComponent class to the console
![]() .
.
To build and deploy this example to Mule, run the component-spring target in the ch4-examples Ant build file. You can then run this example with the springcomponent script (as we also did in the previous examples in this section). When Mule is started, enter a word in the console—for example, enter “EAI” and Mule should then respond with “Where have you been lately?” We’ve now explored three simple examples that use custom logic within Mule. Notice that it’s not hard to include custom functionality and that you can easily use Spring functionality in your Mule configuration. Let’s take a look at the possibilities for applying custom logic in ServiceMix.
4.2. Implementing integration logic with ServiceMix
Let’s begin with a simple example similar to the first example in section 4.1.1. We implement a small piece of custom logic that just logs the content of the incoming message to the console with Log4j. However, we select another transport protocol for the incoming message, as ServiceMix has no stdio binding component capable of reading user input from a console. So we use the JMS transport protocol for the incoming messages.
An important difference with Mule is that the message format in ServiceMix is XML. The JBI specification and, in particular, the normalized message router are based on the WSDL and XML standards. Therefore, we use XML messages in these examples.
Because ServiceMix consists of binding components (BCs) and service engines (SEs), we first have to decide which JBI component we’re going to use to implement the simple logging functionality. Because we want this example to be simple, a POJO implementation is the best choice. ServiceMix offers two POJO SEs: servicemix-bean and servicemix-jsr181. Both SEs are suited to show the logging example, but the servicemix-bean SE gives us better insight into the message exchange within ServiceMix. So we implement our example with the servicemix-bean SE.
4.2.1. Creating a logging service assembly for ServiceMix
Now let’s tackle the actual coding. When using the MessageExchangeListener interface provided by ServiceMix, the entry point for the Java class that we need to implement is the onMessageExchange method. The downside is that our Java class isn’t a real POJO anymore, and there is a dependency to the ServiceMix framework. But for now let’s ignore this, and start implementing the logging functionality in listing 4.8.
Listing 4.8. A simple logging example with the servicemix-bean service engine
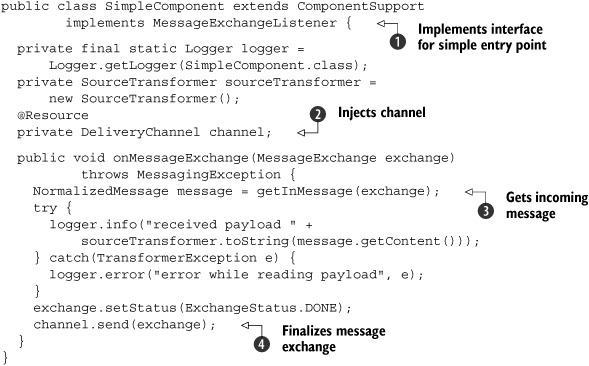
In listing 4.8, the SimpleComponent class implements the MessageExchangeListener
![]() interface to produce a simple entry point for the message exchange with the onMessageExchange method. The ComponentSupport abstract class is the parent class, because this class provides convenience methods for working with the JBI message exchange.
The servicemix-bean SE provides a way to inject the channel into the bean implementation
interface to produce a simple entry point for the message exchange with the onMessageExchange method. The ComponentSupport abstract class is the parent class, because this class provides convenience methods for working with the JBI message exchange.
The servicemix-bean SE provides a way to inject the channel into the bean implementation
![]() . For in-only exchanges, as we have in this example, this does nothing more than finalize the exchange and inform consumers
that the exchange is over
. For in-only exchanges, as we have in this example, this does nothing more than finalize the exchange and inform consumers
that the exchange is over
![]() . In the onMessageExchange method implementation, we first have to obtain the incoming message of the exchange. Because the SimpleComponent class extends the ComponentSupport abstract class, we can easily retrieve the incoming message with the getInMessage method
. In the onMessageExchange method implementation, we first have to obtain the incoming message of the exchange. Because the SimpleComponent class extends the ComponentSupport abstract class, we can easily retrieve the incoming message with the getInMessage method
![]() . The content of this message is logged with Log4j to the console.
. The content of this message is logged with Log4j to the console.
4.2.2. Creating service units and a service assembly
With the implementation of the SimpleComponent class ready, we’ve finished the Java part of this simple logging example. What we have skipped so far, for convenience reasons, is the project structure. As you already saw in previous chapters, the connection between the JMS BC and the SimpleComponent servicemix-bean SE can be configured in several ways. We use the JBI-compliant approach to structure the distribution, using a service assembly and several service units. Figure 4.1 shows the simple-sa service assembly that we use for the logging example.
Figure 4.1. The service assembly for the simple logging example consists of two service units, and the simple-bean-su consists of the SimpleComponent logging implementation.
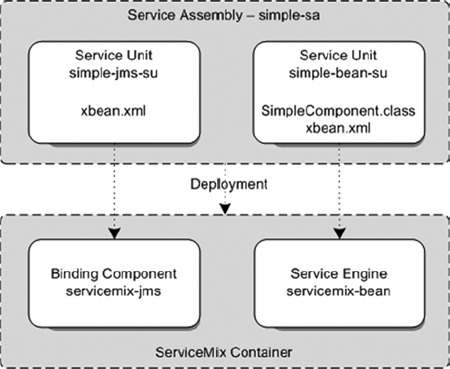
The simple-sa service assembly consists of two service units, as shown in figure 4.1. The SimpleComponent class from listing 4.8 is part of the simple-bean-su service unit. The other service unit, simple-jms-su, configures the JMS transport provider for the incoming message. Both service units have an xbean.xml file that configures the JMS BC and the servicemix-bean SE. This includes the configuration of the relationship between the JMS queue for the incoming message and the Java class that will be invoked when a message arrives at that queue. When the simple-sa service assembly is deployed to the ServiceMix container, the simple-jms-su service unit is deployed to work with the servicemix-jms BC and the simple-bean-su service unit works together with the servicemix-bean SE.
Defining the project structure
Fortunately, we can create the service assembly and the service units by using an Ant build file or a Maven plug-in provided by ServiceMix. The only thing we have to do is structure the project in such a way that this Ant build file or Maven plug-in is able to create the actual service assembly distribution.
Because ServiceMix provides both an Ant- and a Maven-based build procedure to create service units and service assemblies and to deploy the distribution to the ServiceMix container, we have to choose between these two build procedures for our examples. Maven is growing in popularity and provides a great way to deal with library dependencies; Ant is a build tool that has been around for quite some time and is integrated quite nicely in IDEs like Eclipse and NetBeans.
The downside of using Maven to build the ServiceMix distributions is, simply said, the time it takes to create the distribution and to deploy it to the ServiceMix container. The Ant build for ServiceMix takes considerably less time and works just fine for the build and deploy task. Therefore, we decided to use an Ant-based build procedure for our examples, although we know that not everybody will agree with our decision.
Note that our choice doesn’t impact the implementation of the examples; the implementation with a Maven-based build structure would include the same configuration files, except for the jbi.xml file generated only by Maven. Therefore, you can structure the examples in such a way that you can use Maven for the build and deploy task just as easily.
As explained in the previous callout, we use Ant to build and deploy the examples in this book. The project structure for the simple-sa service assembly is shown in figure 4.2. Note that the project structure of the other examples in the book use the same structure of service unit directories and XBean configuration files.
Figure 4.2. Project structure for the simple-sa service assembly used by the ch4-examples Ant build file to create the distribution that can be deployed to ServiceMix
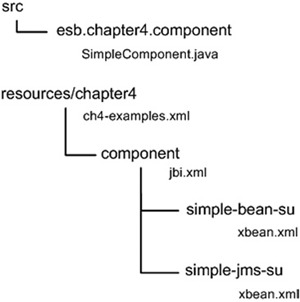
The project structure shown in figure 4.2 can be found in the ServiceMix code distribution for this book. The component directory is the starting point for the project structure of the simple-sa service assembly. In the jbi.xml file of the component directory, the service assembly’s structure is defined, as you can see in the following code snippet:
<jbi xmlns="http://java.sun.com/xml/ns/jbi" version="1.0">
  <service-assembly>
    <identification>
      <name>simple-sa</name>
      <description>OS ESBs - ServiceMix - Simple - SA</description>
    </identification>
    <service-unit>
      <identification>
        <name>simple-jms-su</name>
        <description>simple-jms-su</description>
      </identification>
      <target>
        <artifacts-zip>simple-jms-su.zip</artifacts-zip>
        <component-name>servicemix-jms</component-name>
      </target>
    </service-unit>
    <service-unit>
      <identification>
        <name>simple-bean-su</name>
        <description>simple-bean-su</description>
      </identification>
      <target>
        <artifacts-zip>simple-bean-su.zip</artifacts-zip>
        <component-name>servicemix-bean</component-name>
      </target>
    </service-unit>
  </service-assembly>
</jbi>
This jbi.xml file will be processed by the ServiceMix container to inspect the contents of the service assembly. Therefore, the jbi.xml file has to be part of the service assembly distribution file. The configuration of the service units is implemented with the xbean.xml files, as we see in more detail in the next section. ch4-examples.xml is an Ant build file for building and deploying the examples in chapter 4; you can also start the ServiceMix container with this file.
Configuring the service units
Now let’s go back to the logging example. We have yet to discuss the configuration of the service units in the xbean.xml files. When we want to execute our simple logging example, the first configuration we have to implement is the JMS queue for the incoming message. In the xbean.xml file shown in listing 4.9, the JMS endpoints are configured.
Listing 4.9. ServiceMix configuration for the simple-jms-su service unit
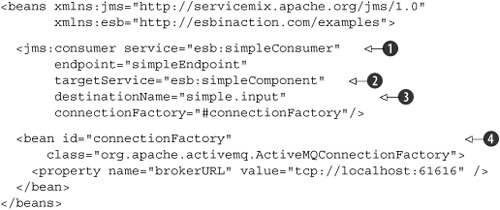
The configuration of the JMS queue for the incoming messages of our logging example is implemented with the jms:consumer element
![]() . The queue name is configured with the destinationName attribute and has a value of simple.input
. The queue name is configured with the destinationName attribute and has a value of simple.input
![]() . Because the endpoint is implemented as a consumer, it will listen for messages arriving at the simple.input queue. The connection factory used to connect to this queue is configured separately as a Spring bean, and points to the
ActiveMQ broker that is part of ServiceMix
. Because the endpoint is implemented as a consumer, it will listen for messages arriving at the simple.input queue. The connection factory used to connect to this queue is configured separately as a Spring bean, and points to the
ActiveMQ broker that is part of ServiceMix
![]() .
.
But what has to be done with the incoming messages? Well, the target destination for incoming messages is configured with
the targetService attribute
![]() . The destination for the incoming message is the simpleComponent service, which is configured in the http://esbinaction.com/examples namespace. The destination values correspond to the configuration of simple-bean-su, as shown in listing 4.10.
. The destination for the incoming message is the simpleComponent service, which is configured in the http://esbinaction.com/examples namespace. The destination values correspond to the configuration of simple-bean-su, as shown in listing 4.10.
Listing 4.10. ServiceMix configuration for the simple-bean-su service unit
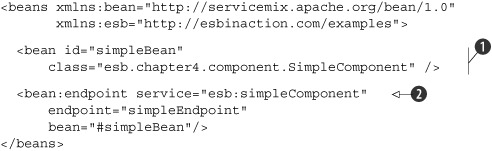
Notice that the service value of the bean:endpoint
![]() matches the targetService value of the jms:consumer shown in listing 4.9. The bean:endpoint simply links the endpoint to a JavaBean implementation with id simpleBean
matches the targetService value of the jms:consumer shown in listing 4.9. The bean:endpoint simply links the endpoint to a JavaBean implementation with id simpleBean
![]() —in our case, the SimpleComponent class in listing 4.8.
—in our case, the SimpleComponent class in listing 4.8.
We’ve now implemented all the pieces that accept a message from the simple. input queue, forward it to the SimpleComponent Java class, and log the message with Log4j to the console. All we have to do now is deploy the simple-sa service assembly to ServiceMix.
Deploying and testing the logging solution
The first step to deploy the service assembly is to start ServiceMix. As you’ll recall from previous chapters, you must start the ServiceMix container with the default target in the Ant build file of this chapter (the ch4-examples.xml file).
Once you’ve started ServiceMix, you’re ready to build and deploy the logging service assembly. Run the deploy-simple target in the ch4-examples.xml Ant build file. The service assembly is now deployed in the ServiceMix container, and the JMS and Bean service units are deployed to the corresponding JMS BC and Bean SE. This means that we are now ready to test the logging example. There are two options here; the first is to use the SimpleComponentTest JUnit test available in the source distribution in the test directory in the package esb.chapter4.component.test. The other option is to use the Swing test client application accompanying this book (see appendix F for more information) to put a message in the simple.input queue of the ActiveMQ broker. Regardless of the choice you make, you should see a logging statement in the ServiceMix console that displays the content of the message you’ve sent. If you use the JUnit test class provided in the source distribution, you should see the following log message:
INFO - SimpleComponent - received payload
<hello>world</hello>
If you see this message in the ServiceMix console, this means you have successfully completed the simple logging example. Let’s now enhance this example a bit and include an example of Spring integration with the JavaBan component. The Spring integration with ServiceMix is provided automatically, because the ServiceMix configuration uses the Spring configuration. In the xbean.xml examples in listings 4.9 and 4.10, you can see that the root element name is beans. This element belongs to the Spring bean configuration namespace. In the next section, we see how Spring can be used with ServiceMix.
4.2.3. Integrating ServiceMix and Spring
We can easily enhance the simple logging example of section 4.2.1 with Spring functionality without doing a lot of extra work. In the source code for chapter 4, as shown in figure 4.2, the Spring example is already added to the xbean.xml files of the simple-jms-su and simple-bean-su service units. In the JMS configuration we add another endpoint definition that listens to another queue, simpleSpring.input, and forwards the incoming message to another service, simpleSpringComponent. The rest of the JMS configuration is the same as in listing 4.9. For the Spring example, we create a separate Java component, SimpleSpringComponent, shown in listing 4.11.
Listing 4.11. ServiceMix component that uses Spring’s dependency injection
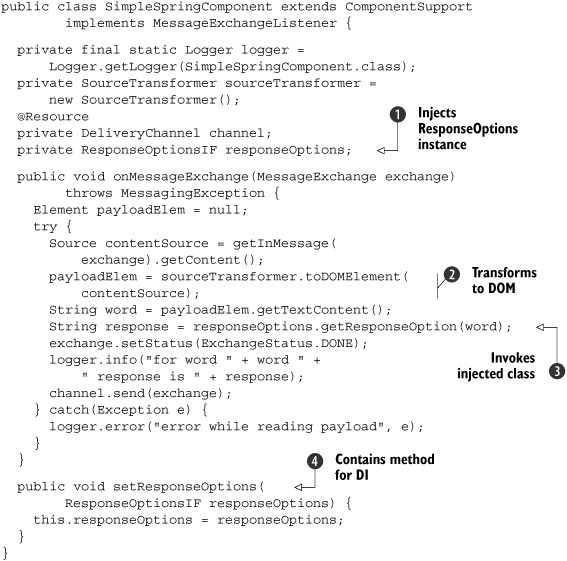
The SimpleSpringComponent implementation is similar to the one for Simple-Component in listing 4.8. There are, however, a few important differences. The Response-OptionsIF and ResponseOptions classes used in the Mule example and shown in listing 4.5 are also used for this ServiceMix example. The ResponseOptions class is injected by Spring according to the configuration that we discuss in listing 4.12
![]() ,
,
![]() . Because we need to pass an incoming text message to the injected ResponseOptions class instance, the incoming message is transformed to a DOM element
. Because we need to pass an incoming text message to the injected ResponseOptions class instance, the incoming message is transformed to a DOM element
![]() . With the DOM element, we can easily get the value of the element with the getTextContent method. Because the input message will be similar to <word>ESB</word>, the get-TextContent method will return the value of the word element (ESB in the example given). The value of the word element is then passed on to the ResponseOptions class instance
. With the DOM element, we can easily get the value of the element with the getTextContent method. Because the input message will be similar to <word>ESB</word>, the get-TextContent method will return the value of the word element (ESB in the example given). The value of the word element is then passed on to the ResponseOptions class instance
![]() and the response value is logged to the console with Log4j.
and the response value is logged to the console with Log4j.
You may wonder why we don’t send the response value back to the sender of the text message. Because this needs some extra configuration (which we discuss in section 4.5), we just log the response to the console. The remaining part of the Spring integration example is the xbean.xml configuration of the simple-bean-su service unit. Listing 4.12 describes this configuration.
Listing 4.12. ServiceMix configuration that uses a Spring bean
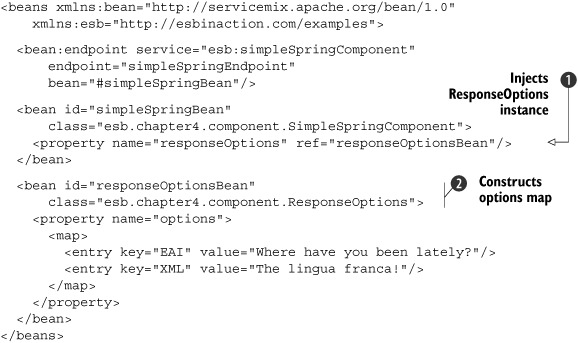
The ServiceMix configuration is similar to the one for Mule in listing 4.7. The ResponseOptions configuration is exactly the same, as we use Spring in both examples
![]() . A ResponseOptions instance is injected by Spring in the responseOptions setter method of the SimpleSpringComponent class that we have just discussed
. A ResponseOptions instance is injected by Spring in the responseOptions setter method of the SimpleSpringComponent class that we have just discussed
![]() .
.
Because we’ve already deployed the simple-sa service assembly to the ServiceMix container that also includes the Spring example, we can proceed to test the example. You can again use a JUnit test, SimpleSpringComponentTest, or use the Swing test client to put a message in the simpleSpring.input queue of the ActiveMQ broker.
The result of the unit test or the Swing test client should be a log statement in the ServiceMix console. The log statement should reproduce the word element value you’ve sent and the corresponding response value as configured in the xbean.xml file shown in listing 4.12.
With this final test, we’ve succeeded in implementing some custom logic in both Mule and ServiceMix. But the custom logic involved just one component—a real-world integration solution consists of more than one. In the next section, we look at how these integration solutions can be implemented with message flows.
4.3. Constructing message flows with an ESB
Now that you know how to build components in Mule and ServiceMix, you only need to learn how to connect these components into complete message flows. We talk about what a message flow is and which elements it consists of in section 4.3.1. But to grasp the basics of constructing message flows, you’ll want to implement a message flow yourself. In section 4.3.2 we present a case study that involves implementing a message flow. This case study will be used in the remaining sections of this chapter (with Mule in section 4.4 and ServiceMix in section 4.5). But let’s not rush and instead start off with some background.
4.3.1. What is a message flow?
Building an integration solution doesn’t stop with developing components and connecting them to one another as we’ve done in sections 3.1 and 3.2. These sections were merely a ramp for the actual deliverable in an integration solution: the message flow. To avoid making our discussion too theoretical, we begin with a schematic overview of a message flow (figure 4.3).
Figure 4.3. Schematic explanation of a message flow, which is the intermediary between a service consumer and a service provider
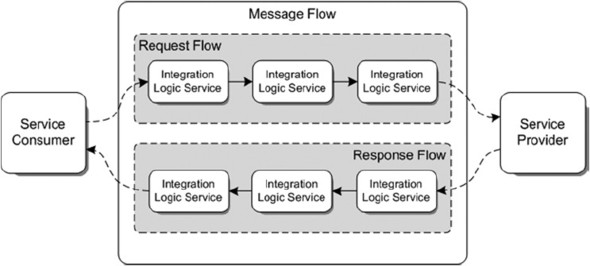
In basic terms, a message flow provides an intermediary layer between a service consumer and a service provider. The terminology of service consumer and service provider is used in the web services and SOA world to indicate which application asks for information (the service consumer) and which application provides the information (the service provider). In chapter 1 we listed the benefits of an intermediary layer in a complex IT environment that needs to integrate applications. The implementation of the intermediary layer is the message flow, which makes sure that the request message is delivered at the service provider and the response message is sent back to the service consumer.
A typical message exchange between a service consumer and a service provider consists of a request and a response message. Although there are other message exchange patterns (MEPs), we use the request-response MEP to explain the concept of a message flow.
The exchange of messages between a service consumer and a service provider can be described with a message exchange pattern (MEP). Common MEPs are request-response and one-way in WSDL 1.1 terminology. In WSDL 2.0, request-response is referred to as in-out and one-way as in-only. MEPs are useful to provide additional details on the message interface a service provider offers.
A typical message flow consists of a request flow for handling the request message and a response flow for dealing with the response message. Because of the diversity of integration logic necessary for a particular implementation, it’s not possible to define a standard structure for a request or a response flow. But as shown in figure 4.3, we can be sure that a request and a response flow consist of a number of integration logic services. You can think of an integration logic service as a piece of work that needs to be done as part of the request or response handling. This can, for example, be a transformation of the incoming message to the message format expected by the service provider. Another example is a message enhancement that consists of retrieving some extra information from a database. The integration logic services are the conceptual equivalents of the ESB components discussed in section 4.1.
In most cases, a message flow consists of multiple integration logic services, so there’s a need for communication between these services. We look at the details of linking components in this section. Figure 4.3 shows a straightforward connection between the various integration logic services. In practice, there will be different paths for different messages.
What also needs explaining is the communication between the service consumer and the service provider. There should be a clear interface for both the message exchange between the service consumer and the message flow (the ESB), as well as between the message flow (the ESB) and the service provider. Often, a WSDL is regarded as the “silver bullet” of defining interfaces between applications. We, however, find one part of the WSDL vital: the message definition. Preferably, use XML as the message exchange format so the message definition can be implemented with an XML Schema Definition (XSD).
Besides the message definition, the message transport protocol should be determined. When dealing with legacy applications the choice of transport protocols is very limited, but when dealing with applications that are still under development multiple options exist. What’s important here is that a transport protocol be chosen that matches the nonfunctional needs for the service. For example, don’t use plain SOAP over HTTP when the messages to be exchanged are business critical and shouldn’t be lost. Chapter 6 explains the various connectivity options, along with their advantages and disadvantages. Now, let’s move on and discuss a message flow example that will be implemented in section 4.4 with Mule and in section 4.5 with ServiceMix.
4.3.2. A message flow case study
We’ve discussed a bit of theory about message flows, so we should be ready to make this knowledge a bit more practical.
The context for the case study will be the calculation of the cheapest price for a specific book at two bookstores, Amazon and Barnes & Noble. As you may recall from figure 4.3, a message flow can be divided into a request and a response flow. The request flow starts with sending a message with an International Standard Book Number (ISBN) to the open source ESB. The ESB will forward this message to the two bookstores and wait for a response message. The processing of the response message is part of the response flow of the message flow that we’ll implement. The response flow is triggered when the two bookstores send a response message containing the price for the book back to the ESB. These messages are aggregated into one message and then the cheapest price is calculated. The name of the bookstore with the least expensive price and the price amount is then sent back to the initial requestor (see figure 4.4).
Figure 4.4. An overview of the message flow for the book price case study that involves communication with the Amazon and Barnes & Noble bookstores. The example shows a customer that requests the cheapest price for a specific book represented as an ISBN.
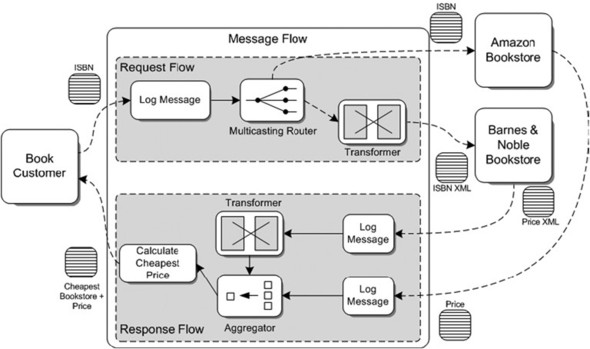
As you can see in figure 4.4, the book price case study is not that simple to implement in a message flow. But we don’t want only simple examples like the ones in sections 4.1 and 4.2, do we? Let’s walk through the important and complex parts of the book message flow. A virtual book customer will send a message containing an ISBN to the ESB. The transport protocol used here could be pretty much anything, but for this case study we use JMS. When an ISBN message arrives at the JMS queue, the ESB will log the message for auditing. Then we need to forward the message to the Amazon and Barnes & Noble bookstores. Hohpe and Woolf’s book on Enterprise Integration patterns (EIPs) has defined a number of patterns for these common integration problems. In figure 4.4, a multicasting router is shown that’s referred to as the Recipient List pattern in the EIP book. This pattern simply distributes the same message to multiple endpoints—exactly what we need for our case study. We’ll see later on how this pattern can be implemented.
The Amazon bookstore is able to process the message in the same format as the incoming message. The Barnes & Noble bookstore isn’t capable of processing the incoming message. This bookstore expects a message in a specific XML format, and the incoming message has another message format. Therefore, the message is transformed to the XML format before it’s sent to the Barnes & Noble bookstore.
When the bookstores have processed the ISBN message and found the listed price for the book corresponding to the ISBN, a response message containing the book price is returned to the ESB. As we did for the incoming message, we use a JMS transport protocol for communication with the two bookstores. When the response messages arrive, the messages are first logged for auditing purposes. The response message of the Amazon bookstore will contain the book price and the corresponding ISBN in a message format that the ESB is able to process. The Barnes & Noble bookstore message needs to be transformed to the same format as the Amazon response message before it can be processed.
Because we must be able to compare the two response messages, we must receive these two messages at the same time. Without implementing additional functionality, a message is commonly processed on an individual basis. To be able to combine the two messages, we can use an aggregator pattern, which is also defined in the EIP book. The aggregator is able to combine messages with unique element values into one message. The aggregator looks at incoming messages for unique values that you can specify and matches messages with the same unique values into one message. For the book price case study, we can use the ISBN message as a simple unique value for the aggregator. A condition to use the ISBN message is that only one input message with the same ISBN message can be processed at once. But for our simple example, this should be sufficient.
When the two book price messages are aggregated into one message, the lowest price can be determined. Eventually, when the lowest price is calculated, a response message containing the name of the bookstore with the lowest price and the corresponding amount is sent to the initial book customer.
Now that we’ve discussed the case study, we can proceed with the implementation. In section 4.4 we look at implementing the book price case study with Mule.
4.4. Implementing a message flow with Mule
In the examples in section 4.1, we’ve already implemented some simple message flows. The message flows consisted of only one Mule service that consumed user input from the console; in the last example, a response was also sent to the same console.
Therefore, these message flows lack a real request and response flow implementation. In this section, you’ll learn how to implement a full message flow, based on the case study description given in section 4.3.2.
4.4.1. Implementing the request flow with Mule
The full implementation of the book price case study will consist of quite a number of Java classes and a large Mule configuration. As usual, the full source code is available at the book’s website. Therefore, we don’t show every bit of Java code and Mule configuration in this section, but we focus on the important parts. First we examine the processing of the incoming ISBN message and the forwarding of the ISBN to the Amazon and Barnes & Noble bookstores. Figure 4.5 shows the Mule configuration for the request flow.
Figure 4.5. An overview of the Mule configuration of the request flow for the book price case study. The incoming message is logged and forwarded to two endpoints by the multicasting router.
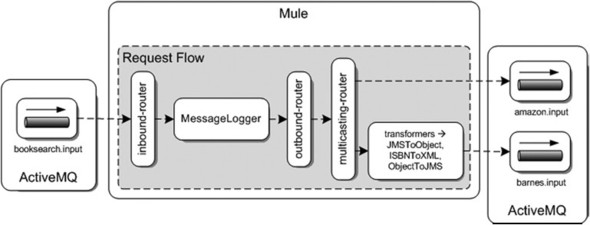
Figure 4.5 shows a distinction between the Mule container and the ActiveMQ message broker. The JMS implementation that will supply the queues to communicate with the book consumer and the two bookstores is provided by ActiveMQ. In the Mule configuration bookquote-config.xml, a message logger class is configured as a Mule component that has an inbound router that polls the booksearch.input ActiveMQ queue. When a message arrives, it’s simply logged with Log4j. This is probably quite familiar to you by now. The more interesting part of the request flow configuration is the implementation of the multicasting to the two bookstores. Let’s zoom in to the outbound router configuration of the MessageLogger Mule component (listing 4.13).
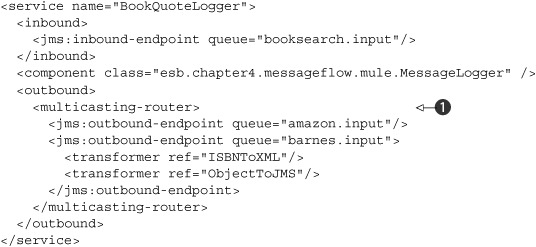
Listing 4.13. Outbound routing configuration of the message logger service
In the example in section 4.1 that also used an outbound router, a simple outbound-pass-through-router was used that just forwards the message to one endpoint.
In this case we need a router that’s able to forward a message to multiple endpoints. In listing 4.13, the multicasting-router is used to implement this functionality
![]() . With this router, we can configure multiple endpoints to which the message is sent. For the Amazon bookstore, the message
is forwarded to the ActiveMQ input queue, which will be read by an Amazon service that retrieves the book price for the provided
ISBN. For the Barnes & Noble bookstore, the message is transformed into an XML message. Because the message just contains
an ISBN, it is a simple XML message like this:
. With this router, we can configure multiple endpoints to which the message is sent. For the Amazon bookstore, the message
is forwarded to the ActiveMQ input queue, which will be read by an Amazon service that retrieves the book price for the provided
ISBN. For the Barnes & Noble bookstore, the message is transformed into an XML message. Because the message just contains
an ISBN, it is a simple XML message like this:
<isbn>ISBN number</isbn>
To be able to get the payload of the initial message as sent by the book customer and to not be dependent on a JMS message instance, the message is first transformed implicitly into a Java object at the inbound endpoint of the BookQuoteLogger Mule service. This transformer, org.mule.transport.jms.transformers.JMSMessageToObject, is provided out of the box, and just retrieves the actual payload of the JMS message. Because the transformed XML message is once again sent to a JMS queue, the message is changed back to a JMS message again at the outbound endpoint definition by another standard transformer, org.mule.transport.jms.transformers.ObjectToJMSMessage.
4.4.2. Implementing the response flow with Mule
More complex logic is implemented in the response flow of the book price case study. We have to implement functionality to aggregate the two response messages that contain the book prices and to calculate the lowest price of the responses. Let’s start with a schematic overview of the Mule implementation of the response flow in figure 4.6.
Figure 4.6. Overview of the response flow for the book price case study. The two response messages from Amazon and Barnes & Noble are logged and aggregated into one message. Then the prices are compared and the lowest price is sent back to the customer.
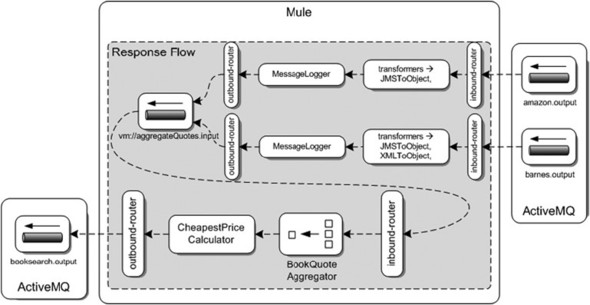
As you can see in figure 4.6, this is different from the request flow we discussed in figure 4.5, isn’t it? Let’s break the response flow of figure 4.6 down to comprehensible portions. We begin with the two response messages that are received from the amazon.output and barnes.output queues. The same MessageLogger service used in the request flow is used to log the incoming messages from Amazon and Barnes & Noble that consist of a book price, the ISBN, and the bookstore company name. Before the message is routed to the next Mule service, it is transformed to a Java object, BookQuote, which has the three message attributes we just mentioned. For the response message from the Amazon bookstore, we can simply get the payload out of the JMS ObjectMessage, but for the Barnes & Noble bookstore, the response message has to be converted from an XML format to the BookQuote Java object. JiBX is used to do this transformation; for more details on JiBX, return to chapter 3.
Configuring and implementing the aggregator
The two response messages that are both transformed into a BookQuote POJO are then sent to a so-called virtual machine queue, vm://aggregateQuote.input. This queue is hosted inside the Java Virtual Machine (JVM) Mule is running in, and is well suited for high-performance cases. In this case, the queue runs in-memory, but in cases where reliability is essential, the queue can also be made persistent. This virtual machine queue is defined in the inbound element of the CheapestPriceCalculator service.
But before the incoming message is routed to the component implementation, the two response messages are first aggregated into one message. Because the calculator must be able to get the book prices of both response messages in order to calculate the lowest price, the messages are combined into a collection of BookQuote POJOs. Before we look at the Java implementation of this aggregator component, let’s see how this can be defined using the Mule configuration (listing 4.14).
Listing 4.14. Mule configuration for the cheapest price calculator

You’ve seen quite a few Mule configurations by now, so perhaps you notice that the main difference here is the use of a custom
router
![]() . Mule provides a number of inbound routers out of the box, but in this case we need some custom logic. We have to match two
incoming messages with the same ISBN and aggregate them into one message. The aggregated message is eventually passed on to
the Java class that calculates the lowest price
. Mule provides a number of inbound routers out of the box, but in this case we need some custom logic. We have to match two
incoming messages with the same ISBN and aggregate them into one message. The aggregated message is eventually passed on to
the Java class that calculates the lowest price
![]() .
.
To implement the aggregator, a custom Java class is necessary, but luckily we can use an aggregator base class that Mule provides: AbstractEventAggregator. Before looking at the implementation of the BookQuoteAggregator in listing 4.15, remember that the incoming message for this aggregator is the BookQuote Java object that contains a book price, an ISBN, and a company name.
Listing 4.15. Implementation of a custom aggregator, the BookQuoteAggregator

The BookQuoteAggregator consists of quite a bit of code, but this class also provides a lot of functionality. The base class AbstractEventAggregator already includes the convenience methods to implement an aggregator, so we only have to implement the custom logic necessary for matching the two book price messages.
The first part of the custom aggregator is the aggregation process to create a new message
![]() . Because we simply need to have the two messages available for the calculation of the lowest price, we create a collection
of the two BookQuote Java objects and return them as the aggregated Mule message
. Because we simply need to have the two messages available for the calculation of the lowest price, we create a collection
of the two BookQuote Java objects and return them as the aggregated Mule message
![]() .
.
The second piece of logic is the implementation of when the group of messages can be aggregated into one message
![]() and forwarded to the actual component implementation, in our example the CheapestPriceCalculator. The shouldAggregateEvents method returns true if all the messages of the same group have arrived and the aggregation can take place, and returns false
if there are still messages to be processed. We’re expecting two response messages, one from Amazon and one from Barnes &
Noble, so we look at the company names of the messages in the group
and forwarded to the actual component implementation, in our example the CheapestPriceCalculator. The shouldAggregateEvents method returns true if all the messages of the same group have arrived and the aggregation can take place, and returns false
if there are still messages to be processed. We’re expecting two response messages, one from Amazon and one from Barnes &
Noble, so we look at the company names of the messages in the group
![]() to determine whether the aggregation can already start.
to determine whether the aggregation can already start.
The final part that we have to implement is the logic that matches corresponding response messages so that eventually the
correct response messages are aggregated into one message
![]() . In this example, the ISBN can be used to match the response messages. So when an event arrives at this aggregator, the ISBN
of the message is returned as the group identifier. Based on this group identifier, the AbstractEvent-Aggregator implementation takes care of creating an EventGroup object instance, where corresponding messages are grouped together. So looking back at the custom aggregator we’ve just implemented,
we think you’ll agree it isn’t as complex as you may have expected.
. In this example, the ISBN can be used to match the response messages. So when an event arrives at this aggregator, the ISBN
of the message is returned as the group identifier. Based on this group identifier, the AbstractEvent-Aggregator implementation takes care of creating an EventGroup object instance, where corresponding messages are grouped together. So looking back at the custom aggregator we’ve just implemented,
we think you’ll agree it isn’t as complex as you may have expected.
To provide a full overview of the functionality implemented to create the lowest price calculator functionality, listing 4.16 shows CheapestPriceCalculator. It shouldn’t be too hard to follow, now that we’ve discussed the aggregator example.
Listing 4.16. Implementation of CheapestPriceCalculator
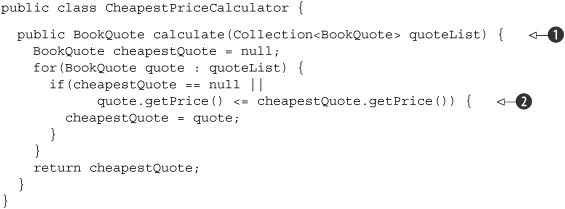
The cheapest price calculator accepts a collection of BookQuote POJOs that were aggregated in the BookQuoteAggregator as input
![]() . While looping through the list of BookQuote instances, the cheapest BookQuote instance is kept as a reference
. While looping through the list of BookQuote instances, the cheapest BookQuote instance is kept as a reference
![]() . The lowest book price message is eventually returned as the output of the calculator component.
. The lowest book price message is eventually returned as the output of the calculator component.
Deploying and testing the Mule cheapest price calculator
We’ve implemented all parts of the book price case study for Mule, so we should be able to the test the whole message flow, right? Well, we’re missing a few important conditions to be able to test the full message flow. We have no book consumer that sends an ISBN and eventually is able to receive the lowest book price. We also lack an implementation of the Amazon and Barnes & Noble price search services.
In the book’s source code, you can find implementations for these three components. The book consumer is simulated with the Swing test client, and the two price search services, AmazonBookStore and BarnesBookStore, are implemented as JMS message listeners and producers. The AmazonBookStore and BarnesBookStore message listeners are started with the messageflow-spring target in the ch4-examples Ant build file.
You also need to start an ActiveMQ message broker by running the activemq script in the bin directory of the ActiveMQ binary distribution or by running the start-activeMQ target in the ch4-examples Ant build file. Go ahead and test this Mule message flow by executing the messageflow-mule target in the ch4-examples Ant script. This Ant script compiles the source code, creates and deploys a Mule-deployable JAR file, and starts Mule with the configuration of the cheapest price example.
Now we can execute the final step, which means running the Swing test client that’s able to send a message to the booksearch.input queue. The input of the message should be an ISBN of 1010101010 or 9999999999. You can also use the JUnit test MessageFlowTest to test the message flow example.
The response message of the cheapest price message flow should eventually include a company name that equals to Amazon or BarnesAndNoble and the lowest price value. When you receive this message, this means that the full message flow has executed as designed. If you feel the need to dig into the processing path of the message flow, you can look in the console where Mule has started. You should find logging messages that describe the message flow path.
Take your time to explore all the parts of the message flow that we’ve just implemented with the Mule source code for this book. We implemented quite a bit of functionality in this section, and we focused on the difficult parts of the case study implementation. Now you’re ready for more serious integration challenges with Mule in the chapters that follow. But first, we implement the same case study with ServiceMix. The ServiceMix case study implementation should give you a good feeling about the similarities and differences between Mule and ServiceMix. And it will make you even more knowledgeable about open source integration technologies in general.
4.5. Implementing a message flow with ServiceMix
In section 4.2 we implemented a small message flow. The example used a component that consumes messages from an ActiveMQ queue, and we included a small piece of custom logic that logged the incoming message to the console. When you look back at the theory behind the message flow concept, this functionality is similar to the request flow part of a message flow. So what’s missing here is an endpoint where the request is sent to and a response flow that takes care of routing the response message produced by the endpoint back to the initial sender. In this section, we implement a full message flow, including a request flow and a response flow.
4.5.1. Implementing the request flow with ServiceMix
We use the price case study described in section 4.3.2 again as the integration problem that we need to solve, this time with ServiceMix. In section 4.2 we discussed the project layout and the JBI binding components and service engines, so we don’t do that here again. Let’s step through the ServiceMix implementation of the price case study by first discussing the request flow and then the response flow. Figure 4.7 kicks off the solution implementation with an overview of the request flow implementation.
Figure 4.7. The request flow implementation of the price case study with ServiceMix. The incoming message is logged and forwarded to the Amazon and Barnes & Noble endpoints.
The solution as shown in figure 4.7 is divided into the service unit packages as they will be deployed eventually on ServiceMix. The packages have the names of the service engines and the binding component to which the service units are deployed. One binding component and one service engine will be familiar to you: the servicemix-jms and the servicemix-bean JBI components. The request flow will start with an incoming message at the booksearch.input queue that you see in the left portion of figure 4.7. The numbers that are included in the figure can guide you with the execution order. We include them only as a functional guidance; the numbers don’t represent the runtime execution order. For example, the message logger bean could be executed after the JMS provider for the Amazon service is executed.
Configuring a static recipient list
A JMS endpoint is configured within ServiceMix that consumes the incoming message and passes it on to the eip:static-recipient-list component. This component uses the EIP package that ServiceMix provides with the servicemix-eip service engine. The static recipient list is able to send the same message on to multiple destinations, and that’s exactly what we need here. The incoming message should be logged to the console and then forwarded to the Amazon and Barnes & Noble bookstores. The configuration of the static recipient list is shown in listing 4.17.
Listing 4.17. ServiceMix configuration for the static recipient list
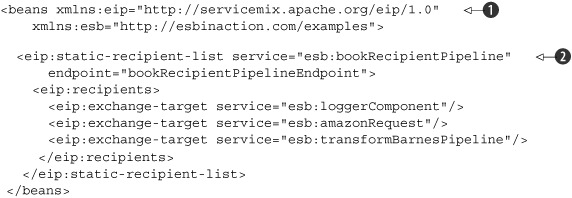
The servicemix-eip service engine uses a separate ServiceMix namespace, http://servicemix.apache.org/eip/1.0
![]() , as is common practice for every service engine or binding component within ServiceMix. The configuration of the static recipient
list pattern is pretty simple in ServiceMix
, as is common practice for every service engine or binding component within ServiceMix. The configuration of the static recipient
list pattern is pretty simple in ServiceMix
![]() . We only have to configure the list of destinations (called exchange targets) for the incoming message. The service attribute of the exchange target points to the destination where the message must be sent. You already learned how to use
service names in section 4.2.
. We only have to configure the list of destinations (called exchange targets) for the incoming message. The service attribute of the exchange target points to the destination where the message must be sent. You already learned how to use
service names in section 4.2.
The MessageLogger implementation that takes care of the logging functionality is similar to the logging implementation in section 4.2. The message to the Amazon bookstore is just forwarded to a JMS endpoint that produces a new message on the amazon.input queue.
Implementing and configuring a message transformer
For the Barnes & Noble bookstore, we first have to transform the message into the proper XML message format. Because the XSLT transformation uses an in-out message exchange type, we have to deal with an in-only message exchange that’s used by the JMS endpoint of the Barnes & Noble request message. Before we can execute the XSLT transformation, the message exchange type first has to be changed with a pipeline component.
The pipeline component is able to accept an in-only message exchange to be forwarded to an in-out message exchange, where the result of the in-out call is forwarded to a destination that can be configured in the pipeline configuration. When you implement message flows with ServiceMix or JBI in general, the trigger of the flow can expect a response message (an in-out exchange), or the trigger expects no answer back (an in-only exchange). An asynchronous communication style is predominant in an enterprise integration environment, so the message exchange pattern is in many integration cases in-only. But some of the components that need to be used in the message flow implementation may require an in-out message exchange. For situations where you need to perform an in-out message exchange from an in-only message exchange, a pipeline can be used. The pipeline converts the in-only exchange into an in-out exchange and forwards the result of the in-out exchange to a configurable destination.
The pipeline component is an essential part when dealing with different types of message exchanges within ServiceMix. JMS endpoints typically use an in-only message exchange as they only accept incoming messages and don’t give back a response message. On the other hand, a lot of the service engines use an in-out message exchange type as they accept incoming messages and return response messages. Listing 4.18 shows the configuration for the pipeline that calls the Saxon component.
Listing 4.18. Pipeline configuration for the in-out invocation of the Saxon component
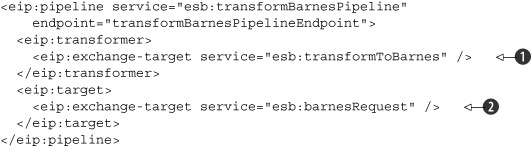
Notice that the service name for this pipeline corresponds with the last target of the static recipient list that was shown
in listing 4.17. With the transformer element, the target service that requires an in-out message exchange is configured
![]() . This service is implemented with the Saxon JBI component that we’ll discuss shortly. With the target element, the target service for the response message of the Saxon JBI component can be configured
. This service is implemented with the Saxon JBI component that we’ll discuss shortly. With the target element, the target service for the response message of the Saxon JBI component can be configured
![]() . The target service barnesRequest is implemented with a JMS endpoint.
. The target service barnesRequest is implemented with a JMS endpoint.
Now that we’ve transformed the message exchange from in-only to in-out with the pipeline configuration, we’re able to implement the actual transformation. Figure 4.8 shows the XSLT transformation performed here.
Figure 4.8. Transformation of the ISBN message incoming format to the message format as expected by the Barnes & Noble bookstore
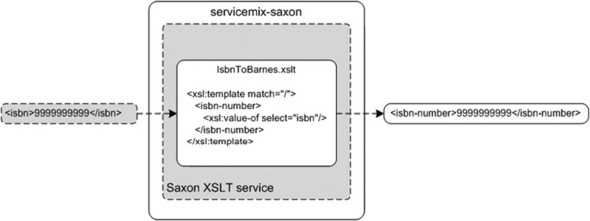
The XSLT transformation used in the book price case study is implemented with the ServiceMix Saxon JBI component. The Saxon JBI component is able to transform an incoming message based on a XSLT style sheet. Figure 4.8 shows a simple XSLT style sheet that transforms the incoming ISBN into an isbn-number element. The functionality implemented here is not so difficult, and the same setup could also be used to perform more complex XSLT transformations. Listing 4.19 shows the xbean.xml configuration for the XSLT transformation.
Listing 4.19. Saxon XSLT configuration
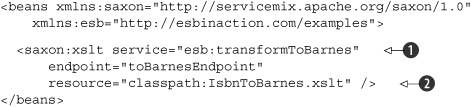
You can see that the value of the service attribute
![]() of this XSLT transformer, esb:transformToBarnes, is referenced from the configuration shown in the transformer element in listing 4.18. Because the XSLT style sheet IsbnToBarnes.xslt is provided in the classpath of the service unit distribution, we can reference
the IsbnToBarnes.xslt file directly
of this XSLT transformer, esb:transformToBarnes, is referenced from the configuration shown in the transformer element in listing 4.18. Because the XSLT style sheet IsbnToBarnes.xslt is provided in the classpath of the service unit distribution, we can reference
the IsbnToBarnes.xslt file directly
![]() .
.
The result of the XSLT transformation will be sent to the target service configuration of listing 4.18, which is a JMS endpoint. You can find the configuration of the JMS endpoints and the MessageLogger bean in this book’s source code. We’ve discussed the details of these configurations in section 4.2.
4.5.2. Implementing the response flow with ServiceMix
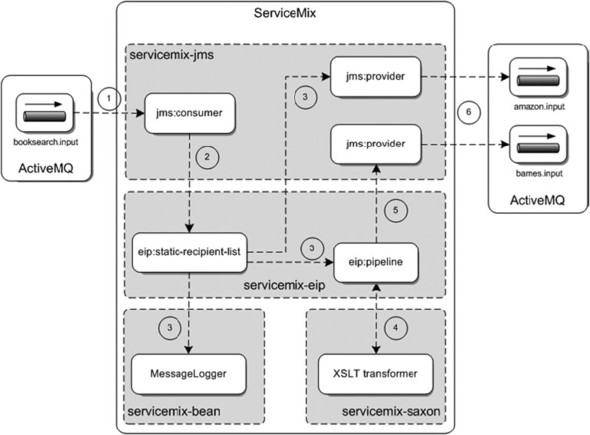
Let’s move on to the response flow. This implementation must be able to consume the response messages of the Amazon and Barnes & Noble bookstores, log these messages, aggregate them into one message, calculate the cheapest offering, and eventually return this offering to the book customer. This is quite a lot of functionality, so let’s begin the walkthrough of the response flow (figure 4.9).
Figure 4.9. The response flow implementation of the book price case study. The incoming book quotes from Amazon and Barnes & Noble are logged and aggregated. Then the lowest price is calculated and sent back to the customer.
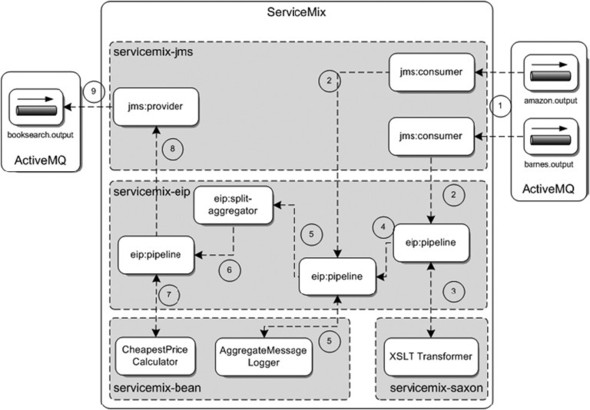
The response flow in figure 4.9 consists of an impressive group of ServiceMix functionalities. When we compare the response flow with the request flow in figure 4.7, the main difference is the aggregator and the number of pipelines. Let’s start with the order of functionality that’s processed when the response flow is executed. The response flow is triggered by two response messages arriving from the Amazon bookstore at the amazon.output JMS queue and from the Barnes & Noble bookstore at the barnes.output JMS queue.
The incoming message from the Barnes & Noble bookstore is first transformed with an XSLT component. This is the same functionality that we saw in the request flow implementation. So again, we use a pipeline to transform the in-only message exchange of the JMS endpoint to an in-out message exchange needed by the Saxon XSLT transformer. (We don’t discuss the details here again.)
Implementing the Aggregator
You may be wondering why the message exchange with the AggregateMessageLogger is in-out and not in-only, as in the request message flow. Why is a pipeline component necessary to transform the in-only message exchange initiated by the JMS consumers to an in-out message exchange to invoke the logger component? In most cases, a logger component requires just an in-only as it consumes a message and doesn’t produce a response message. Well, AggregateMessageLogger does a bit more than just log the message contents.
Because we use a standard ServiceMix aggregator to group the two incoming response messages from Amazon and Barnes & Noble, we need to set some additional message properties. This standard aggregator is part of the splitter/aggregator functionality that ServiceMix provides. So messages are first divided into multiple smaller messages and eventually the aggregator groups the smaller messages into a large message again. Because we didn’t have to use splitter functionality, we must set some message properties that otherwise the splitter would have done. (We could’ve also created a new aggregator implementation, but that approach would make this example unnecessarily complex.)
The AggregatorMessageLogger implementation uses the functionality of the servicemix-bean service engine. You saw some examples of such an implementation in section 4.2, but we’re using different functionality this time (see listing 4.20).
Listing 4.20. AggregatorMessageLogger implementation
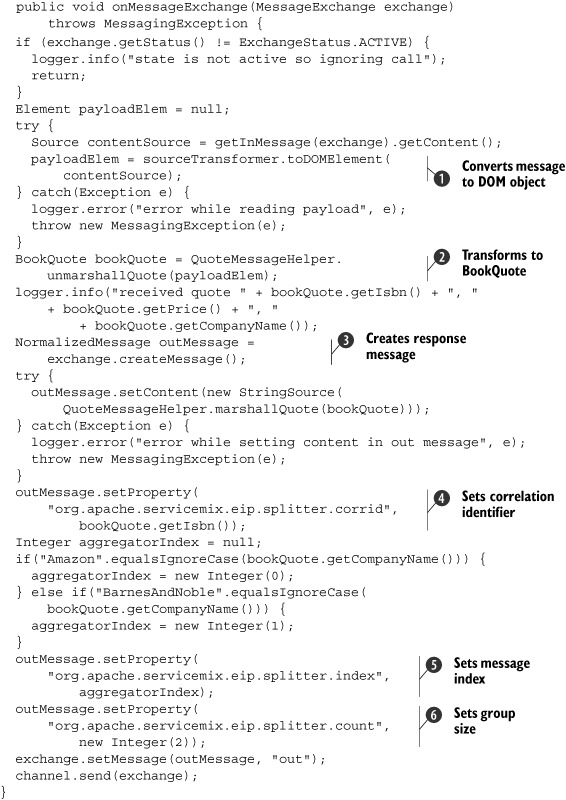
Only the onMessageExchange method implementation is shown in listing 4.20. The logger, transformer, and channel instantiation were already shown in listings 4.8 and 4.11 in section 4.2. In this method implementation, the contents of the incoming message are first transformed to an XML representation as a
Document Object Model (DOM) object
![]() . This makes it easier to process the contents of the message for the rest of the method implementation. Then the DOM object
instance is transformed to a BookQuote JavaBean with an isbn, a price, and a companyName attribute
. This makes it easier to process the contents of the message for the rest of the method implementation. Then the DOM object
instance is transformed to a BookQuote JavaBean with an isbn, a price, and a companyName attribute
![]() . Now we can easily log the message contents with Log4j to the console.
. Now we can easily log the message contents with Log4j to the console.
To be able to set some message properties needed for the ServiceMix aggregator implementation, we created a response message
![]() . First the contents of the incoming message are just copied to the outgoing message. We don’t want to change this part of
the message. What needs to be added are some message properties, including a correlation identifier for the group of messages
that need to be aggregated into one grouped message
. First the contents of the incoming message are just copied to the outgoing message. We don’t want to change this part of
the message. What needs to be added are some message properties, including a correlation identifier for the group of messages
that need to be aggregated into one grouped message
![]() . As with the Mule implementation, we use the ISBN for the correlation identifier. For real-world implementations, you’d certainly
choose a better and more unique correlation identifier here.
. As with the Mule implementation, we use the ISBN for the correlation identifier. For real-world implementations, you’d certainly
choose a better and more unique correlation identifier here.
Another property that needs to be set for the aggregator is the message index. This is needed by the aggregator to determine
whether every message of the group has been received. For this example, we just give the Amazon message a message index of
0 and the Barnes & Noble message a message index of 1. The index is then set with the index attribute
![]() . The last property that needs to be set is the number of messages that have to be aggregated into one message. This is done
by setting the count attribute
. The last property that needs to be set is the number of messages that have to be aggregated into one message. This is done
by setting the count attribute
![]() .
.
Configuring the service units
We have yet to discuss configuring the pipeline that accepts messages from the Amazon response queue and the XSLT transformation, invokes the message logger, and routes the result to the aggregator component. This configuration is shown in listing 4.21.
Listing 4.21. Pipeline configuration for the message logger
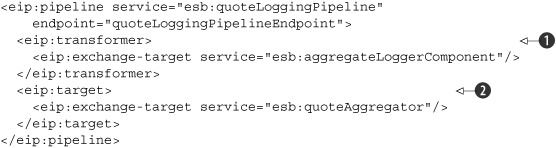
As shown with the eip:transformer element configuration
![]() , the pipeline first invokes the AggregatorLoggerComponent from listing 4.9. With the eip:target configuration
, the pipeline first invokes the AggregatorLoggerComponent from listing 4.9. With the eip:target configuration
![]() , you can set the target service for the response message received from the AggregatorLoggerComponent. The pipeline component is used in many examples in this book as it is essential in invoking in-out components from an in-only
message exchange.
, you can set the target service for the response message received from the AggregatorLoggerComponent. The pipeline component is used in many examples in this book as it is essential in invoking in-out components from an in-only
message exchange.
The next component, the split-aggregator, is invoked in the response flow when the pipeline in listing 4.21 receives a response from the special logger component. Because we enhanced the logging component with the creation of three aggregator-related properties (the correlation identifier, message index, and group size), we can use the standard aggregator provided by ServiceMix. We only need to configure this aggregator (see listing 4.22).
Listing 4.22. ServiceMix aggregator configuration

The service name of the aggregator configuration
![]() corresponds to the target destination configuration of the pipeline in listing 4.21. This links the pipeline component and the aggregator component to each other. There’s no need to configure additional properties;
we can just pass the result of the aggregation to the next component in the response flow, which is another pipeline
corresponds to the target destination configuration of the pipeline in listing 4.21. This links the pipeline component and the aggregator component to each other. There’s no need to configure additional properties;
we can just pass the result of the aggregation to the next component in the response flow, which is another pipeline
![]() .
.
The cheapestPricePipeline invokes the CheapestPriceCalculator bean component and passes the response message to the last point in the response flow, which is the JMS endpoint that produces a JMS message to the booksearch.output queue. The pipeline configuration is similar to the configuration in listing 4.21 and therefore isn’t included here. The configuration of all three pipelines and the aggregator are combined into one xbean.xml configuration for the servicemix-eip service engine. We discussed the logic inside the CheapestPriceCalculator in the Mule example, but because we have to deal with a message exchange for ServiceMix, we explore the details in listing 4.23.
Listing 4.23. Implementation of the CheapestPriceCalculator bean
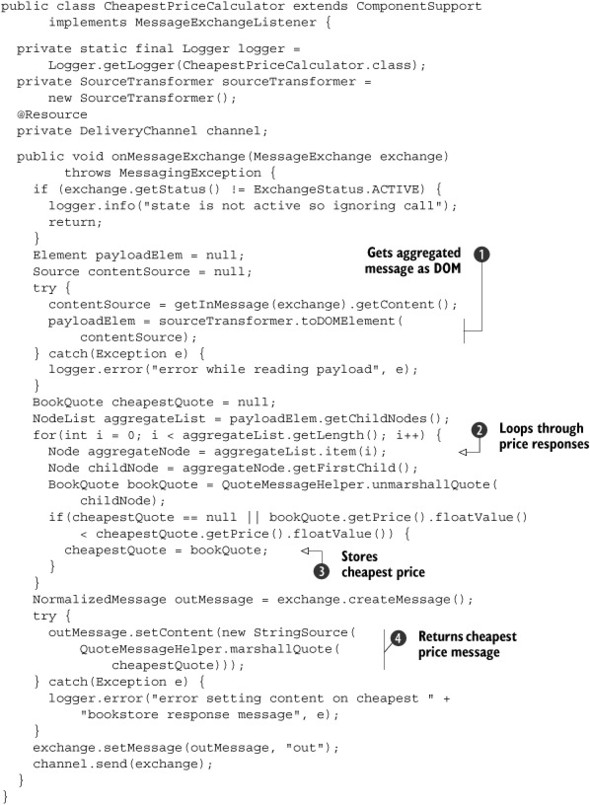
Because the aggregated message produced by the AggregatorMessageLogger in listing 4.20 is sent across the ServiceMix container as a normalized message, we have to work with XML message content that contains both
the price response from the Amazon as well as the Barnes and Noble bookstores. Therefore, we first transform the input message
to a DOM structure
![]() .
.
The root element of the input message contains two child elements that contain the price responses. So the next step is to
loop through these two price responses to be able to determine which is the lowest
![]() . When the price of the response message is the lowest, we store the unmarshaled BookQuote instance into a local variable
. When the price of the response message is the lowest, we store the unmarshaled BookQuote instance into a local variable
![]() .
.
Now that we’ve determined the lowest price, the response message can be constructed and the message content must be filled.
Therefore, we must marshal the lowest book quote message into an XML message
![]() . Because we marshal the BookQuote instance to an XML String representation, we use the StringSource message type. The response message is then sent to the JMS output queue.
. Because we marshal the BookQuote instance to an XML String representation, we use the StringSource message type. The response message is then sent to the JMS output queue.
Deploying and testing the servicemix cheapest price calculator
Let’s proceed to the test phase of our solution. The test resembles the one we used in the Mule example. We also use two message listeners, AmazonBookStore and BarnesBookStore, for testing our ServiceMix solution. To trigger the implemented message flow, we can also use a JUnit test case, MessageFlowTest, or we can use the Swing test client, which produces a message that includes a simple ISBN to the booksearch. input queue.
With all the code in place, we just have to deploy the solution to the running ServiceMix container. You can start the ServiceMix container with the default target in the Ant build file ch4-examples.xml. When the container has started, the deploy-messageflow target can be used to build and deploy the lowest price service assembly. To start the Amazon and Barnes and Noble JMS listeners, you have to run the messageflow-spring target.
Let’s execute the JUnit test class esb.chapter4.messageflow.MessageFlowTest, available in the test directory of the book’s source code. Alternatively, you can use the Swing test client to trigger the message flow. You should see logging statements in the console in your execution environment as well as in the ServiceMix container console. In the console of the JUnit test or in the Swing test client, you should eventually see a “received lowest quote” message with some contents displayed. This means that the message flow has executed successfully.
Take your time to examine the full implementation of this message flow in the source code. The implementation consists of many different parts, so it’s a good idea to play with the source distribution for some time in order to fully grasp the details. Once you feel confident about all the parts of this message flow, you’ll have made a giant step toward becoming a ServiceMix developer.
4.6. Interlude: Spring Integration
Before we end this chapter, we discuss another integration framework that contains some promising features: Spring Integration. We know it’s already been a long ride so far; therefore, we’ll keep the example simple and the level introductory. Spring Integration is a new framework provided by the Spring Framework; at the time of this writing, the project has released the fifth milestone for the 1.0 release. So the information in this section is a sneak preview of what you can expect of the Spring Integration framework.
We all know that Spring is an important and widely used framework for application development. The framework started as a dependency injection (DI) or inversion of control (IoC) project, but gradually a lot of other functionality was added, including web frameworks, web services support, persistency functionality, and messaging templates. And you’ve seen how Mule and ServiceMix also use Spring functionality—for example, for the XML configuration implementation.
What Spring lacked was an abstraction layer that made it easy to configure JMS or file listeners, for example, and to implement functionality like routing and transformation. Well, this is exactly what the Spring Integration framework offers. Based on the functionality already offered by the Spring Framework, an abstraction layer has been added to support the Enterprise Integration patterns defined by Hohpe and Woolf. Therefore, the Spring Integration framework fits quite nicely into the same area as Mule and ServiceMix, but it’s still maturing. Let’s take a quick look.
4.6.1. A quick example with Spring Integration
As you might expect, the Spring Integration configuration uses an XML file. In addition, a number of annotations are provided to define routing functionality. But just talking about a framework isn’t a good way to gain insight into the functionality, so we show an example. We send a hello message to either Ross, the founder of Mule, or Guillaume, the project lead for ServiceMix. If the message is “hello Ross”, it goes to Ross; if the message is “hello Guillaume”, it goes to Guillaume.
First, let’s implement the router that will send the hello message to the right person. Let’s name this router HelloRouter and implement it according to listing 4.24.
Listing 4.24. Spring Integration Implementation of HelloRouter

Notice that the router is a POJO component with two annotations provided by the Spring Integration framework. The MessageEndpoint annotation
![]() is used to relate the routing implementation class to a message channel. This message channel is defined in the Spring XML
configuration that we see in listing 4.25. Then the resolvePerson method
is used to relate the routing implementation class to a message channel. This message channel is defined in the Spring XML
configuration that we see in listing 4.25. Then the resolvePerson method
![]() that determines the target channel is annotated with Router. This means that the Spring Integration framework knows that the output of this method will be a channel name where the incoming
message must be routed. Now let’s look at the XML configuration for this example (listing 4.25).
that determines the target channel is annotated with Router. This means that the Spring Integration framework knows that the output of this method will be a channel name where the incoming
message must be routed. Now let’s look at the XML configuration for this example (listing 4.25).
Listing 4.25. The XML configuration for the Spring Integration hello example
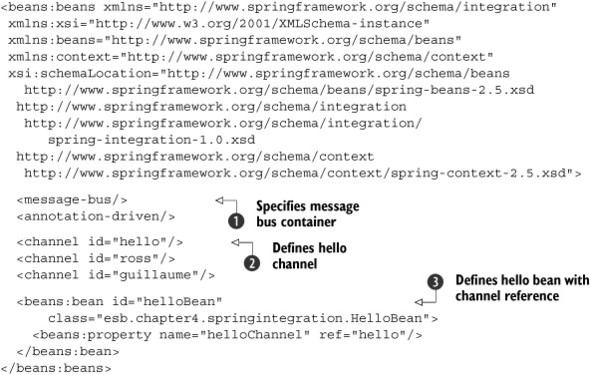
The Spring XML file is where we configure the message bus and its message channels. The first element, message-bus
![]() , instantiates the message bus container that will host the message channels to exchange messages. We also define a number
of channels here, which we also used in listing 4.24. The hello channel
, instantiates the message bus container that will host the message channels to exchange messages. We also define a number
of channels here, which we also used in listing 4.24. The hello channel
![]() is used to send the hello message to the hello router. It’s easy to define Spring beans and inject channels as properties
in these beans
is used to send the hello message to the hello router. It’s easy to define Spring beans and inject channels as properties
in these beans
![]() . We use the hello bean to send the hello message to the hello message channel according to this code snippet:
. We use the hello bean to send the hello message to the hello message channel according to this code snippet:
public class HelloBean {
  private MessageChannel helloChannel;
  public void setHelloChannel(MessageChannel helloChannel) {
    this.helloChannel = helloChannel;
  }
  public void sendHello(String message) {
    helloChannel.send(new GenericMessage(message));
  }
}
To complete the example, we need two beans to listen to the ross and guillaume channels. Here’s a simple implementation of such a bean:
@MessageEndpoint(input="ross")
public class RossBean {

  public void hello(String message) {
    System.out.println("Ross received " + message);
  }
}
To be able to test the example, we can use a simple application that starts the Spring context and invokes the sendHello method of the HelloBean class, as in the following code snippet:
public static void main(String[] args) {
  AbstractApplicationContext context = new
      FileSystemXmlApplicationContext("hello.xml");
  context.start();
  HelloBean helloBean = (HelloBean) context.getBean("helloBean");
  // no offence to Guillaume intended here :-)
  helloBean.sendHello("Hello Ross");
}
Based on an XML configuration and a few Spring beans, we were able to implement the functionality. This simple example doesn’t show complex enterprise integration functionality, but shows the foundation of the Spring Integration framework.
We’ll keep an eye on the progress of the Spring Integration framework; because it’s so easy to configure integration logic, it can be a suitable framework for integration challenges.
4.7. Summary
If you feel a bit overwhelmed by all the examples in this chapter, don’t worry. In upcoming chapters, you’ll see more examples that have many similarities with the examples from this chapter. As you progress in this book, you’ll become familiar with configuring and using Mule and ServiceMix. You have already made a big step in this chapter.
We discussed how to develop custom logic in the first two sections of this chapter. The chapter started off by explaining how to implement your own components with Mule. As you may recall, this was fairly easy as the components are just simple POJOs. After examining a simple component implementation, we explored the integration with the Spring Framework. Because Mule 2.x uses Spring as its standard container, this integration is provided with no additional cost. So we were easily able to develop components with Spring’s dependency injection.
In section 4.2, you saw that with the servicemix-bean service engine, developing custom logic with ServiceMix is not hard. The difference with the Mule approach is that the class implementation in ServiceMix has dependencies to the ServiceMix framework. We also examined JBI message exchanges, source transformers, and other JBI/ServiceMix logic. But as we progressed, you learned that the implementation isn’t that difficult. And using Spring is also easy, because ServiceMix provides Spring integration out of the box.
You saw that it’s not difficult to implement a challenging case study with Mule and ServiceMix. We were even able to test the implementation fairly easily. Now that we’ve reached the end of this chapter, you should be able to build a small solution by yourself.
We haven’t discussed typical enterprise integration functionality like message routing yet. In the next chapter, we look at some interesting functionality that you’ll need every time you implement message flows. We talk about the various kinds of routing functionality that Mule and ServiceMix offers, and we present some examples. Other topics we discuss are message validation, transformation, and enhancement. So take a breath and we’ll hop on to chapter 5 and look at how you can work with messages in an open source ESB.