
Chapter 7. Asynchronous messaging
- Using ActiveMQ and Stomp
- Using reliable-msg
- Using WebSphere MQ
Asynchronous messaging is one of the most effective ways of building a loosely coupled system while maintaining a sense of coherence in the system. Coupling the publish/subscribe architecture with a reliable delivery broker gives you a solid architecture for integration with heterogeneous (or homogeneous) systems. In this chapter, we’ll look at a few options for asynchronous messaging in Ruby, including how to integrate these solutions with Rails. We’ll start with two open source messaging servers, ActiveMQ and Ruby-native reliable-msg, before moving on to WMQ, the granddaddy of message-oriented middleware.
7.1. Open source messaging servers
When building an application that requires asynchronous messaging, open source messaging servers are a compelling option. In this section, we’ll take a look at two such options. The first, ActiveMQ (available from http://activemq.apache.org) is a Java-based messaging middleware developed by the Apache Software Foundation. It’s a popular mid-size solution attractive not only for its price tag (free!) but also for packing the right combination of features and performance while requiring minimal setup and administration. The second, reliable-msg, is a pure-Ruby implementation suitable for small-scale deployments.
You can connect to ActiveMQ in a variety of ways, including REST and XMPP, both of which we covered in previous chapters, or through the JMS API, an option that’s available when deploying on JRuby (see appendix B). In this chapter, we’re going to use Stomp, the Streaming Text Orientated Messaging Protocol. It’s an open protocol that supports a variety of messaging brokers and programming languages, and, in combination with StompConnect, any messaging broker that supports the Java Message Service (JMS) API.
7.1.1. Using ActiveMQ
In this section, we’ll look at using ActiveMQ with the stomp gem, a library that gives you the ability to interface with services over the Stomp protocol. Stomp offers a lightweight format for compatible clients to interact with message brokers. This means that although we’re talking to ActiveMQ in this section, you could just as easily use the stomp gem with any Stomp-compatible message broker (a list of which is on the Stomp website at http://stomp.codehaus.org).
You first need to get your ActiveMQ instance installed and configured (see the ActiveMQ and Stomp websites for information on how to do that). You’ll want to use RubyGems to install the stomp library:
$ gem install stomp |
Problem
Your Ruby application needs to integrate with a monitoring service that uses a message broker to get information from the services it’s monitoring.
Solution
The service we’re integrating with processes error messages from the /queue/errors queue. It receives XML messages in a simple format:
<?xml version="1.0" encoding="UTF-8"?> <error> <type>StandardError</type> <message>Something is broken.</message> <backtrace> NameError: uninitialized constant X from (irb):1 </backtrace> </error> |
We’re going to generate this XML document using Builder, which is the same library we used in chapter 5 to generate Atom feeds from a Rails application. Builder is available as a separate gem (gem install builder). You can see the method generating this XML document in listing 7.1.
def generate_xml(error_object) |
Listing 7.1. A method that takes a Ruby error object and generates XML from it
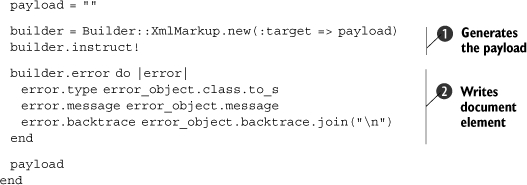
Our generate_xml method takes an error_object as a parameter, from which we’ll grab information to generate the XML. First, we start a new Builder document by creating an instance of Builder::XmlMarkup and telling it to generate the XML declaration ![]() . Then we build our document using methods on the builder object
. Then we build our document using methods on the builder object ![]() .
.
Now, what’s the best architecture for our error reporter? Since we’ll be catching exceptions and reporting them to the error-reporting service, it seems like a good idea to avoid creating an instance every time. We’ll probably want to build a class and use class methods to handle the functionality. Listing 7.2 shows our implementation of this class.
Listing 7.2. Implementing our error reporter
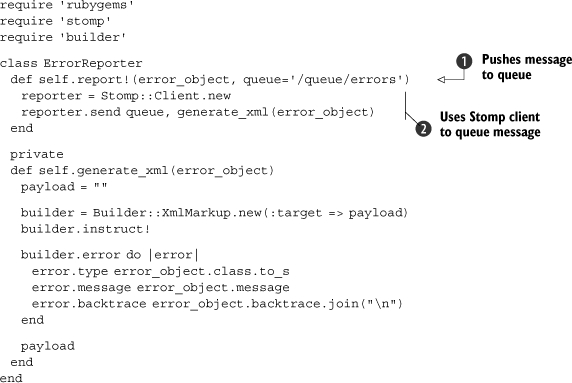
Here you can see that we define a method called report! ![]() , which takes an error_object as a parameter, along with the name of the queue you want to push the messages to (defaulting to /queue/errors). Next, we create our Stomp::Client object
, which takes an error_object as a parameter, along with the name of the queue you want to push the messages to (defaulting to /queue/errors). Next, we create our Stomp::Client object ![]() and tell it to send a message to the queue identified in the parameters with a payload containing XML from the generate_xml method we created earlier (listing 7.1).
and tell it to send a message to the queue identified in the parameters with a payload containing XML from the generate_xml method we created earlier (listing 7.1).
Now, we just have to implement this in some code:
def error_method FakeConstant.non_existent_method! rescue StandardError => error_obj ErrorReport.report! error_obj end |
When running that code, an error will be raised and reported via our ErrorReporter. If you check the queues in your message broker’s web interface, you should see a message that has XML for the error object. That works great, but let’s build a message consumer so we can test it more easily.
To consume messages with a Stomp::Client object, you use the subscribe method, which allows you to define behavior for responding to messages being pushed to a queue. The behavior is defined by providing a block to the subscribe method; you can see a primitive example of this in listing 7.3.
Listing 7.3. Processing all messages from the queue

Running the code in listing 7.3, then pushing messages into the /queue/testing queue will cause the payload of those messages to be printed to the console. The resulting message object is actually a Stomp::Message object, which also contains a little bit more information about the frame if you need it (specifically, the frame headers and command). We also join the thread; otherwise, the script would exit and the listener thread would be killed off.
So, to make a consumer for our error reporter, we’ll need to pop the messages off the queue and process the XML inside of our subscribe call. We’ll use REXML to parse the XML document and work with the elements tree. Our implementation is in listing 7.4.
Listing 7.4. Our testing consumer for the error reporter
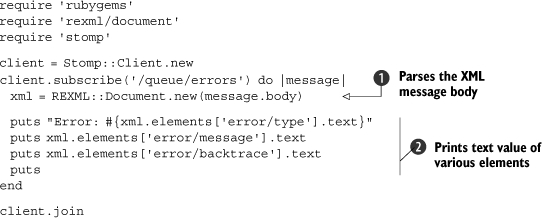
We create a Stomp::Client object and invoke subscribe. When a message is received, we push the message body over to REXML ![]() and pull attributes out to print them to the console
and pull attributes out to print them to the console ![]() . If you run this script and throw a few errors to the error reporter, your console should look something like the following:
. If you run this script and throw a few errors to the error reporter, your console should look something like the following:
Error: NameError uninitialized constant NonExistentConstant my_script.rb:3:in `test_call' my_script.rb:12 Error: NameError uninitialized constant IDontExist application.rb:9:in `invoke!' application.rb:20 |
Discussion
In these examples, we’ve only shown you a few features of the stomp gem. To keep the examples short, we left many features out, but the library is actually quite full-featured.
For example, it supports authentication in the message broker, so if we wanted to log in as a user on the broker listening on the localhost at port 13333, we’d simply do something like the following when creating the Stomp::Client object:
client = Stomp::Client.new('username', 'pass', 'localhost', 13333) |
The library also supports reliable messaging using client-side acknowledgement. For example, let’s say you wanted to make sure that your authorization messages were being received. Your code, at its base level, might look something like the following:
message = nil client = Stomp::Client.new client.send '/queue/rb', "Hi, Ruby!" client.subscribe('/queue/rb', :ack => 'client') { |msg| message = msg } client.acknowledge message |
To learn more about these and other features (like transactional sending), you can check out the Stomp home page or generate the RDocs for stomp on your local machine.
If Java and ActiveMQ aren’t available to you, or you don’t want to go through the effort of setting them up, there is also a pure Ruby Stomp server. It’s available as a gem named stompserver, which you can install by executing the following:
$ gem install stompserver |
Stomp documentation
The stomp gem doesn’t actually generate its documentation when it installs itself, so you’ll need to navigate to its directory and run rdoc to generate it yourself. RDocs aside, we found that the test suite was one of the best locations for information on how to use the library. The same goes for RubyWMQ and other libraries we cover in this book. Chalk it up to a developer community devoted to test-driven development.
While it’s not production quality, it’s great for testing your application locally without creating a lot of overhead on your system. Although it is useful, stompserver isn’t the best pure-Ruby asynchronous messaging solution available. In the next section, we’ll take a look at the best pure-Ruby option we’ve found: Ruby Reliable Messaging.
7.1.2. Using reliable-msg
If your preference is to stay in Ruby rather than using a tool from another language, or if your requirements don’t allow for extraneous software installation, perhaps a pure Ruby solution is in order. Assaf wrote a pure Ruby reliable-messaging library named Ruby Reliable Messaging. In this section, we’ll take a look at using this library to fulfill your asynchronous messaging needs in a small setting where no heavy lifting is required.
To get started, you’ll want to install the Ruby Reliable Messaging gem, which is named reliable-msg:
$ gem install reliable-msg |
Next, you’ll want to start the Reliable Messaging library’s message broker, which is a daemon that exposes brokering over DRb:
$ queues manager start |
DRb
DRb (Distributed Ruby) is a standard library that you can use to write distributed applications. Using DRb, client applications can call Ruby objects that exist on a remote server using a fast binary protocol over TCP/IP. Similar in nature to RMI and DCOM, DRb was designed to make RPC calls between objects running on different machines and for interprocess communication. Because it was only designed to support Ruby clients and servers, its main benefits are speed and simplicity.
Problem
You want to utilize asynchronous messaging, but you need to stay in the Ruby language.
Solution
The Reliable Messaging library functions primarily through the ReliableMsg::Queue class and its put and get methods. These obviously named methods will put messages into the queue and get them out. Listing 7.5 shows an example.
Listing 7.5. Demonstrating the Reliable Messaging library’s core functionality
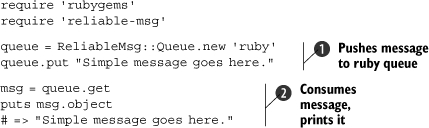
You can see the simple API here. We create a ReliableMsg::Queue object and use the put method to place an object in the queue ![]() . Next, we use the get method to pop the first object (the string we just created) off the queue
. Next, we use the get method to pop the first object (the string we just created) off the queue ![]() . Then we use the object method to get the object from the message and output it to the console (in this case, we just had a string). This simple API makes it very easy to focus more on the business logic around your messaging rather than the messaging itself.
. Then we use the object method to get the object from the message and output it to the console (in this case, we just had a string). This simple API makes it very easy to focus more on the business logic around your messaging rather than the messaging itself.
While reliable-msg isn’t meant for heavy-traffic messaging, it does offer one unique advantage over the other solutions that aren’t Ruby from top to bottom: native object handling. When you place a message in the queue, the reliable-msg library does this:
message = Marshal::dump(message) |
What does that mean for you? It means that you can put any type of object into the queue and have it serialized natively in Ruby. No more XML serialization, no tiptoeing around serialization limitations, and no more worrying about serialization problems. Of course, this means that you can only integrate with Ruby clients, but this section is all about pure Ruby messaging.
Let’s say you want to use a queue to pass work-order information from your Rails application to your Ruby application on a different host that processes and dispatches work orders. Your WorkOrderMessage class might look something like listing 7.6.
Listing 7.6. Passing data from a Rails application to a Ruby application
class WorkOrderMessage attr_accessor :requester, :requested_work, :date_due def initialize(params) raise "Invalid arguments provided." unless params.is_a?(Hash) @requester = params[:requester] @requested_work = params[:requested_work] @date_due = params[:date_due] end def unique_id "#{@requester.slice(0,5).strip.upcase}-" + "#{@date_due.strftime('%m%d%y')}-#{@requested_work.hash}" end def report! puts "Order #{unique_id} received." puts "from #{@requester}, due #{@date_due.strftime('%D')}" puts "Work requested:" puts @requested_work puts end end |
In the class, we have attr_accessors for various attributes, a couple of methods to format the information in a variety of ways, and a constructor that takes a Hash as its single parameter so we can pass from a request action to a create action and to the constructor directly.
In our Rails application, we then would have a create action like the one in listing 7.7.
Listing 7.7. Creating a work order in the database and passing a message
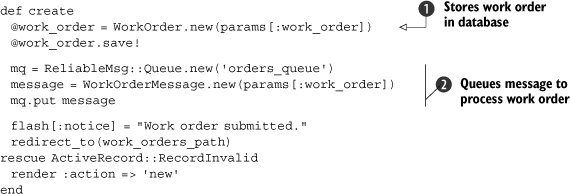
First, we create an ActiveRecord object (WorkOrder) and save it to the database ![]() . If that’s successful, we proceed to create our WorkOrderMessage object and place it in the queue
. If that’s successful, we proceed to create our WorkOrderMessage object and place it in the queue ![]() . The rest of the method will place a confirmation message in the flash and redirect the user to the index of the work_orders controller.
. The rest of the method will place a confirmation message in the flash and redirect the user to the index of the work_orders controller.
Blocking your Rails application
The only downside to this approach is that it blocks your Rails application when placing the message in the queue, which means that if you’re moving around big objects or have a slow or busy queue, your users will have to wait until it’s done (or worse, the request may time out). See the following discussion section for a few tips on how to avoid this.
Now we need to create a message consumer for our Ruby application. Again, we’ll use the get method to grab the message from the queue and process it. See listing 7.8 for our implementation of a simple consumer.
Listing 7.8. Consuming messages from the queue
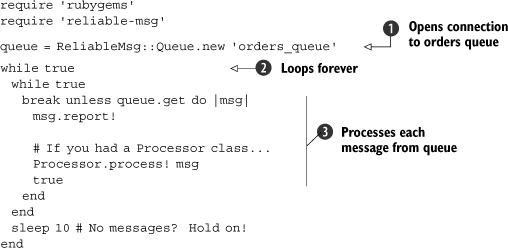
First we create our Queue object ![]() , and then we start looping so that the consumer is always available
, and then we start looping so that the consumer is always available ![]() . When we get a message
. When we get a message ![]() , we call its report! method to give us a report of what its work order contains, then we tell our Processor class (assuming we have one) to process it.
, we call its report! method to give us a report of what its work order contains, then we tell our Processor class (assuming we have one) to process it.
Discussion
We said that the method we showed for Rails integration may cause problems if you have high traffic or big message objects. There are two popular options for Rails integrated messaging: AP4R and ActiveMessaging.
AP4R builds on reliable-msg and offers a number of Rails-specific features that will make your life much easier when trying to handle messaging. If you’re interested in the minimal setup and configuration of reliable-msg and want to use it in combination with Rails applications, we recommend checking out AP4R.
ActiveMessaging is another alternative for integrating messaging providers into Rails applications. Its strength is in supporting WMQ, Stomp, JMS, Amazon Simple Queue Service, and reliable-msg, letting you switch between providers as your project needs change. It requires more setup than AP4R, but it has the clear advantage of supporting more messaging services.
If these libraries strike you as too much to set up or too much code to add to your applications, you could also use something like Spawn or BackgrounDRb to handle the sending (and optionally consuming) of messages. These options are simpler and possibly cleaner, but they aren’t as integrated or powerful.
In our examples, we didn’t cover some of the more advanced features of reliable-msg. For example, you can specify the delivery method. By default, it’s “best effort” (:best_effort), which means it will try to deliver the message once, and if it fails, the message will be discarded. Let’s say you wanted a little more resilience. You decide to change the delivery behavior to repeat delivery six times, and if it fails, to place the message in the dead-letter queue:
queue.put message, :delivery => :repeated |
You can also set the :delivery argument to be :once, which will try to deliver the message once, and if it fails, the message will be placed in the dead-letter queue. These parameters can also be set on Queue objects so that the behavior becomes the default for any message object passed to it:
queue = Queue.new("my_queue", :delivery => :repeated) |
This will cause any message put in that queue to be delivered using the repeated method rather than the default. The reliable-msg library also has a very flexible consumption API and a number of options for persistence. You can read more about these in RDocs, which are generated when you install the gem.
Viewing gem documentation
If you want to view the documentation for gems on your system, run gem server from your favorite command line. This script will start a web server on port 8808; you can navigate to it and browse a list of the gems you have installed and their accompanying documentation.
7.2. WebSphere MQ
What happens when you combine powerful message-oriented middleware with a powerful programming language? In the next two sections, we’re going to look at RubyWMQ, a library for using WMQ from Ruby.
The best thing about RubyWMQ is how it’s implemented. It’s essentially a thin wrapper around the WMQ client API, which means you get access to all the WMQ options and flags, and full control over message descriptors and headers. The get and put methods work exactly like you expect them to, as do browsing and retrieving related messages, managing queues, and running WMQ commands. If you know WMQ, there’s little new to learn here, and you’ll be up and running in a few minutes.
RubyWMQ also brings with it all the useful Ruby idioms, like using hashed arguments, blocks, and the each method. As you’ll see in the following example, it’s easy to get productive with RubyWMQ and to write code that’s simple, readable, and reliable. So let’s get started.
7.2.1. Queuing messages
We’re going to use WMQ for integration, and we’ll start by using Ruby as the message producer. For the rest of the chapter, we’ll be looking at an environment with several applications that invite people to register and create new accounts. To capture and handle all that information, we’re going to use WMQ as a message bus across all these applications. All our applications will use a common format (using XML) and a queue to collect all these messages. Now let’s put it to use.
Problem
Your web application allows users to register and create new accounts. Whenever a user creates an account, you need to capture some of that account information, create an XML message, and push that message into the ACCOUNTS.CREATED queue.
Solution
Since we covered Rails in previous chapters, we’re going to use it again in this chapter. We’re doing that so we can focus on RubyWMQ rather than the details of building a web application. However, what you will learn here is not specific to Rails or web applications.
Installing gems with C extensions
RubyWMQ is Ruby code mixed with a native C library. There are other gems that mix Ruby code with C extensions, some of which we cover in this book: MySQL, Mongrel, Hpricot, and RMagick.
On Windows, these C libraries are installed as DLLs, but on other operating systems they download as source code and need to be compiled and linked on your machine. If you’re curious what C extensions look like, check out one of these gems’ ext/ directories. Typically gems that use C extensions include an extconf.rb file, which uses the mkmf library to generate the Makefile. The rest is handled by make and gcc.
To run the examples in this section, you will need to have a development environment that includes these build tools. Some installations include them by default, but if yours doesn’t, you will have to install them separately. If, for example, you’re using Ubuntu, you will need to run this command: apt-get install build-essential ruby1.8-dev. We talk more about installation and setting up your environment in appendix A.
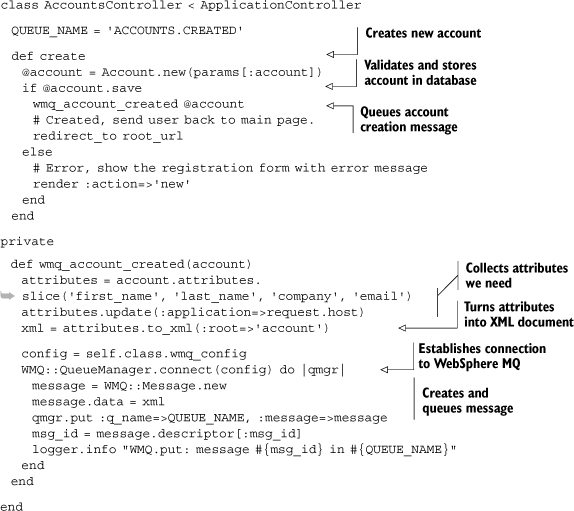
Let’s first have a look at our existing AccountsController. It has several actions, but we’re only interested in the create action that responds to POST requests and creates new accounts. Listing 7.9 shows what this action looks like.
Listing 7.9. AccountsController create action for creating a new account
def create @account = Account.new(params['account']) if @account.save # Created, send user back to main page. redirect_to root_url else # Error, show the registration form with error message render :action=>'new' end end |
After we create the new account record, and before we respond to the browser, we’re going to send a new message using RubyWMQ. Let’s keep that code separate and add a new method called wmq_account_created.
To start with, this method will need to create an XML document with the new account information. The actual account record contains more information than we want to share, such as the user’s password and the record’s primary key, so we’ll be selective with the few attributes we want to share:
attributes = account.attributes.slice('first_name', 'last_name', 'company', 'email' } |
There’s another attribute we want to share: the name of the application that created this account. Since we’re very Web savvy, we always refer to applications by their domain name, so we’ll use the domain name to set the value of this attribute:
attributes.update(:application=>request.host) |
Now, let’s turn these attributes into an XML document with the root element “account”:
xml = attributes.to_xml(:root=>'account') |
A typical message will look like this:
<?xml version="1.0" encoding="UTF-8"?> <account> <first-name>John</first-name> <last-name>Smith</last-name> <company>ACME Messaging</company> <email>[email protected]</email> <application>wmq-rails.example.com</application> </account> |
Next, we’re going to connect to the queue manager. We want to keep the connection configuration in a separate file, so we don’t have to dig through source code whenever we need to change it.
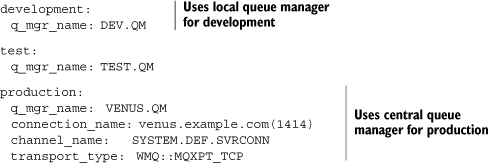
In fact, we want to keep several connection configurations that we can use in different environments. Typically, we’ll use one queue manager that we run locally for development, another one for testing, and the real deal in production. We’ll even configure those differently; for example, we’ll use nonpersistent queues for development and testing. If you worked with Rails before, you know that it uses a YAML file to specify the database connection configuration—one for each environment. We’ll use a similar structure to configure RubyWMQ. Listing 7.10 shows a sample wmq.yml configuration file.
Listing 7.10. A config/wmq.yml configuration file
Loading YAML files is a trivial matter (see chapter 11 for a longer discussion about YAML and configuration). We need to pick the right configuration based on our current environment:
config_file = File.expand_path('config/wmq.yml', RAILS_ROOT) config = YAML.load(File.read(config_file))[RAILS_ENV].symbolize_keys WMQ::QueueManager.connect(config) do |qmgr| ... end |
Now that we have an XML document and an open connection, it’s a simple matter of putting the message in the right queue:
qmgr.put :q_name=>'ACCOUNTS.CREATED', :data=>xml |
One thing we found helpful during development is keeping a trace of all the messages created by the application. It helps when we need to troubleshoot and look for lost messages. So let’s expand this single line to create a WMQ::Message object. The message identifier is set when we put the message in the queue, so we can log it afterwards:
message = WMQ::Message.new message.data = xml qmgr.put :q_name=>'ACCOUNTS.CREATED', :message=>message logger.info "WMQ.put: message #{message.descriptor[:msg_id]} in ACCOUNTS.CREATED" |
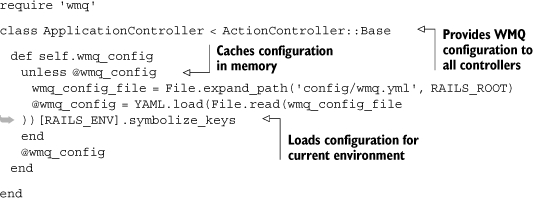
Now let’s assemble all these pieces into working code. Since we might use RubyWMQ elsewhere in our application, we’ll handle the configuration in a single place that is shared by all controllers. Listing 7.11 shows the ApplicationController and the method we added to load the right configuration.
Listing 7.11. The app/controllers/application.rb file modified to read WMQ configuration
Listing 7.12 shows AccountsController with an action that creates new messages and the wmq_account_created method. Controllers expose all their public methods as actions, and since this method is not an action, we’ll make it private.
Listing 7.12. AccountsController queues new accounts in ACCOUNTS.CREATED
And we’re done. We just changed an existing controller to create XML messages and deliver them to other applications using WMQ.
Discussion
Writing the code was easy, but we sometimes make mistakes, and we can’t tell for sure this will work in production. Not without a test case. So let’s write a test case to make sure we’re sending the right information on the right queue. We test the controller in listing 7.13.
Listing 7.13. Test case for putting message in ACCOUNTS.CREATED

The second half of listing 7.13 is our test case, and it’s a very simple one. We POST to the create action with new account information, which pushes a new message to the queue. We then ask RubyWMQ to retrieve the new message, assert that the message exists, then yield to the block. In the block, we specify another assertion, checking the message content against the expected values.
We may want to use RubyWMQ in more places, so we abstracted the common features into a separate module, Test::Unit::WMQTest, that we can mix into other test cases. We have one method to return the queue manager configuration (wmq_config), another to check a message on any given queue (wmq_check_message), and a third that we use during teardown to empty the queue before running the next test (wmq_empty_queues).
If test cases fail, we could end up with messages filling the queue, which would lead to the wrong result the next time we run the test, so we discard all the messages from the test queue during teardown. That explains why we need a separate queue manager for running tests.
Running WMQ commands
You can also use RubyWMQ to run commands and perform administrative tasks. For example, if you’re sharing this code with other developers, they will need the ACCOUNTS.CREATED queue in their development or test queue manager. You can set it up with a simple script or a Rake task:
namespace :wmq do
desc 'Creates WebSphere MQ queues on development and test environments'
task :setup=>:environment do
wmq_configs = YAML.load(File.read(File.expand_path('config/wmq.yml', RAILS_ROOT)))
['development', 'test'].each do |environment|
config = wmq_configs[environment].symbolize_keys
puts "Connecting to #{wmq_config[:q_mgr_name]}"
WMQ::QueueManager.connect(wmq_config) do |qmgr|
puts "Creating ACCOUNTS.CREATED queue"
qmgr.mqsc('define qlocal(ACCOUNTS.CREATED) defpsist(no)')
end
end
end
end
So, now that we know the basics of producing messages, let’s look at another form of integration: consuming and processing messages.
7.2.2. Processing messages
In this section, we’re going to use WMQ for integration by receiving and processing messages. If you recall from the previous section, we have several applications that push account-creation messages to a single queue. In this section, we’re going to turn these messages into sale leads in a customer-relationship management (CRM) database.
Problem
You have several applications through which users can create new accounts, and each of these applications pushes a message to the ACCOUNTS.CREATED queue. We want to batch process these messages and use them to create sale leads in our CRM database.
Solution
We’re looking at batch processing messages here, so we’re going to develop a standalone program that we can schedule to run at night.
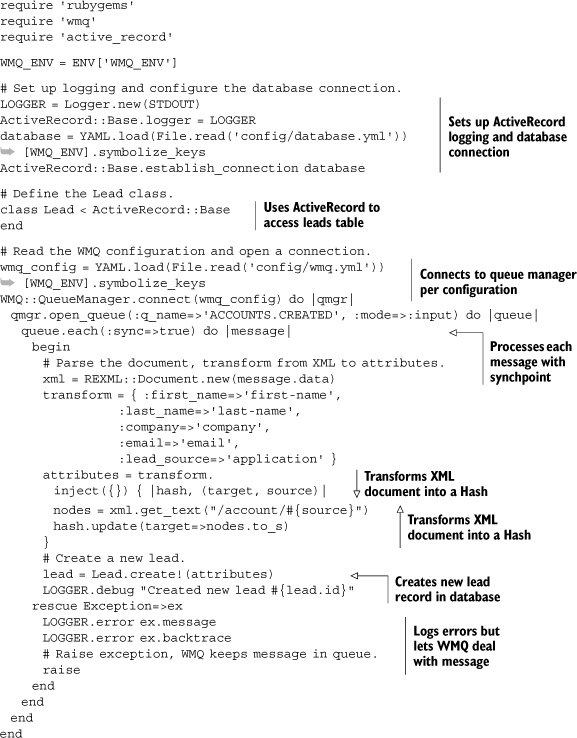
We’ll start by reading the connection configuration, using the same YAML configuration file we specified in listing 7.10. This time around, we’re not running inside Rails. Instead, we’ll pass the environment name using the WMQ_ENV environment variable:
ENV = ENV['WMQ_ENV'] wmq_config = YAML.load(File.read('config/wmq.yml'))[WMQ_ENV].symbolize_keys |
Next, we’ll open a connection to the queue manager and open the queue for reading:
WMQ::QueueManager.connect(wmq_config) do |qmgr| qmgr.open_queue(:q_name=>'ACCOUNTS.CREATED', :mode=>:input) do |queue| ... end end |
We need to pick up and process each message from the queue. There are a couple of ways of doing that. We can call get to retrieve each message and repeat until there are no more messages to receive (when get returns false). We showed you how to use the get method when we covered test cases in the previous section. We’re much more fond of using Ruby idioms, however, so let’s do that instead:
queue.each(:sync=>true) do |message| ... end |
The each method iterates over every message in the queue and passes it to the block. It also makes our code more reliable. The :sync=>true option tells WMQ to use synch-points. If the block throws an exception and doesn’t catch it, the message goes back to the queue so we can process it again. WMQ marks the failed delivery attempt and will decide how long to wait before redelivery and how many failures to tolerate before filing the message in the dead-letter queue. Meanwhile, even if it failed on one message, the loop will continue processing the remaining messages. As simple as it is, this code is fault tolerant and can deal with failures like losing the database connection or someone tripping over the power cord.
This loop terminates once it’s done processing all the messages in the queue, which is exactly what we wanted it to do. Remember, we’re running this program on a night schedule to batch process all messages queued during the day. Of course, we could also run this program continuously and have it pick up messages as they become available, blocking to wait for new messages. All we need to do is add option :wait=>-1.
We’re going to use REXML to parse the XML document in the message:
xml = REXML::Document.new(message.data) |
There are certain elements whose contents we’re interested in, such as the person’s name and email address. We want to map those into a Hash and pass that to the Lead.create method. However, the names don’t exactly match: Lead uses one convention for naming database columns, and the XML message has a different naming convention for its elements. Then there’s the application name (the application XML element) that we want to store as the lead source (the lead_source column in the database). What we need here is a transformation. Let’s define that:
transform = { :first_name=>'first-name', :last_name=>'last-name', :company=>'company', :email=>'email', :lead_source=>'application' } |
The convention we’re using here is to name the target on the left and its source on the right, for example, extracting the value of lead_source from application. This makes it easy to iterate over the transformation and map each value from its XML source to its Hash target. We’ll use the XML Path Language (XPath) expressions to extract each value:
attributes = transform.inject({}) { |hash, (target, source)| nodes = xml.get_text("/account/#{source}") hash.update(target=>nodes.to_s) } # And create the sale lead record in the database... Lead.create!(attributes) |
Where did Lead come from? We’re using ActiveRecord in this example, so Lead maps to the database table leads, and since ActiveRecord knows how to extract the class definition from the database schema, all we need to do is specify the class:
class Lead < ActiveRecord::Base end |
So now let’s wrap this example into a single file we can run from the command line. Listing 7.14 shows essentially the same code we developed so far, with the addition of error logging.
When you look at listing 7.14, you may notice this chapter’s key lesson. There are a handful of lines dedicated to setting up the environment and to turning an XML document into an ActiveRecord. Yet, what we set out to show you in this chapter—how to easily build programs that can reliably retrieve and process messages—is captured in two lines of code: each and the following end. It really is that simple.
Listing 7.14. Processing messages from WMQ to create new leads
Discussion
That’s really all there is to our solution. We wrote a simple program that can batch process messages and create new records in the database. It’s simple, yet reliable, and isn’t fazed when the database goes down or it encounters an invalid message.
Integrating with WebSphere MQ and SalesForce
Which database are we going to use? Tough call. How about SalesForce? Wouldn’t it be interesting if we could turn this example into one that uses Ruby to integrate all our internal applications with SalesForce’s SaaS CRM solution?
We can change out our solution to create a new sale lead in SalesForce with these three simple steps.
1. install the ActiveSalesForce gem: $ gem install activesalesforce
2. load the ActiveSalesForce connection adapter by adding this line as the last require at the top of the file: require 'activesalesforce'
3. change the database.yml configuration file to use ActiveSalesForce as the connection adapter. Let’s do that for the development environment: development:
adapter: activesalesforce
url: https://test.salesforce.com
username: <your username>
password: <your password> And we’re done! Now when you run this program, it will process a day’s worth of messages and turn them into sales leads that will show up in your SalesForce account.
7.3. Summary
Integrating with systems that are totally foreign to your development environment can be trying, but solutions like asynchronous messaging make it much easier. Fortunately Ruby has a number of mature libraries that work with a variety of messaging vendors. In this chapter, we looked at using RubyWMQ to work with WMQ. This solution works well for large-scale deployments, where WMQ is a requirement.
We also looked at ActiveMQ (open source high-throughput message-oriented middleware), using the Stomp protocol. What you learned here will also apply to other messaging services that support the Stomp protocol, and that includes many of the JMS providers out there. Last, we looked at a lightweight alternative that requires minimum setup and configuration—the Ruby Reliable Messaging library.
Now that we have talked about developing web applications and using Web services and asynchronous messaging, let’s look at some options for deploying Ruby applications.