
Chapter 9. Database facilities and techniques
- Using plain text data storage
- Automating contacts in an address book
- Using Ruby’s API for gdbm
- Using relational databases
So far we’ve taken a look at a number of technologies and how to use them with Ruby. This chapter will introduce key database tools available with, and for, Ruby. We’ll take a broad view of what it means for something to be a database. Our working definition will be that a database is a storage unit external to your program where data can be stored. This definition includes highly evolved structures like relational databases, but also includes, potentially, plain-text files.
We’ll also stipulate that the stored data has to have some intelligence about itself. A file containing a stream of words—though it may be loaded into a program as a string or an array—will not count as a database, because the file itself does not preserve any information about the structure of the data.
A flat file in YAML format, however, will count as a database, under our definition. As you’ll see, it’s possible and not even terribly difficult to wrap a YAML file in a workable API and reap the benefits of addressing your data structurally while also having access to it in text form. Text files are not the whole story, of course. Ruby ships with several flavors of the Berkeley database (DBM) system. We’ll also look at tools available for creating and manipulating relational databases in Ruby.
Throughout the chapter, we’ll work with a specific example: the implementation of an API for storing personal contacts—an address book. We’re not so much concerned here with implementing the whole address book as with implementing the programming interface to the database facilities. Examples will include a certain amount of address-book implementation, but primarily we’ll be looking at how to set up a database in which contact information can be stored, and how to talk to such a database in Ruby. We’ll implement the API twice, once for YAML storage and once for gdbm. We’ll then use the MySQL and database interface libraries (DBI) to move data from one database format to another.
We’re going to start with YAML, a data-serialization tool that can, with a little assistance from Ruby, form the kernel of a simple data-persistence library.
9.1. Using plain-text files for data persistence
Using YAML as a data-persistence tool is an example of the more general case of using plain-text files for this purpose. You’ll find other ways to do this in Ruby, such as the CSV (comma-separated values) facility in the standard library. XML files fall into this category, too.
None of these are full-fledged database systems. What they have in common with such systems is that they include information about the data, together with the data. CSV files don’t contain much information about the data, but they do preserve ordering and, often, something like column or header information. XML preserves relationships in and among nested data structures. YAML does something similar with the avowed goal of being somewhat easier to read than XML, and more suitable for storing arbitrary Ruby data structures.
In looking at plain-text data-storage techniques, then, we’ll focus on YAML as the one that offers the richest combination of complexity on the data end and editability on the text end.
Note
This example covers YAML persistence, but we also cover YAML elsewhere in more depth. See chapter 10 for in-depth coverage of using YAML as a persistence mechanism.
YAML is a data-serialization format: Ruby objects go in, and a string representation comes out. The strings generated by YAML conform to the YAML specification. YAML, itself, is not specific to Ruby; Ruby has an API for it, but so do numerous other languages. Here’s a Ruby example in an irb session:
>> hash = { :one => 1, :two => 2, :colors => ["red","green","blue"] } => {:colors=>["red", "green", "blue"], :one=>1, :two=>2} >> require 'yaml' => true >> puts hash.to_yaml --- :colors: - red - green - blue :one: 1 :two: 2 |
YAML is part of the Ruby standard library. You just have to load it ![]() , and then your objects can be serialized to YAML using the to_yaml method
, and then your objects can be serialized to YAML using the to_yaml method ![]() .
.
Objects serialized to YAML can be read back into memory. Picking up from the last example:
>> y_hash = hash.to_yaml => "--- :colors: - red - green - blue :one: 1 :two: 2 " >> new_hash = YAML.load(y_hash) => {:colors=>["red", "green", "blue"], :one=>1, :two=>2} >> new_hash == hash => true |
The YAML.load method can take either a string or an I/O read handle as its argument, and it deserializes the string or stream from YAML format into actual Ruby objects.
While objects are in serialized string form, you can edit them directly. In other words, YAML gives you a way to save data and also edit it in plain-text, human-readable form. Part of the incentive behind the creation of YAML was to provide a plain-text format for representing nested data structures that wasn’t quite as visually busy as XML.
Problem
You need a way to automate the storage and retrieval of professional and personal contacts (an address book), but you want it to be in plain text so that you can edit the entries in a text editor as well as alter them programmatically.
Solution
We’ll write code that uses YAML, together with simple file I/O operations, to provide a programmatic interface to a plain text file containing contact entries.
First things first: let’s start with a test suite. Aside from the merits of writing tests in general, this will allow us to create examples of how the code should be used before we’ve even written it. There’s no better way to describe how you want an API to work than to write some tests that put it to use.
We’ll create two classes: Contact and ContactList. The initializer for Contact will take the contact’s name as the sole argument and will yield the new Contact instance back to the block, where it can be used to set more values. Listing 9.1 shows the class declaration and setup method for the test suite—you can place this code in a file called contacts_y_test.rb (the “y” indicates that this is for the YAML implementation). Our API for the contact code has already started to take shape.
Listing 9.1. Class declaration and setup method for testing the contact code
require "test/unit" require "contacts_y" class TestContacts < Test::Unit::TestCase def setup @filename = "contacts" @list = ContactList.new(@filename) @contact = Contact.new("Joe Smith") joe.email = "[email protected]" joe.home[:street1] = "123 Main Street" joe.home[:city] = "Somewhere" joe.work[:phone] = "(000) 123-4567" joe.extras[:instrument] = "Cello" @list << @contact end end |
In addition to test/unit, we load what will eventually be our implementation file: contacts_y.rb ![]() . After the loading preliminaries, we instantiate a contact list along with a filename
. After the loading preliminaries, we instantiate a contact list along with a filename ![]() , and a contact with a name
, and a contact with a name ![]() . In addition to the name, the contact has an email address
. In addition to the name, the contact has an email address ![]() , and several apparently deeper hash-like data structures: home, work, and extras
, and several apparently deeper hash-like data structures: home, work, and extras ![]() . The ContactList object itself appears, not surprisingly, to have an array-like interface, judging by the appearance of the append operator (<<)
. The ContactList object itself appears, not surprisingly, to have an array-like interface, judging by the appearance of the append operator (<<) ![]() .
.
Now it’s time to write some tests for business logic. The setup method inserts one Contact object into the list. What about retrieving an object? Listing 9.2 shows a method that does exactly that.
Listing 9.2. Testing the removal of a Contact object from a ContactList object
def test_retrieve_contact_from_list contact = @list["Joe Smith"] assert_equal("Joe Smith", contact.name) end def test_delete_contact_from_list assert([email protected]?) @list.delete(@contact.name) assert(@list.empty?) end end |
Listing 9.2 includes a method that retrieves a contact ![]() and one that removes a contact from the list
and one that removes a contact from the list ![]() . These two methods go in the test file after the setup method. We’ll also close out the class so that we can write the implementation and get the test to pass.
. These two methods go in the test file after the setup method. We’ll also close out the class so that we can write the implementation and get the test to pass.
Let’s start with the ContactList class. We’ll give each ContactList instance an array, in which it will store the actual Contact objects. The business of the ContactList class will consist mostly of deciding what, and when, to pass along to this array: inserting contacts, removing contacts, and, of course, persisting contacts to a YAML file and reading contacts from a file.
The initial implementation of ContactList is shown in listing 9.3. We’re not using YAML yet, but we’ll need it, so it’s being loaded. (We’re also not yet using the contacts accessor methods, but we’ll use it a little later so it’s best to put it in now.) Most of the action is in the @contacts array, which is expected to contain Contact objects. The code in listing 9.3 can be saved to contacts_y.rb.
Listing 9.3. Initial implementation of the ContactList class
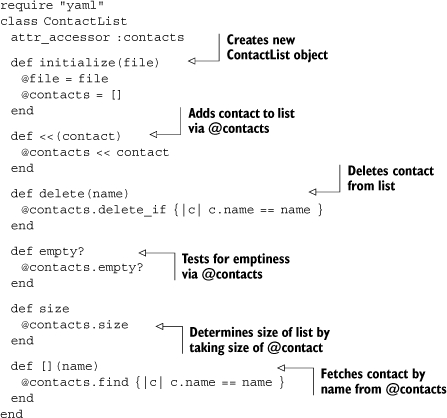
The @contacts array fields requests for array-like operations. Some of these operations work the way they do out of the box for any Ruby array (such as empty?, size, and <<). Others require special implementation to make sure they do the right thing for a list of Contact objects. Note that delete and [] use a name lookup to figure out which contact you want to operate on.
Next comes the implementation of the Contact class, which will be responsible for storing the contact information itself. We want to be able to store separate contact info for home and work. Each of these sets of data will be stored as a hash and accessed as an attribute of the Contact object. The name and email properties will be separate, stored as individual attributes rather than parts of any of the hashes, as shown in listing 9.4.
Listing 9.4. The Contact class we use to store contact records
class Contact attr_reader :name, :email, :home, :work, :extras attr_writer :name, :email def initialize(name) @name = name @home = {} @work = {} @extras = {} end end |
$ ruby contacts_y_test.rb Loaded suite contacts_y_test Started .. Finished in 0.000594 seconds. 2 tests, 3 assertions, 0 failures, 0 errors |
Success: no failures, no errors.
Now let’s get to the YAML side of things. We want a ContactList object to know how to save itself, in YAML format, to a file, and we want the ContactList class to know how to load a YAML file into a new ContactList instance. Listing 9.5 shows a test for these functions; you can paste this test into the existing test class.
Listing 9.5. Saving and loading a ContactList object
def test_save_and_load_list @list.save relist = ContactList.load(@filename) assert_equal(1,relist.size) contact = relist["Joe Smith"] assert_equal("Joe Smith", contact.name) end |
To get these new assertions to succeed, we have to add save and load methods to the ContactList class, as shown in listing 9.6.
Listing 9.6. Second set of methods for the ContactList class
def save File.open(@file, "w") do |fh| fh.puts(@contacts.to_yaml) end end def self.load(file) list = new(file) list.contacts = YAML.load(File.read(file)) list end |
These two methods can be pasted into the class definition for ContactList. Note that load is a class method, so it’s defined directly on the ContactList class object (represented in context by self ![]() ).
).
It’s in the load and save methods that you can see the use of YAML, and it’s very simple. When you want to save the list, you convert its @contacts array to YAML and print the resulting string to the file ![]() . When you want to read the list in, you use the load class method of YAML, passing it a string consisting of the contents of the file
. When you want to read the list in, you use the load class method of YAML, passing it a string consisting of the contents of the file ![]() . (You can also pass an open File object to YAML.load.)
. (You can also pass an open File object to YAML.load.)
The new tests pass. And so, with rather little fanfare, we have data persistence. Running the tests will create a file called “contacts”, containing the YAML representation of the Joe Smith contact. This brings us to the other side of the YAML coin: the ability to edit the YAML file itself. You do have to be a bit careful, because the YAML specification has rules you have to follow. But as long as you follow the YAML rules, you can make as many changes as you want to the file between reads.
Listing 9.7 shows the contacts file resulting from running the tests for the contact classes.
Listing 9.7. The contacts output file, in YAML format
--- - !ruby/object:Contact email: [email protected] extras: :instrument: Cello home: :city: Somewhere :street1: 123 Main Street name: Joe Smith work: :phone: (000) 123-4567 |
You don’t want to touch the first two lines, which are YAML’s business. But you can change the values of the strings, or add more data, and all your changes will be happily absorbed into the in-memory Contact objects next time you use the Contact class.
Discussion
YAML provides easy serialization of objects to strings, and it’s not much harder to save those strings to a file. Whether or not you decide it’s technically correct to call this a database, it certainly has database-like properties. You don’t have to edit your YAML files by hand; you can treat them as a black box. But it’s nice to know that they’re easy to edit.
Still, plain-text files are far from the only game in town. We’ll look next at Ruby’s API for gdbm, the GNU version of the Berkeley DB database system.
9.2. Using the (g)dbm API
Ruby ships with wrappers for the DBM, gdbm, and sdbm database libraries. These libraries are a family, of which the original member is DBM. The GNU Database Manager version is gdbm, and sdbm (Substitute DBM) is a public-domain version based on the earlier ndbm (New Database Manager, a successor to DBM). We’ll focus on gdbm here, though the examples should work with any of the three *dbm libraries included with Ruby.
Problem
You want a simple contact manager, and you need to share the files with someone who may not have access to YAML.
Solution
Our hypothetical YAML crisis provides a chance to look at a gdbm-based solution. We’ll aim for something that’s as close as possible to the YAML version of the contact manager, and the best way to guarantee that closeness is to use a similar test suite.
The tests are shown in listing 9.8. Note that we’re loading contacts_g, implying that the implementation of the two classes will be in contacts_g.rb.
Listing 9.8. The contact application tests
require 'test/unit' require 'contacts_g' Dir.mkdir("gdbm_contacts") unless File.exist?("gdbm_contacts") class GDBMTest < Test::Unit::TestCase def setup @list = ContactList.new("gdbm_contacts") @contact = Contact.new("Joe Smith") @list << @contact @contact.home["street1"] = "123 Main Street" @contact.home["city"] = "Somewhere" @contact.work["phone"] = "(000) 123-4567" @contact.extras["instrument"] = "Cello" @contact.email = "[email protected]" end def test_retrieving_a_contact_from_list contact = @list["Joe Smith"] assert_equal("Joe Smith", contact.name) end def test_delete_a_contact_from_list assert([email protected]?) @list.delete("Joe Smith") assert(@list.empty?) assert(@list.contact_cache.empty?) end def test_home contact = @list["Joe Smith"] assert_equal("123 Main Street", contact.home["street1"]) end def test_email contact = @list["Joe Smith"] assert_equal("[email protected]", contact.email) end def test_non_existent_contact_is_nil assert_equal(nil, @list["Some Person"]) end def teardown @list.delete("Joe Smith") if @list["Joe Smith"] end end |
The test suite for the gdbm implementation is similar to the one for the YAML implementation, but there are a few differences. One extra step here is creating the gdbm_contacts directory, so that the tests will be able to find it ![]() . Also, some tests have been replaced to show you some of what you might want to do specifically for gdbm (though neither test suite is exhaustive). It’s now necessary to add the contact to the list before setting any of the contact’s properties
. Also, some tests have been replaced to show you some of what you might want to do specifically for gdbm (though neither test suite is exhaustive). It’s now necessary to add the contact to the list before setting any of the contact’s properties ![]() . The reason is the hash-to-database magic only works if the contact’s components—home, work, extras—are gdbm file handles. And that will only happen when the Contact objects become part of a ContactList; it’s the ContactList object that knows where the directory of gdbm files is.
. The reason is the hash-to-database magic only works if the contact’s components—home, work, extras—are gdbm file handles. And that will only happen when the Contact objects become part of a ContactList; it’s the ContactList object that knows where the directory of gdbm files is.
Another tweak is that all keys are now strings, instead of symbols ![]() . gdbm doesn’t like symbols; it wants everything to be strings. Nonetheless, the goal of preserving the API in the gdbm reimplementation has been largely met, assuming we can get the tests to pass. On now to the implementation itself.
. gdbm doesn’t like symbols; it wants everything to be strings. Nonetheless, the goal of preserving the API in the gdbm reimplementation has been largely met, assuming we can get the tests to pass. On now to the implementation itself.
The way gdbm works is very different from the way YAML works. gdbm is definitely more of a real database, but it is simpler in terms of the kinds of data structures it can store. gdbm stores key/value pairs. The Ruby gdbm extension is programmed almost exactly like a hash.
Here’s a simple example of using gdbm. First, run this code from a file—it will create a file called movies.db, so make sure you’re not clobbering one!
require 'gdbm' movies = GDBM.new("movies.db") movies.update( { "Vertigo" => "Alfred Hitchcock", "In a Lonely Place" => "Nicholas Ray", "Johnny Guitar" => "Nicholas Ray", "Touch of Evil" => "Orson Welles", "Psycho" => "Alfred Hitchcock", }) movies.close |
Notice the use of the update method, which is familiar as a hash operation. Now, go into irb and do this:
>> require "gdbm" => true >> movies = GDBM.new("movies.db") => #<GDBM:0xb7ef12cc> >> movies.values.uniq |
You’ll get a list of all the directors in your database:
=> ["Orson Welles", "Nicholas Ray", "Alfred Hitchcock"] |
The gdbm API is designed to be as hash-like as possible, with all the hash operations automatically writing to, or reading from, the database file.
The contact data we’re storing isn’t a simple hash, though. A contact has a name and an email address, which are just strings and could serve as hash keys, but the additional information, such as the home data, comes in the form of nested or embedded hashes.
One way to use gdbm in a situation where you need hashes within hashes is to serialize the inner hashes with YAML, and store them as strings. There’s nothing terrible about doing that, but we’ve already looked at a YAML solution, so we’ll do it a different way here. For our gdbm implementation of the contact list, the entire list will be represented by a directory, and each contact will have its own subdirectory. Inside that subdirectory, there will be individual gdbm files for each of the inner data structures: home, work, extras.
In the YAML implementation, a ContactList object was a kind of proxy to the actual array of Contact objects. In the gdbm implementation, ContactList objects will be proxies to directories. It’s desirable to keep the API as transparent as possible. As API users, we don’t want to have to know the details of how the files are being handled, so all of that can be encapsulated in the ContactList class.
The Contact objects can do their share of the lifting, too. A ContactList is in charge of a whole directory, and each contact has a subdirectory. It makes sense, then, for the Contact object to know the name of its directory.
Let’s start this time with the Contact class. It’s shown in listing 9.9.
Listing 9.9. The Contact class for the gdbm implementation of the contacts library
class Contact COMPONENTS = ["home", "extras", "work"] attr_accessor :name, *COMPONENTS attr_reader :dirname def initialize(name) @name = name @dirname = @name.gsub(" ", "_") end def components COMPONENTS.map {|comp_name| self.send(comp_name) } end def open COMPONENTS.each do |component| self.send(component + "=", GDBM.new(component)) end end def close components.each do |component| component.close unless component.closed? end end def email extras["email"] end def email=(e) extras["email"] = e end end |
One addition to the Contact class is the COMPONENTS constant ![]() , which contains an array of strings corresponding to the nested containers in the Contact objects. The point of having this constant is to encapsulate these names in one place. That way, both the Contact and ContactList objects can find all of them easily, and the names will not have to be hard-coded in specific methods. Moreover, as you’ll see when we look at the ContactList class, each component is actually going to be the name of a gdbm database: one each for home, work, and extras.
, which contains an array of strings corresponding to the nested containers in the Contact objects. The point of having this constant is to encapsulate these names in one place. That way, both the Contact and ContactList objects can find all of them easily, and the names will not have to be hard-coded in specific methods. Moreover, as you’ll see when we look at the ContactList class, each component is actually going to be the name of a gdbm database: one each for home, work, and extras.
We want a read-write attribute for name, and one for each of the components ![]() . Using the unary * operator on COMPONENTS has the effect of turning the array into a bare list, so it’s as if we’d written this:
. Using the unary * operator on COMPONENTS has the effect of turning the array into a bare list, so it’s as if we’d written this:
attr_accessor :name, :home, :work, :extras |
We also want each Contact object to have a reader attribute in which it can store the name of its directory ![]() , which will be a subdirectory of the master directory of the contact list to which the contact belongs.
, which will be a subdirectory of the master directory of the contact list to which the contact belongs.
The initialize method preserves the name (which is the actual name of the person whose contact information this is), and also stores the directory name ![]() . The creation of the directory name involves replacing spaces in the name with underscores. You can adjust this if you prefer a different munging algorithm, as long as the result is a valid directory name (and preferably a reasonably cross-platform one).
. The creation of the directory name involves replacing spaces in the name with underscores. You can adjust this if you prefer a different munging algorithm, as long as the result is a valid directory name (and preferably a reasonably cross-platform one).
The components method provides a translation from the component names to the actual components ![]() . This, in turn, allows the close method to walk efficiently through all the components, performing a close operation on any that are not already closed.
. This, in turn, allows the close method to walk efficiently through all the components, performing a close operation on any that are not already closed.
Speaking of the close method, the Contact class provides both open and close methods. The open method creates a new gdbm object for each component ![]() , assigning that new object to the relevant component attribute of the contact. If there’s already a file with the appropriate name (for example, “extras”), gdbm will open it for reading and writing; otherwise, it will be created. (There are some further subtleties to the way gdbm handles read and write access, but we’ll assume for the purposes of the contact list that it’s private and only being accessed by one program at a time.)
, assigning that new object to the relevant component attribute of the contact. If there’s already a file with the appropriate name (for example, “extras”), gdbm will open it for reading and writing; otherwise, it will be created. (There are some further subtleties to the way gdbm handles read and write access, but we’ll assume for the purposes of the contact list that it’s private and only being accessed by one program at a time.)
The close method goes through the components corresponding to the filenames in which the data is stored, and performs the gdbm close operation on each one. This terminates the database connection to each file ![]() .
.
Finally, we include special methods for handling the contact’s email address ![]() . The email address gets stored in, and retrieved from, the extras["email"] slot. The point of writing these methods is to enable us to set and retrieve the email address as if it were a simple attribute, even though storing it is a little bit involved. (A contact might have separate home and work email addresses, of course. But we’ll keep it simple, as we did in the YAML implementation, and assume that each contact has only one email address.)
. The email address gets stored in, and retrieved from, the extras["email"] slot. The point of writing these methods is to enable us to set and retrieve the email address as if it were a simple attribute, even though storing it is a little bit involved. (A contact might have separate home and work email addresses, of course. But we’ll keep it simple, as we did in the YAML implementation, and assume that each contact has only one email address.)
Now, let’s look at ContactList. The specifics of implementing this class derive partly from the way gdbm works, and partly from the way directories work. We want to be able to get a contact from a contact list:
contact = @list["Joe Smith"] |
The list object is going to need to go to the directory, look for a directory with the right name, and load all the gdbm files into a Contact object. Fair enough, but not very efficient. It might pay to keep a cache of Contact objects on hand, so the search doesn’t have to be repeated if the same contact is requested twice.
With that in mind, look at listing 9.10, which shows the first segment of the ContactList class, including the initialize method, the [] method (which retrieves a Contact object by name), and a helper method called populate_contact. You can add this code to the top of the file containing the Contact class (or the bottom, though if you do that, it’s best to follow the convention of keeping the two require lines at the top of the file).
Listing 9.10. The ContactList class for storing contact records
require 'gdbm' require 'fileutils' class ContactList attr_reader :contact_cache def initialize(dir) @dir = dir @contact_cache = [] end def [](name) contact = @contact_cache.find {|c| c.name == name } return contact if contact contact = Contact.new(name) Dir.chdir(@dir) do if File.directory?(contact.dirname) populate_contact(contact) @contact_cache << contact else contact = nil end end contact end def populate_contact(contact) Dir.chdir(contact.dirname) do contact.open end end |
The fileutils extension is loaded for the sake of one or two utility methods to be used later ![]() .
.
Then, upon initialization ![]() , the list stores its directory and creates an array that will serve to cache Contact objects. That array is available as a reader attribute
, the list stores its directory and creates an array that will serve to cache Contact objects. That array is available as a reader attribute ![]() . When you try to retrieve a contact from the list, the list object first checks the cache
. When you try to retrieve a contact from the list, the list object first checks the cache ![]() . If the contact is there, it returns it. If the contact isn’t there, the real fun starts.
. If the contact is there, it returns it. If the contact isn’t there, the real fun starts.
First, a new Contact object is created ![]() . Then, the ContactList object switches to its own directory, where it looks for a subdirectory whose name is the same as the directory name reported by the Contact object—“Joe_Smith” for the contact “Joe Smith,” for example
. Then, the ContactList object switches to its own directory, where it looks for a subdirectory whose name is the same as the directory name reported by the Contact object—“Joe_Smith” for the contact “Joe Smith,” for example ![]() . If such a directory exists, the contact’s components get initialized to a new gdbm database object, based on the component name
. If such a directory exists, the contact’s components get initialized to a new gdbm database object, based on the component name ![]() . The contact is now added to the list’s contact cache
. The contact is now added to the list’s contact cache ![]() , so that the whole directory-based instantiation won’t have to be repeated during this session. If, however, the directory corresponding to the requested component name does not exist, the contact variable is reset to nil. This indicates a request for a nonexistent contact. (Remember, you’re just trying to fetch an existing contact, not create one.)
, so that the whole directory-based instantiation won’t have to be repeated during this session. If, however, the directory corresponding to the requested component name does not exist, the contact variable is reset to nil. This indicates a request for a nonexistent contact. (Remember, you’re just trying to fetch an existing contact, not create one.)
Finally, the value of the contact variable—which is going to be either nil or a gdbm object—is returned from the method ![]() . If it’s nil, you know that the contact you requested does not exist on this list. The populate_contact utility method navigates from the top directory of the list down to the specific subdirectory for this contact
. If it’s nil, you know that the contact you requested does not exist on this list. The populate_contact utility method navigates from the top directory of the list down to the specific subdirectory for this contact ![]() . It then calls the open method on the contact—which, as you’ll recall, calls GDBM.new on each of the contact’s components, creating database handles on the relevant files.
. It then calls the open method on the contact—which, as you’ll recall, calls GDBM.new on each of the contact’s components, creating database handles on the relevant files.
Now let’s look at adding an object to a list and removing one from the list. We’re shooting for the same API as the YAML version:
@list << contact # add a contact @list.delete(contact) # delete a contact |
As listing 9.11 shows, these operations require attention to the filesystem and directory structure.
Listing 9.11. Adding and removing a contact
def <<(contact) Dir.chdir(@dir) do Dir.mkdir(contact.dirname) unless File.exists?(contact.dirname) populate_contact(contact) end @contact_cache << contact end def delete(name) contact = self[name] return false unless contact contact.close Dir.chdir(@dir) do FileUtils.rm_rf(contact.dirname) end contact_cache.delete_if {|c| c.name == name } true end |
To add a contact, we need to create a new directory, unless one exists ![]() (which is possible; there could already be a Contact object corresponding to this directory, even if it’s not part of a contact list). We also need to go into the directory and populate the contact’s components based on the gdbm files in the directory, creating them as necessary or just opening them for reading if they’re already there. Finally, we add the contact to the list’s contact cache
(which is possible; there could already be a Contact object corresponding to this directory, even if it’s not part of a contact list). We also need to go into the directory and populate the contact’s components based on the gdbm files in the directory, creating them as necessary or just opening them for reading if they’re already there. Finally, we add the contact to the list’s contact cache ![]() .
.
Removing a contact involves several steps. First, we only want to delete contacts we actually have, so the method returns false if the contact is unknown ![]() . Second, we ask the contact to close itself, which means walking through the components and closing each gdbm connection in turn
. Second, we ask the contact to close itself, which means walking through the components and closing each gdbm connection in turn ![]() . Then we use the FileUtils.rm_rf method to delete the contact’s directory
. Then we use the FileUtils.rm_rf method to delete the contact’s directory ![]() , remove it from the cache if it’s there
, remove it from the cache if it’s there ![]() , and return true to indicate a successful deletion
, and return true to indicate a successful deletion ![]() .
.
Arguably, directory removal is a rather harsh step; it means that the information is really gone, not just hidden from the list. The reasoning, though, is that the list is really in charge of the contact, and that in practice we’ll always access contacts through their lists. You can, of course, soften the code, if you want to devise a way to keep the contact but remove it from the list, or a way to copy contacts from one list to another.
We can now add, remove, and retrieve contacts from the list. We just need a few query methods: directory_names (the names of all the list’s directories, which will be the munged versions of the names of the contacts), empty?, and size. Listing 9.12 shows the remaining code necessary to complete the ContactList class.
Listing 9.12. The remaining methods for the ContactList class
def directory_names Dir["#{@dir}/*"] end def size directory_names.size end def empty? directory_names.empty? end end |
This class, along with the Contact class, now gives us all the functionality we need to make our tests pass.
$ ruby contacts_g_test.rb Loaded suite contacts_g_test Started ..... Finished in 0.071413 seconds. 5 tests, 7 assertions, 0 failures, 0 errors |
The key, again, is the directory structure, which we have to walk through explicitly, but which adds an extra level of nesting so that a Contact object can present us with what amounts to a collection of hashes.
Discussion
The gdbm version of the contact manager is a bit more sprawling, in terms of file space and directory structure, than the YAML version, and gdbm files, unlike YAML files, are not human-readable. But gdbm is a real database tool, not a different tool being recruited for database-like operations (such as a data-serialization tool, in the case of YAML). In practice, that means gdbm is optimized for database operations. Furthermore, having the entries spread out over many file directories means that you don’t have to read them all in at the same time.
If you’re just dealing with a few contacts or a small amount of data in whatever domain you’re writing this code for, it’s not going to make any noticeable difference whether you load in all the data at once or traverse a directory looking for it. If you’ve got a lot of data, you’ll probably hit a point where splitting the data out into many gdbm files will speed things up. Of course, as with all performance questions, you have to try it out and measure for yourself. If you’re using these tools for relatively small operations, you’ll likely find any of them acceptable in terms of performance. That’s part of their merit: they’re easy to write and usually fast enough in operation.
One interesting programming issue arising in connection with the gdbm implementation of the contact manager is the issue of how much functionality should be embodied in the Contact objects, and how much should be delegated to the ContactList objects. Notice, for example, that a Contact object does not know how to populate itself, in the sense of opening connections to all of its gdbm files. The list handles that, through the populate_contact method. Would it be better to teach a contact how to populate itself, and then have the list call
contact.populate |
instead of calling its own populate_contact method? You could certainly make a case for that; it puts the knowledge inside the object that’s nearest to the operation. On the other hand, the contact list is really what we’re modeling here. In a sense, the Contact class only exists as a convenient way to split out some of the list’s functionality. If that’s true, then how much functionality we split out is pretty much discretionary. And there’s certainly no harm in experimenting with different ways of doing the same thing.
We’ll turn next to the Ruby MySQL module, which takes us into the realm of relational databases.
9.3. The MySQL driver
We’ve now got enough usable code for manipulating contacts and contact lists to put it to some use. This will also allow us to delve into the world of relational databases and the available APIs for Ruby.
Overall, the story is that there are individual (database) drivers for MySQL, PostgreSQL, SQLite, and others. Any of these can be programmed individually. On top of these, you can also use the DBI (Database Interface) package, which provides an abstract API that can serve as a frontend to any of the DBD packages available.
We’ll look at a use case for the “pure” MySQL driver here, and in section 9.4 we’ll do something with DBI. Unlike the YAML and gdbm examples, these examples will not involve writing an API for a contact list but, rather, moving contact list data around: to a MySQL database first, and from a MySQL database second. It’s not uncommon to use database tools in situations where you’re moving data from one storage system to another. The nice thing about the facilities available in Ruby is that you can do quite a lot of this at a rather high level of abstraction.
Problem
You’ve got a YAML file of contact information, and you want to store it in a relational database.
Solution
Let’s tackle this problem by using the MySQL driver. This driver is available as a gem or as a non-gem Ruby package. To install it as a gem, simply run the following command:
gem install mysql |
To get started, take a look at listing 9.13, which shows several Contact objects in the YAML format.
Listing 9.13. An example of a YAML file for contact records
--- !ruby/object:ContactList contacts: - !ruby/object:Contact extras: :sport: bowling :car: Toyota :pets: armadillo home: :postal: "12345" :state: NJ :country: USA :street1: 123 Main :city: Somewhere name: David Black work: {} email: dblack@somewhere - !ruby/object:Contact extras: {} home: :postal: "23456" :state: AB :country: USA :street1: 234 Main :city: Somewhere name: David Smith email: dsmith@somewhere work: :company: The Somewhere Consultants :street1: 234 Main :street2: Suite 33943 :city: Somewhere :postal: "23456" :state: AB :country: USA - !ruby/object:Contact extras: :instrument: violin :car: Honda :pets: cat home: :postal: "00000" :state: US :country: USA :street1: 9393 West Main :city: Nowhere name: Joe Smith email: jsmith@somewhere work: {} - !ruby/object:Contact extras: {} home: :postal: "98765" :state: HH :country: USA :street1: 8 North Main :street2: Apt. 3 :city: Anywhere name: John Smith email: jsmith2@somewhere work: {} |
The first step in migrating these contacts to a MySQL database is designing and creating the database itself. We’ll use the contact’s email address as the primary key for the contacts table and as the foreign key for all the other tables. Listing 9.14 contains SQL instructions suitable for creating this database in MySQL. Running listing 9.14 as a MySQL script, with appropriate permissions, should create the database.
Listing 9.14. SQL instructions for creating the contacts database
drop database contacts; create database contacts; use contacts; drop table if exists contacts; create table contacts ( name varchar(100), email varchar(50), primary key (email)) ENGINE=INNODB; drop table if exists home; create table home ( street1 varchar(100), street2 varchar(100), city varchar(50), postal varchar(20), state varchar(20), country varchar(25), contact_email varchar(50), foreign key(contact_email) references contacts(email) on delete cascade) ENGINE=INNODB; drop table if exists work; create table work ( company varchar(100), street1 varchar(100), street2 varchar(100), city varchar(50), postal varchar(20), state varchar(20), country varchar(25), contact_email varchar(50), foreign key(contact_email) references contacts(email) on delete cascade) ENGINE=INNODB; drop table if exists extras; create table extras ( label varchar(50), description varchar(150), contact_email varchar(50), foreign key(contact_email) references contacts(email) on delete cascade) ENGINE=INNODB; grant all on contacts.* to 'contacter'@'localhost' identified by 'secret' |
The last command (grant) gives all the necessary privileges to the “contacter” user. You can, of course, make up your own username and password for that command. The main thing is to create a non-root user, since the username and password are going to appear in a plain-text program file. (Not that you’d be handing the file around anyway, but it’s always better not to put very important passwords in plain text anywhere.)
The next step is to create the “glue” program that will take us from YAML to MySQL. This program is going to read the YAML file in, which will create a ContactList object containing several Contact objects, and write it out again, this time to the MySQL database. The input, however, isn’t entirely congruent with the output; we have to do a little work to make it fit.
Contacts have home and work components, which map very easily from a hash (the structure by which they’re represented inside the Contact object) to a database table. In fact, the keys of the home and work tables in the database schema are simply lifted from the key names in the home and work hashes.
The extras component is a little different. Here, keys are arbitrary, which means they cannot match up to database column names, since those names have to exist in advance. (It’s possible to create columns on the fly using the MySQL API, but that’s just asking for confusion and trouble.) Instead of storing each value in a column named for its key, the extras table has two storage columns: label and description. It also has a contact_email column, where the email address of the contact will be stored.
What this means is that while there will be one record in the home table and one in the work table for each contact, there will be one record in the extras table for every entry in the contact’s extras hash. The key/value combination in the hash becomes the label/description combination in an extras record.
Most of the rest of the work of writing the program involves creating query strings and shipping them off to the database via the MySQL API. Each Contact object will trigger a three-part cycle of insertions:
- The query that creates the entry in the contacts table itself
- The loop that creates the entries in the home and work tables
- The loop that creates the entries in the extras table
First things first. Before any of this happens, we need to load in the necessary libraries, as well as our application code (contact_y.rb), and make connections on both the YAML side and the MySQL side:
require 'yaml' require 'mysql' require 'contact_y' conn = Mysql.new("localhost", "contacter", "secret", "contacts") list = YAML.load(File.read("contacts.yml")) |
The assignment to conn gives us a new Mysql object—essentially an addressable handle on a database connection ![]() . Note the arguments given to Mysql.new: host, username, password, and database name. The variable list
. Note the arguments given to Mysql.new: host, username, password, and database name. The variable list ![]() will contain the ContactList represented in the YAML file; this contact list, in turn, contains and manages the specific contacts.
will contain the ContactList represented in the YAML file; this contact list, in turn, contains and manages the specific contacts.
Now, let’s take care of the first of the three major stages: creating the entry in the contacts table. Just for fun, here’s how to do it using Ruby’s % interpolation operator:
list.contacts.each do |contact| conn.query "INSERT INTO contacts (`name`, `email`) VALUES ('%s','%s')" % [contact.name, contact.email] |
The %s format specifiers work as they do in the sprintf method family: they serve as placeholders for a string to be determined later. The two necessary strings are provided in an array after the main string, and between the main string and the array comes another %-sign—this is what triggers the interpolation operation.
Amidst all this handy string manipulation, notice what’s actually happening here: a call to conn.query. We’re using conn, the database connection handle, to send a SQL query to the database.
Next up: the home and work components. For each of these, the goal is to send a query that will insert the right values in the right fields. The fields into which we’ll insert values are those that have the same names as the hash keys from the YAML structure (“postal”, “state”, etc.), plus the extra field contact_email—the primary key column in the home and work tables, which has no corresponding value in the YAML structure.
We first want to drill down from the contact to its components. Then we want to isolate each component’s keys and create a query string that uses them as field names, together with the component’s values as the database values. Here’s the code that will do this:
%w{ home work }.each do |component| data = contact.send(component) items = data.keys fields = (["contact_email"] + items).map {|field| "`#{field}`" }.join(",") values = [contact.email] + items.map {|field| data[field]} values.map! {|value| "'#{value}'"} values = values.join(",") conn.query("INSERT INTO #{component} (#{fields}) VALUES (#{values})") end |
The data object is the entire component hash; we acquire it by sending the name of the component (home or work) to the Contact object ![]() . Then we isolate the keys, which will be things like street1, street2, and phone, as items
. Then we isolate the keys, which will be things like street1, street2, and phone, as items ![]() . If we add the string "contact_email" to this list of items, we’ll have all the necessary column names for the relevant database table. (There’s no contact_email field in the YAML version, so we have to shoehorn it in to please the MySQL database schema.) These field names get inserted into backticks and are strung together with commas
. If we add the string "contact_email" to this list of items, we’ll have all the necessary column names for the relevant database table. (There’s no contact_email field in the YAML version, so we have to shoehorn it in to please the MySQL database schema.) These field names get inserted into backticks and are strung together with commas ![]() . That will give us something like this for the fields variable:
. That will give us something like this for the fields variable:
`contact_email`, `street1`, `street2`, `city`, etc. |
Those are the fields we’ll be inserting values into. The values themselves come from a similar, but not identical, mapping of the actual value for contact.email, plus the actual values for the items (as retrieved from the data hash). Here, we put the array together first, because that’s a somewhat longer operation, in this case ![]() . Then the array gets mapped—map! ped, actually, because the values get changed in place—and then joined with commas to make a values string out of the array
. Then the array gets mapped—map! ped, actually, because the values get changed in place—and then joined with commas to make a values string out of the array ![]() ,
, ![]() .
.
The result will be something like this:
'jsmith2@somewhere', '123 Main', '', 'Somewhere', etc. |
Thus, the values string lines up nicely with the fields string, ready for insertion into the appropriate table ![]() .
.
You may be wondering why it’s necessary to march through all the keys and dig out all the values for each hash, when there’s a values method that would do the same thing in one step. The reason is order—or, rather, lack thereof in a hash. Hashes are unordered, which means that the order in which their entries are returned is not guaranteed. While it’s very likely that the keys, when returned separately via the keys method, will line up with the values as returned by the values method, it’s a good idea nonetheless to go ahead and retrieve each value explicitly, so as not to depend on hash ordering in any guise.
The handling of extras comes next. It’s actually a bit less involved than the handling of the home and work components, though it does potentially create more records:
contact.extras.each do |label, description| conn.query("INSERT INTO extras (`contact_email`, `label`, `description`) VALUES ('#{contact.email}', '#{label}', '#{description}')") end end |
Encapsulating component references
You’ll recall that for the purpose of the gdbm contracts implementation, we neatened things up by setting a COMPONENTS constant inside the Contact class, so that it wasn’t necessary to hard-code the names of the components wherever they were used. There are a couple of reasons it’s probably not worth doing that here. First, the extras component has to be split out anyway. Second, the remaining components have to correspond exactly to table names in the database.
It is possible to query the database for its table names, and if you subtract “extras” and “contacts” from the list, you’ll have (as it’s currently engineered) the names of the other components. Still, while it’s great to automate things as much as possible, you’ll probably find that with more or less one-time conversion scripts, it’s inevitable that certain things are going to have to be hard-coded, and in some cases will require individual treatment (like “extras”).
Each entry in the extras hash gets an entry in the database, with its foreign key (contact_email) set to the current contact’s email field. And that last end tells you that the big loop—the loop through all the contacts—is finished.
Discussion
The MySQL API may seem a bit raw to you, especially if you’re used to a full-blown object-relational mapper (ORM) like ActiveRecord or Og. When you use the API directly, you write a lot of SQL yourself, and that may or may not be to your taste.
Keep in mind that having the programming interface available can make a big difference. It gives you all the power of Ruby in front of your SQL generation. You can, of course, grep through a YAML file and try to piece together queries yourself, but all you’ll learn by doing that is how much easier it is when you have a programmatic layer, even if it’s not an ORM.
If you do have an ActiveRecord-friendly database, you can of course use the higher-level commands available to you to handle the data more abstractly. It all depends on what your starting point and goal happen to be in a given project.
One thing that isn’t covered in the preceding solution is error handling. Our script will simply die if something goes fatally wrong in a database operation, and that could leave the database in an inconsistent state. To prevent this, you can wrap each contact’s set of queries up as a transaction.
To do this, you first need to turn off auto-commit mode:
... conn = Mysql.new("localhost", "contacter", "secret", "contacts") list = YAML.load(File.read("contacts.yml")) conn.autocommit(false) |
Now, you need to put each contact’s worth of querying inside a begin/rescue/end block, where rescuing from a Mysql::Error will result in a rollback:
list.contacts.each do |contact| begin # rest of code, through the "extras" loop rescue Mysql::Error => e puts "Problem with contact #{contact.name}: #{e}" conn.rollback next end conn.commit end |
The commit only happens if no Mysql::Error gets raised along the way. Doing it this way will help you avoid getting the database into an inconsistent state (such as where a contact record is saved but the home record is not), and it will also avoid stopping the whole program just because of one malformed record.
So far, we’ve looked at sending insert queries to the database, which is important, but it’s not the whole story. Our next problem will take us in the other direction: starting from a relational database and reading data out in order to store it in a different format. Moreover, we’ll take this opportunity to turn the corner to DBI, the high-level Ruby database interface library.
9.4. Using DBI
DBI, Ruby’s database interface library, ships separately, and it provides a high-level interface that allows you to come about as close as you can to programming different relational databases with the same programming tools. The goal is to abstract away the differences between various databases, and focus on what they have in common. At the same time (though we won’t pursue it in detail here), DBI can also take advantage of features that one database has but others don’t.
DBI rests on top of, and needs, one or more database driver (DBD) packages, such as the MySQL library we used in section 9.3. At time of writing, DBI supports 12 DBDs (plus a deprecated one). If you learn how to use DBI, it’s almost one-stop-shopping for database APIs.
Problem
You need to read out some contact records from a relational database and save them to a gdbm database.
Solution
We’re going to use the MySQL database from section 9.3, but this time we’ll address the database with DBI. The goal is to migrate the data to the gdbm-style contacts database. That means we’ll need to load contacts_g.rb, as well as DBI. Loading contacts_g.rb will in turn cause the gdbm driver to be loaded. We also need to create the output directory, if it doesn’t exist already.
require 'dbi' require 'contacts_g' Dir.mkdir("migrated_contacts") unless File.exist?("migrated_contacts") |
Now we need a ContactList object, which will serve as the receptacle for the data coming in from the MySQL database; the data will be massaged, of course, so as to fit the shape of Contact objects. (Make sure that the directory you use already exists, or add something to the script to create it.) We also need a database connection. And, finally, we need a list of all the tables in the database, except contacts and extras; those two tables require special handling.
list = ContactList.new("migrated_contacts") conn = DBI.connect("DBI:Mysql:contacts", "contacter", "secret") tables = conn.select_all("show tables"). flatten - %w{ extras contacts } |
The first argument to DBI.connect is the name of the database, contacts, qualified with DBI:Mysql to point DBI to the correct driver. Note that the separators here are single colons, not the double-colon operator that indicates nested constants in Ruby. The whole thing is just a string; none of the characters have significance until they’re scanned and interpreted by DBI itself. The host will default to localhost.
To get the list of tables, we use select_all to return an array of rows. In this case, each row is a table name. Rows are returned as arrays inside arrays, and flattening the array takes out the nesting. Finally, we remove the names of the tables that require special treatment: extras and contacts.
The processing of the data from the database consists of a big loop, an iteration through all the rows of the contacts table. Inside the big loop is another loop, which handles all the tables in the tables array. Finally, the data from the extras table is read and transferred.
Listing 9.15 shows the big loop, and what happens inside it.
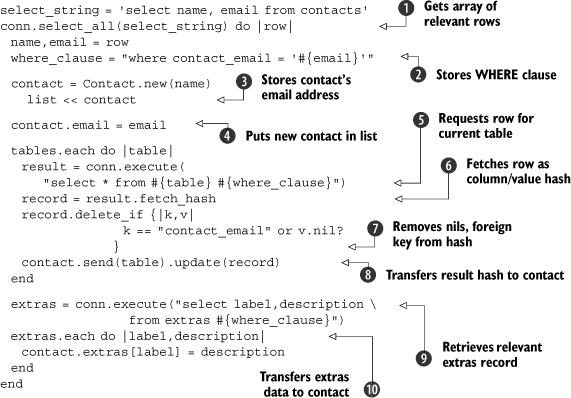
Listing 9.15. The loop through the contacts table
The table names will match the relevant components of the gdbm contact: specifically, home and work.
As with the previous script, where we went from YAML to MySQL, we’re dealing with three major phases: creating the Contact objects, handling the miscellaneous tables, and handling the extras table. In preparation, we get hold of all the contact rows ![]() , and store a WHERE clause that we’re going to use repeatedly
, and store a WHERE clause that we’re going to use repeatedly ![]() , just to save having to type it out.
, just to save having to type it out.
Creating and storing a new contact is easy ![]() , thanks to the API we’ve already developed for the gdbm contacts database. After storing the contact, we set its email address, using the email= method, which transparently puts the email address into extras["email"]
, thanks to the API we’ve already developed for the gdbm contacts database. After storing the contact, we set its email address, using the email= method, which transparently puts the email address into extras["email"] ![]() .
.
Then we go through the list of tables. For each table (remembering that we’ve subtracted extras and contacts from the list), we execute a query returning the relevant row for this contact ![]() . This request returns an object of class DBI::StatementHandle, which takes requests for actual delivery of the rows. The relevant request here is fetch_hash
. This request returns an object of class DBI::StatementHandle, which takes requests for actual delivery of the rows. The relevant request here is fetch_hash ![]() , which returns the next row in the form of a hash of column names against values. (A certain amount of error-checking has been left to the reader, including making sure that there is only one row returned per table for each contact!) We then cleanse the hash of the irrelevant contact_email key, as well as any entries with nil values
, which returns the next row in the form of a hash of column names against values. (A certain amount of error-checking has been left to the reader, including making sure that there is only one row returned per table for each contact!) We then cleanse the hash of the irrelevant contact_email key, as well as any entries with nil values ![]() (which gdbm doesn’t like; it only wants strings, and there’s not much point storing empty strings for nils). The hash of columns and values is then transferred to the relevant component of the contact
(which gdbm doesn’t like; it only wants strings, and there’s not much point storing empty strings for nils). The hash of columns and values is then transferred to the relevant component of the contact ![]() . The hash update method is effective because the component is actually a gdbm object, and gdbm objects are programmed like hashes.
. The hash update method is effective because the component is actually a gdbm object, and gdbm objects are programmed like hashes.
Next comes the extras special case. Here we get all the extras records belonging to this contact ![]() , and make the appropriate assignments in the extras component
, and make the appropriate assignments in the extras component ![]() .
.
Discussion
DBI is a great tool for addressing a variety of database systems. Like the individual drivers, it keeps you fairly close to the SQL, and like the MySQL driver, DBI is not as abstracted or high-level as ActiveRecord or Og. But even if you’re writing the statements mostly by hand, the ability to embed them inside Ruby logic and string handling is extremely valuable.
In this example, we see again the special casing of the extras table. Going from YAML to MySQL, the special casing involved the need to create a separate record for each key/value pair in the extras hash, using the column names label and description, because the keys for extras are arbitrary, and it was impossible to have a separate column name for each one. Going the other way, extracting the data from the MySQL database and putting it back into a Ruby hash structure (which is what gdbm objects essentially are), it’s possible to shed the label/description wrapper and go back to having each label be a hash key and the corresponding description its value.
This kind of massaging of structure is fairly common when you migrate around the different data-storage facilities available in Ruby (and, of course, not just in Ruby). The decisions you make about the shape of the containers are as important as any other feature of the storage process.
9.5. Summary
In this chapter, we’ve looked at a representative set of database and data-storage facilities in Ruby. We looked at YAML, the data-serialization format, as a kind of database tool, having the particular dual merit of allowing for direct storage of Ruby data structures and offering a human-readable, editable text representation of the data it’s storing. From there we went to gdbm, one of the drivers in the DBM Berkeley database family. gdbm objects are tied invisibly to files and are programmed like Ruby hashes, making for another quick and easy data-storage tool.
In both YAML and gdbm, we developed library code for creating and managing a list of contacts. The rest of the chapter involved using this code in the service of trying out the relational database facilities available for Ruby. We undertook the task of migrating a YAML database of contact objects to a MySQL database, and then we migrated the same MySQL database back out, into gdbm contact-list format. Both of these projects were written “script-style” (with no classes, just procedural code), and both shed some light on the process of formulating and implementing data structures across different storage systems.
We haven’t covered everything in the Ruby database realm, by any means, but you’ve seen enough to give you a toolset for writing your own scripts, and to give you your bearings as you explore some of the other available tools. You’ll likely find that these techniques have some very practical uses—if not every single day, then at critical junctures in data-migration and -reorganization projects. In the next chapter, we’ll take these ideas further and look at handling structured data files more in depth.