
Chapter 10. Structured documents
- Using XML to read configuration files
- Working with HTML
- Generating XML with Hpricot
- Reading RSS feeds
Almost any Ruby program you write will involve either loading data from an external source or exporting data produced in your program to an external source, which will be reloaded later or loaded by another program. You might use a dead-simple representation like YAML or a more complex one like Atom to store the data, but the basic principles will remain the same.
While you’ll have the ability to choose the data format for your configuration files or external storage, you will often run into situations where you need to use data produced by someone else, often by programs written in other programming languages or even created manually by human beings. In these cases, you might need to be able to read in, and correctly interpret, broken data files. The most common example of this is reading HTML files from the internet, which are frequently impossible to parse without first repairing the data.
Thankfully, almost every structured format you might come across has an associated Ruby library that will make reading in data for use by your program, or writing out information you’ve collected, a trivial matter. Some of these libraries, like the Hpricot library that we will discuss later, also specialize in fixing broken input before giving you a simple API to parse and manipulate the data.
In this chapter, we’ll look at XML, including specific forms like RSS, Atom, and XHTML. We’ll also look at YAML, Ruby’s built-in, simple serialization format, and CSV, which is commonly exported by programs like Microsoft Excel and Outlook.
10.1. XML in practice
The most common data-interchange format is XML. It is used to encode all sorts of information from documents produced in Microsoft Word to the votes of members of Congress made available online. Virtually all programming languages have extremely good support for XML, so it’s virtually guaranteed that information exported by one program will be easily interpreted by any other. Vendors frequently use XML as a format for configuration files because they have to do little or no custom work to read or write them.
Because XML is such a common interchange format, there are a number of extremely common uses, like using XHTML for web pages and RSS or Atom for online feeds. We’ll get to those cases later, but another extremely common use of XML is for storing configuration data for applications. Sooner or later, you will likely need to parse legacy or configuration data in the form of XML, and Ruby has a nice set of XML libraries to help you out.
For our first couple of examples, we’ll look at parsing the configuration for a fictitious calculator program that performs similarly to the calculator built into Apple’s Mac OS X or Microsoft Windows. Let’s assume that the calculator supports two modes, standard and scientific, and that we’ll store its starting position in our configuration file. We’ll also store information about the decimal-point precision, as well as the number currently in memory, if any.
10.1.1. Using XML to read configuration files
One of the most common uses for XML in both development and consumer environments is storing configuration values. XML is a staple of Java and C# development, where many project presets are managed by XML files. XML files are an excellent way to integrate with an existing codebase or to use existing configuration data in a new Ruby (or other language) application.
Problem
You need to load and parse an XML configuration file for a new application.
Solution
For our calculator, we need to be able to read in the configuration details and instantiate a calculator object with the settings that were previously saved by the user. A sample configuration file for the calculator is shown in listing 10.1.
Listing 10.1. Our calculator’s XML configuration file
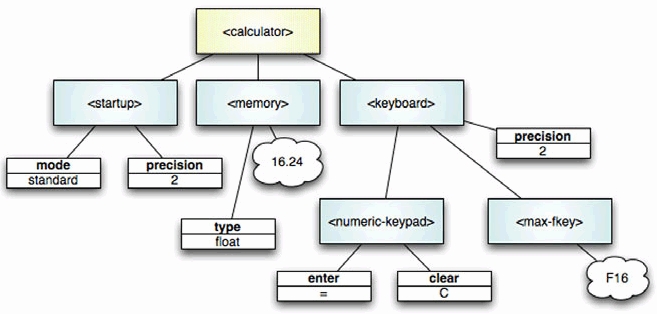
<?xml version="1.0" encoding="ISO-8859-15"?> <calculator> <startup mode="standard" precision="2" /> <memory type="float">16.24</memory> <keyboard type="Macintosh"> <numeric-keypad enter="=" clear="C" /> <max-fkey>F16</max-fkey> </keyboard> </calculator> |
This is a very simple configuration file, but it offers enough variance to explore the features of Ruby’s built-in XML parser, REXML. Figure 10.1 shows the XML represented graphically as a tree of nodes.
Figure 10.1. A graphical representation of the calculator XML document. Element nodes are represented by rounded rectangles, attributes by squared rectangles, and text nodes by bubbles.
There are a number of libraries that allow us to parse XML in Ruby. For this simple case, REXML, the XML parser that is built into Ruby, will do the trick. Check out listing 10.2 to see how natural the implementation is.
Listing 10.2. Getting our XML into Ruby with REXML
require 'rexml/document' include REXML module Calculator class Config def initialize(memory, startup, keyboard) @memory = memory, @mode = mode, @keyboard = keyboard end end class Keyboard def initialize(type, numeric_keypad, max_fkey) @type = type, @numeric_keypad = numeric_keypad, end end end string = File.read("calculator.xml") calculator = Document.new(string) root = calculator.root memory = root.elements["memory"] memory = memory.text.send("to_#{memory.attributes['type'][0.1]}") startup = {:mode => root.elements["startup"].attributes["mode"], keyboard = root.elements["keyboard"] keyboard_type = keyboard.attributes["type"] numeric_keypad = keyboard.elements["numeric-keypad"].attributes max_fkey = keyboard.elements["max-fkey"].text keyboard = Calculator::Keyboard.new(keyboard_type, config = Calculator::Config.new(memory, startup, keyboard) |
In listing 10.2, we started by producing a hypothetical API for our calculator configuration object. Because, in this example, we are producing both the application and the XML configuration we’ll read in, we are free to create an API for our application that closely mirrors the XML format. In this case, we used the simple XML reading methods of REXML to extract the information we needed from the configuration file and populate our configuration object. In a real-world scenario, this configuration object would presumably be passed into the application when it was instantiated.
For simplicity, we have left out any error handling, but you would probably want to handle errors caused by incorrectly formatted XML more gracefully than simply throwing an error and exiting the application, as this example would.
Discussion
Because this example is so simple, there are only a few things that need discussion. First off, the example uses a common Ruby trick to produce the correct value for the starting memory value. The XML format can only return strings, but we wanted to be able to specify that the value in memory was some other type. In our case, we wanted to allow integers or floats to be loaded in. Because Ruby allows conversion from string to numeric formats via to_f for floats and to_i for integers, we were able to provide a single character in the type attribute of memory, and then easily call the appropriate conversion function by using the send method.
REXML allows you to use XPath selectors and returns the appropriate node type based upon the selector. For instance, when getting the precision, we used the object’s methods: root.elements["startup"].attributes["precision"]. We could have instead used an XPath attribute selector: root.elements["startup/@precision"]. Because the @ sign indicates that it’s an attribute selector, the expression will return an attribute’s value. In other cases, if we were to select elements, we could get elements back.
Another neat trick is that the attributes method on an element returns a Hash. As a result, if you structure your API to accept a Hash, you can simply pass in the result of the attributes method, as we did for numeric_keypad. This allows us to support an arbitrary (and even changing) set of options for the numeric keypad without having to change the way we parse the configuration file.
10.1.2. Writing configuration data to disk
Now that we’ve put together some code for reading in configuration data from an XML file, what happens if you want to save changes to the XML? Unless you expect your user to modify the document by hand, you need a way to output any changes back to the configuration file.
Problem
Now that you’ve read in the configuration file, you need to write an edited configuration file to disk.
Solution
For the purposes of this example, let’s assume that we need to produce a function that will take a configuration object, as we defined it previously, and serialize it back into outputtable XML. Because we’re doing more than just pulling in some data from a file, we’ll get a bit more object oriented this time, and take the opportunity to write tests proving that our function works.
In addition to creating a mechanism for outputting our configuration object to XML, we’ll pull our input conversion into Calculator::Config. We’ll create to_xml and from_xml methods on the Config class. And to make things even more encapsulated, we’ll create to_xml and from_xml methods on the Keyboard class, which will allow us to specify how we want keyboard specification objects to be saved and restored within the larger specification XML. See listing 10.3 for our implementation.
Listing 10.3. Reading and writing the configuration

All of the code inside the new from_xml method should look very familiar, as it’s basically cribbed out of our example in section 10.1.1. However, we moved the logic dealing with the Keyboard into a from_xml method on the Keyboard object, which allows us to pass in the root <keyboard> XML node, and have it return a Keyboard object, which we can use to instantiate our specification object.
Note that Keyboard.from_xml is a class method on the Keyboard class, just as Config.from_xml is a class method on the Config class. There’s a slight incongruity between the two in that Config takes a filename, while Keyboard takes a DOM node. This is because of the way we expect to instantiate the objects: Configs will pull in an external file, while Keyboards will receive part of an existing DOM structure.
The to_xml function we wrote in the Config class is even simpler to understand than the original parsing function. First, we create a new XML Document. We then add an XML declaration (which should appear at the top of the XML files, if we’re following good form), and then the root element (<calculator>). The add_element function has a nice property that makes the next step very simple. It takes an element name as its first parameter, and an optional Hash object for any attributes you wish to instantiate. Well, holy attributes, Batman! We already store the startup attribute of Config as a Hash, so we can simply pass it in. Elegant, huh?
We’re not quite as lucky with memory, because we have to reverse the procedure we used in from_xml to store the number and its type. For type, we slice off the first character of the memory object’s class, lowercase of course (s for String, i for Integer, and f for Float). For the value, which we store as text inside the <memory> node, we use to_s to stringify the value. The real trick, however, comes next, with our encapsulated Keyboard object.
As you recall from section 10.1.1, we decided to keep the Keyboard information in its own object, which would encapsulate information about a Keyboard. At the time, there was very little utility in this decision, but when we made our code more object oriented, we got to make further use of this encapsulation. Since our Config object has a Keyboard object in its keyboard attribute, we can simply call keyboard.to_xml to get the appropriate XML for the keyboard.
The Keyboard#to_xml function is also pretty simple. We start by creating a new wrapper element (<keyboard>), and adding the type attribute based upon the object’s @type instance variable. You might have thought you could use the shortcuts we use with add_element to add the attributes when you create the elements, but unfortunately Element.new does not support that shortcut. We then use the shortcut syntaxes we used earlier to finish up the element, and we return it.
Discussion
The takeaway from all this XML creation is that writing somewhat elegant REXML code requires a good knowledge of the chaining and shortcut possibilities. Because add_element returns the element in question, for instance, we can immediately throw an add_text on top of it. We can also use existing hashes that we have created for our application for the attributes of any node—a trick we made extensive use of.
So far, we’ve been parsing and working with plain vanilla XML, but in the next section we’re going to look at how to work with a domain-specific variety of XML: HTML.
10.2. Parsing HTML and XHTML with Hpricot
With the explosion of the web more than a decade ago, a tremendous amount of information has become available on the internet in HTML form. Unfortunately, that information is rarely, if ever, presented in fully valid, parsable form. Since we can’t control the creation of the data we’ll be reading in, it is important for us to have fast, dead-simple tools for taking broken markup and converting it into machine-readable content.
Fortunately, Hpricot, an XML parser written by Ruby luminary “why the lucky stiff” (http://github.com/why/hpricot/tree/master), provides us with just that. Its most performance-related features are written in C, so it’s very fast, and it uses CSS3 selectors (plus a number of custom CSS extensions), so finding precisely the nodes you want, which is very important in massive, markup-heavy HTML pages, is much simpler than in REXML. Finally, it was born out of the philosophy of the popular jQuery JavaScript library, so you’ll find that certain common tasks, like adding a class to a series of elements in a document, become extremely simple.
In this section, we will explore processing HTML documents that we create, as well as reading files in from the wild.
10.2.1. Post-processing HTML output
Suppose you use a Ruby web framework like Ruby on Rails, Merb, or Nitro, and you have a number of pages that produce tables. You want all of the tables to have zebra-striping (even numbered rows should be colored light blue) when your pages are rendered by the browser. You’ve already explored a few options, but none of them have met your needs.
You’ve tried using client-side JavaScript code, but some of your tables are quite large, and those pages can take minutes to load with this solution. You’ve considered manually ensuring that your tables are properly striped, but you have so many different mechanisms for creating tables that trying to manually ensure that the striping occurs has quickly become tedious. That said, it is not difficult for you to ensure that all tables that need to be striped have a specific class, such as zebra.
Problem
You need to process and transform HTML output from your web application.
Solution
We’ll use Hpricot to post-process the rendered page and set an appropriate style on every other row. Then, we’ll use a CSS stylesheet to pull in the style. We’ll use Ruby on Rails for this example, but the general solution is framework-agnostic. As long as you have access to the rendered response, you can use the technique outlined here to postprocess your HTML. See listing 10.4 for our implementation; the CSS is in listing 10.5.
Listing 10.4. A simple postprocessing filter
class ApplicationController < ActionController::Base after_filter :zebra def zebra doc = Hpricot(response.body) doc.search("table.zebra tbody response.body = doc.to_s end end |
Listing 10.5. The associated CSS
.zebra .even { background-color: #ddf; } |
First off, note that we kept the example very simple, just to demonstrate the technique at hand. Later in this chapter, we will explore more features of Hpricot, which you will be able to use together with this technique to do more advanced postprocessing of HTML data.
With that said, let’s look at the example. You can ignore the Rails-specific semantics. All that we’re doing is saying that the postprocessing should occur for all pages in the application (by including it in ApplicationController), and specifying that we will do the postprocessing via an after_filter. The real action happens in the zebra method, and you’re probably surprised at how short the code is.
The first line simply grabs the existing response body and parses it via Hpricot. Next, we find the rows we want to change. This might look a bit odd, but it’s just a simple CSS3 selector. We find all tables with the class zebra, which is how we’re going to specify that we want a table zebra-striped. Then, we’ll jump down to the <tbody>, because we probably don’t want to be striping our rows in the table head (if we have any).
Once we have the tbody, we get all the even-numbered rows, relative to their parent. We need to use :nth-child (rather than the :even selector supported by Hpricot) in case we have multiple tables on the page. If we simply used :even, if the first table ended on an odd row, the next table would have the striping skewed by one. Using :nth-child scopes the evenness to the table in question.
Once we’ve gotten the rows we need, we can use the add_class convenience method provided by Hpricot to add the even class to every matched row.
As we’ll see later, Hpricot returns the Elements set that was matched by the original selector from add_class, so you can chain further modifications onto the end of it. Finally, we reset response.body to our modified document, and we’re off to the races. Simple, huh?
Discussion
While we noted one important difference in behavior between the :even selector and even, there is another. The :even selector and even also index the rows in the tables differently. When you use the :even selector, the table is indexed as 0-based, which causes it to get the first, third, fifth rows, and so on. This differs from even, which indexes the table’s rows starting with 1, fetching the second, fourth, sixth rows, and so on.
In the next section, we’ll look at solving a nearly inevitable problem for developers working with HTML: fixing a broken HTML document.
10.2.2. Reading broken HTML
Broken HTML is a regular problem for developers who work with HTML for any period of time. Whether the cause is bad editors or web designers who fail to follow conventional web standards, there’s a big, busted world of HTML to deal with. Fortunately, parsers have reached a point of reasonable intelligence and can fairly easily render broken HTML into something usable.
Let’s say we have an application that reads in data from a series of blogs and aggregates the data for our readers. In most cases, the blogs provide a nice RSS feed, and we can happily use the feeds to get the data. Unfortunately, a few of them don’t provide any kind of feed, and the HTML is extremely sloppy. On the bright side, they haven’t updated their layout in at least a decade or two, and you can be pretty sure that the template they’re using isn’t going to change any time soon. An example of a typical post can be seen in listing 10.6.
Listing 10.6. A sample blog entry
<h3>Open Thread </h3> <p class="byline"><i>by</i> <a href="http://foo.com/">Mr. Foo</a>, Fri Aug 17, 2007 at 11:15:45 PM EST</p> <div class="story_summary"> <p>Some Text Here</p> <p>Lorem ipsum dolor sit amet, consectetur adipisicing elit, sed do eiusmod tempor incididunt ut labore et dolore magna aliqua. Ut enim ad minim veniam, quis nostrud exercitation ullamco laboris nisi ut aliquip ex ea commodo consequat. Duis aute irure dolor in reprehenderit in voluptate velit esse cillum dolore eu fugiat nulla pariatur. Excepteur sint occaecat cupidatat non proident, sunt in culpa qui officia deserunt mollit anim id est laborum.</p> <p> </div> <p class="byline story_trail"> <br><a href="/story/2007/8/17/55555/5555">Permalink</a> :: 5 <a href="/story/2007/8/17/55555/5555#commenttop">Comments</a> <br>Tags: <a href="http://www.myblog.com/tag/foo%20tag"> foo tag </a> (<a href="http://www.myblog.com/tag">all tags</a>) <br> </p> |
The post in listing 10.6 uses a typical blog engine and includes information about the person who wrote the article and when it was created, a permalink to the entry, and some tags, among other things. We want to get the information from the blog entry into an object we can use elsewhere in our application.
Problem
You need to parse and manipulate chunks of broken HTML.
Solution
Although it would be very common to store the information from the post in an ActiveRecord object, which is exposed by the Ruby on Rails framework and used on its own by other applications, we will use a run-of-the-mill class for this example. The code to accompany this chapter (available at the Manning website) includes an example of using ActiveRecord to scrape and store information that is very similar to the solution we’ll use here.
First, you’ll notice that there’s a little bit of broken HTML in listing 10.6. While it’s mostly acceptable, it’s a far cry from perfectly valid XHTML (there’s an open <p> tag on its own before the close of the <div> tag, and the <br> tags aren’t self-closing). Hpricot will attempt to fix these problems when it parses the HTML, so the output you’ll eventually get will be, at the least, parsable. Listing 10.7 shows how to use Hpricot to implement this.
Listing 10.7. Getting the HTML into a Post object
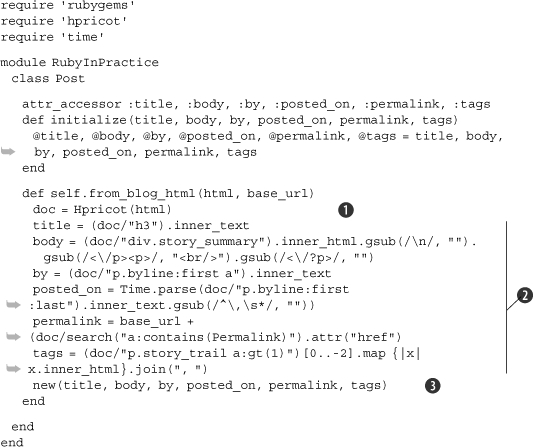
The example in listing 10.7 is fairly rudimentary, but it allows us to take a look at a number of techniques you can use with Hpricot to get very specific pieces of information quickly and easily. But first, let’s peruse the structure we’re using here.
As in listing 10.3, where we read and wrote the configuration data, we have separated out the initialization of the class from the function that will pull the information from an external source.
This is an important technique, because it will allow us to extend this class later with additional parsers that can scan different types of blog entries. You might have Post.from_wordpress_entry, Post.from_typo_entry, and Post.from_mephisto_entry methods (and while all of those methods have RSS feeds, let’s pretend we needed to do some screen-scraping for the sake of argument). Because we’ve left the initialization method so generic, we can easily plug into it after doing whatever complex parsing we need to do. That said, let’s take a look at the actual code we use to get the various pieces of information out of the HTML fragment in listing 10.6 that we pulled from the web page.
The first thing we do, as in listing 10.4, is create an Hpricot object from the HTML ![]() . To get the title, we simply grabbed the inner_text from the document’s <h3> element. Marvel at the simplicity of the API before we move on
. To get the title, we simply grabbed the inner_text from the document’s <h3> element. Marvel at the simplicity of the API before we move on ![]() . The body of the article was in a <div> with the class of story_summary. All we need to do to get the contents of that element is to use elementary CSS knowledge: div.story_summary represents a <div> with the class story_summary, so that’s all we need here. We do some fancy gsubbing to normalize line spacing, and we’re done.
. The body of the article was in a <div> with the class of story_summary. All we need to do to get the contents of that element is to use elementary CSS knowledge: div.story_summary represents a <div> with the class story_summary, so that’s all we need here. We do some fancy gsubbing to normalize line spacing, and we’re done.
Getting the byline is a bit trickier. Examining the HTML, we see that it’s inside a link that’s inside a <p> element with the class byline. Unfortunately, there are two <p> elements with that class on the page, but that poses no difficulty for the dexterity of Hpricot. Using the custom :first extension to the typical CSS3 syntax, we can grab just the first matched element. Putting it together, p.byline:first a matches the link we need, and, as before, inner_text will grab the text inside it.
We then move on to find the date and time the post was created, and we encounter another difficulty. The time is formatted well enough for our needs, but it’s not surrounded by any tags. That, too, poses no problem for Hpricot. Examining the HTML, we see that the time is in the first <p> element with the byline class, and that it’s the very last thing in the <p>. Because all of the text is grouped together, Hpricot considers it a single text node, so the selector p.byline:first :last matches it. The :last selector is another one of Hpricot’s custom extensions, and the space in between the two parts of the selector indicate that Hpricot should find the last child of the first p.byline. Using Time.parse, which is included from the standard library when we did require 'time' wraps it all up.
Getting the permalink proves easy compared to the last two problems. Hpricot supports the CSS3 selector :contains, which returns all elements whose text contents match the text passed in to :contains. In this case, the link we want has the text “Permalink” helpfully embedded, so we get the element and use the handy attr method to get its href attribute. We then append the href to the base_url passed in, because we can see that the permalink provided in the HTML is a relative URL.
Then we get the tags attached to the article. Looking at the HTML, we can see that the tags are all enclosed inside links in a <p> element with the class story_trail. Looking closer, we see that we don’t want to include the first, second, or last links. Using Hpricot’s :gt selector, we can filter out the first two elements. Once we have those, we can use Ruby’s Array#[] operator (since an Hpricot element collection is simply an extension of the base Array class) to remove the last link. We then create an array containing the inner_text of the links, and join them with a comma, producing a nice comma-separated list of tags.
Finally, we feed all this harvested data into a new object ![]() .
.
Discussion
All in all, using Hpricot to scrape information from typical HTML sites is a piece of cake once you learn the supported selectors. But it’s key that you do. Most of the power of Hpricot comes from being able to drill down into the dark corners of the document you’re parsing without resorting to manually iterating through them. Since Hpricot supports all of the same selectors as jQuery, you can get documentation on supported selectors by visiting docs.jquery.com/Selectors.
Now that we’ve learned a bit about Hpricot, let’s take a brief detour to look at how we could rewrite our configuration example from section 10.1.2 using Hpricot.
10.3. Writing configuration data: revisited
A rare but valid use case for Hpricot is generating XML. It’s not that Hpricot is bad at generating markup; it’s just that that’s not what it’s built for. Fortunately, because we have tests for the class we wrote (included in the downloads for this book), we can simply reimplement our serialization methods and make sure they work.
Problem
You want to use Hpricot to generate the XML configuration file rather than adding another library to the requirements list.
Solution
We’re going to show only the modified #to_xml methods from Config and Keyboard, which reflect the usage of Hpricot instead of REXML (which was shown in listing 10.2). Using the code in listings 10.8 and 10.9, all tests written for section 10.1.2 still pass.
Listing 10.8. Redone Config#to_xml
def to_xml doc = Hpricot.XML("<?xml version='1.0' encoding='ISO-8859- (doc/"calculator").append("<startup/>"). (doc/"calculator").append("<memory>#{@memory.to_s}</memory>"). search("memory").attr("type" => @memory.class.to_s.slice(0,1).downcase) (doc/"calculator").append(keyboard.to_xml) doc.to_s end |
Listing 10.9. Redone Keyboard#to_xml
def to_xml el = Hpricot.XML("<keyboard/>") (el/"keyboard").attr("type" => @type). append("<numeric-keypad/>"). append("<max-fkey>#{@max_fkey}</max-fkey>"). search("numeric-keypad").attr(@numeric_keypad) el.to_s end |
Using Hpricot for XML creation involves a lot of literal node creation. You create fragments of XML and stick them where they belong, and Hpricot takes care of creating XML nodes out of them. In listings 10.8 and 10.9, we also used a fair amount of chaining, taking advantage of the fact that Hpricot tends to return the original Elements array from operations performed on it.
Quickly looking through Config#to_xml (listing 10.8), you can see that we replaced our individual calls that created the XML document, its root node, and the XML declaration with a single call to Hpricot.XML. We use Hpricot.XML rather than the typical Hpricot call when we want the parser to use strict XML semantics instead of HTML semantics. We then find the <calculator> node and append the empty <startup> node. Because the append method returns the original Elements array, we can then search for the new <startup> node and set its attributes in the same way we did in the REXML solution (listing 10.2). We use the same techniques until the end of the method, when we append the XML returned by Keyboard#to_xml.
Because Hpricot uses string-based manipulation, we put together the XML for the Keyboard in much the same way that we created the Config’s XML in listing 10.7, but we return a String so that it can be appended to the <calculator> node in the Config object. Rerunning the tests gives us solid green, so we’re good to go.
Discussion
The main thing to remember about using Hpricot to produce XML is that you’ll be mostly producing XML fragments and using methods like append, inner_html=, and attr to set up your document. Once you get comfortable with this, it’s extremely powerful.
Now that we’ve taken a look at HTML and generic XML, let’s take a look at another form of rich markup: RSS.
10.4. Reading RSS feeds
Over the last few years, RSS has become a common way for content authors to keep readers updated about the material they are posting. Blog authors use RSS to keep their readers updated with their freshest content, booksellers use RSS to let people know about new books they are selling, and podcasters use a specialized form of RSS to point listeners to their latest episodes.
Because RSS content is so consistent, it’s very easy to write web applications that take advantage of its aggregation capabilities. Feed readers galore have popped up, allowing users to enter their favorite feeds and giving them different ways to view the contents. We’re going to take a look at how Ruby allows us to read through an RSS document, and we’ll build a rudimentary feed reader to get information about our favorite feeds.
Note
While we will not provide details in this book on how to integrate this solution with a web application framework such as Ruby on Rails, code samples along those lines are available in the downloadable materials for this book.
Problem
You want to build a simple feed reader that will allow your users to get the titles, URLs, brief descriptions, and publication dates for the articles in a feed. You want to be able to display the data on the command line by accepting command-line arguments, or on the web, as formatted HTML.
Solution
In this solution, we’ll be using familiar tools, like Hpricot, and some not so familiar, like open-uri, to parse RSS. Listings 10.10 and 10.11 show our implementation of a simple RSS feed reader.
Listing 10.10. A simple RSS parser
require 'rss' require 'open-uri' require 'rubygems' require 'hpricot' module RubyInPractice class RssParser attr_accessor :rss def initialize(file, options = {}) f = open(file) s = f.read @rss = RSS::Parser.parse(s) @options = {:truncate => 500}.merge(options) end def titles @rss.items.map {|x| x.title} end def short_info @rss.items.map {|x| [x.title, Hpricot(x.description). end def details @rss.items.map do |item| [item.title, item.pubDate, item.link, Hpricot(item.description). ] end end def to_html @rss.items.map do |item| %{ <h3><a href="#{item.link}">#{item.title}</a></h3> <h4>#{item.pubDate}</h4> <div class="body">#{item.description}</div> } end end end end |
Listing 10.11. A small command-line script for running the RSS parser
#!/usr/bin/env ruby require 'optparse' require 'rss_parser.rb' module RubyInPractice class RssRunner def self.parse_options @config = {} OptionParser.new do |opts| opts.banner = "Usage: rss_parser [options]" opts.separator "" opts.on "-f", "--file [FILE]", @config[:file] = file end opts.on "-t", "--titles", "specify titles only" do |titles| @config[:titles] = true end opts.on "-s", "--short", @config[:short] = true end opts.on "-r", "--truncate [NUMBER]", @config[:truncate] = trunc.to_i end end.parse! end def self.run parse_options file = @config.delete(:file) r = RubyInPractice::RssParser.new(file, @config) if !@config[:titles] && !@config[:short] r.details.each do |item| puts ""#{item[0]}" published at #{item[1]}" puts "Available at #{item[2]}" puts puts item[3] puts puts end elsif !@config[:titles] r.short_info.each do |item| puts ""#{item[0]}"" puts item[1] puts end else puts r.titles.join(" ") end end end end RubyInPractice::RssRunner.run |
There are two parts to the solution provided here. First up, we created a small class to read in an RSS feed and extract the useful information into some useful configurations (listing 10.10). Second, we created a command-line script written in Ruby that accepts a filename and spits out a human-readable version of the feed (listing 10.11), using the class we created in the previous listing. Before we take a look at the command-line script, let’s take a look at the class that does the hard work.
At the very top, we initialize our class with a filename. Because we have required open-uri, we can provide either a local filename or an internet URL, which makes the code more versatile than it appears at first glance. We use RSS::Parser.parse to read the file into an RSS object, which will give us access to its contents. We also provide default options, which we will allow to be set using command-line switches later on.
We’ll then create the methods that will aggregate the information from the feeds that we’ll need later. Pretty much all you need to know here is that the RSS object exposes an items array, and that each Item has several pieces of information associated with it, including its title, a link to the URL, the publication date, and a description. The description will frequently have HTML data in it, so we’ll strip that out using Hpricot if the data is being dumped to the terminal.
We also create a to_html method, which can be used by web frameworks to take the RSS feed and produce simple web-ready content. To see how it might be used, look at the rss_controller.rb file included with the downloadable files for this chapter. Note that we do not strip out the HTML content in the to_html method, because we are assuming it provides useful formatting instructions. You could use the techniques we covered in the previous sections to convert the description HTML into a more usable format.
In the command-line script (listing 10.11) we use simple techniques to make the class we just created produce useful content. It’s not important that you fully understand how it works, but the basic principles should be obvious. We’re using Ruby’s built-in option parser to accept options to pass into our RSS parsing class. We accept a file parameter, which will be passed directly into our class (and, as a result, will support either a local file or a URL). We also support a choice of long, short, or titles-only display. Finally, we allow the user to specify how many characters to retain when we truncate the long version’s descriptions.
Because we are using optparse, we automatically support -h (or --help), which will provide usage instructions based upon the information we specified. You can see for yourself by running parse_it.rb, which is provided with the downloadable materials for this chapter. Try entering the URL to the feed for your favorite blog. If you don’t have one, check out the official Rails blog’s feed at http://feeds.feed-burner.com/RidingRails.
Returning briefly to the command-line script, you can see two main sections: #parse_options and #run. These names are not required, but they’re conventional. At the end, you can see that we call RubyInPractice::RssRunner.run, which itself calls parse_options. The option parser will take apart the arguments you passed in to the function and set up the @config instance variable, which we use in #run to determine the filename and to pass configuration options to the RSS parser.
Discussion
We used optparse to handle our argument parsing in this section, mostly because it’s built into Ruby’s standard library, but there are a few libraries out there that handle the same functionality in a prettier shell. For example, the Trollop library (http://trollop.rubyforge.org/) offers a much nicer syntax at the cost of a bit of power. Here is a Trollop version of our arguments code from listing 10.11:
require 'trollop' opts = Trollop::options do banner "Usage: rss_parser [options]" opt :file, "the file or URL you wish to load in" opt :titles, "specify titles only" opt :short, "show a short version of the feed" opt :truncate,"the number of characters to truncate the long version to (defaults to 500)", :type => :int, :short => "r" end |
You’ll notice you can’t use a proc like we did in listing 10.11, so if you need to do any processing other than setting a value, perhaps this isn’t the library for you. Other libraries include Optiflag (http://optiflag.rubyforge.org/), a very nice library with a rather powerful syntax, and Choice (http://choice.rubyforge.org/), a concise DSL for handling argument parsing. Any of these will work well; the choice largely hinges on the sort of syntax and the amount DSL-driven syntactic sugar you like to work with.
Now that we’ve taken a look at reading feeds, let’s turn our attention to generating our own feeds.
10.5. Creating your own feed
Now that you’ve learned how to read feeds from other sites, you might be thinking that you’d like to create your own feed. Unfortunately, there are a number of feed formats, and creating a program that exports only to RSS1, for instance, will leave some of your potential readers in the dark. Thankfully, a library called FeedTools will allow you to create a generic feed and then export it in multiple formats.
Problem
You want to create a feed for your website, but you only want to have to create a single feed and have it export feeds in the formats you want. Ideally, you would be able to decide at a later point exactly which feed formats you want to support, so the Ruby class should be flexible enough to support various formats.
Solution
We’ll create a wrapper around FeedTools that will allow us to easily create a new feed and export it to whichever format we want. We’ll only wrap a few commonly used functions for demonstration purposes, but it’s trivial to extend this wrapper to provide additional functionality.
First, you’ll need to install the feedtools gem:
gem install feedtools |
Once you have FeedTools installed, the code in listing 10.12 will implement a feed generator.
Listing 10.12. Wrapping FeedTools
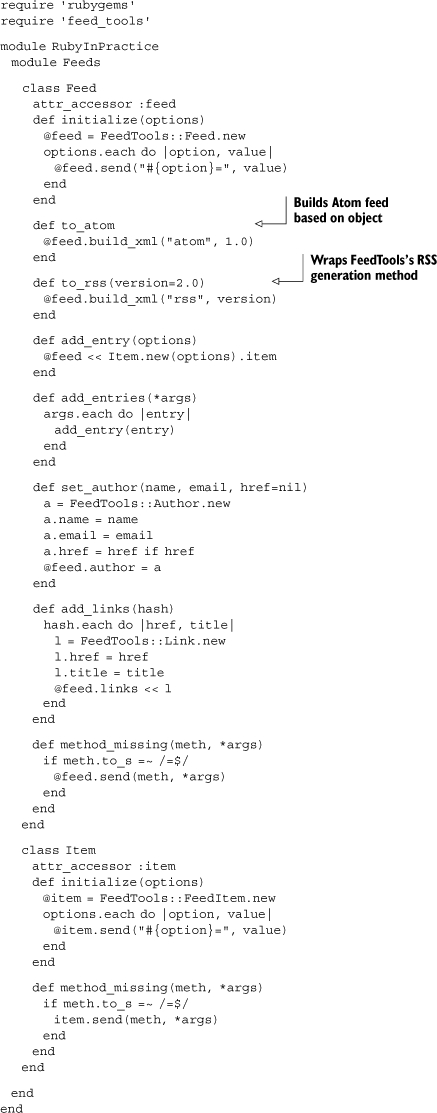
While FeedTools is quite cool, in that it provides a single API for multiple feeds, it suffers from extreme API complexity. Adding an author to a feed, for instance, requires creating a new FeedTools::Author object (trying to call set_author on a feed with a String will populate only the name field of the object). To simplify things a bit, we have created a new class called RubyInPractice::Feeds::Feed, which accepts a series of fields and instantiates the feed quickly and easily.
Because most of the fields on the FeedTools::Feed object are set by calling methods like link=, id=, and copyright=, we’ve instantiated our wrapper object with a Hash with corresponding values. For instance, to create a new Feed object with the feed’s ID set to “http://www.manning.com”, you would use this one-liner:
RubyInPractice::Feeds::Feed.new(:id => "http://www.manning.com") |
Adding entries is a similarly complex process with FeedTools, so we have created a similar API for adding new entries. Once you have your wrapper object (let’s call it feed), you would call add_entry:
feed.add_entry(:id => "http://www.manning.com/foo", :title => "NEW!", :abstract => "Brand new feed entry", :description => "This is the first feed entry for our feed", :content => "Some longer content would go here") |
If you were creating an iTunes feed, there would be additional properties, like enclosure, itunes_summary, itunes_image_link—more than can be set using this method. Keep in mind that Atom feeds require unique IDs; those IDs must be URLs, or you will not be able to generate an Atom feed.
Because setting up an author correctly using FeedTools can also be complex, we have added a set_author method that takes a name, email, and optional href, creates the required FeedTools::Author object, and associates the object with the wrapped feed. We do a very similar thing with the add_links method, which allows the creation of a FeedTools::Link object by simply passing in a hash of href => title pairs. You would do something like this:
feed.add_links("http://www.manning.com" => "Manning Publications") |
To facilitate the creation of RSS and Atom feeds, we have also created two generation methods: to_rss and to_atom. Both methods simply delegate to the build_xml method of the underlying FeedTools::Feed object.
Discussion
Listing 10.13 shows an example of the feeds that will be generated using our wrapper script.
Listing 10.13. Creating a new feed
f = RubyInPractice::Feeds::Feed.new(:id => f.set_author "Yehuda Katz", "[email protected]" f.add_entry(:title => "NEW!", :abstract => "This is a new feed", |
The API using our wrapped set is fairly simple, as you can see. Now, let’s see what happens when we go to generate the feeds using our to_atom and to_rss methods. Listings 10.14 and 10.15 show markup generated by our code.
Listing 10.14. Generating RSS 2.0
<?xml version="1.0" encoding="utf-8"?> <rss xmlns:taxo="http://purl.org/rss/1.0/modules/taxonomy/" xmlns:rdf="http:// www.w3.org/1999/02/22-rdf-syntax-ns#" xmlns:itunes="http:// www.itunes.com/dtds/podcast-1.0.dtd" version="2.0" xmlns:media="http:// search.yahoo.com/mrss" xmlns:dc="http://purl.org/dc/elements/1.1/" xmlns:content="http://purl.org/rss/1.0/modules/content/" xmlns:trackback="http://madskills.com/public/xml/rss/module/trackback/"> <channel> <title>Ruby in Practice Feed</title> <link>http://rubyinpractice.manning.com/</link> <description>A sample feed for the Ruby in Practice chapter on <managingEditor>[email protected]</managingEditor> <ttl>60</ttl> <generator>http://www.sporkmonger.com/projects/feedtools/</generator> <item> <title>NEW!</title> <link>http://rubyinpractice.manning.com/new</link> <description>This is a new feed for testing</description> <content:encoded> <![CDATA[There might normally be some long content here]]> </content:encoded> <pubDate>Tue, 28 Aug 2007 13:37:55 -0000</pubDate> <guid isPermaLink="true">http://rubyinpractice.manning.com/new</guid> </item> </channel> </rss> |
Listing 10.15. Generating ATOM 1.0
<?xml version="1.0" encoding="utf-8"?> <feed xml:lang="en-US" xmlns="http://www.w3.org/2005/Atom"> <title type="html">Ruby in Practice Feed</title> <author> <name>Yehuda Katz</name> <email>[email protected]</email> </author> <link href="http://rubyinpractice.manning.com/" rel="alternate"/> <subtitle type="html">A sample feed for the Ruby in Practice chapter <updated>2007-08-28T13:38:09Z</updated> <generator>FeedTools/0.2.26 - <id>http://rubyinpractice.manning.com</id> <entry xmlns="http://www.w3.org/2005/Atom"> <title type="html">NEW!</title> <author> <name>n/a</name> </author> <link href="http://rubyinpractice.manning.com/new" rel="alternate"/> <content type="html">There might normally be some long content <summary type="html">This is a new feed for testing</summary> <updated>2007-08-28T13:37:55Z</updated> <id>http://rubyinpractice.manning.com/new</id> </entry> </feed> |
As you can see, we get back two very different feeds with all of the required feed-specific data, even though we were able to create them very simply. As we said previously, the wrapper API is far from complete, but the code should provide you with enough to get started adding more functionality for working with RSS. Unfortunately, the RDoc for FeedTools is not easily available online; however, it is installed with the gem. The easiest way to take a look at it would be to run gem_server and navigate to http://localhost:8808/doc_root/feedtools-0.2.29/rdoc/index.html.
Now let’s take a look at YAML, another markup format that isn’t based on XML at all.
10.6. Using YAML for data storage
We first looked at YAML in chapter 9. It is a lightweight alternative to XML, which, even in its more structured and parsable forms, requires quite a bit of code to get simple things done. At first glance, YAML can store and reload simple objects like hashes, arrays, integers, and strings, which will allow you to develop a serialization and load strategy for your configuration objects. For instance, Ruby on Rails uses YAML files to store information about the database it uses in different operating modes.
YAML is even more powerful, however, in that it is able to do quick-and-dirty serialization of your custom objects, as long as they’re relatively simple. In this section, we’ll take one final foray into the land of calculator configuration to see how we can use YAML to make the entire process of serializing a configuration object and reloading it later absolutely trivial.
Problem
You want to take an existing Calculator::Config object and store it to disk. When your application starts, you want to load in the file from disk and create a new Calculator::Config object for use.
Solution
In section 10.1, we looked at how to use XML as a configuration store. Now, we’ll use Ruby’s built-in YAML functionality to replace our previous XML plumbing. Listings 10.16 and 10.17 show our implementation.
Listing 10.16. Using YAML to solve the calculator config problem
require 'yaml' module Calculator class Config attr_accessor :memory, :startup, :keyboard def initialize(memory, startup, keyboard) @memory, @startup, @keyboard = memory, startup, keyboard end def save_to(file) f = File.open(file, "w") f.puts(self.to_yaml) end def self.get_from(file) YAML.load(File.read(file)) end end class Keyboard attr_accessor :type, :numeric_keypad, :max_fkey def initialize(type, numeric_keypad, max_fkey) @type, @numeric_keypad, @max_fkey = type, numeric_keypad, max_fkey end end end |
In listing 10.16, you can see that we kept the same API to the outside world but replaced the guts of our configuration parser with YAML. The API here is beautifully simple. To save our configuration to a file, we use the to_yaml method and write that data to the file ![]() . Most of Ruby’s core objects implement to_yaml in one form or another, so it should work for most values. We also load in the file and get a usable Ruby object in one fell swoop using the load method
. Most of Ruby’s core objects implement to_yaml in one form or another, so it should work for most values. We also load in the file and get a usable Ruby object in one fell swoop using the load method ![]() . This process is simple and straightforward (much like the YAML format itself!). Our class should now behave the same as before, except that our configuration file will have to be in the YAML format.
. This process is simple and straightforward (much like the YAML format itself!). Our class should now behave the same as before, except that our configuration file will have to be in the YAML format.
Now that the guts are in place, we need to test and make sure it works. Listing 10.17 shows a short script that does that.
Listing 10.17. Using the YAML solution in an equivalent manner to our XML solution
k = Calculator::Keyboard.new("Macintosh", {"enter" => "=", c = Calculator::Config.new(16.24, {"mode" => "standard", c.save_to("config.yml") Calculator::Config.get_from("config.yml") |
Using Ruby’s built-in YAML serialization, we are able to take a complex problem that we previously solved using XML serialization in section 10.1, and convert it to a one-liner.
Discussion
YAML serialization isn’t the solution for every problem, because it can only serialize data structures, not objects that contain baked-in code (like procs and metaclass methods). However, for most configuration requirements, simple data structures are more than adequate. If you’re getting much more clever than this, you’re probably doing something wrong. Creating a separate Keyboard class to hold keyboard information was pushing it for us, but it was useful for the examples at hand.
For more complex examples, you can configure the YAML serialization. By defining the to_yaml_properties method to return an array of the properties you wish to serialize, you can cause YAML#dump to ignore properties that are not appropriate for serialization. You can also define yaml_dump and yaml_load methods on the object you are serializing to use a custom serialization strategy. You can get more information about customizing the default load and dump in the Pickaxe book (Programming Ruby: The Pragmatic Programmers’ Guide, by Dave Thomas, with Chad Fowler and Andy Hunt).
10.7. Summary
Ruby’s toolset for working with structured documents is excellent. Ruby can handle any major interchange format: XML, HTML, or YAML.
XML has bindings for almost any language, and Ruby’s built-in REXML library is excellent for parsing XML. The Hpricot gem is even better, since it can handle the rich context of formats like HTML and can generate markup. Paired with the FeedTools gem, Hpricot can even handle RSS.
If YAML is your preference, Ruby’s built-in YAML library is one of the best available. As such, YAML is used extensively in a lot of Ruby applications; it’s preferred to XML not only for its superior bindings but also for its low visual noise and human readability.
In the next chapter, we’re going to take a look at using authentication and authorization in Ruby and Rails applications.