
Chapter 7. Enhancing a Restlet application with recipes and best practices
- Handling common web artifacts such as forms and cookies
- How servers can redirect clients
- Handling file uploads on the client and server side
- Improving the performance of Restlet applications
- Splitting a large Restlet application into several modules
As you near the end of the second part of this book, you’ve already read about many important topics that required dedicated chapters, such as dealing with representations and securing and documenting your web API. But many important questions have yet to be covered—questions that still matter when you want to bring your Restlet application closer to production.
First you’ll see how to deal with common Restlet developer needs, such as handling web forms, cookies, and file uploads. We also explain how Restlet can replace a classic web server by serving static files, how to customize default error pages, and how to deal with web feeds.
Then we explain how to redirect client calls, at first manually and then in a more sophisticated way with the Redirector class, with both client-side and server-side redirections. We continue exploring Restlet with features and best practices to improve performance such as streaming and compression of representations, caching, and conditional processing.
Finally you learn how to manage complexity with the server dispatcher, the RIAP pseudoprotocol, and internal routing to modularize your applications. For each development topic we provide small, reusable example code to copy and paste in your own application to save you time.
7.1. Handling common web elements
Even though the Restlet Framework is quite suitable for building RESTful web APIs accessible by programmatic clients, you can also use it to build regular websites.
In this section we illustrate those features and show how to manage web forms and cookies and how to serve static files without needing a separate HTTP server such as Apache HTTPd. And you learn how to deal with web feeds and how to customize error pages. Let’s get started!
7.1.1. Managing forms
Web forms are a very common way to ask a user to enter or edit information using a web browser. Several popular technologies are available (such as XForms and PDF Forms) that can be used with Restlet (because they submit XML documents), but the most popular one covered here is HTML forms [5].
In this section you’ll see how to present an HTML form in a browser and how to process its submission on the server side. You’ll also see how a simple Restlet client can also submit forms without needing a browser. As an illustration we’ll start and enhance the example started in section 4.4.1 related to FreeMarker template representations.
First you need to modify the mail template to return an HTML form instead of a read-only HTML table, as illustrated in the following listing, allowing the mail subject to be edited as a text field and the content to be edited as a text area.
Listing 7.1. Mail-editing form as a FreeMarker template

Because the purpose of the form is to update the state of a mail resource, you want to use the proper HTTP PUT method—but PUT isn’t allowed by HTML 4, so you take advantage of the TunnelService (introduced in section 2.3.4) by adding a method query parameter.
Note
At the time of this writing, HTML 5 is still a working draft, but after initially supporting methods other than GET and POST as valid values for the form method attribute (such as PUT and DELETE), the later drafts dropped this possibility for unknown reasons.
Continue modifying the original example by adding a Java method supporting PUT, as illustrated here:
@Put
public String store(Form form) {
    for (Parameter entry : form) {
        System.out.println(entry.getName() + "=" + entry.getValue());
    }
    return "Mail updated!";
}
Now start the original MailServerApplication class again and point your browser to http://localhost:8111/accounts/chunkylover53/mails/123 to display the mail form. The output from Firefox is shown in figure 7.1.
Figure 7.1. Displaying the mail-editing form

Now in your browser change the subject to “Message to Jérôme,” change the content to have several lines and special characters, and click the Save button. On the server side the console will first display the raw form value and then the result of the iteration over the higher-level Form object, as illustrated here:
subject=Message to Jérôme
content=Doh!

Allo?
As you can see, the raw value is a long string containing a sequence of encoded form values separated by & characters. Using the org.restlet.data.Form allows you to automatically decode this structure and navigate it as a list of org.restlet.data.Parameter instances, each of which is a pair of Strings: a parameter name and a parameter value.
There are many interesting methods in the Form class, such as getValues-Array(String name), which returns all values with the same name in a String array, or the getFirstValue(String name) which is convenient when you assume that only one value should be available for a given parameter name.
But that’s not all with the Form class! It can also create new forms from scratch and update them. To illustrate this, write a simple programmatic client to the MailServer-Resource, as in the following snippet:
public static void main(String[] args) throws Exception {
    ClientResource mailClient = new ClientResource(
            "http://localhost:8111/accounts/chunkylover53/mails/123");
    Form form = new Form();
    form.add("subject", "Message to Jérôme");
    form.add("content", "Doh!

Allo?");
    System.out.println(form.getWebRepresentation());
    mailClient.put(form).write(System.out);
}
If you run this client, it will display the raw and encoded form sent and then the “Mail updated!” message in console. Note how you were able to pass the Form instance directly to the ClientResource.put(Object) method, which transparently relies on the getWebRepresentation() method and on the converter service.
Now that we’ve covered processing basic web forms, we explore the support for setting and reading cookies in the Restlet Framework in the next section. We come back to the topic in section 7.4 when explaining how to process file uploads.
7.1.2. Managing cookies
Even though REST discourages the use of cookies [6], there are situations where they’re still needed. The most common case is for browser-based authentication, when using regular HTTP authentication isn’t desired for usability reasons, or to support Web Single Sign-On (SSO) mechanisms. Other common use cases are personalization of representations and navigation tracking.
The Restlet API has extensive support for both reading cookies sent by a client on the server side and setting cookies on the server for storage on the client side, allowing control of expiration, applicable URI path, and domain name.
For this purpose it provides two classes: org.restlet.data.Cookie to exchange existing cookies between clients and servers, and org.restlet.data.CookieSetting to let servers create or update new cookies on clients. Setting a cookie requires a client to store it for a given duration and send it again to the same server in subsequent requests. It also provides two related modifiable list properties on Request: cookies and cookieSettings. You’ll now use those classes and properties to build a cookie-based authentication mechanism.
Listing 7.2 shows a naïve NaiveCookieAuthenticator class extending the Challenge-Authenticator class (introduced in chapter 5 during the discussion of security aspects). This filter can authenticate a client based on a special cookie and challenge the client by displaying a login HTML form and intercepting its submission to set or update the cookie with an expiration time set to 30 seconds.
Listing 7.2. Simple cookie-based authentication

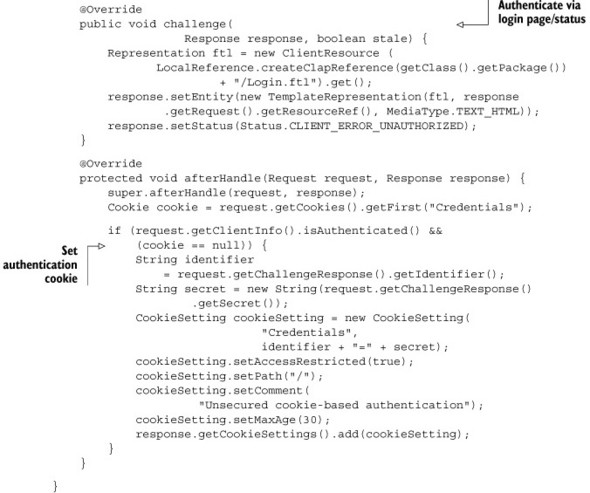
One of the benefits of extending ChallengeAuthenticator is that you can take advantage of default behavior like the use of SecretVerifier to check passwords. The following listing shows a portion of the updated MailServerApplication presented in the previous section; the createInboundRoot() method now creates the NaiveCookie-Authenticator and its associated verifier.
Listing 7.3. Guarding the mail server application
@Override
public Restlet createInboundRoot() {
    Router router = new Router(getContext());
    router.attach("/accounts/{accountId}/mails/{mailId}",
            MailServerResource.class);

    MapVerifier verifier = new MapVerifier();
    verifier.getLocalSecrets().put("chunkylover53", "pwd".toCharArray());

    NaiveCookieAuthenticator() authenticator = new NaiveCookieAuthenticator(
            getContext(), "Cookie Test");
    authenticator.setVerifier(verifier);
    authenticator.setNext(router);
    return authenticator;
}
Now launch the main method of the MailServerApplication and try to retrieve the previous email. The first time, you should see a login page where you can enter chunkylover53 as the identifier and pwd as the password and click the Login button to effectively display the mail form. If you reload the same page immediately you should see it directly. But if you wait more than 30 seconds, the login page should be presented again because the authentication cookie expired.
If you try to launch the previous MailClient, you should get a 401 (Unauthorized) status in the console because authentication credentials are missing. To solve this you need to authenticate like a web browser, sending the expected Credentials cookie with a value of chunkylover53=pwd as illustrated in the following listing.
Listing 7.4. Authenticating the mail client
public static void main(String[] args) throws Exception {
    ClientResource mailClient = new ClientResource(
            "http://localhost:8111/accounts/chunkylover53/mails/123");

    mailClient.getRequest().getCookies()
            .add(new Cookie("Credentials", "chunkylover53=pwd"));

    Form form = new Form();
    form.add("subject", "Message to Jérôme");
    form.add("content", "Doh!

Allo?");
    mailClient.put(form).write(System.out);
}
If you launch this authenticating client, the “Mail updated!” message should be displayed in the console instead of the previous error, illustrating how to programmatically send cookies on the client side.
Warning
Again, this example is a naïve implementation to illustrate the use of cookies; it’s unsecure as login and password are stored in the clear. In a real application those values must be encrypted to prevent attacks. In version 2.1 of the Restlet Framework, a more robust org.restlet.ext.crypto.Cookie-Authenticator class is available.
Now that you know how to deal with cookies, you can continue your exploration by learning how to serve static files and potentially replace an Apache HTTPd server.
7.1.3. Serving file directories
Even though the Restlet Framework is frequently used to expose or consume web APIs, and therefore dynamic data, you can also use it to develop any kind of web application, blurring the lines between websites and web services. You already saw those ideas in chapter 1, and now it’s time to put this feature in action.
The main class supporting this feature is the org.restlet.resource.Directory class that can serve static files in a way similar to a regular web server but in a lighter and embeddable way. To use it you need to give it the root URI, from which it will serve the static files, and attach it to a Router that will make it visible to your clients.
The following listing creates an HTTP server exposing a web service on the http://localhost:8111/hello URI, as well as the directory of temporary files on your machine on the http://localhost:8111/home/ URI.
Listing 7.5. Merging websites and web services
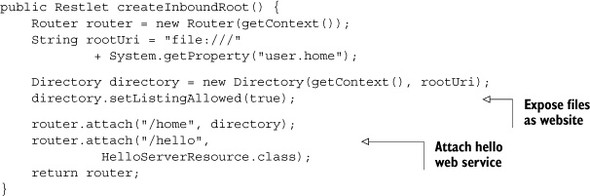
The example sets the listingAllowed property to true in order to display the content of the directory as an HTML listing if no predefined index file is present, like a regular Apache HTTPd server would do. Figure 7.2 lists other properties you can set and methods you can override to display a customized representation of this index page.
Figure 7.2. Class diagram of Directory

Note also that you can change the way entries are sorted in the listing using the comparator property, as detailed in table 7.1, or by directly calling the useAlpha-Comparator() or useAlphaNumComparator() method. The latter sorting algorithm is the default, but you may prefer to revert to the former one for performance reasons.
Table 7.1. Directory class properties
|
Name |
Description |
Default value |
|---|---|---|
| comparator | Comparator object used to sort URI references displayed on index pages | Friendly Alphanum algorithm based on Dave Koelle’s original idea [7] |
| deeplyAccessible | Indicates whether the subdirectories are deeply accessible | true |
| indexName | The index name, without file extensions | index |
| listingAllowed | Indicates whether the display of directory listings is allowed when no index file is found | false |
| modifiable | Indicates whether modifications to local resources (most likely files) are allowed | false |
| negotiatingContent | Indicates whether the best file variant is automatically negotiated with the client based on its preferences | true |
| rootRef | The root URI from which the relative resource URIs will be looked up | Undefined |
Thanks to Restlet’s pluggable client connectors, you can use any URI scheme in the rootRef property to retrieve and serve files from various types of locations, such as the following:
- Local file directories using the built-in FILE client
- Local JAR or ZIP files using the built-in JAR and ZIP clients
- Classpaths using the built-in CLAP client
- WAR archives using the org.restlet.ext.servlet extension
- FTP sites using the org.restlet.ext.net extension
When configuring a Directory it’s important to keep in mind that not all these sources are born equal. For example the ClassLoader Access Protocol (CLAP) client doesn’t have the ability to list the content of directories due to technical limitations. In this case turning on the directory listing by setting the listingAllowed Boolean property to true will have no effect. Because connectors such as CLAP and WAR are inherently read-only, enabling modification on a Directory by setting the modifiable property will return an error. Speaking of errors, now you’ll see how Restlet deals with them and how you can customize error pages.
7.1.4. Customizing error pages
Dealing with errors is an important part of the web developer’s job. Errors can come from your own program or its dependencies, from your host machine, from a remote client or server, or from the network. One of the reasons for the Web’s scalability comes from a design choice made by its creator, Tim Berners-Lee [8], to allow for broken hyperlinks and those famous 404 (Not Found) error pages.
When developing your Restlet application, you should strive to use stable URI names that aren’t likely to change. You should also try to detect bugs in advance with proper testing practices (covered in detail in section 7.5), but you can’t anticipate all of them, particularly those outside of your reach.
For programmatic clients it’s generally sufficient to return the proper response status code, but for regular web browsers you need to be ready to present a friendlier error page. The good news is that the Restlet Framework generates such pages for you automatically when your application or component returns an error status in a response. This feature is managed by the org.restlet.service.StatusService class and the associated statusService properties on Component and Application. Figure 7.3 shows the default error page displayed when a resource doesn’t exist.
Figure 7.3. Default error page

Let’s see how you can customize this page on a per-application basis or on a percomponent basis. The easiest way to customize this representation is to change the home page URI by setting the homeRef property on StatusService, but generally you want to change the whole document by overriding the getRepresentation(Status, Request, Response) method, as illustrated in the following listing. In this case we decided to rely on FreeMarker again to provide a template error page that’s dynamically filled with data from the application and specific error status.
Listing 7.6. Changing the default status service
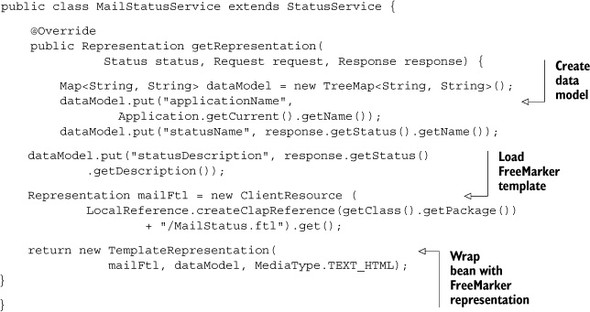
The missing piece is the MailStatus.ftl template document in the following listing, which displays the application name and a logo of the Restlet Framework.
Listing 7.7. Content of the MailStatus.ftl template
<html>
<head>
    <title>Mail status page</title>
</head>

<body style="font-family: serif;">
    <p>An error was detected in the <b>${applicationName}</b>
       application.</p>
    <p><b>${statusName}</b> : ${statusDescription}</p>
    <p>
        <a href="http://www.restlet.org">
            <img src="http://www.restlet.org/images/logo150"/></a>
    </p>
</body>
</html>
The next step is to configure this customized status service, which you achieve by updating the MailServerApplication constructor to set the statusService property, as in the following snippet:

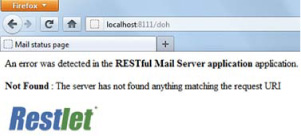
You can now try the invalid http://localhost:8111/doh URI in a browser again to observe the new error page in figure 7.4. You could go much further in term of userfriendliness, but at this point there’s no special limit to your creativity.
Figure 7.4. Customized error page
Beyond the customization of the error representations, it’s also possible to change the association between exceptions caught in Resource subclasses by the doCatch (Throwable) method and Status instances by overriding the StatusService.get- Status(Throwable, UniformResource) method. By default it returns the 500 (Internal Error) status, but you could define a NotFoundException class that would map to the 404 status. Note that in that case, you still have access to the underlying exception via the Status.getThrowable() method, so you could easily display more information about the cause of the error status.
The next section covers advanced forms that need to upload files from an HTML page and retrieve those files on the server side.
7.1.5. Handling file uploads
When you need to upload a file from a web browser to a web application, your HTML form uses a special multipart/form-data media type. This changes the way your form content is encoded so that on the server side you can’t use the org.restlet.data.Form class anymore; it only supports the application/x-www-form-urlencoded media type that you saw in the first section.
Currently, the Restlet Framework relies on an org.restlet.ext.fileupload extension to parse multipart forms on the server side. This extension depends on the Apache Commons FileUpload library (http://commons.apache.org/fileupload/) provided in the /lib directory of your Restlet Framework installation, along with two additional dependencies (org.apache.commons.io and javax.servlet).
To illustrate the use of this feature, you’ll enhance the mail-editing form developed in section 7.1.2 to allow the upload of an attachment file. First modify the mail form template to change the form encoding and add the file upload field, as in the following listing.
Listing 7.8. Adding a file attachment field to the mail-editing form


The next step is to update the PUT handling logic in the MailServerResource class. The important thing to note in listing 7.9 is that you need to instantiate an org.restlet.ext.fileupload.RestletFileUpload class and retrieve from it a list of form fields. It’s then easy to detect whether a field is a regular form field, like the subject and content fields, or a file upload field that should have a special treatment.
Listing 7.9. Adding a file attachment field to the mail-editing form
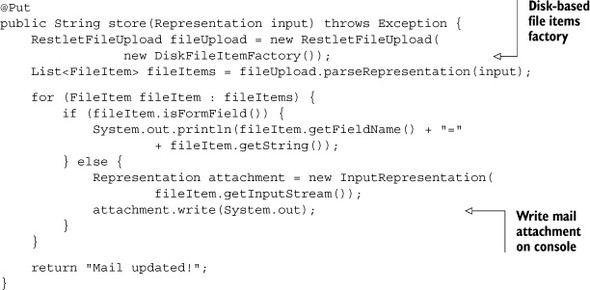
We encourage you to try this example and observe that the console still displays the mail subject and content fields, plus the uploaded attachment file. That was easy! Note also that Apache FileUpload offers various strategies to parse this multipart form, including a streaming API for maximum efficiency that can be accessed via the RestletFileUpload.getItemIterator(Representation) method. For additional information, look at the FileUpload library documentation.
Let’s now continue with the second section of the chapter—web feeds.
7.2. Dealing with Atom and RSS feeds
Exposing or consuming web feeds has become a common requirement for web applications, and the Restlet Framework has comprehensive support for them, through two extensions.
The first is the org.restlet.ext.atom extension, which provides comprehensive Atom and AtomPub support with dependency only on the Restlet core and on the org.restlet.ext.xml extension for XML parsing and writing support. This is a lightweight implementation (about 80 Kb in size, dependencies included) integrating naturally with the Restlet API. If you only require Atom support in your applications, either client side or server side, this is the way to go.
The second extension is org.restlet.ext.rome, which integrates with the popular ROME open source library that’s heavier (350 Kb in size, dependencies included) but has the ability to parse and write all feed formats, including RSS and Atom, with a single API. If you can’t solely rely on Atom and AtomPub, this is the extension to use.
7.2.1. Exposing web feeds
Let’s illustrate those extensions with the RESTful mail example by implementing a feed resource associated with an account that exposes its data in both Atom 1.0 (via the Atom extension) and RSS 2.0 (via the ROME extension), so you can compare them side by side. The source code of the server resource is in the following listing.
Listing 7.10. Account feed server resource


Both representation variants are built similarly; the Atom extension is more compact because there’s no separation between Java API interfaces and the implementation classes as there is in ROME.
If you attach this resource to the application’s inbound router at the /accounts/{accountId}/feeds/{feedId} URI template, you can test them from your web browser. To compare the RSS and Atom variants, you can take advantage of the tunnel service by adding a ?media=rss or ?media=atom query string at the end of the URI. Figure 7.5 shows the result obtained in Firefox. The browser recognizes the media type set by Restlet and displays the feed.
Figure 7.5. Retrieving Restlet web feeds

Those feed resource implementations are quite minimal, but the extensions provide comprehensive APIs supporting most subtleties encountered with more complex feeds, so you should be pretty safe moving forward on those foundations.
Because modern web browsers tend to provide a nice rendering of web feeds, in either Atom or RSS media types, let’s try another way to obtain raw representation using the command line curl or wget tools. Here’s raw output obtained:
~$ curl http://localhost:8111/accounts/chunkylover53/feeds/xyz?media=atom
<?xml version="1.0" standalone='yes'?>
<feed xmlns="http://www.w3.org/2005/Atom">
   <title type="text">Homer's feed</title>
   <entry>
      <summary>Doh! This is the content of mail #1</summary>
      <title type="text">Mail #1</title>
   </entry>
...
</feed>
Serving feeds was pretty easy, but what about the client side?
7.2.2. Consuming web feeds
Unsurprisingly, consumption of Atom and RSS feeds is equally easy in Restlet and relies on the same classes in both cases, as illustrated in the following listing.
Listing 7.11. Consuming account feeds

Again you can see the power and simplicity of the converter service and its ability to automatically negotiate the best representation variant based on the Java type passed to the ClientResource.get(Class<T>) method.
As a final note on this topic, keep in mind that using Java APIs like the Atom and ROME extensions gives a very convenient abstraction to expose feeds but isn’t always the best way to achieve this task compared to template representations. There’s more to say about feeds—including how they’re used by higher level web APIs such as OData (see the dedicated Restlet extension available since version 2.0) and GData—but we need to continue exploring Restlet best practices with a section on web redirection followed by optimization and modularization advice.
7.3. Redirecting client calls
Redirections are an essential feature when developing web applications. They can be divided into two categories: client-side redirections and server-side redirections. Clientside redirections are useful to point a client to the new location of a resource, to a fallback resource when the target one has been deleted, or to the original target resource after authenticating the user with a single sign-on mechanism such as OpenID.
Server-side redirections are transparent to the client making the call, but facilitate the internal processing either by delegating to another resource within the component (inbound server redirection), or by delegating to a resource outside the component (outbound server redirection, often referred to as a reverse proxy).
The Restlet Framework has comprehensive support for all of these cases. First we cover how redirection can be handled manually, and then we introduce the powerful Redirector class.
7.3.1. Manual redirection
Client-side redirections use dedicated HTTP status codes. Those codes are in the Restlet API with their equivalent constants in the org.restlet.data.Status class and set with the org.restlet.Response.status property. For more details using status codes when designing your web API, refer to appendix D.
When writing a server-side resource, you can call the various ServerResource.setStatus(...) methods directly or use the following shortcut methods: redirect-Permanent(targetUri), redirectSeeOther(targetUri), and redirectTemporary (targetUri). Those methods accept absolute and relative URIs; relative URIs are resolved against the current base reference of the resource.
Note that when clients are web browsers, you can also implement client-side redirection by adding an HTML META tag in a document head like this: <meta http-equiv="refresh" content="5; URL=http://my.targetLocation.com">
In this example, the result page will be displayed for five seconds before redirecting the browser to the target URI. Be warned, though, that this approach is outside HTTP and can therefore be overlooked by some clients, including programmatic ones. It might also have a negative impact on search engine referencing and should be used sparingly.
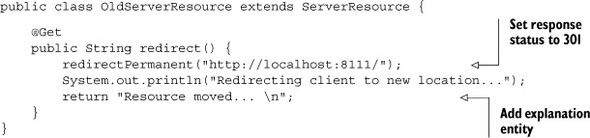
Let’s assume that you have an application that contains an old REST resource that was replaced by a newer one at a different URI and even a different HTTP port. You’d like to ensure that existing clients don’t receive a 404 status when attempting to retrieve the old resource and at the same time would like to inform them that there’s a new location that should be used, updating previous bookmarks it may have. The following listing contains the code of the old resource doing the permanent redirection.
Listing 7.12. Redirecting clients to a new permanent location
The program in the next listing serves both the old resource from listing 7.12 on port 8183 and the new resource (HelloServerResource) on port 8111.
Listing 7.13. Server program listing hosting the old and new resource

The final step in this example is to write a client program that tries to reach the old resource and verify that the ClientResource class and its followRedirects feature work as expected, retrieving the result of the new resource. In the following code snippet you can see how simple it is to write such a client:
public class RedirectedClient {

    public static void main(String[] args) throws Exception {
        ClientResource resource
              = new ClientResource ("http://localhost:8113/");
        resource.get().write(System.out);
    }
}
If you launch this RedirectedClient class, you’ll observe that the client console displays the “hello, world” string. At the same time, the server console displays the “Redirecting client to new location...” message, proving that it worked as expected. Finally, you can open http://localhost:8113/ in a web browser to observe the same result, including the change of URI in the address bar.
Even if writing a redirecting server is easy for a single resource, you can guess how tedious it can be to redirect a large set of resources—for example, if a complete application migrated from one domain name to another. In the next section we explain how the Restlet Framework can help solve this use case.
7.3.2. The org.restlet.Redirector class
As introduced earlier, the Redirector class is a special Restlet subclass that redirects all requests reaching it in two modes: client-side or server-side redirections.
First it can issue for you a response with a client-side redirection, exactly as explained in the previous section, with an additional feature: the target URI reference provided can be a URI template where variables are replaced automatically for you. For example, you can append the URI remaining part (relative to the current base URI) to your target URI, by using this target template: http://my.targetDomain.com/{rr}. Table 7.2 lists a few common variables.
Table 7.2. Common URI template variables
|
Description |
|
|---|---|
| cia | IP address of the client (request.clientInfo.address) |
| cig | User agent name (request.clientInfo.agent) |
| m | Method (request.method) |
| rr | Remaining part of the URI reference (request.reference.remainingPart) |
To obtain a comprehensive list of supported variables, check the Javadocs of the org.restlet.util.Resolver<T> class, which is used to wrap a request and response pair as a template data model.
This URI template mechanism lets you easily redirect a subset of your URI space to a new location. It can also be used in the second server-side redirection mode. In this mode, the redirection is transparent from the client point of view and handled entirely on the server side while the user is waiting for a response.
We complete the discussion of the Redirector class with the class diagram in figure 7.6.
Figure 7.6. Redirector class diagram

As you can see, there are two properties: targetTemplate for the URI template to redirect to and mode to indicate the redirection mode to use with a value in this list of constants:
- MODE_CLIENT_FOUND :—Client-side mode for Status.REDIRECTION_FOUND
- MODE_CLIENT_SEE_OTHER :—Client-side mode for Status.REDIRECTION_SEE_OTHER
- MODE_CLIENT_TEMPORARY :—Client-side mode for Status.REDIRECTION_TEMPORARY
- MODE_SERVER_OUTBOUND :—Server-side mode for application’s outboundRoot or context’s clientDispatcher (using client connectors)
- MODE_SERVER_INBOUND :—Server-side mode for context’s serverDispatcher
The server outbound mode allows you to define a reverse proxy transferring requests to a remote service, typically by rewriting the request’s URI. The inbound mode is valuable when trying to modularize a large application, as we discuss in section 7.4.
The rewrite(Representation) method is invoked for the server-side redirections. By default it does nothing, but you can override it to provide your own logic—such as to rewrite hyperlinks for response entities received from remote applications.
Let’s see an example of this class in action. The following listing provides a search resource relying on Google search to illustrate two things: how to use a target URI template to insert a dynamic variable (the keywords to search) and how to extract an attribute automatically from a request’s URI query parameter.
Listing 7.14. Client-side redirection with attribute extraction
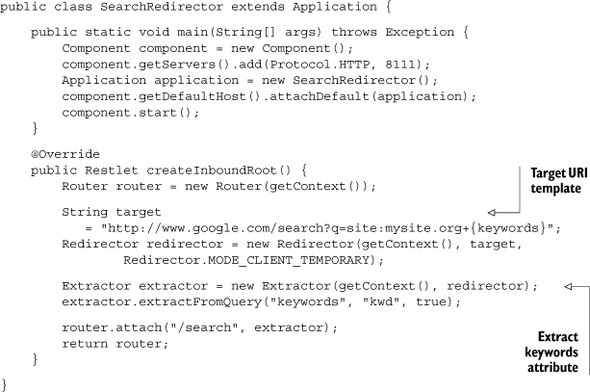
As you can see, you use Extractor, another class from the Restlet routing system, to automatically add a request attribute by extracting a URI query parameter named kwd. Note that this class also works with cookies and posted web forms via additional extractFrom*() methods.
Launch the search redirector program and test it by entering the following URI in your web browser: http://localhost:8111/search?kwd=book. You should see a redirection to the Google search page with the following search string: "site:mysite.org book."
Adding new resources and new features such as web feeds and forms is important to cover the requirements of your application, but this shouldn’t be your sole enhancement focus. The next section continues your exploration of best practices with a discussion of Restlet application performance and how to improve it.
7.4. Improving performances
Performance improvement of web applications is a vast topic that would require at least one complete book to do it justice. Our goal here is to explore six powerful features of REST, HTTP, and the Restlet Framework to help you improve the latency and system resource consumption of your Restlet application.
We first explain how to stream large representations that may not fit in available memory (for example, a multigigabyte file) or would consume too much memory under load. Then you see how compression is a simple and powerful way to save bandwidth and reduce latency. We finish with four additional ways to improve performance.
7.4.1. Streaming representations
In most use cases, HTTP requests and responses must contain a header that specifies the length in bytes of the message body, if there is one (note that this length doesn’t take into account headers or other control information such as the status code). For instance, a server that answers a request with the ASCII character string “hello, world” will include the following header in its response, as the string is composed of 12 characters:
Content-Length: 12
Doing this requires knowing the length of the data before you start sending it. But that’s not always the case; for example, the data can be generated dynamically and you might not know its length up front. You could generate all the data before starting to send it, because that would allow you to know its size and fill in the Content-Length header correctly (or its equivalent Representation.size property in the Restlet API).
But if the data is large or takes a long time to generate, you might want to start sending it before it’s entirely generated. Streaming data like that is made possible by TCP, which is usually the transport protocol you use for sending HTTP requests and responses over the network. When a TCP connection is established between the client and the server, data can be sent over that connection piece by piece, progressively.
In such situations, to solve the unknown Content-Length problem, you can use a technique called content streaming. Instead of indicating the entire content length, you specify that the entity will contain a series of chunks, using a Transfer-Encoding: chunked header. Each chunk specifies its own size, and the end of the series is marked with a zero-sized chunk.
When enough data is ready to be sent, you put it in a chunk that you send over the network. That way the recipient can process it while you’re generating other chunks. As you can imagine, this ability for HTTP components to easily exchange and process data progressively as it becomes available can be very beneficial to the performance and responsiveness of your applications. Let’s now see how the Restlet API supports this.
Content Streaming Example with Restlet
Using the Restlet Framework, performing content streaming is easy. You still need to prepare a representation, as usual. The following listing illustrates the generation of such dynamic content.
Listing 7.15. Server Resource that generates dynamic content

The Restlet Framework provides a broad set of Representation subclasses dedicated to common usages. The WriterRepresentation is an abstract class that handles the generation of dynamic and potentially large content, ensuring that the chunked encoding is automatically used to communicate with HTTP clients. Subclasses are only required to override the write(Writer) method where they can implement the logic of writing the representation’s content of any length.
7.4.2. Compressing representations
Another great feature of HTTP that isn’t widely used is its ability to compress the content of entities exchanged between components. This feature relies on the Accept-Encoding and Content-Encoding HTTP headers and the Representation.encodings and ClientInfo.acceptedEncodings properties of the Restlet API.
Even though some entities—such as most image, audio, and video formats—are already compressed, the average win for textual entities is 70%. The only condition is that both clients and servers support the same encoding algorithm, which is increasingly common, especially for the GZip algorithm.
Since version 2.1, the Restlet Framework is fully capable of automatically compressing and uncompressing entities exchanged with other remote components. This support comes with the DecoderService and EncoderService properties available to applications. By default the decoding of compressed message entities received is enabled, but encoding is disabled. To turn it on for a Restlet application, call get-EncoderService().setEnabled(true) in the application constructor.
Compression is configurable through a list of accepted media types (all types by default), combined with a list of ignored media types (archive, audio, image, and video by default). You can also set a minimum size (default value of 1000 bytes) to prevent compression of small entities, where the benefit is small compared to the extra overhead in CPU, memory, and latency.
We recommend you turn on this service in production after proper testing with representative clients. During development the lack of entity readability due to compression can be a drawback when debugging, though. Next we show the importance of partial representations and the RangeService to manipulate large entities.
7.4.3. Partial representations
Suppose that, while receiving the representation of some resource in response to a GET request, your client application suffers a temporary network problem that drops the connection to the server. When the network is back, if the representation is large, wouldn’t it be beneficial to be able to request only the missing part of the representation instead of restarting from the beginning?
Or suppose that your client application, for whatever reason, only needs a portion of a particular representation. Wouldn’t it be nice to be able to ask the server to send only the needed portion? For large data sets, this can reduce network traffic local storage capacity requirements and improve performance.
For such situations, HTTP offers a Range header to specify the desired range(s) to return in a response, expressed in bytes. Optionally, on the server side, an application can also advertise its support for serving partial content, on a per-resource basis, by including Accept-Ranges headers in response to regular requests. The possible values associated with this header are the names of the units in which ranges can be specified (for example, bytes) or the word none to express that partial content delivery isn’t supported on the target resource. The latter is useful to advise the client not to attempt a range request.
As you can imagine, this ability to exchange partial content is another powerful feature of HTTP, so consider using it when implementing your applications. Let’s illustrate range usage with the HelloServerResource class and a client that wants the first five characters of the “hello, world” sentence—that is to say, hello. The following listing shows a client that asks for the first five characters of the remote resource.
Listing 7.16. Requesting parts of a resource

Because the server supports the range feature, a client can obtain a specific portion of a resource’s representation using the ranges property, which maps to the Range header. Note that if you ran the same client after launching the DynamicContentServer of the previous section, the client would still receive the full representation. This is merely due to the fact that this server isn’t using a Restlet application as a container for its resource, thereby missing the RangeService providing the partial representation processing.
Let’s continue exploring HTTP performance optimization mechanisms with caching. For this purpose we first explain how to set cache information on the server side, then how to use conditional methods to revalidate cached responses.
7.4.4. Setting cache information
The purpose of caching is to allow a client or an intermediary, under certain conditions, to keep previous responses sent by the server and reuse them instead of performing real requests over the network. There are two main benefits: reduced latency (the time to wait for the response) and reduced network traffic.
HTTP provides powerful support for caching. Making use of it requires some cooperation from your application because what is cacheable and what isn’t is specific to each application (and potentially each resource that it contains). In addition, to benefit from caching, your clients must manage the cached representations. Fortunately most HTTP client libraries, including web browsers, provide automatic cache management.
When a client issues a GET request, it can look in its local cache to see if this request has previously been answered by the server and stored in the cache. If this is the case, and if the cached response is fresh enough, the cached response will be used, without the need for network interactions with the server.
If the cached response appears to be stale, the cache can try to revalidate the response by sending a request to the server and letting it know it already has a cached response. If the server determines that the cached response held by the client is fresh enough, it can avoid further processing and inform the client that its cached response is still fresh. Finally, you can choose to allow certain cached responses to be handed to the client even if they’re stale. This can be useful as a fallback mechanism if the client is disconnected from the server.
The way all this works is specified by the HTTP protocol. A server can add an Expires header to a response; this element contains a date and time after which the response should be considered stale. Usually, it’s application-dependent. For example, if the state of a given resource changes every day at midnight, the server can return an Expires header set to midnight, along with the resource representation, when serving a GET request on that resource. The client’s cache can then use this information in subsequent requests for that resource to determine whether a response it holds is fresh enough to be returned to the client.
A number of additional mechanisms are defined by HTTP to control the caching strategy—for example, a response that must not be cached can be tagged with a Cache-control header with a no-cache value. For in-depth coverage of HTTP caching, we recommend the excellent online tutorial written by Mark Nottingham [9].
When implementing a RESTful system, you should consider making use of these caching mechanisms. You should specify information about the cacheability of responses emitted by your server-side application. The Restlet API has integrated support for all these headers via the following properties:
- RepresentationInfo.tag :—E-Tag-based validation
- RepresentationInfo.modificationDate :—Date-based validation
- Representation.expirationDate :—Date-based cache control
- Message.cacheDirectives :—Advanced cache control
We can’t illustrate every kind of caching mechanism available, because that’s beyond the scope of this book. Instead we focus on a simple way for a server resource to help clients such as browsers optimize their requests.
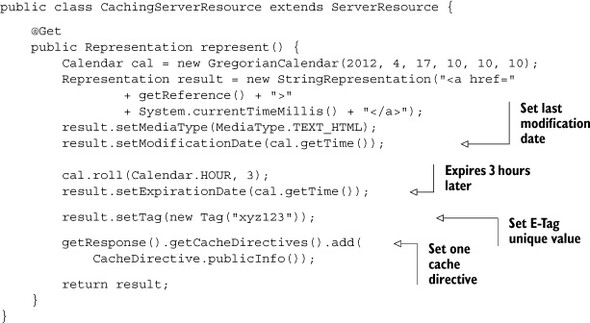
In listing 7.17, the resource updates its representation with a modification date, an expiration date, and an entity tag (E-Tag). This cache information can then be used by web browsers and intermediary caches such as Squid (www.squid-cache.org) to prevent or shortcut future requests to the same resource.
Listing 7.17. Server resource that time-stamps its representation
Note that if you launch this server and try to access it from a web browser, you won’t see the browser cache in action because browsers bypass the cache for localhost sites. You need to deploy the server under a real domain name. As an alternative, verify that this information is available on the client side, as shown in the following listing.
Listing 7.18. Retrieving caching metadata

In this particular example, on the server side the resource always generates the same representation, so its modification date remains unchanged. But in real cases those values would be adjusted based on the resource lifecycle, including its state changes.
Next you’ll see how you can use conditional methods to revalidate cached responses and prevent the lost update problem.
7.4.5. Conditional methods
Sometimes a client wants to ask the server to process a request only if certain conditions are met. HTTP supports headers that allow conditional method processing: If-Match, If-Modified-Since, If-None-Match, and If-Unmodified-Since.
A client might want to retrieve the state of a resource (with a GET method), do some processing, and then update the state on the server (with a PUT method) only if the resource state has not changed in the meantime—for example, after concurrent editing by another client. To accomplish this, the client’s PUT request should include an If-Match header specifying the entity tag included in the response to the previous GET request. An E-Tag is a character string generated by the server that allows it to determine whether two representations of a given resource are equivalent.
Conditional Method Example
The following code snippet adds a PUT method to the previous CachingServer-Resource. The implementation displays a message on the server console:
@Put
public void store(Representation entity) {
    System.out.println("Storing a new entity.");
}
On the client side, in listing 7.19 you retrieve the original representation and do a conditional GET based on the modification date and E-Tag. Then you do two conditional PUTs, one with a matching E-Tag and then one with a nonmatching E-Tag, to demonstrate that it produces an error due to a failed condition.
Listing 7.19. Updating a resource with conditions

Running this client obtains the following output in the console:
OK (200) - OK
Not Modified (304) - Not Modified
Not Modified (304) - Not Modified
OK (200) - OK
Exception in thread "main" Precondition Failed (412) - Precondition failed
Tip
The last line is quite interesting because the framework automatically prevented an update of the resource due to the (simulated) detection of a change in the representation E-Tag. Because this condition isn’t met, the PUT request was ignored by the ServerResource class. This is a great way to prevent the lost update problem that occurs when several concurrent clients update the same resource concurrently without previously acquiring locks.
Now we describe a last performance best practice, directly inherited from the REST architecture style: living without sessions.
7.4.6. Removing server-side session state
In many web applications, including those developed with Java Servlet technology, there’s a notion of server-side session used to maintain conversational state between clients and servers. This session is typically identified uniquely by a cookie or a query parameter. For each request received, the server is then able to look up the correct session and update it if necessary (for example, to maintain a shopping cart). At first glance this looks like a convenient feature for developers.
Unfortunately, this leads to numerous problems such as reduced scalability as servers are encumbered by in-memory data. Also, client requests must be processed by servers that contain or have access to the associated session state (also known as session affinity) when load balancing becomes necessary—otherwise constant session replication must be used. Reliability is also harder to achieve because session state potentially has to be reliably stored and restored in the case of server failure. Finally, this prevents the HTTP infrastructure and network intermediaries from providing some services because a request can no longer be understood in isolation from this out-of-band conversation.
From an HTTP point of view, each request should contain all the information needed by the server to process it without having to refer to out-of-band information. The Restlet Framework helps you enforce this rule by not providing any server-side session mechanism in its Restlet API. If you find yourself in desperate need of Servlet-like sessions, you usually need to rethink your design more RESTfully, relying on the two approaches discussed next, separately or in conjunction.
The first solution is to store this conversational state on the client side, as hypermedia information, cookies, JavaScript logic, HTML 5 offline databases, and so on. Often people talk about the stateless principle of REST, implying that there can’t be any session state between clients and servers. This isn’t true; session state can be kept on the client side. But the client should send the relevant state along with each request to the server. One way to achieve this is by using the HATEOAS pattern (Hypermedia As The Engine Of Application State) discussed in chapter 10, where possible state transitions are encoded inside the hypermedia representations exchanged between the server and the client. Another way is to develop rich clients with technologies such as GWT (see chapter 9 for details), Flex, or Silverlight.
The second solution is to convert this conversational state into first-class resources in your web API. You could have a caddie resource with its own URI and HTTP methods to manipulate it. Its state could be persisted in a database for a rather long time (not the usual 30 minutes of a Servlet session) and let the user continue shopping a few days later. The scalability issue doesn’t disappear in this case but is transformed into a well-understood problem that can be solved using database sharding, replication, or cloud-scale databases (for example NoSQL). The advantage of this approach is that it puts low requirements on the clients, which is important for mobile devices.
You are now done with your review of Restlet best practices for improving performance. Before ending this chapter and the second part of the book, we’d like to wrap things up by consolidating pieces of the example mail component and address its slowly growing complexity by introducing solutions to modularize large Restlet applications.
7.5. Modularizing large applications
When we introduced Restlet components in chapter 3, you saw how they can act as containers of several applications. This is the most obvious way to modularize your web presence, creating more or less isolated functional spaces. The advantage is that you can later decide to deploy those applications separately, on different host machines for example. But when an individual application is becoming in itself too complex, maybe due to a growing list of contained resources, you can split it into several applications, still hosting them in the same component and benefiting from intra-JVM communication.
In this section you’ll see that Restlet provides a mechanism, similar to Servlet’s request dispatcher, called the server dispatcher. Then we introduce the more powerful RIAP pseudoprotocol, inspired by Apache Cocoon. We illustrate how to use RIAP to separate a large application into two parts—a public part and a private part not reachable by clients outside of the current component.
7.5.1. Server dispatcher
If you’re a Servlet developer, there’s a good chance you’ve already used the Servlet context’s request dispatcher to include the result of another Servlet or to forward call processing. The Restlet API comes with a similar mechanism called the server dispatcher, which works like the client dispatcher but sends requests to the current component as if they came from the outside instead of asking server connectors to process them.
This object can be retrieved from the current context using the serverDispatcher property, which is an instance of the Restlet class like clientDispatcher. To invoke it you need to create a new Request object with the proper target resource URI reference and method set. If your local target resource is protected, you need to properly authenticate yourself as there won’t be much difference between your call and an outsider call. You can also use ClientResource as long as you set the serverDispatcher as the value for the next property.
To illustrate these advanced concepts, go back to the example mail server component. In previous chapters you’ve developed a web application mixing web API aspects and website aspects, with bean representations and annotated interfaces for the former one and template HTML representations for the latter. Although this approach works fine when security requirements and resource granularity are the same, there are cases where it’s wiser to split this application into two complementary applications: a web API layer at the bottom exposing the domain data into a reusable RESTful API, and a website layer picking up, splitting, or aggregating various resources from one or several RESTful APIs underneath. In your case, this results in two Restlet applications, as illustrated in figure 7.7: MailSiteApplication and MailApiApplication. At the same time, you consolidate in those applications many features introduced in the first two parts of the book. We won’t review all the resulting code in the manuscript, but you can refer to the source code available on the book’s website.
Figure 7.7. Mail server component split into a web API and a website application

The following listing demonstrates the use of the server dispatcher in this new architecture. You build template HTML representations of mail messages in the Mail-SiteApplication by first retrieving the mail bean from the MailApiApplication and then by resolving the FreeMarker template exactly as done in section 4.4.
Listing 7.20. Optimizing internal calls with the server dispatcher

If you test the new application with the following mail URI, you should first see the login page where you can enter the usual chunkylover53 login and pwd password and then see the HTML page with the mail-editing form filled with the mail data obtained from the mail API:
http://localhost:8111/site/accounts/chunkylover53/mails/123
What’s remarkable is that by setting the context’s server dispatcher as the next property of the client resource, you optimize the call to the API by not even going through the network local loopback. This is more optimal because you save the formatting and parsing of the HTTP messages. If you removed the setNext(...) call, the application would still work, but you’d need to add an HTTP client connector to the parent MailComponent.
Note
To test the previous example without manually setting the base URI of the mail resource in the mail API application, you need to use a recent version of the Restlet Framework, in either the 2.0 branch or the 2.1 branch.
Technically speaking, the server dispatcher is providing a shortcut path that forwards your calls right before the virtual host routing in the parent component. Even though this mechanism works very well, it lacks flexibility; it requires you to specify the full absolute resource URI on the request. Also, because it doesn’t come with a specific URI scheme, you can’t use it as the target of references (in an XSLT representation, for example). This is where the RIAP feature of the Restlet Framework comes into play.
7.5.2. RIAP pseudoprotocol
Restlet Internal Access Protocol (RIAP) is a mechanism that allows various Restlet applications to call upon each other to retrieve resources for further processing. This feature can be used to access resources contained in the same Restlet component, virtual host, or application, allowing powerful modularization of larger Restlet applications or even calls internal to a single application.
RIAP arose as a solution to support execution of XSLT stylesheets capable of importing and transforming local documents without suffering network costs. It comes with a riap:// URI scheme that identifies a pseudoprotocol. This terminology is derived from Apache Cocoon; it describes the difference between a “real” or “official” public protocol and the RIAP scheme, which only relates to internal processing of the Restlet system architecture.
RIAP brings a URI notation for interapplication calls that exposes them through the uniform interface. There are three flavors of this protocol, with distinct URI authorities for different use cases:
- riap://application/ :—Resolves the rest of the URI relative to the current context’s application (applications can use this scheme to call resources within themselves)
- riap://host/ :—Resolves the rest of the URI relative to the current context’s virtual host
- riap://component/ :—Resolves the rest of the URI with respect to the internal router of the current context’s component
The following listing updates the previous example to use RIAP instead of the server dispatcher. As you can see, the resulting source code is slightly simpler and offers more flexibility. In terms of performance this is equivalent to the server dispatcher.
Listing 7.21. Optimizing internal calls with the RIAP pseudoprotocol

Note that internal resources that require protocol-specific attributes of the URI where it’s invoked (like the hostname) might yield errors or unexpected results when called via the RIAP protocol. The main advantage of RIAP is flexible decomposition of your component into smaller, reusable, configurable, and interchangeable applications while assuring optimal efficiency when calling between them.
The RIAP schemes application and host are easy to understand and use, but how to use the component authority is probably unclear at this point. The final section of this chapter covers the internal router and how those modularized applications can be made private to the component, unreachable from the outside world. Note that you can create instances of Client and Server classes with the RIAP pseudoprotocol and send calls between them inside the same component, which should be unique to the current JVM. This method can be useful when the client side has no direct access to the current Restlet’s context or its client dispatcher, such as inside callback methods of a third-party library invoked from Restlet’s server resources.
7.5.3. Private applications
Sometimes application modules should not be accessible directly from the outside world but only via other applications contained in the same component. The Restlet API supports such private applications by providing a Component.internalRouter property where applications (or any org.restlet.Restlet instance) can be attached. If this application instance isn’t attached at the same time to a virtual host, then it’s guaranteed to not be reachable from one of the server connectors.
With this additional private router (which can be thought of as a private host), you can effectively modularize a larger component and separate public applications facing the web from private ones, only providing support resources to the former ones.
That’s great, but you may think one piece is missing in this puzzle: how can public applications invoke the private ones? Because each application is technically isolated from the parent component except via the Context class, you have to rely again on the RIAP feature, this time using the riap://component/ flavor listed in the previous subsection.
You implement this public/private architecture with the sample MailServer-Component as illustrated in figure 7.8. As you can see, we decided to isolate the Mail-ApiApplication by attaching it to the internal router under the /api root URI path from the MailSiteApplication publicly available under the default virtual host attached to the /site root URI path.
Figure 7.8. Isolating public and private applications
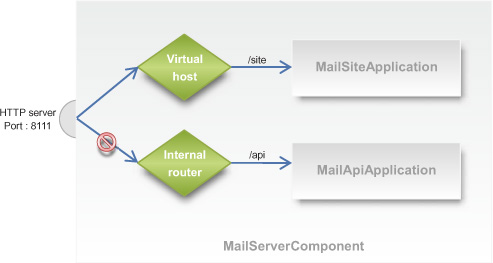
Reviewing the source code, there are a few differences compared to the previous RIAP example to achieve this design. First you need to modify the constructor of Mail-ServerComponent, as illustrated in the following snippet, to change the MailApi-Application attachment:
getDefaultHost().attach("/site", new MailSiteApplication());
getInternalRouter().attach("/api", new MailApiApplication());
The second point is to update the MailServerResource to modify the way the mail URI is built in order to use the RIAP component scheme:
String mailApiUri = "riap://component/api/accounts/" + accountId +
                    "/mails/" + mailId;
You can now test that the component is working fine by opening http://localhost:8111/site/accounts/chunkylover53/mails/123 in your browser and verifying that http://localhost:8111/api/accounts/homer/mails/123 can’t be reached anymore!
Before ending this chapter we’ll discuss how to persist the state of your Restlet applications in general and more precisely of their resources state.
7.6. Persisting resources state
When you need to provide persistence for your Restlet application, you can choose among dozens of serious technologies. Several types of storage mechanisms are frequently used in addition to relational databases, such as cloud databases like Cassandra, object databases like db4o, graph databases like Neo4j, distributed data grids like Hazelcast, or full-text indexes like Lucene.
For relational databases the most common standard is Java Database Connectivity (JDBC), which can be used directly via its Java API or indirectly via object-relational mapping (ORM) tools such as Hibernate, iBatis, or DataNucleus. Higher-level persistence Java APIs such as JPA and JDO APIs are also reasonable choices.
7.6.1. The JDBC extension
As with presentation technologies, the Restlet Framework tries to stay agnostic regarding your persistence choices because this decision often depends on your project’s technical environment and goals.
Restlet provides the org.restlet.ext.jdbc extension as an alternative, more RESTful way to use JDBC. This isn’t a recommendation over other approaches to managing persistence—it’s only one option. The idea is to use a pseudoprotocol based on the JDBC URI scheme. To access a MySQL database the URI template is as follows:
jdbc:mysql://{hostname}/{database}
This extension offers a Restlet client connector supporting only the POST method in order to issue JDBC requests, using an XML representation as in the following listing.
Listing 7.22. XML request for the JDBC client connector

When you create such a request, you can either use an AppendableRepresentation by hand or use FreeMarker or Velocity template representations. This XML request is then parsed and converted to an equivalent JDBC call in Java. The result set and additional properties are also returned as an instance of the RowSetRepresentation class, which can be automatically converted to XML, reusing the format defined by the javax.sql.rowset.WebRowSet interface. When it’s used directly, you can also access the optional list of generated keys and update count.
Let’s now continue exploring Restlet support for persistence technologies with the Lucene extension for searching.
7.6.2. The Lucene extension
A frequent feature that developers want to add to web applications is search. In Java land and even beyond, the Apache Lucene open source project has become the de facto standard for efficient indexing and retrieval, in particular for textual content.
To help you use Lucene, Restlet comes with an org.restlet.ext.lucene extension that facilitates integration with two subprojects:
- Apache Tika—A content analysis toolkit
- Apache Solr—An enterprise search platform
For Tika the extension provides a TikaRepresentation class that facilitates the extraction of textual content from various media types such as PDF, Word, HTML, and XML. It can also extract useful metadata about those textual representations, such as the page count, the author, or the modification data.
For Solr the extension provides a pseudoconnector for this specific URI scheme:
solr:///{command}
solr://{coreName}/{command}
This client connector lets you interact with an embedded Solr engine from your Restlet application using the Restlet API. You have access to the same web API as the one accessible through HTTP from a standalone Solr installation [10]. You’ll now look at some best practices when dealing with resource state persistence before moving on to the third part of the book.
7.6.3. Best design practices
When using any persistence solution with Restlet, you should try loading and storing the state of your resources each time a ServerResource instance is created in order to process a new call. The goal is to respect the stateless constraint of REST.
This constraint doesn’t mean that your application can’t have state, but that the conversation between clients and servers shouldn’t be driven by out-of-band information such as cookie-based sessions promoted in the Servlet API.
For efficiency reasons you should consider putting in place database connection pools and data caches in your Restlet application subclasses, accessing those mechanisms by casting the result of the ServerResource#getApplication() method. Another option to share state between several resource instances is via the parent Context instance, which contains a map of attributes.
When dealing with transient data, such as a shopping cart or transactions running across several web pages, you should rethink your application design to turn this data into resources, such as a shopping cart resource with a specific URI. The state of those resources might be stored in a database like other resources, maybe with a shorter lifecycle but without special treatment.
Far from being a backward step, this stateless constraint can even benefit your end users—they won’t experience the typical session expiration issue when taking too long to complete a purchase order, for example.
7.7. Summary
In this chapter you learned best practices that, taken together, make the difference between a prototype Restlet application and a more mature one suitable for production.
You first saw how to complete an application with the usual web elements manipulated in most web APIs and websites, such as HTML forms handling, static file serving, and cookie manipulation. Each feature has been carefully illustrated in the context of the ongoing mail server example.
You also learned two complementary ways to handle web feeds in the Atom and RSS formats using two Restlet extensions, comparing the advantages and disadvantages of each of them. Then you learned how to redirect client calls, either manually by setting the proper HTTP statuses or more automatically and powerfully with the Redirector class.
We also discussed performance and modularization aspects in order to deal with applications growing in size and complexity. We looked at HTTP built-in features such a conditional method processing, entity compression, and caching support. We also introduced Restlet-specific features such as the server dispatcher, the internal router, and the RIAP pseudoprotocol to communicate optimally inside a Restlet component.
You’ll now continue exploring further Restlet Framework possibilities, such as deployment in cloud computing, web browsers, and smartphones—and innovative semantic web support.