Chapter 5. Clojure and Java interop
- Introduction to Clojure’s Java Interop functionality
- Calling Java from Clojure
- Compiling Clojure down to byte code
- Calling Clojure from Java
Java is the new COBOL. This pronouncement has been made year after year for a few years now, but hasn’t quite come to pass. Java was originally designed in the early nineties, was officially released in the mid-nineties, and went on to become one of the most significant technologies of its time. Today, the Java stack is probably one of the most popular in the industry. It isn’t going away anytime soon.
With the sheer amount of Java code in production (and more being written every day), no modern programming language can hope to succeed without being able to interoperate with it. Rich Hickey chose well when he picked the JVM to host the Clojure language. Not only does Clojure benefit from the state-of-the-art technology (raw performance, HotSpot, just-in-time compilation, adaptive optimization, garbage collection, and more), but also it makes the goal of seamless Java interoperability easier to achieve. The result is that Java interop with Clojure is both elegant and easy to use. We’ll explore this facility in this chapter.
We’ll start out by demonstrating how to use Java classes from our Clojure code. Clojure provides a lot of convenient macros that make the resulting code simple and clean. After that, we’ll see how our Clojure code can be converted into Java byte code via the compilation facility provided by Clojure. Before wrapping up this chapter, we’ll take a brief look at how Clojure code can be called from Java programs.
This chapter talks about several macros that are provided by the Clojure language. We haven’t addressed macros so far, so for now, you can think of these as features of the language itself. Once you learn how to write your own macros in chapter 7, you’ll be able to appreciate the elegance of the macros from this chapter even more. In any case, by the end of this chapter, you’ll have mastered another extremely powerful feature of Clojure—that of being able to use the extensive set of Java libraries out there from within your Clojure programs.
5.1. Calling Java from Clojure
The availability of a good set of standard libraries can make or break a programming language. This is why Clojure has such a great advantage; being hosted on the JVM means that programs have instant access to literally thousands of libraries and frameworks. It’s a bit like having the privilege of living most of your programming life in the advanced environment of Clojure but being able to cherry-pick any Java library to use when you need to. So let’s begin our exploration of Clojure’s Java interop features by learning how to use external Java classes in your programs.
5.1.1. Importing Java classes into Clojure
Writing large programs in any language quickly reaches a point where code needs to be organized into logical units. This is a simple way of managing complexity, because it breaks things down into more understandable chunks of code. In Clojure, the basic unit of code organization is namespaces, and we explored them in chapter 3. We also showed how to require and use namespaces. In Java, the analogous unit of code organization is called the package. The import statement is used to import complete packages or specific classes from inside packages into Java programs that need them. In keeping with that, Clojure also provides the import function. Here’s the general form:
(import & import-symbols-or-lists)
As you can tell, import takes a variable number of arguments. Each argument is a list, where the first part of the list is a Java package name, followed by the names of those classes from inside that package that you want to import. Here’s an example:
(import
  '(org.apache.hadoop.hbase.client HTable Scan Scanner)
  '(org.apache.hadoop.hbase.filter RegExpRowFilter StopRowFilter))
This code snippet uses the Hadoop HBase client library, and the first line imports the HTable, Scan, and Scanner classes from the org.apache.hadoop.hbase.client package. This makes them available to the rest of the code in the namespace. The recommended way to import Java classes into a namespace is to use the :import option in the namespace declaration:
(ns com.clojureinaction.book
  (:import (java.util Set)))
Once classes have been imported, they can be used easily in the rest of the code. You can do almost anything you can do in Java from within Clojure. We’ll explore all the common things you might need to do in the following sections, beginning with how to create new instances of Java classes and how to access methods and fields of Java objects.
5.1.2. Creating instances and accessing methods and fields
In this section, we’ll quickly demonstrate the basics of Java interop, specifically ways in which to create new objects from Java classes and to access methods and fields on these objects. We’ll also show some conveniences that Clojure provides to make things easier when working with Java. For instance, once you’re familiar with the macros that Clojure provides for creating and using Java classes and objects, you might decide it’s easier to use Java classes from Clojure than from Java itself! Let’s start with instantiating classes.
Creating instances
Let’s create a new instance of a Java class. Consider the following code:
(import '(java.text SimpleDateFormat))
(def sdf (new SimpleDateFormat "yyyy-MM-dd"))
After the call to def, the sdf var has a root binding that’s a new instance of the class SimpleDateFormat. The new special form works similarly to the new keyword in Java: it accepts a class name and arguments that can be a applied to a matching constructor.
Clojure also has an alternative to using the new form via its support of a special notation for symbols containing a dot (.). If the first symbol in a list ends with a dot, that symbol is assumed to be a class name, and the call is assumed to be to a constructor of that class. The remaining symbols are assumed to be arguments to the matching constructor. This form gets converted into the equivalent new form.
Here’s the previous example again, rewritten to use this macro syntax:
(def sdf (SimpleDateFormat. "yyyy-MM-dd"))
Note the dot at the end of “SimpleDateFormat.”. Now that you know how to create new Java objects, let’s examine accessing their members.
Member access
In Java, member access refers to accessing methods and fields of objects. Doing this from within Clojure is easy because Clojure provides another convenient dot macro to do this. Consider the following code:
(defn date-from-date-string [date-string]
  (let [sdf (SimpleDateFormat. "yyyy-MM-dd")]
    (.parse sdf date-string)))
You first create a SimpleDateFormat object as you did earlier. To call the parse method on that object, you use the dot form by prefixing a dot to the symbol parse. The first operand in that form is the object on which the instance member is being called. The remaining operands are arguments to that instance method.
Calling static methods on classes is slightly different but just as easy:
(Long/parseLong "12321")
Here, parseLong is a static method on the class Long, which accepts a string containing a long number. This example returns 12321 as an instance of java.lang.Long. Calling a static method in general has the following form:
(Classname/staticMethod args*)
The first element of this list is a class name and static method combination like Long/parseLong, whereas the remaining elements in the list are arguments to that method.
Accessing static fields is similar to calling static methods. Here’s an example:
(import '(java.util Calendar))

Calendar/JANUARY
Calendar/FEBRUARY
These two examples access the static fields JANUARY and FEBRUARY from the Calendar class.
The dot special form
In Clojure, all underlying Java access is done via the dot operator. The macro forms we just discussed get converted into forms using this dot operator. The Clojure documentation says that the dot operator can be read as “in the scope of.” That means that the member access is happening in the scope of the value of the first symbol.
Let’s examine how it works. Consider the following pair of general forms:
(. Classname-symbol method-symbol args*)
(. Classname-symbol (method-symbol args*))
These forms allows static methods to be called on classes specified as the first argument. Here’s an example of using them:
(. System getenv "PATH")
(. System (getenv "PATH"))
Both these forms return the system path as a string. The second form uses parentheses to enclose the name of the method being called. This is convenient when such a call is being made inside other macros (it’s easy to generate lists of things). Typically in code, if you do use the dot operator directly, the first form is preferred. Having said that, idiomatic code uses the form described in the previous section, “Member access.”
Now let’s look at another example that’s similar but operates on instances of Java classes (objects) as opposed to classes. Here are the general forms:
(. instance-expr method-symbol args*)
(. instance-expr (method-symbol args*))
The following example illustrates both these forms:
(import '(java.util Random))
(def rnd (Random. ))

(. rnd nextInt 10)
(. rnd (nextInt 10))
Again, they both return a number, randomly picked between 0 and 10. The second form, with the extra parentheses, is useful when this kind of call is made inside other macros. This is convenient because it’s easy to generate lists of things in Clojure. Also as pointed out in the previous section, when using the dot operator in this way, the first option is preferred. The forms described in the previous section are the idiomatic way to access members of Java objects.
Finally, let’s consider the following two general forms:
(. Classname-symbol member-symbol)
(. instance-expr member-symbol)
These access public fields from either a class or an instance of a class. Here’s an example of accessing a static field from the Calendar class that you saw earlier, rewritten using the dot operator:
(. Calendar DECEMBER)
Now that you’ve seen how the dot operator works, it’s worth repeating that it’s idiomatic to use the regular forms as described in the previous section. The dot operator is usually reserved for use within macros. We’ll now look at another couple of convenience macros, the dot dot macro (two dots) and doto.
.. (dot dot)
Java code tends to be verbose. It isn’t only the syntax; the mutable state, its idea of object orientation, and the lack of higher-order functions all contribute to its verbosity. One common pattern is a series of methods that need to be called on the same object. Another is a sequence of methods that need to be chained together, each operating on the result of the previous. The doto macro helps with the former, and the .. (dot dot) macro helps with the latter.
Consider the following code snippet:
(import '(java.util Calendar TimeZone))
(. (. (Calendar/getInstance) (getTimeZone)) (getDisplayName))
Depending on where in the world you are, this might return something like "Pacific Standard Time". But writing that code is a bit unwieldy—where the dots and the brackets go can get confusing. Imagine if you had another method call to make! You can simplify this by using the form without the extra parentheses as described earlier, to make it a little cleaner:
(. (. (Calendar/getInstance) getTimeZone) getDisplayName)
This is better but not by much. This is where the dot dot form comes in. It’s a convenient macro that chains together method calls. The previous code can be rewritten using this macro as follows:
(.. (Calendar/getInstance) (getTimeZone) (getDisplayName))
This can be simplified (without the extra parentheses, because we’re passing no arguments to either getTimeZone or getDisplayName methods) to the following:
(.. (Calendar/getInstance) getTimeZone getDisplayName)
If we were using method signatures that accepted arguments, we’d do so as follows:
(..
  (Calendar/getInstance)
  (getTimeZone)
  (getDisplayName true TimeZone/SHORT))
This might return something like "PDT", again depending on where you are. Note that the code reads better, too, because the sequence of method calls is clearer. Having examined this convenience macro, let’s look at another way to write clearer code in such situations.
Doto
As mentioned earlier, the doto macro helps write code where multiple methods are called on the same Java object. Consider this contrived function that starts with the current time and works out the most recent midnight:
(import '(java.util Calendar))
(defn the-past-midnight-1 []
  (let [calendar-obj (Calendar/getInstance)]
    (.set calendar-obj Calendar/AM_PM Calendar/AM)
    (.set calendar-obj Calendar/HOUR 0)
    (.set calendar-obj Calendar/MINUTE 0)
    (.set calendar-obj Calendar/SECOND 0)
    (.set calendar-obj Calendar/MILLISECOND 0)
    (.getTime calendar-obj)))
As you can see, there’s tedious repetition of the symbol calendar-obj in this code. The doto macro eliminates this sort of duplication. Here’s an example:
(defn the-past-midnight-2 []
  (let [calendar-obj (Calendar/getInstance)]
    (doto calendar-obj
      (.set Calendar/AM_PM Calendar/AM)
      (.set Calendar/HOUR 0)
  (.set Calendar/MINUTE 0)
  (.set Calendar/SECOND 0)
  (.set Calendar/MILLISECOND 0))
(.getTime calendar-obj)))
In general, it accepts a symbol followed by a body of forms. The symbol is spliced into the form without the doto. This kind of macro used to eliminate duplication is quite common in Clojure code.
Before wrapping up this section, let’s look at a couple of macros that make life easier when dealing with Java code. We’ll first talk about memfn, which is a convenient way to convert Java instance methods into Clojure functions. We’ll then cover bean, a super-convenient way to convert a Java bean object into a Clojure map.
5.1.3. memfn
Let’s say you wanted to collect the byte arrays that compose a few strings. Here’s how you might do it:
(map (fn [x] (.getBytes x)) ["amit" "rob" "kyle"])
This can be simplified using the reader macro for anonymous functions:
(map #(.getBytes %) ["amit" "rob" "kyle"])
Creating this anonymous function is necessary because a member function like get-Bytes can’t be used as a regular higher-order Clojure function. But there is a convenient macro called memfn that makes it easy to convert such a member function into a Clojure function. This is necessary because Java methods aren’t first class, so they can’t be used without this conversion in places that need functions. Our previous use of the higher-order function map is a typical example of such usage. Here’s an example of using memfn:
(memfn getBytes)
Using it in the context of map, for instance, looks like this:
(map (memfn getBytes) ["amit" "rob" "kyle"])
memfn also works with member functions that accept more than one argument. Consider the following call to the subSequence member function on a String object:
(.subSequence "Clojure" 2 5)
This returns "oju". The equivalent form is
((memfn subSequence start end) "Clojure" 2 5)
This also returns "oju". The Clojure function returned by the call to (memfn subSequence start end) can be used as a regular function in all the usual constructs. Now we’ll look at bean, another macro that’s quite useful when working with Java code.
5.1.4. bean
bean is another convenient macro that’s useful when dealing with Java code, especially Java beans, which are classes that conform to a simple standard involving exposing their data via getter and setter methods. Instead of having to deal with calling the getters via the macros described previously (which can get tedious rather quickly if you’re dealing with large objects), you could use the Clojure-provided bean macro to convert the object into a hash map. Consider the following examples:
(bean (Calendar/getInstance))
This returns a Clojure map that contains all its bean properties. Being a Clojure data structure, it’s immutable. It looks like the following:
{:timeInMillis 1257466522295,
 :minimalDaysInFirstWeek 1,
 :lenient true,
 :firstDayOfWeek 1,
 :class java.util.GregorianCalendar

;; other properties
}
This map is a lot easier to work with when compared to calling getters on the original object. Next we’ll look at Clojure’s mechanism for dealing with arrays.
People often talk about the sheer number of parentheses that Clojure uses. Despite the advantages this syntax offers, first-time Clojure programmers can find the code a bit hard to read.
This is why it’s somewhat amusing to note that when compared to Java code, Clojure code often has fewer parentheses, all used and placed in a consistent and regular manner. It’s true that the placement of the parentheses is different, but it’s a point worth noticing.
5.1.5. Arrays
A Java array is a container object that holds values of the same type. It’s a random-access data structure that uses integers as its keys. Although not used as often as other container classes from the standard Java library, it’s common in Java programs. Clojure has native support for dealing with Java arrays. Consider the following snippet:
(def tokens (.split "clojure.in.action" "\."))
tokens is a Java array of String objects.
Let’s now look at a few of the functions that Clojure provides that help in working with Java arrays:
- (alength tokens)—alength returns the size of the array, which in this case returns 3.
- (aget tokens 2)—aget returns the element of the array at the index specified, which in this case returns the string "action".
- (aset tokens 2 "actionable")—This mutates the tokens array so that the last token is now actionable.
It’s worth remembering at this point that unlike any of Clojure’s core data structures, Java arrays are mutable. This is true for all Java objects. You’ll see in chapter 6 how mutability can cause problems in multithreaded programs, and you’ll also learn about Clojure’s approach to dealing with concurrency.
Clojure also provides several other functions that allow sequences to be converted into Java arrays (to-array, to-array-2d, and into-array) and one that allows arbitrary new Java arrays to be created (make-array). There are also array-specific versions of the previously seen map and reduce functions, called amap and areduce.
All these functions make working with Java arrays easy. Having said that, because arrays need special handling and are a bit unwieldy compared to regular sequences, you should limit their use to situations where they’re absolutely needed.
We’ve covered quite a few aspects of Clojure’s support for interoperating with the world of Java code. We’re nearly finished; the last thing we’ll discuss is how to implement Java interfaces and extend Java classes from within Clojure code. By the end of the next section, you’ll have a mostly complete Java interop toolkit under your belt.
5.1.6. Implementing interfaces and extending classes
When working with Java libraries and framework, it’s often necessary to define new classes that implement certain interfaces or extend certain classes. It would be a shame if any of that required writing Java code. Luckily, Clojure has a macro called proxy that allows you to do this from within Clojure code.
Consider, for instance, the Grizzly project. It’s a server application framework that takes advantage of Java’s NIO API and allows programmers to write highly scalable server applications for various services. An abstract class that’s provided by the framework is the GrizzlyAdapter class, which can be used for simple services. The only abstract method on the class is
abstract void service(GrizzlyRequest req, GrizzlyResponse res)
The request and response objects are what you’d expect. Here’s a contrived example of creating an instance of a class that extends GrizzlyAdapter and implements the service method:
(import '(com.sun.grizzly.tcp.http11 GrizzlyAdapter))
(proxy [GrizzlyAdapter] []
    (service [req res]
      "Service was called!"))
Please note that you’ll need the Grizzly JARs on the classpath for this to work. The general form of the proxy macro is
(proxy [class-and-interfaces] [args] fs+)
This shows that the proxy form accepts a vector of Java classes and interfaces, followed by a vector of arguments (possibly empty) that will be passed to the superclass constructor, followed by any methods being defined. In the previous example, the Grizzly-Adapter interface is specified, and only the single method service is implemented.
This section was quite dense and filled with a lot of detail! You’re now in a position to use any kind of Java library in your Clojure programs. This is a great feature of the Clojure language and is quite critical to writing real-world programs. We’ll do that later, when we use HBase to store data and communicate between Clojure programs over a message bus.
Now that you understand Clojure’s support for Java interoperability, we’re ready to move on. You’ll now see how to generate static Java classes from Clojure code.
5.2. Compiling Clojure code to Java byte code
As you saw in chapter 1, Clojure doesn’t have an interpreter. Code is evaluated one s-expression at a time. During that process, if something needs to be compiled, the Clojure runtime does so. Ultimately, because Clojure is hosted on the JVM, everything is converted to Java byte code before execution, and the programmer doesn’t have to worry about when and how this happens.
Clojure provides a mechanism to do this compilation ahead of time (AOT). AOT compilation has its advantages. Packaging the code lets you deliver it as a class file (without the source code being included) for use by other Java applications, and it speeds up the program’s startup time. In this section, we’ll examine how to AOT compile Clojure code.
5.2.1. Example–a tale of two calculators
In this example, we’ll examine some code that implements a couple of financial calculators that you might use to manage investments in stocks and bonds. We’ll lay out our code in a directory structure for easy organization of code—one that’s somewhat idiomatic in the Clojure world. Figure 5.1 shows this organization.
Figure 5.1. Typical organization of a Clojure project. The src directory contains the source code, organized in a similar way to Java packages.
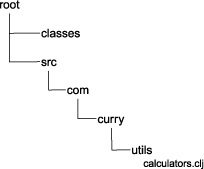
Note that calculators.clj is located in the src/ com/curry/utils folder and is the file that contains the namespace of our current interest. Here are the contents:
(ns com.curry.utils.calculators
  (:gen-class))

(defn present-value [data]
  (println "calculating present value..."))
This code can be compiled from a REPL that has both classes and src directories on the classpath. The compile function is used to do this, and it accepts the namespace to be compiled:
(compile 'com.curry.utils.calculators)
If successful, this function returns the name of the namespace that was compiled. Let’s now examine what the output of this compilation process is, what class files are generated, and where they’re located.
Generated classes
As noted, the compile function compiles the specified namespace. In this case, it generates class files for the com.curry.utils.calculators namespace. Three class files that get generated here are calculators_init.class, calculators.class, and calculators$present_value__xx.class, and they’re located in the classes/com/ curry/utils directory.
A class file is created for each Clojure function. In this case, the present-value function causes the calculators$present_value__xx.class to be created, the name of which will vary each time the namespace is recompiled (because it’s a generated name). A class file is also generated for each gen-class, and in this case this corresponds to the calculators.class file.
Finally, the class files that have the __init in their names contain a loader class, and one such file is generated for every Clojure source file. Typically, this loader class doesn’t need to be referenced directly, because use, require, and load calls figure out which file to use when they’re called.
:gen-class has a lot of options that allow control over various aspects of the generated code. These are explored in section 5.2.2. Now that we’ve covered the basics of compilation, let’s try to compile a namespace that’s spread across files.
Additional files
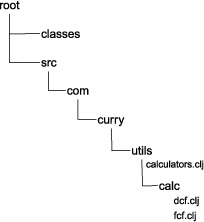
Let’s add a couple more calculators to our calculators namespace. You’ll create two more files in order to do this, one for each new calculator function. The resulting file structure is shown in figure 5.2.
Figure 5.2. Adding two new files, dcf.clj and fcf.clj, in a subdirectory of utils that have code for the same com.curry.utils.calculators namespace.
The contents of dcf.clj are
(in-ns 'com.curry.utils.calculators)
(defn discounted-cash-flow [data]
  (println "calculating discounted cash flow..."))
And the contents of fcf.clj are
(in-ns 'com.curry.utils.calculators)
(defn free-cash-flow [data]
  (println "calculating free cash flow..."))
Note that they both use in-ns to ensure that these files all belong to the same namespace. calculators.clj is modified as follows:
(ns com.curry.utils.calculators
  (:gen-class))

(load "calc/fcf")
(load "calc/dcf")

(defn present-value [data]
  (println "calculating present value..."))
Note the use of load using relative paths, because the fcf.clj and dcf.clj files are inside the calc subdirectory of utils. Calling compile, as you did before, results in new class files being generated in the classes directory. Two files, namely dcf__init.class and fcf__init.class, are generated in the classes/com/curry/utils/calc folder. New files are also created for the new functions, namely discounted-cash-flow and free-cash-flow in the classes/com/curry/utils directory.
*Compile-path*
In case you’re curious as to why the generated code is being output to the classes directory, it’s because it’s the default value of the global var *compile-path*. It’s easy to change this by calling set! to alter the value of the var or to call compile inside a binding form with *compile-path* bound to something appropriate. The thing to remember is that the directory must exist, and it should be on the classpath.
5.2.2. Creating Java classes and interfaces using gen-class and gen-interface
Clojure also has a standalone utility for generating Java classes and interfaces in the gen-class and gen-interface macros. When code containing these calls is compiled, it generates byte code for the specified classes or interfaces and writes them into class files as you saw earlier. In this section, you’ll see an example of how gen-class works. Consider the following listing, which is a contrived example of an abstract Java class that we’ll use to illustrate gen-class.
Listing 5.1. An abstract Java class that will be used to illustrate gen-class
package com.gentest;

public abstract class AbstractJavaClass {

    public AbstractJavaClass(String a, String b) {
        System.out.println("Constructor: a, b");
    }

    public AbstractJavaClass(String a) {
        System.out.println("Constructor: a");
    }

    public abstract String getCurrentStatus();

    public String getSecret() {
        return "The Secret";
    }
}
Once AbstractJavaClass is compiled, it needs to be on Clojure’s classpath. After ensuring that the Clojure runtime can see the class, you can use gen-class as shown in this next listing.
Listing 5.2. gen-class generates a Java class to reference AbstractJavaClass
(ns com.gentest.gen-clojure
  (:import (com.gentest AbstractJavaClass))
  (:gen-class
    :name com.gentest.ConcreteClojureClass
    :extends com.gentest.AbstractJavaClass
    :constructors {[String] [String]
                   [String String] [String String]}
    :implements [Runnable]
    :init initialize
    :state localState
    :methods [[stateValue [] String]]
    ))

(defn -initialize
    ([s1]
      (println "Init value:" s1)
        [[s1 "default"] (ref s1)])
    ([s1 s2]
      (println "Init values:"  s1 "," s2)
      [[s1 s2] (ref s2)]))

(defn -getCurrentStatus [this]
  "getCurrentStatus from - com.gentest.ConcreteClojureClass")

(defn -stateValue [this]
  @(.localState this))

(defn -run [this]
  (println "In run!")
  (println "I'm a" (class this))
  (dosync (ref-set (.localState this) "GO")))

(defn -main []
  (let [g (new com.gentest.ConcreteClojureClass "READY")]
    (println (.getCurrentStatus g))
    (println (.getSecret g))
    (println (.stateValue g)))
  (let [g (new com.gentest.ConcreteClojureClass "READY" "SET")]
    (println (.stateValue g))
    (.start (Thread. g))
    (Thread/sleep 1000)
    (println (.stateValue  g))))
Now, let’s go over the code in listing 5.2 to understand what’s going on. The call to ns should be familiar by now. It uses :import to pull in AbstractJavaClass from listing 5.1. This was why it needs to be on the classpath. The next option, :gen-class, is our primary interest. It can take several options, some of which are used in this example and some aren’t. Table 5.1 describes the options used in listing 5.2.
Table 5.1. gen-class options used in listing 5.2
|
Description |
|
|---|---|
| :name | The name of the class that will be generated when this namespace is compiled. |
| :extends | The fully qualified name of the superclass. |
| :constructors | Explicit specification of constructors via a map where each key is a vector of types that specifies a constructor signature. Values are similar vectors that identify the signature of a superclass constructor. |
| :implements | A vector of classes that the class implements. |
| :init | The name of a function that will be called with the arguments to the constructor. Must return a vector of two elements, the first being a vector. |
| :methods | Specifies the signatures of additional methods of the generated class. Implemented interface or extended superclass public methods are generated by default. |
Functions such as –initialize, -getCurrentStatus, and -run implement or override interface or superclass methods. The reason they’re prefixed with a dash (-) is so that they can be identified via convention. The prefix can be changed using the :prefix option (see table 5.2). Now that you understand what each option in the example does, you’re ready to run it.
Table 5.2. More gen-class options
|
Option |
Description |
|---|---|
| :postinit | Name of the function that’s called with the newly created instance as the first argument and that’s called each time an instance is created, after all constructors have run. |
| :main | Defaults to true—specifies whether a main method should be generated. |
| :factory | Specifies the name of the factory function(s) that will have the same signature as the constructors. A public final instance of the class will also be created. An :init function will also be needed in order to supply the initial state. |
| :exposes | Used to expose protected fields inherited from the superclass. The value is a map where the keys are the name of the protected field and the values are maps specifying the names of the getters and setters. The format is :exposes {protected-field-name {:get name :set name}, ...} |
| :exposes-methods | Exposes overridden methods from the superclass via the specified name. The format of this is :exposes-methods {super-method-name exposed-name, ...} |
| :prefix | Defaults to the dash (-). When methods like getCurrentStatus are called, they will be looked up by prefixing this value (for example, getCurrentStatus). |
| :impl-ns | Defaults to the current namespace but can be specified here if the methods being implemented or overridden are in a different namespace. |
| :load-impl-ns | Defaults to true; causes static initializer of generated class to reference the load code of the implementing namespace. Can be turned to false if the code needs to be loaded in a more controlled manner. |
Running it
The classpath needs to have clojure.jar on it as well as the locations of com.gentest.AbstractJavaClass and com.gentest.ConcreteClojureClass. The following command assumes the CLASSPATH environment variable has been set up appropriately. The command to test our generated class is
java com.gentest.ConcreteClojureClass
This outputs the following to the console:
Init value: READY
Constructor: a
getCurrentStatus from - com.gentest.ConcreteClojureClass
The Secret
READY
Init values: READY , SET
Constructor: a, b
SET
In run!
I'm a com.gentest.ConcreteClojureClass
GO
As the code shows, you’ve used both constructor signatures to create instances of our generated class. You’ve also called a superclass method getSecret and the overridden method getCurrentStatus. Finally, you’ve also run the second instance as a thread and checked the mutating state localState, which changed from "SET" to "GO".
Table 5.2 shows the other options available to gen-class.
This is quite an exhaustive set of options, and it lets the programmer influence nearly every aspect of the generated code. gen-interface works in a similar fashion to gen-class but has fewer options because it’s limited to defining an interface.
Now that you’ve seen how to compile and generate Java code from our Clojure source, we’re ready to move on. Next, you’re going to see how to go the other way: to call our Clojure functions from Java programs. This will allow you to write appropriate parts of our application in Clojure using all the facilities provided by the language and then use it from other Java code.
5.3. Calling Clojure from Java
One of the great things about most languages hosted on the JVM is that they can be embedded into other Java programs. This is useful when you need the ability to script the larger system. Let’s review how to call Clojure functions from Java code.
Consider the following Clojure function, defined in the clj.script.examples namespace:
(ns clj.script.examples)

(defn print-report [user-name]
  (println "Report for:" user-name)
  10)
If this Clojure code is in a file named clojure_script.clj, you can now call the print-report function from a Java method, as shown in the following code:
public class Driver {
    public static void main(String[] args) throws Exception {
        RT.loadResourceScript("clojure_script.clj");
        Var report = RT.var("clj.script.examples", "print-report");
        Integer result = (Integer) report.invoke("Siva");
        System.out.println("Result: " + result);
    }
}
Here, RT is the class that represents the Clojure runtime. You initialize it by calling the static method loadResourceScript on the RT class. It accepts the name of the Clojure script file and loads the code defined within. The RT class also has a var static method, which accepts a namespace name along with a var name (both as strings). It looks up a var as specified and returns a Var object, which can then be invoked using the invoke method. The invoke method can accept an arbitrary number of arguments.
As you can see, the basics of calling Clojure from Java are quite straightforward. This is by design; Clojure was created to embrace the JVM, and does so in a seamless, user-friendly manner.
5.4. Summary
This chapter explored Clojure’s excellent support for interoperability with Java. This is an important feature, because it gives programmers instant access to thousands of libraries and frameworks. As you’ll see in later parts of the book, this is a huge advantage when it comes to building real-world systems in Clojure. You can write your application-specific code in Clojure and use well-tested, production-quality Java libraries for infrastructure-related requirements, for example, accessing HBase (an open-source implementation of Google’s BigTable) and using RabbitMQ (an extremely fast messaging system).
This availability of a large number of well-tested, production-ready libraries and frameworks makes a huge difference to a new language such as Clojure. Apart from making all this functionality available to use from Clojure, the Java interop also makes it possible to write code that coexists with and leverages existing investments in Java systems. This allows Clojure to be brought into environments and organizations in an incremental fashion. Lastly, the elegance of the interop makes it easy to use Java code from within Clojure. All these factors contribute to making Clojure’s embrace of the Java platform a huge plus when considering the adoption of the language.