
Chapter 14. Xpand Template Language
From model instances, it’s common to generate code, text files, reports, and so on. Query/View/Transformation Operational Mapping Language (QVT OML) provides our language for Model-to-Model Transformation (M2M), and we turn to Xpand to provide for Model-to-Text Transformation (M2T). Alternative choices exist within the M2T project, namely Java Emitter Templates (JET) and the new Model to Text Language (MTL) component.
JET is the default M2T technology that EMF itself uses, but other projects within Eclipse have found success and discovered advantages to using Xpand. JET borrows heavily from Java Server Pages (JSP), but Xpand has a significantly different syntax to offer those who might not be fond of JSP. This is not to say that JET is not worth consideration as the default template technology in your DSL Toolkit; this book just does not cover it. Hopefully a future book will include details on using JET.
Xpand itself has minimal syntax and relies on the Xtend language and underlying expression language and type system to complete its syntax and semantics. Xpand also provides aspect-oriented capabilities, which lends to its extensibility features. Invoking Xpand templates is primarily done through the EMFT Modeling Workflow (MWE) component. This chapter covers all these topics, in addition to example code throughout to illustrate Xpand’s capabilities.
One important note about the future of Xpand is important at this point. Two versions of Xpand exist within the Modeling project. I cover the traditional Xpand here, and a refactored version will soon be available in the context of the Graphical Modeling Framework (GMF) project. This version uses OCL and QVT OML as the expression language and will be invoked primarily from Java or Ant files. The latter represents an attractive workflow alternative to MWE, particularly because QVT OML also provides Ant integration. For now, however, let’s continue our coverage of the Xpand language.
14.1 Xpand Language
Xpand templates are written in text files that end with an .xpt extension. An Eclipse editor is provided for authoring templates, complete with syntax highlighting, code completion, and code templates. As guillemets (French quotation marks, ≪ and ≫) are used as delimiters in the language, it’s important to first configure your environment to the right encoding. For PC installations of Eclipse, use UTF-8 encoding; ISO-8859-1 works on Mac OS X. Furthermore, learn to use Ctrl+< and Ctrl+> on the PC to type guillemots (Alt+| and Alt+Shift+| work on the Mac). Alternatively, you can use an empty ≪≫ template by pressing Ctrl+spacebar.
Regarding the use of guillemets, when outputting text into a file, you can remove trailing whitespace by adding a hyphen before the closing guillemot: ≪...-≫.
With the preliminaries out of the way, let’s take a look at the Xpand language itself. Each of the following sections covers the main elements of the language: ≪IMPORT≫, ≪DEFINE≫, ≪EXPAND≫, ≪FILE≫, ≪FOREACH≫, ≪EXTENSION≫, ≪IF≫, ≪PROTECT≫, ≪LET≫, ≪ERROR≫, and ≪REM≫.
14.1.1 IMPORT
At the top of an Xpand template, metamodel imports are listed using the ≪IMPORT≫ statement. The concept of importing is similar to import statements in Java and modeltype statements in OML. As with modeltype statements, imports in Xpand let you declare metamodels by either their package or their registered Eclipse Modeling Framework (EMF) Namespace URI (NS URI) Uniform Resource Identifier (URI). In the case of their package, discovery of models along the containing project’s source path resolves the model declared.
This is a simple import statement for the Ecore metamodel:
≪IMPORT ecore≫
Alternatively, the import below uses the NS URI method, available in the GMF Xpand implementation.
≪IMPORT “http://www.eclipse.org/emf/2002/Ecore”≫
After a metamodel is imported, you can reference its elements throughout the template without fully qualifying their names. Xpand currently does not have the flexibility to assign an alias for use within the template, as you saw with QVT OML.
14.1.2 DEFINE
Although an .xpt file is called a template file, in Xpand, the content of a ≪DEFINE≫ block is considered the template. This book uses the word template to reference both. A ≪DEFINE≫ block represents a fragment that is expanded in the context of executing the template. A ≪DEFINE≫ block has a name and optional list of parameters, along with a FOR clause that specifies the applicable element of the metamodel. An ≪ENDDEFINE≫ tag terminates the ≪DEFINE≫ block. This is the general syntax for a ≪DEFINE≫ statement:
≪DEFINE templateName (parameterList) FOR MetaClass≫
. . .
≪ENDDEFINE≫
This is a simplistic template that describes ≪DEFINE≫ and other Xpand elements. It takes a mindmap instance and produces a Comma-Separated Values (CSV) file.
≪IMPORT mindmap≫
≪DEFINE Main FOR Map≫
≪FILE title + “.csv”-≫
≪FOREACH elements.typeSelect(Topic) AS topic-≫
≪topic.name≫,≪topic.start≫,≪topic.end≫
≪ENDFOREACH≫
≪ENDFILE≫
≪ENDDEFINE≫
The ≪DEFINE≫ statement includes the name Main and indicates that the mindmap model’s Map class is the metamodel element used in the definition. This example passes no parameters. Within the body of the ≪DEFINE≫ block, output text is placed, along with other Xpand statements. I explain the contents of the example in detail shortly, but it’s not hard to see that an output file is created and will contain a series of Topic attributes separated by commas. Consider this sample output:
A Topic,Tue Nov 20 10:16:00 EST 2007,Fri Nov 23 12:46:20 EST 2007
A Subtopic,Wed Jun 20 00:00:00 EDT 2007,Sat Aug 09 00:00:00 EDT 2008
Another Topic,Sun Sep 09 00:00:00 EDT 2007,Wed Dec 12 00:00:00 EST 2007
Another Subtopic,Sat Dec 01 00:00:00 EST 2007,
Tue Jan 01 00:00:00 EST 2008
A SubSubtopic,Mon Oct 22 00:00:00 EDT 2007,Sat Dec 08 00:00:00 EST 2007
When invoking a template, Xpand uses fully qualified namespaces, including directory structures, the .xpt filename, and the ≪DEFINE≫ name. If this example template were in a file named mindmap2csv.xpt within the folder /templates/deploy, this ≪DEFINE≫ would be addressed as deploy::mindmap2csv::Main from another template or the workflow used to execute the template. This assumes that the /templates folder is set to a source path in the project properties, or, in the case of GMF, that it is the folder specified as the dynamic templates location.
14.1.3 EXPAND
The ≪EXPAND≫ statement directs execution to another ≪DEFINE≫ template block or expands it, similar to invoking a subroutine. This is the general syntax for an ≪EXPAND≫ statement:
≪EXPAND definitionName [(parameterList)] [FOR expression |
FOREACH expression [SEPARATOR expression] ]≫
The definitionName must be a fully qualified namespace, including the filename and path, unless it’s a ≪DEFINE≫ within the same file. In that case, a simple name is sufficient. When referencing a ≪DEFINE≫ block outside the file, it might be more convenient to add the appropriate IMPORT statement to the template file. For example, let’s say we wanted to modify our simple mindmap2csv.xpt template to output a CSV file for Relationship elements, in addition to the one for Topic elements. Our original ≪DEFINE≫ would then include two ≪EXPAND≫ statements, as shown here. In this case, the Topic version of the template is located in a directory /topic relative to a project source path in a file named topic.xpt with a main ≪DEFINE≫. The relationship template is structured similarly.
≪IMPORT mindmap≫
≪DEFINE Main FOR Map≫
≪EXPAND topic::topic::Main FOR this≫
≪EXPAND relationship::relationship::Main FOR this≫
≪ENDDEFINE≫
Alternatively, if the topic and relationship folders were located below our/template root folder, we could add IMPORT statements to our template and shorten our ≪EXPAND≫ statements slightly.
≪IMPORT mindmap≫
≪IMPORT topic≫
≪IMPORT relationship≫
≪DEFINE Main FOR Map≫
≪EXPAND topic::csv FOR this≫
≪EXPAND relationship::csvFile FOR this≫
≪ENDDEFINE≫
Note that each ≪EXPAND≫ statement explicitly includes FOR this, meaning that the context of the enclosing ≪DEFINE≫ is passed along. Technically, we could have eliminated FOR this altogether. An alternative is to pass another element, such as a list of Topic or Relationship elements. In the following example, the Relationship elements are filtered out and passed to a ≪DEFINE≫ that takes a list.
≪DEFINE Main FOR Map≫
≪EXPAND topic::csv≫
≪FILE title + “-relations.csv”-≫
≪EXPAND relationship::csv FOR elements.typeSelect(Relationship)-≫
≪ENDFILE≫
≪ENDDEFINE≫
≪DEFINE csv FOR List[mindmap::Relationship]≫
≪FOREACH this AS relation-≫
≪relation.name≫,≪relation.type.toString()≫,≪relation.
source.name≫,
≪relation.target.name≫
≪ENDFOREACH≫
≪ENDDEFINE≫
Another option would be to have a ≪DEFINE≫ that accepts a single Relationship element, enabling us to use a FOREACH clause in the ≪EXPAND≫ to iterate over the collection:
≪EXPAND relationship::csv FOREACH elements.typeSelect(Relationship)≫
≪DEFINE csv FOR Relationship≫
≪relation.name≫,≪relation.type.toString()≫,≪relation.
source.name≫,
≪relation.target.name≫
≪ENDDEFINE≫
As you can see, we can accomplish the same result in many ways using Xpand, as is the case for most languages. Before we describe how to accomplish this using polymorphism, let’s look at the final feature of our ≪EXPAND≫ statement: the SEPARATOR.
Suppose we wanted to simply output a comma-separated list of Topic names instead of the details of each Topic element. We could use the SEPARATOR feature of ≪EXPAND≫ to accomplish this, as shown in the following example. A nice feature of SEPARATOR is that it places a comma (or specified separator) between each element, with no trailing separator at the end of the list. Note the judicious use of the hyphenated closing guillemet (-≫), to avoid whitespace in the output.
≪DEFINE Main FOR Map≫
≪FILE “topics.csv”-≫
≪EXPAND topicList FOREACH elements.typeSelect(Topic)
SEPARATOR “,”≫
≪ENDFILE≫
≪ENDDEFINE≫
≪DEFINE topicList FOR Topic-≫
≪this.name-≫
≪ENDDEFINE≫
This is a sample output of the Topic list:
A Topic,A Subtopic,Another Topic,Another Subtopic,A SubSubtopic
Polymorphism
Xpand templates include polymorphism support for metaclasses declared in ≪DEFINE≫ blocks. If a metaclass has two subclasses and each has its own ≪DEFINE≫ block, template execution invokes the proper ≪DEFINE≫ to match the instance.
Let’s refactor our mindmap2csv template to take advantage of this capability. We can do this in two steps, just to illustrate more completely. First, we modify the template as shown here:
≪IMPORT mindmap≫
≪DEFINE Main FOR Map≫
≪EXPAND csvFile(title) FOR elements.
typeSelect(Topic)≫
≪EXPAND csvFile(title) FOR elements.typeSelect(Relationship)≫
≪ENDDEFINE≫
≪DEFINE csvFile(String title) FOR List[mindmap::MapElement]≫
≪ENDDEFINE≫
≪DEFINE csvFile(String title) FOR List[mindmap::Topic]≫
≪FILE title + “-topics.csv”-≫
≪FOREACH this AS topic-≫
≪topic.name≫,≪topic.start≫,≪topic.end≫
≪ENDFOREACH≫
≪ENDFILE≫
≪ENDDEFINE≫
≪DEFINE csvFile(String title) FOR List[mindmap::Relationship]≫
≪FILE title + “-relations.csv”-≫
≪FOREACH this AS relation-≫
≪relation.name≫,≪relation.type.toString()≫,≪relation.
source.name≫,
≪relation.target.name≫
≪ENDFOREACH≫
≪ENDFILE≫
≪ENDDEFINE≫
As you can see, this is not quite polymorphism at its best, but it is a working example that illustrates the proper dispatching of ≪DEFINE≫ statements based on type—in this case, a list of a particular type. This example also illustrates the use of parameters: The title from the Map is passed to both MapElement subclass ≪DEFINE≫ blocks for use in creating their output files.
Also note that an empty ≪DEFINE≫ for a list of MapElement types is provided. This seems to be an Xpand limitation; without a ≪DEFINE≫ for the superclass, Xpand could not properly invoke the subclass ≪DEFINE≫ blocks.
Even better is the next example, where true polymorphism is used in place of the explicit typeSelect() filtering. Notice that the FILE statements specify outlets now. This is because it’s possible to set an append attribute to an outlet; otherwise, each invocation of csvFile would create a new file. Outlets are specified in the workflow file that invokes this template and are covered in detail later.
≪IMPORT mindmap≫
≪DEFINE Main FOR Map≫
≪EXPAND csvFile(title) FOREACH elements-≫
≪ENDDEFINE≫
≪DEFINE csvFile(String title) FOR MapElement≫
≪ENDDEFINE≫
≪DEFINE csvFile(String title) FOR Topic≫
≪FILE title + “-topics.csv” TOPIC_OUTLET-≫
≪name≫,≪start≫,≪end≫
≪ENDFILE≫
≪ENDDEFINE≫
≪DEFINE csvFile(String title) FOR Relationship≫
≪FILE title + “-relations.csv” RELATIONS_OUTLET-≫
≪name≫,≪type.toString()≫,≪source.name≫,≪target.name≫
≪ENDFILE≫
≪ENDDEFINE≫
As you can see, this is a much nicer use of polymorphism, although our obligatory ≪DEFINE≫ for the MapElement still exists. If you’re curious, consider this portion of the workflow file that sets up the outlets and invokes this template:
<outlet path=“${out}”/>
<outlet name=“RELATIONS_OUTLET” path=“out” append=“true”/>
<outlet name=“TOPIC_OUTLET” path=“out” append=“true”/>
<expand value=“mindmap2csv::Main FOR model”/>
14.1.4 FILE
The previous sections have already covered most of how ≪FILE≫ works, so if you’ve skipped to this section, you might want to go back and read up the EXPAND topic. This is the syntax for ≪FILE≫:
≪FILE expression [OUTLET_NAME]≫
. . .
≪ENDFILE≫
As you’ve seen, you can possibly combine strings and model element values using + to form the ≪FILE≫ name, or expression. A previous example used the title of the Map element combined with the string -topics.csv.
OUTLET_NAME is optional and corresponds to a named <outlet/> element defined in a workflow file. One way to think about this is to consider the use of outlets as named streams. In fact, future versions of Xpand might provide more formal support for the named stream concept. The GMF version of Xpand relies on the stream concept because the output files used for persistence are determined externally in Java code. This feature should become available in M2T Xpand in the future, where file output likely will be specified within the work-flow instead of within the Xpand template itself.
14.1.5 FOREACH
When working with collection types, it is often necessary to iterate through their contents. You’ve already seen FOREACH used within an EXPAND statement for this purpose. However, frequently iteration is required within ≪DEFINE≫ blocks, which is where ≪FOREACH≫ comes into play.
≪FOREACH expression AS varName [ITERATOR iterName]
[SEPARATOR expression]≫
. . .
≪ENDFOREACH≫
The expression can be any collection element within the current context or a statement that results in a collection. Within the block, each element in the collection is accessed using the varName you provide. The body of the FOREACH block can contain other Xpand statements, including nested FOREACH elements. A special Xpand-provided iterator is accessible by name within the block if the ITERATOR is specified. A common use for the ITERATOR is to access its counter for outputting a numerical sequence within the body of the statement. As you saw earlier, you can declare a SEPARATOR and insert it between elements in the collection. Section 14.1.1, “Type System,” covers the full list of features that an iterator offers.
To illustrate the use of an ITERATOR, consider this ≪DEFINE≫ block:
≪DEFINE NumberedCsvFile FOR Map≫
≪FILE “numbered-” + title + “-topics.csv“-≫
≪FOREACH elements.typeSelect(Topic) AS topic ITERATOR i-≫
≪i.counter0≫,≪topic.name≫,≪topic.start≫,≪topic.end≫
≪ENDFOREACH≫
≪ENDFILE≫
≪ENDDEFINE≫
In this case, we’re prefixing each line in our output CSV file with an index obtained by our iterator’s counter0 property. The output looks like the following.
0,A Topic,Tue Nov 20 10:16:00 EST 2007,Fri Nov 23 12:46:20 EST 2007
1,A Subtopic,Wed Jun 20 00:00:00 EDT 2007,Sat Aug 09 00:00:00 EDT 2008
2,Another Topic,Sun Sep 09 00:00:00 EDT 2007,
Wed Dec 12 00:00:00 EST 2007
3,Another Subtopic,Sat Dec 01 00:00:00 EST 2007,
Tue Jan 01 00:00:00 EST 2008
4,A SubSubtopic,Mon Oct 22 00:00:00 EDT 2007,
Sat Dec 08 00:00:00 EST 2007
14.1.6 EXTENSION
Xpand supports the extension of the underlying metamodel through the ≪EXTENSION≫ statement. Declaring an ≪EXTENSION≫ import in a template means that additional features of the metamodel can be added using the Xtend language. This is analogous to QVT’s use of libraries.
For example, consider the rootTopics derived feature added to the mindmap model in Section 3.3.3, “Adding OCL.” We explicitly extended the metamodel and provided an implementation using OCL. The same type of extension can be provided using Xtend and made available to our Xpand templates. Consider the following implementation of rootTopics in a file named util.ext.
import mindmap;
List[Topic] rootTopics(Map mindmap):
let topics = mindmap.elements.typeSelect(mindmap::Topic):
topics.without(topics.subtopics)
;
When used within a template, this extension can be declared at the top of the file and used within the body as if it were part of the metamodel itself. The only difference between the use of rootTopics() in our extension and the rootTopics element in the model is the parentheses used in the former. This example shows the use of both:
≪IMPORT mindmap≫
≪EXTENSION util≫
≪DEFINE Main FOR Map≫
≪EXPAND csvFile(title) FOREACH this.rootTopics()≫
≪EXPAND csvFile(title) FOREACH this.rootTopics≫
≪ENDDEFINE≫
14.1.7 IF
As you might expect, Xpand supports conditional expansion using the ≪IF≫ if statement. ≪ELSE≫ and ≪ELSEIF≫ statements complement the ≪IF≫ block. This is the general syntax of the ≪IF≫ statement:
≪IF expression≫
. . .
[ ≪ELSEIF expression≫ ]
. . .
[ ≪ELSE≫
. . . ]
≪ENDIF≫
This is an example of ≪IF≫ and ≪ELSE≫ from the ProperySection.xpt template used in GMF’s diagram generation:
≪IF createLabel() && isExpandable()-≫
≪EXPAND createControls(name()+"Control") FOREACH contents-≫
≪name()≫.setClient(≪name()≫Control);
≪name()≫.addExpansionListener(getExpansionListener(≪parentVar≫));
≪ELSE-≫
≪EXPAND createControls(name()) FOREACH contents-≫
≪ENDIF ≫
14.1.8 PROTECT
To mark sections of generated code that are designated for user modification, Xpand provides a ≪PROTECT≫ statement. During regeneration, these regions are protected from being overwritten. This is the general syntax for ≪PROTECT≫ statements:
≪PROTECT CSTART expression CEND expression ID expression (DISABLE)?≫
. . .
≪ENDPROTECT≫
The CSTART and CEND expressions should be valid comment markers for the target language—for example, /* and */ for Java comments. The ID expression should be unique for the execution of the generator. By default, a protected region is enabled, but you can disable it by adding the DISABLED keyword.
To use protected regions, you must configure a resolver in your workflow file.
EMF uses the recommended approach for dealing with user-modified code, and JMerge follows this upon regeneration. To use this approach, insert @generated JavaDoc comments above class, field, and method declarations. Removing this tag and modifying it (such as by adding NOT to the end, as in @generated NOT) signifies that the block should not be overwritten.
14.1.9 LET
Sometimes it’s convenient to create a local variable for use in your template. The ≪LET≫ statement enables you to bind an expression to a variable name using the following syntax:
≪LET expression AS varName≫
. . .
≪ENDLET≫
Statements using the variable are nested within the block. For example, if we wanted to use a ≪LET≫ statement for our Topic CSV filename, we could refactor our template as shown next. When accessing ≪LET≫ or metamodel elements within a body, simply place the name within guillemets, as in ≪fileName≫.
≪LET title + “-topics.csv” AS fileName≫
≪FILE fileName TOPIC_OUTLET-≫
≪name≫,≪start≫,≪end≫
≪ENDFILE≫
≪ENDLET≫
14.1.10 ERROR
You can terminate the execution of a template by inserting an ≪ERROR≫ statement. The expression will be used as the message of an XpandException, which is thrown if the ≪ERROR≫ is processed. Note that it’s typically best to validate input model elements before executing templates, so using the ≪ERROR≫ statement is rarely required. This is the general syntax:
≪ERROR expression≫
This simple example reports when the passed Map class has no title set:
≪DEFINE Main FOR Map≫
≪IF title == null || title == ''-≫
≪ERROR 'No title'≫
≪ELSE≫
...
≪ENDIF≫
≪ENDDEFINE≫
14.1.11 REM
Comments can be added to templates to provide documentation using the ≪REM≫ statement. ≪REM≫ tags cannot be nested. They follow this general syntax:
≪REM≫Text comment here...≪ENDREM≫
14.1.12 AROUND
One of the more powerful features used in Xpand templates is the aspect-oriented capabilities provided by the ≪AROUND≫ statement. Using ≪AROUND≫, you can augment templates noninvasively. This is convenient when you want to augment the capabilities of templates that you cannot or do not want to modify, or, in the case of multiple products generated in a product line, when you seek to avoid conditionals throughout your MDD artifacts. This is the general syntax of ≪AROUND≫:
≪AROUND fullyQualifiedDefinitionName(parameterList)? FOR Type≫
. . .
≪ENDAROUND≫
The aspect-oriented part is in the point cut fullyQualifiedDefinitionName, which can contain wildcards (*). For example, mindmap::topic2csv::csvFile can provide a fully qualified name, while mindmap::topic* can match templates that begin with mindmap::topic.
Similarly, parameter types can be specified in our point cut. Types specified are matched to their definition parameter type or super type. The wildcard (*) can be used in parameter lists as well. For example, you can use mindmap::topic2csv::csv(String name) or mindmap::topic2csv::csv(String name,*) if there might be additional parameters.
Consider some examples of ≪AROUND≫ definitions.
To match all templates:
≪AROUND *(*) FOR Object≫
To match all templates ending in topic and with any number of parameters:
≪AROUND *topic(*) FOR Object≫
To match all templates in the mindmap namespace that have no parameters for MapElement types (including subclasses):
≪AROUND mindmap::* FOR MapElement≫
To match all templates with a single String parameter:
≪AROUND *(String s) FOR Object≫
To match all templates with at least one String parameter:
≪AROUND *(String s,*) FOR Object≫
You can call the underlying definition using proceed() on the implicit variable targetDef. The original parameters are passed to the underlying definition, but you can modify this with the advice beforehand. You can achieve total control over the parameters passed using proceed(Object target, List params), although no type checking occurs when you do so.
Let’s take a look at a simple example of using ≪AROUND≫. Consider this portion of a previous version of the mindmap2csv file template:
≪DEFINE Main FOR Map≫
≪FILE title + "-topics.csv"-≫
≪EXPAND listElements FOR elements.typeSelect(Topic)≫
≪ENDFILE≫
≪ENDDEFINE≫
≪DEFINE listElements FOR List[mindmap::Topic]-≫
≪FOREACH this AS topic-≫
≪EXPAND csv FOR topic-≫
≪ENDFOREACH≫
≪ENDDEFINE ≫
≪DEFINE csv FOR Topic-≫
≪name≫,≪start≫,≪end≫
≪ENDDEFINE ≫
Here, the Topic elements are expanded into CSV line entries where their name, start date, and end date values are written. Let’s assume that it’s legal to enter a comment at the top of a CSV file to describe each entry, preceded by a # sign. If we weren’t given access to the template, or if we did not want to modify it, we could use ≪AROUND≫ to noninvasively add a comment line before each Topic line in our output. This is a new .xpt file with an ≪AROUND≫ statement that lets us do just that:
≪IMPORT mindmap≫
≪AROUND templates::mindmap2csv::listElements FOR List[mindmap::Topic]-≫
# Topic Name, Start Date, End Date
≪targetDef.proceed()≫
≪ENDAROUND≫
Using the qualified name of the ≪DEFINE≫ that we want to augment instructs the generator that this block will be executed in its stead, stating that it should output a simple comment line and then proceed with the original statement using targetDef.proceed(). It’s possible to place the proceed() in the beginning, thereby providing before advice. To execute the template so that the generator knows about our advices, we can modify our workflow file. Section 14.1.1, “Aspects,” covers this, so for now we just show the new output.
# Topic Name, Start Date, End Date
A Topic,Tue Nov 20 10:16:00 EST 2007,Fri Nov 23 12:46:20 EST 2007
A Subtopic,Wed Jun 20 00:00:00 EDT 2007,Sat Aug 09 00:00:00 EDT 2008
Another Topic,Sun Sep 09 00:00:00 EDT 2007,Wed Dec 12 00:00:00 EST 2007
Another Subtopic,Sat Dec 01 00:00:00 EST 2007,
Tue Jan 01 00:00:00 EST 2008
A SubSubtopic,Mon Oct 22 00:00:00 EDT 2007,Sat Dec 08 00:00:00 EST 2007
In general, the aspect-oriented capabilities of Xpand (and Xtend and Workflow) are key to providing flexibility in your MDD artifacts. Knowing these capabilities when writing templates helps to keep a fine-grained approach to ≪DEFINE≫ blocks and even inserts extensibility points. These are all recommended practices in general and are exemplified by these capabilities.
14.1.13 Type System
Before moving on to the expression language and Xtend language description, it’s important to understand the underlying type system. You’ve seen the List type used in the preceding Xpand examples, so let’s cover this and the rest in detail.
Type System API Documentation
This section provides basic information on the properties and operations available for each of the underlying type system elements, as seen in Table 14-1 and Table 14-2.
Table 14-1 Object Properties


The super type of String is Object.
Table 14-3 String Properties

Table 14-4 String Operations


The supertype of Integer is Real.
Table 14-5 Integer Operations


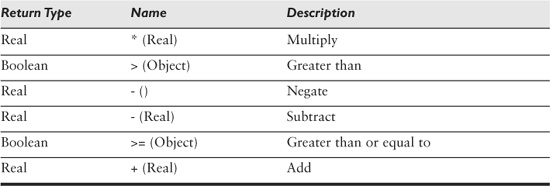
The superclass of Boolean is Object.
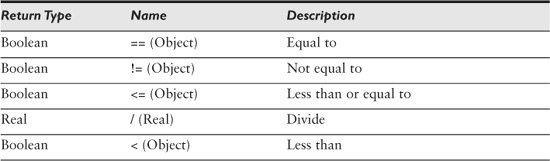
Table 14-6 Boolean Operations

The supertype of Real is Object.
Table 14-7 Real Operations
The supertype of Collection is Object. Note that Set is a subclass of Collection but offers no properties or operations beyond that of Collection.
Table 14-8 Collection Properties

Table 14-9 Collection Operations


Table 14-10 List Operations

The supertype of Type is Object.
Table 14-11 Type Properties


Table 14-12 Type Operations

The supertype of Feature is Object.
Table 14-13 Feature Properties

The supertype of Property is Feature.
Table 14-14 Property Operations

The supertype of Operation is Feature.
Table 14-15 Operation Operations

The supertype of StaticProperty is Feature.
Table 14-16 StaticProperty Operations

The supertype of AdviceContext is Object.
Table 14-17 AdviceContext Properties

Table 14-18 AdviceContext Operations

The supertype of Definition is Object.
Table 14-19 Definition Properties
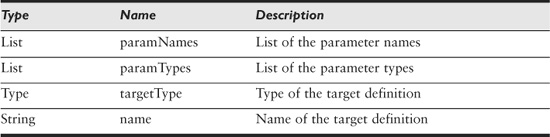
Table 14-20 Definition Operations

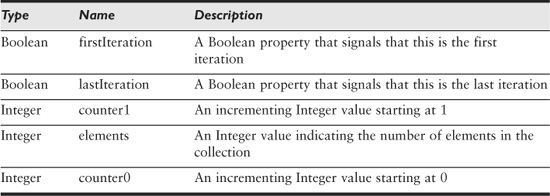
The supertype of Iterator is Object.
Table 14-21 Iterator Properties
14.1.14 Expression Language
To provide support for metamodel element access, aggregation, and iteration, Xpand uses an underlying expression language. This language is also available within Xtend, and this section covers it. You’ve already seen uses of this expression language, such as in the typeSelect() function used in our earlier example template.
The syntax of the expression language is a mixture of OCL and Java. On one hand, this is good because it’s familiar to many. On the other hand, it’s not OCL. The underlying implementation does not leverage the MDT OCL project, as does QVT OML, which is also based on OCL. To provide side effects, QVTO itself could be used in place of Xtend/OCL in Xpand, which is exactly the approach that the forthcoming Xpand variant from GMF takes.
General Syntax
Let’s begin with some of the basics of accessing properties, invoking operations, and so on. Following are examples that should form a self-explanatory basis of the expression language.
To access a property of a model element, use a simple dot notation:
modelElement.name
To access an operation defined in the model, use a dot notation with parentheses:
modelElement.anOperation()
To perform basic arithmetic, use the usual suspects:
(1 + 1 * 2) / 4
Boolean logic is specified using Java-like constructs and semantics:
! ((text.startsWith('t') && text.length > 0 ) | | ! false)
Literals and Special Operators for Built-In Types
Several literals exist for built-in types, each of which is described next.
Object
Naturally, no literals exist for Object, but there are two operators:
obj1 == obj2 // equals
obj1 != obj2 // not equals
Void
The only possible instance of Void is the null reference. Therefore, just one literal exists: null.
Type Literals
The literal for types is simply the name of the type—for example:
String // the type string
my::special::Type // evaluates to the type 'my::special::Type'
The literal for static properties (also known as enumeration literals) is similar to type literals:
my::Color::RED
Two different literal syntaxes are used for Strings (with the same semantics):
'a String literal'
“a String literal”
For Strings, the expression language supports the plus operator that is overloaded with concatenation:
'The element ' + element.name + ' is ' + element.state
The Boolean literals are true and false. These are the Boolean operators:
true && false // AND
true || false // OR
! true // NOT
The syntax for Integer and Real literals is as expected:
5 // Integer
4456 // Integer
8.9 // Real
0.95 // Real
Additionally, common arithmetic operators are used:
1 + 2 // addition
4 – 3 // subtraction
2 * 3 // multiplication
3 / 7 // divide
- 32 // unary minus operator
Finally, the well-known compare operators are defined:
4 > 5 // greater than
4 < 5 // smaller than
4 >= 5 // greater than or equal
4 <= 5 // smaller than or equal
Collections
A literal exists for lists:
{1,2,3,4} // a List with four integers
No other special concrete syntax is used for collections. If you need a Set, you must call the toSet() operation on the List literal:
{1,2,4,4}.toSet() // a Set with 3 Integers
As with OCL, the expression language defines several special operations on collections. These operations are not members of the type system, so they cannot be used in a reflective manner.
select
Sometimes an expression yields a large collection, but one is interested in only a special subset of the collection. The expression language has special constructs to specify a selection out of a specific collection. These are the select() and reject() operations. The select() operation is analogous to the OCL select() operation and specifies a subset of a collection as follows:
collection.select( v | boolean-expression-with-v )
Select returns a sublist of the specified collection. The list contains all elements for which the evaluation of boolean-expression-with-v results in true. For example:
{1,2,3,4}.select(i | i >= 3) // returns {3,4}
typeSelect
A special version of a select expression is the typeSelect() expression. The metaclass name is provided as the argument.
collection.typeSelect( classname )
typeSelect() returns a sublist of the specified collection that contains only objects that are an instance of the specified class. For example:
elements.typeSelect(mindmap::Topic)
reject
The reject operation is similar to the select operation, but with reject we get the subset of all the elements of the collection for which the expression evaluates to false. The reject syntax is identical to the select syntax:
collection.reject( v | boolean-expression-with-v )
For example:
{1,2,3,4}.reject(i | i >= 3) // returns {1,2}
collect
As shown in the previous section, the select() and reject() operations always result in a subcollection of the original collection. Sometimes we want to specify a collection that is derived from another collection but that contains objects not in the original collection (it is not a subcollection). The collect operation does this using the same syntax as the select and reject expressions:
collection.collect( v | expression-with-v )
collect() iterates over the target collection and evaluates the given expression on each element. In contrast to select, the evaluation result is collected in a list. When the iteration is finished, the list with all results is returned. For example, if the name property of the objects in the collection elements is a String, a list of Strings is returned:
elements.collect(e | e.name) // returns a list of Strings
Navigation through many objects is common, so a shorthand notation for collect() makes the expressions more readable. This is just as in OCL, so instead of using:
self.employee.collect(e | e.birthdate)
You can simply write this:
self.employee.birthdate
In general, when a property is applied to a collection of Objects, it automatically is interpreted as a collect() over the members of the collection with the specified property.
forAll
Often a Boolean expression must be evaluated for all elements in a collection. The forAll() operation enables you to specify a Boolean expression that must be true for all objects in a collection for the operation to return true:
collection.forAll( v | boolean-expression-with-v )
The result of forAll() is true if boolean-expression-with-v is true for all the elements contained in the collection. If boolean-expression-with-v is false for one or more of the elements in the collection, the expression evaluates to false.
For example:
{3,4,500}.forAll(i | i < 10) // evaluates to false
exists
Often you need to know whether there is at least one element in a collection for which a Boolean is true. The exists() operation enables you to specify a Boolean expression that must be true for at least one object in a collection:
collection.exists( v | boolean-expression-with-v )
The result of the exists() operation is true if boolean-expression-with-v is true for at least one element of collection. If the boolean-expression-with-v is false for all elements in collection, then the complete expression evaluates to false.
For example:
{3,4,500}.exists(i | i < 10) // evaluates to true
sortBy
If you want to sort a list of elements, you can use the function sortBy(). The list processed using sortBy is sorted by the results of the given expression.
For example:
elements.sortBy(e | e.name)
In the example, the list of elements is sorted by the name of the element. Note that no Comparable type exists in the expression language. If the values returned from the expression are instances of java.util.Comparable, the compareTo() method is used; otherwise, toString() is invoked and the result is compared.
Consider some more examples. (The following expressions return true.)
{'C','B','A'}.sortBy(e | e) == {'A','B','C'}
{'AAA','BB','C'}.sortBy(e | e.length) == {'C','BB','AAA'}
{5,3,1,2}.sortBy(e | e) == {1,2,3,5}
Ternary Expression
Conditional expressions come in two different flavors. The first one is the ternary expression, with this syntax:
condition ? thenExpression: elseExpression
For example:
name != null ? name: 'unknown'
switch
The second conditional expression is the switch expression, with this syntax:
switch (expression) {
(case expression: thenExpression)*
default: catchAllExpression
}
The default part is mandatory because switch is an expression; therefore, it needs to evaluate to something in any case. This is an example from GMF, found in GenModelUtils.ext:
String getClassifierAccessorName(genmodel::GenClassifier gc):
switch (gc.getEcoreClassifier().name) {
case "Class": "Class_"
case "Name": "Name_"
default: gc.getEcoreClassifier().name
}
;
Boolean expressions have an abbreviation:
switch {
case booleanExpression: thenExpression
default: catchAllExpression
}
Chain Expression
Expressions and functional languages should be as free of side effects as possible. But sometimes side effects are necessary. In some cases, expressions don’t have a return type (that is, the return type is Void). If you need to call such operations, you can use the chain expression, with this syntax:
anExpression -> anotherExpression -> lastExpression
Each expression is evaluated in sequence, but only the result of the last expression is returned. For example:
person.setName('test') -> person
This chain expression sets the name of the person first, before it returns the person object itself.
Create Expression
The create expression instantiates new objects of a given type:
new Topic
Let Expression
The let expression lets you define local variables. The syntax is as follows:
let v = expression : expression-with-v
This is especially useful together with a chain and a create expression. For example:
Topic newTopic(): let t = new Topic: t.setName('A topic') -> t
;
Casting
The expression language is statically type checked, although sometimes it’s necessary to perform a cast. The syntax for casts is very Java-like:
((String)unTypedList.get(0)).toUpperCase()
14.1.15 Xtend Language
The Xtend language is commonly used with Xpand templates to provide reusable operations and simple expressions by extending the underlying metamodels. Xtend is based on the expression language covered in the previous section and is also used for model transformation definition. We limit our use of Xtend in the scope of this book to its use in Xpand templates because we rely on the QVT OML for model transformation.
Xtend files have an .ext file extension and corresponding editor in Eclipse. They are typically arranged in libraries and imported by Xpand templates using the ≪EXTENSION≫ statement.
Xtend Syntax
The syntax for Xtend is simplistic because most of an extension file’s content is made up of the underlying expression language syntax.
Import
The import keyword is used at the top of a file and indicates the name space of different types used within the extension file. As usual, double colon (::) characters delimit elements in the namespace, and a semicolon ends the statement. For example, the following import statement imports our mindmap model namespace.
import mindmap;
No support exists for wildcard or static imports in Xtend, so the following examples are incorrect:
import org::eclipse::*; // incorrect
import mindmap::Map; // also incorrect
Extension Import
It is possible to import another extension file using the ≪EXTENSION≫ keyword at the top of the file. Again, fully qualified namespace declaration is required. Following is an example.
extension org::eclipse::mindmap::Util; // full path with no *.ext
If you want to export an extension used in a file with your own extensions, add the reexport keyword to the end of the extension statement.
extension org::eclipse::mindmap::Util reexport;
Comments
Comments in Xtend come in two flavors: single line and multiline. Single-line comments are like those in Java: two forward slashes (//) demark the start of a comment that goes until the end of the line.
// An example single line comment
A multiline comment is also like comments in Java, with /* marking the start and */ marking the end of comments that can span multiple lines.
/*
* A multi-line comment.
*/
Extensions
The basic syntax for an extension expression indicates an optional return type, extension name, parameter list, and expression body following a single colon and terminated with a semicolon. Following is the general syntax.
ReturnType expressionName(ParamType1 param1, …): expression-body;
Consider this simple example that returns a standard setter method name for a passed element:
String setterName(NamedElement element): 'set' +
element.name.toFirstUpper();
Extension Invocation
You can invoke an extension in two ways. The first is by passing the element instance as a parameter, as shown here:
setterName(myFeature);
The implicit first parameter represents the element instance, so we can use the “member syntax” to seemingly invoke an extension on the instance. This gives us more of the feeling that we’re truly extending the underlying metamodel. This is an equivalent example to the first:
myFeature.setterName();
Remember that even though we’re seemingly extending the metamodel, these extensions are not available using reflection and cannot be used for specialization of metamodel operations. During evaluation, an operation matched in the metamodel takes precedence in execution.
Type Inference
It’s not strictly required that a return type be declared because the type can be inferred from the expression and depends on its context of use. For example, consider this expression:
asList(Object o): {o};
When invoking this extension and passing an Integer, as shown next, it has the static type List[Integer]. So the use of upTo() is statically type safe.
asList(55).get(0).upTo(60);
Recursion
One exception to the rule regarding type declaration is with recursive expressions. Because the type cannot be inferred, it must be stated explicitly, as shown in this example:
String fullyQualifiedName(JavaPackage p):
p.eSuperPackage == null ? p.name:
fullyQualifiedName(p.eSuperPackage) + '.'
+ p.name
;
Consider another example from GMF’s xpt::editor::palette::Utils extensions:
private List[gmfgen::ToolGroup] collectSubGroups(gmfgen::ToolGroup
group):
let rv = group.entries.typeSelect(gmfgen::ToolGroup):
rv.addAll(rv.collect(g| g.collectSubGroups()).flatten())
;
Cached Extensions
If you expect to have an extension called multiple times for a given set of parameters, you might want to have the result cached for performance reasons. This is accomplished by adding the cached keyword to the expression, as in this example from GMF’s xpt::navigator::Utils extensions:
cached List[gmfgen::GenCommonBase]
getNavigatorContainerNodes(gmfgen::GenNavigator navigator):
getNavigatorNodes(navigator).select( n |
getChildReferencesFrom(navigator, n).size() > 0)
;
Private Extensions
If you do not want to expose an extension outside its file, you can add the private keyword, as shown in this example from GMF’s xpt::navigator::Utils extensions:
private List[gmfgen::GenCommonBase]
getNavigatorNodes(gmfgen::GenNavigator navigator):
let diagram = navigator.editorGen.diagram:
{ diagram }
.addAll(diagram.topLevelNodes)
.addAll(diagram.childNodes)
.addAll(diagram.links)
.addAll(diagram.compartments)
.typeSelect(gmfgen::GenCommonBase)
;
Java Extensions
Sometimes you need to call a Java method. The JAVA keyword provides the means by which to declare that a Java public static method is called. This is the general syntax for defining a Java public static method:
Type aJavaExtension(ParamType param, …):
JAVA package.Type.staticMethod(package.Type, …)
;
Following is an example from GMF’s xpt::EMFUtils extensions:
String toStringLiteral(String strValue):
JAVA org.eclipse.gmf.internal.codegen.util.EmfUtils.toStringLiteral(
java.lang.String)
;
Xtend Examples
The first example provides the same functionality we expressed in our mindmap model using OCL. Although the derived feature for rootTopics was created and annotated with OCL to provide the value, this snippet of Xtend completes the story by showing what otherwise we would need to do to accomplish the same thing if we had not “pulled up” the capability into our metamodel. This is an extension that returns the list of root Topic elements from a Map:
import mindmap;
cached List[mindmap::Topic] rootTopics(Map mindmap):
let topics = mindmap.elements.typeSelect(mindmap::Topic):
topics.without(topics.subtopics)
;
To compare, this is the OCL we added to the metamodel after creating a derived, transient, volatile rootTopics reference in our Map class:
let topics: Set(mindmap::Topic) = self.elements
->select(oclIsKindOf(mindmap::Topic))
->collect(oclAsType(mindmap::Topic))->asSet() in
topics->symmetricDifference(topics.subtopics->asSet())
Finally, this is the QVT we used in our transformation from mindmap root Topic to RequirementGroup objects:
var topics: Set(mindmap::Topic):= mmap.elements
->select(oclIsTypeOf(mindmap::Topic))
->collect(oclAsType(mindmap::Topic))->asSet();
var rootTopics: Set(mindmap::Topic):= topics
->symmetricDifference(topics.subtopics->asSet());
As you can see, the three are similar. Because QVT OML is based on OCL, it’s understandably the same syntax as the OCL annotation. And because Xtend borrows from OCL, it is similar except where without is used instead of symmetricDifference(), and where typeSelect() is used instead of select()->collect().
In the context of our mindmap2csv Xpand template, you can see the use of our rootTopics() extension here. In this case, only the root Topic elements of our Map will be written out in CSV format.
≪DEFINE csvFile FOR Map≫
≪EXPAND csvFile(title) FOREACH this.rootTopics()-≫
≪ENDDEFINE≫
Chapter 7, “Developing Model-to-Text Transformations,” has additional examples of Xtend and Xpand usage.
14.1.16 Workflow Engine
Although it is possible to invoke Xpand templates using Java and even Ant, the “native” method is to use the Model Workflow Engine (MWE) component of EMF Technology (EMFT). The workflow engine uses configuration files, which are Ant-like XML files executed using the Eclipse launcher. Note that this section concentrates on using the workflow engine in the context of Xpand templates only. Although additional capabilities exist, such as constraint checking and Xtend-based model transformation, they fall outside the scope of this book.
Properties
Workflow configuration files support Ant-like properties. The following example would set a model property that could be used as ${model} elsewhere in the workflow. The use of full URIs, such as platform:/resource/... shown here, is recommended practice.
<property name=“model”
value=“platform:/resource/org.eclipse.dsl.mindmap/model/Map.xmi”/>
Note that properties passed into a workflow invocation via Java or Ant override those defined in the workflow itself. This is a convenient means by which to develop and later deploy a workflow when the environment of execution changes.
EMF Setup
When using EMF models, configuring a bean element with the StandaloneSetup class is required in the workflow. A number of elements are available to be used within the StandaloneSetup component, as described next.
platformUri
This element points to the platform, and, in most cases, the value used is simply../, as shown in the following example. In a project in which the .ecore file is within a source path of the project and uses a local dynamic instance model as input, this is all that setup requires.
<bean class="org.eclipse.emf.mwe.utils.StandaloneSetup">
<platformUri value="../" />
</bean>
uriMap
The uriMap element enables you to specify a map from the package’s registered NS URI to another URI, such as a platform:/resource/... URI. For example, working with a mindmap instance model, not a local dynamic instance model that references an *.ecore model, you can map its NS URI to a workspace *.ecore model for resolution, as follows:
<bean class="org.eclipse.emf.mwe.utils.StandaloneSetup">
<platformUri value="../" />
<uriMap
from="http://www.eclipse.org/2008/mindmap"
to="platform:/resource/org.eclipse.dsl.mindmap/model/mindmap.ecore"/>
</bean>
RegisterGeneratedEPackage
Models in the environment that have contributed to the EMF generated_package extension-point can be referenced using the RegisterGeneratedEPackage element. The package element’s class attribute of the contribution is used as the value, as shown here:
<bean class="org.eclipse.emf.mwe.utils.StandaloneSetup">
<platformUri value="../" />
<RegisterGeneratedEPackage
value="org.eclipse.jem.java.JavaRefPackage"/>
</bean>
In this example, the Java EMF Model (JEM) is referenced by its generated_package, as shown here in its plugin.xml file:
<extension point="org.eclipse.emf.ecore.generated_package">
<package
uri="java.xmi"
class="org.eclipse.jem.java.JavaRefPackage" />
</extension>
RegisterEcoreFile
To explicitly register a metamodel using its .ecore file, use the RegisterEcoreFile element. In this example, the mindmap.ecore file is referenced from another project in the workspace:
<bean class="org.eclipse.emf.mwe.utils.StandaloneSetup">
<platformUri value="../" />
<RegisterEcoreFile value=
"platform:/resource/org.eclipse.dsl.mindmap/model/mindmap.ecore"/>
</bean>
Note that it is possible to use any valid URI scheme in the value attribute. For example, if you want to reference a file within a *.jar file, declare the path as follows:
<RegisterEcoreFile value=“jar:/file:/my.jar!/model/my.ecore”/>
ExtensionMap
If the EMF extension_parser extension-point is to be used to load a model, you can use the ExtensionMap element, as shown here. Also shown is the contribution from the corresponding model plugin.xml file.
<bean class="org.eclipse.emf.mwe.utils.StandaloneSetup">
<platformUri value="../" />
<ExtensionMap from="gmfgen"
to="org.eclipse.gmf.internal.codegen.util.GMFGenResource$Factory"/>
</bean>
<extension point="org.eclipse.emf.ecore.extension_parser">
<parser type="gmfgen" class=
"org.eclipse.gmf.internal.codegen.util.GMFGenResource$Factory"/>
</extension>
Reader
A Reader must be configured and populated with the input model instance for use in the Generator component. The default org.eclipse.emf.mwe.utils.Reader has a number of nested elements, which are covered next. At a minimum, a Reader is configured with a uri and modelSlot element to indicate where to load the model from and which slot to populate, respectively. Following is an example:
<component class="org.eclipse.emf.mwe.utils.Reader">
<uri value="${model}" />
<modelSlot value="model" />
</component>
uri
The uri element contains the path to the model to be loaded. As mentioned in the previous properties section, this is a path that is typically expressed using a uri value. It’s common to set a property to this value so that it can be substituted with a runtime parameter during deployment.
modelSlot
The modelSlot element defines the default model slot that is used in the expand element of our Generator element. Typically, the uri element is used to populate this slot with a model instance, as in the previous example.
firstElementOnly
Set this element’s value attribute to false if the input model has multiple root elements that require processing. The default for EMF models is to have a single root element, so the default value for this element is true, meaning that it does not normally need to be defined. However, sometimes multiple roots are present and should be passed to the template, as is the case in GMF when diagram and domain models are persisted in the same file.
Xpand Component
A predefined workflow component provided with Xpand is the org.eclipse.xpand2.Generator class. The use of this component is complemented by workflow properties, metamodel references, and model readers. Following is a basic configuration that was used to invoke our earlier template examples that produced CSV files from our mindmap model.

The comments throughout make this workflow example fairly straightforward. The bean element for org.eclipse.mwe.emf.StandaloneSetup supports the registration of Ecore models using URIs, generated packages, and those models in our project source path, such as our mindmap.ecore model.
An org.eclipse.mwe.emf.Reader is then configured to fill our model slot with our dynamic instance. In the Generator component that follows, this slot is referenced by name in the ≪EXPAND≫ element. Note that an ≪EXPAND≫ element in a workflow takes in its value attribute an ≪EXPAND≫ expression, minus the ≪EXPAND≫ keyword (as it is provided by the element name). Note also the assignment of the ID attribute. When we discuss the use of aspects with Xpand in Section 14.1.1, “Aspects,” you’ll see that this is a required attribute.
Before invoking the template with the ≪EXPAND≫ element, a metaModel is declared and uses the org.eclipse.m2t.type.emf.EmfRegistryMetaModel class. The outlet directs our template result to the out directory, relative to the project location. Each of the elements and their properties are described next.
metaModel
The metaModel element takes an ID and class attribute, with the default class being org.eclipse.xtend.typesystem.emf. for working with EMF models.
EmfRegistryMetaModel
expand
The expand element determines the template that is invoked and the model element that is passed. These are specified in the value attribute, which contains an Xtend expression that is the same as an ≪EXPAND≫ expression in an Xpand template, without the ≪EXPAND≫ statement itself. In the previous example, the Main definition is invoked in the mindmap2csv.xpt template file, passing the model slot, which is populated with our Mindmap.xmi dynamic instance.
Outlet
The outlet element of the Xpand generator component provides five attributes: name, append, overwrite, path, and fileEncoding.
Additionally, we set up outlet elements to direct the output of the template. We covered earlier the concept of named outlets, as shown with the RELATIONS_OUTLET and TOPIC_OUTLET declarations. Note that we are specifying that the output should be appended with append=“true” because the default is false. An overwrite flag is also available and is set to true by default. In our example, the default outlet points to the path /out, which is created in the root of the containing project (if it doesn’t already exist). ≪FILE≫ statements that do not specify an outlet write to the default location.
Postprocessor
Although it’s possible to write your templates so that they produce nicely formatted output, code formatters are available for most languages and can be invoked using the postprocessor element within the outlet element. It’s likely more important for your templates to be readable, so leveraging a formatter for your generated output gives you the benefit of both readable templates and generated code.
Xpand workflow provides two beautifiers, specified using org.eclipse.xpand2.output.JavaBeautifier and org.eclipse.xpand2.output.XmlBeautifier. You enter these into your Generator elements, as shown in the following example:
<outlet path="src-gen">
<postprocessor class="org.eclipse.m2t.xpand.output.JavaBeautifier"
configFile="config/org.eclipse.jdt.core.prefs"
</outlet>
The Java post-processor uses the JDT’s code formatter and picks up preferences as long as they are found in the classpath. To create a preferences file for use in your post processor, enable project-specific settings in Preferences ![]() Java
Java ![]() Code Style
Code Style ![]() Formatter and save the file into the path specified in your
Formatter and save the file into the path specified in your configFile attribute.
The XML post-processor provides default support for .xml, .xsl, .wsdd, and .wsdl file extensions. Use the fileExtensions attribute to add alternate extensions.
If you are generating something other than Java or XML, you can create your own post-processor by implementing the org.eclipse.m2t.xpand.output.PostProcessor interface. When deploying the provided or custom processors, be sure to include the required dependencies to your plug-in.
Aspects
To use the aspect-oriented features of Xpand or Xtend when invoking the generator, you need to configure them in your workflow. As you might recall from Section 14.1.12, “AROUND,” which covered using ≪AROUND≫ in templates, the workflow used to leverage aspects must be made aware of them. Following is the workflow file used to invoke the mindmap2csv.xpt template, including the advices defined in aspects::mindmap2csv.xpt:
<?xml version="1.0"?>
<workflow>
<cartridge file="mapsample.mwe" inheritAll="true"/>
<component class="org.eclipse.xpand2.GeneratorAdvice"
id="reflectionAdvice" adviceTarget="generate">
<advices value="aspects::mindmap2csv"/>
</component>
</workflow>
This workflow file simply invokes the original, as defined in the cartridge element. The GeneratorAdvice component is configured to use reflectionAdvice and targets our component with ID equal to generator, which is the ID attribute of the Generator component defined in the original workflow. The advices contributed are defined in the child advices element, which points to our aspects::mindmap2csv template.
Java Invocation
A WorkflowRunner class is provided to allow for invocation at the command line or from within an Eclipse application. The syntax for the command line follows, where –p lets you override properties.
java org.eclipse.emf.mwe.WorkflowRunner
–pbasedir=/base path/workflow.mwe
To invoke from within Eclipse, a Map of properties and a Map of slot contents are required, along with a String path to the workflow file. Following is the run() method signature:
public boolean run(final String workFlowFile,
final ProgressMonitor theMonitor,
final Map<String, String> theParams,
final Map<String, ?> externalSlotContents)
For example:
Map<String, String> properties = new HashMap<String, String>();
properties.put(“model”, modelURI);
properties.put(“out”, outputDirectory);
new WorkflowRunner().run(workflowFile.getPath(),
new NullProgressMonitor(), properties, null);
Note that the contents of the properties map override those defined in the workflow, and you can pass a model already in memory as a slot content. Also note that the ProgressMonitor and NullProgressMonitor shown here are workflow classes, not Eclipse platform classes.
Section 8.1.1, “Actions,” includes a complete example of Java invocation in a deployed plug-in.
Using Ant with Workflow
It is possible to invoke a workflow and pass it parameters using Ant. Following is a simple example to illustrate the basic configuration:
<target name='generate'>
<taskdef name="workflow"
classname="org.eclipse.emf.mwe.core.ant.WorkflowAntTask"/>
<workflow file='path/workflow.mwe'>
<param name='baseDir' value='/base/'/>
</workflow>
</target>to i
14.2 Summary
In this chapter, we looked closer at the Xpand template language, including its underlying expression and Xtend languages. We also learned how to invoke a template for generating text using the Model Workflow Engine.